- Home
- About
-
Shop
-
Sewing Patterns
-
Fabric
- Sewing Supplies
- Folkwear Clothing
-
- Blog
- Customer Gallery
- Contact

When we decided last month to feature our 203 Edwardian Underthings pattern, we agreed to make an outfit that shows how the three garments in the pattern can be used to make an outfit that is not just historic underwear. You can read more about how to style these wonderful pieces here.
Three of us in the office (Esi, Cynthia, and Molly) made these three garments from 203 Edwardian Underthings pattern. We chose a beautiful white embroidered eyelet type fabric for the drawers. I think I bought the fabric in NYC Garment District, and was saving it for a project like this (we have several romantic patterns in the Folkwear collection perfect for eyelet). For the petticoat and the camisole, we wanted something a little lighter-weight and the new organic cotton voiles that we carry now were perfect. We chose the lilac and blush colors - so sweet for springtime. They were the perfect weight and sheer-ness for this project!
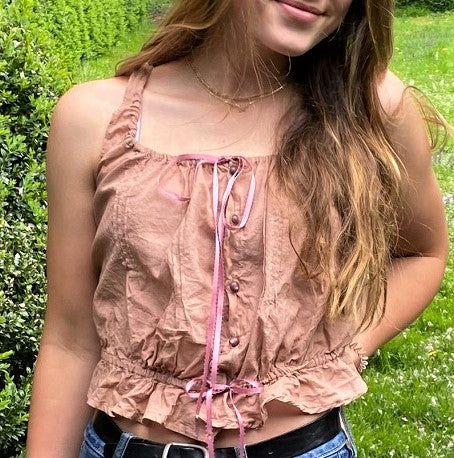
Esi made the camisole with the simple pintucks at the front and small gathers at the waist as the pattern instructs. Instead of eyelet lace or beading at the neckline for the ribbon, she just turned under the allowance to make a casing and threaded a ribbon through. Pretty little rounded purple-pink buttons finished it off.

The next garment to be made was the white drawers made of eyelet fabric. In the pattern, the drawers come to just below the knees, but we wanted them longer. We have seen the trend of these old-fashioned long drawers that look so stylish with every-day tops (and very romantic and chic). Cynthia lengthened the drawers at the hem line of the main pieces, and kept the ruffle the same length as indicated in the pattern. Because she used the edge of the eyelet that was already finished, she did not need to hem the drawers. She made the plackets from a lighter weight white cotton voile. And you can read about how to make the plackets here if you need a little tutorial to help get them done. There is a placket on each side of the waistband. This is a perfect place to put a pocket (if you can add a pocket to a placket), but also a perfect place for a Victorian type pocket.


Hands in plackets (not pockets)

This is a close up of the fabric ruffle. You can see the eyelet fabric edge and how this edges does not need to be hemmed.
Finally, the petticoat was made from the lilac cotton voile. I shorted in the skirt part of the pattern by about 4 inches. And I made the petticoat with the dust ruffle, which is optional. I wanted to add the dust ruffle just to give a little extra body to the bottom of the petticoat. It also makes a fun detail. Because the dust ruffle seam allowance is exposed on the right side of the fabric, you need to sew a ribbon or bias binding over the allowance to enclose it. I used scraps from the camisole to make bias binding to add a touch of color to the inside of the petticoat. I used the method we show in this video to make lots of bias binding fairly quickly and very easily.

The ruffle is sewn to the skirt about 6.5" above the bottom of the skirt and dust ruffle and covers the bottom. There are options to add insertion lace here and/or pintucks. I decided to add the pintucks, which were quite easy. The method taught in the pattern has the raw edge of the hem hidden inside the lowest pintuck. Quite ingenious and easy. As with the dust ruffle, the outer ruffle seam allowance is exposed on the outside of the petticoat. It can be covered with a ribbon for a more decorative finish, but I just made more bias binding from the scraps of fabric from cutting out the pattern.
The waist of the petticoat is just a casing on the inside with a ribbon to cinch. Again, I used bias binding made from the camisole scraps and for ribbon, I used a seam binding in my collection (which worked really well and was a pale pink), but ribbon, twill tape, or handmade bias binding would work well.

Here you can see the pintucks on the ruffle, the dust ruffle underneath, and the bias binding that finishes each ruffle.


These pieces are all adorable on their own, but quite stunning together. I hope you will give this pattern a try! It is sweet.


