- Home
- About
-
Shop
-
Sewing Patterns
-
Fabric
- Sewing Supplies
- Folkwear Clothing
-
- Blog
- Customer Gallery
- Contact
May 25, 2022
by Molly Hamilton
The 121 Guatemalan Gabacha has several authentic detailing options that can be used to decorate the yoke of this very cute dress (or apron). These techniques were used on the original dress samples Folkwear had, and were clever and simple enough that they were included in the pattern. So you can see the instructions for how to make these fun designs in the newly re-released (and re-sized, up to 54" bust) 121 Guatemalan Gabacha, but I am also going to show you how to do them here. You can also think about how these techniques could be used to decorate other sewing projects you have - blouses, shorts, table cloths, etc.
Trim
Trim plays an important part in finishing the handwork on the yokes of this dress. At least one yard of trim, such as ribbon, rick rack, or braid, is needed to cover the edges of the handwork. Trim can also be applied almost anywhere on the dress or apron. Six to eight yards would be enough to go around the neck and outer edges of the yoke, the pockets, and the top of the ruffle.
When choosing trim, consider contrasting colors or a matching trim to get the effect you wish. There is a lot of fun and creativity in adding decorations to the garment you are making. Let your imagination go wild!
Decorative Technique #1
This is the simpler of the two techniques. You will apply it to the yoke only. This technique should be applied after the yoke and yoke facing have been sewn together and before it is sewn to the dress. You will need about 1/8 yard (11.5cm) of extra fabric for this technique, and a little more if you cut the fabric on the bias.
First cut two strips of fabric 15.75" (40cm) by 3" (7.5cm) and press under 1/2" (13mm) on all four edges of each strip. Topstitch to secure.

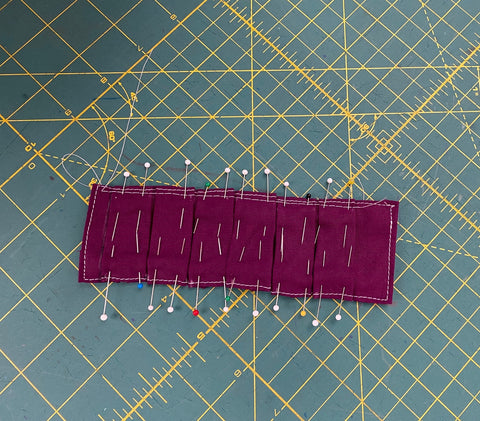
Make six 3/4" (2cm) full box pleats leaving 3/8" (1cm) on the right side and 1" (2.5cm) on the left side of one strip. To make the box pleats, mark off 3/8" and 1" at each end. Then mark every 3/4" (2cm) starting from 3/8" side of the strip. These marks will serve as a guide to make the box pleats. Be very accurate in order to keep the pleats even. I used chalk to mark on this fabric because the marks can be easily erased by rubbing, but I marked the end sections with an ultra washable marker (Crayola). Pin the pleats in place and press. Staystitch within the seam line.


Pin the pleated strip to the Front Yoke centering it between the sides of the Yoke and with the 1" (2.5cm) end flush with the seamline at bottom of Yoke. Topstitch the pleated strip to the Yoke (but not the yoke facing), close to the edges.


Now you can apply contrasting (or matching) trim around both sides and top of the pleats. Experiment to see what you like! Then, stitch the trim in place.


I'm just showing you what trim could look like, but I did not add any to this sample.
For the next step, use contrasting (or matching) strong embroidery thread and catch both edges of the first pleat in the center. I like to use 2 or 3 strands of DMC embroidery floss. Make three or four overcast stitches, pulling up the edges to meet, forming a tiny bow. Repeat for the remaining five pleats.


Repeat for the other strip and other side of the Yoke, and you are done! The yoke facing will cover all the interior stitch lines.
Video for this decorative technique #1:
Decorative Technique #2
This technique is a little more involved, but gives a really fun look to the dress or apron. It is perfect for using on a sleeveless summer version. You will also apply this technique after the yoke and yoke facing are sewn together but before the yoke is sewn to the dress. You will need about an 1/8 yard (11.5cm) of fabric for the bows, as well as an additional 1/4" yard (23cm) for the optional pleated ruffle.
Use the guide on the pattern tissue and transfer the markings for the diagonal slash lines to the Yokes. Draw a line between the triangle points to create a slash line and cut along the line to the triangles and then to each corner of the rectangle (along the triangle legs). Do this on the yoke and yoke facings.


Press the seams to the inside of the box, creating an opening that is 3/4" (2cm) wide. The length will vary by the size you are making.

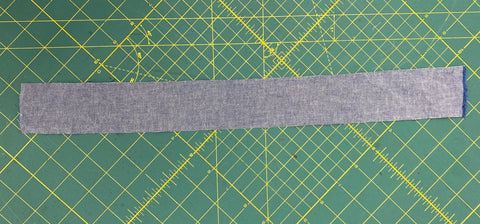
Now, cut a strip of fabric that is 2" (5cm) wide by 17½”/44cm long for XS-SM, 21”/54cm long for MD-LG, or 24½”/62cm long for XL-3XL. The length is not terribly important and you can make the strip longer if you want to have more small strips to use in the next steps. You can use the same fabric that you use for the dress or a contrasting or coordinating fabric. Use your imagination! Press under ¼”/6mm on the two long edges. Then press in half lengthwise and topstitch close to the two pressed edges.


Cut this strip of fabric into equal pieces that are about 1.75" (4.5cm) long. You should have about 10 pieces for XS-SM, 12 pieces for MD-LG, and 14 pieces for XL-3XL.
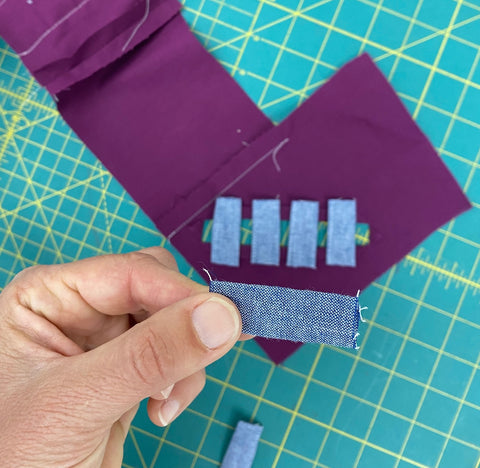
Pin half the pieces across the 3/4" (2cm) opening on the wrong side of one side of the yoke facing, spacing them evenly. You can choose to put as many or as few small strips as you wish here. Topstitch the strips in place 1/8" (3mm) from pressed edge of opening. Repeat for the other side of the yoke facing. Note: I am not using a yoke facing in this tutorial, just one side of the yoke for an example. The technique is the same, but you will be applying this treatment to the yoke facing after the yoke and yoke facing are sewn together.


Also note that you could press these strips so that the seam line is not at the bottom (as above), but is press in the center of the strips so it is not seen from the front.


Fold the front yoke over the front yoke facing, sandwiching the inserted pieces between the yoke and facing. Line up the edges of yoke and facing and topstitch around opening close to the pressed edges. Again, I don't have the yoke for this step in the tutorial.
Using a contrasting (or matching) embroidery thread, make 4 or 5 overhand stitches in the center of both edges of each small inserted strip, pulling up edges to meet, to form a tiny bow - similarly to making the bows in decorative technique #1 above.


You can stop here and add trim around the edges as in Technique #1 (and as I did), or you can keep going with instructions in the pattern for adding a pleated ruffle that I will leave below. If you are going to add the pleated ruffle, don't add the trim until the ruffle is attached.

Pleated Ruffle (optional): I don't show how to make the pleated ruffle in this tutorial, but if you want to add it, cut four strips of fabric 2" (5cm) wide by 12" (30.5cm) for XS-SM, 15" (38cm) for MD-LG, and 19.5" (50cm) for XL-3XL. With right sides of one strip together, fold in half lengthwise and stitch the short ends together with 1/4" (6mm) seam. Turn and press.
Make 1/4" (6mm) pleats across the length of the strip, or as wide as needed to have evenly spaced pleats to fit the length of the opening. Place the ruffle along the length of the opening, and pin in place with raw edge of ruffle approximately 1/8" (3mm) from edge of opening. Topstitch close to the raw edge.
Apply trim (ribbon, rickrack, lace, etc.) flush with all edges of opening and covering the raw edges of the ruffle and the stitching lines.
---------------------------------------------------------------
So, I hope you will try one of these decorative techniques. They are really quite easy to do and are fun to add to your 121 Guatemalan Gabacha dress or apron. Let us know what you make, if you try one of these, and what you think!
