Country

  • Log in
  • Cart (0)
  • Checkout
  • Home
  • About
  • Shop 
    • Sewing Patterns 
      • Folk Patterns
      • Vintage Patterns
      • PDF Patterns
      • Men's Patterns
      • Children's Patterns
    • Fabric 
      • Linen
      • Cotton
      • Silk
      • Wool
    • Sewing Supplies
    • Folkwear Clothing
  • Blog
  • Customer Gallery
  • Contact
  • Country

News

How To Sew Lace Insertion

March 24, 2021 1 Comment

How To Sew Lace Insertion

I am still working on my project goal of making our 227 Edwardian Gown from a gorgeous grey organic cotton voile and hand-dyed lace.  (Fabric and lace naturally dyed from Botanica Tinctoria.)  This is honestly the first time I have done lace insertion, and I am quite enjoying it.  It is not nearly as difficult as I thought it would be, but it is a lot more time consuming than I realized.  Hence, the dress is not finished.  

However, even though I haven't finished the dress yet, I want to show you the easy lace insertion technique that is used in this pattern so you can more easily do it on your own - for making this dress or the 205 Gibson Girl Blouse or 210 Armistice Blouse or in any project you want to do (napkins and tablecloths would be gorgeous and easy!).  

First, make sure your fabric and lace are pre-washed, or wash them before working on your project.  Wash them as you plan to wash you finished garment.  This is because if you wash you fabric and not your lace (or vice versa or neither), you can end up with lace that shrinks and fabric that does not and end up with a garment that is distorted or too small.  You do NOT want to go through all the work of lace insertion to have this happen.  My lace and fabric were pre-washed with very hot water during the dyeing process, so I don't need to worry about pre-washing/pre-shrinking either.

Another couple of tips:  make sure your machine is at a tension that works well for your fabric (you don't want it eating up your lace or making it tight); and if your fabric is very fine, you can use spray starch to help sew and use the lace.  

Also, make sure you have enough lace to do the project you have in mind.  Honestly, I don't have enough insertion lace for this project, but I am making changes to the design to make it work.  I bought out all the lace of this color that they had, so I had limits from the start.  Which is fine - I am making it work.

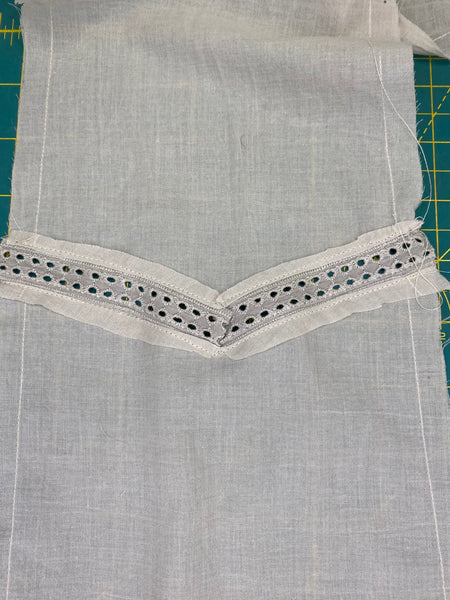
There are two types of lace used in this project. First is insertion lace.  This type of lace has two sides that are straight (or mostly straight).  This lace is "inserted" in the garment and becomes part of the fabric.  You need two straight edges on the lace to work.

grey insertion lace on a cardboard spool

The other type of lace is called pre-gathered (or gathered) or lace edging.  This type of lace can have ruffles (gathered/pre-gathered) or just lay mostly flat (edging).  But, both have one side that is mostly straight and one side that is scalloped or has some shaping to it.  

grey edging lace on a cardboard spool


Sewing on Insertion Lace

Usually, you start insertion lace on pattern pieces before they are sewn to any other pattern pieces.  Sometimes you sew over seams, but we'll get to that below. 

To sew insertion lace on your garment, you pin the lace down right on top of your garment piece where you want it to be - on the right side of your fabric.  For corners, make a mitered corner.  For curves, ease around the curve. And, don't cut your lace at the end.  This allows for some extra lace that might be needed by the end of sewing the lace down. 

grey insertion lace pinned to fabric.

Then sew along each edge of the lace.  For curves (and corners), sew the outside edge first.  I like to pin so that I sew on top of the lower end of the pins on the first edge, then pull them out as I sew long the second edge of the lace.  

sewing insertion lace down on fabric
    
Once sewn down, you can trim the lace even with the edge of the fabric.
  
  
Now comes the slightly scary part (but only the first time).  You will flip the fabric piece over and cut right down the middle - between the two seams you just sewed.
 
Cutting the fabric between the seams of the lace insertion.
  
Once you cut all the way to the other end of the fabric piece, you should clip at corners and at the outer edges of any curves.
 
Clip to corner of lace insertion on back of pattern piece.
 
Now press the seams open.  The fabric should press to the outside of the lace.
 
Seams pressed open on lace insertion 
Now, flip the fabric over and topstitch on each side of the lace.  This will catch the fabric edges to keep it from falling into the open lace area.  Be sure you are top stitching on the outside of your original stitching when you stitched the lace down.  Sometimes I will edge stitch here.
  
Topstitching lace insertion
         
lace insertion sewn down and topstitched
  
You can see above that once the seams are topstitched, there is a bit of fabric sticking out of each edge. This needs to be trimmed, especially on garments with fabric that is so sheer like this voile.  I trimmed some of my seams with my large fabric sheers.  I do not recommend this.  Of course, I thought I could get away with it, but I nicked my fabric a couple of times and find that frustrating.  If you do nick your fabric, you can hand sew or machine sew a tight zig-zag over the nick to cover it.  It might be see, but doesn't have to be a bit deal.  You can also cover the nick with another piece of lace insertion.  I did this on the yoke of the bodice and skirt with lace going perpendicular to the first lace.  I was able to situate the perpendicular lace over the nick and then not worry about it.   
  
Trimming the fabric on side of lace insertion
  
But an even better solution is to use a pair of scissors meant for this kind of work.  Duckbill scissors, or the kind used for applique are much better.  These are Tula Pink's 4" mini duck bill scissors.  They trim right up to the topstitching and are curved so it is harder to nick the fabric.  
  
Tula Pink mini duck bill scissors in front of lace insertion cloth
       
Trimming lace edges with duckbill scissors
You are done with the basic lace insertion!


Lace Insertion Over Seams

The 227 Edwardian Gown is lovely in so many ways, but one of the neat things about the dress is that you don't have to finish many of the seams because they are covered by lace insertion.  To put insertion lace over a seam, it is very similar to over any other part of the fabric or garment.  

First, sew your seam - do not do French seams or finish you seams.  Just sew with a 1/2" (in the case of Folkwear patterns) seam allowance.  Then, trim your seams to 1/4" and press open.  Trimming the seams is important because it will reduce bulk in the seam for the insertion lace, but it also allows the insertion lace (in this case 3/4" wide) to cover the seam and seam allowance that is pressed open.  In other words, trimming your seam keeps extra fabric from peeking out behind the lace insertion.  Center the insertion lace over the seam and continue as you would above.  There may be a little more bulk in the insertion lace seam when you press it and topstitching it due to the seam allowance.  You can trim some of this out before pressing and topstitching if you like.  
      

Lace Edging with Insertion Lace

On some seams in the 227 Edwardian Gown, the pattern calls for lace edging to be used as well as insertion lace.  You can, of course, choose not to use lace edging (or pre-gathered lace) but I will show you how to use it below when it is used on a seam allowance.  If not used on a seam allowance, you can proceed as below ignoring the seam.  Just decide where you want it, and place the edging lace down first.
On a seam allowance, place the lace edging with the straight side over the seam allowance, but stitching approximately 1/8" (3mm) from the seam line (offsetting onto the side you want the lace to be). 
  
lace edging pinned down to seam allowance.
     
   
One the lace edging is sewn down, you can place the insertion lace on top, off-setting it so that the great portion of lace lies to the side of the lace edging (off to the left in the photos. This will place the insertion lace over the seam allowance.  Sew it down as above.  When cutting the seam open, there will be a bit more bulk because of the lace edging.  You can trim it before pressing it down, or leave as is.  It is up to you.
  
 Insertion lace and edging lace on voile for dress bodice
  
Now that I have written about lace insertion, you can see that each time I put a piece of insertion lace down, it takes me sewing over the lace 4 times, pressing it once, and cutting 3 times (center cut and trimming seam allowances).  And you can understand why the dress is not finished.  While lace insertion is fairly easy, it is time consuming.   

But, I hope you will try it!   Edwardian fashion and gorgeous laces are timeless and beautiful and this pattern is a great place to start (so is 205 Gibson Girl Blouse or 210 Armistice Blouse).  This is a great and fun sewing skill to have and use.  Tell me . . . will you try it now?  Or if you've done it before, what are some of your sewing tips?


Tweet Share Pin It Email

1 Response

Patti Schulz
Patti Schulz

April 01, 2021

I have always admired lace insertion and thought it must be difficult to do. Thanks for clearing that up. I think I can do it!

Leave a comment


Also in News

A smiling woman stands before a grey wall and is wearing a light colored silk slip dress. She has her hands up behind her head.
219 Intimacies Pattern: Making a Vintage Style Slip

March 21, 2023

Continue Reading

Making 219 Intimacies Teddy into a Romper: Part 2

March 15, 2023

Continue Reading

Make the 219 Intimacies Teddy into a Romper!  Part 1
Make the 219 Intimacies Teddy into a Romper! Part 1

March 13, 2023

Continue Reading

More Info
  • Stockists
  • Wholesale
  • Policies
  • Search
Sign up for our newsletter

Sign up to get the latest on sales, new releases and more…

Contact Us

info@folkwear.com

P.O. Box 732, 1185 Charlotte Hwy, Unit G Fairview, NC 28730

828-628-2049