- Home
- About
-
Shop
-
Sewing Patterns
-
Fabric
- Sewing Supplies
- Folkwear Clothing
-
- Blog
- Customer Gallery
- Contact

by Cynthia Anderson
Creating our own trim is something we generally do not consider taking the time to do as modern sewists. With all the lovely ribbon, laces, and trims available on the market, it hardly seems necessary. There are times however, when finding the right embellishing trim may not be feasible or the perfect trim simply does not exist. Plus learning to make your own trim embellishments is a tradition that is fun and connects us to generations of past makers whose creativity and techniques are good to learn from.
Until recent history, making your own trim was done by hand. The techniques found in the our 123 Austrian Dirndl Pattern have long been a part of European trim, or ruching, making traditions and culture that continue today. These trim techniques are synonymous but not limited to the dirndl. The dirndl may be the traditional dress of Austria and Southern Germany, but this popular silhouette makes a beautiful everyday summer dress as well. Whether you embellish it or not, is up to you. Though resisting these trims may prove difficult.
The 123 Austrian Dirndl comes with a plethora of extra information and history to help inspire anyone interested in not only making the dirndl, but the authentic trims. You will find seven different ruching trimmings to try. All the trims are stunning on their own and can be combined in numerous ways, or masterfully paired to make one fabulous trim (as in the photo above). Upon closer inspection, it is not hard to imagine all the different types of projects that these ruching trims could be used for. These techniques are fun and easy to master and so beautiful! You can also find all the information you need in the PDF version of the 123 Austrian Dirndl.
Materials
All the ruching techniques offered in this pattern start with a tube of cloth or ribbon, that is then hand-stitched in various ways and pulled up to form a repeated motif. Tubes cut on the bias are generally preferred, because fabric cut on the bias naturally allows for bending into curves that lay smoothly. This is especially true when applying trim to necklines, armholes, or any curved shape or edge. Detailed instructions on how to make a continuous bias strip or tape are included in the pattern. You can also view this extremely helpful video we made on how to make lots of continuous bias tape.
In this blog I will be demonstrating the Holflaten, also called a Whole Folds or Box Pleat Ruching, and the Rosenrushe or Rose Ruching. These rushing techniques start with making a tube cut on the bias or straight grain. The fabric I am using here is cut on the straight grain to economize fabric and for the ease of time.
Ribbon can be used for making many straight grain techniques as well. Silk ribbon cut on the bias is especially nice when bias is required. You can find beautiful bias hand dyed silk ribbon by Hannah Silks on Etsy.
That's not all, the Herzrusche or Heart Ruching will be demonstrated using a sateen finished ribbon, because everyone should be inspired to make this beauty!
Getting Started
First you need to determine the width and length of your tube, or ribbon, if you have a specific purpose in mind. When deciding on the width, simply experiment to see what proportions you like depending on application. Your final widths for the tube, or ribbon width, can be between 1/2" to 1-3/4", depending on the look you want and the weight of fabric, or ribbon, you are using.
To make a fabric tube for the trim, cut your fabric two times as wide as the final tube plus 1/4 inch (6mm) for seam allowances. For example, for a 1-inch (2.5cm) tube, cut bias strips 2 inches (5cm) wide plus 1/4 inch (6mm), or 2-1/2 inches (6.3cm) in total width.
Keep in mind that the fabric weight. Heavier weight fabrics generally work best for wider trims that do not require fitting along tight curves or shapes. Lighter and finer weight fabrics work best for more narrow trim widths and will allow for fitting along tighter curves or shapes.
The length of bias you will need to make your ruching also depends on how heavy your fabric. It is best to experiment with scraps before cutting your bias strips to help determine width and length. Below are the approximate length calculations for the ruching designs used in this blog.
For demonstrating these rushing techniques, I have cut a strip of laundered silk dupioni on the straight grain approximately one yard (.9m) long. Laundering silk dupioni reduces the shine and softens the fabric. This length is plenty for experimenting. Since we are merely experimenting, a one-yard length can be used for more that one technique and then cut apart if desired. Cotton muslin is perfect for experimenting in making ruching either on the straight grain and/or bias as well.
Make a Ruching Tube

Fold the strip of fabric in half with right sides together, matching and pin the edges every two to three inches (5.75cm), then sew a 1/4 inch (6mm) seam allowance. If working with a bias cut tube, try not to pull or stretch while pinning and sewing or the tube will not lay flat when turned, which will cause pleating difficulties.

Press the seam open. If experimenting go ahead and press the edges creating a crease. However, on some ruching, you may not want a crease in your fabric and want rounded edges. You can finger press in those instances.

Next turn the tube. To help turn the tube right side out, thread a cord or yarn through the tube with a safety pin. Pin the cord/yarn to the end of the tube and use the cord pull back through.

Or stitch across the cord/yarn to hold it securely in place and use the cord/yarn to pull back through.

Try to keep the seam allowances open inside the tube. As you pull the tube right side out, it will help to pin the seam allowances in place as you go.


Clip off the end with the cord/yarn or remove the stitches to release the cord/ yarn.

To make experimenting easier, you can press the tube creating creased edges. Be sure the seam is in the center back (underneath side) of the tube and not at an edge. Placing the seam at an edge hampers folding.
Note, that when making a final strip of ruching you may prefer the look of gently rounder edges instead of pressed edges. Once you get the hang of making ruching using a tube, try avoiding pressing the edges, so you can compare the effects.

Now that the tube is complete, lets make some ruching.
Holfalten, or Box Pleat, Ruching
To make the Holfalten (Whole Folds) Ruching the tube is pinned into box pleats, then stitched down the middle of the tube to secure the pleats in place. Box pleating ruching is lovely on its own. However, we will use this technique for the foundation in making the Rosenrusche Ruching below.
Begin by working on the underneath side, or the side with the center seam. Notice the center seam in the photo below.
To make using a 1-inch (2.5cm) wide tube, place spacing pins 2 inches (5cm) apart with 1 inch (2.5cm) between the spaces.

The red tip pin indicates the center point between the two white tip pins spaced 2 inches (5cm) apart. The far left pin indicates the 1 inch (2.5cm) space. Don't worry about the 1 inch (2.5cm) pin for now.

Starting at the right hand edge, fold so that the 2 inch (5cm) spacing (white tip) pins meet in the center (indicated by red tip pin) of the 2 inch (5cm) space. This automatically creates two 1-inch (2.5cm) underfolds which will extend under the 1-inch (2.5cm) spaces, which will become the top folds or box-pleats.

Notice the underneath side fold and seam below.

View of top fold below (notice there is no center back seam, and the box pleat is seen on the front side).

Repeat making as many box pleats as you want. The idea is to make the box pleats the same width consistently. If you find folding and measuring with the fabric fiddly at first, practice using a strip of paper instead.
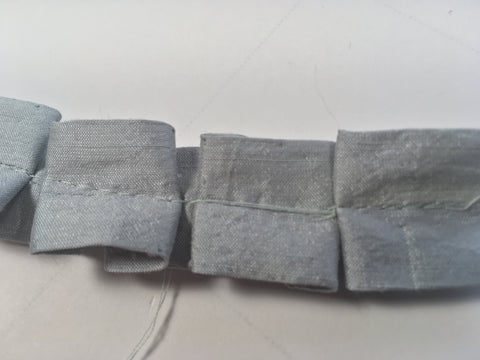
Below is a view of the box-pleats seen from the back or underneath side. Notice the seam.

Below is a view of the box-pleats flipped over to the front side.

Stitch by machine, using a long stitch length through the center of the tube to hold the folds in place. Now, the box pleating is finished to be used alone or transformed into the Rosenrusche or Rose Rushing as instructed below.

Rosenrusche, or Rose Ruching
This trim may look more like bows than roses, but is simple to make and quite decorative. To make the Rose Ruching you will need to start with the box-pleat ruching as the foundation. The roses are created by matching the center edge of each box-pleat and stitching them into place.
Start with a knotted double threaded hand-sewing needle, long enough to use continuously as you work.
On the underneath side, bring double threaded needle up through the center of the square at the center stitching on the front side of the box-pleat.

Then make two small stitches, one on each side of the center point.

Draw these points together and stitch down through center to the underneath side, to anchor these stitches.

Come up again from the underneath side, to the front side through center of stitching.
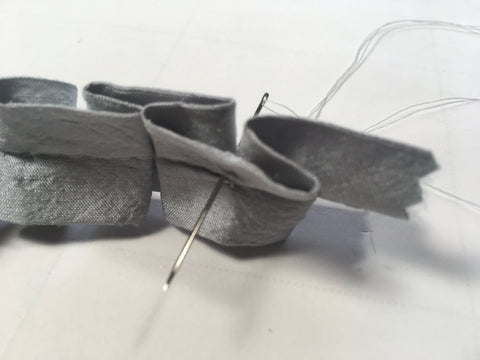
This time, catch both edges at the center of the box-pleat with the needle and thread, pulling them together. Secure the edges with a couple of small stitches, knotting at the second stitch to secure. Follow the sequence of photos below.


To continue using one continuous thread, part the gathered section at the base of the rose and send the needle back through the center front to the back or underneath side.
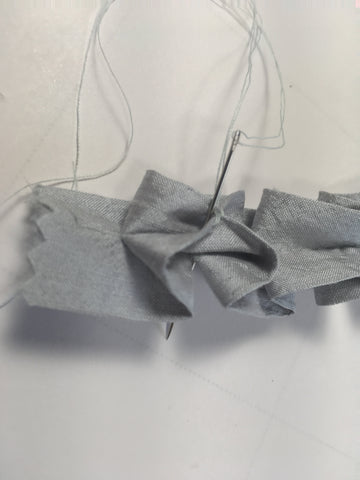
While still on the underneath side, start the next rose by drawing the thread over the box-pleat as seen below. Then pass the needle and thread through the center fold on the underneath side, coming up through the center of the box-pleat on the front side. Below is a view of the continuous thread stretched across the underneath side and inserted into the center of next box pleat.
Repeat until you have finished turning the box-pleats into rose ruching.

Herzrusche, or Heart Ruching
This trim looks a bit like the flower known as bleeding heart, but not so much like a traditional Valentine heart. It is amazing how by simply drawing fabric up on itself, such a lovely soft three-dimensional effect can be created. This technique is worked on the underneath side, so be sure turn your work over from time to time, and inspect the beauty happening on the front side!
The Heart Ruching can be made using a fabric tube or ribbon, on the straight grain or bias. A satin finish ribbon is being used for this demonstration. The sheen of the ribbon reflects the light, creating an enchanting effect.
Start by making the stitching guides. Lightly mark these guides with pencil on the underneath side of the ribbon. Measure the points one-inch apart along the top and bottom edge of the ribbon, keeping the points perpendicular. Then mark the center between the one-inch points with a lightly drawn "x" as seen below.
Use a long thread so the stitching can be as continuous as possible.

With the underneath side up, pinch the two edges of the ribbon together, matching the drawn points and tack the edges together with a couple of stitches. Knot the last stitch to ensure the edges stay securely together.


Pass the eye of the needle through or under the stitched edges from right to left. Passing the needle through backwards helps prevent nicking or catching the ribbon with the needle.

Turn the needle around and create a horizontal stitch at the center "x", inserting the needle from the right to the left as seen below.

Pull the needle and thread left all the way through the stitch.

Now, pull the thread in the opposite direction (to the right), drawing it up, until the center stitch meets the first stitch, forming a small pinched triangle on the front side. The idea is to pull, drawing the center stitch to the already stitched edges.

Hold the two combined stitches firmly, with the edges folded downward with your fingers, then make a couple of stitches to secure the edges together. Knot the final stitch to hold.

Remember, all of the work thus far has happened on the underneath side. In order to see the how the final ruching is looking, turn your work to inspect your progress. The photo below depicts how the small pinched triangle on the front side should look.
Note: Keeping the spacing equal and tension even on the overlaying thread is the key to mastering this technique.

Again, turn so the underneath side is facing up. Pinch, matching the next set of edge dots; notice when starting to make this second edge stitch, the thread is continuous and carried from the right to the left, with the thread stretched between the first set of combined stitches and the start of the second edge stitch. See second photo below.

Look closely at the free floating horizontal thread connecting one finished set of stitches with the beginning of the next set of edge stitches.

Be sure to gently pull the thread just enough to allow the trim to remain horizontal before stitching the edges together. If you pull the thread too much the ribbon will gather up on itself. The idea is to keep the ribbon ruching laying relatively flat.
Repeat tacking the two edges together as before, continue drawing up the center "x" stitch and drawing it to the edge stitch, and securing it in place. Continue, repeating the steps until you have as much ruching as your heart desires!


