- Home
- About
-
Shop
-
Sewing Patterns
-
Fabric
- Sewing Supplies
- Folkwear Clothing
-
- Blog
- Customer Gallery
- Contact
November 15, 2020
I feel that the 148 Black Forest Smock and the 110 Little Kittel are under-appreciated Folkwear patterns. They are fun to make, and really quite easy, with lots of options for special customization. Embroidery can be added to the neckband, cuffs, pocket openings, and/or shoulder yokes. And, the patterns include embroidery designs to use! Different fabrics combined for fun color blocking. And, the smocks make a simple silhouette that is easy to wear and can be made formal or informal depending on fabric - and made into a dress or shirt, depending on length!
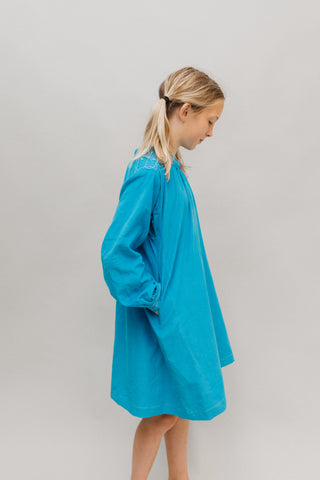
I made the 110 Little Kittel for my daughter a few years ago from a beautiful blue corduroy. I really wanted to add embroidery, but did not have time to do hand-embroidery, so I tried out some stitches on my machine to simulate the embroidery designs included in the pattern. It was not hard at all and a lot of fun to figure out which stitches to use (and finally use some of those stitches my machine can do, but I never use). If you use your sewing machine to embroider, make sure to use a stabilizer on the back side of the fabric - interfacing or a tear-away stabilizer will work fine.


This past week, I decided to make a 148 Black Forest Smock for myself. I wanted to make a simple smock (no embroidery) made into a short dress that I could wear with boots for winter. I had a great, warm brown fabric in my stash, but it was a knit. I decided that the medium-weight knit might be perfect for this pattern and it would be fun to see how it could work out. And, then I could show you how to do the same!
The fabric is some combination of wool and/or mohair and synthetic. It is thicker and heavier than a jersey and is a 2-way stretch, with over 50% stretch. It is probably easier to use a knit with a little less stretch, but this fabric worked just fine.
There were only a few adjustments I made to the pattern to work for a knit fabric, and I am outlining those below. I followed the instructions in the pattern for everything else. I did not cut the welts (noted below) and I did not cut or use the shoulder yoke facings (only cut and used one set of shoulder yokes and did not face them). I used a serger for sewing most seams; exceptions are outlined below as well. If you don't have a serger, just use a zig-zag or stretch stitch for seams. I cut the smallest size, and since this pattern has a lot of ease, and I would be making it from a knit, this was perfect. This is a traditional-style garment and one of our oldest patterns, so the sizing and construction is a little different from typical modern construction. It is fairly easy to size the pattern up by adding to the front and back side seams and to the sleeve seam, as needed.

Pockets
First, I cut all the pattern pieces as I would have for a woven fabric, except that I did not cut the welts for the pocket.
But, I cut all the pocket pieces with an extra long section where it joins the smock so that I could use the technique for welt pockets that is a little easier to do and does not require an extra welt piece. I added about an inch extra to the part of the pocket that juts out to join the body of the garment.
The first step in making the smock is to add the pockets. To do this one-welt pocket without the welt, I started by putting the two pocket pieces (front and back) together over the pocket opening. I've marked the corners of the welt pocket and the opening on the side piece with a purple marker. Then, I centered the pocket pieces over the opening and lined up the edges of the pocket with the opening line of the pocket.

I sewed, with a regular sewing machine and a straight stitch, along both long edges of the welt pocket, starting and ending at the corners of the welt pocket (marked with purple).

Then, I cut the welt pocket opening to 1/2" of the ends and snipped to each corner (don't cut the pocket pieces, just the side panel piece, as seen below). Note that the side panel is facing up in the photo below, and the pocket pieces are on the other side.


April 15, 2024 1 Comment on Making the Black Forest Smock with Knits
