- Home
- About
-
Shop
-
Sewing Patterns
-
Fabric
- Sewing Supplies
- Folkwear Clothing
-
- Blog
- Customer Gallery
- Contact

This is day ONE
To learn how to make the piping, click here
by Cynthia Anderson
Today we are starting a three-day sew along for our 503 Poriet Cocoon Coat! This coat has a simple construction, yet it is unique and it can help to have some extra instruction and photos to show you how the coat comes together. As well as how the details can be more easily implemented in the coat construction.
Folkwear’s 503 Poiret Cocoon Coat Pattern is one of Poiret’s most iconic designs. Poiret drew his inspiration from the theatre and Eastern Asian culture to create a coat that is just as much a show stopper today as it was in the early 1900’s. Poiret understood the French Public’s desire to see and to be seen as part of the new avant garde, whether at the theatre, a cultural event, or art galley exhibition. Poiret saw his clothing designs as an extension of the wearer’s experience, allowing them to be part of the drama and to participate in the spectacle of being seen. We may owe “Red Carpet” phenomenon to Poiret!
Check out the How Poiret Made History and the Cocoon Coat blog to learn more.

Poiret brilliantly introduced all his designs in the most luxurious and beautiful fabrics of the day, using radical and exuberant attention-getting color combinations. He was not afraid of pairing clashing and bold colors, which only added to the excitement that embodied his bold new approach.
Poiret’s use of layering details also added to his unique aesthetic. He used embroidery, beadwork, appliqué, avant garde painting techniques, and even the more crude aesthetic of stenciling on fabric. Fur trim was often used in radical ways, as in the Lamp Shade Dress. This level of innovation set his reputation as an artist, encouraging Poiret to crown himself the King of Fashion. His willingness to push boundaries seemed to elevate each new design to a wearable work of art.
To help you make the Folkwear 503 Poiret Cocoon Coat even easier, it’s construction is broken down here into three easy to follow sewing days. None of this is difficult, but it is always fun to have a bit of help and learn a few tips along the way.
The Sew Along Schedule:
Day One: The first blog is is simply to help inspire you, provide suggestions on fabrics to use, and getting started with the basic layout and construction. You can make a lining too.
Day Two: How to add the neck band and optional pipping.
Day Three: How to finish the coat by adding the lining, adding the optional decorative ribbon, hemming the sleeves, and adding a finishing closure touch.
Sizing
First, see the size chart below (or linked) to determine your correct size and the yardage that corresponds to your size. Take note that there is quiet a bit of ease built into the pattern, allowing it will fit larger sizes than the pattern indicates.
Use the "Lengthen and Shorten" line if you need to adjust the length. See the “Fitting Your Pattern” in the instructions inside the pattern for more details.

Choosing Fabrics
The same fabrics that made the Cocoon Coat such a head turner when it first introduced, are still excellent choices today. Poiret understood the dramatic effect of using velvet and silk to not only create a sense of enveloping luxury, but in how beautifully these fabrics made the light dance making the wearer appear illuminated. You can make the coat using a double layer of differing silk weights or a combination of velvet with a silk lining for a truly decadent coat or robe. For best draping results mix any combinations of medium to heavy-weight fabrics such as velvet, silks, rayon, or jersey. Typically, use a heavier weight fabric for the coat and a lighter weight for the lining. Have fun and use different textures and colors combinations for outer coat fabric and lining fabrics for stunning results.
Fabrics like Polar Fleece would make a unique and fun garment for lounging about or giving an outdoor activity a new twist. Just imagine wearing a cocoon coat made of polar fleece and lined with silk to a football game or socializing around an outdoor fire pit with your friends and neighbors. Rip-stop-nylon would turn the Cocoon Coat into a unique windbreaker or beach cover up.
Any fabric that has a nice drape is an excellent choice. Besides the usual offering in cotton, wool, and linen, consider fabrics like a soft corduroy in a cotton blended. Look for cozy cotton and wool blend flannels. Silk/cotton organdy or a gauzy open weave fabric to make a truly unique cover-up for warmer weather, especially if you leave it unlined.
Follow in Poiret’s footsteps by using the Folkwear 503 Poiret Cocoon Coat Pattern to show off your skills in embroidery, quilting, dyeing, appliqué, or hand painting. Or use Pre-embroidered fabrics, metallic fabric, and quilted fabrics. This coat makes the perfect canvas for making your own wearable work of art and honoring the creative genius that inspired fashion history.
Note that fabric less than 45-inches (114 cm) wide will not work for this pattern because the pattern pieces are too large to fit on smaller width fabric. Just keep this in mind when choosing a fabric.
Getting Started
To get started in making your own 503 Poiret Cocoon Coat you will need:
For this sew along, I will be using silk duponi as the coat body fabric, a cotton/linen sheer woven fabric for the lining, and a striped cotton/rayon velvet for the collar.
Note: I like to use the selvage when possible, especially when using a delicate fabric. For this coat I am using the selvage of the fabric to help create a sturdier center back.

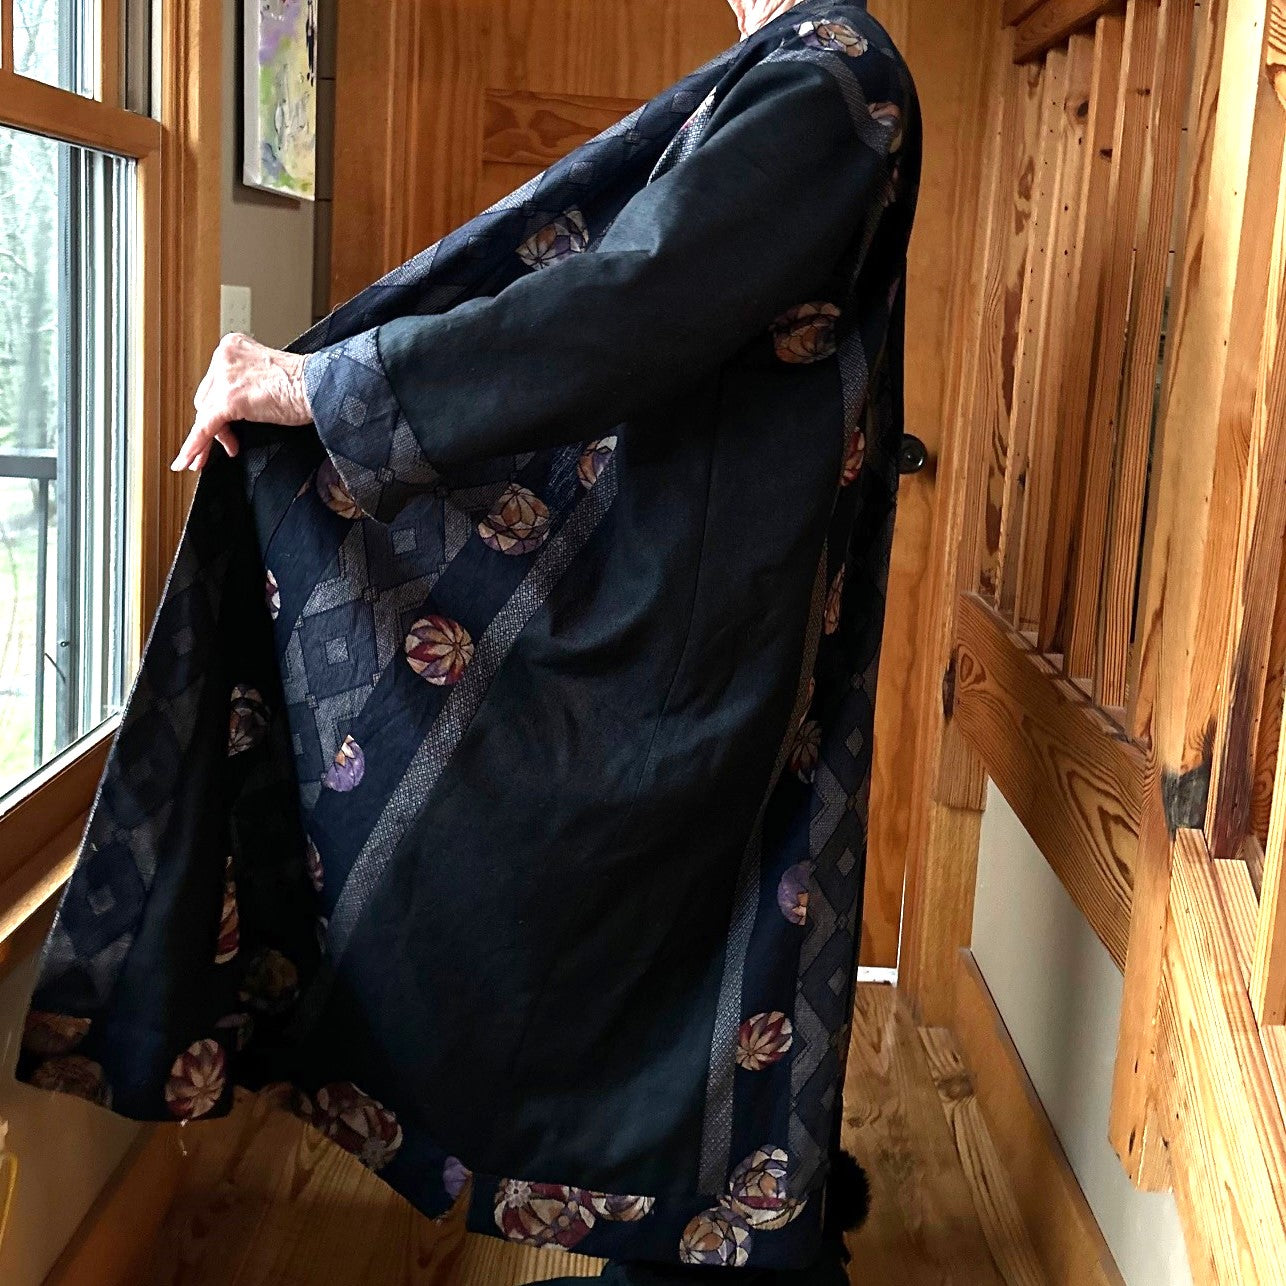
The Basic Construction
The Cocoon Coat is deceptively simple to make, but it is help to be familiar with the layout and construction before getting started. The main body is comprised of two pieces cut from Coat Body A. Pattern Piece A includes portions of both the front and the back of the coat. It helps to know there are no side seams in this coat design, instead the two Coat Body A pieces are stitched together at the center back seam. The sleeves are created by folding them in half and sewing up the seam. The front pieces overlap equally to create a simple balanced closure.
Cutting the Pattern and Fabric
You will need a large area to lay out the fabric and pattern for cutting - a large table or the floor.

Helpful Hints
To avoid disappointment please read the information below before cutting the fabric out.
Laying Out Fabric With a Directional Considerations
If you are using a fabric with a directional nap like velvet or corduroy, be sure that both pattern pieces are laying on the fabric in the same direction. Note: If one of the pieces is flipped up-side-down then the nap will go in opposite directions on each side which will look odd.
If using a fabric with a large directional (printed or woven) repeat design you will likely need more fabric to allow you to match the design. Due to this particular coat design, you should try to match the pattern at the back seam. And honestly, you could cut the coat without a back seam if you have fabric that is wide enough. You may also find it helpful if to trace two copies of pattern piece Coat Body A. Having two pieces to work with will help take the guess work out of matching the pattern design of the fabric or aligning the pattern.
For help in understanding how to matching large repeat design patterns… See the blog: Helpful Hints in Making the 122 Folkwear Hong Kong Cheongsam.
Cut fabric for main body of the coat, lining of the coat, and collar. Be sure to transfer all pattern markings from the pattern to the fabric with temporary markings or tailor's tacks.
STEP ONE: Coat Body
Note: You will use the same Coat Body pattern piece for the main coat as for the lining, and repeating the same steps are below. I am going to make a lining, but will resist providing photos since I would simply be repeating the process.
Darts
Start by making the darts at the neck of the coat. Transfer the lines, dots, and circle provided on the pattern to the wrong side of the pattern piece of the Coat Body.

Working on the wrong side of the fabric, fold the fabric so the lines match. Use pins to align and match the lines and to hold the fabric securely in place. At the neck edge of the Coat Body A, start the stitching at the dot with a backstitch, continue stitching using the line as a guide, ending at the circle point with a long thread tail. Tie off the thread tail with three knots.


Press the dart away from the center back.

Center Back Seam
With right sides together, pin and stitch the coat bodies together along the Center Back seam, matching notches 1 and 2.


Press the seam open. Notice the selvage was used to create strength in the center back seam.

Repeat for lining.
Sleeves
Fold the sleeve in half lengthwise (perpendicular to the sleeve hem). Stitch the sleeve seam, matching notches 3 and 4. Clip the curves and press the seam open.
Repeat on opposite sleeve.


Repeat for lining.
I hope you have enjoyed the easiness of the construction of the 503 Poiret Cocoon Coat so far.
In the next Sew Along blog we will cover how to make the collar and learn how to add the optional pipping, plus a few more tips and hints.
FYI: The Folkwear 503 Poiret Cocoon Coat Pattern and PDF are both on sale until Oct. 31. Thanks and see you again soon!


Alwyn
July 29, 2023
it would be super helpful if there were more pictures of attaching the collar, and folding the sleeves before that, than all the information about piping and trim. The instructions for attaching the collar are quite confusing.
In fact the most common remark on all the blogs about this pattern is the difficultly with the folding for the sleeves, and the attaching of the lining. It would appear you are attaching the collar and then the lining without any kind of hemming or overlocking either. A bit confusing to old school sewers :)