- Home
- About
-
Shop
-
Sewing Patterns
-
Fabric
- Sewing Supplies
- Folkwear Clothing
-
- Blog
- Customer Gallery
- Contact


by Esi Hutchinson
Hello! Today I will be showing everyone how I made a quilted jacket from the Basic Jacket pattern using an arbitrary patchwork assembling process, similar to Crazy Quilting.
I was inspired to do this by the quilted jackets that went into our inspiration post, as well as all the gorgeous scraps of linens we had laying around (we have most of these linens in stock here), as well as crazy quilts that I'd seen in the past. Here is a linked video about Crazy Quilting. The Crazy Quilt - The Ultimate Stash Buster! - YouTube
This was my first time quilting a garment, so I will give a few tips on what worked and did not work for my personal process. Making a patchwork garment is a great way to use the scraps that you haven't wanted to throw away of your main fabric, and with this project you can do the outer and possibly the lining if you have enough scraps.
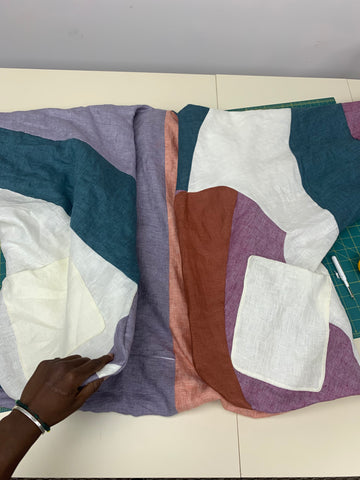
I have selected most of the linen scraps that Folkwear had left over from previous projects and started to cut them up into large shapes with straight edges. You may cut them into whatever size and shape you wish, or cut them into equal sizes and shapes to make the patchwork process more straight forward.
This is how I started. I just cut straight edges on the scraps and started to sew them together to make a large piece of fabric that I could cut the pattern from.


It is helpful to press after you have sewn each piece together. Either pressing the seams open or pressing them to one side. Don't worry about finishing the raw edges, because you will be quilting all three layers of fabric together encasing each edge. And, the jacket has a lining so you won't see the inside.


Every now and then I placed the pattern piece on the patchwork cloth I was assembling to make sure it would be big enough.

Sometime later I came out with this.

Make sure to press the patchwork fabric well before cutting out the pattern from it. It's important that the pattern pieces are cut out to be the same size before your start to sew the jacket together. This will prevent a headache when sewing the jacket together as well as bunching when quilting the jacket.
I cut out my pieces for the Outer Layer from the patchwork above. I serged the edges around the pattern pieces, but depending how sturdy your fabric is you may not need to finish the edges. For fabric edges that are on the bias or loosely woven fabrics, it may be best to just staystitch the edges of the pattern pieces, especially around the curves. Actually, it would probably be best to staystitch all the edges of the pattern pieces before finishing them.


Now that the outer layer is done, it's time to cut the lining and inside batting. For this jacket, I used a white flannel for a lightweight layer.
If you'd like, you can use the same patchwork process for the Lining that you used for the Outer Layer, if there are enough scraps. I had large enough pieces in two different colors that worked for the Lining.


Flannel cut from the same pattern piece as the jacket.


Now that the front and back pieces are all cut, check again if they are all the same size, and trim edges if needed.
I then followed the instructions from the pattern: With right sides together, sew outer Front/Back pieces together at center back seam. Press seam open. Repeat with lining and with flannel (batting).
Then, I basted the raw edges of lining to the flannel wrong sides together, making it one piece.

With right sides together, I stitched the Front to Back outer layer at underarm/side seams; trimmed and clipped seam allowances, and pressed seams open. I repeated this with the lining/flannel layer.

Decide where to place the pockets. You can place them as indicated in the pattern, or angled up further from the original placement lines indicated. I angled the pockets up a little bit, then topstitched the pockets to the outer layer of fabric. I decided to use one solid color for my pockets, I thought it would be a nice contrast. If you want to quilt the whole jacket (i.e. also under the pockets), you will need to add the pockets after the jacket is finished and hand-stitch the pockets to the jacket.

I put together all layers of the Jacket as instructed.
If you wish to not stitch along neckline and hem edges as indicated in STEP THREE of the instructions, just layer the fabrics as they would be in a finished jacket. You can baste the layers together to prevent shifting and then trim any excess fabric from the edges when you are finished. However, you will have to bind the neckline and hem edges. You can use bias tape to finish the edges.
Quilting Time!
I practiced stitching on a separate piece I made similar to the Jacket to get a sense of the thickness I would be working with and whether or not to change the tension and the length of the stitch. Troubleshoot with your sewing machine to see what length and tension works best with your fabric thickness. I used the stitch length 3 so it would not be too tight and easier for me to take out stitches if I made a mistake.

 Practicing on more scraps
Now starting to stitch onto the Jacket. I bascially decided to give each scrap section its own stitching design.


Drawing onto the fabric is helpful, it makes the planning process easier. Use a fabric marker, Crayola markers are washable.


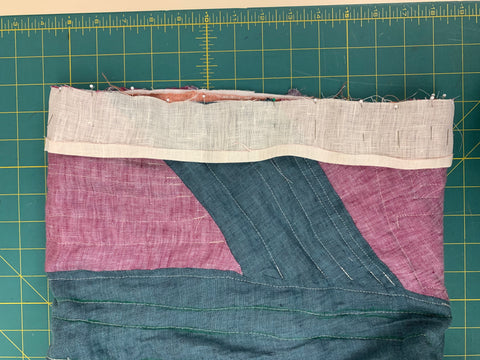
This is what the inside looks like so far.

Planning the lines for the back of the Jacket.

 Almost done!

I am finished quilting the Jacket, and used the same color for the cuffs to match the pockets. The cuffs neatly and easily bind the sleeves. This is basically the same method you would use to bind the front, neck, and hem of the jacket if you stacked the layers.
My only other advise would be to baste the layers together a bit more than I did to avoid shifting fabric. I enjoyed this project (such beautiful linens!), and I hope you are inspired to try something like this yourself!
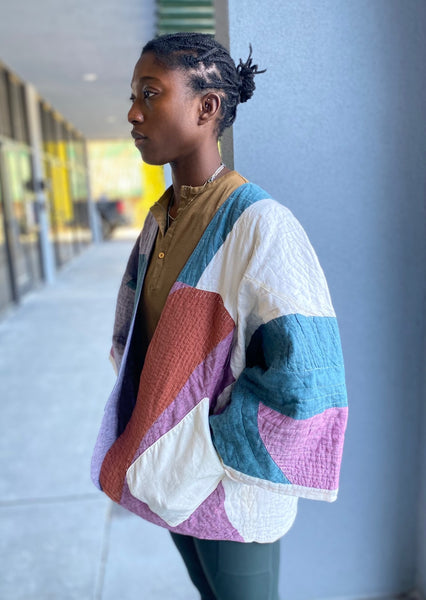
Here is the final product! Thank you!


Well hey there, howdy, hi. I’m Sarahbeth. A (mostly) retired, previously-award-winning indie apparel designer coming to you from Mars Hill, NC with a hopefully inspired, and also tragically comedic, adaptation of the 267 M’Lady’s Corset.
A bit about my history in apparel design: Many many moons ago I had an indie apparel line called Unabashed Apparel. I did it all: designed, drafted, sewed, produced product line, photo shoots, etc. Now I create for myself and my loved ones and take a few commissions when the mood strikes me. I’m most interested in how we inspire and encourage one another as creatives. I drafted patterns for every piece I made for my apparel line. I drafted a prototype, then several sizes for each piece in a collection. I personally handmade each piece. In custom bridal, I created a custom body block for each client and then a pattern for the gown from there. I sewed muslins before cutting into silk, but my original patterns were spot on and so after a few years I scratched the muslin part of the process. It was nerve wracking at first. For the last decade I’ve mostly draped any piece that I want to create. There have been times I’ve been frustrated that I didn’t create a pattern to return to, but it’s rare. For personal use, Folkwear has been the only pattern company whose patterns (other than my own) I have reused time and again. I’m a big fan not just of the quality but of the fantastic women who have been stewards of this pattern company.

The tale of this jacket is one of beautiful woe.
Mostly it goes like this: pride cometh before the 2 dozen things you have to do to make a grand idea live-able. You know the old phrase, when someone tells you they like something you made, say thank you and then clamp your mouth shut? This is not that. I want you to be inspired, I want you to grab the bull by the horns, (I want you to use a different lining for your project…)
In short: A while back I designed a jacket for a particularly beautiful Merchant & Mills wool. Then inspiration struck! It was similar enough to the 267 M’Lady’s Corset my buddy Cynthia asked me to model for her recent Folkwear blog post. Why reinvent the wheel? I fetched the pattern and planned to adapt it to my design.
Now, I feel I should tell you I’m more a Jack Pollock than a Jo Vermeer type. Of course, I wish I was refined and dedicated to the exact right brush stroke, but in truth, I really don’t have patience and just throw spaghetti on the wall. I’d rather yelp and fix than wait and plan it perfectly. It’s good to know thyself, because it turns out I was a bit rusty and a bit over-confident with my adaptation and ideas. I had a lot I had to fix with this project. I learned/remembered a lot too and that’s always a great boon to an old grizzled pro.
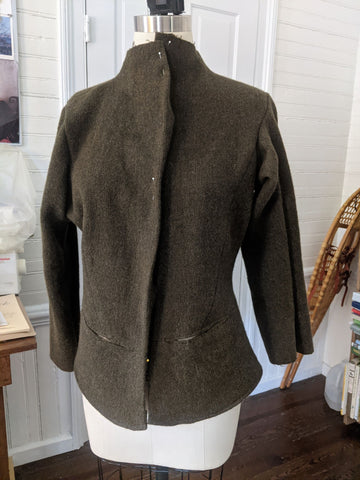
The idea: Seamed peplum wool jacket, lined with soft jersey for comfort and a casual effect.
Add to the pattern: Sleeves, High neck, Pockets, an Elizabethan flare, be comfy & warm.
Reality: Lined with soft, lightweight jersey? Please. Send help.
1. Prewash. I pre-wash almost everything, including wool. I hand wash my woolens, and to be able to do this, I throw my fabric in the washing machine before I cut out a pattern. It might change the look (and it did change this wool) but I find I want to be able to personally wash things 99% of the time. I buy 1/3 more of my wool than a pattern calls for for this fact. You can see here that the fabric was looser before washing. I prefer the tighter and fluffier outcome post washing and drying. I can’t tell you the number of times a bride I’ve designed for will call me about stains/dirt, and when I say, throw your gown in the bathtub, wash it with some gentle soap – wring it out, hang it to dry – they cry. I prewash errythang.

2. Lay it out, think it through. Add about an inch to the pattern body to turn a fitting corset into a jacket. Cut.
Consider the neck. Of course the original pattern had a scoop neck, and I wanted a warm jacket. I like things to cover the base of my neck and ride a bit high in the back. I used my French curve ruler to sort it out. Always allow for more fabric (shallower curve), you can trim away for the correct shape.

3. I love a selvedge. I use them all the time for the center front of jackets. The stability is priceless.

4. Peplum Front: I straightened the pattern piece to match a jacket front, knowing I would want to continue my closure.


7. Sleeves. Ok here’s the catch and how I (successfully) planned for it:
A) The M’Lady’s corset pattern has a rather squared off underarm. I rounded it and added a bit of fabric to my cut with a “that looks right” eye on the pattern pieces, there are 2 pieces here to consider. Always cut it higher, again, you can trim away, you can’t add back. The multiple seams at the side also give you plenty of room to adjust your fit. You’ll learn the true non-symmetrical reality of your body in this add-edit-and-cut process. Lack of the body’s symmetry is one of the secrets to understanding personal fit success.
B) What sleeve pattern piece to choose: You can see this is one of my old drafted pattern pieces. How to pick a sleeve: Pick a sleeve from a pattern you already have that is loose enough to be a jacket sleeve. I chose a single piece rather than a double piece because it was for a loose rather than rigid jacket idea. This is most important: You can always make an ample sleeve fit a jacket by pinning it and editing it to what you’re creating. It follows more fabric = more editing options principle. The only thing to be aware of is not to cut too deep a curve away from the top of the sleeve to the underarm edge, while this allows for more underarm room in principle, it only does so if you have matching and loose shirt/jacket designs and pattern pieces. Again, cutting away is easy, adding back is not impossible, but more gnashing of teeth than it’s worth. Make sure you pick a woven sleeve pattern. Creating a good sleeve hang is easily achieved through pinning it to the armseye and adjusting the ease from there.

8. Pockets. Now the pocket part was brilliant, forgetting to recut them in a matching fabric was my 2nd whoopsie of this project. I wanted you to see that little French-seamed, wonky silk habotai pockets are easy and awesome to add, particularly where you have a natural waist seam, so I cut a couple out of this pale beige silk and then forgot to remake them in the correct and matching green color for the jacket. That’s right. I added them in, after I remembered to rip out the seam where they needed to be inserted. See next photo.


13. Finishing: Mmmhmm. Well, I’d planned to attach the jersey lining to the hem. Ridiculous in reality due to the pulling of the jersey to wool situation but I hadn’t cut the jacket long enough for a double hem. Solution: I tea-stain dyed some cotton lace and used it to hand finish the wool hem. I hand stitched the jersey to the wool at the front placket and neck. I wanted a subtle edge to both.


I’d do it all again with a silk stretch charmeuse lining. I’d cut the lining the same size as the rest of my pieces and I’d be happy as a peach.
I hoped you enjoyed reading about my adventures of my extreme pattern hack of this fab pattern, 267 M'Lady's Corset (and maybe you learned something too). And are inspired to tackle your own pattern hacking. Folkwear patterns are a great place to start.

by Cynthia Anderson
Creating our own trim is something we generally do not consider taking the time to do as modern sewists. With all the lovely ribbon, laces, and trims available on the market, it hardly seems necessary. There are times however, when finding the right embellishing trim may not be feasible or the perfect trim simply does not exist. Plus learning to make your own trim embellishments is a tradition that is fun and connects us to generations of past makers whose creativity and techniques are good to learn from.
Until recent history, making your own trim was done by hand. The techniques found in the our 123 Austrian Dirndl Pattern have long been a part of European trim, or ruching, making traditions and culture that continue today. These trim techniques are synonymous but not limited to the dirndl. The dirndl may be the traditional dress of Austria and Southern Germany, but this popular silhouette makes a beautiful everyday summer dress as well. Whether you embellish it or not, is up to you. Though resisting these trims may prove difficult.
The 123 Austrian Dirndl comes with a plethora of extra information and history to help inspire anyone interested in not only making the dirndl, but the authentic trims. You will find seven different ruching trimmings to try. All the trims are stunning on their own and can be combined in numerous ways, or masterfully paired to make one fabulous trim (as in the photo above). Upon closer inspection, it is not hard to imagine all the different types of projects that these ruching trims could be used for. These techniques are fun and easy to master and so beautiful! You can also find all the information you need in the PDF version of the 123 Austrian Dirndl.
Materials
All the ruching techniques offered in this pattern start with a tube of cloth or ribbon, that is then hand-stitched in various ways and pulled up to form a repeated motif. Tubes cut on the bias are generally preferred, because fabric cut on the bias naturally allows for bending into curves that lay smoothly. This is especially true when applying trim to necklines, armholes, or any curved shape or edge. Detailed instructions on how to make a continuous bias strip or tape are included in the pattern. You can also view this extremely helpful video we made on how to make lots of continuous bias tape.
In this blog I will be demonstrating the Holflaten, also called a Whole Folds or Box Pleat Ruching, and the Rosenrushe or Rose Ruching. These rushing techniques start with making a tube cut on the bias or straight grain. The fabric I am using here is cut on the straight grain to economize fabric and for the ease of time.
Ribbon can be used for making many straight grain techniques as well. Silk ribbon cut on the bias is especially nice when bias is required. You can find beautiful bias hand dyed silk ribbon by Hannah Silks on Etsy.
That's not all, the Herzrusche or Heart Ruching will be demonstrated using a sateen finished ribbon, because everyone should be inspired to make this beauty!
Getting Started
First you need to determine the width and length of your tube, or ribbon, if you have a specific purpose in mind. When deciding on the width, simply experiment to see what proportions you like depending on application. Your final widths for the tube, or ribbon width, can be between 1/2" to 1-3/4", depending on the look you want and the weight of fabric, or ribbon, you are using.
To make a fabric tube for the trim, cut your fabric two times as wide as the final tube plus 1/4 inch (6mm) for seam allowances. For example, for a 1-inch (2.5cm) tube, cut bias strips 2 inches (5cm) wide plus 1/4 inch (6mm), or 2-1/2 inches (6.3cm) in total width.
Keep in mind that the fabric weight. Heavier weight fabrics generally work best for wider trims that do not require fitting along tight curves or shapes. Lighter and finer weight fabrics work best for more narrow trim widths and will allow for fitting along tighter curves or shapes.
The length of bias you will need to make your ruching also depends on how heavy your fabric. It is best to experiment with scraps before cutting your bias strips to help determine width and length. Below are the approximate length calculations for the ruching designs used in this blog.
For demonstrating these rushing techniques, I have cut a strip of laundered silk dupioni on the straight grain approximately one yard (.9m) long. Laundering silk dupioni reduces the shine and softens the fabric. This length is plenty for experimenting. Since we are merely experimenting, a one-yard length can be used for more that one technique and then cut apart if desired. Cotton muslin is perfect for experimenting in making ruching either on the straight grain and/or bias as well.
Make a Ruching Tube

Fold the strip of fabric in half with right sides together, matching and pin the edges every two to three inches (5.75cm), then sew a 1/4 inch (6mm) seam allowance. If working with a bias cut tube, try not to pull or stretch while pinning and sewing or the tube will not lay flat when turned, which will cause pleating difficulties.

Press the seam open. If experimenting go ahead and press the edges creating a crease. However, on some ruching, you may not want a crease in your fabric and want rounded edges. You can finger press in those instances.

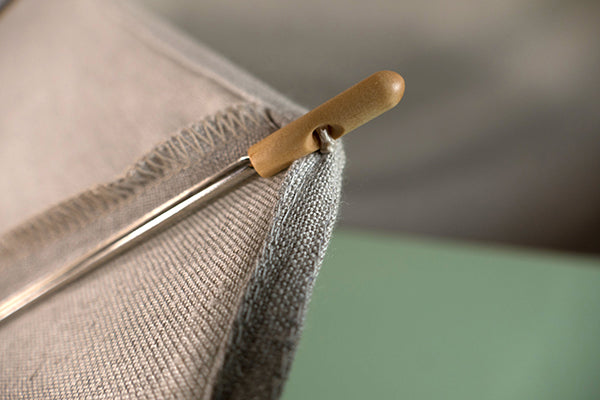
Next turn the tube. To help turn the tube right side out, thread a cord or yarn through the tube with a safety pin. Pin the cord/yarn to the end of the tube and use the cord pull back through.

Or stitch across the cord/yarn to hold it securely in place and use the cord/yarn to pull back through.

Try to keep the seam allowances open inside the tube. As you pull the tube right side out, it will help to pin the seam allowances in place as you go.


Clip off the end with the cord/yarn or remove the stitches to release the cord/ yarn.

To make experimenting easier, you can press the tube creating creased edges. Be sure the seam is in the center back (underneath side) of the tube and not at an edge. Placing the seam at an edge hampers folding.
Note, that when making a final strip of ruching you may prefer the look of gently rounder edges instead of pressed edges. Once you get the hang of making ruching using a tube, try avoiding pressing the edges, so you can compare the effects.

Now that the tube is complete, lets make some ruching.
Holfalten, or Box Pleat, Ruching
To make the Holfalten (Whole Folds) Ruching the tube is pinned into box pleats, then stitched down the middle of the tube to secure the pleats in place. Box pleating ruching is lovely on its own. However, we will use this technique for the foundation in making the Rosenrusche Ruching below.
Begin by working on the underneath side, or the side with the center seam. Notice the center seam in the photo below.
To make using a 1-inch (2.5cm) wide tube, place spacing pins 2 inches (5cm) apart with 1 inch (2.5cm) between the spaces.

The red tip pin indicates the center point between the two white tip pins spaced 2 inches (5cm) apart. The far left pin indicates the 1 inch (2.5cm) space. Don't worry about the 1 inch (2.5cm) pin for now.

Starting at the right hand edge, fold so that the 2 inch (5cm) spacing (white tip) pins meet in the center (indicated by red tip pin) of the 2 inch (5cm) space. This automatically creates two 1-inch (2.5cm) underfolds which will extend under the 1-inch (2.5cm) spaces, which will become the top folds or box-pleats.

Notice the underneath side fold and seam below.

View of top fold below (notice there is no center back seam, and the box pleat is seen on the front side).

Repeat making as many box pleats as you want. The idea is to make the box pleats the same width consistently. If you find folding and measuring with the fabric fiddly at first, practice using a strip of paper instead.
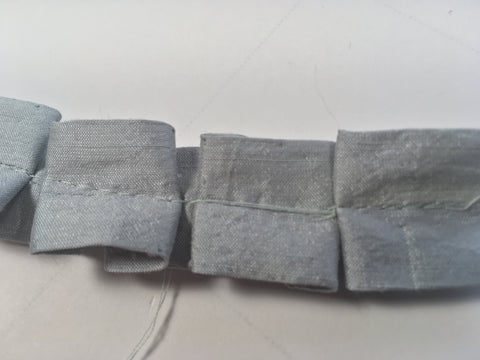
Below is a view of the box-pleats seen from the back or underneath side. Notice the seam.

Below is a view of the box-pleats flipped over to the front side.

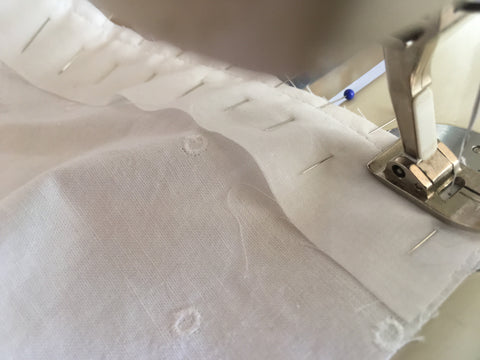
Stitch by machine, using a long stitch length through the center of the tube to hold the folds in place. Now, the box pleating is finished to be used alone or transformed into the Rosenrusche or Rose Rushing as instructed below.

Rosenrusche, or Rose Ruching
This trim may look more like bows than roses, but is simple to make and quite decorative. To make the Rose Ruching you will need to start with the box-pleat ruching as the foundation. The roses are created by matching the center edge of each box-pleat and stitching them into place.
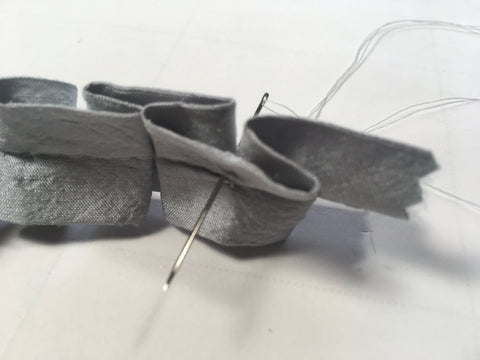
Start with a knotted double threaded hand-sewing needle, long enough to use continuously as you work.
On the underneath side, bring double threaded needle up through the center of the square at the center stitching on the front side of the box-pleat.

Then make two small stitches, one on each side of the center point.

Draw these points together and stitch down through center to the underneath side, to anchor these stitches.

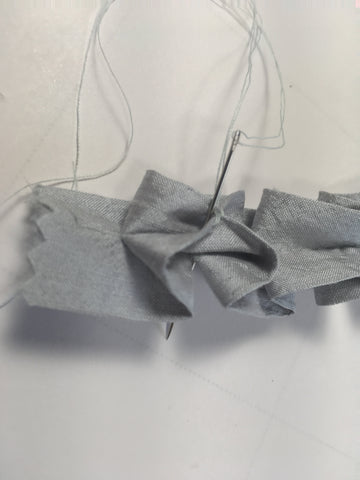
Come up again from the underneath side, to the front side through center of stitching.
This time, catch both edges at the center of the box-pleat with the needle and thread, pulling them together. Secure the edges with a couple of small stitches, knotting at the second stitch to secure. Follow the sequence of photos below.


To continue using one continuous thread, part the gathered section at the base of the rose and send the needle back through the center front to the back or underneath side.
While still on the underneath side, start the next rose by drawing the thread over the box-pleat as seen below. Then pass the needle and thread through the center fold on the underneath side, coming up through the center of the box-pleat on the front side. Below is a view of the continuous thread stretched across the underneath side and inserted into the center of next box pleat.
Repeat until you have finished turning the box-pleats into rose ruching.

Herzrusche, or Heart Ruching
This trim looks a bit like the flower known as bleeding heart, but not so much like a traditional Valentine heart. It is amazing how by simply drawing fabric up on itself, such a lovely soft three-dimensional effect can be created. This technique is worked on the underneath side, so be sure turn your work over from time to time, and inspect the beauty happening on the front side!
The Heart Ruching can be made using a fabric tube or ribbon, on the straight grain or bias. A satin finish ribbon is being used for this demonstration. The sheen of the ribbon reflects the light, creating an enchanting effect.
Start by making the stitching guides. Lightly mark these guides with pencil on the underneath side of the ribbon. Measure the points one-inch apart along the top and bottom edge of the ribbon, keeping the points perpendicular. Then mark the center between the one-inch points with a lightly drawn "x" as seen below.
Use a long thread so the stitching can be as continuous as possible.

With the underneath side up, pinch the two edges of the ribbon together, matching the drawn points and tack the edges together with a couple of stitches. Knot the last stitch to ensure the edges stay securely together.


Pass the eye of the needle through or under the stitched edges from right to left. Passing the needle through backwards helps prevent nicking or catching the ribbon with the needle.

Turn the needle around and create a horizontal stitch at the center "x", inserting the needle from the right to the left as seen below.

Pull the needle and thread left all the way through the stitch.

Now, pull the thread in the opposite direction (to the right), drawing it up, until the center stitch meets the first stitch, forming a small pinched triangle on the front side. The idea is to pull, drawing the center stitch to the already stitched edges.

Hold the two combined stitches firmly, with the edges folded downward with your fingers, then make a couple of stitches to secure the edges together. Knot the final stitch to hold.

Remember, all of the work thus far has happened on the underneath side. In order to see the how the final ruching is looking, turn your work to inspect your progress. The photo below depicts how the small pinched triangle on the front side should look.
Note: Keeping the spacing equal and tension even on the overlaying thread is the key to mastering this technique.

Again, turn so the underneath side is facing up. Pinch, matching the next set of edge dots; notice when starting to make this second edge stitch, the thread is continuous and carried from the right to the left, with the thread stretched between the first set of combined stitches and the start of the second edge stitch. See second photo below.

Look closely at the free floating horizontal thread connecting one finished set of stitches with the beginning of the next set of edge stitches.

Be sure to gently pull the thread just enough to allow the trim to remain horizontal before stitching the edges together. If you pull the thread too much the ribbon will gather up on itself. The idea is to keep the ribbon ruching laying relatively flat.
Repeat tacking the two edges together as before, continue drawing up the center "x" stitch and drawing it to the edge stitch, and securing it in place. Continue, repeating the steps until you have as much ruching as your heart desires!


What is a placket, you might ask? You have seen them and used them before! A placket is an opening or slit in a garment at the waist, neck, or sleeves to help the user put the garment on and off easily. It usually contains some kind of closure for the garment (like buttons, snaps, zip, etc.). The slip of fabric must be contained, or faced, so it looks good and the fabric does not unravel or fall apart. Plackets can vary depending on application - there are plackets used for shirt neck openings, vents, sleeve openings, pant and skirt openings. Plackets are commonly found in tailored shirt sleeves.
Here I am going to show you how to make the placket that is in our 203 Edwardian Underthings Pattern. This pattern has a petticoat and drawers that result in a beautifully finished opening. The plackets make the petticoat and drawers easy to get in and out of, and are authentic to the time period when zippers were not used or common. The petticoat has a placket in the center back seam. The drawers have plackets at each side seam of the waist for added easy accessibility.
This type of placket creates a continuous binding to the raw edges of the seam opening, resulting in a clean tailored finish that can be used on shirt sleeves also. This design results in a neat-crisp tailored-looking finish that is well worth the effort. This placket design is a handy skill to learn, and the more skills you know, the more options your sewing will have.
It can help to make a practice placket or two before you attempt the placket on your final project. When practicing, and to help with eliminating any confusion, use a fabric with an obvious right and wrong side. This will help prevent getting tangled up.
Take time to prepare the placket so construction will go more smoothly. The placket should be cut precisely on the grain to ensure the fabric folds as crisply and accurately as possible. Carefully mark the fold lines, stitch lines, and the dots for the clipping lines as indicated on the pattern. Use a fine pencil, or other marking tool, to create all the necessary marking on the practice piece to help guide the construction and accuracy. See photo below.

It also helps to use a fabric for the placket that will not fray easily. Try using a finely woven cotton batiste or muslin for your practice fabric.
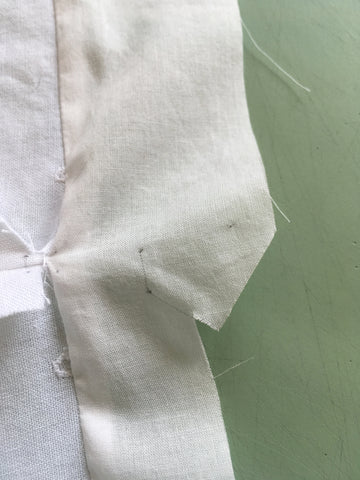
For these plackets, I prepared the center back of the petticoat and the side seams of the drawers according to the pattern instructions. In getting started it is helpful to know that when the placket is finished, the wider back section with the point will lay and fasten over the front or narrow section of the placket. Have a look at a tailored shirt sleeve as an example.
To add the placket to the petticoat get oriented first: Pin the wider section of the placket to the left-hand side of petticoat or skirt back.
To add the placket to the drawers get oriented first: Make the placket on the right-hand side first, which is identical to the petticoat instructions. Pin wider section of placket to Back of drawers.
Pin the wider section of the placket to the back piece of the garment opening only (as seen below). Place the right side of the placket to the wrong side of the back garment piece, match the box, notches and waist edge. Notice the straight edge aligns with the waist edge. Stitch from the waist edge to the center of the square, using a 1/4" (6mm) seam allowance. Be sure to back-stitch at the waist edge and carefully at the square.
Clip the seam allowance of the garment to the square. Do not clip into the placket. Clipping the seam allowance of the garment fabric, releases the fabric so it will open up and lay flat for easier construction. See the photo below.
Press the seam open or to the back of the garment depending on how you choose to finish the garment seams.

With the garment seem allowance clipped the fabric should relatively flat. Pin and stitch the narrower section of the placket to the other or front side of the garment opening. Be sure to pin the right side of the placket to the wrong side of the main fabric as seen in the photo below. Stitch using a 1/4" (6mm) seam allowance from the square center to the waist edge. Be sure to back-stitch at the waist edge and carefully at the square.

Press the seam towards the placket. Notice that the right side of the placket is facing up and the wrong side of the garment is facing up in the photo below.

On the wider section of the placket, clip the inside of the point to the small dots indicated on the pattern. See the drawn guide line in the photo below.
Carefully clipping the guide line, Avoid cutting beyond the dot and into the fabric.

Press the point edges under 1/4" (6mm) creating a crisp and clean finish.

One point edge pressed tuner 1/4" (6mm).

The other point edge pressed under 1/4" (6mm) creating a clean point.

Now, press under the long edges of both sections of the placket using a 1/4" (6mm) seam allowance.
Helpful Hint: To make turning the edges under easier, make a folding guide by sewing a long stay-stitch. Leave thread tails on each end. Once the edge is turned and pressed, the stay-stitch can be easily removed by gently pulling the thread tails. See photo below.

Pressing the edges under 1/4" (6mm).


Turn the narrow section of the placket to the right side to the garment fabric at the seam line and press.

To secure the narrow placket to the garment fabric, pin and top-stitch in place from the waist to small dot on the turned under edge, as indicated on the pattern. Note, the folded outer edge does not require top-stitching.
The two sides of the placket should naturally fold and lay into place as seen below. Note, that the narrow section of the placket falls to the inside of the opening. The wider section with the point falls to the outside of the garment, covering and laying on top of the narrow section. Be sure the edges are aligned as they should be. Adjust the turned edges if needed.


Fold the remaining wider section of the placket, wrong sides together, on the lengthwise center fold line as indicated on the pattern and press creating a clean crisp edge. Pin the turned-under edge over the seam line, using the seam line as a guide. Top-stitch from waist edge to star (as indicated on the pattern), taking care not to catch the stitching in other side of narrow placket underneath.


Pin the pointed end of the placket, over the narrow side of the placket (point will extend below). The idea is to securely stitch the two sections of the placket together at the pointed end.

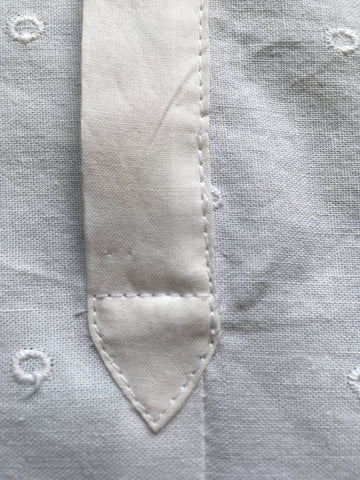
That's it! Placket beautifully made. While learning to make plackets may take a bit of practice, the results are well worth the effort. Plackets are useful and beautiful elements that will elevate any sewing project. Plus, Folkwear has many patterns that are made even more special due to their beautiful plackets. If you need more placket sewing inspiration Folkwear has it covered... check out the 102 French Cheesemaker's Smock, 116 Shirts of Russia & Ukraine, 117 Croatian Shirt, 120 Navajo Blouse & Skirt, 124 Bolivian Milkmaid's Jacket, 128 Russian Settler's Dress, 130 Austrian Bush Outfit,
I hope you found this blog tutorial helpful and please keep as a reference for the next time you need to make a placket.

This month Folkwear is featuring the 111 Nepali Blouse Pattern, which is a beautiful piece, often worn by Nepali women as an over blouse. While this blouse is considered a traditional garment, typically made of velvet, it has a truly contemporary feel, which makes it a perfect complement to any wardrobe.
This versatile pattern can be made for any season or occasion. For everyday wear it would be lovely made of fabrics such as cotton, linen, rayon, light wools, or even knits. Any fabric with a bit of drape and a light to medium weight would be suitable. When made in velvet or silk it is transformed into an elegant and comfortable garment whether for a special occasion or for blissfully lounging about. Shorten the sleeves for warmer temps and enjoy year round. The blouse can be worn open at the collar (simply omit the top sets of ties and cut just four ties for the waist). The ties could also be made of ribbon or even be replaced with buttons, hooks, frogs, or snaps.

Since the Nepali Blouse is traditionally made of velvet, this is a perfect opportunity to learn more about velvet and how to handle it. Velvet can be a tricky fabric to sew with, but the tips below will make it much easier and less intimidating to work with.
Most velvets available today are made of rayon or silk. They generally have a very drapey effect and sometimes a bit of stretch, that work well for tops, blouse, skirts, dresses, pants, and scarfs. The photos below shows the soft silky drape of silk rayon velvet. This type of velvet has a distinct nap, which captures the light creating a beautiful shimmer.


Velvet can also be made of cotton and polyester blends, which generally have a more stiff hand or feel, and are perfect for more structured pieces, like coats and jackets. The velvets in the photos below are made of cotton and have a stiffer drape and the sheen is typically more subdued than silk and rayon velvets.


While silk and rayon velvets are stunning and rich fabrics, they are not the easiest fabrics to control and require a bit of extra attention. This blog will help provide some tips to ensure successful sewing for any velvet sewing project on your list. Use these tips for making the 111 Nepali Blouse, as well as the 120 Navajo Blouse and the 124 Bolivian Milkmaid Jacket, which are also traditionally made in velvet.
Also view or download these tips as a PDF.

PRESSING TIPS
Because of the different nature of velvet fabric, it is a good idea to practice and experiment on a few scraps before you make your final project. Here are a few experiments to try using velvet.
While working with velvet takes more time and effort, the benefits are well worth it. No other fabric compares with the unique quality of a stunning velvet. Use these tips to make a 111 Nepali Blouse and for all your other velvet sewing projects.
View or download this as a PDF.


Parasols are not only a convenient and stylish way shield yourself from the suns rays, but a perfect accessory companion to one of Folkwear's most favorite and popular patterns. The Folkwear 261 Paris Promenade Dress is made even more perfect when paired with its very own parasol.
The 1920's styling of this easy-to-sew and easy-to-wear, pullover dress has a carefree, yet sophisticated aesthetic. The unique construction of this dress makes it easy to imagine all sorts of creative fabric combinations. Complete your 261 Paris Promenade Dress ensemble by coordinating the vintage-style drawstring hand bag that comes with the pattern and now a parasol, for the next time you want to make a truly vintage-inspired statement.
And, today we are going to show you how to make your own parasol!


For a bit of inspiration in making your own parasol read the History of the Parasol blog for an interesting stroll through the history of sun protection and much more. Learning to make your own parasol is not as difficult as you might imagine.
Knowing what to look for in a parasol or umbrella frame is important because the frame is the foundation of your project. Due to the superb quality and craftsmanship of antique umbrellas and parasols, their frames and handles can be found in good condition and are not hard to find if you know where to look. Flea markets, thrift shops, ebay, Etsy, and historical reenactment website shops are all excellent resources. Consider using an umbrella you already have... if the quality of the frame is good, don’t toss it out… recover, re-purpose, reuse. Enjoy anew!
Frame Structure
When looking for a frame to use, remember that the more sections or pie-shapes a frame has, the easier it will be to make the canopy fit. This is in part because the more reinforcing seams you have, the more stable the fabric will be. The narrower the width and the more seams there are, the more stable the fabric and therefore it will be easier to fit the canopy to the frame. The number of pie shapes corresponds to the number of ribs. The number of ribs corresponds to the seams. Parasols tend to be more elegant and daintier then umbrellas. So, parasols usually have more ribs, pie-shapes sections, and seams.

The frame and pieces needed to make a parasol.
The parasol frame and parts I am using in this tutorial were sourced at Vena Cava Designs (they also carry Folkwear patterns!). I ordered the Parasol Frame (Skeleton) kit (adult, straight handle).
This is an inexpensive and good quality frame. This frame is suitable for either a parasol or umbrella and a great option for trying out your making skills. The pattern we are providing here fits this particular frame. However, you can use this pattern, with some modifications, to fit most other frames that you might find.
Please note that I am referencing the parasol frame that is sourced in this tutorial. The pattern included has been made to fit this frame.
The Proper Fabric
The fabric you use to make an umbrella is different than fabric used for a parasol. Parasols were generally made of natural materials like silk, cotton, and linen and these fabrics are available at most fabric stores. Most natural fibers such as the ones mentioned have enough stretch and sometimes too much stretch when cut on an angel. For this reason the pie shaped pattern piece should be cut with the grain line indicated on the pattern (aligned with selvedge of the fabric).
When choosing a fabric, it is best to choose a fabric that is the same on both sides since you will see the wrong side of the fabric when he parasol is open.
Modern oil cloth and waxed cotton are fabrics that come the closest to original umbrella fabrics. Suitable waterproof fabrics will be made of synthetic nylon and woven from fine threads. These types of fabrics will not have much stretch, so pattern pieces will need to be cut on the cross-grain or with a curved edge on the bottom edge. Nylon frays easily (can cut with a hot knife or serge immediately). To avoid disappointment, do a bit of research if considering the use of waterproof fabrics.
If you are going to make the parasol canopy for the kit, or modify it for your own use, instructions are below.
You will need:
Fabric Layouts and Cutting Guide
Layout your pattern piece on your fabric and cut out 10 pieces to make your parasol. The diagram below shows how to create the parasol pattern piece used in this demonstration, if you do not print the PDF piece provided in the link above. Notice the grain line and lay your pattern out with the grain line parallel to the selvage.

Ten pattern pieces laid out on a 45" (114.3 cm) or 60" (152.4 cm) wide fabric, requires just over a yard (1m) of fabric. Note that these illustrations shows the fabric laying open and flat.


Note: The pattern pieces in the illustrations above are placed close to the edges of the fabric. If you think you may need more hem at the bottom edges, then allow for a bit more yardage. To be safe add an additional 1/4 yard (0.2286 m) of fabric.
If your pattern pieces are a different size than ours, you can lay the pattern pieces out on a piece of fabric the width you intended to use, and have a look at how the pattern pieces lay out and how you can make them fit. The illustrations above should help.
Sewing Guide
The 1/2" (13 mm) seam allowance for the long edges are included in the pattern. The 1/2" (13 mm) bottom edge seam allowance is included to produce a 1/4" (6.35 mm) hem. The narrow top edge of the pattern piece does not get a hem. This pattern is intended for a natural fabric to be cut on the selvage grain. I used a light weight linen for the purpose of this demonstration.
MAKE A MUSLIN FIRST!! This is my best piece of advice in attempting the making of a parasol or umbrella. Frames are not always perfect. Especially if your frame is an antique. Plus experimenting without feeling the pressure of messing up good fabric is always wise. And, you get to practice getting it right.
Step One: Sewing the Canopy
Once the fabric pieces are cut out, I recommend working with wedges in pairs. With the right sides of the fabric together, pin one long edge and stitched a 1/2" (13 mm) seam allowance. Then, move the needle over one or two notches and stitch again just OUTSIDE of the seam allowance. Back stitch at each end. This extra stitch line will help to create a bit more seam strength and stability.
If you want add a strap to fasten your parasol neatly closed, now is the time. Just pick a seam and insert the strap into the seam allowance, sewing all at once. Use a snap or a button to fasten the strap.

View showing a second reinforcing stitch just to the outside of the seam allowance.
Continued this method, working in pairs until all ten of the pie piece shapes are sewn together creating the circular canopy. There should be a hole in the center of the canopy. This is where the tip will come through.

Canopy all sewn up.
Press all seams in the same direction on the wrong or under side of the canopy. Press to set the seams and create a clean finish on the right or top side of the canopy as well.
Finish all the underneath seam allowances. Either, serge, pink, or trim. You could also do a faux flat felled seam. French seams and bound seams will be too bulky and are not recommended.
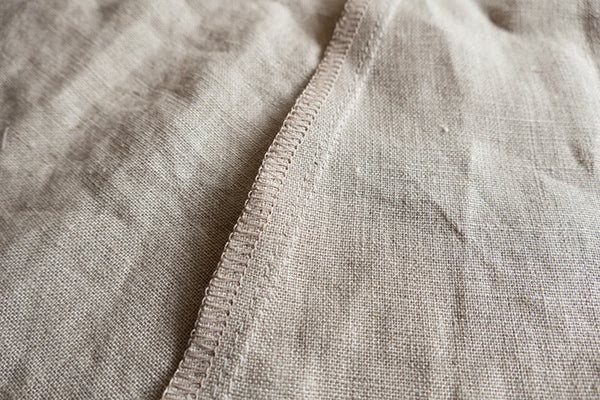
Seam finished with a serge. Notice the seam allowance stitch and the second row of reinforcing stitches.
Step Two: Top Strengthening Detail
The entry point where the tip-ferrule-post or top point, inserts into the fabric of the canopy is a major stress point and needs reinforcing to provide strength. The hole at the opening needs to be made smaller without adding fabric bulk. A couple of simple tricks will take care of both of these issues.
Make a short stay stitch approximately 5/8" (16 mm) around the hole opening in the top of the canopy. This will ensure all the panels stay in place and not over stretch when the parasol is opened and closed repeatedly.
A simple circle of fabric sewn to the underneath at the hole opening, will provide another layer of support and to be sure the canopy hole fits tightly to the tip-ferrule-post base.
From a scrap of the same fabric you are using to create your parasol, cut a 2-1/2" (6.35 cm) to 3" (7.62 cm) circle, using pinking shears. The idea is to not add any bulk to this area so finishing the edges with pinking shears serves the purpose well.
Fold the fabric circle in half and then in half again. Snip the tip of the point off with your scissors. Smooth out the circle and press to remove the ceases.

Fold the Circle of fabric in half and then in half again.
Depending on the nature of your fabric, it might be wise to Fray Check the edges to seal the edges. The linen I have used needed a bit of Fray Check for this very reason. Allow the Fray Check to dry.

Reinforcing linen fabric circle getting a touch of Fray Check.
On the underneath side, make sure all seam allowances are pressed in the same direction, align the hole of the small reinforcing circle with the opening of the canopy and sew the circle to the canopy approximately 1/2" (13 mm) from the center hole.
Push the tip of the frame through the hole of the circle to see how it fits. Clip the hole of the circle a tiny bit more if needed. The idea is to have the hole of the circle to fit snugly to the base of the tip-ferrule-post.
 View of pinked linen circle sewn to the canopy.
Below are a series of images showing you how the simple circular piece of reinforcing fabric is attached to the canopy and what an important role this little bit of fabric performs in maintaining the strength and integrity of a highly used stress point.


View of the pinked linen circle peaking through on the outside of the canopy before the being stretched and fitted to the frame.
With the canopy stretched over the frame and closed-up you can appreciate how much this simple bit fabric reinforcement provides to the integrity of the parasols construction.

View of the pinked linen circle peaking through on the outside of the closed canopy after being stretched and fitted to the frame.
Step Three: Hemming the Edge
Turn the widest edge or the bottom edge of the pie pieces under 1/4" (6.35 mm) and press. Turn under another 1/4" (6.35 mm) and press creating a straight edge. Press and pin the hem in place. Manipulate the connecting seam edges to lay as smoothly as possible. Top-stitch close to the turned edge, taking care to create a clean finish.

Pinning the hem.
Step Four: Adding the Rib Posts
Using button twist thread for extra strength, hand sew all the wooden tips to the wrong side of the canopy, at the seam allowance. Use the turned under hem as an anchor spot for sewing the tip to. You do not want to see any stitch work on the right side or top side of the canopy.

Gutermann button hole twist is ideal for attaching and strengthening the tips to the canopy.
The extra thickness of the turned under hem makes an excellent spot to sew on the tips and prevent the stitches from being seen on the top side.

Wooden tip securely sewn to the hem of the canopy.
Step Five: Test for a Proper Fit
Once you get a few tips sewn in place, give the fit a try. It will work best to sew your first few tips on opposite sides of the canopy from each other, to help with the tension. Place the top hole of the canopy over the tip-ferrule-post base. Then gently pull the fabric over the rib and insert the metal rib tip into the wooden tip sewn at the canopy edge. You want the fabric of the canopy to fit tightly over the ribs (each seam should correspond to a rib), once the rib end is inserted in the wooden tip. There should be some tension, but not so much that the rib begins to distort or twist from its intended position along the seam. If this does happen, there is too much tension, the panel is too short. To remedy, let out the hem a bit to lengthen the panel.
With the rib inserted in the tip you can see how the tip needs to be secure and strong due to the tension required for a proper fit.
Tension created when metal rib is inserted in wooden tip.
Note: It is important the fit is good before proceeding any further.

A perfect fit on the outside!

Perfect fit on the inside!
Step Six: Secure Ribs to the Seam Allowance
Your canopy should now be installed to the frame and fit perfectly. Even if the canopy fits beautifully to the frame, a bit more stabilization never hurts. Adding a thread tack will easily accomplish this task.
I have placed and sewn each tack 5" (13 cm) from the hem edge inwards along the rib. Using regular thread, double the thread up, and sew a few hand tacks as shown below.

Measure to determine tack location to help added extra stability for each rib.
Start on one side of the seam allowance, inserting the needle between the seam stitch line and the extra stitch line previously made in the assemble instructions. Make the stitch through the seam allowance and under the rib. Pull the needle through to the opposite side.

First pass through the seam allowance and under the rib.
Insert the needle over the rib, through the seam allowance at the extra stitch line, to the opposite side. Continue in this manner until you have made 5 to 8 passes, creating a neat and secure hold. The idea is to prevent any stitch work from showing on the top side of the canopy. Tie the thread off with a couple of knots on each side of the tack. Trim the thread close to the knot. Repeat for each rib.

Passing thread over the rib and continuing to make the tack.

Making tacks all the way around for each rib.
The Top Finishing Detail
One last finishing touch is required to tidy up the top of the parasol, where the canopy and tip-ferrule-post meet. This will conceal the reinforcing stitching lines and create a clean yet simple finishing flourish of interest. This not the only creative way to finish the top of your parasol, but it is quick and easy and adds just enough detail without being fussy.

Start with a strip of fabric measuring 1-3/4" wide by 8-1/2" long (4.445 cm x 21.59 cm). I like to utilize the selvage edge when ever possible to give an extra bit of strength and stability. So, I have cut my strip of fabric including the selvage. I turned and press the opposite long edge under 1/4" (6.35 mm). Then top stitched to create a finished edge. This edge will eventually show.

Finishing detail begins with a linen strip. Notice the top stitched turned under edge.
Next, sew a long gathering stitch 1/2" (13 mm) from the top stitched edge. Leave long thread tails on either end to make gathering easier. Make another long gathering stitch 1-1/8" (3 cm) from the top stitched edge. Leave long thread tails again.


You will need:


The carrier/holder strap in place and seam allowance sewn before turning right side out.
Note: Predetermine the length you would like the strap to be before sewing up the seam allowance.
With right sides together and the strap length out of the way of catching in the seam allowance, sew 1/2" (13 mm) seam allowance on the longest side and at the smallest end if you are sewing the end up. Trim the excess strap. Press the seam open. Finish seam or trim.
Turn right side out and hem the remaining ends using a 1/4" (6.35 mm) turn under and then turn under another 1/4" (6.35 mm). Top stitch close to the edge to finish. I chose to leave the bottom edge open so I hemmed it too.


by Cynthia Anderson, Folkwear Creative Assistant
With Valentine’s Day literally just around the corner and the thought of spring inspiring me, my sewing aspirations have turned a bit romantic as I start to day dream of the clothes I want to make and wear.
What better project to satisfy romantic yearnings, as well as creating a nod to spring, than the Fabric Rose Accessory featured in the Folkwear Flamenco Pattern.
This project is easy to make and lends itself to so many possibilities. Of course, roses say Valentine’s Day, as well as notions of spring, gardens, weddings, parties . . . . This project is simply the romantic touch only roses can conjure up. Besides being easy to make with endless possibilities, you can practically make this project from scraps of fabric.
To get started you can use the pattern piece provided in the Flamenco Pattern, labeled Rose “Z”. This pattern piece is quite large and would make a stunning statement piece be it for a dress, a purse, or even a pillow. You can make your rose any size you like. Use the “Z” pattern piece as a guide or make your own. Your rose size will vary depending on the width and length of the strips you cut. Cutting the piece longer will make a fuller flower, cut the piece wider for a larger flower.
Once you decide on the size of roses you want to make, you can cut out your fabric using a pattern as a guide or simply cut out your fabric freehand. This rose looks great cut on the fold as the pattern instructions suggests or it can be cut out as a single layer of fabric as well. Ribbon and seam binding work great too! When using mere scraps of fabric there is no excuse not to experiment.
I chose scraps of silk dupioni left over from I dress I made for myself as a starting point for my Romantic Spring Rose Corsage. I wanted to work relatively small and vary the sizes of my roses to make my corsage. I ended up using scraps of silk haboti, linen, and silk organza to make additional roses. You can see the great effect of using different fabrics to make the different roses in the photo above and at the end of this tutorial.
To get started, using the Rose “Z” pattern, fold fabric in half lengthwise, with wrong sides together. Do not press the fold… in order to make the edges of your rose softer. I am showing the "how-to" photos below with a blue fabric for the rose, set over a white fabric for contrast (sorry the fabric is wrinkled!).

Turn the lower corner of your fabric strip with the squared off edge (right angle) upward to create a 45 degree angle as shown.

Now sew a LONG gathering stitch (by hand or on a sewing machine) along the raw edge, about 1/4 “ from the edge. You might want to try making the gathering stitches in three of four sections, rather than trying to gather up the entire length with one thread. I did find this helpful because my thread would break when I attempted to do just one gathering thread.

Next, start at the pointed end, draw up the gather stitches… roll the strip around itself. This is where you will want to do a bit of experimentation in shaping your rose to see what effect you like.


As you roll up the strip, hand sew the rose to itself, using the gathering stitches as a guide. Try different techniques with the look of your rose, pull the gathering stitches lightly for a more tightly closed flower, and pull tighter for a fuller rose. Do a little of both for a more varied look. I used a small hot glue gun to secure my rose on itself. This technique allowed me to shape my rose more quickly because I am not stopping to sew. As with most things concerning sewing, you will find the techniques that works best for you.


Continue to gather, roll and stitch the entire strip of fabric. I manipulated the shape and edges with each small turn. Trim away any thread ends and frayed edges.

To finish off the underside of your rose trim a bit of the fabric to make it easier to turn under. Secure the base with a round circle made of felt or fabric to create a backing. Iron a bit of fusible interfacing on the wrong side of your circle to help give it some stability. Then secure your finishing circle backing to the turned under edges of your rose with a slip stitch - or in my case I used hot glue. The idea in doing this is to cover up the rolled up raw edges and provide a nice finished surface.


You could to attach a pin, barrette, or ribbon, etc. and accessorize any number of things. I ended up attaching my roses to a piece of silk organza and adding a couple of strips of silk dupioni to create ribbons, then I pinned my corsage to a silk scarf to finish off the look of my dress. On some of the rosettes in this corsage, I left the outer edges raw (as opposed to folding the fabric in half so there are no raw edges exposed), and I really like the look of this as well - a bit rustically romantic.


Here is a simple and sweet pattern from the many that are included in the 302 Victoria's Boudoir pattern from Folkwear's home wear collection. Our pattern includes three different shapes for the sachet (we are only including two shapes here). Optional lace trims the outside of the sachet. And, this is a great pattern to try out those rarely-used embroidery stitches on your machine. You can add pretty stitching along the sides of the sachet before putting it together and make this a really beautiful and special project. You can also hand embroider initials to the sachet for a unique and special gift for someone. Our pattern includes templates for beautiful Victorian style letters. A romantic and easy project to sew a thoughtful gift or stocking stuffer (or host gift) for those on your holiday gift list. Or to use in your own clothes drawers!
I made the sachets above as gifts, and even embroidered one with my daughter's initials.
All these instructions, plus LOTS more are in our 302 Victoria's Boudoir pattern (40% off all this month).
CUTTING GUIDE FOR SACHETS
The pattern pieces, and the embroidery designs, are found in the file Pattern Pieces 302 Sachets. They can be printed on two pieces of regular printer paper from a home printer. First download the file to print the pattern (we made it to fit A4 paper too). This file also has an embroidery design and all the monogram letters.
For the Square Sachet you will need Piece R.
For the Round Sachet you will need Piece S.
If you plan to embroider your Sachet, do so before cutting pattern pieces from fabric. Trace outline and embroidery motif onto fabric before cutting the pattern out from the fabric. Allow enough fabric around traced outline to fit into embroidery hoop. Or, if you are using embroidery stitches on your sewing machine, it can help to draw a line that you want the embroidery to follow. And, make sure you stabilize the area where you will be stitching with embroidery stabilizer paper or interfacing. You should be able to tear away the stabilizer after embroidering. After embroidering, cut pieces from fabric.
SEWING GUIDE FOR SACHETS
NOTE: Shading denotes right side of fabric.
Prepare scented floral Potpourri for your sachet as explained below. (Or you may buy ready-made potpourri or lavender)
Instructions for both Sachet shapes are the same. The square sachet will be illustrated here.
 Right sides together, stitch two (unembroidered) sachet pieces together as a lining, leaving an opening between boxes for stuffing.
Turn right side out and press. Fill as full as possible with Potpourri. Slip-stitch opening together.
Optional: Baste pre-gathered lace to one remaining sachet piece, right sides together, with edge of lace on seam line, turning under first short edge of lace ½”/13mm. (If you have embroidered your Sachet, this will be the embroidered piece.)
Right sides together, stitch remaining sachet pieces (this will be the embroidered piece if using) together, sandwiching optional lace, leaving an opening between boxes. Turn right side out.
 Insert stuffed Lining into lace-trimmed Sachet. Slip-stitch opening together.
You can also make this sachet with just two fabric pieces from the pattern: Make as for the outer layer of the sachet and fill with lavender or potpourri.
POTPOURRI
"The drying of fragrant, natural ingredients and blending them into a potpourri became popular in the sixteenth century, when sanitation was primitive at best. Chamomile, lavender and fennel leaves were often sprinkled around the rooms of a castle to cover up unpleasant odors. In those days, herbs were also thought to possess mysterious, strange, and powerful properties. Aromatic leaves were supposedly able to cast out demons and save lives.In the 1500's, a Swiss pharmacist theorized that herbs embody the 'quinta essentia', the fifth essence, which medieval philosophers believed was the highest element after earth, air, fire, and water. Aromatic botanical compounds commonly became known as 'essential oils.'The term is still used to indicate pure fragrance oils such as those that are added to the ingredients in... potpourri to enhance and extend their natural scents.Today, the herbs, flowers, spices, and essential oils...have no magic powers - they just look and smell wonderful, adding a decorator touch to any room with a delightful, fresh fragrance."--Used by permission of Patti Howard of Victorian Fancies.
RECIPE FOR POTPOURRI:
This recipe comes to us courtesy of Patti Howard of Victorian Fancies.
1 c. dried rose petals
½ c. dried, crushed geranium leaves 1 tbsp. dried, slivered lemon rind
1 tbsp. whole allspice 3 crushed bay leaves
6 drops Rose-Geranium oil (available at many health food/craft stores)
Mix, sniff, and enjoy!
Note: The essential oil is not required, but it will prolong and enhance the natural fragrance of the ingredients. If you use the oil, it is nice to mix everything in a plastic bag, close it tightly, and place in a cool, dark place for a few days, shaking it up occasionally to blend the oil with the leaves and petals. This procedure can be repeated whenever the fragrance begins to fade.
EMBROIDERY STITCHES
Use this as a guide to select the right stitch for each particular motif:
Use 3 strands of embroidery floss or size 8 Pearl cotton.
Satin Stitch
This looks like the simplest of all embroidery stitches, with its over-and-over stitch, but in reality, it requires practice, patience and even tension. Stitch placement must be precise, entering and exiting exactly on the motif outline with the same distance between parallel stitches.
To fill in body of motif, work a series of straight stitches perpendicular (or slightly angled) to the transferred outline and parallel to one another.

Fig. 5 shows the satin stitch: out at A, in at B, up at C.
Where the design narrows down to a single line (as on the monograms), you will not be able to work the stitches parallel, but will have to stagger them. Fig. 6 shows an exaggerated scheme to handle the curves. (These stitches will closely resemble the stem stitch.)
Stem Stitch
Bring thread up at A- down at B- and up at C which is halfway between A and B (Fig. 7). Be sure to keep your needle on the same side each time. (Fig. 8).

For the downloadable PDF version of this pattern, go here.

On old fashioned shirts (such as the 202 Victorian Shirt), as well as many well-made modern ones, the tops of the side openings are often reinforced with small tabs to prevent the shirt-tails from ripping. As in so many of our patterns, Folkwear teaches a technique used in the era and that is still relevant and interesting today in the 202 Victorian Shirt pattern. There are three versions shown and taught for making these tabs in the pattern. Each version is one that we found on antique shirts in the Folkwear collection. Here is one on a sheer blouse.

These tabs are great for reinforcing shirt-tails or side slits on shirts or dresses. I will show you how to make one of the versions below.
This simplest reinforcement consists of a triangle stitched on the inside of the shirt. Cut a rectangle 1" (2.5cm) by 1 1/2" (4cm), tuck the edges under, and topstitch the folded edges to the top of the side slit.

First, cut the rectangle from the fabric you want to use - 1" (2.5cm) by 1 1/2" (4cm). I am using the main fabric for the tab, but you could use something bold to add fun detail. Most of these tabs are on the inside of the garment, so they generally won't be seen.

Then, using an iron, press the first fold:
Press the second fold, folding over the top point of the first fold:

Press third fold, folding the corner of the second fold into it:

Press the forth fold, folding the corner of the first fold into it:

Press the fifth fold, enclosing the lower edges of the first and second fold:

The tab is now finished. Press it well and make sure all raw edges are neatly tucked to the wrong side. I made this sample a little asymmetrical, but symmetry for the tab is probably better!

Place this tab, with the pointed side toward the top of the garment, and with the long flat side at the top of the slit - inside the shirt with wrong sides facing. Then topstitch around the folded edges of the tab. I used a contrasting thread here so you could see it better, but, if you want it to blend in and not be noticeable, use a matching thread.


Our 104 Egyptian Shirt pattern comes with detailed information on applying applique to the shirt front, back, and sleeves. It also has instructions for applying soutache (narrow braid used for trim), creating your own cording to apply as trim, and how to make knotted buttons from soutache or your own cording. Here, I am going to briefly cover how to make your own flat cording and then use it to make a knotted button.
To make self-cording, cut bias pieces at least 1" (2.5cm) wider than the cord you are using, and at least 12"-15" (30.5 to 38cm) long. Cut cords about 5" (12.5cm) longer than your bias strips.

Fold the bias strip in half lengthwise, rights sides together, over the cord. Pin cord in place, butted up against fold, and using a zipper foot, stitch down the length of the strip, making a 1/4" (6mm) seam.


Backstitch at beginning and end to secure. Secure one end of the cord by stitching several times through cord and fabric about 1/2" (13mm) from end of fabric at one end.

Now grasp the fabric near the secured end with thumb and index finger while bulling the loose end of the cord with the other. Ease the fabric over the secured end and continue pulling, turning the tubing so the raw edges are on the inside. When it is all turned, you will have a piece of flat tubing. Trim the cord off of the handmade cording.


The small knotted round button is a three-dimensional Josephine knot, tied with one piece of cord. Soutache or a small flexible braid or fabric tubing are recommend. In Middle Eastern clothes, soutache made of metallic thread is commonly used.

Make a loop with the cord.

Bring cord around and make another loop on top of the first.

Bring the same cord end around, underneath the first loop cord.

Bring that end over the first cord in the loops, under the second,

over the third cord in the loops, and under the forth cord in the loops. Creating the shape you see below.

Now pull the center loops slightly tighter, then pull gently on the cord ends to tighten. Continue to do this until you have a fairly tight knot.


The finished button size will depend on the size of the cording and how tight you pull the knot. You can use the "tails" of the knots to create the button hole loops.
You can print this by using this link.
Here is a video of how to make flat cording and tie the knotted button.


