- Home
- About
-
Shop
-
Sewing Patterns
-
Fabric
- Sewing Supplies
- Folkwear Clothing
-
- Blog
- Customer Gallery
- Contact

To get started on today's Sew Along I'd like to share some thoughts on how to lay out the pattern pieces of this particular pattern and what to do anytime you might not have exactly enough yardage.
It is always worth taking the time to familiarize yourself with the layout instructions of a new sewing pattern before jumping in. While the construction of this pattern is not difficult... it is a little different in the various ways the pattern pieces are cut out. Also, the wrap extensions are a design element you don't see everyday.
After tracing off the pattern, lay the pattern pieces out according to the layout diagram as indicated in the pattern instructions. The idea is to be sure you can clearly see how each piece will fit. If it helps think of cutting the similar pieces out in batches. Consider the largest cut one pieces first, then the cut on fold piece, and lastly the cut two pieces.
Start with positioning the largest Front A piece and the Back B piece on your fabric to be sure you know how to best use your fabric. Then concentrate on the smaller pieces. Be sure to keep grainlines and any directional concerns in mind.
Front A and Front Underflap C are cut one laying flat in a single layer of fabric. Back B is Cut one on the fold. Pieces D,G,H, and I are cut two. Pieces E and F are cut one.
Yardage Challenge?
The challenge I faced with laying out my pattern was due to my limited yardage. Just because you do not have exactly what the pattern yardage chart suggests for your size does not mean it might not work.
I am making a size medium in the shorter version. My "Plan A" is to use fabric I already have in my stash. But what if you are unsure you have enough fabric to make it work? Well before deciding on a "Plan B"... try laying out all the pattern pieces, including tracing off an extra pattern piece for all the pieces that require "cut two"... and lay the pattern pieces out in a single layer of your yardage. This is an extra step, but it will allow you to visually see for sure if everything will fit properly and eliminating any guess-work.
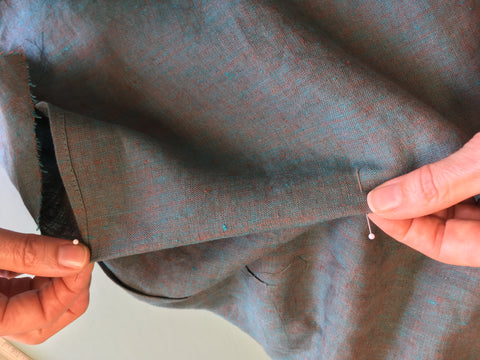
I have 2 5/8 yards of 60-inch wide fabric. The pattern call for 3 1/8 yards of 60-inch fabric. I am 1/2 yard short. The fabric I am using is a linen cross weave and therefore not directional, which makes my challenge much easier than if I had any directional concerns to consider.
Remember if laying pattern pieces out flat… account for the "cut two" pieces, being sure each piece has a corresponding mirrored pattern piece. Don't forget the grain lines.

Place each pattern piece straight on the grain of the fabric as indicated on each pattern piece. It does not pay to get creative when laying out pieces, especially those cut with a curve. Remember that fabric cut with a curve is unstable. When cut with a curve the fabric weave tension wants to relax and expand. For this reason, I recommend laying the pattern piece out, but waiting to cut any curved pieces until you are ready to use them. Especially, if your fabric is a looser weave.
Before Removing the Pattern from the Fabric... Be sure to transfer all the markings (notches, dots, and boxes, etc.) to the wrong side of your fabric so that they will not disappear by the time you need them.
It might also help to understand that this dress is one in which you step into to access. Hopefully, knowing this will help to know the construction is coming together correctly.
Make Darts Before Construction Begins
Darts on Front A & Back B
Transfer the all double-end dart dots on the pattern to the wrong side of the fabric. Working with the wrong side of fabric facing up, use a hip curve or french curve to connect the dots using tailors chalk or a non-permanent pen or pencil. Your dart arches should look like those on the pattern pieces. Use the dot in the center of each curve to help guide the drawn curve to each end dot.

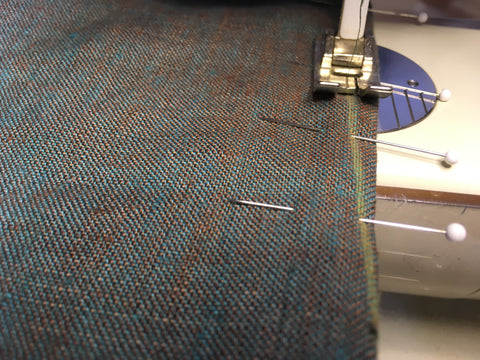
With right sides together connect the double-ended dart guide lines using straight pins… aligning the pins perpendicular through the horizontal curved edges of dart as seen below.


Pin being sure the dart guide lines match creating a straight foldline.

At the begining of the dart do not back-stitch, instead be sure to leave a thread tail, continue stitching along the drawn curved line, when you reach the other side or end do not back-stitch but leave a thread tail again.

Tie off the thread tails on each end of the double-ended dart.

Press the darts towards the Center Front and the Center Back.

Front Underflap C Edges & Darts
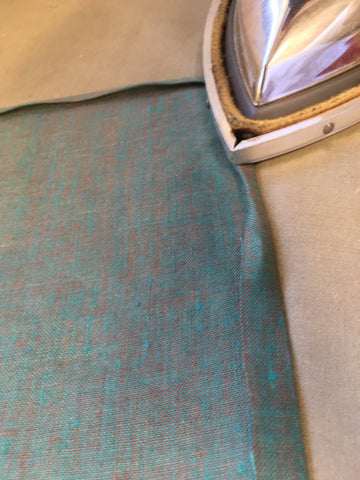
Work with the wrong side of Front Underflap C facing up (see the pattern to orient your work), press under 1/4-inch (6mm) along the un-notched edges.
Hint: In the photo below, I made a basting stitch on the 1/2-inch (13mm) seam allowance, to create a guide to help with folding under the edges. The basting stitch can easily be removed when edges are complete. Fold along the 1/2-inch (13mm) guide stitch and press to hold in place.

Turn the edge again 1/4-inch (6mm) for a total of 1/2-inch (13mm) on seamline, and stitch close to the pressed edge.


To help stabilize the curve of the armhole sew a stay-stitch inside the seam allowance.

Working with the wrong side facing up, draw the guide lines for the larger dart. Fold the dart on the lower edge along the dart fold line, pinning along the chalk guide line in the same manner as the double-ended darts. Start stitching with a back stitch at the wide end, stitch to the dot point, and leave a thread tail at the dot end. Tie off the thread tail at the dart. Press the dart away from the notched side seam.

Draw the dart guide to create the small dart along the arm hole. Fold the dart on the armhole edge along the dart fold line, pinning along the chalk guide line in the same manner as the larger dot above. Stitch the small dart starting at the outer edge with a back-stitch, sew to the dot point and leave a thread tail at the dot end. Tie off the dart at the dot and press dart away from the shoulder and towards the finished edge.


Shoulder Seams and Staystitch Neckline
With right sides together, stitch Front A and Front Underlap C at the shoulders, matching notches. Press the shoulder seams open. Then stay-stitch the entire neckline edge inside the seam allowance to stabilize the long curve of the neckline… 1/4-inch (6mm) from the outer edge is good.


Turn your work right side out and set it aside while we make the ties.
The Ties
Fold each Tie D piece right sides together along the center fold line, pin, and stitch using the 1/2-inch (13mm) seam allowance, leaving the small ends of each tie piece open.

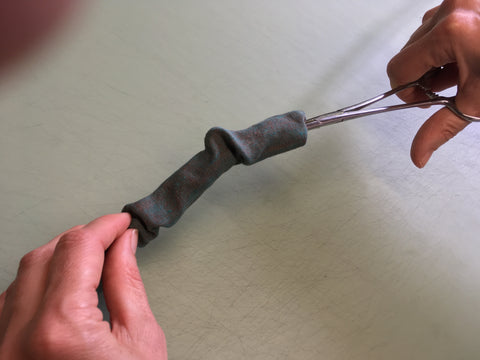
Trim the the seam allowances, turn right side out, and press. Instead of rolling the edges, keep the edges flush or even, creating a nice finish when the ties are tied.


Hemostats make turning easier.

Ties to Front
Working with the right side facing up (remember you turned your work right side out), stitch Tie D to the right-hand side of the front, lining up the raw edges with side seam, and the top edge of the Tie with the star (as indicated on the pattern). Securely stitch the the Tie edge inside the 1/2-inch seam allowance. Repeat with the other Tie piece at the left-hand side of the Front.

Notice ties are sewn at the side seams on the right side of the Front.

Sewing Up the Side Seams
The pattern instructs you to start working on the LEFT side only. Remember to orient yourself by determining the left side as if you were wearing the garment… not the left side that lays facing up at you.
It might also be helpful to understand that the side seams are the side seams of the wrap extension, that wraps to the back of the dress.
The Left Side Extension
Working on the LEFT side only (the side without under-flap C), with right sides together (wrong side facing up). Be sure the tie is sandwiched between the Front A and Back B pieces, laying towards the center or inside of the garment and out of the way of the stitching. The idea is to sew up the side seam with the tie sandwiched in the seam allowance.
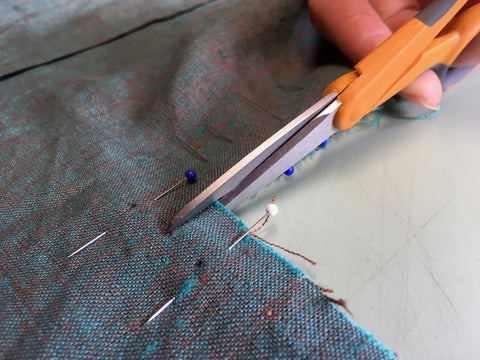
With right sides together, pin and stitch the front and back together from the outermost dot at the side seam dart, across the top to the outer edge, and then down the side of the wrap extension portion, matching notches. Clip the corner to the dot (see photo). Trim the sewn seams 1/4-inch (6mm).

With right sides together, stitch the left Front to left Back at the side seam, from the armhole to innermost dot at the side seam dart, matching the notches. Clip to the dot and press the seam open.


With still concentrating on the Left side, we are going to sew the darts that create the shaping at the side of the hips. At first the darts at the sides may seem odd. Since there is no true side seam to create the hip shaping, darts are used instead. A dart is made on the Front side and a dart is made on the Back side.
Each dart is sewn starting at the top of the waist edge, the darts then extends downward into the skirt. You are creating a dart just on either side of what would be the side seam to give shape to the waist/hip area, when the wrap portion is eventually tied in place.
Start with the front edge first, fold along the dart foldlines and bring both dart dots together. Stitch begining with a back-stitch, from the upper pair of dots to the lower single dot, being careful not to catch the Back in the stitching. Leave a thread tail at the end. Tie off the thread tail at the dot. Repeat on the back dart. In the photo, I have drawn a chalk line from the upper dot pairing to the bottom single dot and pined to secure for stitching.
Pinning the

Below you can see the darts sewn on the front and back.

Press the front dart towards the center front and the back dart towards the center back.
The Right Side Extension
Now, concentrate on working the RIGHT side only (the side with the Underflap C). With right sides together, stitch the Front and the Back together from the box (as indicated on the pattern) to the corner of the extension and down the side of the wrap extension, matching the notches. Be sure to keep the tie and Front Underflap C out of the stitching. Trim the seam 1/4-inch (6mm).

Pin the right Front and the Back at the right angle edges so they align evenly. Then clip inside the corners 1/2-inch (13mm) along the dart foldlines (clip the seam allowance in the center between the two dart dots). Take care not to cut past the seam allowance. This will release the fabric for the next step.

Now, to finish the raw untrimmed horizontal edge on the Right side of the wrap extension. On the Front extension, press under 1/4-inch (6mm) on the raw horizontal edge between the newly-made clip and the box. Turn the edge under again 1/4-inch (6mm) on the seamline, tapering to nothing (a point) at the box. Because my fabric wanted to unravel… tapering to a point was a bit fiddly. The idea is to create as neat a finish as you can. Stitch close to the pressed edge, keeping the Back out of the stitching. Repeat on the Back edge.

Note in the photo above: I have folded and pressed the 1/2-inch (13mm) seam allowance first and then turned under the edge 1/4-inch (6mm). I find this method easier. It does not matter the result is the same.


Hint: If you find back stitching messy when beginning and ending a small turned edge… leave a thread tail long enough to thread through a needle and pull the top thread to the wrong side and tie off.
Notice how I have pined the vertical side under the armhole edge (top right in the photo) to assist with proper alignment and how the finished Front edge was used as a guide for the Back edge finishing. The Front and Back edges are only pined together to ensure they evenly match.

Make the darts on the Front and Back of the right side in the same manner as for the left side. Sewing through the finished edge is the only difference. You may need to relocate the dot that got finished in the seam… just measure over 1/2-inch from the cut you made in the seam allowance for a total of a 1-inch (2.5cm) dart width. Tie off the thread tails at the end of the darts. Press the front dart towards the center front and press the back dart towards the center back.


Next, we want to finish the vertical raw edge on the Front of the dress. (The back edge will receive the underlap C a bit later). Clip the side front seam allowance to the seamline above the dart, taking care to not cut beyond the seam allowance. Press under the side front 1/4-inch (6mm), from clip to the upper edge. Then turn the edge again 1/4-inch (6mm) on the seamline and stitch close to the pressed edge.


The shoulder of Front Underflap C and the Back shoulder were attached early on in the construction of this project. To finish constructing the Front Underflap C to Back B; with right sides together, pin the Front Underflap to Back at the side seams between the armhole and the dart dot, matching the notches.
Continue pinning the Underflap to the dart, matching the stitching lines (the raw edge of Underflap will not be even with the dart fold line). The idea is to align the the side seam stitching line and the dart stitching line. Press the seam open.
S


Turn the side wrap extensions right side out and press, slightly rolling the edges towards the back.

This is what your project should look like with the wrong side of the front of the dress facing up (forgive me... I forgot to take a photo with the right side facing up).

If you like, go ahead and finish the seams as you prefer. I decided to serge the shoulder seams and the side seam under the armholes. You should have already trimmed the seam allowances along the sides of the wrap extensions, so there is not need to worry about finishing them.
That's it for now. The major constrution is done! I hope the sew Along has been helpful in making of the 131 Tibetan Chupa.
On Day Three of the Sew Along we will be finishing the neckline and armholes, heming the bottom skirt edge, and make the simple closures.
If you are sewing this and use Instagram, we recommend tagging any photos you post with #folkwear131 or searching that hashtag to see whan others are doing!


