-
Sewing Patterns
-
Fabric
- Sewing Supplies
- About
- Blog
- Gallery
-

by Cynthia Anderson
In this blog I am going to show you how I made View A of the 222 Vintage Vests pattern, adding a contrasting facing for a custom look. See Add a 222 Vintage Vest to Your Fall Wardrobe and Vintage Vest Inspiration for more ideas to get you started in making your own vest.
I used a light-weight dark navy wool suiting with a white pin-stripe for the vest front pieces, the inside facings, and the back belt. For the contrasting front facing I used a similar weight wool plaid. For the back, lining, and the pocket I used a dark navy acetate lining.
Feel free to make the back of the vest out of the same material as the front of the vest if you like. The belt is optional too. This pattern shows you how to easily line every vest. And I do recommend keeping the linking, for not only a clean interior finish, but because a lining makes wearing a vest truly luxurious. Vests are a great use of small amounts of fabric that can be used in any number of ways.
If welt pockets are new to you or you need a refresher, make a muslin. Practice transferring the pocket opening, adding the welts, and the pocket bag on a tightly woven scrap of fabric. Use a scrap of lining to make the pocket bag, so you will get a feel for what it is like to work with a slippery fabric.
Vest Front Construction
Welt Pockets
First, I transfered the pocket markings (welt pocket opening) to the right side of the vest. For dark fabrics a fine chalk pencil works well. Use a water soluble pen or black chalk pencil for light colored fabrics.
My favorite way of transfering markings like this is while the pattern piece is still attached to the fabric. Insert pins into the corners of the pocket opening, with the pin sticking through the fabric. Then, mark the corners of the pocket opening before completely removing the pattern from the fabric. Connect the dots using a ruler. I did not transferbthe stars and dots to the fabric to keep my work tidy. But I kept the pattern handy to use as a reference. I made all four of the pockets for View A, but feel free to make as many as you like, or none at all. Or add a patch pocket!


I added fusible interfacing over the pocket areas on the wrong side of the vest to reinforce the fabric. You could use sewn-on interfacing if the fabric is heavy enough to allow for invisible stitching on the right side of the fabric.

I traced the all pocket openings with a machine basting stitch to provide a guide for aligning the welt tabs and for cutting the pocket open later on. I stitched over the center slash line as well. This extra bit of stitching keeps the stitching visible on each side of the fabric long after the chalk has worn away.


Add the Optional Facing
To add a contrasting facing to the out side of the vest, I used the same facing pattern piece intended for the inside facing of the vest. Treat the facing as a trim or applique and stitch it to the outside of each vest front. It is actually easier to add the facing while the fabric is still flat and before the welt pockets are added.
I cut the plaids so that they matched at the center front. To help ensure the plaids match, I cut each facing piece separately, paying attention to where the pattern piece match/align to the plaid for each side. Once one side of the facing is cut, I flipped the pattern for the opposite side facing. If you don't have to worry about pattern matching, then feel free to cut both pieces at once.
I made a machine baste-stitch on the 1/2" (13mm) seam line on the un-notched edge of each of the facings pieces. Use the basting stitch as a guide I turned under a clean smooth edge and press the edge.


I pinned and stitched the the wrong side of the facing to the right side of vest on the center front edge, matching notch 5. I made the stitching just inside the 1/2"(13mm) seam allowance.

Then, I top-stitched the opposite un-notched edge close to the turned under edge to hold the facing in place and to create a clean finished edge.

Now I could treat the vest front as one piece of fabric and continue the construction.

Make the Welt Tabs
Now, let's get back to the welt pockets. I added interfacing to the wrong side of half the pocket welts for each welt C and D tabs.
If using fusible interfacing, pre-trim the interfacing as seen below before ironing to the fabric.
If using sewn-in interfacing, machine-baste along the seam lines. Then sew invisibly (by hand) along the horizontal Center Fold Lines. Trim the interfacing close to the basting stitches. The stitched interfacing has the benefit of making it easy to see which is the wrong side of the tab.
Note: I am using fusible interfacing because my fabric is a light-weight wool suiting.

With the right sides of the welt tabs together, I folded the welt along the Center Fold Line and stitched the short ends together, using the 1/4" (6mm) seam allowance.

I trimmed the corners, turn right side out, and press.

Then, I machine-basted the remaining long edges together using the 1/4" (6mm) seam allowance.

Add the Welts and the Pocket Bag to the Pocket Opening
I basted the interfaced side of the welt tabs to the right side of the vest, along the lower welt seam lines. The folded edge is positioned facing downward. The long raw edge of the welt meets at about the slash line.

I transferred the pocket opening lines to the pocket bags as indicated on the pattern. With right sides together, I pinned the pockets to the right side of the front (on top of the welt tab), matching the dots and stars as marked on the pattern. I stitched along the pocket opening seam lines, pivoting at the small dots and stars. I had to be careful not to catch the welt tabs in the short sides of the rectangles.


I then carefully slashed through the Pocket and Front along the slash line between the seams lines, clipping diagonally to the small dots and stars.

Next, I turned each pocket half to the inside of the vest, and pressed both of the pocket halves down on the horizontal Center Fold Line.
I pressed the welt tab up on the outside (right side) of the vest. And, I pinned and stitched the remaining raw edges of the pocket bag, right sides together to close up the pocket. I removed any basting stitching if it was visible.

On the outside (right side) of the vest, I hand whip-stitch (or machine-stitch) along both short ends to secure the welt tab. I also added a few extra stitches to the top of each corner to reinforce.

Back Belt
The patterns calls for the belt to be made out of lining fabric. The belt is best made out of a light weight material to not only cut down on bulk against the wearer's back, but a lighter fabric also makes adding the belt-buckle hardware easier and less bulky. Vests typically have belts made of lining material, but I decided to use the same light-weight wool suiting the front of the vest is made from.
If using a lighter-weight fabric like lining fabric, add fusible interfacing approximately the same weight as the belt fabric for more durability.
You could also replace the belt buckle with a button/buttonhole or create a faux buttonhole look by using a snap with a button stitched over the top of the snap.
With right sides together, I stitched the belts on three sides, leaving the notched edge open.


With right sides together, I then pinned and stitched the center back vest seam, making sure to keep the belt pieces from getting caught in the stitching.

I repeated this for the back lining as well.
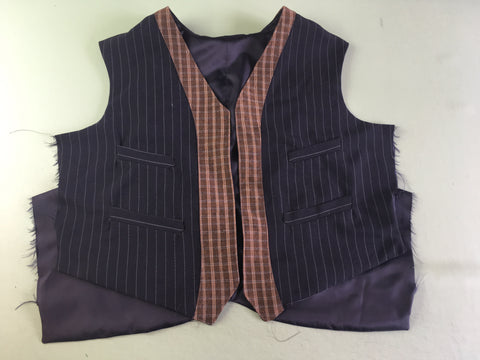
In the photo below, the vest back is in the foreground and the back lining is in the background. Both backs are viewed wrong sides facing up.

Attach the Front and Back of the Vest
With right sides together, I stitched the center back neck band seam of the Vest Fronts.

The photo below shows the shoulder seam snipped on right side of vest.


Then, with right sides together, I pinned and stitched the shoulder/back neck band with right sides of the front and back together, pivoting at the dot and matching the center back seams. I failed to take a photo of this step, but it is also pretty straighforward.
Attaching the Lining
I stitched the shoulder seams of the lining right sides together, matching the dots - and pressed them open.

Instead of cutting my Lining Facing out of the lining material, I used the pin-stripe wool suiting. Typically, the interior facings are made from the lining fabric. But, I continued to use the main outer fabric on the inside. I like the the way the facing looks and feels on the interior of the vest, especially when worn unbuttoned. Of course, this is totally up to you. I cut both the lower front and front facings out of the pin-stripe wool suiting.
Because of the extra layer of facing fabric added on the outside front of the vest, I eliminated using the interfacing the pattern recommends. The three layers of wool suiting are sufficient enough to support the use of buttonholes and buttons. But if you are not adding an extra layer of interfacing, or you are using lightweight lining fabric, you might want to use the interfacing.

With right sides together, I pinned and stitched the lower front facing to the front lining, and pressed the seams open.

I then pinned and stitched the center back seam of the front facing, right sides together (and pressed seams open).

With right sides together, I also pinned and stitched the front facing to the lining, clipping along the curves, and matching the Center Back seams. The seam is pressed towards the facing.

I added stitching close to the edge of the facing to create strength and add a nice finish.


With right sides together, I pinned the lining to the outer vest, matching the Center Back seams and notches.

Then, I stitched along the outer front opening edges, pivoting at the corners and stopping at the boxes that mark the top of the side slits/vents.

I then pinned and stitched around the armholes. I clipped the seam allowances to release the fabric in the curves. And I stitched the back bottom edges as well.
I stitched all the vest edges, except the side seams. The side seam openings need to be left open for turning the vest right-side out.
It helps to clip and trim all the seam allowances (except for the side seams) to make it easier to turn the vest neatly right sides out.

I turned the vest right side out by pulling the fronts though the shoulders and then pull both fronts out one side opening of the back.
I pressed the turned edges, slightly rolling them to the inside of the vest, so the lining was not visible from the right side.
Finish the Side Seams
I started with the vest front and back outer side seams first. With right sides together, I pinned and machine stitched the vest front to the vest back at the sides seams, beginning at the boxes (at bottom side slit/vent opening) and ending the stitching 2" (5mm) past the armhole seam.

Next, I closed the lining side seams. I turned under the remaining lining seam allowances to the inside of the vest and pressed along the stitch line to create a clean edge. I worked with the right side of the side seam lining facing out, and pinned the front and back side seam lining together, matching the turned under edges and hand slip-stitched together. I made sure not to catch the side seam for the outer vest in the stitching. Because the previous machine stitching extended 2" (5mm) beyond the armhole, the amount of hand stitching is not very much.


The vest is lined!

Buttonholes & Buttons
I made the buttonholes by machine on the front as marked on the pattern, 1/4" (6mm) from the finished edge. I used 1/2" (13mm) buttons. You could also make the buttonholes by hand or change up the size and number of the buttons used. Generally, men's buttonholes should be made on the left front, women's on the right. Then I sewed on the buttons to properly align with the buttonholes.


Due to the outer facing, I preferred the way the front of the vest looks with my buttonholes on the left front side, so am breaking the "rules".
If you are new to buttonhole/button making or need a refresher, see the blogs Buttonhole 101: Part One and Buttonhole 101: Part Two.
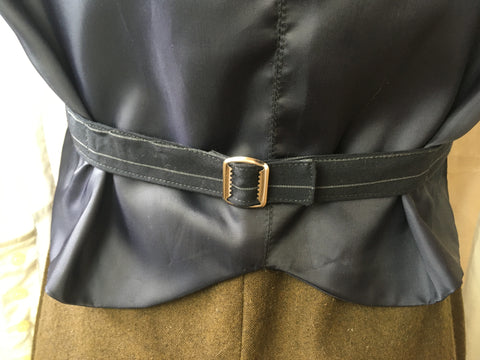
Add the Buckle As a Final Touch
Buckle designs may vary, so have a look at the instructions for how to add them to the belt. For the buckle I used, one end of the belt is attached to the center post of the buckle, by wrapping the belt end around the center post approximately 1/2" (13mm) and stitching on the back side to hold. I chose to hand-stitch the edge, but machine stitching would work too.


Vests are not only functional and versatile, but they are an fun way to spruce up any wardrobe. Plus, vests are a perfect fall project to practice tailoring construction techniques and skills in preparation for making a new coat or jacket. Have a look at all the Folkwear coat and jacket patterns and enjoy making a special piece for yourself or someone else. Don't forget to add a vest for extra warmth and style to whatever you make!


I love this vest and even wore it today with a coordinating grey skirt and a white buttoned shirt underneath. Perfect fall layering for the cool weather we are starting to get.


