- Home
- About
-
Shop
-
Sewing Patterns
-
Fabric
- Sewing Supplies
- Folkwear Clothing
-
- Blog
- Customer Gallery
- Contact


by Cynthia Anderson
Welcome to Day Two of the 160 Hawiian Mu'umMu'u Sew Along where we will create the darts and in-dart pockets, as well as create the front and back of the dress. In Day One of the sew along, we gathered materials, explored the pattern, and choose size and view to make.
I am making View B (with the 3/4 length sleeve) in a size small, but the instructions for both views with sleeves will be nearly the same. The fabric I am using is a mid-weight gray-blue linen, with pockets added to the front side dart. You may be wondering about how a pocket is added to a dart. I promise this is not difficult and you will love wearing this mu'umu'u with pockets.
To get started today, cut out the pattern pieces for your size and the view you want to make, according to the layout instructions. Don't forget to transfer all the needed markings to your fabric before you unpin and remove the pattern pieces from the fabric.
Seam Finishes: Finish seams as you prefer. There are a couple of places you could use French seams, but often you will want to press seams open and finish with serging or zig-zag stitching (or pinking).
Transfer Dart Marking
It is perfectly fine to transfer the pattern markings to your fabric in any method that works best for your project. But before you do, have a look at the method I have used for the dart and why.
First, I used tailor's chalk to transfer the dart outline to my fabric, because the ink of the water soluble pen I have is not easy to see on my fabric. Typically, I would make the marking on the wrong side of the fabric. This time, I transferred the marking to the right side of the fabric, because I planned to trace the chalk lines with a basting stitch. Since the basting stitching shows on the right and wrong sides of the fabric it really does not matter which side the transfer drawing is made.
I chose to make a basting stitch to outline the entire dart, because sometimes the chalk marking disappears before a task can be completed. Since this dart is large and it is handled quite a bit, I decided a removable basting stitch to be a good choice. The stitched outline also helps to maintain the integrity of the dart, preventing it from stretching.
Note: The basting stitch does not need to be removed unless it accidently ends up being visible on the right side of the mu'umu'u.

Another great way to transfer the larger dart lines is to use a piece of tracing paper and a tracing wheel. You can slip the tracing paper to the wrong side of the fabric and trace the dart cutting and stitching lines with the tracing wheel. The marks will be left on the fabric. You will need to move the tracing paper once or twice to be able to mark the whole dart, but it is fairly easy to do that and mark the entire dart. Be sure to use a tracing paper color that will contrast with your fabric. You can also use the basting marking method described above after tracing with the paper and wheel if you like.
Stabilize the Yokes and Yoke Facings
Anytime a fabric is cut with a curve, it becomes less stable. To preserve the shape and to stabilize the fabric, interfacing or stay stitching should be added. Most fabrics benefit from stabilization directly after being cut. Even if the fabric is just laying flat undisturbed, the weave will relax and the fabric will spread. If the fabric spreads or distorts, the pattern pieces will not fit correctly when they are sewn together.

Note: Adding interfacing is optional, but it is always a good idea unless you are confident in the stability of the fabric used. If you are not using interfacing, be sure to stay stitch all Yoke and Yoke Facing pieces.

To stay stitch, stitch just inside the seam allowance (seam allowance is 1/2" or 13mm) with a regular length stitch or shorter.
Tip: Try to avoid pulling or over handling these pattern pieces when stay stitching.

Prepare Dart for Pockets
The 160 Hawaiian Mu'uMu'u does not have a true side seam. Instead it has a long shaping-dart that acts as a side seam. The authentic mu'umu'u that inspired the drafting of this pattern did not originally have a pocket. However, the Folkwear team concluded that this dress was a perfect candidate for pockets.
If you do not want to add pockets, transfer the dart markings and make the dart according to the pattern instructions.
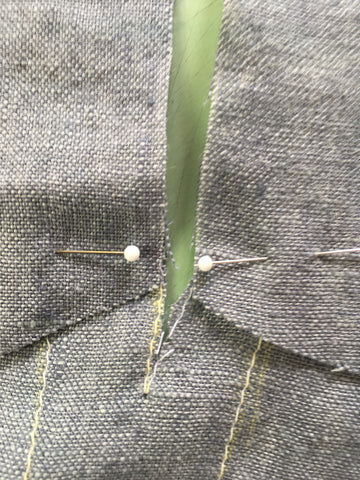
To add the pockets, the center of the dart needs to be cut away at the cutting lines, as seen in the photo below. Cut on the cutting lines for your size and cut carefully to the dot at the bottom of the cutting lines. This cut out space creates a seam allowance in which to attach the pockets. This might seem odd or even scary, but it is a standard way of installing pockets to a dart. If this is new to you, please do not hesitate to give it a try. Learning to sew is all about building your skill set.

Pocket Added to Dart
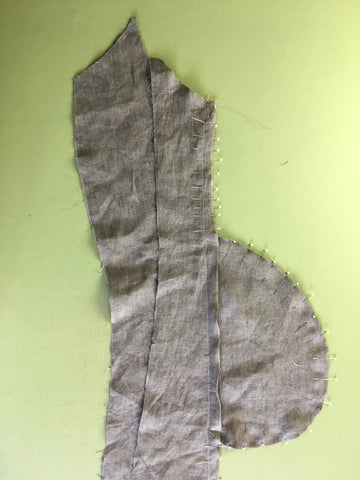
With right sides together, position and pin each pocket at the raw edge of the opening, matching the circles and stars.
Stitch the edges of the pockets to the raw edge of the dart along the seam line between the circles. (The white tip pins mark the circles. The red tip pin marks the star).


Stitch the pocket to the raw edge of the dart opening using 1/2" (13mm) seam allowance between the top and bottom circles.


Fold pocket to through to the inside (wrong side) of the dress, and press the seam towards the pocket.

Now, pin pockets, right side together, matching the notches on curve of pocket, and matching circle and stars. Pin the dart together matching the dart lines (above and below the pocket). Stitch from the top of the dart to the circle at the top of the pocket. Pivot, with the needle down in the fabric, and stitch from circle around the curve edge of the pocket to the circle at the bottom of the pocket and end with a backstitch. See the photos below.


Be sure the seams are aligned, and now stitch from the star (red tip pin in photo below) on the dart/pocket seam to the dart dot, leaving long thread tails at the bottom of the dart and tie off. Keep the pocket out of the stitching.

 The bottom of the dart threads tied.
Press the dart and pocket towards the front of the mu'umu'u. Repeat for the other pocket on the other Side Front.
The photo below shows the dart and pocket pressed towards the front of the mu'umu'u as seen on the wrong side.


Finished dart with pocket!
Add Front Sides to Center Front of the Mu'umu'u
With right sides together, matching notches and dots, pin and stitch each Side Front A to Center Front C as seen below. Press the seams open or towards the sides and finish.

Right side view of the finished front.

The Back
Make two rows of gathering stitches along the top of each Back B as marked on the pattern (between the open notches).

With right sides together and matching the (double) notches, stitch the Back B center seam. Try to keep the gathering stitches out of the center back seam. Gathering the back will be done at a later step.

Press the seams open and finish.

Sew Front and Back of Dress Together
With right sides together, stitch the front and back of the mu'umu'u at the side seams. Press the seams open or towards the back and finish.

There we have it. The body is constructed with pockets added to the darts. I hope Day Two of the mu'umu'u sew along went smoothly and you learned something new. Join in again for Day Three, for adding the sleeve to the armhole, constructing the yoke and yoke facing, and assembling the dress/sleeve/yoke.


