- Home
- About
-
Shop
-
Sewing Patterns
-
Fabric
- Sewing Supplies
- Folkwear Clothing
-
- Blog
- Customer Gallery
- Contact


Our 106 Turkish Coat is one of the first patterns Folkwear released in the late 1970s. The pattern is still true to the original - providing instructions for creating a fully quilted coat with quilted or trapunto borders, plus all the information (and designs) need for doing so. And the pattern also instructs how to make a coat with pre-quilted fabric.
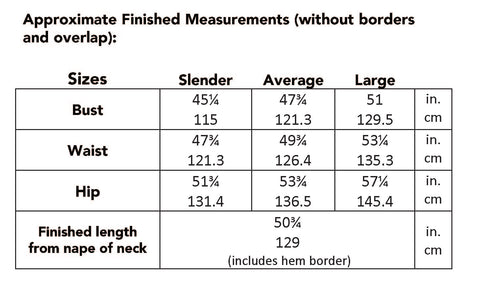
The pattern also stays true to the original sizing, which is labeled as "slender", "average", and "large". These aren't very precise sizing labels and I think that is exactly what the pattern designers had in mind. There is a lot of ease in this coat as it is meant to go over clothes, even outerwear, as a final outer layer. I recently went back to this pattern and calculated the approximate finished measurements as well as assigned sizing labels for the size chart to the original sizes (slender, average, and large). This gives an idea of how large the coat is and can help you decide what size you want to make.

We occasionally get requests to size this pattern up as we have done with many other patterns we have in our collection. However, this one is difficult, not because of the actual pattern pieces that need to be graded, but because of the designs and traditional nature of the pattern. It is not as straightforward as some of our vintage patterns that have regular sizing and grading; and would change the instructions and detailing in complicated ways that a simple tutorial doesn't do. Plus, this pattern is extremely easy to make in larger sizes due to the simple geometric shapes of the pattern pieces. And really only one part needs to sized up to get to most sizes that would be desired.
So in this blog post I am going to show you how to easily increase the sizing of the 106 Turkish Coat.
Front and Back
First, the front and back of this pattern are cut as one piece. You tape them together so the shoulder seams meet. And then lay them out as one piece on your fabric.
If you have a directional print or napped fabric, you can cut the front and back separately, but be sure to add in the 1/2" seam allowance (it is included on the pattern piece). It will take likely take more fabric than the pattern calls for.
This Front/Back piece is the only piece you really need to make larger to expand the sizing of the whole coat.
The finished measurements for the largest size is approximately 57-1/4" (not including the borders and overlap section). This provides approximately 12"-13" of ease at the hips. So if we were to go up to a 52" hip (our current grade rule size of 2XL), you would want the coat to finish at 64" at the hip (52" hip + 12" ease = 64"). So we would want to add about 7 more inches to the pattern to get the desired width (I am disregarding the 1/4" on the finished measurement for these calculations); 57" (current finished largest size) +7" = 64". So we need to divide 7" by 4 because we are going to add width to each side of the front and back to get to 7". So, we are going to add 1.75" to each front and back side. To do this, you just need to draw a line 1.75" wider than the largest pattern size on each side of the Front/Back.
For this example, I am going up to XL, adding 5" to get a finished measurement of 53" (finished largest size)+5"=58" (48" hip + 12" ease) finished hip. So I am going to add 1.25" to each side. You can use these calculations to get whatever size and fit you want. If you want more ease, add more width to the sides of the Front/Back pattern piece.
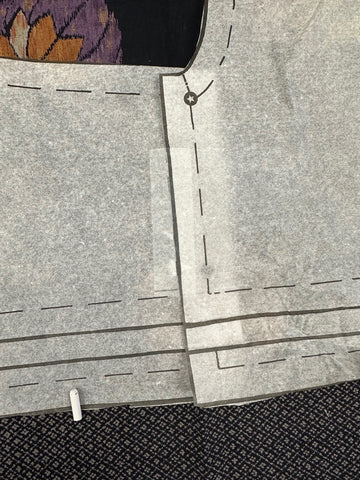
I use a straight clear ruler to do this, but you can use any kind of ruler to mark the new cutting lines.
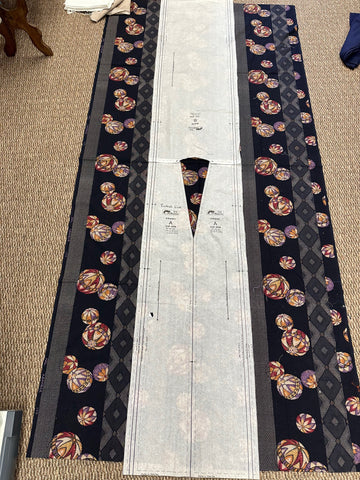
You can see here that I am laying this pattern out with the front and back taped together at the shoulders. I am using a Japanese cotton with a fun print. I have centered the Front/Back over the center printed part of the design. My fabric is slightly shorter than the pattern pieces, so I am going to make the coat a little shorter than the pattern calls for. It is easy to shorten or lengthen this coat, but it important to note how much you are shortening the coat so that when you cut the front borders, you cut the correct length.
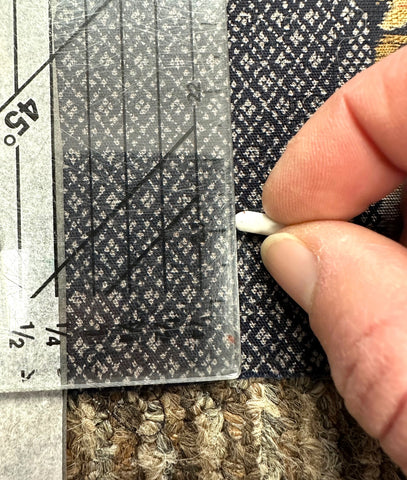
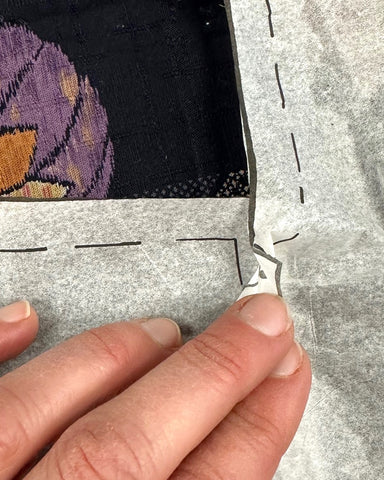
Marking 1.25" on each side of the Front/Back pattern piece.
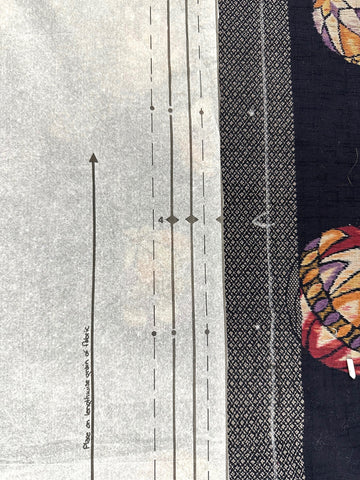
Be sure to put in the notches and dots where they are on the pattern, just transposed to the new seam allowance that you have drawn in.
You will need to do this for the main fabric, lining fabric, and batting. And if you are expanding the sizing of this pattern, you may need more fabric than what the pattern calls for. Be sure to have extra fabric. For this coat, we made it as an unlined coat so did not need to cut out the lining or batting.
Borders
As the pattern instructs, do not cut out the border pieces until you are instructed. You will follow the directions in the pattern to get the border pieces that will fit your new Front/Back. Be sure NOT to cut out the border pieces until you are instructed, and follow the instructions in the pattern. You will need to a measuring tape to take a few measurements on the coat once the main body has been put together.
When I cut out the border pieces, I had to add some length to each of them (except the front borders), and I added the length to the side of the pattern piece that had markings.
Also, you basically don't use the notches on the borders for placement of any of these pieces. They are mainly there to tell you which side is going to go against the main body of the coat. So it does help to have them, just don't bother trying to line them up with anything, especially if you have changed the sizing of the coat.
Finally . . .
We also highly recommend making a muslin for any pattern that you are adjusting. This with help you know if you need to make further adjustments before cutting out your garment fabric. A muslin for this coat would not need the borders or cuffs to make sure the fit is what you want.
This is pretty much all there is to expanding the size of this pattern. There is a lot of ease at the shoulders due to the underarm gusset (which adds 4") and the side panels). The sleeve itself also has a lot of ease. But, if you are wanting to make the sleeve larger, add the extra you want to expand it by to each side of the underarm of the sleeve. Then you will also need to adjust the dots on the Front/Back that indicate where to attach the sleeves by the length you increased one side of the sleeve width. Your side panel may be slightly longer than the Front/Back, but you will just trim off the extra at the end of body construction and before you add the borders to the coat.
I hope this has helped you figure out how to easily expand the sizing of this coat to fit you. It is simple! And the 106 Turkish Coat is so fabulous!


Laine
March 18, 2024
I have my pattern from the 70s-almost ready to make it-honestly never found the fabric I wanted 🩵🩵🩵