- Home
- About
-
Shop
-
Sewing Patterns
-
Fabric
- Sewing Supplies
- Folkwear Clothing
-
- Blog
- Customer Gallery
- Contact
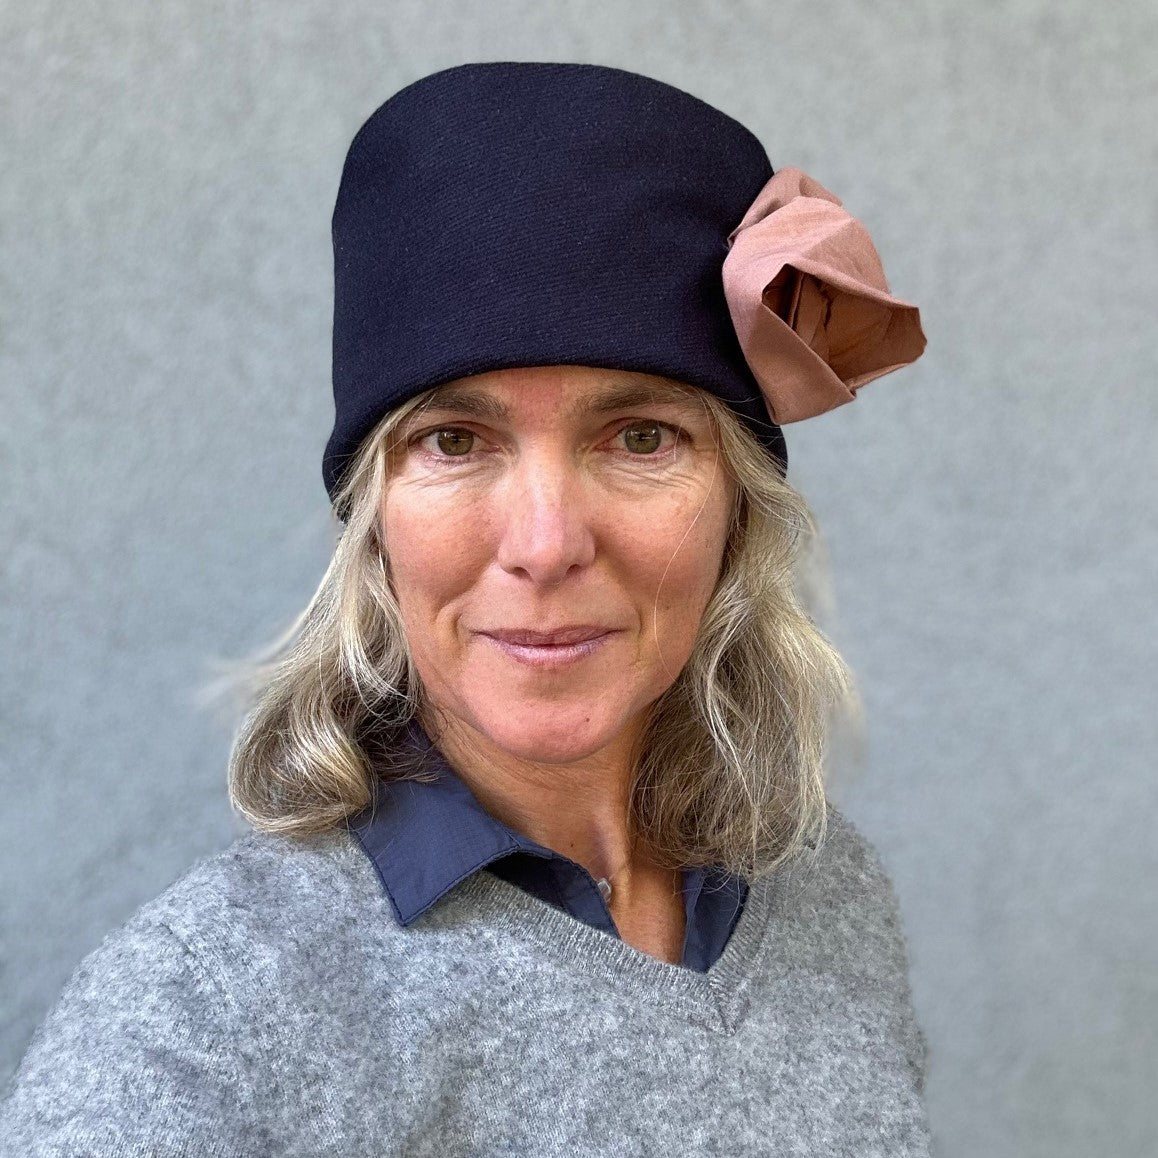
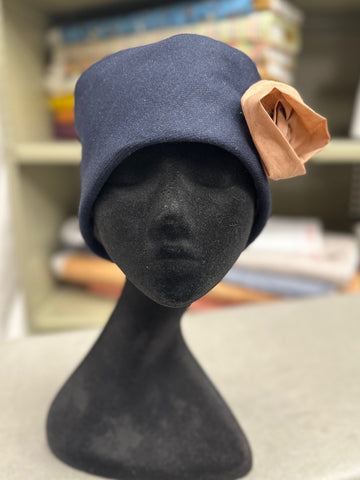
by Molly Hamilton
The cloche hat became popular in the 1920s. It was originally designed in France a decade or so early by milliner Caroline Reboux, and is named with the French word for "bell" because of its typical shape. The cloche generally features a small brim or no brim and was perfect for the new short women's hair styles of the early 1920s. It's popularity surged in the 1920s with new fashions and freedoms. The hat was a huge departure from the wide-brimmed hats that were popular in the previous era, and reflected the changing fashion trends and newfound liberation of women. The cloche hat continues to be a symbol of femininity, style, and the bold spirit of the 1920s.
Folkwear's 262 Spectator Cloche hat comes from the 262 Spectator Coat pattern, and features a wide cuff that is perfect to embellish with embroidery, applique, or other trims. It can also be made from a separate coordinating or contrasting fabric or left off entirely. We recently released this hat as its own PDF pattern!
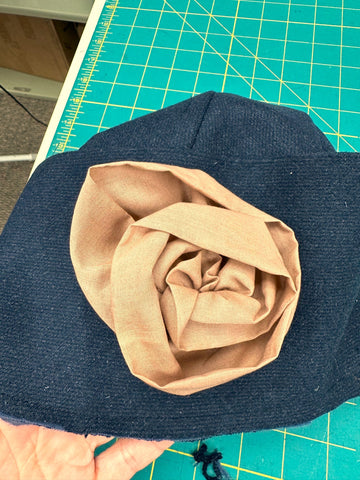
In this blog post, I am going to show you how I made the basic cloche hat. I also made a fabric flower to trim the hat and will share some tips for making one yourself. You can find instructions for making a fabric flower in this blog post.
Choosing Fabric
We have made three cloche hats in this office in the last several weeks, and each one was made with a different fabric. In general, you want to use a medium to heavy weight fabric to make a hat that holds its shape. I made the one for this post with a navy heavy weight wool blend from our collection (top photo). This fabric was perfect for a warm hat that is also sturdy. Esi made one with a cotton canvas and several layers of voile, which you can see in this post about making the 262 Spectator Coat.
And I made another that I hope to show off soon out of a lighter weight wool that we also have in stock - this vicuna wool. The photos below show the hat while I was working on it. I made the hat without the cuff and added a band of fabric that I added a ruching style to (from 123 Austrian Dirndl) and had pinned onto the hat to see how it looked. You can see the hat without the cuff, then with just a band of fabric, then with the ruched fabric. Which do you like best??


The possibilities for this hat are almost endless!
For the lining, a soft lightweight fabric is best. Think Bemberg, silk, satin, charmeuse, rayon, cotton voile. I used a navy cotton voile for the lining of this hat. Esi used a rayon/linen blend, and I used a scrap of silk charmeuse for my other hat. All were great!
Sizing
The hat comes in sizes XS to XL, which finish at 22½” (57.2cm) to 24-1/2" (62.2cm), respectively (measurements are in the pattern). However, this hat is cut on the bias which means that there is some movement or stretch that is built into the hat. You can adjust the inside ribbon band to make the hat larger or smaller by about 1/2" in either direction for whatever size you choose. So pick the size that you think works best for your head size (measure around the crown of your head), and adjust at the end of the hat making, if needed. I made my hats in size small and they fit great and did not need any adjustments. Esi made her hat size large to have more room for her hair and she was happy with that size also.
Cutting out the Pattern
For the cloche, you will need to cut one hat cuff, one hat front, and two hat backs from the main fabric and from the lining fabric. Be sure to cut the two back pieces so that they are opposites (i.e. if cutting one layer of fabric, be sure to flip the pattern piece print side down to cut the second one).
Sewing the Cloche
It is important to note that this hat pattern has a 3/8" seam allowance. This is to reduce bulk in the hat seams.
First, it is important to transfer the pattern marks to your fabric. For my wool blend hat, I decided tailor tacks would be the best way to mark the pattern. These are easy to remove and do not leave any marks that I have to wash out. Also my fabric was dark so I would have needed a white or light colored marking tool. I did not want to scrub or brush chalk out. Anyway, tailor tacks were perfect. To make tailor tacks, I used white thread and with a needle pulled the thread through the fabric at the mark on the pattern. I clipped the thread so that it marked on my fabric where the dots were located.

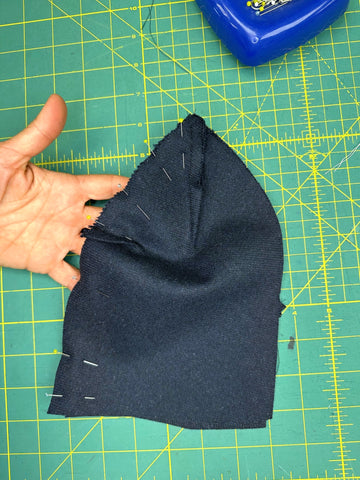
On the front pattern piece, I made the darts indicated on the pattern, sewing from the top dot to the dot at the bottom of the dart, with right sides of the fabric together. At the bottom of the dart, I sewed right off the fabric, cut the threads long and tied them by hand so I did not have backstitching at that point. At the top of the dart (top of hat), I backstitched to secure the thread. I matched the dots (not squares) at the top of the pattern, which I marked in the photo below with red dots so you could see it clearly. The other thread in the photo indicates the square at the top of the crown that we sew in the next step. This is important to note and make sure you sew the correct parts to make the darts. I sewed both darts on the hat front in this same way.


Now I sewed between the dot and the square, which I marked with a tailor tack - so I sewed the remaining seam at the top of the hat from my stitching (also marked by a tailor tack in the photo) to the other tailor tack. You can see how it is marked in the photo below.

Next, I sewed the same type of dart at the top of the back hat pieces. And, then sewed the small dart on the center back of each back piece. I marked the smaller dart line with red in the photo below so you could easily see where it goes. This one is a little tricky because it is so small, but it just needs to be marked clearly. I marked the start of the dart with a pin and sewed to the tailor tack.

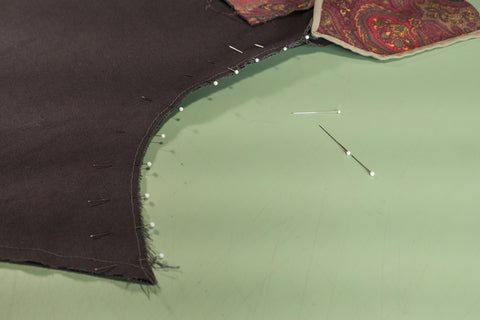
Once the darts are in the hat back pieces, I sewed both back pieces together at the center back seam, with right sides together. I made sure to match the two dart seams that come together at the center back.
Now I was able to sew the front and back of the hat together. At the top of the hat, several seams come together to create some bulk, but you can a seam jumper to help you get over the fabric hump. My seam jumper is just some plastic pieces that you use under the presser foot to keep the foot level even when it is going over bulky seams. You can barely see my seam jumper below just behind my presser food.


Front and back of hat pinned together.
I did all the same steps for sewing my lining pieces as I did for my main fabric pieces. I have a little tip for sewing the lining darts, or really starting any seam on very fine fabric like like fine cotton voile or silk. I use a scrap of tracing fabric under the seam. This gives the fabric stability and keeps the fine fabric from getting pulled into the feed. After the seam in sewn, I just rip the tracing fabric off and I'm left with a nice seam.

Starting my seam with a scrap of tracing fabric under my lining fabric to keep the fine lining from getting pulled into the feed.

Main fabric and lining ready to be put together.
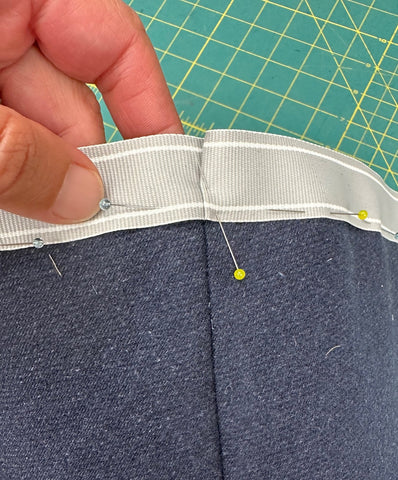
Next I sewed the cuff of the hat by sewing the center back together on the main fabric and lining. Then I put the cuff lining and main fabric together with right sides together and matching notches and center back seam.

I turned the lining to the inside and pressed it so that the outer fabric was about 1/4" to the inside (so the lining would not show on the right side).
And then placed the lining inside the main part of the hat with wrong sides together. I basted the open edges together so they could be sewn without shifting.


Back of cloche on a hat form.


Cloche hat on me. It is quite warm!
Now, what hat are you going to make? What trim would you add to it? What other questions do you have about this hat? There are so many options! We would love to see what you make with this pattern!

Pant Assembly and Leg Godet
I hope you have enjoyed learning how to make the 229 Sailor Pants so far. The only construction we have left is sewing up the back crotch and adding the inner leg godets!
See Day One, Day Two, Day Three, Day Four, Day Five, Day Six, Day Seven, and Day Eight to see the progress of the 229 Sailor Pants sew along!
Sew Up the Back Crotch Seam
Lets sew up the back crotch. With right sides together, and matching the notches, pin the back crotch seam from the center back gusset to the leg seam.
Stitch from just below the dot at the bottom Center Back Gusset assembly to the end of the back crotch. Stitch the seam again to reinforce. Press the seam open.


The back crotch seam sewn and pressed open.
Add the Godets to the Inner Leg Seams
The inner leg godets are optional, but this is one of the pants best iconic features. Like so many of the features we have learned to make... a godet design can easily translate to other projects with pants legs, as well - if you ever want to transform a pair of pants into bell-bottoms (or even boot-cut).

The Inner Leg Godet pieces ready to be assembled to the pant legs.
Pin and sew the Inner Leg Godet (D) to the inner leg of one leg with right sides together, matching the notches.

The Inner Leg Godet pined to one leg.

A godet sewn to the inner leg.

With the right sides together, match the other side of the same pant leg to the other side of the Inner Leg Godet and pin in place. Match and pin the rest of the inner leg of the pants together, matching the notches and the center crotch seam. Stitch from the bottom edge, up through the top of the godet, and up to the crotch, creating the inner leg seam. Backstitch at the crotch. Press the godet seam toward the leg and press the leg seams open above the godet. Finish these seams as you like.

Use a pin to align the crotch center seam.


A view of the godets sewn in place as seen on the wrong side of the pants.

The godets installed in the leg of the pants.
Repeat for the opposite leg.
We did it! The 229 Sailor Pants construction is done. On Day Ten of the Sew Along we will add the Topstitching Details.

Cutting and Assembly of the Front and Back of the Pant.
Now that you have made all the necessary sizing and lengthening adjustments to customize your Sailor Pants pattern, we will start cutting and sewing! Check out the prep work in Day 1 of the Sew Along.
Most pants patterns have a front leg pattern piece and a back leg pattern piece, This pattern is a bit different, with only one leg pattern piece. The front and back leg are built into the same piece. This design eliminates an outer side seam. The leg piece actually wraps around the leg and connects at the inner leg seam.
We have two leg pieces to cut out and each leg pattern piece should be cut out separately, one at a time. Cutting the pieces one at a time will help to ensure accuracy which is especially important to this design, as well as insuring each leg is cut on the grain (otherwise the legs can start to twist when you wear your pants). Spread your fabric out in one flat layer. Because, this leg pattern piece are rather large, take the time to access how to lay your pattern out so everything will fit and stays on grain. Spread out on the floor if you need to. Below, is an example of the layout of pattern pieces on the fabric and lining, I am using.
Note: It is always a good idea to make a muslin the first time you try a new pattern. Making a muslin frees you to try new techniques, make adjustments and simply familiarize yourself with your project without the added pressure of possibly messing up. It is like a practice round. You can use cheap fabric, leave off details that are not important to fit, and not finish seams.

Cutting your fabric
Place the leg pieces on the fabric first since they are the largest. Remember one of the legs will need to be flipped over with print side down to cut out of the fabric. You want to cut out two leg pieces that are a mirror image of each other, and you want them cut on the grain (so you need to cut them separately and flat, flipping over the pattern to cut out one of the legs).
Depending on your fabric, pay close attention to any directional elements, like the nap or design/pattern/plaid considerations. You do not want the directional elements of one one leg going in the opposite direction from the other! If using a fabric with a directional element be sure both pant pieces are a mirror image of each other as well.
You will need to cut two legs, two waistbands, two godets (if using), two front dart gusset facings, two center back eyelet facings, one center back gusset, one buttonhole facing (on the fold), and one welt pocket (if using) from the main fabric. If you are using a lining fabric (like we are in this tutorial), you will cut two front dart gusset facings, two waistband curtains (on the fold), one center back gusset, one pocket bag (if using), and one coin pocket bag (if using) from the lining. Of course, you can cut these pieces from your main fabric instead of a lining fabric, if you want. Or, you can cut the welt pocket from the lining fabric (for a little fun visual since this piece will be seen from the outside of the pants). Options are up to you!
Pin or weigh all your pattern pieces to your fabric and carefully cut them out of the fabric. Once you have cut out the legs, you can fold your remaining fabric in half being sure the grain is aligned, and cut the remaining pieces. Be sure to pay attention to the grain lines for each pattern piece.
Before you remove your pattern pieces from your fabric, be sure to transfer all necessary instructional marking to the RIGHT side of the fabric. And, make sure your notches are in place. You can use chalk, a tracing wheel, tailor's tacks, or water soluble marker to transfer the markings to your fabric. I have added simple tailor's tacks to indicate the placement of the corners of the top-stitching to be added latter on. I have drawn in the stitch line and slash line as well. Be sure to add these guides to both sides of the center front of the pants with removable marking tool.

Stitch line and slash line drawn on front to each side of pant.

Because we will be handling and manipulating this project at lot during the process of making it, I recommend that you add a stay stitch (sew a line with shorter stitch length) just inside the seam allowances of the leg inseams. This stay stitch will add stability that the curves most definitely need.
Step One: Assemble the Pant Front/Back
Sewing up the Center Front of the pants is the first step in constructing the 229 Sailor Pants. With the right sides of Pants A together, match the notches at the center front and stitch from the top edge to the crotch. You can finish the seam now or wait until later in the process. Press the seams open.

Front pined and crotch sewn. Notice the stabilizing stay-stitching inside the seam allowance

Seam allowance pressed open on wrong side.

Front of the pants sewn up.
That's it for now!
The assembly of the 229 Sailor Pants, is not difficult. However, it is important to follow in the correct order. You will learn some helpful tricks that will ensure your project will go together smoothly. I hope you will try all the techniques offered in this sew along.
Each lesson will be broken down into easy to follow segments, with ample time given for you to sew along. When we are finished you will be amazed with what you were able to accomplish! Hopefully, you will not only be thrilled with your new 229 Sailor Pants, but you will have grown in confidence with all that you have learned.
On Day 3 of our Sew Along we will learn how to make a Welt Pocket in the back waistband of the 229 sailor pants.

Day 5: Making the neck tie
Throughout history some items of clothing have had design elements built into them that serve a well thought out purpose. Each subtle details of the Middy Blouse View B (from 211 Two Middies pattern) is unique and has a function of its own. The distinctive collar served as extra protection from the sun on the shoulders of seamen. The pocket could hold any number of things, the scarf provides a cloth to wipe the brow or tie back ones hair, and the tab holds the scarf in place. The hip band provides an alternative to tucking the shirttail in a bottom garment waistband, which allows for comfort and ease of movement while looking finished and tidy. The Middy Blouse View B is loaded with details that create a balanced aesthetic. No matter what detail captures your attention first, this Middy Blouse design has so much to offer.
There is one more element to be added if you so choose, and is included in the pattern. The Middy is hardly complete without the useful and charming detail of the Pencil Scarf or Triangular Scarf. Even if you do not pair a scarf with a Middy Blouse, knowing how to make a scarf is a useful and easy skill. Scarfs are the decorative and utilitarian accessory perfect to wear with all kinds of outfits!

Fabrics That Make Good Scarfs
Scarfs can be made from any fabric, it just depends on the aesthetic you prefer. You may want a flowing look or a stiffer look, but a light- to medium-weight fabric is going to be best. I have chosen to use a piece of white cotton lawn to make a pencil scarf to accessorize my Middy Blouse View B. Rummage about in your fabric stash or even your scrap bin to find the perfect bit to make a new accessory!
Other fabrics work well too! Try cotton voil, cotton lawn, handkerchief linen, silk noil, silk haboti, silk charmeuse, organza, stretch velvet, georgette, knits, rayon, gauze, flannel, etc. Basically, any fabric that will tie, knot, or drape is a good choice.
Do consider that fabrics that have an obvious right and wrong side might not be the best choice as both sides will be seen when worn.
Make a Triangular Scarf
It is fun and easy to make a simple scarf. A scarf can be the focal point of any ensemble and made from endless combinations of fabrics and edge finishing details.
A scarf can be made small or large or any size in between, and can elevate the look of so many items in your wardrobe.
Note that the measurement of your scarf can be anything you choose depending on desire and application and how much fabric you have.
The instructions below recommend using a measurement of 36"x 36", which utilizes just the right amount of fabric to provide not only a interesting visual touch, but can lend a bit of protection and comfort when the elements require it.
Start with a square piece of fabric measuring 36" x 36" square. Use the illustration below to guide you through the process.
Starting at the top right corner, fold the cloth on the diagonal, matching the bottom left corner. Press to create a crease. Then unfold to reveal the crease. Use the crease as a cutting guide.

Or use a straight edge to draw a diagonal line from opposite corners to create a cutting guide. Cut the diagonal line to create two separate triangles to make two scarfs (one for you and one to share!).

Make A Longer Pencil Scarf
The height of the Roaring Twenties was the heyday of the Middy Blouse. This popular look was finished off with an accessory referred to as the Pencil Scarf or "silks" that were worn under the sailor collar of the Middy Blouse and pulled through the tab below the front opening.
This version of the scarf is cut on the bias. Fabric cut on the bias has a bit of stretch, resulting an easy drape around the neck. But that does not mean you could not utilize any long straight piece of fabric to make a tie.
The pencil scarf is perfect for knotting, tying in a bow, looping loosely, wrapping around the neck or waist, or simply hanging open... whether cut on the bias or on the straight grain.
The illustration below shows how to make a bias cut scarf from a rectangular piece of fabric. Fold a rectangle of fabric as demonstrated in the illustration bellow to create a bias strip, using the folded creases as a guide. Note you can make the bias strip that will become your scarf any width your fabric will allow. Make a wide scarf, make a skinny scarf... the possibilities are endless!
This illustrated instruction uses a rectangular piece of fabric measuring 50" x 36" which will make a scarf measuring 3-1/2 inches wide and approximately 51 inches long. Adjusting the measurement of your fabric will allow you to change the length, or width, of your scarf.
Fold the left bottom corner up to match the top edge of the fabric. Press to make a crease.

Unfold the the fabric to reveal the first crease.

Fold the right top corner down to match the bottom edge of the fabric. Press to make a crease.

Unfold the the fabric to reveal the second crease.
Cut along the guide lines created by folding the creases or draw a cutting guide line using a straight edge. The bias cut strip in the center is the Pencil Scarf.
Note: I cut the length of my Pencil Scarf to make it shorter.
Finishing Scarf Edges
Once you have cut a piece of fabric to make a scarf all you have to do is finish the edges. The edge finishing is a great place to have fun and get creative. You can make it quick and easy, or take time with hand sewing. Finishing edges is a perfect opportunity to get creative and really customize your look. Use a contrasting thread to give your scarf an unexpected pop of color or use a subtle color for a softer look.
Use your imagination and have a look in your materials stash for a bit of inspiration. Any number of materials could be use to finish your scarf edges. Some possible choices to consider would be: embroidery thread, sewing thread, yarn, seam binding, lace, or soft ribbon. Another option would be to simply turn the raw edge under a couple of time and stitch in place. Leaving the edges raw or creating a frayed edge has a look of its own. Once again the options are endless and only limited by your imagination.
Adding an edge finishing touch can be done by hand, sewing machine, or serger. Any hand embroidery stitch, such as a blanket stitch would be a charming touch. A zig-zag stitch made on a sewing machine would be quick and easy. Applying a bit of lace to any scarf edges could be done with a simple whip stitch by hand or an edge stitch sewn on a machine.
I have chosen to use a very easy and quick rolled hem made on my serger.

Making a rolled edge on the serger to finish my scarf edges.

Never overlook a scrap of fabric again!
Thank You for joining me in making Folkwear's newly released 211 Two Middy Blouse Pattern. I hope you found my thoughts and processes in making these two charming blouses useful. Folkwear is very excited to offer this pattern once again and we would love to see what you create! I look forward to making and doing with you again.
Stitch well,
Cynthia

For day three of the 211 Two Middies Sew Along, we are doing to start on View B of the pattern - cutting out the pattern, fabric, and begin on the front/back, neck and collar. Check out Day 1 and Day 2 of the Sew Along!
This much-loved Middy blouse design (View B from 211 Two Middies pattern) has become synonymous with the iconic nautical aesthetic that came into being in the early 1920's and has endured over a century later. It's popularity continues because not only of its carefree charm, but it is as practical to wear, as it is comfortable. The multiple details of this blouse add so much character to what is actually a very easy blouse to make. The well proportioned iconic collar is the initial detail that sets this blouse apart from other over-the-head-pull-on tops. The unique sleeve construction and hip band with subtle pleats, are not only easy to execute, but worthy of closer inspection.
Once you realize how easy and quick this blouse is to make, you will most likely adopt this Middy Blouse as a new staple in your wardrobe. I am very excited to be sharing the making of this blouse with you, for it is a favorite, that I make nearly every season!

Trace the pattern pieces for the front of the Middy Blouse View B.
Let's get started! For today's Sew Along, we will concentrate on the making of the front of the blouse.
First, trace and/or cut out View B pattern pieces: Front G and Back H, Front Facing I, Tab J, Pocket K, Collar (& Facing) L.
You can also cut out the other pieces to this pattern at this time: Sleeve Pieces M and N; Hip Band P; and Cuff O. We will be using these pieces in tomorrow's Sew Along installment. There are different hip band and cuffs for men's and women's sizes, so make sure you cut the one you want to use.

Pattern Pieces needed for Middy Blouse View B
Making Pattern Adjustments and Preparing Fabric for Cutting
Before pining your pattern pieces to your fabric, take a moment to consider any sizing adjustments you might like to make. While a size small fits me just fine through the bust measurement, I have decided to make a bit of an adjustment to the width of the bottom of the blouse where it joins to the hip band. A little bit more width at the bottom would allow for a tad more room, therefore easier wearing. I am going to make this adjustment to the pattern pieces I have already traced and cut out. These adjustments could just as easily be made before cutting out the traced pattern.
Pattern Grading Adjustment
This adjustment is easily accomplished with a simple technique referred to as "grading" between sizes. This simple and subtle grading technique only deals with adding a bit of width added in the side seams.
Adding a 1/4 inch seam allowance at the side seams of the blouse bottom edge (both front & back), as well on the side seam edges of the hip band will add about an inch to the width at the hips, grading the hip size to between a size Small and Medium.
When making adjustments, do so on a traced pattern. It is always a good idea to keep the original pattern intact.
Start by adding a new piece of tracing paper to the back of pattern pieces Front G and Back H. Add extra tracing paper that is large enough to make the adjustment needed. Secure the new strip of tracing paper to the pattern piece with a bit of tape on the back side. You may want to tape on the front too.
With the new strip of tracing paper securely in place, draw a horizontal line straight off the bottom edge of Front G and Back H. Then add the measurement width required depending on the size you are making. For my blouse I am adding a measurement of 1/4 inch to the bottom edge of Front G and Back H.

Using a straight edge ruler, draw a straight line connecting the arm pit curve point to the 1/4 inch measurement increase just made. The original edge of the blouse is a straight 90 degree angle, so this grading line is subtle and does not change the shape of the blouse or the drape in a noticeable manner.
Cut Pattern Pieces from the Fabric.
Note that I am only pinning the pattern pieces we are using for this portion of the Sew Along. The other pieces will be featured in the next Sew Along Day 4. Go ahead and cut all your pattern pieces at this time if you like.
You will cut one each, on the fold, of Front G and Back H; one each of Front Facing I, Pocket K, and Tab J; two each of Collar and Facing L, Sleeve pieces M & N, Hip Band P, and Cuffs O. Do not cut the slash line on the Front or Front Facing. We will do this in another step.

Your fabric pieces should look like this illustration.
Step One: The Front Of Middy Blouse B
The detail elements (pocket, tab, and front facing) on the Middy Blouse View B all have a function and add interesting charm. The Front Facing is sewn on as a re-enforcing detail that will only be seen near the collar on the front side of the blouse. The Pocket and Tab details are prepared and applied to the front before the shoulder seams of Front G and Back H are assembled.
Prepare and Add the Front Facing
To ensure a neat and clean turned under edge for the Front Facing, simply create a turning guide using a straight stitch along the 1/4 inch seam allowance. Do not back stitch at the beginning or end of the stitching as this will allow you to easily remove the stitching when finished. Turn under the side edges and curve toward the wrong side of the fabric. Clip around the curve, as needed and only to the stitching, so that the turned under fabric will lay down smoothly and flat. Press to create a smooth crisp edge. Once the edges are turned under and pressed, the stitching guide line can be removed.
With right sides together, pin the Front Facing to Front G. Match the center opening slash line and the boxes matching your size, at the bottom of the slash line.
Sew a straight stitch, 1/4 inch on either side of the slash line, tapering at the bottom to the box.


An illustration of the stitch line and slash line have been added for clarity.
With small scissors carefully cut the slash line to the box. Do not cut into or beyond, the stitch line. You may or may not want to carefully clip away a small amount of the excess seam allowance (if your fabric is loosely woven skip the clipping).

Turn the facing to the wrong side of Front G. Using your fingers to help shape the edges and the bottom curve and press.

Secure and neatly finish off the facing on the inside, or wrong side, of the blouse by hand stitching or topstitching on the sewing machine right at the edge of the facing. The stitching happens on the wrong side of the blouse, using the Front Facing edge as a guide. I have chosen to top-stitch on the sewing machine. Remember, the top-stitching will be seen on the right side, so take your time to help ensure a nice finish.

Make Tab J
To make the Tab J, fold lengthwise with right sides together. This time stitch a 1/4 inch seam allowance along the long edge and one of the short edges. Trim the seam allowance to make turning easier and eliminate bulk, then turn the tab right side out. Tuck the remaining short side raw edge under, and press.

Using the the markings on pattern piece Front G, apply the finished Tab by top-stitching down on the short edges. Be sure to back stitch a few times to secure and reinforce the tab.
Make Pocket K
Using the guide on the pattern, turn and press under 1/2 inch at the top of Pocket K. Turn under another 1/2 inch and press again for a total of a one inch. Press to create a crisp edge. Stitch a topstitch close to the pressed edge to finish the top edge of the pocket.
Fold the remaining edges under 1/2 inch and press, but do not top-stitch. The remaining top-stitching comes a bit later when the pocket is sewn to the blouse front.

Note: If adding any details or embellishments to the pocket, do so before the pocket is applied to the blouse. We will be covering embellishments on the last day of the sew along, so stay tuned if you are planning to add any details.
Add Pocket and Tab Details to the Blouse Front
Next, position and pin the pocket to the left side of Front G, as indicated on the pattern, or in the position that suits you. Be sure all the raw edges are turned under and neatly pressed. Pin the pocket to the blouse front. Top-stitch close to the pressed edge and pivot at the bottom point and corners. Back stitch at the beginning and end to secure. You can also re-enforce the top corners by stitching a small rectangle or triangle.
Position the tab according to the placement on the pattern, centering under the front slash opening, and pin into place. Secure the tab in place and re-enforce the sides by stitching the short ends of the tab several times.

Step Two: The Shoulder Seams and Collar
With all the Front G details made, the shoulder seams are sewn up next. With right sides together pin the shoulder seams, matching the notches of Front G and Back H. Stitch on the 1/2 inch seam allowance, and press the seams to the back of the blouse, and finish.
I have chosen to finish the seams together in this blouse, and therefore all seams will be pressed in one direction, which is normally to the back of the garment.

After having pressed the shoulder seams, I decided to top-stitch the seam right at the edge. This is often a prudent exercise, for the top-stitching not only holds the seam allowance towards the back of the garment. But it also creates some strength at a stress point, especially for a thin weight fabric like the handkerchief linen I am using to make View B. You can also finish the shoulder seam with a serger before stitching it down. This creates what is often called a faux flat-felled seam.

A blind hem stitch presser foot is an excellent tool for top-stitch along an edge.
The Collar
The blouse is coming along, but the addition of the collar is the point where the blouse really starts to take shape.
If adding any details or embellishments to the collar, do so while the collar is two separate pieces. It is much easier to work with flat fabric and before the two collar pieces are pined and sewn together. Be sure that any embellishments or details do not fall with in the seam allowance, unless this is your intention. We will be covering embellishments in the last day of our sew along, so stay tuned!
With right sides together, pin all un-notched edges of the collar. Leaving the neck open for turning right side out. This opening in the collar is where the collar attaches to the back neck edge and the front side edges. Stitch at the 1/2 inch seam allowance, back stitch when pivoting at the corners for reinforcement. This will help maintain the corners when the seams are turned right side out. Trim the seam allowances and turn right side out. Press the edges, being sure to roll the edges slightly to the underneath side of the collar. This will create a neat finish, which is also a simple, but telling tailoring technique. This "underneath" side of the collar is called the facing (or collar facing).
 Collar edges all pined and ready to be sewn up.
With right sides together, match and pin the center back notch of only the underneath side of the collar, or collar facing, to the center back neck notch of the blouse. Then pin the collar facing edge to the front edges on either side of the neck opening on the blouse. Start pinning from the center working out to the edges. Do this on the right and left side of the center back point. You will need to carefully ease the two pieces together, adjusting the pinning as you go. Stitch the collar facing and the back neck edge together, using the 1/2 inch seam allowance. Notice that the upper collar is still not attached and is waiting its turn.

The under collar pinned to the back neck edge. Notice that the upper collar is unattached at this point.
Carefully clip the curve of the neck edge to allow the fabric to spread slightly and therefore lay smoothly at the back of the neck. Make the clips into the fabric edge stopping slightly before the seam stitching. Be very careful to not clip into or beyond the seam stitching. If you do, you will be cutting into the collar and back of the neck! Be sure to leave the upper collar free. Turn under the edge of the upper collar to create the finished edge of the inside back of the neck. Use the neck stitching as a guide as where to turn the edge under (you will turn under the collar by about 1/2 inch). The turned under edge should conceal the stitching edge.

Clip the curve at the neckline before securing the upper collar.
Next we need to sew the upper collar to the back neck edge, by hand using a simple whip stitch or if you are a seasoned sewist you can use the stitch-in the-ditch method.
Here I am going to concentrate on using a hand-stitch method while rolling the neck of the collar. Despite what you might think, hand stitching is a very satisfying and relaxing task. It can also go surprisingly fast and look much better in instances like this. There are times in sewing, when the results using the sewing machine are simply not as nice as a hand sewn stitch. Hand stitching is a good option for finishing work and it allows for more control. The stitch placement and size are easily controlled if done by hand.
The most important part about hand stitching is to pin the area you need to stitch with as many pins as it takes to hold the fabric securely. The pins help to keep the edges together so you can concentrate solely on the stitching. Remove the pins one at a time as you stitch. Hand basting the collar to the neck is also a great option so that you don't prick your fingers and hands while hand stitching the collar down. Just sewing a running stitch, going in and out of the fabric every 1/2' to 1" along the seam.
Before you begin the final hand stitching of the turned under collar edge to the back of the blouse neck, it is important to note that a subtle technique should be incorporated. This technique will help to ensure a nice roll at the back of the neck. Your neck and shoulders have a roll and so should the neck edge of the blouse. The goal is not to have the collar lay completely flat against the neck and shoulders of the blouse.
To make this slight roll, hold the collar at the neck between your thump and fingers and allow the collar to drape backward over your hand. This slight roll that happen naturally when the fabric falls backward, is all that it takes to make the roll. Use a few pins to hold the roll in place.
Because the collar has rolled backward, a bit of the 1/2 inch turned under seam allowance has been consumed by the roll. You will find the 1/2 inch turned under edge you had to work with has now been reduced by as much as 1/4 inch. This is what you should expect.
First begin turning under the edge, at the outer edges of each side of the collar, being sure the folded edge lays flat and tucks under. Move the edges of the collar and the edge of the blouse opening up to each other so they meet aligning perfectly. Notice where the collar and the neck edges align in the photo below.

Turning the upper collar edge under so it tucks up and into the edge of the blouse opening.
When turning the finishing edge under, use the neck stitch line as a guide. You want to cover up the neck stitching line with the turned under edge. Pin the turned under edge in place to secure while hand stitching.

Creating the neck roll, while pinning the upper collar to the back of the neck of the blouse

The upper collar rolled and pinned into position to ready for hand-stitching.
Next begin the hand whip stitching. Keep your whip stitches evenly spaced as small as possible. When working, stitch right up to the pin, then remove the pins as you go. Whip stitch all the way across the back of the neck and secure your thread by tying a double knot. Before snipping my thread I like to put the thread back on the needle and slip the thread under a few stitched to conceal the thread tail.

Raw edge of upper collar turned under and being hand whip stitched to finish the neck edge.

Hand stitched collar edge. Notice the nice roll of the neck.

With the collar hand stitched on the front blouse details are complete.
Hope you found this portion of the Middy Blouse View B Sew Along informative and enjoyable. Join me for Day Four and we will complete View B of the Middy Blouse.

Welcome to the Sew Along for the Folkwear 211 Middy Blouse View A. Check out the prep work in Day 1 of the Sew Along. Today, we are going to get into quite a bit more detail than even the pattern instructions give, so I hope it helps you make a beautiful shirt, as well as teaches some tips and tricks to have in your sewing toolbox!
The Middy Blouse View A is a very easy blouse to make with a touch of a nautical aesthetic, which can be played up or down. The construction is really simple and the details can be made as subtle or as interesting as you like. This blouse can be made in so many creative fabric and trim combinations. Which makes View A of the Two Middies pattern, simple but surprisingly different every time you make it!
Below is an illustration of the back of View A which includes its most unique feature. The patch originally served as a protective element that could be replaced. Back in the 18th century navies, men's oily and dirty pigtails hung down their backs, staining their shirt backs. The patch protected the shirt and could be replaced when too worn out from scrubbing (or too dirty). Consider this patch a design element, to either add interest or to treat more subtly - or consider it a hearkening back to naval tradition. Have fun with it!

Trace and Prepare Your Pattern

Let's get started! First, trace and/or cut out View A pattern pieces: Front A, Back B, Patch C, Trim D & E, and Sleeve F.
 So simple and so few pattern pieces!
Preparing the Pattern Pieces and Making Adjustments
Before you cut the fabric out, stop. Look at your pattern and consider if you want to make any simple adjustments. This blouse can be made with or without a shoulder seam. The length of the body and sleeves can all be changed very easily using the "lengthen or shorten here" line on the pattern pieces.
Prepare the Front & Back of Pattern
For this project I am cutting the body of the blouse in one piece, as the pattern indicate.! Prepare the body pieces of the pattern by matching up the Shoulder Line of Front A and the Shoulder Line of Back B. Instead of cutting one of the front and one of the back each on the fold, the two pieces are combined (aligned) at the shoulder line. Resulting in making just one pattern piece, that is then cut at once on the fold. Hence, there are no shoulder seams. How easy!

Match the shoulder lines on both the Front A and Back B to create one pattern piece to be cut on the fold.
Note: If you are making View A, directional prints will not work, because the front and back are cut as one piece. As a result, if you position the print to run or lay going in the right direction on the front, the problem is the design on the back of the blouse would end up being upside down. This issue can easily be remedied, by cutting the front and back separately and sewing at the shoulder like you normally would.


Align A & B on the shoulder line and tape into place to secure.
Adjusting the Sleeve
The sleeve can easily be made longer or shorter, depending on your requirements. Use the line labeled "lengthen or shorten here" for lengthening or shortening. I decided to lengthen my sleeve by 1-1/2 inches. Simply cut on the "lengthen or shorten here" line to separate the sleeve into two pieces. Then insert another piece of tracing paper behind the two original sleeve pattern pieces, to will allow for the increase. Be sure the extra tracing paper is big enough to provide enough overlap on the back side to secure to the original pattern pieces with tape. A bit of tape added to the front side will help as well. Use a hip curve or French curve to create a smooth continuous drawn line (the green line in illustration below) connecting the two separated pieces of the sleeve. Trim any access tracing paper away. Now the sleeve pattern has been lengthened and ready to use.
 To shorten the sleeve length, simply fold your pattern piece up making a pleat equal to one-half the amount you wish to shorten. There is no need to cut your pattern piece, simply pin or tape it in place. Keep it in tact for future use.
This technique can be used to adjust the length of the blouse body as well. If you lengthen or shorten the body of the blouse, be sure to make the same adjustment to both Front A and Back B pattern pieces to ensure they are the same length.
View A has it's "lengthen or shorten" line at the bottom hem, so just extend the side lines/seams of the pattern down as long as you want. To shorten, move the bottom hem line up as far as you desire.
Note: If you make length or width adjustments to the pattern pieces, be sure to re-check your yardage requirements before purchasing fabric.
Cutting Out Pattern Pieces
Now, that all the pattern pieces have been adjusted, we are ready to cut out the fabric pieces using the pattern as a guide. I have decided to work with the fabric right side up and wrong side together (note: it is perfectly acceptable to work opposite, wrong sides up and right sides together) and matching selvages, pin your pattern pieces to the fabric, or hold them down with pattern weights. Pay attention to grain lines on each pattern piece and the placement of the pattern pieces to be cut on the fold.
Cut the combined Front A & Back B once on the fold (remember the two pieces are taped together). Cut one patch (Piece C). Cut two sleeves (Piece F) on the fold. And don't forget to cut out the neck trim pieces (two of Piece E, two of PieceD).
 Illustration of fabric cut out using pattern pieces.
Before you remove the pinned pattern from the fabric, be sure that all notches and center points have been marked, on all the fabric pieces. Also, be sure to mark the right side of each fabric piece with a pin once the pattern piece has been removed.
A good habit is to place your marking within the seam allowance if using a pin. This can help prevent the pin from damaging your fabric depending on the delicacy of the fabric. If using a fabric that could be damaged due to using a pin, make your mark using a fine needle and contrasting thread within the seam allowance to indicate the right side.

Right sides of fabric marked using pins inside the seam allowance.
Step One: The Patch
In order to help ensure the patch has a neat and evenly turned under edge, sew a stitch line to use as a turning guide. On the right side of the patch fabric, except for the top edge (I accidentally pressed the top edge in the picture below, but you don't need to do it), stitch a long straight stitch, at the 1/2 inch seam allowance. Make the stitch all the way around the patch edges to create a guide. Do not back stitch at the beginning and end of your straight stitch lines. Only use this stitch line as a guide, later the stitch will be removed. Stitching one continuous line will make removing the stitch line more difficult, so it is fine to stitch each side separately.
Now, working on the wrong side of the patch, using the stitch line you just created, press the edges inward 1/2 inch on all the edges, except the top edge. The top edge will attach to the back neck and does not need to be turned down.
Clip the curves and corners and press all edges down firmly and cleanly. Use the stitch guide line to help you with the corner clipping too. Be sure to not clip into or beyond the stitch guide edge.
Once your edges are nicely pressed in place, the stitch line can be carefully removed, leaving a beautifully even crisp edge finish.


The patch edges all turned under and ready to be attached to the back of the blouse.
Carefully align and pin the patch in place on the back of the blouse. Be sure the top edge of the patch is laying flat. Match the notches and center line of the patch and center back of the blouse to help with alignment.

Topstitch the patch to the back of the blouse. Position your needle close to the edge of the patch, and stitch 1/16" from the edge. An edge stitch or blind hem stitch foot makes a good guide tool for this task. Remember to remove the pins as you come up on them as the blind hem presser foot does not hurdle the pins very well, which will disturb the clean finishing stitches. Topstitch slowly and pivot at the corners to secure and create a finished look. The patch is a very revealing detail, so take your time and enjoy the beautiful crafted results!

An edge stitch or blind hem stitch foot makes a great guide when topstitching along the patch edge.
Step Two: Prepare the Neck Line for the Trim
Once the patch is successfully attached, prepare the rectangle neckline of View A. Work on the right side, sew a straight stitch line at the 1/2 inch seam allowance around the neck rectangle, to help as a guide for clipping the corners and turning the edges. Just for good measure, I added another straight stitch line around the outer most edge of the rectangle (about another 1/2 inch from the first) to provide stability and to help prevent the fabric from unraveling too much.
Use the stitch line as a guide for snipping the corners and folding the edge of the fabric to the right side. Fold the edges to the right side of the fabric. Press to create a clean finish.

The trim on the neckline could be made of any number of things, like solid, embroidered, or striped ribbon, handmade or pre-made purchased bias tape, twill tape, braid, soutache, or embroidered decorative trim. No matter what you decide to use, just remember that neck details tend to draw the eye in and therefore becomes a focal point. So keep this in mind when deciding what kind of detail you want to apply.
Note: Wash and dry your trim material or ribbon before using.
The trim for this project can be cut using the pattern piece D & E. Simply turn the raw edges under the 1/4 inch as the pattern suggests, and press into place for a clean edge before applying.
Another easy method that produces the same results... but just a bit quicker... is accomplished with a tool called a bias tape maker. I have chosen to cut my trim pieces using the pattern and then use a bias tape maker, which worked great! Use an iron to press the edges as you slowly pull the tape out of the bias tape maker tool. This is a very handy tool for all your bias making needs (and Folkwear has a selection to purchase from)!
If you don't have a bias tape maker, you can use the instructions in the pattern. Just fold each long edge of Pieces D and E toward the center of the fabric and press.
The pattern recommends these neck trim pieces to be cut on the straight grain of the fabric. However, t is perfectly acceptable to use a bias cut fabric for the trim. Since the trim will not be going around curves, it is more efficient to cut on the straight grain of the fabric.


The neck of View A getting ready for applying the trim strips. Trim made with bias tape maker. Notice the folded over edges of the neck opening will be covered with the trim strips.
Attaching the Trim Strips
Apply the shorter side neck trim strips (Piece E) first. You do not need to turn under the short edges of these pieces. Pin and align the trim right up to the edge of the neck opening. The folded over raw edges of the shirt will be covered and disguised by the trim strips. This is a really nice raw edge finishing technique to remember for future projects!

Stitch the shorter trim strips down with a topstitch on the sewing machine. Stitch 1/16 inch from each edge of the trim.
Once the shorter trim strips are applied, then pin on the longer strips. Turn the raw end edges under and make sure the edges are straight and squared off neatly.

Topstitch the longer trim strips on each side of the strip, in the same manner as the shorter trim strips. Be sure to back stitch at the beginning and end either side of each strip to secure.

Topstitching completes the neck trim.
Step Three: Sleeves & Seams
Find the shoulder placement: Match the boxes near the bottom of the side seam. Smooth out the blouse fabric and align the bottom of the armhole (armsyce) as well. Where the shirt if folded at the top of the blouse is the top of the shoulder. It is important to locate the shoulder placement, or center point, despite not having a shoulder seam.
To find the sleeve center point, simply fold the sleeve in half.
The sleeve center point must match up to the shoulder center point. Place pins to mark the center points of the shoulder placement and the sleeves center fold to help with alignment. Work with the project right side up.

Pin indicates center point of shoulder edge.
To find where the alignment of the sleeve and blouse armhole seam allowances match up, measure out the 1/2 inch seam allowance intersection of each edge, using pins as markers then match up the pins. Be sure right sides are together.

Find the 1/2 inch seam allowance intersection on both the armhole and the sleeve pieces marking with pins to help with alignment.
With right sides together, match the center points and side edges, pin the sleeve to the body of the blouse and stitch in place using 1/2 inch seam allowance.

Sleeve pined to the body of the blouse and ready to be stitched.
If doing a flat-felled seam, press sleeve seam allowance towards the body. Or press towards the sleeve if serging or using another method of seam finishing.
See the pattern instructions for flat felled seams (we will also have a tutorial of this technique soon!).

Pressing the seam.
Sew up the Sides Seams
Now that the sleeves are attached we are ready to sew up the side seams. With right sides together, matching notches, and underarm seams. Sew the side seams together starting at the box that indicates the top opening to the side vent and back stitch. Continue sewing the side seam up towards the sleeve and finish with a back stitch at the sleeve edge. Press the side seams open to flat felled the seams. If using another seam finishing method, the seams are generally pressed towards the back of the garment.

Step Four: Finishing the Vents and Hem
With seams pressed open, starting at the vent box marking, turn the seam edge under 1/4 inch.

Turn the edge under again another 1/4 inch, for a total of the 1/2 inch seam allowance. Press and stitch close to the turned under edge, up one side, across the seam, and down the other. Back-stitch horizontally, a few times at the top of the box to help reinforce the vent opening.

Hem the Sleeves and Bottom Edge . . . and that is it!
Determine the depth of the hem you would like for both the sleeves and the bottom hem of the blouse. Turn the hem edge to the wrong side of the fabric by half the hem measurement, pin to hold in place, and press.

Then, turn half the hem measurement up again, pin to hold in place, and press.
For example: I have chosen a hem of one inch. I first turn the hem up 1/2 inch and then again 1/2 inch, for a total of one inch.

Either stitch your hem in place by using a whip stitch or edge stitch done by hand, or use a straight stitch, or top-stitch, close to the turned edge using a sewing machine.

Notice the hem stitch is close to the turned edge for a neat finish.

Finished bottom hem and side vent finish.
I hope you are as pleased with your finished Middy Blouse as I am. I am already thinking of all the other fabric and trim combinations I would like to try!


There is yet another version of this blouse to make! I hope you will join me for day three of this sew along, where we will start the construction of the iconic Middy Blouse View B.

Folkwear is excited to re-release our favorite nautical-inspired blouses, the 211 Two Middies, just in time for easy, breezy summer wearing. These are the perfect pieces that provokes a smart, yet carefree, aesthetic with just a touch of nostalgia.
Read about the Middy Blouse history and the inspiration for this pattern re-release in our previous blog post!
The 211 Two Middies pattern provides two different blouse versions (View A & View B) that will surely become seasonal staples in any wardrobe. You can find this pattern in either a printed or a downloadable pdf version. The size offerings for women range from XS to 2XL and S to 2XL for men.

Today, we are starting a Sew Along for both middy shirts in this pattern. These blouses don't take a lot of time to sew, allowing time for creative embellishments or to make a neck tie (all part of the pattern)! Join us over the next few days to sew your own middy blouse. Here's the schedule:
Day 2: Cutting and sewing View A
Day 3: Cutting and sewing View B - front, back, neck facing and collar
Day 4: Finish sewing View B - sleeves and hip band
------------------------------------------------------------------------------
Day 1: Preparation
First, get the pattern (it's on sale through the 26th!). Then, you can move on to selecting fabric, gathering materials, and figuring out what you are going to make and how!
Selecting Fabric
Sometimes a specific pattern and fabric just seem made for one another and the pairing is easy, but just about any fabric is perfect for this Middy blouse project as long as it is not too heavy.
If you need a bit of inspiration or if you are not sure where to begin, be sure to see the Folkwear Pinterest board for different inspiring Middy Blouse looks and our fabric suggestion blog post.
Below is a collection of woven cottons and linen fabric swatches from my collection that would all be perfect for a Middy blouse.

This pattern is perfect for light weight woven fabrics, such as shirting, cotton lawn, voile, handkerchief linen, mid-weight linen, chambray, gingham, oxford cloth, silk noil, etc. Any fabric that has a relatively light hand and drapes well would be suitable for this project, especially for warm weather wearing. A good test to help determine a good weight of fabric to use, is to double the fabric over and hold between your fingers and ask yourself if it feels too bulky? This technique helps in determining if a fabric will work well for pleats, gathers, or if it will make a nice crisp corner when the fabric is turned.
For cooler temps this pattern could be made with just about any weight of cottons such as twill, light to medium weight linen, flannel, denim, fine wale corduroy, or a light weight wool would all do.
Just the right knit would provide lovely results too. A medium weight knit like a double knit cotton or wool jersey, a firm 6 oz jersey Rugby type fabric, or even a ponte would be ideal. Look for double knit micro fibers in medium weights. If using a knit for the Middy Blouse, the knit needs to to be stable, which means some stretch, but not so much that the shape of the blouse can not be maintained due to too much loose drape and stretch.
For this sample, I am using a lovely pale gray cotton for the blouse body, with a blue-green cross weave linen for the neck trim for view A. For View B I have chosen a soft periwinkle blue handkerchief linen for the blouse body and a white cotton lawn for the tie.
Yardage, Sizing, and Adjustment Considerations
Once you have decided on a fabric, consult the yardage requirement chart on the back of the paper pattern or included in the PDF pattern instructions. You can choose a size based on the measurements in the chart. I considered the bust measurement first for both View A & View B, keeping in mind the loose fit. The chart (below) is meant as a guide for the basic aspects of body to garment measurements. You can also see the yardage chart through this link (PDF). We will learn some simple grading techniques using the chart measurements to allow for some easy adjustments.

Consider Simple Grading?
Simple sizing adjustments can be made using this pattern. For example, if you find the blouse pattern for the View B fits you nicely, but the band might not fit as loosely as you prefer, then a simple adjustment may be in order. If your bust is size Small but hips are size Medium or Large, you can adjust by grading a bit between sizes. Adding a 1/4 inch seam allowance at the side seams of the blouse bottom edge, as well on the side seam edges of the hip band should do the trick. This technique is called "grading." The general grading rule of thumb when adding or subtracting width at the side seams is 1/4 inch to 3/8 inch for sizes 6-18 and 3/8 inch to 1/2 inch for size 18 and up. The grading term describes the re-aligning of the original pattern and the newly added measurement. This simple and subtle grading technique will be demonstrated in the making of the Middy Blouse View B. So stay tuned!
Note: Due to the minor size adjustment described here, the fabric yardage will not be affected.
Determine your size and any adjustments you might require and purchase your fabric accordingly. Do not forget the width of your fabric matters. Be sure to purchase enough fabric to lay your pattern out properly and the way you intend. Design elements like stripes or pattern design should be considered. You will need to consider if your fabric design is directional and therefore you need to carefully plan how your pattern pieces will lay out, this may require more fabric yardage. Matching plaids will require consideration and most likely more fabric to enable matching.
If you are making View A with the front and back combined as one pattern piece, note that directional prints will not work, because the front and back are cut on the fold as one piece. As a result, the print on the back of the blouse would end up being upside down. This issue can easily be remedied, by cutting the front and back separately, adding seam allowances, and sewing at the shoulder like you do!
Extra Details
Be sure to read the bonus material provided in the Folkwear 211 Two Middies pattern for ideas and instructions on some great embroidery designs to add to your blouse. It is easy to add extra detailed touches with ribbon, soutache, twill tape, patches, and braid, but some elements need to be added before the shirt is completely put together. The nautical theme is just one of many possibilities to explore!
Preparing Fabric
Once you have your fabric, it is a good idea to test the fabric for washability and shrinkage. Cut a small corner of fabric from your yardage that measures approximately 3"x4" rectangle. Place the swatch of fabric on a scrape piece of paper and trace around it. Set the tracing aside to use as a future reference. Wash and dry the fabric swatch according to fiber content recommends, or in the manner in which you intend to care for your finish garment. Then place your fabric swatch back down on the tracing to determine if your fabric shrank or changed in any way. Not all fabrics behave the same. Washing and drying gives you better insight into how your fabric will behave in the real world of washing and wearing. This simply allows you to make any needed adjustments forehand to help prevent disappointment.

Trace around the edges of the fabric swatch on a scrape of paper.
 Tracing a a fabric swatch helps to see if the fabric shrinks after washing and drying.
It is also important to wash all of your fabric yardage before beginning. If your fabric has a loose weave, you might consider securing the raw cut edges first so it doesn't unravel. This is a simple, yet practical extra step. On your sewing machine sew a straight stitch or long basting stitch to keep the raw edge of the fabric from unraveling or getting tangled due to loose threads. Using a serger for this purpose is an excellent choice as well.

A serge stitch helps prevent the raw edge of the fabric from unraveling when washed.
This is also a good time to determine the right or wrong side of your fabric. It may be perfectly obvious for some fabrics, but not so much for others. If you have trouble determining the right from the wrong side, simply pick a side and stick with it. If you are unable to decide no one else will ever know the difference. Indicate the side you deem to be the right side, buy marking it using a needle and contrasting thread. Just catch a few threads of the fabric and tie the marking thread off with two or three tiny knots to secure.
Once your fabric is all washed and ready to go, give it a good pressing not only to smooth it out, so the pattern will lay down well, but to force yourself to give the fabric one last good inspection before you lay out your pattern. Inspect for any flaws in the fabric that you want to avoid. Occasionally when being manufactured fibers can break, or snatches and pulls can happen or, discoloration can occur. When ironing the fabric I intend to use for this project I came across a perfect example of a flaw. I knew it had been noticed, because the inspector left a visible tie thread at the edge of the selvage, adjacent to the flaw.
 The white thread tied to the selvage indicates a flaw in the fabric to be avoided.
Be Respectful of the Grain...
For this project I am using a woven fabric and before pinning the pattern to the fabric, it is important your fabric is "on grain." This means your fabric grain must be straight. Grain refers to the lengthwise and crossgrain yarn of the fabric. It is important that fabric is on grain so your garment will fit and drape correctly and have the effect you intend. Always remember to have respect for the grain to avoid disappointment.
The vertical and horizontal yarns are always at right angles to each other. The fabric was woven on a loom this way and this is how it comes off the loom - with the grain perfectly aligned at right angles.
If a fabric does not match up at right angles it is off grain, and the grain must be restored. To return the yarns of the fabric to their original rectangular position, the horizontal ends (the cut or raw ends) need to be straightened. Note that we are only concerned with the horizontal grain. The vertical grain (the selvedge edge) has already been established as straight by the loom along the selvedge edge.
If your fabric has a "woven in" guide, like a stripe, line, plaid, or check your task is quite easy. You can trust the thread creating the stripe, line, etc. to be straight, because it had to be woven straight.
The next best thing and the easiest method of restoring the grain, is to tear the fabric. This creates an edges that is straight and is perfectly perpendicular to the selvage, making it easier to layout your fabric so that the grainline is straight. Many fabrics tear easily, but not all. It is best to make a small test first. Make a cut through the selvedge and just into the fabric, with the point of your scissors and give the fabric a gentle tear. If it tears easily, proceed tearing carefully. If you are not used to tearing fabric, this process can be a bit unnerving, but all will be fine. Torn fabric grain should be straight.
If your fabric will not allow for tearing (as in the case I encountered with the handkerchief linen I am using for this project), then try pulling a thread to create a straight guide to cut by. To do this cut into the selvedge and into a small amount of the fabric, just enough to pull a crosswise yarn with your fingers. The idea is to pull the thread to create a guide to cut by. Do not try to pull a thread all a in one go, the entire length of your fabric. The thread will most likely break, so pull a short distance, then cut.
 Fabric gathers up along pulled thread.
When you pull the thread sometimes the fabric will gather up along the pulled thread. Simply smooth the fabric out a bit without pulling too much and cut along the guide the pulled thread has created. Continue the whole length of the fabric.
 Smooth gathered fabric out a bit and use pulled thread as a guide to cut by.
Just know that sometimes the fabric is not cut properly straight when you purchased it. Sometimes a printed design is unfortunately not printed straight on the fabric, which is most unfortunate. Sometimes nothing can be done to fix this issue. Not all fabrics are created equal and knowing what to look for in fabric quality can help to avoid disappointment.
Be aware that when fabric is not straight, you can lose precious inches, once the fabric is straightened. For this reason it is wise to buy a little bit more fabric than the pattern calls for. My rule of thumb is 1/4 of a yard more than I think I will need... just to be safe.
In the photo below you can see the attempts taken to find the straight edge of the fabric. I moved over gradually in order to determine the least amount of fabric to be wasted. This photo illustrates how incorrectly the fabric was originally cut. However, it is straight now!
 The wasted fabric removed to restore the grain line.
Gather Your Materials:

... and all the usual tools and notions: pins, scissors, tracing paper, pattern weights, pencil for tracing, measuring tape or ruler, iron and ironing board. And a sewing machine in good working order.
If you decide to do any of the embroidery options provide in the pattern instructions then you will need embroidery thread, needles, and embroidery hoop for hand work.
Ready to Begin!
My inspiration comes from blue skies, white billowy clouds, warm sand, and sea glass. I have decided upon a pale taupe-gray cotton for the main body of View A, with a blue-green linen cross weave for the neck trim. For View B, I have chosen a beautiful light blue handkerchief linen and a very light weight white cotton lawn for a neck tie.
 Fabric and notions for Middy Blouse View A
 Fabric and notions for Middy Blouse View B
I hope this start of the Sew Along has given you some useful things to think about in planning your project. Have fun gathering your materials and dreaming up ideas for your Middy Blouse! I am off to trace my pattern and I will meet you back here to begin Day Two: Cutting & Sewing of the Folkwear 211 Two Middies View A.


