Skip to Content
    • Log in
    • Cart (0)
    • Checkout
    Menu
    • Home
    • About
    • Shop 
      • Sewing Patterns 
        • Folk Patterns
        • Vintage Patterns
        • PDF Patterns
        • Men's Patterns
        • Children's Patterns
      • Fabric 
        • Linen
        • Cotton
        • Silk
        • Wool
      • Sewing Supplies
      • Folkwear Clothing
    • Blog
    • Customer Gallery
    • Contact
    News

    209 Walking Skirt Buttoned Placket Tutorial

    February 07, 2024

    close up of denim placket from 209 walking skirt.

    By Esi Hutchinson

    Plackets serve important functions in the history of garment making, they provide a neat and finished look to the garment, as well as making it easier to put on and take off clothing. They occur at necklines, wrists, waists, and occasionally at ankles.  A fastener, such as a button or snap, is often used to secure a placket closed. Not only functional, but they can also be incorporated as a decorative design on your garment. They can be designed in various ways, such as hidden plackets, exposed plackets, or decorative plackets with contrasting fabrics or unique stitching patterns. These design elements can enhance the overall look of the garment, making it more visually appealing and fashionable, as well as functional. Some Folkwear's patterns that exemplify the differences and similarities of plackets are 212 Five Frontier Shirts, 204 Missouri River Boatman's Shirt, 206 Quilted Prairie Skirt, 102 French Cheesemaker's Smock, 116 Shirts of Russia & Ukraine and of course the featured pattern this month February, the 209 Walking Skirt. 

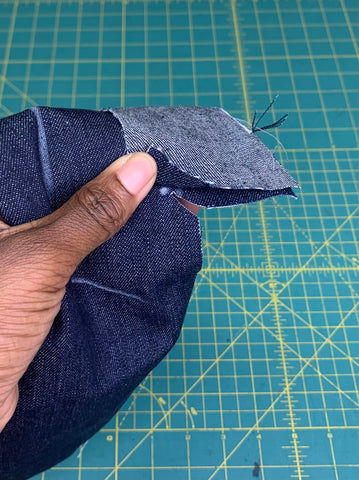
    Today we are providing you with a tutorial on making the buttoned placket for this pattern, 209 Walking Skirt. This tutorial will show you exactly how to manage sewing this particular placket. Plackets can be tricky at times, but making sure you line the pieces up exactly and in the correct way makes a huge difference.  

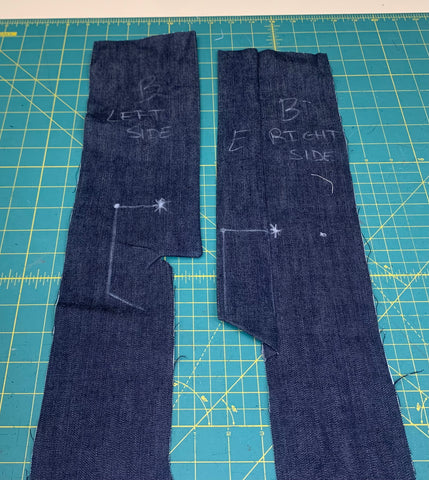
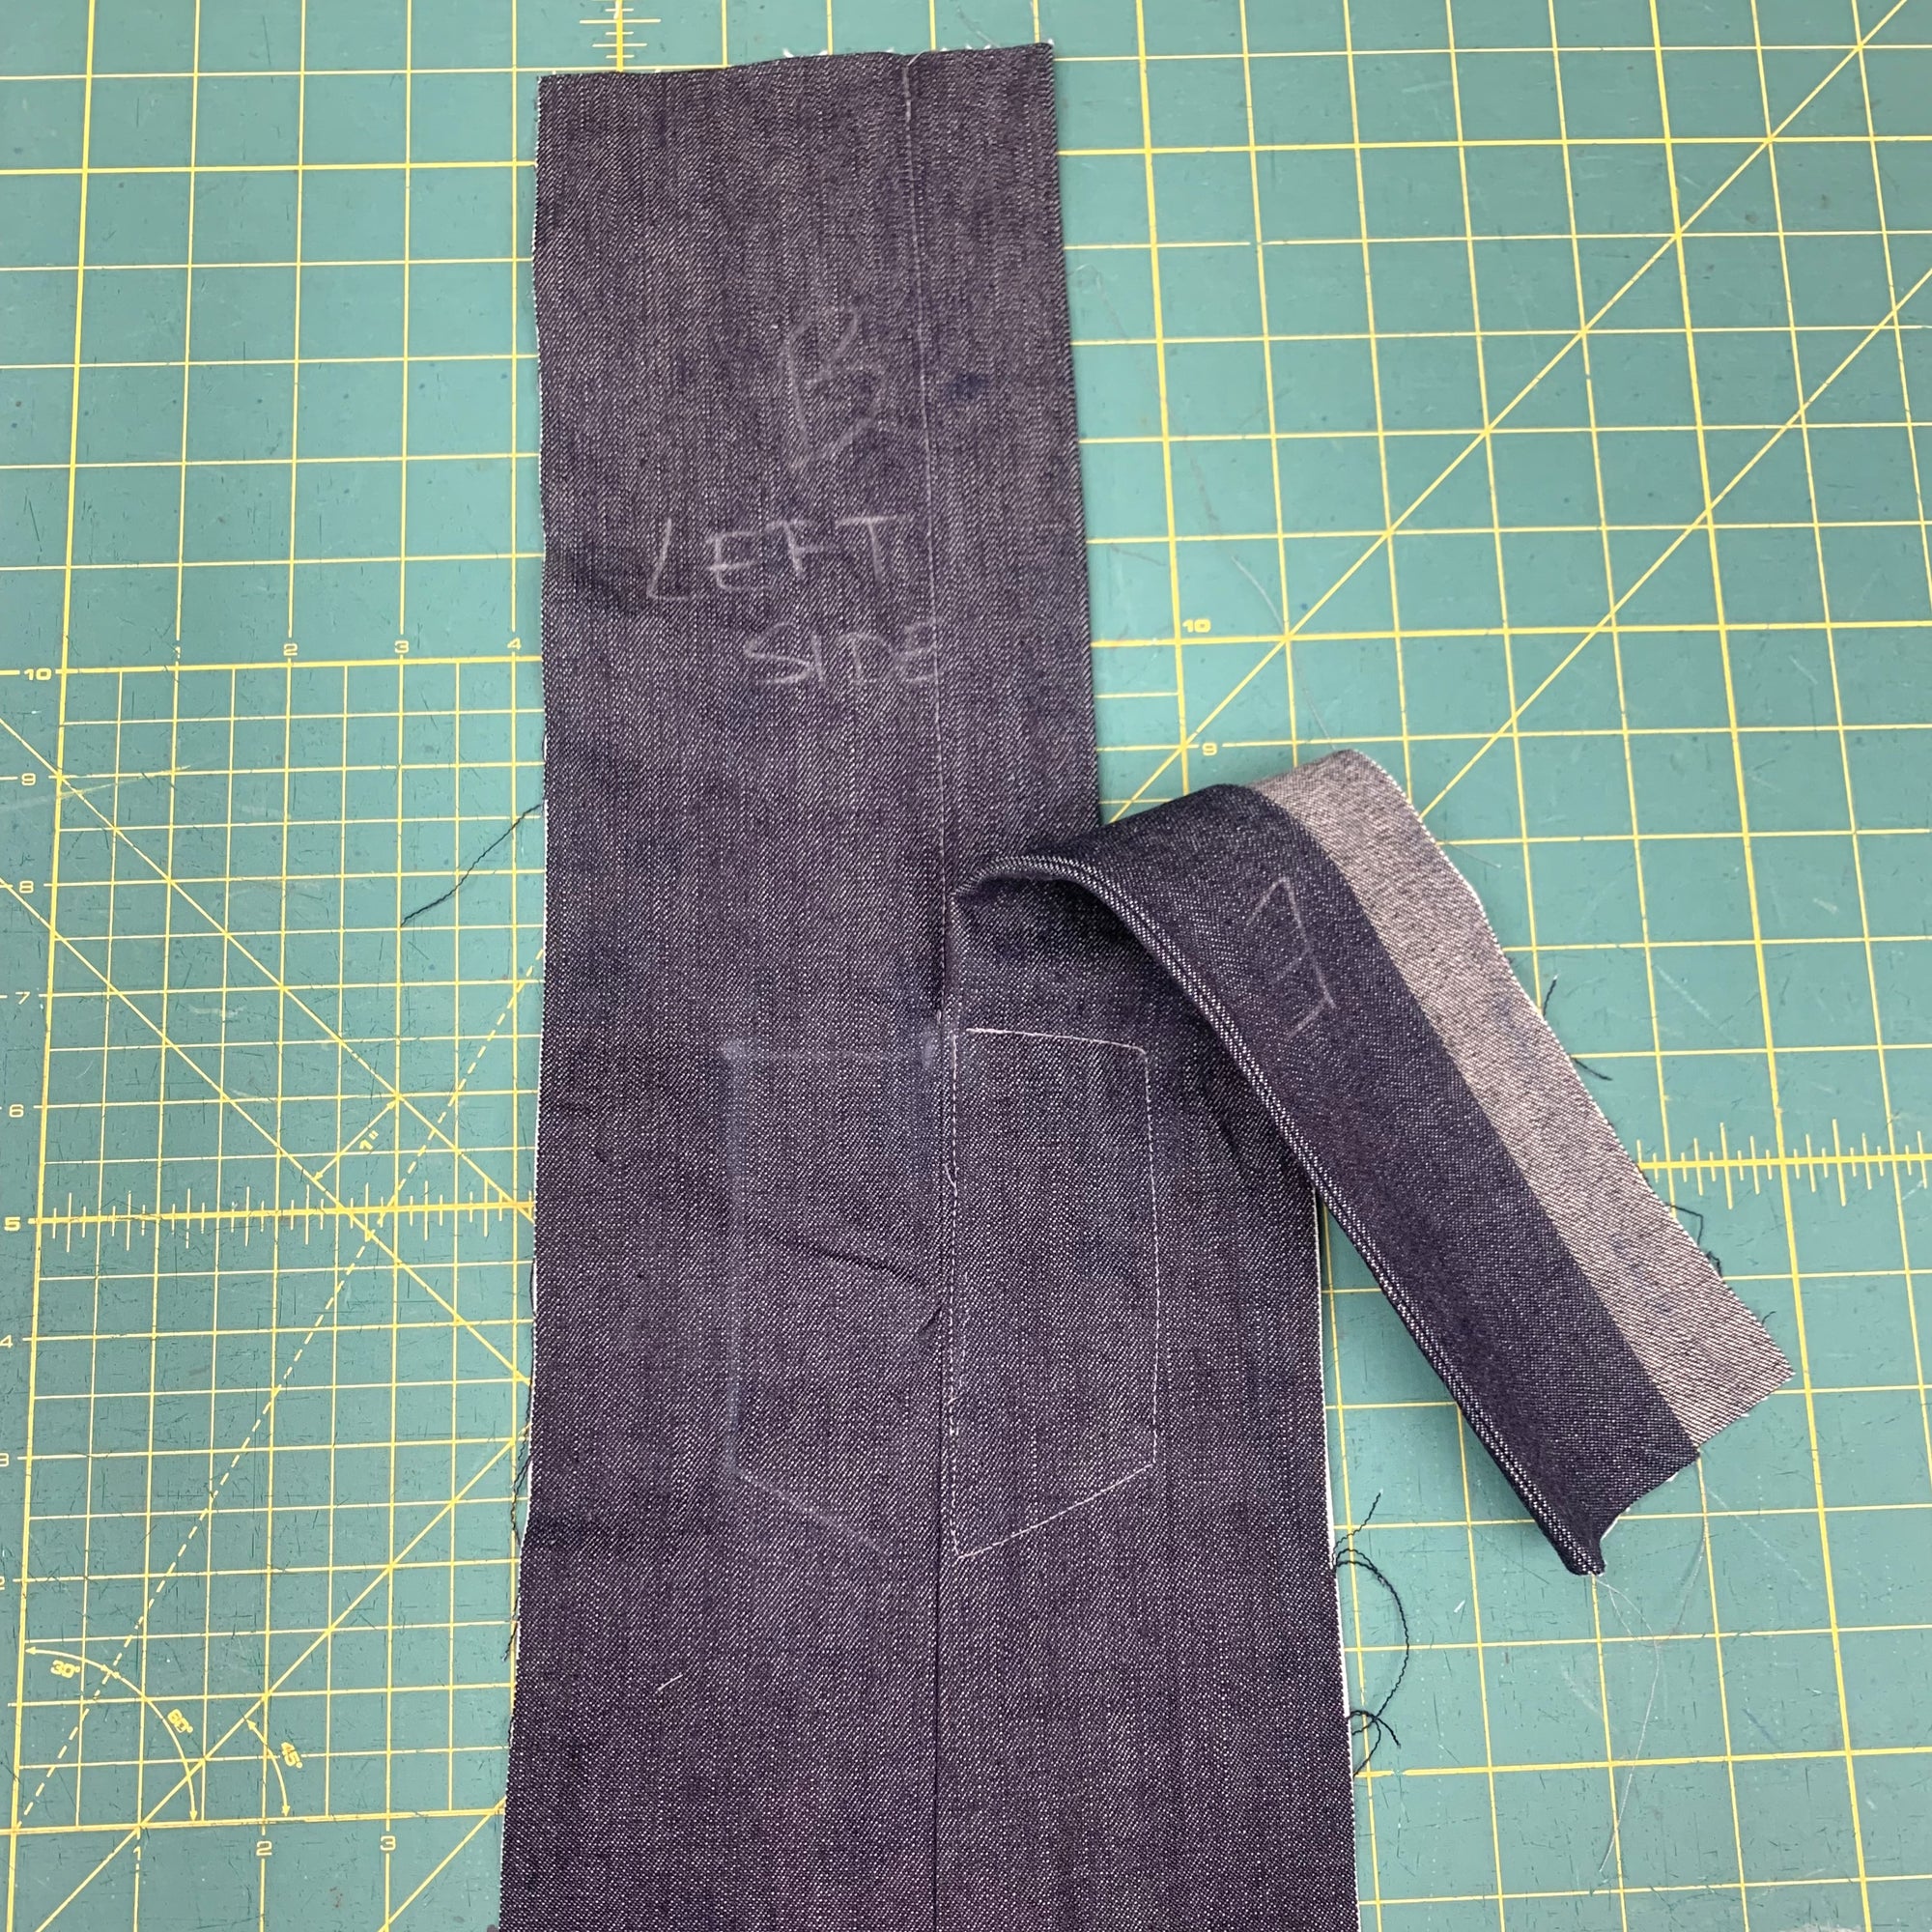
    For this tutorial, I've labeled all the pieces required for assembling the placket and I've cut the back skirt pieces so that you just see the top center backs (so that you can easily see how the placket goes together).  You will need the left and right Skirt Back pieces B, Facing D, and Placket E.  Be sure the Skirt Back pieces are cut out at their designated cutting lines that are indicated on the pattern piece (the left side extends further out than the right side).  NOTE:  on some versions of the pattern, Facing D should be cut with the printed part of the piece face down on the fabric.  If your fabric is the same on front and back, this does not matter.  But if you have a wrong and right side of the fabric, you will need to flip this pattern piece over when cutting to get the notches to line up correctly.

    Also make sure you transfer the dots, stars, and top stitching lines onto the pattern pieces. It also is a good idea to label the left and right side of the Skirt Back  pieces just to make it easier.

    Rectangular pieces for the buttoned placket cut out of dark blue denim on a green cuttting mat.
    You can see here that I have just cut out the Skirt Back pieces where the placket comes together for this demonstration (these are not the whole Skirt Back pieces).

    First you will press under to the wrong side 1/2" (13mm) on the unnotched edge of the facing D.


    Then with right sides together, and matching notches and dots, sew Facing D to the left side of the Skirt Back B along the notched edge. Pivot with your needle down in the fabric at the corner and sew to the dot. Backstitch at the dot.

    Facing D sewn onto Left side of back skirt B right sides together on a green cutting mat.

    Clip to the dot ONLY on the Skirt Back piece (not on the Facing piece).  Trim the seam and clip at the corner.  This will help when you turn the piece right side out.

    close up of clipped to dot on a dark blue denim fabric on a green cutting mat.

    Turn this part right side out and press well.

    Facing D turned right side out on green cutting mat.

    Now we will work on Placket E. Press under 1/2" (13mm) to the wrong side on Placket E along the unnotched edge, and press under the angled side as well.

    Placket E in denim fabric pressed under 1/2"13mm to wrong side on placket E along the unnotched edge on a grey background.
    Placket E in denim fabric pressed under 1/2"13mm to wrong side on placket E along the unnotched edge and angled edge, on a grey background.

    Sew Placket E to the RIGHT side of Skirt Back B with right sides together, matching notches. Trim the seam on the placket ONLY and DO NOT clip to the dot.

    Placket E sewn on to rectangular piece indicating right side of back skirt B right sides together, on a green cutting mat.
    Sewn right sides together - Placket E to Skirt Back (right side). 

    Press the seam towards the placket

    wrong side of the placket sewn to the retangular piece indicating the right side of the back skirt, the seam is pressed towards the left to the placket. On a green cutting mat.

    You now sew the back skirt pieces together:  Match the star on Facing D to the star on placket E.  With right sides together.  It helps to stick a pin through one star and line it up with the other star when doing this.


    You will sew from the bottom of the skirt, all the way up the center back seam, stopping at the star. You can draw a line using a washable marker or chalk to show the 1/2" (13mm) seam line where there isn't a raw edge where the facing and placket are connected, if this helps you.

    left and right sides of skirt back pieces sewn together with the placket and facing. illustrated dashed line with a star on top shows where it was sew together from the hem up to the star, on a green cutting mat.
     
    Press the seams open below the Placket and Facing.

    seam pressed open of the back skirt peices with the placket and facing sewn together at star to hem on a green cutting mat.

    Now, whip-stitch (or top stitch) the folded long edge of the Placket to the right Skirt Back and Facing to the left Skirt Back.  This is to secure the pieces in place when you top stich the lower part of the placket.
    Then topstitch along the topstitching line indicated on that pattern pieces.  
    On the wrong side, I started topstitching from the bottom of the facing, up the angled edge, then up towards the dot, then across to the star. I cut my thread (you can backstitch or leave long tails and pull them to the back and tie off).  I then turned the right side of the fabric up and finished topstitching from the star down to where I first started.  In the instructions, it indicates to sew from the star, down through the Facing and Placket to the bottom of the Placket, up through the angled Placket, up along the side of the Placket to the dot, and then across to the star.  

     From the wrong side illustrated with white dashed lines indicating where I topstiched, starting from the bottom of the facing, up the angled edge, then up towards the dot to the star.
    From the right side illustrated with white dashed lines indicating where I topstiched, finishing topstitching from the star down to where I first started.


    You can see the top stitching here and how I stitched from the lower stitching to the do at the top of the top stitching line. 

    At this point you continue on with the pattern as the instructions indicate.
    And, that is how you make this buttoned placket!  Hopefully this tutorial helps when sewing up this skirt.


    right side of finished buttoned placket on a green cutting mat.   right side of finished buttoned placket with the right side flipped down on a green cutting mat.
    How the placket comes together on this sample placket that I made.  Not too hard!


    Tweet Share Pin It Email

    Leave a comment


    Also in News

    African woman wearing the 147 Bunad, White blouse, red vest with embroidery, royal blue skirt and white embroidered with silver thread apron. She is standing outside in front of a brick building with greenery behind her.
    147 Norwegian Bunad Apron Sew Along

    April 30, 2025

    Continue Reading

    African woman wearing a white bunad blouse and royal blue pleated bunad skirt standing outside in front of a brick building and smiling with hands in her pockets.
    147 Norwegian Bunad Skirt Sew Along

    April 28, 2025 2 Comments on 209 Walking Skirt Buttoned Placket Tutorial

    Continue Reading

    African woman wearing 147 white bunad blouse and red vest standing in front of a bring wall. With hands raised to the hem of the vest.
    147 Norwegian Bunad Vest Sew Along

    April 17, 2025 1 Comment on 209 Walking Skirt Buttoned Placket Tutorial

    Continue Reading

    More Info
    • Patterns
    • Fabric
    • Blog
    • Stockists
    • Wholesale
    • Policies
    • Search
    Sign up for our newsletter

    Sign up to get the latest on sales, new releases and more…

    Contact Us

    info@folkwear.com

    P.O. Box 732, Fairview, NC 28730

    Office/Studio: 240 Clingman Ave Ext, Asheville, NC 28801

    828-628-2049


    © 2025 Folkwear. Powered by Shopify