-
Sewing Patterns
-
Fabric
- Sewing Supplies
- About
- Blog
- Gallery
-

Attaching the Front Dart Gusset to the Pant
Just one more construction feature to add to the front of the 229 Sailor Pants, and the assembly of this piece has an interesting turn at the end!
See Day One, Day Two, Day Three, Day Four, and Day Five of the Sew Along to see what we have done so far!
To get started, you should have two Front Dart Gusset Facing B pieces cut from your main Pant fabric, that are mirror images of each other. And two more pieces, either cut from the same main pant fabric or from the lining fabric (also mirror images of each other).
This is a feature that can be faced with a lining fabric or the same fabric as your main pants. To face my Front Dart Gusset Facings, I am using a paisley print lightweight wool challis as my lining fabric. When using a lining fabric that is different from your main pant fabric, remember the idea is to not see the lining fabric on the outside of the pant. When you press the pieces later, be sure to carefully roll the seam edges of your main pant fabric to the inside of the pant. The lining on the Front Dart Gusset Facing is for the inside of the pants only.

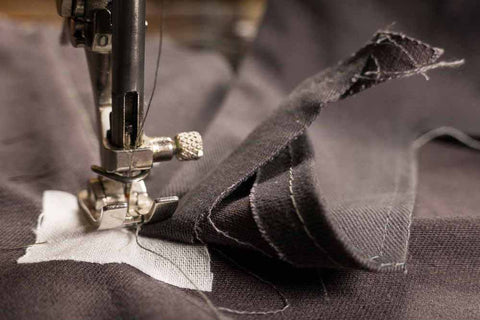
Pin and sew the Front Dart Gusset pieces together.
With right sides together, match the notches and align the edges of the two pieces comprising (the outer and inner) Front Dart Gusset Facing piece. Pin, then sew around all the curved edges of one Front Dart Gusset Facing. Leave the top edge (with the notch) open.


Trim the seam allowances and turn the front Dart Gusset Facing.
Clip the curves and trim the seam allowances. Turn the newly sewn up Front Dart Gusset Facing right side out and press. Remember to roll the main pant fabric to the inside.


Sewing Front Dart Gusset Facing to the pant.
With the right side of the pant facing up, place the right side (main fabric) of the Front Dart Gusset Facing to the right side of the pant, matching the dots around the slash.
You may find it helpful to sew a straight line, using a basting stitch, between the two dots on the Front Dart Gusset Facing and on the pants. These lines will serve as a pining and sewing guide, which can be seen on either side of your work. The idea is to match the stitch line on the Front Dart Gusset Facing with the stitch line at the pants slash. Leave long tails on each end of the basting stitch, so they can easily be removed once the Front dart Gusset facings are sewn in place.

Photo of guide line sewn on Front Dart Gusset Facing


Right side of Front Dart Gusset to right side of pant with dots aligned.
Now, turn the pants over, and finish matching the stitch line on the Front Dart Gusset Facing with the stitch line at the pants slash. The line on the pants goes from 1/2" (13mm) seam allowance at the top of the pants and tapers to almost nothing at the dot. Pin to secure, and stitch along the stitching line, backstitching at each end to secure. Take care to keep the Buttonhole facing out of the stitching.
Repeat this process for the remaining Front Dart Gusset Facing piece.


Another view of the Front Dart Gusset Facing aligned and pinned to the pants. The Front Buttonhole facing is folded back.

Starting sewing from the top dot and sewing down, using the stitch line as a guide. Back stitching at both ends.
Up close view of stitching at the bottom dot, with the Front Buttonhole Facing out of the way of the stitching.

Starting sewing from the bottom dot and sewing up, using the stitch line as a guide. Back stitching at both ends (this may work better for left side of pants).
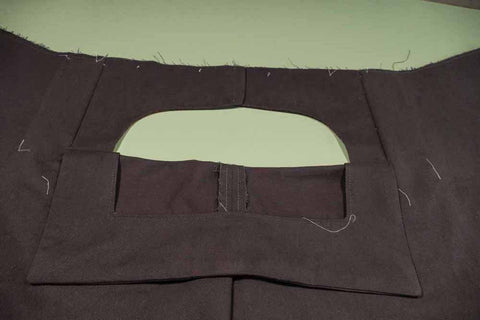
Finishing the Front Dart Gusset Facing.
Now turn the Front Dart Gusset Facing to the inside of the pants, and press the the seam toward the back. I just love how that bit works. The Front Dart Gusset Facing now becomes part of the front of the pants.

View on the right side of the pant with the Front Dart Gusset Facing sewn in place.

View on the right side of the Front Dart Gusset facing about to be turned to the wrong side of the pant.

Turning the Front Dart Gusset to the inside of the pant.

The right side of the pant up, with the Front Dart Gusset facing in place and the seam being pressed.

Another view of pressing the Front Dart Gusset Facing seam.
Views of the Front Dart Gusset Facing and Front Buttonhole Facing.

The right/outside front side of the pant showing the Front Buttonhole Facing folded down, revealing the Front Dart Gusset Facing.
Another view.

The inside/wrong side of the pant showing the Front Dart Gusset Facing.

The right/outside of the pants with the front dart gusset attached and tucked away in side the pants.
Now, you have all of the front pant flap construction done. On Day Seven of the Sew Along we will add a Coin Pocket to the left waistband and sew the right and left waistbands to the pants.


