Skip to Content
    • Log in
    • Cart (0)
    • Checkout
    Menu
    • Home
    • About
    • Shop 
      • Sewing Patterns 
        • Folk Patterns
        • Vintage Patterns
        • PDF Patterns
        • Men's Patterns
        • Children's Patterns
      • Fabric 
        • Linen
        • Cotton
        • Silk
        • Wool
      • Sewing Supplies
      • Folkwear Clothing
    • Blog
    • Customer Gallery
    • Contact
    News

    The Cravat - FREE PATTERN (plus history and a tutorial)

    November 26, 2017 14 Comments on The Cravat - FREE PATTERN (plus history and a tutorial)

    free cravat sewing pattern

    The Cravat

    From the mid 17th century, and to this day, the well-dressed gentleman has never considered his costume complete without some form of neckwear. In 1636 the cravat became fashionable – after the custom of the Croats or Cravates serving in the French army, who wore a length of cloth around their necks to protect the throat.

    The first cravats were wound around the neck and usually tied in a bow or with a black ribbon. In 1692, the Battle of Steinkirk (in Belgium) introduced a new fashion. The French cavalry, surprised by the enemy, rushed to the attack with the ends of their cravats flying or carelessly twisted and drawn through a buttonhole. The casual style popularized by their victory was taken up by women as well as men.

    For several decades following, the cravat gave way to a neck cloth that was pre-folded and fastened in back – the stock. In the 1770s, a vogue for pastoral English tastes brought back the unconstructed cravat in the form of a large triangle or square of the finest linen or muslin.

    After 1830 the collar began to turn down over the cravat, which evolved into the bow tie, the ascot, and the four-in-hand.

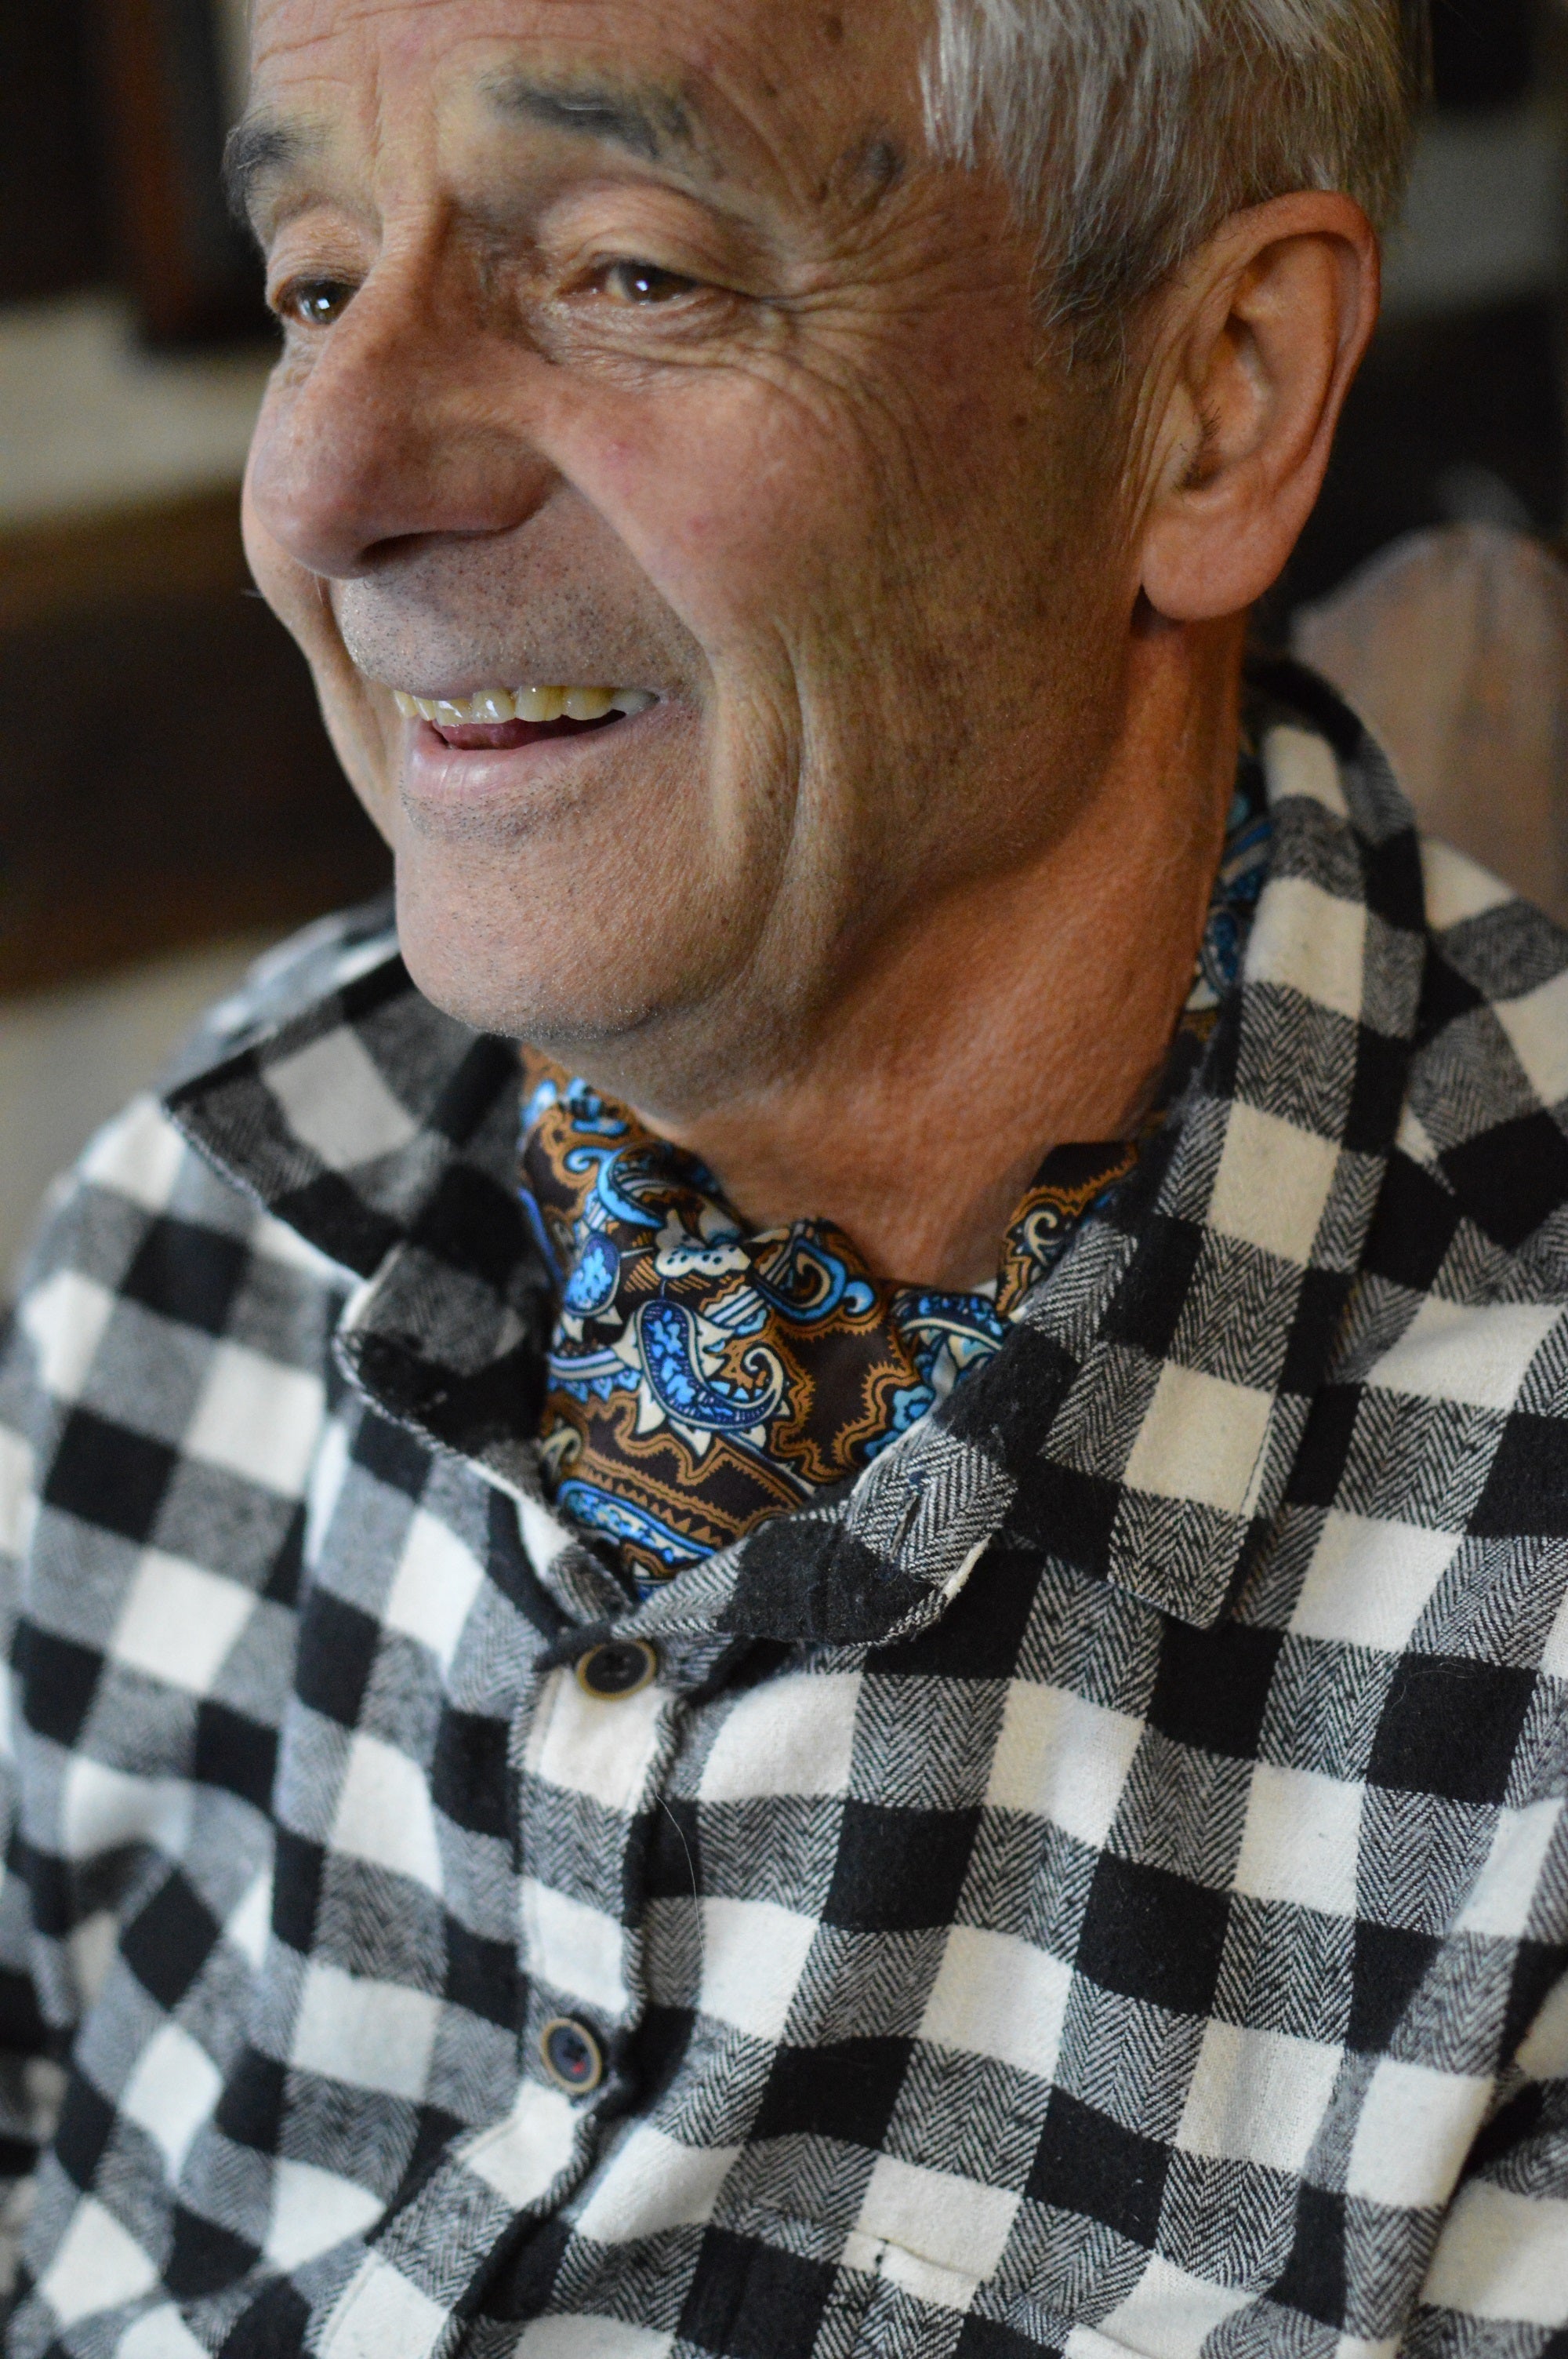
    Today, the cravat is fashionable for men and women.  It can compliment your outfit, provide a splash of color, and keep your neck warm.  My British father-in-law wore one nearly everyday of the winter – under his dress shirts or denim work shirts.  It gave him an air of gentility, and is a fun and useful accessory.  The instructions provided below create a cravat similar to what he wears, or you can download them here.  Simple to make and simple to wear, this pattern is a fun and quick make - a great holiday gift for anyone in your life.

    Construction

    The size and shape of cravats have varied over the centuries. In their earliest manifestation (c. 1680), they consisted of a rectangular strip of very fine lawn, the ends often trimmed with lace. By the end of the 18th century, a folded square or triangle had been adopted, folded into a band, with endless varieties and subtleties of knots. Early in the 19th century, cravats were pre-knotted and mounted on a fixed collar that fastened in the back by a button or a pin, although free-tying cravats were still used. Folkwear also offers the triangular cravat pattern in our 217 Poet's Shirt pattern, which is a versatile and adaptable for modern fabrics and fashions.

    Choose fabrics that are fine, soft, and have a good drape.  Often, modern cravats are made with paisley print silk or other printed patterned silk, with a soft and plain colored cotton lawn as backing. 

    This cravat

    This cravat pattern is based on cravats my father-in-law wore all winter.  They are made of silk paisley print and cotton fabric.  They are pleated in the center for ease of wear and are very stylish.  You can see the way he ties and wears his cravat at the end of this post.

    Seam allowance for this pattern is 1/4".

    MATERIALS

    • 1 1/4 yard silk print for the outside fabric of cravat (You may also cut this on the cross grain and therefore only need 1/4 yard of at least 45" wide fabric; Or, you can use a scrap of long 6"-8" wide selvedge edge from another project).
    • 1 1/4 yard plain colored cotton lawn or poplin for inside of cravat (This can also be cut on the cross grain and only need 1/4 yard of at least 45" wide fabric, or be cut from 6"-8" selvedge edge)
    • Coordinating thread
    • Tailors chalk or your favorite marking pen/pencil/tool
    • Pins
    • The pattern, which is also below, but can also be downloaded with illustrations as a PDF here. 

    CUTTING AND MARKING

    Wash and press fabric before beginning.

    Cut one rectangle each from the silk and cotton measuring 42" long by 6" wide, each. To see pattern drawings, you can view or download this article as a PDF here. 

    Note: Most markings can be made just on the cotton piece (which can be a plain color and therefore easier to see markings).  Use tailor's chalk, or your favorite marking pen/chalk/pencil/etc.

    Mark a line across the center of the fabric (across your fabric at 21").  Line is perpendicular to the long sides.

    Make two more lines, one 6 3/4" on each side of this center line.  These will be your stitching lines when sewing down the pleats.

    Mark a line, perpendicular to the long edge, 3 1/2" from each end of the long rectangle.

    Mark the center of each short end of the rectangle and draw a line from the center to 1/4" inside the above line, on each side, to form a triangle.  Transfer these diagonal lines to the other side of the fabric also.  You will be stitching along these lines in the next step.

    SEWING THE CRAVAT     

    Use 1/4" seam allowance.

    Place right sides of fabrics together (I would consider the chalk marked side of the cotton to be the "right side").  Pin and sew 1/4" seam allowance on the long sides of the cravat.  At the short ends, sew along 3 of the 4 diagonal lines formed in the previous step.

    Turn right sides out. Press so that the ends form a nice flat triangle.  You will be hand stitching one side end closed later.

    Now it is time to form the pleats.

    Draw, with chalk, horizontal lines every 1/2" from the top edge, going perpendicular to the 3 center lines.  These marking lines should only go from the left-hand vertical line, crossing the center, to the right-hand vertical line.  They do not need to go further.

    Start folding from the top, place each horizontal line on the second one below it, so that you have 3 horizontal pleats. Press pleats.

    Stitch across pleats along the 3 vertical stitching lines, backstitching at beginning and end to secure thread.

    Whipstitch diagonal end closed.

    How to wear: 

    This is how my father-in-law ties and wears his cravats.

    First, hang this cravat around the back of your neck with one end shorter than the other.

     Then, wrap the longer end around the shorter end two times.

    Then, tuck the long end behind the wrap and bring it to the front and tuck it into the font of your shirt.


    Tweet Share Pin It Email

    10 Responses

    David Gallacher
    David Gallacher

    April 19, 2025

    I’ma first time sewer and made a good job of my first item – your cravat. I bought a silky blouse in a charity shop and used a roll of gingham my wife had, to make the backing. It turned out rather well – the pleating I found to be the trickiest bit. Thanks for the instructions!

    Ellyn Whitten Smith
    Ellyn Whitten Smith

    July 13, 2022

    Just a comment to make things easier for the next person who makes your cravat (which is wonderful), but you’re going to want to have some fabric left at the point created when you marked the triangle on each end of the cravat. Sewing on the line, following the photograph, you’ve essentially created a hole that will then fray as you wear garment. Marking that line as pictured and then sewing to the left of it we’re leaving that problem. It’s a short in the cravat by half an inch or so, but it’s preferable to the inevitable fraying.

    Thank you so much for taking the time it took to write out these instructions and include photo illustrations to help. I was very pleased with my finish cravat.

    Steph
    Steph

    December 23, 2021

    Thank you so much for sharing this free cravat pattern. I found it easy to follow and to make, and am very pleased with how it turned out. I used a royal blue satin paired with a vibrant patterned cotton (Red Octopus from Brandon Mably / Kaffe Fasset collective).

    I made it for my brother’s Christmas present, as our late father loved a cravat & my brother inherited his sense of style, so fingers crossed he likes it. xx

    RB
    RB

    November 21, 2021

    SEW easy and perfect! thank you

    Charlie
    Charlie

    May 12, 2021

    Thankyou so much for this lively tutorial. I have made my Father a clan tartan & silk backed version with a personalised monogram for Father’s Day. Very excited to gift it to him. A lovely & bespoke gift! Thanks again

    Fellcia Boddie
    Fellcia Boddie

    January 26, 2021

    I am trying to get a pattern for the masonic cravat or tie

    Alexandra Sage
    Alexandra Sage

    June 18, 2020

    Really clear instructions. Just made it for Father’s Day. Looks lovely. Thanks!

    Christopher
    Christopher

    May 13, 2020

    Thanks for this, nicely presented.
    I played around with the design a little. Prior to creating the pleats I tied it and then marked the centre of the neck on it…then did the pleats based on that. Means the pleated section is offset but it sits better around my neck.

    Masha
    Masha

    January 08, 2019

    I just found this site while looking for places to comment to show our matching shirt & tie sets @ MashasCorner.com – but this is a really cool sight! Cravats are really classy. Masha

    Corne' Redelinghuys
    Corne' Redelinghuys

    August 29, 2018

    Thank You very much for sharing your cravat pattern. It was easy to follow and I made it in no time. We made a 1920’s motorcycle outfit for my husband and it needed a pop of color.

    1 2 Next

    Leave a comment


    Also in News

    African woman wearing the 147 Bunad, White blouse, red vest with embroidery, royal blue skirt and white embroidered with silver thread apron. She is standing outside in front of a brick building with greenery behind her.
    147 Norwegian Bunad Apron Sew Along

    April 30, 2025

    Continue Reading

    African woman wearing a white bunad blouse and royal blue pleated bunad skirt standing outside in front of a brick building and smiling with hands in her pockets.
    147 Norwegian Bunad Skirt Sew Along

    April 28, 2025 2 Comments on The Cravat - FREE PATTERN (plus history and a tutorial)

    Continue Reading

    African woman wearing 147 white bunad blouse and red vest standing in front of a bring wall. With hands raised to the hem of the vest.
    147 Norwegian Bunad Vest Sew Along

    April 17, 2025 1 Comment on The Cravat - FREE PATTERN (plus history and a tutorial)

    Continue Reading

    More Info
    • Patterns
    • Fabric
    • Blog
    • Stockists
    • Wholesale
    • Policies
    • Search
    Sign up for our newsletter

    Sign up to get the latest on sales, new releases and more…

    Contact Us

    info@folkwear.com

    P.O. Box 732, Fairview, NC 28730

    Office/Studio: 240 Clingman Ave Ext, Asheville, NC 28801

    828-628-2049


    © 2025 Folkwear. Powered by Shopify