- Home
- About
-
Shop
-
Sewing Patterns
-
Fabric
- Sewing Supplies
- Folkwear Clothing
-
- Blog
- Customer Gallery
- Contact
November 10, 2020
Any one who sews, knows what a challenge fitting can be. The ultimate joy in learning to sew, and what makes it so rewarding, is the pleasure that comes from wearing clothes that fit and bring you joy.
This blog is intended to help you make minor changes that can make a big difference in how your Folkwear's 229 Sailor Pants fit. If you are in between sizes, a simple grading technique can make all the difference. Or, if your waist is quite a bit smaller than you hips, a couple of easy-to-make darts can be all that stands between you and a good fit. Adjusting the depth of the crotch can make a difference too.
The 229 Sailor Pants pattern was directly taken from an authentic pair of sailor pants from the 1940's. Part of the authenticity of this design, means there are no side seams. However, side seams do allow for more options when it comes to shaping a garment, especially when considering the curves of the female body. However, adding side seams is a future blog.
Despite this sailor pant design having no side seams, a few simple and helpful adjustments will give you a better understanding on how to make the 229 Sailor Pants fit your shape. Because, there are no side seams to this pant design and the front has all the opening flap and darts, most sizing adjustments need to be made to the back of the pants.
Even though the techniques demonstrated here are simple, it is always best to make a test muslin first. All the adjustments for this blog are done making a muslin. Other than the adjustments, the pants are made according to the pattern instructions. We will be focusing on the back seam and waistband of the pants, mainly. Since the fit of the leg is not the focus of this tutorial, I only constructed the pants to the knee.
To make sizing adjustments you need to consider the widest part of the body first. The widest part of your body can vary depending on your body shape. If your waist is the widest part, start by choosing the waist size that matches your measurement. The focus of this blog concentrates on making adjustments for the waist, hips, and crotch.
If your hips are the wider part of your lower body, there are a couple of approaches to take depending on how much difference there is between your waist and hip measurement.
Simple Grading Between Sizes
Sometimes, the difference between your hip and waist measurements are not all that dramatic, but you still fall in between pattern sizes. For example, while the size 32 might fit nicely in the waist, it might be too narrow through the hips. In this case, keep the size 32 waist and make the hips wider by using the size 34 pant pattern. This the technique Molly used when making her red corduroy Sailor Pants above.
So you can more clearly see what is being demonstrated, I traced (using Swedish tracing paper) the size 32 pants pattern piece and laid it on top of the size 34 pattern piece. These pattern pieces are not nested next to each other, so it helped to trace it and move it. I used the Center Front edge and notches for alignment. The grain line and "lengthen or shorten here" line printed on the pattern can be used to ensure alignment as well.
Draw a Grading Line
Below, the line between sizes, or grade line, is drawn in red between the size 32 at the waist and the size 34 toward the hip area. You want to create a smooth continuous line between the sizes. Doing this widens the hip area to size 34 while allowing the waist to remain unaltered. Notice this grading line runs slightly into the crotch area without altering this area too much. Trace your new pants pattern piece, staying with size 32 at waist and following the red line to size 34 for the rest of the pants.

A size 32 traced on Swedish tracing paper aligned over the original pattern and the new grading line drawn in red.
This technique works fine when grading between just two sizes. However, this technique does not always work well if you need to grade between more than two sizes. Too much grading forces the fabric off grain or distorts the crotch area, which results in an unfortunate wonky look. When making a minor grading adjustment, the measurement threshold or limit is approximately 1/2 inch (13mm) or less.
Adding Darts at the Waist
If the difference between your hip and waist measurement greater than one size, a different approach using darts can be used. For example, I started with an original size 36 pant pattern (because of my hip measurement) and then shaped the excess fabric using darts to create a 32 inch (81cm) waist. Below is the size 32 waist band and the size 36 pant cut from muslin.
In this case, the difference between the size 32 waist band and the hip of the size 36 pattern is 2 inches (51mm) for each back side of the pants. The idea is to reduce the extra two inches (51mm) to fit the waistband. To do this, the 2 inch (51mm) dart needs to be folded in half, creating a one inch (25mm) width at the widest part of the dart. The location of the dart should be positioned, at the waist edge, over the fuller part of the body, or where you are round. The point of the dart points toward the fullest part of the rear end, and ends about one inch from the fullest part. Often this is about half-way between center back and side waist, but try out the location in a muslin and adjust before making your final fitting. Add a dart in the same location (mirror image) to each side of the back waist to create the needed shape.

With wrong side facing up, the dart drawn at the pant waist.

The dart folded in half takes up the excess fabric.
A "V" shaped dart is used to eliminate the excess fabric at the waist and create a 3-dimensional shape. Start with a back stitch at the widest part of the dart and stitch along the angled guide line, ending in a point. At the end if the point, leave a long thread tail and tie the the treads off to secure.
Press the darts to create smooth finish.

The dart sewn starting from the widest point and ending in a point.
Hints: Generally, you press darts toward the center front or back. Also, the curvier the body, the larger the darts usually need to be. You can even create two darts, one larger, one smaller.

The dart pressed toward the center of the pant and pinned to the waistband.

Another view of the waist with a dart, pinned to the waistband and ready to be sewn.

The waist and waist band now align due to the dart.

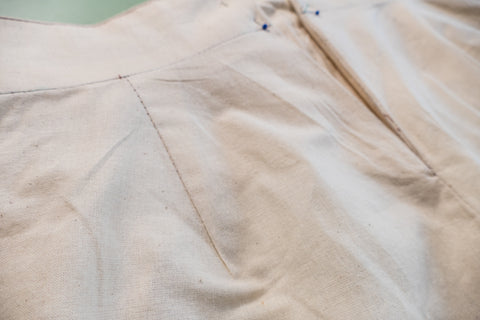
A close up view of the dart pressed toward the center of the pant and sewn in place.

View of the dart on the right side of the pants.

Darts with the right side of the pants laying flat.

Pants with darts creating shape at the waist and curve of the hips.

Another view showing how the darts allow for the curve the backside.

Side view... notice the dart placement.
It is worth understanding the varying methods for calculating dart positioning. However, it is also acceptable to let the excess fabric determine where the darts need to go. This is often an adequate method of figuring out good dart placement in order to give a pleasing shape to your garment. If there is excess fabric in the sides, then the dart should be at the side seam area. If the excess fabric is at the side back area, then your darts need to be positioned there.
Some curvier figures may required a combination of dart positioning, or two darts (one smaller, one larger) in the waist and/or side seam areas. Because everyone is shaped differently, it is worth experimenting to determine what works best for you. The rules of sewing are not written in stone. But it does help to understand prescribed methods and techniques, to help you determine what works best for you.
Adjusting the Crotch Depth
The final fit adjustment to consider is the depth of the crotch. The "lengthen or shorten here" line printed on the pattern, can be used if you need to adjust the depth of the crotch area. To shorten the length, simply fold your pattern piece up making a pleat equal to one-half the amount you wish to shorten.

Make a shortening pleat.

Pin the pleat in place and ready to use.
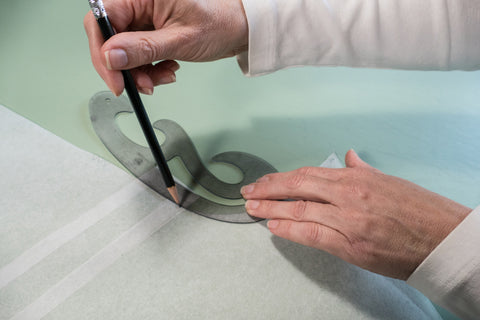
To add depth to the crotch, simply cut on the "lengthen or shorten here" line to separate the pattern into two pieces. Then insert another piece of tracing paper behind the original pattern piece, to will allow for the increase. Be sure the extra tracing paper is big enough to provide enough overlap on the back side to secure to the original pattern pieces with tape. A bit of tape added to the front side will help as well. Use a hip curve or French curve to create a smooth continuous drawn line connecting the two separated pieces. Trim any access tracing paper away and the adjusted pattern is ready to use.

Separate the pattern by cutting on the "lengthen or shorten here" line.

Use a French curve to create a smooth continuous drawn line connecting the two separated pieces.

Pattern separated, adjusted, trimmed and ready to be used.
I hope these basic fitting adjustments prove helpful in fitting your Folkwear 229 Sailor Pants. Learning to fit is a process and patterns are meant to be the starting point in this process. Learning how to take a two dimensional fabric and mold it to a 3-dimensional body is an art form in itself. I hope this blog will help you in your fitting journey.
