-
Sewing Patterns
-
Fabric
- Sewing Supplies
- About
- Blog
- Gallery
-

by Cynthia Anderson
Beautiful fabrics simply make garments more special. However, sometimes these beauties can sometimes be a challenge to sew with. Folkwear's 265 Afternoon Tea Dress and the 266 Greek Island Dress are two favorite sewing patterns that are perfect for using these beautiful, but challenging fabrics - slinky silks, sheers, laces.
These patterns, and many others, are perfect for using slippery silks or rayons, and for layering sheer and/or lacy fabrics to achieve a filmy, flowy, and romantic look. In this blog series you will learn tips and techniques on how to achieve success in sewing fabrics that can be tricky to work with. Today we are focusing on sheers and laces. To learn more about working with bias cut fabrics or bias binding, go here.
Sheer fabrics like chiffon, georgette, voile, organdy, and organza are challenging to work with because they're so soft and delicate. Silk charmeuse can be slippery and unruly to handle. However, there is no denying the beautiful drape and effect that only these fabrics can provide. There is no need to shy away from these fabrics and every sewist is eventually lured by such temptations. Before you begin cutting, review these tips for working with slinky fabrics, sheers, and lace to ensure success!
Layering sheer materials and lace over each other or over heavier-weight solid fabrics is a creative and easy way to achieve beautiful effects. However, the lightweight filmy quality of sheer and lacy fabrics can be troublesome and exasperating to sew. If you take just a little extra care and follow these tips, you'll get great results from these beautiful fabrics.
Planning, Layout, and Cutting
• If the pattern calls for interfacing, choose light weight, sheer fabrics for interfacing, such as organza, organdy, or other sheer fabrics that match the fashion fabric or are flesh-colored. For materials other than lace, you can even use the fashion fabric itself, as a self fabric interfacing.
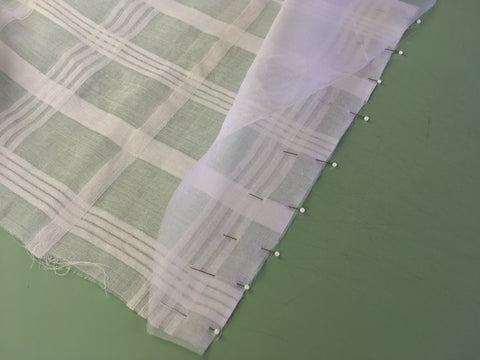
In the photos below silk organza provides a light-weight yet stable interfacing to a sheer gauzy cotton fabric.

• If the sheer or lace fashion fabric is a bit too transparent for your taste, simply underline the pattern pieces with a matching or flesh-colored sheer. To underline, cut the pattern out a second time from the selected underlining fabric. Baste the underlining pieces to the fashion fabric pieces, wrong sides together, and then handle as one during garment construction.
• If neckline, armhole, front opening, or other facings will show through the fabric, omit them altogether. Instead, bind the edges with bias strips or line the entire garment with a compatible sheer fabric.
• Cover the cutting surface with muslin, flannel, or an old sheet to keep sheer, slippery fabrics from sliding around. You might even want to baste the fabric to the muslin underlayer around all edges, before pinning and cutting pattern pieces.
• Instead of cutting pieces on the fold, make a full size pattern piece and cut from a single layer of fabric. For example, the FRONT pattern piece is usually just the right front section of the garment and is cut on the fold. Make a mirror-image drawing of the FRONT piece, which will be the left front section of the garment, and cut the whole piece from a single layer of fabric.
• Cut the pattern pieces out one at a time, from a single layer of fabric. This will prevent the underlayer from shifting out of position. Be sure that you cut both left and right pieces, where appropriate (see Planning and Layout in Bias section here).
• Insert pins in the seam allowances only, so you won't have pinholes showing in the finished garment.

Sewing
• If you baste seams before sewing, baste only in the seam allowance.
• Start sewing with a brand new sharp needle, and choose an appropriate size for lightweight fabrics, such as 60/8, 65/9, or 70/10.
• Experiment with different threads (cotton, silk, polyester, or blends) on swatches of the fashion fabric, to determine which you like best.
• If the fabric is too slippery and hard to manage while stitching, place a layer of tissue paper on top of the fabric (between fabric and presser foot), and then tear away the tissue after stitching.


• To keep fabric from being pulled down into the hole of the sewing machine needle plate at the beginning of seams, begin stitching on a small square of self-fabric. Be sure to hold the thread tails taut for the first few stitches, then let them go. When you’ve finished stitching the seam, cut away the square of fabric.


• Don’t back stitch at the beginning or end of seams. Instead, turn the stitch length to O (zero) for a few stitches, to knot the threads. Alternatively, tie the thread tails in square knots at the beginning and end of the seam.
• Don’t overload a lightweight, filmy garment with bulky seam finishes and hems. French seams are ideal for sheers, because they are self-finished and end up being quite narrow. For hems, it’s usually sufficient to turn up 1/8” (3mm) twice and edge stitch.
Special Notes For Lace
• If lace has a specific directional design, be sure to lay out the pattern pieces so they face in the same direction (a "with nap" layout). Also try to match the design motifs as closely as possible at obvious places, such as center front and center back. The "with nap” layout will probably require extra yardage, and matching the design motifs may also require a bit extra.
• Try to position the lace design motifs in a balanced way, so they won't look off center when the garment is complete. For example, if the lace has a prominent floral motif, try to position that motif in the center of the pattern piece.
• Take advantage of the pretty scalloped selvage edge of lace by using it as a shaped hemline on the sleeve and garment front/back. Simply lay out the pattern pieces so the finished hemline (not the cutting line) runs along the edge of the lace. When the garment is finished, it will already be "hemmed" by the scalloped edge, and you won't have to deal with turning up or facing a hem.

• Be careful not to snag the lacy fabric with the sewing machine presser foot while stitching or with the point of the iron while pressing.
• For a ready-made applique embellishment, carefully cut out one of the design motifs from the leftover lace fabric and hand stitch it to the finished garment where desired.
Again, once you master a few simple tips and techniques you can easily tame unruly fabrics, conquer their fussy side, and enjoy the luxury feel and drape that every sewist deserves.
One of the pleasures of sewing is trying new things with confidence and we are always here to offer you guidance. Celebrate yourself, or a special occasion, by using these beautiful fabrics to make a garment that is special. Hope you find these tips helpful!


Konveksi Seragam Kerja
September 23, 2024
Your website is very inspiring with high-quality content. We are sure that you will find additional useful information on our website. Come on, visit us at Konveksi Seragam Kerja and we can collaborate with each other.
Warm Regard.