Skip to Content
    • Log in
    • Cart (0)
    • Checkout
    Menu
    • Home
    • About
    • Shop 
      • Sewing Patterns 
        • Folk Patterns
        • Vintage Patterns
        • PDF Patterns
        • Men's Patterns
        • Children's Patterns
      • Fabric 
        • Linen
        • Cotton
        • Silk
        • Wool
      • Sewing Supplies
      • Folkwear Clothing
    • Blog
    • Customer Gallery
    • Contact
    News

    Free Pattern - Holiday Napkins

    December 06, 2023 2 Comments on Free Pattern - Holiday Napkins

    Napkin with a cross stitched poinsetta on a wooden table set with silverware and a table runner.

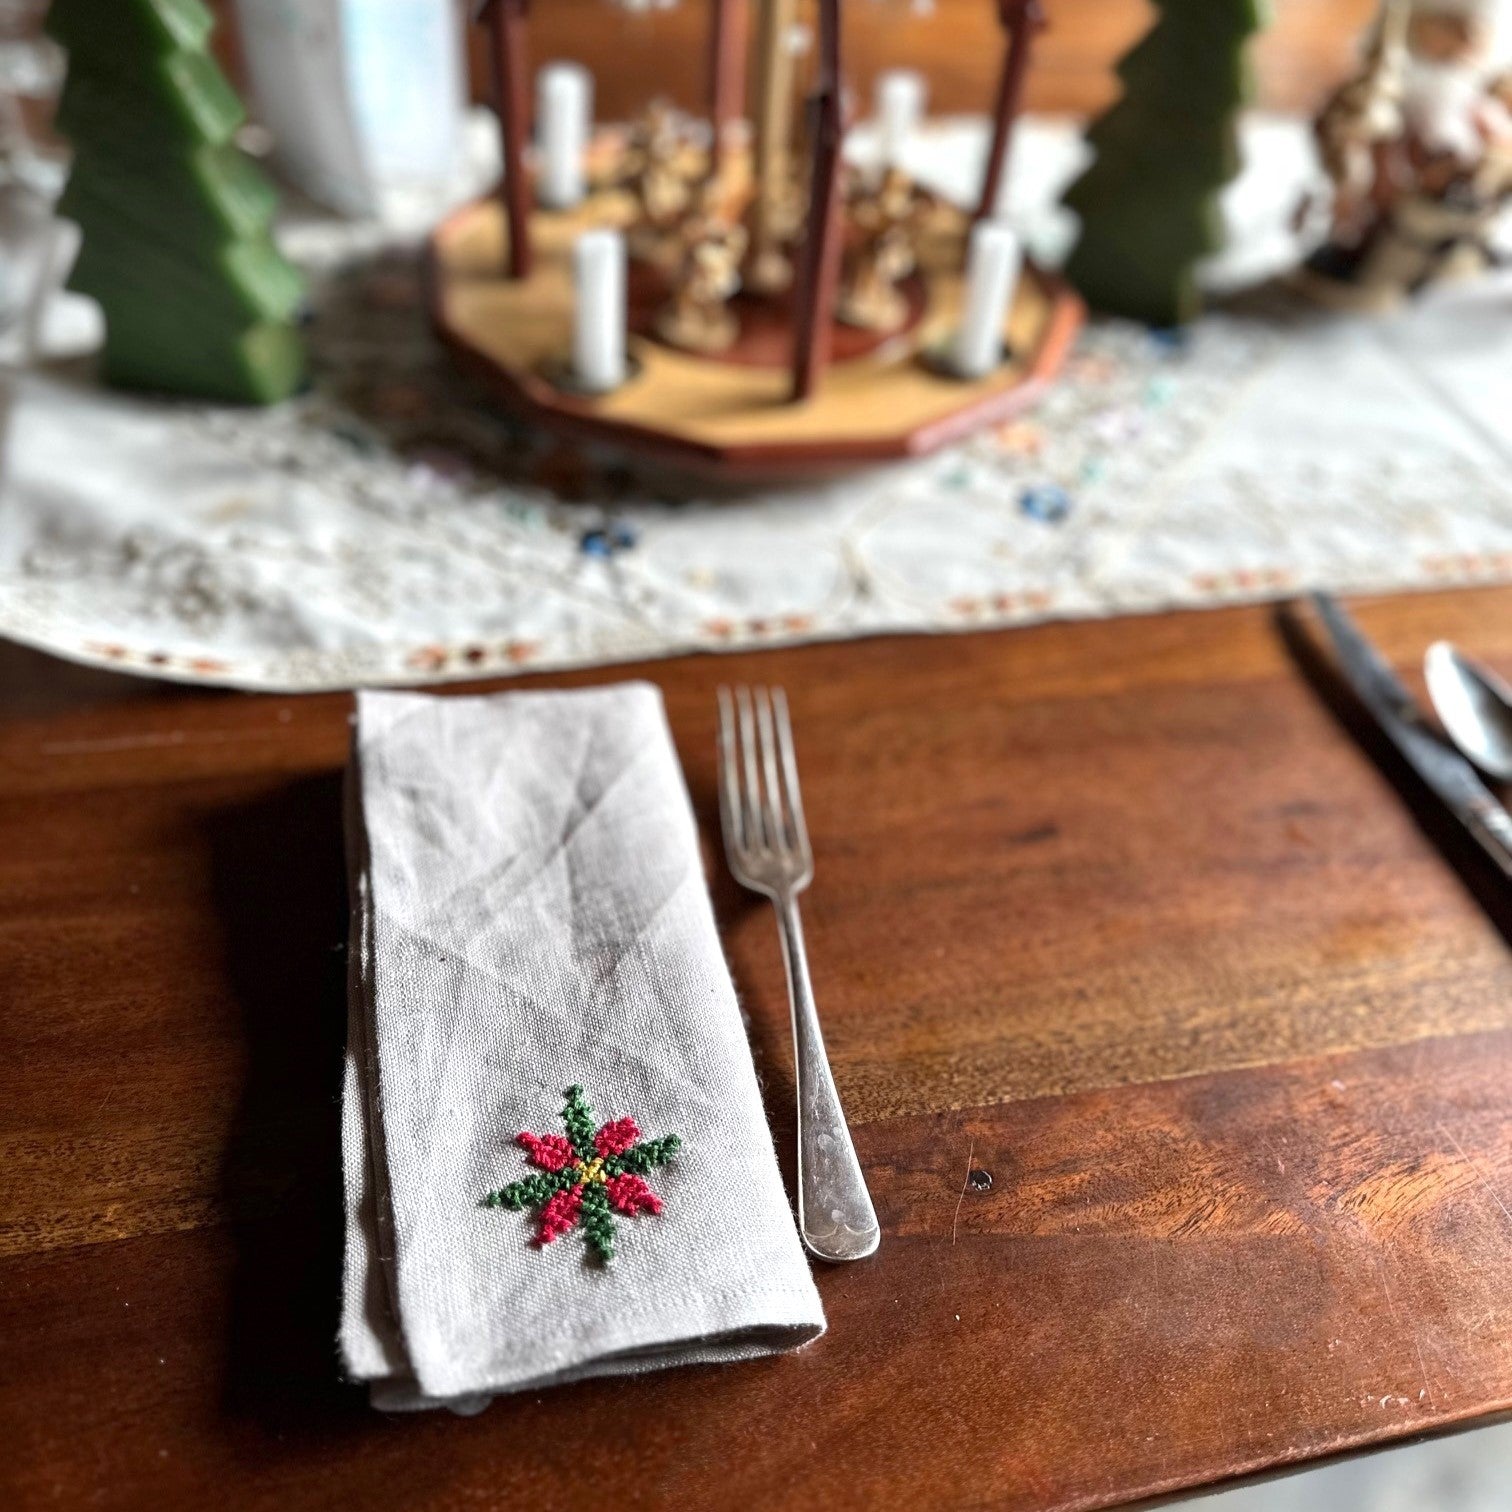
    Cloth napkins are a classy and elegant (not to mention, environmentally friendly) way to set a holiday table. These napkins are easy and quick to sew and we have several motifs to add a handmade touch to your napkins - embroider a poinsettia or paint a holly leaf motif. This project will show you how. 

    Materials Needed:

    • Fabric (see suggestions and yardage information below)
    • Thread
    • Pattern, instructions are below, but the file can be "purchased" for free and downloaded here.  This will include the embroidery and paint motifs., as well as more detailed instructions.
    • For embroidery: embroidery thread, needle, small patch of waste canvas
    • For fabric painting: fabric paint, small brush

    Suggested fabrics: Medium to lightweight cotton or linen is best; poplin, voile, percale. A solid color is good if you are planning to embroidery or paint, but patterns can be fun also. A holiday-themed fabric would also be fun; quilting cottons come in many holiday patterns.

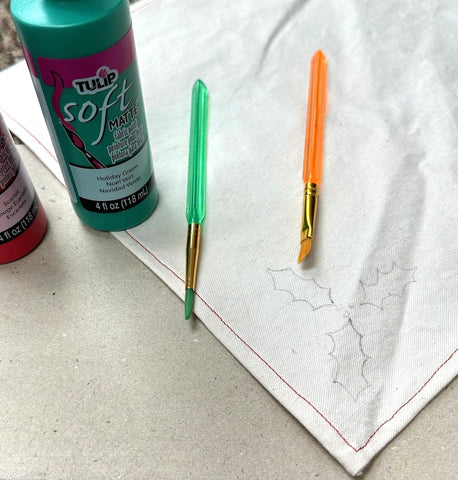
    Notions: Thread. If embroidering, you will need embroidery needles, embroidery floss (DMC or perle cotton #5 or #8) and waste canvas (if doing the cross-stitching). If using fabric paint, fabric paint in your color choice and small paint brushes.

    Yardage Requirements

    For four luncheon napkins (finish at 15”/38cm wide), you will need 7/8 yard (.8m) of 45” to 60” wide fabric (115-150cm).
    For four tea napkins (finish at 10”/25.4cm wide), you will need 3/8 yard (.34m) of 45” to 60” wide fabric (115-150cm).

    Cutting

    Be sure to wash your fabric before cutting. This will insure that the fabric does not shrink, and you end up with smaller napkins than you expected. Also, if you are embroidering the fabric, you can end up with distorted embroidery if it is not washed first. Press fabric well before cutting.

    Cut your napkins with your fabric spread flat. This way you will be most likely to cut on the grain and connect straight edges. Note: to find the true grain and to be sure you are cutting on the grain, pull a few threads from the fabric to show the grain and cut along pulled thread lines. Cut four napkins in the sizes below:
    For luncheon napkins - Cut 16”x 16“ (40.6 x 40.6cm) square
    For tea napkins - Cut 11”x 11“ (28 x 28cm) square

    You can choose to make different napkin sizes. For a cocktail napkin, cut 7” (17.8cm) square, for a dinner napkin, cut 19” (48.3cm) square, for a formal dinner napkin, cut 25” (63.5cm) square. Or cut square napkins at the size you desire, adding 1” to the length and width to account for hem allowance. You will need to adjust your yardage required if you change the napkin size. You could also increase the hem allowance by up to 1/2” (13mm) if you want, for a 1” (2.5cm) hem. Be sure adjust yardage if you are making fewer or more napkins, or making them larger or smaller.

    Sewing Instructions

    These napkins have 1/2” (13mm) hem allowance on every side.

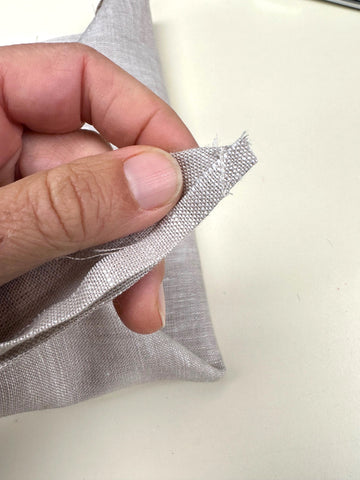
    Press under 1/4” (6mm) along all raw edges of napkin. Turn again on 1/2” hem line and stitch along pressed edge by hand or machine. You can do square corners or mitered corners. For square corners, just press up each edge overlap corners with a square edge.

    square corner sewn with red thread on white fabric.
    Square corner. Hem is sewn with contrasting red thread.

    For mitered corners, only press under 1/4” hem to start, and place right sides of napkin together at the corners, forming a diagonal, matching folded edges. Stitch a line that is perpendicular to the folded edge of inside of the napkin and goes to the hem edge. Back stitch at beginning and end.

    grey square cloth with two sides folded down 1/4" for a hem.
    Fold down 1/4" (6mm) on all sides.

    folded grey linen napkin at corners with a red line drawn at corner.
    Fold napkin at corner so hemmed edges are together and stitch at 90 degrees to the folded edge (as shown here in red).

    Grey linen napkin sewn together at corner.
    Stitching is shown here (90 degrees to folded edge), backstitched at each end.

    Cut off the extra fabric, cutting at a 90 angle to the hemmed edge.

    folded grey linen napkin with corner sewed together and extra fabric clipped off.
    Clipped corner of napkin.

    Open the napkin up, adjusting the corner fabric and press the mitered corner.  Then press on all sides 1/4" more.

    Grey linen napkin folded at corner to make a mitered corner.

    Grey linen napkin folded at corner to make a mitered corner.

    Do this to all corners and stitch close to the folded inner edge to secure the hem.

    You can stitch around the hem with a contrasting colored thread for a festive look.  Or, stick with a thread that matches the fabric.  For sewing the mitered corners, I do recommend using matching thread.  

    Now you can embroider, paint, or stencil a design on napkin. And/or add lace, tatting, or other edging to napkin edges for a more Victorian vintage look. See our instructions below for cross stitch embroidery, embroidery, and fabric painting.

    For Embroidery

    Materials:

    • #10 Penelope scrim, blue line, or waste canvas. Do not use mono canvas.
    • #5 or #8 Perle cotton or 2 or 3 strands of 6-strand floss in your preferred colors.

    Pattern (from our Christmas embroidery pattern): 

    cross stitch pattern for a poinsetta
    Prepare Scrim

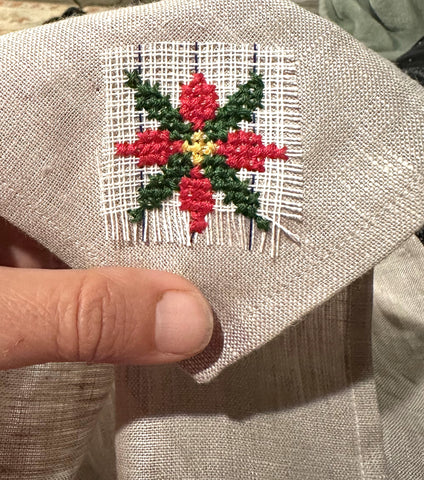
    Cut scrim larger on all sides than design area.  Pin scrim in place, matching the angle you want to stitch your design. It can be on grain or on the bias. Baste to the napkin.

    Begin stitching
    Start at the top, center of the design and work down and outward. Holes in scrim correspond to + on graph, as needle passes through the hole only, and must not catch threads of the scrim. Each graph square represents one Cross Stitch, 10 sts per inch = 10 holes per inch. Use a #10 crewel embroidery needle, and take great care not to catch threads of the canvas, but to pass through the fabric below. Pull stitches up snugly to compensate for removal of scrim. Begin and end threads by running 1”/2.5cm tails under completed stitches on wrong side of fabric.

    poinsetta embroidery beginning with cross stitch on a napkin with waste canvas.


    Stitching
    Cross Stitch as indicated on graphs on the design, starting at the center top of the design. It is important to cross the stitches in the same direction, however, you can see in mine that I don't always do that.  So it's ok if you miss a direction.  Unless someone is going to carefully study your napkin and understand that some stitches are crossed a different way (which they won't do), noone will notice!  It is helpful to take each stitch so that on the back of the work so there are only vertical stitch lines (so just go up or down with stitches in the back of the work).  This will keep the work neater on the wrong side, which is great for a napkin where the wrong side might be seen. But, again, not a huge deal.

    You may work the first half of the stitch in vertical or horizontal rows, crossing on the return course. In small areas it is generally easier to cross each stitch individually (figures on left below).


    Remove scrim
    When the design is completed, remove basting and fray edges of the scrim so you can grasp the ends one at a time and carefully pull the threads straight out. Pull shorter edges first, holding embroidery near pulling place to avoid distortion. Any scrim threads which have been caught by embroidery must be delicately cut out. 

    poinsetta embroidery beginning with cross stitch on a napkin with waste canvas.

    Poinsettia embroidery on grey linen with waste canvas being pulled out.
    Poinsettia embroidery on grey linen with waste canvas being pulled out.
    Poinsettia embroidery on grey linen napkin.
    Finished design with waste canvas removed!
    Back of work of poinsettia embroidery on grey linen.
    Back of the work.  You can see the stitches were vertical on the back side.  I wove the thread ends into the work to hold them.


    Fabric Painting Instructions

    Hand painted motifs are a great alternative to embroidery. You can also add embroidery to the hand painted motifs with couching stitches or backstitch. A very beautiful effect can be achieved with painting in a motifs and couching with metallic threads around the outlines. Use the holly design below or create your own designs! Painting will cut the handwork time to a fraction of the embroidery time.

    There are many fabric painting substances currently available, mostly from handcraft supply stores. If you are painting a small design like this, the paints that make the fabric hand a bit stiffer are fine since this design is so small. They are what you will most easily find at craft stores. Finely spun, tightly woven, smooth surfaced fabrics are generally easier to paint on. They should be able to take 250° heat set.

    Materials. This is a very small design, so you will only need the minimum amount sold of each color used in red and green. If you want to make a different design, don’t forget that primary colors may be mixed to get more colors. You also need a small fine brush.  Also a piece of cardboard placed under your fabric while painting will protect your surfaces.

    Permanent Fabric Paint. Brands such as Deka, DecoArt, and Jacquard. These are ready to use straight from the bottle on all natural and most synthetic materials. Heat-set as below.

    Heatsetting. For most painted pieces you will want to place the work face down on a clean paper or cloth and press with an iron as hot as the fabric can take, but at 250° minimum (12 o'clock straight up position on most irons). Pressing time on silk, 1 to 2 minutes. Pressing time for cotton (350°) 30 to 60 seconds.

    NOTE: Be sure to test all your paints and settings on scrap fabric before you start!

    To transfer the design, trace with a fabric marker onto your fabric. Be sure the markings will not show once painted (i.e. they should not be too dark). Paint the motif within the lines of the design. Let dry for 24 hours and press with heatsetting as above.

    Add embroidery to the design if you desire; French knots to the holly berries or couching or line stitches on the outside of the leaves.  
    Holly Motif.  Use this motif to paint the design in the napkin corners.  You can scale the design up or down.  Print from the download.


    green holly leaves and red berries - motif

    When I painted these napkins I used a simple fabric paint from Joann's, and a couple of small paint brushes.  I sampled the design on a lightweight muslin, which painted well but bled through to the back which I did not like.  For my main napkin, I used a medium weight muslin that had a bit of twill weave.  This was great for not bleeding through the fabric, but made painting the design slightly more difficult.  
    I traced the design on to the napkins and started painting.  This is not take long.  Once painted, I let them dry for 24 hours and pressed them.  I think I might add some embroidery at the edges (back stitch around the leaves with a green thread).  
    Tracing the design on the napkin.
    I traced the design with a pencil onto the napkin.
    Napkin, brushes, and paint ready to start.
    This is the napkin, brushes that I used, and paint on top of the cardboard, ready to paint.  Cardboard will protect your surfaces from the paint and catch any that bleeds through.
    Painting the holly leaf green with paint brush in photo.
    Painting the holly berries red with the paint brush in the photo.

    This is a fun and simple project, with lots of room for your own creativity.  I made a couple of napkins to use at our table this holiday season and they are very sweet.  

    Three napkins, two painted with holly leaves and one embroidered with a poinsettia on cream and grey fabrics.

    two cream colored napkins with embroidery and fabric paint in holiday motifs.
    Napkin with poinsettia cross stitch set on wooden table with silverware and a table runner.
    We, at Folkwear, are wishing you a very happy holiday season!


    Tweet Share Pin It Email

    2 Responses

    Brandy
    Brandy

    December 23, 2023

    The napkins are lovely! Looks like a fun project for next holiday with plenty of time to finish.

    I too noticed the minor wrinkle but my first thought was, how nice it is to not look perfect. It felt relaxed with room to breathe. Recently I finished my first quilted table runner that took me 5 years to complete, all because I am new to quilting, and was trapped within my fear of free motion quilting for the first time. The quilt sandwich looked so beautiful and I didn’t want to mess it up. Finally, I said who cares?! and just went for it. Exciting! Liberating! and such a fantastic feeling to finally finish it.

    So I full heartedly embrace your beautiful and well loved napkins. Be gone with self imposed perfection! Well done! And thank you for sharing the pattern.

    Happy holly days!

    Elyind Baker
    Elyind Baker

    December 21, 2023

    I like to iron, our daughter does not and she teases me about ironing sometimes. I think your finished napkins would have a much nicer look it they were ironed. The napkin is lovely, but looks undone because of the wrinkled look. It looks like it has already been used, the re-folded and placed back on the table. Just a thought for a nicer presentation look. Years ago, when our youngest was in 4-H, she competed in a table setting competition. I’m pretty sure she would have lost points if her napkins were all wrinkled. Thanks for letting me express my thoughts. Please forgive if I come off “rude”.
    Elyind Baker

    Leave a comment


    Also in News

    History of the 128 Russian Settlers' Dress Sewing Pattern
    History of the 128 Russian Settlers' Dress Sewing Pattern

    June 06, 2025 3 Comments on Free Pattern - Holiday Napkins

    Continue Reading

    Summer Sewing Contest!
    Summer Sewing Contest!

    June 01, 2025 2 Comments on Free Pattern - Holiday Napkins

    Continue Reading

    Fabric Suggestions for 160 Hawaiian Mu'umu'u
    Fabric Suggestions for 160 Hawaiian Mu'umu'u

    May 30, 2025

    Continue Reading

    More Info
    • Patterns
    • Fabric
    • Blog
    • Stockists
    • Wholesale
    • Policies
    • Search
    Sign up for our newsletter

    Sign up to get the latest on sales, new releases and more…

    Contact Us

    info@folkwear.com

    P.O. Box 732, Fairview, NC 28730

    Office/Studio: 240 Clingman Ave Ext, Asheville, NC 28801

    828-628-2049


    © 2025 Folkwear. Powered by Shopify