Country

  • Log in
  • Cart (0)
  • Checkout
  • Home
  • About
  • Shop 
    • Sewing Patterns 
      • Folk Patterns
      • Vintage Patterns
      • PDF Patterns
      • Men's Patterns
      • Children's Patterns
    • Fabric 
      • Linen
      • Cotton
      • Silk
      • Wool
    • Sewing Supplies
    • Folkwear Clothing
  • Blog
  • Customer Gallery
  • Contact
  • Country

News

How to: Sew Sleeve Plackets

November 18, 2022 1 Comment

How to:  Sew Sleeve Plackets

by Molly Hamilton

Our 212 Five Frontier Shirts pattern has so many amazing details on these five shirts, especially on the cuffs, and especially for Views D and E.  These two shirts are a bit of a modern take on Western shirts - and very classic at the same time.  This shirt is actually my go-to button-down (or snap-down as the pattern suggests).  The drafting and fit are great and the details are really nice.  You can make this shirt as Western as you want with the rounded yokes and piping and "smile" pockets.  But you can also make this a very classic shirt by just leaving out those details.  However, you will be adding a placket to the sleeve.  Here, I am going to show you how to sew the placket so this step will be less intimidating, especially if you've never done one before.  This is a typical two-piece sleeve placket design (sleeve + placket piece).  

First, make sure you transfer all pattern markings to the fabric pieces.  Here I forgot to transfer the fold line on the longer side of the placket piece, but I do have the dots and you'll see where the fold goes pretty easily.  I like to use ultra-washable markers to transfer on linens or cottons. And this brings me to another cautionary note for my tutorials:  sometimes do as I say, not as a do.  But also, be flexible and do what makes the most sense to you - or what YOU want to do!

For the 212 Five Frontier Shirts, the sleeve is cut on the fold, but the markings for the placket opening is only placed on back side of the sleeve.  Make sure you have mirror images with the two sleeves (you don't want one placket on the front of the sleeve and one on the back).  

Press under side seam allowances of Placket piece.  Baste near the fold and trim the seam down to about 1/4" (6mm).  Then press under the seam allowances of the pointed end of the placket.  Try to keep a nice even point at the top, so adjust the fabric as necessary. Baste the point and trim the fabric.

Then place the right side of the Placket to the wrong side of the Sleeve, matching slash lines and stitching lines.  Pin in place and stitch on the stitching lines (they are 1/4" (6mm) from the slash line).  Pivot at the dots.  I use a slightly smaller stitch length for this step to provide some more stability.  


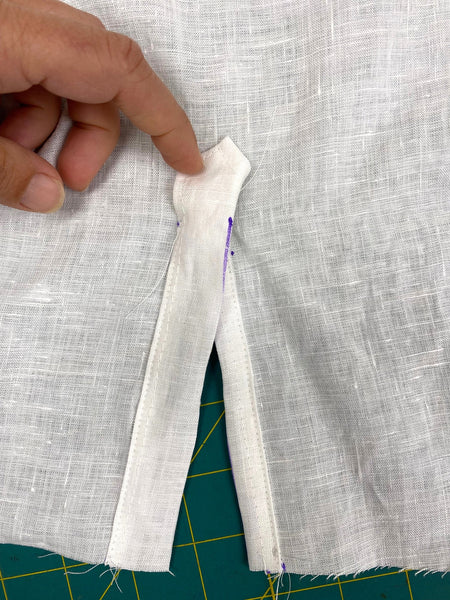
Now carefully cut along the slash line to the bottom of the V, and then carefully cut to the dots at the corners, making sure not to cut into the stitching.

Now, pull the Placket to the right side of the sleeve.  Press the slashed edges toward the Placket. Note that now the Placket sides are on the opposite side as when they were on the wrong side of the sleeve.


Working with the smaller side of the Placket, fold this shorter edge at the fold line so that the basted edge covers the stitching at the seam.  Stitch close to edge, up to the dot.

Now, fold the larger side of the Placket at the fold line, covering the stitching from the slash line seam.  Pin and press and stitch close to the basted edge up to the dot.  Be sure to keep the shorter Placket side out of this stitching.

Pin the pointed end of the Placket over the shorter edge of the Placket, using placement lines on the pattern as a guide (please excuse my wonky sketches on the top of the placket - I don't worry to much about perfect for this kind of thing). Top-stitch around the point and across to dots. Then top­stitch close to the remaining pressed edge of each side of the Placket if you want to - just make sure not to stitch into the other side of the Placket.  I did not do this with this shirt, but it could provide a little more stability to the edges if you want.

This is what the back of the placket will look like (inside the sleeve):

Now you can remove any basting stitches (if you look closely, you'll see that I forgot to remove the basting stitches).  Your placket is finished!  

Here's what is looks like on the shirt!  You can of course, add snaps rather than buttons, and you might think of putting a button or snap at the center of the placket if you think it opens more than you like (since it's a fairly long placket).  
This shirt is really great and I love wearing mine!  Get the pattern here: we have this available as a paper pattern and a PDF pattern (PDF pattern has expanded sizing).


Tweet Share Pin It Email

1 Response

Michelle
Michelle

January 10, 2023

Thanks for the instructions! Nice shirt!

Leave a comment


Also in News

A smiling woman stands before a grey wall and is wearing a light colored silk slip dress. She has her hands up behind her head.
219 Intimacies Pattern: Making a Vintage Style Slip

March 21, 2023

Continue Reading

Making 219 Intimacies Teddy into a Romper: Part 2

March 15, 2023

Continue Reading

Make the 219 Intimacies Teddy into a Romper!  Part 1
Make the 219 Intimacies Teddy into a Romper! Part 1

March 13, 2023

Continue Reading

More Info
  • Stockists
  • Wholesale
  • Policies
  • Search
Sign up for our newsletter

Sign up to get the latest on sales, new releases and more…

Contact Us

info@folkwear.com

P.O. Box 732, 1185 Charlotte Hwy, Unit G Fairview, NC 28730

828-628-2049