-
Sewing Patterns
-
Fabric
- Sewing Supplies
- About
- Blog
- Gallery
-
August 30, 2020 12 Comments
Have you admired the welt pocket, but deemed it too complicated or beyond your skill level? Follow along this blog post and hopefully you will discover how simple this welt pocket design is to make. There are many methods in making a welt pocket, incorporating one or two welts. Here, we are going to learn how to make a double welt pocket, with a simple, yet beautifully engineered technique, without the usual separate welt pieces. This simple technique creates welts by fold the fabric is place!
Welt pockets are a great addition to any number of garments that require an extra touch of tailored flair. Folkwear offers many patterns that either have welt pockets in them or would be made even more perfect with addition of a welt pocket. Folkwear's 124 Bolivian Milkmaid's Jacket, 209 Walking Skirt, 222 Vintage Vest, 230 Model T Duster, 251 Varsity Jacket, and 263 Countryside Frock Coat, just to name a few favorites. And, the welt pocket design demonstrated here will be featured in our brand new Folkwear pattern (released very soon)!
The welt pocket goes by many names… jet, bound, slit, and besom. This pocket design has a long history of adding to the functionality of men’s waist coats, jackets and pants. "Welt" refers to the narrow fabric strips that bind and cover the edges of pocket openings, which can be single or double. The actual pocket bag is hidden away inside the garment… sometimes between the lining and the outer garment fabric, which keeps it perfectly contained.
As history would have it, women’s clothing has been mostly absent of pockets. It would seem that only women's clothing deemed truly functional, was suitable enough for the addition of pockets. One can only guess that this is the reason welt pockets were sometimes found in tailored women’s clothing like riding habits, which were close cousins to men's riding jackets. Learn more about the pocket history here.
Learning to make a welt pocket is not difficult, but measuring precisely and ensuring accurate placement and stitching. Pocket placement is an important consideration,for ease of accessibility and comfort. Most welt pockets are located at breast level and just above the waist on jackets, vests, etc. Placing pockets within seams and darts can cause extra issues, but not once you have a bit more experience. Thinking about how the inside pocket bag will hang is also a factor. You do not want to see the bulge of items within your pockets. Welt pockets are usually placed horizontally on garments, but they can be vertical or at an angel as well. Once you get the hang of the construction you will see all kinds of new possibilities in incorporating the welt pocket into your wardrobe. It is always worth having new skills in your back pocket (pun intended)!
In this demonstration I am not actually making a finished garment, but showing you how to make a welt pocket as if it were going into a garment. This is a great way to try your hand at not only the craftsmanship that is required for a well constructed welt pocket, but you can easily experiment with different fabric weights and fabric combinations. The welt is a great detail that can be played up or down. The detail may be small but it can add an unexpected touch of whimsy or elegance… all it takes is creative consideration.
Getting Started
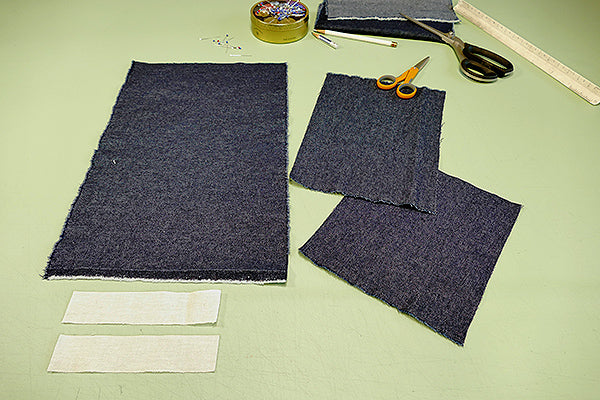
You will need:
The fabric I am using for the demonstration is a lovely Merchant & Mills 8 oz. denim. This is a nice weight of fabric with two distinct sides. Having distinct sides will help with seeing the right and wrong sides of the fabric as we work.
The weight of your fabric will somewhat determine the size of your welts. Remember that heavy weight fabric, when folded over is thick. When using a thick fabric you may want to make your welts larger, which requires a larger rectangle pocket opening. For this exercise, pick a light weight to medium weight fabric to help ensure good results and to make things easier to manage. Light weight fabric will help in making precise and clean folds, seams, and corners.
Only two pattern pieces are used to make this pocket. These two pieces will be referred to as the “Pocket Welt" (which is slightly larger at 7”x 9” (18x23cm)) and “Pocket Bag” (slightly shorter at 7”x 7-3/4” (18x20cm)). The rectangular opening on the “Pocket Welt” measures 3/4”x 5” (1.9x13cm).
The fabric you use that represents the “Garment” will need to be larger than the pocket dimensions. I am using a piece of fabric measuring 9”x 15” (23x38cm).
Determine where on your garment fabric you would like your pocket to be placed. For demonstration purposes, I am centering the pocket opening between the width of my fabric and 2” (5cm) down from the top edge of my Garment fabric. Mark the four corners of the pocket opening (3/4"x 5"/1.9x13cm) on the garment fabric using sewing pins or mark with a pencil. These markings now determine the placement and opening of the welt pocket.
Step 1: Adding Fusible Interfacing
Iron a lightweight fusible piece of interfacing measuring 1-1/4”x 5-1/2” (3.17x13.9cm) to the wrong side of the garment fabric, over the pocket opening markings. The fusible interfacing gives you an easy place to draw your guide lines and using it will help stabilize the fabric once you cut the corners to prevent fraying out at the corners.
Iron another piece of fusible interfacing the same dimensions to the wrong side of Pocket Welt, also aligning over the pocket opening markings. Accurately draw the rectangle pocket opening onto the fusible interfacing on the Welt Pocket with a pencil or water soluble marker. The corners should be at right angles.
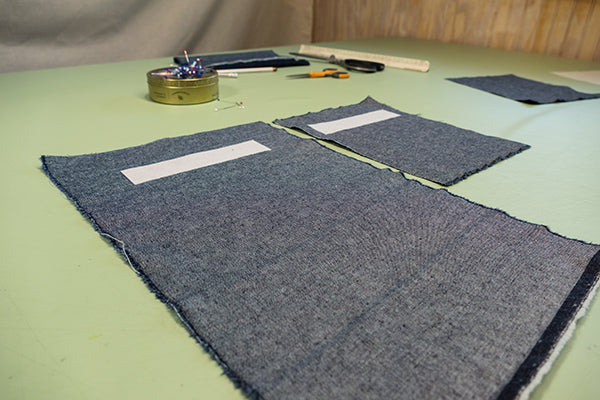 Fusible Interfacing ironed to the wrong side of the Garment fabric and the wrong side of the Pocket Welt .
Step 2: Sew the Pocket Welt and the Pocket Bag
Stitch the Pocket Welt and the Pocket Bag at the bottom, with right sides together. These two pieces now become the pocket.

Step 3: Align The Openings
Pin the right side of the Welt Pocket to the right side of the garment at the welt pocket corner markings, making sure to match and align the corners of the pocket opening.
 Using pins to align the corner dots on the Garment fabric and the pocket welt.
The right side of your Garment fabric should be facing up and the wrong side of the Welt pocket should be facing up.
Step 4: Stitch Welt Pocket Parallel Lines
To secure the Pocket Welt/Pocket Bag to the Garment fabric, stitch along the horizontal (longer) parallel lines of the welt pocket opening. It is important to make sure you start and finish in the same place for each line. This is important to ensure a rectangular pocket opening (rather than a parallelogram or a skewed pocket opening). Back stitch at each end.
Sewing parallel horizontal lines of welt pocket.
Now that the welt opening is attached to the Garment, the engineering gets fun!
Step 5: Prepare & Cut Slit Pocket Opening
Draw a horizontal center line between the two parallel lines you just stitched. Measure in 1/2” (13mm) from the vertical, or short ends, of the rectangle and mark with a dot. Drawn in lines from the dot to the corners to create cutting guide lines.
The horizontal stitching lines and drawn guide lines.
Fold the pocket in half (use a pin to be sure the center line is aligned) and cut a small slit through all the layers of the fabric. This initial snip will help you get started in cutting the center horizontal slit line.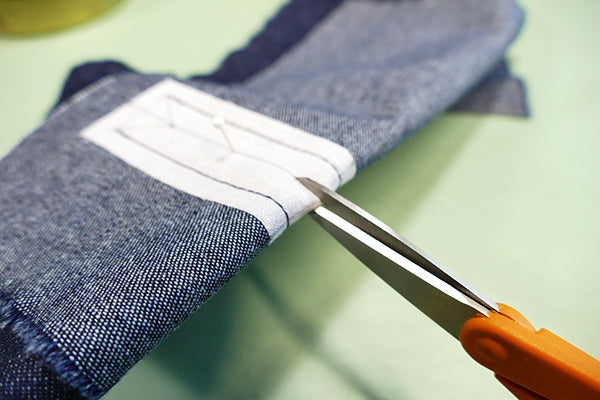
Continue to cut along the center line and stop at the dot you marked. Then cut diagonally, to the corner edges using the guide lines you drew in. Cut as close a possible, without cutting into the stitching and cut just up to the corner and not beyond.
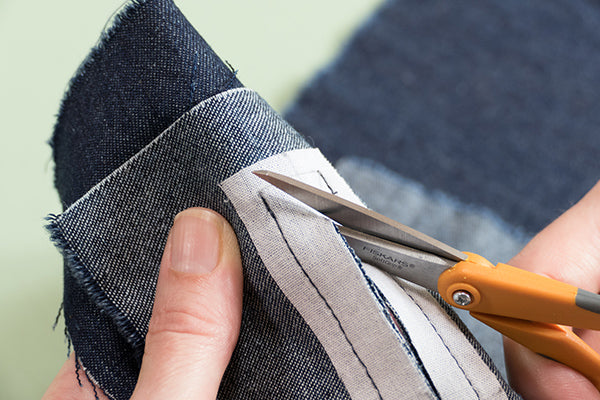 Carefully cutting the pocket slit opening and cutting to the corners.
Step 6: Pull the Pocket Bag Through the Slit
Now we need to pull the whole pocket bag through the slit to the other side (which is the wrong side of the garment fabric).
 Pocket bag being pulled through to wrong side of Garment fabric.
 View of fabric pulled to other side, before shaping the rectangular opening.
Step 7: Shape the Pocket Opening
Take a minute and get re-oriented. The right side of the garment should be facing up and the right side of the Pocket Welt/Pocket Bag should be seen facing up through the opening. The interfacing pieces will not be visible.
Now, use your fingers to manipulate the stitched edges of the rectangle opening into a straight crisp edges. Gently pull and twist the fabric to set the shape of the corners and pinch with your fingers to create right angle corners.
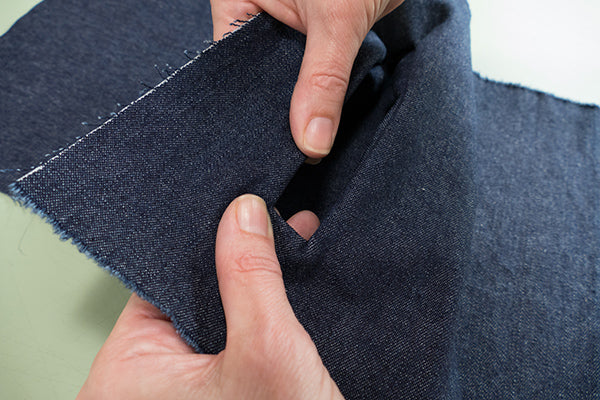 Shaping the rectangle with your fingers.
The idea is to create a well crafted rectangular opening that will soon get its welts. Once you are satisfied with the rectangle pocket opening, press to set.
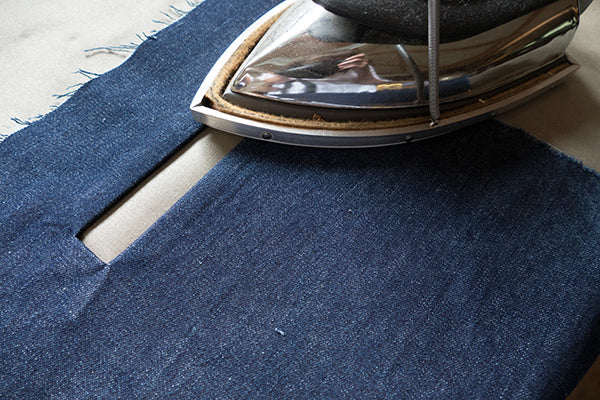
Press rectangle pocket opening to set the edges and corners.
Step 8: Creating the Welts
Now turn your work over, with the wrong side of the Garment fabric and the INSIDE of the pocket should be facing up.
Now, we are going to make the welts. To do this, simply fold the top of the Pocket Welt into a pleat so that the top half of the pocket opening is covered. To help ensure the pleat aligns exactly with half of the opening, mark the center of the short edges as a guide. Press the top welt into place creating a nice clean edge to the pleat and pin to secure.
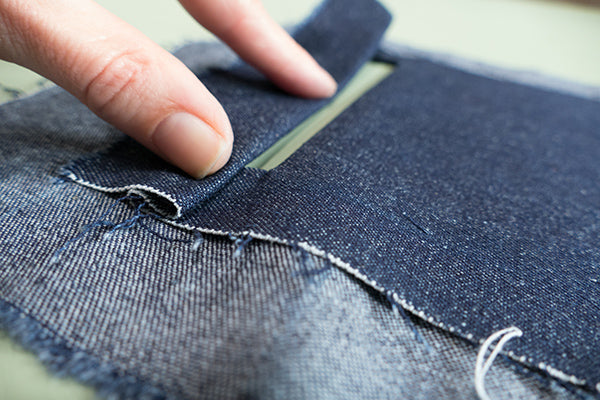
Fold top of the pocket welt into a pleat covering half of the opening.
Now, fold up the bottom of the Pocket Welt into a pleat so that the bottom half of the pocket opening is covered and meets in the center. Be sure that each welt pleat is the same width and align touching in the center. Press the bottom welt into place to secure and create a nice clean edge to the pleat.
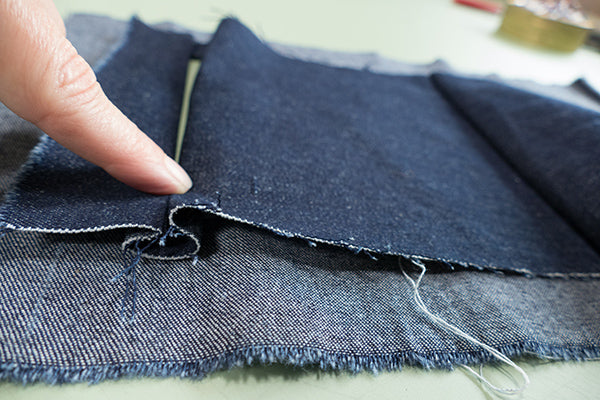 Fold up the bottom of the welt pocket, making a pleat, covering the bottom half of the pocket opening.
Turn your work over, so the right side of the garment is facing up, and inspect your welts. Realign and press again if you need to. Make everything as neat as you possibly can.
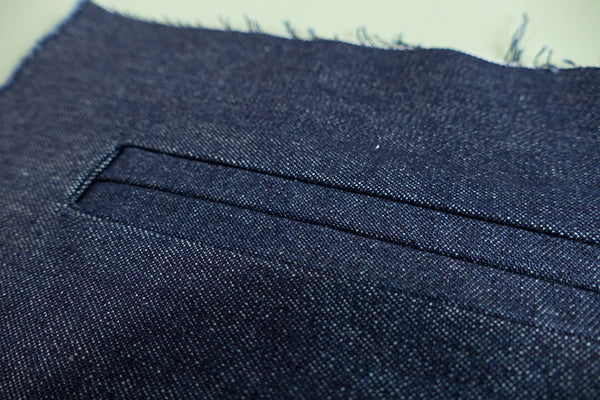 Welts folded and aligned in place and pressed to set.
Step 9: Sew Welts in Place
Now, the welt needs to be secured in place. There are three suggested techniques to tack the welts in place and secure the integrity of the pocket construction. I will demonstrate all three versions to create a detailed finish and completely ensure a secure pocket opening. Be sure the pocket bag is out of the way before you start.
Version 1: Stitch and back tack the shorter vertical edges of the pocket opening on the inside of the pocket opening. This secures the welts to the underneath of the pocket. Use thread that blends into the fabric when using this version.
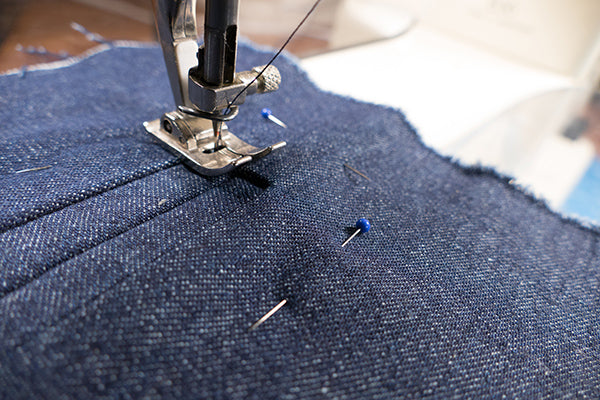 Stitch and back tack the shorter edge to secure the welts underneath the pocket.
Version 2: Edge stitch or stitch-in-the-ditch all the way around the inside of the welt. Use thread that blends into the fabric when using this version.
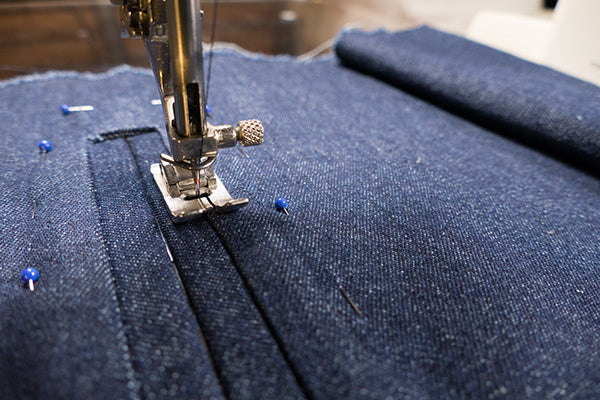
Edge stitch or stitch-in-the-ditch all the way around the inside of the welt.
Version 3: Top stitch all the way around the pocket opening outer edge. This not only secures the pocket, but adds a detail that can be played up or down. Use a thread that blends with your Garment fabric or use a contrasting thread to stand out. If using a contrasting thread, avoid back stitching. Top stitching adds a casual or sporty aesthetic, so if you are going or a more elegant look you may want to skip top stitching.

Top stitching around the pocket opening creates a nice detail and secures the welts in place.
Note: Instead of pivoting your sewing at the corners. Leave a long tail thread (top thread) on the right side of your work and an equally long (bobbin thread) tail on the underneath side of your work. Thread the top thread to a needle and pull through to the underneath side. Using the ending stitch length to determine where to pull the thread to the underneath side. To secure the stitch, tie the two threads together a few times and cut to tidy the long threads.
The only part that remains is to sew up the pocket.
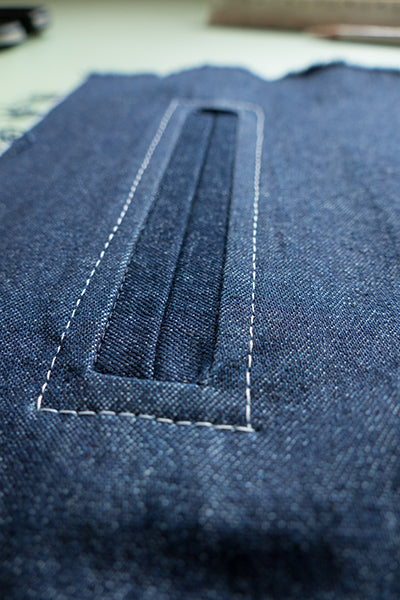
Welt Pocket top stitched and almost done. Notice the crisp corners.
Step 10: Stitch Up The Pocket Bag
Fold the Pocket Bag up to face the Pocket Welt. Align the sides and pin into place. Then, sew both sides of the pocket using a 1/2" (13mm) seam allowance. Being sure to back stitch at the start and finish. Finish the pocket edges in any technique you prefer when making a finished garment.
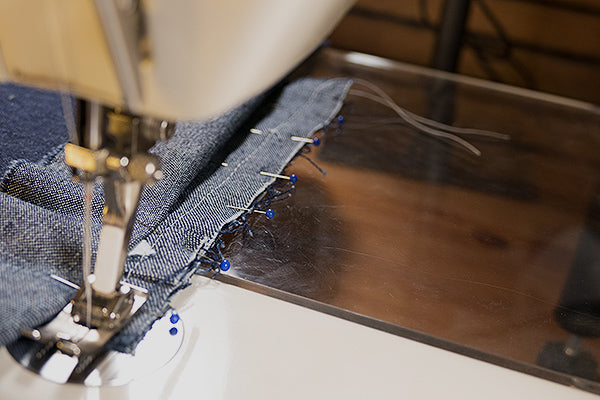
Sewing the side seam of the pocket.
Now, the top of the pocket needs to be sewn up. With the right side of the Garment facing up, fold the top of the fabric down over the welt. The idea is to move the garment fabric out of the way so you can sew the top of the pocket together and get as close as possible to the welts.
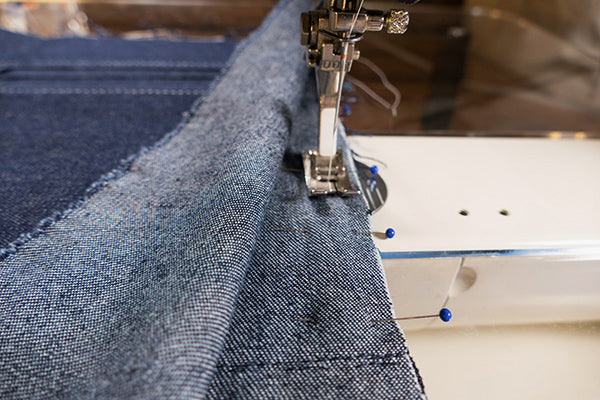
Sewing to close the top of the pocket bag.
The Welt pocket exercise is complete... simple and quick.
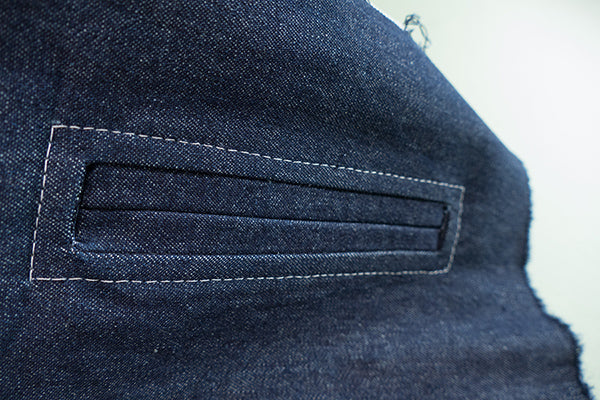
Pockets are welcome any time of the year in my wardrobe, for they provide a practical and hidden receptacle for any number of items. For me, the promise of cooler temps means pockets needed for tissues, gloves, and gathered acorns - along with keys and a cell phone. Consider adding a handy and elegant welt pocket to your next fall sewing project. Check out the accompanying video in Folkwear's Pocket Series: Make a Welt Pocket, for additional help.
I hope this tutorial will sooth any anxieties you may have had about trying a welt pocket or taught you a new welt pocket technique! The next time you make a pair of pants, pajamas, a blouse, a coat, a jacket, a vest, a cap - or anything with a lining - consider adding a welt pocket. Pockets add practicality as well as pleasure-in-wearing to clothing.
Be sure to look for the release of Folkwear's exciting new pattern! Besides being a perfect fall wardrobe staple, it features a Welt Pocket and many other interesting details to learn and master!
Sew Well,
Cynthia
May 01, 2023
Thank you very much
April 06, 2023
Instructions are fine, thanks! I too have a jacket with fake pockets, so will add “real” ones with this method. Also passed this on to my sis, another sewer. 🤗
February 20, 2023
I have a store bought woolen jacket, every time I wear it my hands try to slide into the nonexistent side pockets. I have been considered adding patch pockets to it, with the openings on a slant. I do not have matching fabrics. The jacket fabric is heavy-ish red & black buffalo plaid and the fabric I was going to use for the pockets is a lighter weight black wool. Does that sound too heavy for welt pockets on a slant?
January 08, 2023
Thanks so much for this beautiful and clear tutorial.
November 12, 2022
Sou costureira e sempre achei esse modelo de bolso mt elegante mas nunca me aventurei a fazer pq achava q era mt dificil de costurar até vc mostrar uma forma bem descomplicada,agradeço por vc compartilhar seus conhecimentos e tecnica,vou começar a colocar em minhas roupas.
September 03, 2022
Merci, excellentes explications
August 20, 2022
Many years ago I made welt pockets using a kit that I purchased at a sewing store. This technique looks similar, but easier and with clearer explanations for each step. Thank you! I’ll consider adding welt pockets to my projects again.
August 20, 2022
Many years ago I made welt pockets using a kit that I purchased at a sewing store. This technique looks similar, but easier and with clearer explanations for each step. Thank you! I’ll consider adding welt pockets to my projects again.
May 17, 2022
You could copy and paste the article into a word processing program and then enlarge the font and then print.

Cecilia
August 05, 2024
Could you do a tutorial for the type of welt pocket in the Black Forest Smock (148)?