-
Sewing Patterns
-
Fabric
- Sewing Supplies
- About
- Blog
- Gallery
-
September 30, 2020
The Center Back Gusset and Back Eyelet Facing
It is time to turn our attention to the back construction of these Sailor Pants. The Center Back Gusset (H) and Back Eyelet Facing (G) are paired together to create the back of the pant feature synonymous with the traditional sailor pant. Originally, this lace-up back eyelet gusset was intended to allow men to just untie the back and slip their pants up or down as needed. However, depending on how the pants fit and your body shape, you just loosen your ties and open one side of the front flap - so that you don't have to unbutton all the buttons to get in and out.
Check out Day One, Day Two, Day Three, Day Four, Day Five, Day Six, and Day Seven of the sew along to see our progress!

Center Back Gusset H, with paisley fabric lining and the Center Back Eyelet Facings Pieces.
Prepare the Center Back Gusset
The Center Back Gusset is another perfect place to utilize a lining fabric and have a bit of fun. The edges of the Center Back Gusset need to be finished as well. Since, the gusset is not very large, it is a perfect excuse to try a bit of seam binding and show off your fine tailoring skills. I will be doing this at the end of this sew along.
First, with the right sides together, stitch the the main fabric to the lining at the top edge and trim the seam allowance.

Turn and fold, so the wrong sides are together. Press, remembering to roll the edge of the main fabric slightly towards the lining. Leave the remaining edges unsewn for now. Topstitch the top edge of the Center Back Gusset to finish it off and secure the two fabrics.

The top edge of the Center Back Gusset turned and stitched at top edge to finish.
Prepare the Center Back Eyelet Facing G
Now, for the Center Back Eyelet Facing. Turn and press the 1/2" (13mm) seam allowance of the top edges of each Center Back Eyelet Facing to the wrong side. Finish the edge or turn under 1/4" (6.4mm) to meet the top fold if you like. Stitch close to the fold to finish and secure.

The top edges of each Center Back Eyelet Facing turned under.

The top edges of both Center Back Eyelet Facing turned under 1/4" (6.4mm) twice and stitched close to the fold edge to finish.
The two Center Back Eyelet Facing pieces do not need to be faced or lined. Lining would just add to the bulk that should be avoided in this area.
Add the Center Back Eyelet Facing to the Pant Back.
The Center Back Eyelet Facing pieces are now ready to be attached to the back edges of the pants. With right sides together, stitch one Center Back Eyelet Facing to one side of the center pants back, matching the notches. Stitch from the top of the waistband edge to the bottom of the facing. Press the seam towards the pants. Do the same for the other Center Back Eyelet Facing.


Press the Center Back Eyelet Facing towards the pants.
Attach the Center Back Gusset to the Center Back Eyelet Facing Pieces
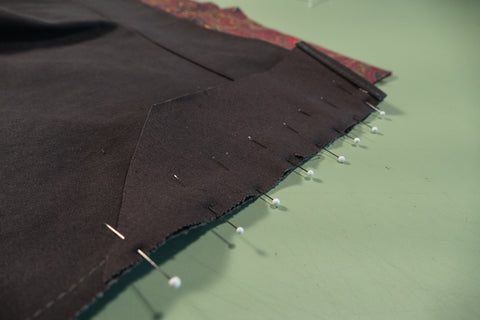
Working on one side at a time, place the Center Back Gusset assembly on the eyelet facing, with right sides of the main fabrics of each piece together, matching the notches. Pin to secure in place. On one side, stitch a 1/4" (6mm) seam allowance from the top to the bottom of the point. Avoid stitching into the pants. Repeat for the other side of the Center Back Gusset the same way.


Center Back Gusset and Eyelet Facing pined on one edge and ready to be sewn.
 View of Eyelet Facing sew to edge of Center Back Gusset.

One side of the Center Back Gusset and Eyelet Facing sewn and the other side aligned and pined in place.


The back view of the assembled Center Back Gusset and Eyelet Facing.
The raw edges of the Center Back Gusset Facing need to be finished. You can serge or use an overcast stitch to finish, if you like. Trim the bottom corners as needed. I am going to finish the edges of the Center Back Gusset with a piece of seam binding, and simply whip-stitched by hand. Seam binding is light weight, easy to work with, and does not add any extra bulk. I have chosen this method of finishing the edges because the seams are only 1/4" (6.4mm) and turning bias tape on such small edges is hard for me to control. Of course, you can use the usual bias tape technique if you chose.

Raw edges of the Back Gusset Facing to be finished using seam binding.

Seam binding sewn by hand with a simple whip stitch.

Wrap the seam binding over the raw edge and repeat the whip stitch on the opposite side.

Whip stitching the seam binding to cover the raw edge.

The raw edges of the Center Back Gusset finished with seam binding.
The back of the pants are now together and you can really see them take shape now. On Day Nine of the sew along we will finish up the last of the construction work on the 229 Sailor Pants, by adding the godet to the legs and sewing the back of the pant up!
