-
Sewing Patterns
-
Fabric
- Sewing Supplies
- About
- Blog
- Gallery
-

Parasols are not only a convenient and stylish way shield yourself from the suns rays, but a perfect accessory companion to one of Folkwear's most favorite and popular patterns. The Folkwear 261 Paris Promenade Dress is made even more perfect when paired with its very own parasol.
The 1920's styling of this easy-to-sew and easy-to-wear, pullover dress has a carefree, yet sophisticated aesthetic. The unique construction of this dress makes it easy to imagine all sorts of creative fabric combinations. Complete your 261 Paris Promenade Dress ensemble by coordinating the vintage-style drawstring hand bag that comes with the pattern and now a parasol, for the next time you want to make a truly vintage-inspired statement.
And, today we are going to show you how to make your own parasol!


For a bit of inspiration in making your own parasol read the History of the Parasol blog for an interesting stroll through the history of sun protection and much more. Learning to make your own parasol is not as difficult as you might imagine.
Knowing what to look for in a parasol or umbrella frame is important because the frame is the foundation of your project. Due to the superb quality and craftsmanship of antique umbrellas and parasols, their frames and handles can be found in good condition and are not hard to find if you know where to look. Flea markets, thrift shops, ebay, Etsy, and historical reenactment website shops are all excellent resources. Consider using an umbrella you already have... if the quality of the frame is good, don’t toss it out… recover, re-purpose, reuse. Enjoy anew!
Frame Structure
When looking for a frame to use, remember that the more sections or pie-shapes a frame has, the easier it will be to make the canopy fit. This is in part because the more reinforcing seams you have, the more stable the fabric will be. The narrower the width and the more seams there are, the more stable the fabric and therefore it will be easier to fit the canopy to the frame. The number of pie shapes corresponds to the number of ribs. The number of ribs corresponds to the seams. Parasols tend to be more elegant and daintier then umbrellas. So, parasols usually have more ribs, pie-shapes sections, and seams.

The frame and pieces needed to make a parasol.
The parasol frame and parts I am using in this tutorial were sourced at Vena Cava Designs (they also carry Folkwear patterns!). I ordered the Parasol Frame (Skeleton) kit (adult, straight handle).
This is an inexpensive and good quality frame. This frame is suitable for either a parasol or umbrella and a great option for trying out your making skills. The pattern we are providing here fits this particular frame. However, you can use this pattern, with some modifications, to fit most other frames that you might find.
Please note that I am referencing the parasol frame that is sourced in this tutorial. The pattern included has been made to fit this frame.
The Proper Fabric
The fabric you use to make an umbrella is different than fabric used for a parasol. Parasols were generally made of natural materials like silk, cotton, and linen and these fabrics are available at most fabric stores. Most natural fibers such as the ones mentioned have enough stretch and sometimes too much stretch when cut on an angel. For this reason the pie shaped pattern piece should be cut with the grain line indicated on the pattern (aligned with selvedge of the fabric).
When choosing a fabric, it is best to choose a fabric that is the same on both sides since you will see the wrong side of the fabric when he parasol is open.
Modern oil cloth and waxed cotton are fabrics that come the closest to original umbrella fabrics. Suitable waterproof fabrics will be made of synthetic nylon and woven from fine threads. These types of fabrics will not have much stretch, so pattern pieces will need to be cut on the cross-grain or with a curved edge on the bottom edge. Nylon frays easily (can cut with a hot knife or serge immediately). To avoid disappointment, do a bit of research if considering the use of waterproof fabrics.
If you are going to make the parasol canopy for the kit, or modify it for your own use, instructions are below.
You will need:
Fabric Layouts and Cutting Guide
Layout your pattern piece on your fabric and cut out 10 pieces to make your parasol. The diagram below shows how to create the parasol pattern piece used in this demonstration, if you do not print the PDF piece provided in the link above. Notice the grain line and lay your pattern out with the grain line parallel to the selvage.

Ten pattern pieces laid out on a 45" (114.3 cm) or 60" (152.4 cm) wide fabric, requires just over a yard (1m) of fabric. Note that these illustrations shows the fabric laying open and flat.


Note: The pattern pieces in the illustrations above are placed close to the edges of the fabric. If you think you may need more hem at the bottom edges, then allow for a bit more yardage. To be safe add an additional 1/4 yard (0.2286 m) of fabric.
If your pattern pieces are a different size than ours, you can lay the pattern pieces out on a piece of fabric the width you intended to use, and have a look at how the pattern pieces lay out and how you can make them fit. The illustrations above should help.
Sewing Guide
The 1/2" (13 mm) seam allowance for the long edges are included in the pattern. The 1/2" (13 mm) bottom edge seam allowance is included to produce a 1/4" (6.35 mm) hem. The narrow top edge of the pattern piece does not get a hem. This pattern is intended for a natural fabric to be cut on the selvage grain. I used a light weight linen for the purpose of this demonstration.
MAKE A MUSLIN FIRST!! This is my best piece of advice in attempting the making of a parasol or umbrella. Frames are not always perfect. Especially if your frame is an antique. Plus experimenting without feeling the pressure of messing up good fabric is always wise. And, you get to practice getting it right.
Step One: Sewing the Canopy
Once the fabric pieces are cut out, I recommend working with wedges in pairs. With the right sides of the fabric together, pin one long edge and stitched a 1/2" (13 mm) seam allowance. Then, move the needle over one or two notches and stitch again just OUTSIDE of the seam allowance. Back stitch at each end. This extra stitch line will help to create a bit more seam strength and stability.
If you want add a strap to fasten your parasol neatly closed, now is the time. Just pick a seam and insert the strap into the seam allowance, sewing all at once. Use a snap or a button to fasten the strap.

View showing a second reinforcing stitch just to the outside of the seam allowance.
Continued this method, working in pairs until all ten of the pie piece shapes are sewn together creating the circular canopy. There should be a hole in the center of the canopy. This is where the tip will come through.

Canopy all sewn up.
Press all seams in the same direction on the wrong or under side of the canopy. Press to set the seams and create a clean finish on the right or top side of the canopy as well.
Finish all the underneath seam allowances. Either, serge, pink, or trim. You could also do a faux flat felled seam. French seams and bound seams will be too bulky and are not recommended.
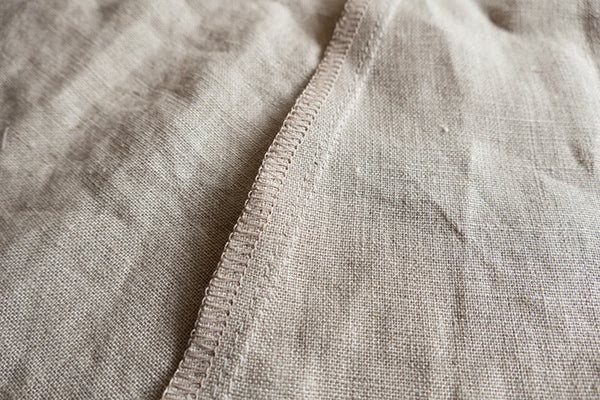
Seam finished with a serge. Notice the seam allowance stitch and the second row of reinforcing stitches.
Step Two: Top Strengthening Detail
The entry point where the tip-ferrule-post or top point, inserts into the fabric of the canopy is a major stress point and needs reinforcing to provide strength. The hole at the opening needs to be made smaller without adding fabric bulk. A couple of simple tricks will take care of both of these issues.
Make a short stay stitch approximately 5/8" (16 mm) around the hole opening in the top of the canopy. This will ensure all the panels stay in place and not over stretch when the parasol is opened and closed repeatedly.
A simple circle of fabric sewn to the underneath at the hole opening, will provide another layer of support and to be sure the canopy hole fits tightly to the tip-ferrule-post base.
From a scrap of the same fabric you are using to create your parasol, cut a 2-1/2" (6.35 cm) to 3" (7.62 cm) circle, using pinking shears. The idea is to not add any bulk to this area so finishing the edges with pinking shears serves the purpose well.
Fold the fabric circle in half and then in half again. Snip the tip of the point off with your scissors. Smooth out the circle and press to remove the ceases.

Fold the Circle of fabric in half and then in half again.
Depending on the nature of your fabric, it might be wise to Fray Check the edges to seal the edges. The linen I have used needed a bit of Fray Check for this very reason. Allow the Fray Check to dry.

Reinforcing linen fabric circle getting a touch of Fray Check.
On the underneath side, make sure all seam allowances are pressed in the same direction, align the hole of the small reinforcing circle with the opening of the canopy and sew the circle to the canopy approximately 1/2" (13 mm) from the center hole.
Push the tip of the frame through the hole of the circle to see how it fits. Clip the hole of the circle a tiny bit more if needed. The idea is to have the hole of the circle to fit snugly to the base of the tip-ferrule-post.
 View of pinked linen circle sewn to the canopy.
Below are a series of images showing you how the simple circular piece of reinforcing fabric is attached to the canopy and what an important role this little bit of fabric performs in maintaining the strength and integrity of a highly used stress point.


View of the pinked linen circle peaking through on the outside of the canopy before the being stretched and fitted to the frame.
With the canopy stretched over the frame and closed-up you can appreciate how much this simple bit fabric reinforcement provides to the integrity of the parasols construction.

View of the pinked linen circle peaking through on the outside of the closed canopy after being stretched and fitted to the frame.
Step Three: Hemming the Edge
Turn the widest edge or the bottom edge of the pie pieces under 1/4" (6.35 mm) and press. Turn under another 1/4" (6.35 mm) and press creating a straight edge. Press and pin the hem in place. Manipulate the connecting seam edges to lay as smoothly as possible. Top-stitch close to the turned edge, taking care to create a clean finish.

Pinning the hem.
Step Four: Adding the Rib Posts
Using button twist thread for extra strength, hand sew all the wooden tips to the wrong side of the canopy, at the seam allowance. Use the turned under hem as an anchor spot for sewing the tip to. You do not want to see any stitch work on the right side or top side of the canopy.

Gutermann button hole twist is ideal for attaching and strengthening the tips to the canopy.
The extra thickness of the turned under hem makes an excellent spot to sew on the tips and prevent the stitches from being seen on the top side.

Wooden tip securely sewn to the hem of the canopy.
Step Five: Test for a Proper Fit
Once you get a few tips sewn in place, give the fit a try. It will work best to sew your first few tips on opposite sides of the canopy from each other, to help with the tension. Place the top hole of the canopy over the tip-ferrule-post base. Then gently pull the fabric over the rib and insert the metal rib tip into the wooden tip sewn at the canopy edge. You want the fabric of the canopy to fit tightly over the ribs (each seam should correspond to a rib), once the rib end is inserted in the wooden tip. There should be some tension, but not so much that the rib begins to distort or twist from its intended position along the seam. If this does happen, there is too much tension, the panel is too short. To remedy, let out the hem a bit to lengthen the panel.
With the rib inserted in the tip you can see how the tip needs to be secure and strong due to the tension required for a proper fit.
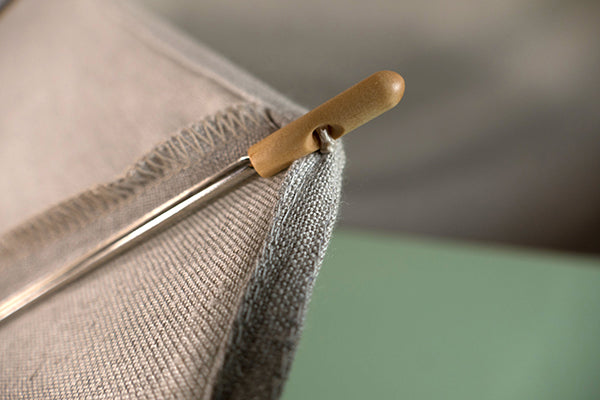
Tension created when metal rib is inserted in wooden tip.
Note: It is important the fit is good before proceeding any further.

A perfect fit on the outside!

Perfect fit on the inside!
Step Six: Secure Ribs to the Seam Allowance
Your canopy should now be installed to the frame and fit perfectly. Even if the canopy fits beautifully to the frame, a bit more stabilization never hurts. Adding a thread tack will easily accomplish this task.
I have placed and sewn each tack 5" (13 cm) from the hem edge inwards along the rib. Using regular thread, double the thread up, and sew a few hand tacks as shown below.

Measure to determine tack location to help added extra stability for each rib.
Start on one side of the seam allowance, inserting the needle between the seam stitch line and the extra stitch line previously made in the assemble instructions. Make the stitch through the seam allowance and under the rib. Pull the needle through to the opposite side.

First pass through the seam allowance and under the rib.
Insert the needle over the rib, through the seam allowance at the extra stitch line, to the opposite side. Continue in this manner until you have made 5 to 8 passes, creating a neat and secure hold. The idea is to prevent any stitch work from showing on the top side of the canopy. Tie the thread off with a couple of knots on each side of the tack. Trim the thread close to the knot. Repeat for each rib.

Passing thread over the rib and continuing to make the tack.

Making tacks all the way around for each rib.
The Top Finishing Detail
One last finishing touch is required to tidy up the top of the parasol, where the canopy and tip-ferrule-post meet. This will conceal the reinforcing stitching lines and create a clean yet simple finishing flourish of interest. This not the only creative way to finish the top of your parasol, but it is quick and easy and adds just enough detail without being fussy.

Start with a strip of fabric measuring 1-3/4" wide by 8-1/2" long (4.445 cm x 21.59 cm). I like to utilize the selvage edge when ever possible to give an extra bit of strength and stability. So, I have cut my strip of fabric including the selvage. I turned and press the opposite long edge under 1/4" (6.35 mm). Then top stitched to create a finished edge. This edge will eventually show.

Finishing detail begins with a linen strip. Notice the top stitched turned under edge.
Next, sew a long gathering stitch 1/2" (13 mm) from the top stitched edge. Leave long thread tails on either end to make gathering easier. Make another long gathering stitch 1-1/8" (3 cm) from the top stitched edge. Leave long thread tails again.


You will need:


The carrier/holder strap in place and seam allowance sewn before turning right side out.
Note: Predetermine the length you would like the strap to be before sewing up the seam allowance.
With right sides together and the strap length out of the way of catching in the seam allowance, sew 1/2" (13 mm) seam allowance on the longest side and at the smallest end if you are sewing the end up. Trim the excess strap. Press the seam open. Finish seam or trim.
Turn right side out and hem the remaining ends using a 1/4" (6.35 mm) turn under and then turn under another 1/4" (6.35 mm). Top stitch close to the edge to finish. I chose to leave the bottom edge open so I hemmed it too.


Olivia
April 12, 2023
Ah this is so helpful, thank you so much! I bought the exact same parasol frame, and I’m intending to make a parasol for my wedding in July (which was the hottest day of the year last year), but I was struggling to get my head around exactly how it fits together and how to finish it off nicely – this is perfect!
I’m going to attempt to line my parasol, because my main fabric is embroidered so wouldn’t look great on the inside – fingers crossed I figure out a good way to secure it all together haha