-
Sewing Patterns
-
Fabric
- Sewing Supplies
- About
- Blog
- Gallery
-

This post continues our series of blog posts on pockets by showing you how to add a patch pocket to garments. More pocket posts are below!
Some Folkwear patterns do not have pockets due to the historic or traditional nature of the garment (read more about the controversial history of the pocket here). But, we want to help you be able to add pockets whenever you wish!
The patch pocket is a useful and easy pocket to add to any garment. It can change the look of the garment because, unlike the in-seam pocket, it is very obvious and in plain site. It can easily become a design feature of your garment if you want to make it in a contrasting color or pattern. You can also choose to make the patch pocket in the same fabric as the garment, matching patterns to keep it as unobtrusive as possible.
You can make patch pockets in many different shapes, but I am going to show a fairly simple rectangular pocket with a diagonal opening. You can find the (free) pattern for this patch pocket here. This pattern can be printed on one sheet of 8.5"x11" paper or A4 paper.

You can change the design or look of this pocket fairly easily by extending or widening the pocket, rounding the corners, making the straight opening into a curve, or adding bevels to the corners. You can use your imagination and think about what shape you like best for your garment. Here you can see a couple of options for different looks of this pocket.


Patch pocket designs: beveled corners, rounded corners, curved opening
I made this patch pocket large enough to fit my phone (since I am usually hauling it around with me), and I made it to add to my favorite pair of Sarouelles. The 119 Sarouelles pattern is perfect for a patch pocket. There are no side seams to add a pocket into the seam on this pattern, so the only other option is to cut in a welt. Which I did not want to do. The patch pocket is so much more simple, and this fabric will be perfect for a patch, seeing as it is already made from pieced together cloth strips. And, I had some extra fabric leftover after making the pants.

To make patch pockets
First cut out the pattern and use it to cut the pockets from your fabric. You can use the PDF pattern we provide, or the measurements I have here in the photo (6" wide by 4.5" tall on one side and 8.25" tall on the other, and 2.5" wide at the top - add 1/2" seam allowance all around and/or 1" at the opening). This pattern does not take much fabric. You will need about 1/4 yard (or less) for two pockets.

If you want two pockets (which is the norm), be sure to cut so you are getting two opposite pockets (i.e. fold the fabric wrong sides together and cut two).

First, finish seams on all edges except the opening edge. You may want to stay stitch the opening edge so that it does not distort while you are stitching (and folding and pressing).
Then, you can turn under the opening edge twice and stitch. Or, you can finish (or serge) the opening edge and turn down once and stitch. I serged my edges, and turned down the opening edge twice. Then, press under all outer edges of the pocket by 1/2" (13mm).

Now place your pocket on your garment where you want it to be sewn. I marked where I wanted my pockets with tailors chalk and pinned the pocket to the pants.


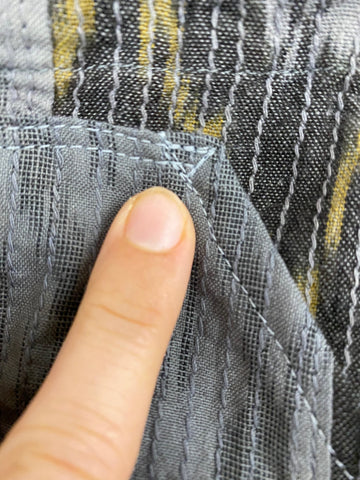
Sew pocket to pants by topstitching close to the folded edges along all edges except the opening edge. I also like to add a bar tack or to sew a small square or triangle at each opening edge to reinforce the opening (I hate it when my pockets rip). You can also add another row of topstitching about 1/8" (3mm) from the first row of stitching to help reinforce the pocket. I like to increase my stitch length a bit for topstitching - to 3 or 4. And, to manage corners, keep the needle down and pivot fabric at each corner. You may need to adjust with the flywheel when nearing the corners so that you don't over- or under-shoot the corner (i.e. go too far or not far enough to make a neat corner).

These patch pockets are perfect! I love that these pants now have pockets, making them much easier more convenient to wear. They look great with lots of tops (this one is actually a dress that I made from silk noil from Stone Mountain and Daughters Fabric).
So I hope you will be able to now easily add patch pockets to your clothes, even after they have been finished!


Watch the video on patch pockets for the 119 Sarouelles below:


Caroline Whitehead
January 03, 2026
Thank you! I’d made some basic pyjama pants that were good but pocketless. The problem is now solved and I think the pants look better with the patch pockets added. All very quick and easy thanks to your free pattern.