- Home
- About
-
Shop
-
Sewing Patterns
-
Fabric
- Sewing Supplies
- Folkwear Clothing
-
- Blog
- Customer Gallery
- Contact

by Cynthia Anderson
Halloween is the perfect excuse to get creative and have fun making a costume, especially for a child. In the previous blog Make a Child's Halloween Costume with the 208 Kinsale Cloak for Young Folk, I made a cape as a simple foundation for bat-themed witch/wizard costume. While the cape was lots of fun to make, it was just the beginning and an excuse to make more Halloween stuff. In this blog, I will show you how to make a Harry Potter-inspired witch/wizard hat. How to make a ruff, bat hair pins, and wand is soon to follow!


Materials Needed:
Measurements Needed
Note the measurements you need down on some paper before you start. First measure the forehead circumference using a fabric measuring tape. Measure the head placing the measuring tape above the eyebrows and ears. Add 1/2" (13mm) to 1" (2.5cm) of ease to the circumference, depending on how high or low you want the hat to sit.
My circumference is 19 1/2" (50cm) + 1/2" (13mm) of ease = 20"( 51cm) total head circumference
Next, decide the width of the brim. This will also be the width of the hat. My brim diameter is 14" (36cm) . It can be any width you like.
Make the Brim Pattern
First, determine the head diameter (hat opening) using this formula: total head circumference /divide by pi (3.14159) = head diameter
For my hat:
20" (51cm) / 3.14 = 6.4" (16cm). For ease of measuring the pattern, I decided to round to the nearest 1/8" (3mm) which is 6.5" (16.5cm), which is close enough. My head diameter is 6.5" (16.5cm).
Make a center point on a large piece of paper or Swedish tracing paper. Then draw a circle for the head diameter based on your measurement. Then draw another circle outside the head diameter circle, measuring 3" from the head diameter circle (or whatever brim size you choose). The head diameter circle is centered in the width of the brim circle. Cut this pattern out, including the hat opening.

Try the paper pattern on for size and evaluate if the brim width is how you want it. But, before you cut the fabric opening for the head, consider how stiff or floppy you want the brim to be.

To create just the right amount of brim flop, I am using two layers of felt. If you prefer an even more ridged brim, sandwich a stiff layer of interfacing or fabric between the two layers. I determined one layer to be much too floppy.
To give the brim more structure I decided to stitch the two layers together with a circular free-hand stitch on the sewing machine using black thread. The stitching adds a quilted design aesthetic as well adding extra heft. I used pins to help keep the layers from shifting while stitching. It is easier to maneuver when stitching if the head opening has not been cut out yet.


Make the Cone Pattern
First, decide on the height of the hat.
My hat is 11" (20cm) tall.
Draw a horizontal line that measures the head diameter, then mark the center point.
From the center point draw a vertical line to the hat height.
Connect the vertical height point to the horizontal head diameter width.


Use the triangle template and trace it again twice more as shown.

Draw a curve to smooth out the bottom edge of the cone shape.

Be sure to add the seam allowance to each straight edge of the pattern. I am using a 1/4" (6mm) seam allowance. Cut out and use as a pattern for the hat cone.


Using the cone pattern, check to be sure it fits and be sure it fits into the head opening of the brim. Make adjustments if needed.
With right sides together pin and stitch the seam allowance.

Assemble the Hat
With right sides together match and pin the edges of the hat opening and the bottom cone edge, stitch on the seam allowance. I used 1/4" (6mm) seam allowance.


Clip the point of the cone to make turning right side out easier and for inserting the top wire detail.

With the wrong side still facing out, add a pipe cleaner along the seam stitching, using hot glue to tack it down. This will make a hat that can be bent and shaped. Only attach the pipe cleaner to the narrowest point of the cone shape first. This will help to make turning much easier. Once the cone is turned, then finish gluing the pipe cleaner in place.


Add the Finishing Touches

The hat's whimsical top detail, is made of stars, a crest-moon shape, and felt bats danging from wire. Cut the star and crest-moon shapes out of two layers of unbleached cotton muslin, with interfacing sandwiched between, and machine stitch the shapes with black thread. Leave a small hole in the stitching, in which to insert a length of 26 gauge wire. Use a dab of hot glue to seal the hole opening.


For the bats, use the same template used on the cape, but scale them down to be much smaller. Cut them out of a single layer of felt and attach a length of wire as well.
Arrange the shapes to the desired length and twist the wires together to make a bouquet. Apply a small amount of hot glue to the end of the twisted wires and wrap with masking tape before the glue sets.
Insert the wire bouquet into the tip of the hat and add a bit more hot glue from the inside the hat to secure the hold.

In the next blog the fun continues - learn how to make a simple ruff, wand, and hair pin decorations that you can copy or customize for your own inspired Halloween costume.


by Cynthia Anderson
Fall coming and it’s time to get started making a Halloween costume! Lots of Folkwear patterns can be used for costume making for big and little Halloween fans alike. Have a look at Folkwear’s Pattern Collection and get inspired to make your best Halloween costume ever! Also check out Victoria's blog (and some past ones here for some adult costume inspiration).
However, this year we wanted to inspire you with some great kids' costume patterns (plus they are on a huge sale for the next two weeks). I decided to take the 208 Kinsale Cloak for Young Folks and make a relatively simple costume, but have fun adding creative details. My plan was to start with a cape and add other detailed accessories to make a truly fun and unique costume. The 207 Kinsale Cloak and 208 Kinsale Cloak for Young Folks hold lots of possibilities for this approach.

To see how I made the hat for this costume, and how you can make one yourself, go here. For the accessories I made, go here and learn how to make them yourself!
Pattern Info and Fabric Suggestions
Both the adult and child versions of are fully lined and hand-gathered into a wide collar, falling in small unpressed pleats to a curved hem. The cloak fastens at the neck with a large hook and eye, and offers an optional detachable hood that buttons to the cloak under the collar. It may be worn loosely over the head or down over the shoulders as an over-cape. Both versions of the cloak can be unisex. You could make matching Halloween capes and enjoy trick-or-treating with a child.
When it comes to capes, any fabrics and trims you would normally sew with will work. However, costumes are a good excuse to have fun and try other types of materials and combinations. Consider using cotton, linen, canvas, corduroy, denim, wool, velvet, heavyweight silk, felt, faux fur, microfiber, burlap, polar fleece, upholstery fabric, or something in your stash. For the lining, use a lighter weight fabric such as cotton, satin, polyester, rayon, silk, or linen. Of course, you can eliminate the lining, but don’t. Linings are great excuse to get creative. Have a look at the fabric suggestions blog for the 207 Kinsale Cloak and the 208 Kinsale Cloak for Young Folks for more ideas. And, this time of year craft stores are full of fun fabrics perfect for Halloween making - there's lots to get excited about.
Don't forget the trim. Pull out your trim collection to add another layer of creative details with ribbon, rick-rack, braid, embroidered patches, beads, etc. You could even make your own ruching (check out the blog How to Make Authentic Ruching Trim to learn how to make your own). Using fabric paint or acrylic paint is also a great idea. Dig through your craft supplies and have fun.
Besides being simple to make, fit is not a crucial aspect of capes - and can be made any length. All of which makes them not only versatile, but also provides the perfect jumping off point for making all kinds of easy to put together costumes. Magicians, ringmasters, Red Riding Hoods, Harry Potter, superheroes, queens, kings, princesses, princes, detectives, Victorian characters, vampires, witches, devils, wizards, knights, stage coach drivers, sorcerers, spooks all wear capes. Even Elvis wore a cape.
I used the 208 Kinsale Cloak for Young Folks, which comes in sizes 2 thru 12, as the foundation of a unisex witch (or wizard) costume. I compared the length measurement of the pattern to the height of the child I made the cape for to determine which size to use.
To keep things really simple and unisex I made the cloak with just the collar, using black quilting cotton and a unbleached cotton muslin for the lining. I took this approach so the cape can be reused for different themed costumes for future Halloweens. Or it can be relegated to a costume play box for continued enjoyment throughout the year. For this Halloween, I made a bat-theme cloak costume complete with a traditional felt witch/wizard hat, wand, neck ruff, and lots of spooky bats attached to the cape.
FYI: My first idea was to add appliqué stars, crest-moons, and bat shapes cut out of unbleached muslin and stitch them to outside of the black fabric cape using machine black stitching. This simple application would happily result in black stitched shapes on the inside lining as well. I abandoned this idea once the cape was constructed, because I realized the shapes would get lost in the drape of the fabric. It is good to have a plan B.
Making the Cloak
Be sure to launder your fabric, and make sure the yardage is square if needed. Then make the cape/cloak according to the easy-to-follow pattern instructions. I made a Size 4 and shortened it by approximately six-inches to ensure it won’t cause my wearer to trip. Make your cape any length you choose.
Once you have the cape made, treat it like a canvas and have fun decorating it with fabric, paint, or any variety of craft materials. If you are making the costume for a child that is old enough help, invite them to join in and make your own Halloween memories together!
Have look at the internet for free templates of shapes and designs to use or draw/trace your own. To save time and effort I downloaded a couple of bat shape designs and printed them out in different sizes. I cut out the paper templates to use as a pattern. Then I pinned the pattern to the felt and cut out the bat shapes. Halloween cookie cutters make great tracing templates too.

Note: I was able to find felt in a couple different weights at my local fabric store. Thicker weight felt is typically sold by the yard and is nice because it makes larger projects or details less flimsy than the thinner weight of felt typically sold in squares. Inspect your felt to determine if the right and wrong side are noticeable. Thinner felt always works well for small details.
I cut the bats used on the cape in pairs because I wanted more thickness so the wings would stand up and not flop. The felt was easy to cut two layers at a time for the larger bats, but I resorted to cutting the smaller bats out one layer at a time.

To give the bats even more shape I taped a thin length of black 26 gauge wire to the wrong side of each of the felt bats. I bent the wire to more-or-less fit the contour of the center of the bat shape. I used little bits of masking tape to hold the wire in place.
Note: A slightly heavier gauge wire would have been better, but I used what I had on hand.


I placed the bat pairs wrong sides together, matching the edges as well as possible. And then I glued the two bats together starting in the center.
I prefer to use a small hot glue gun purchased at the craft store for adhering paper and fabric details like this, because you can work quickly.

If doing something similar, keep working/gluing on either side of the center of the bat one wing section at a time. Don’t apply the glue too thickly or too close to the edge of the felt. If using regular white glue, follow the same technique to ensure to keep your work neat.

Gently press the pieces together and set them aside until the glue is dry or set. Hand stitching or machine stitching works as well, it just takes longer.


With all the bats made, I arranged and pined them on the cape while on a dress form. To better emulate the slight shoulders of a child I pressed in the retractable shoulders. This helped with the placement of the bats.


Once I was satisfied with the bat placement, I made a few hand stitches to secure them in place. When all the bats were attached I tweaked their angle placement with a few more hand whip-stitches just to insure they would remain just so.
To hold the cape closed, I secured the front neck opening using a larger hook and eye. Lastly, I stitched the center of a bat to the neck front edge of the cape for a final touch.


Not only was the cape fun to make, but I still had plenty of time to make the hat, ruff, hair pins, and wand. I will show how to make all these accessories in the next couple of blog posts, so be sure to check back to see how to make all the other pieces for this fun and easy Halloween costume.
Remember that one of the charms of Halloween is the fun of making a homemade costume!


by Victoria Watkins
This time of the year is always so exciting for me. While it's not for everybody, Halloween is probably my favorite holiday. For that reason, I was excited to have the chance to come up with ideas for how we can modify our children's patterns into Halloween costumes.
Of all the possibilities, I settled on turning our 213 Child's Prairie Dress and Pinafore into a witch's dress and apron (NOTE: pattern deeply discounted this month). The two garments together can be used to contrast a black fabric with a novelty Halloween print quilting cotton, as I've done here. When making selections at our local fabric store, this purple bat motif was what spoke to me the most. There are always countless seasonal quilting cottons available at both mom-and-pop and chain stores, so you're sure to find something that you can use for this costume.
I made a couple considerations when choosing elements for this project. The first is that this pattern has an option for a shorter length and a longer one. I chose the shorter version. This was mainly due to personal preference, but in retrospect I think it works great because it allows room to show off the classic witchy striped socks, if you choose to include them. The pinafore also has an option to be closed or open in the back, and I chose to keep it open for a more apron-like effect. I also chose to omit the cuffs on the sleeves, which left them open and bell-shaped, which felt more magical to me.
If I'm honest, while working I didn't feel like switching the thread from black for the dress to a purple for the apron. There are areas of topstitching on the pleats, and I'm actually pretty pleased with how the contrasting thread looks on these spots! Had I sewed this a year prior, I'm sure my finishing would've been a little more off kilter, and I'd probably have wanted a purple thread to melt into that fabric...

Here is Miss Iris, kindly modeling the dress and apron for us. She loved it and twirled around quite a bit, showing it off. She also really liked having a wand, and it could definitely fit into a Harry Potter themed costume as well.


 The all black dress is also great for a witch or wizard. Lots of magic!

In the past, we have suggested some patterns for Halloween costumes, and we thought we would do this again this year. Especially since we are having a HUGE sale on some of our children's patterns which could be used to make some fun (and beautiful) costumes for little ones in your life. The sale will go for the rest of the month! Below you will find some patterns and ideas for making memorable costumes - ranging from simple to involved.
Cynthia and Victoria also made some great kids costumes that we will feature on the blog - along with some free instructions for making accessories. Check out our past suggestions here and here. As always, we expect you will use our patterns with respect. Quite a few of our patterns are from specific cultures, and it would be disrespectful to wear them as a Halloween costume.
Children's Costume Ideas:
110 Little Kittel. Make an adorable Gretel from Hansel and Gretel - add some embroidery and/or a hat/bonnet and a basket with bread crumbs to accessorize. Or use black fabric to make an easy and comfortable witch's dress.
138 Child's Drovers Coat. Make this coat in a tan canvas or heavy twill and it can be used for an outlaw costume, Western sheriff, or a cowboy costume - with cowboy hat, bandana, and boots. Add the 218 Child's Frontier Shirt for a great Western look.


208 Kinsale Cloak for Young Folks. Could be made into a Witch or Wizards cloak, Little Red Riding Hood, or Count Dracula without the hood. Also great for Harry Potter character costumes. It would also be great as a Elvish Cloak given to the Hobbits in Lord of the Rings.

213 Child's Prairie Dress and Pinafore. This one makes an adorable Little House on the Prairie look, of course - complete with the bonnet (in the pattern). But you could also make a great witch's outfit with some black fabric (and creative fabric) - check out what Victoria made in the next couple of days on the blog. You could also make a very cute Heidi or Alice in Wonderland outfit as well (blue fabric, white pinafore). Even Mary Had a Little Lamb would be great, include a wooden walking stick and a stuffed toy lamb as a prop.
218 Child's Frontier Shirt. Perfect for a Sheriff Woody costume from Toy Story or a cowboy complete with chaps, bandana, boots, and a hat. Also a great shirt for a pirate with an eye patch, felt tricorn hat, and don't forget the faux parrot attached to one shoulder. With a the right shade of green fabric, this shirt would be a great jumping off point for a Peter Pan costume. Add a green felt pointed apron-like waist wrap and some green tights and your ready to take flight. Great for a Three Musketeers costume too.

225 Childhood Dreams. Make a dress inspired by Wendy from Peter Pan. The 223 A Lady's Chemise could be inspired by Wendy as well for adults. With the right fabric, the Childhood Dreams dress could also be used to make a princess dress - think shimmery fabric, tulle, etc. Or use it to make a Clara from the Nutcracker.
256 At the Hop. For a very cute sock hop costume.

For Adults:
207 Kinsale Cloak. Again, perfect for characters from Harry Potter, Lord of the Rings, or even Little Red Riding Hood.

215 Empire's Dress. Shows like the new House of the Dragon, Bridgerton, and the new Persuasion include costumes like the Empire Dress. Dress up as your favorite character or best Jane Austin. Add an English accent to your gab and you'll fit the part.

256 At The Hop. Make a quick and easy felt circle skirt for a Grease or Happy Days themed costume complete with poodle applique, saddle shoes and bobby socks, and a cardigan sweater for a little Jitter Bug. This one could be for children too.

We've been enjoying shows like Hotel Portofino, Downton Abbey, and the Durrells in Corfu (as well as the new Downton Abbey movie). The 249 1930s Day Dress, 1920s flapper dress, 220 Garden Party Dress, 237 Tango Dress, or 233 Glamour Girl Dress would all make fun garments to wear to dress up as a character from these shows. The flapper dress and 233 Glamour Girl Dress are particularly easy and quick to sew. Grab some fun, sparkly fabric from Joanns for the flapper dress - it doesn't take a lot.


by Esi Hutchinson
You can never have enough pillows can you? I showed you how I made a Makura pillow from 305 A Japanese Interior, and this blog post will focus on the Zabuton. Victoria made a beautiful Zabuton, or floor cushion, and shows her process in this blog post. I am making basically the same pillow (there are 3 options for the cover in this pattern), but using fabric scraps for stuffing the pillow. This is probably the most simple pillow in this pattern. The cover can be made to be removable so it can be easily washed when dirtied. And if you are going to use a poly-fil or fabric scraps to stuff your pillow (which I will be doing), you would have to make a separate cover that is non-removable to hold the loose stuffing of any kind. The filling that the pattern calls for (layers of batting), make it easier to remove and wash the cover.
If you want to make a separate removable cover repeat instructions for Cover #1, adding an extra 1 in. (2.5cm) seam allowance at one edge of both top and bottom pieces. Turn this inch under as a facing, then topstitch. Add several snaps so that this final edge overlaps by ½ in. (13mm). A cheap muslin would be fine to make the inside cover and hold the fill.

However, I am just going to make this pillow with one cover. It will be just a display pillow so I am not worried that I will need to wash the cover.
Since you know, as a sewist, fabric scraps build up. Often they are small pieces that you might save thinking, "this is too large to throw away" or "this fabric is so nice, I can't throw it away" or "maybe I can make a pocket from this scrap in some other project". Or maybe you have scraps you test stitches or buttonholes or muslins on. Either way, we always end up with loads of scraps of fabric. We at Folkwear, don't like to throw them out, but sometimes it is hard to find uses for them. Filling pillows is a perfect option, especially if the pillow needs to be quite firm. I wanted to show you how I made this pillow and filled it with fabric scraps (and reduced our scrap pile), so you might be inspired to do the same!
I found these scraps to work with in our fabric scrap pile.

To make an even surface for my pillow, I cut about 5 layers of fabric the size of the pillow batting. I used some of Folkwear's larger pieces of muslin that could not be used for other prototypes - even cutting up some of the old garment muslins we had made. Having these smooth layers of fabric to sandwich the rest of the scraps helps to keep the pillow without bunched fabric which can easily make the pillow feel uneven. Cut as many layers as you like for this "sandwich".

Then, I took the smaller fabric scraps and laid them in between the larger layers of fabric. Trying to make it feel plush and even and and not flat.


I sewed one edge of the two of the two layers to sandwich the scraps together in order to hold everything together more easily when inserting the stuffing in the cover.

Layers of scrap fabric (the size of Zabuton batting) sewn together at one end.

The scrap fabric batting is finished and ready to but inserted in the cover (it almost looks more like a taco than sandwich). Now you can make the cover!
Cover
This is the simplest cover. Just follow directions in the pattern. I used a gorgeous cotton ikat that we have in stock here at Folkwear.

Like Victoria, I found it difficult to insert the batting I'd made with the technique used in the pattern. So I just left open one side of the pillow and inserted the "batting" gently, adjusting as needed to fill the pillow with the scraps. I added more scraps to the pillow after getting the "batting" inside the cover, again adjusting to make everything even. Then I just slip stitched the opening closed with a 1/2" (13mm) seam allowance turned to the inside.
Note that if the pillow is not fully stuffed with fabric scraps, the scraps will tend to shift around with use. You can try to fill the pillow very full, or you could be sure it is not in heavy use. Or, you could add the center stitching to be more authentic and would help prevent fabric shifting.


This is a very simple pillow, and a good way to use your fabric waste rather than throwing it away. Here at Folkwear we try our best to not be wasteful. We hope you are inspired to make something to use up your fabric scraps! The pattern 305 A Japanese Interior will be on sale all month. Use it to make your own beautiful pillows (and use up fabric scraps)!


by Esi Hutchinson
Even though most of our patterns are for clothing, I love that Folkwear, also has some patterns for traditional interior accessories. The 305 A Japanese Interior pattern covers twelve different items for a traditional Japanese room but can be used in a distinctive living space anywhere. There are pillows as well as well as covers for pillows, mats, a sleeping kimono, and a set of curtains (noren). I think it is really neat Folkwear has a pattern such as this one, to a handmake a comfortable space for you, family, or friends.
The 305 A Japanese Interior pattern has two patterns and instructions for two head pillows, or makura. Pillow #1 is quite simple, so I wanted to make pillow #2. This blog post will focus on the Makura pillow #2 and cover - a sew along with some sewing tips. It is an oblong pillow with a cover that can easily be removed so it can be washed or changed out. Just to get a sense of the size of this pillow, it is a small pillow, nice for the back of the neck or for your lower back. It is about 11"/28cm long and 15"/38cm in diameter. if you want it larger use your best judgement for adjustments for the pillow and cover.
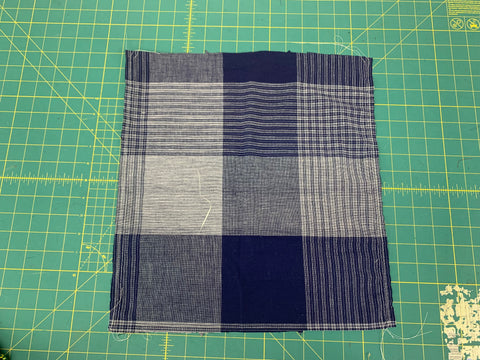
I used the same fabric for the pillow and cover, but you could choose separate, coordinating fabrics. I chose a mid-weight cotton with a plaid-like pattern.
Pillow
You only need a few pattern pieces for this pillow.

I gathered the long edges of the main pattern piece.
Then, fold the pillow piece in half lengthwise, right sides together and stitch along short sides, locking off at notches and leaving open between notches for turning. Press seam open.

Pull up gathering stitches of both ends very tightly and tie off. Then using the excess thread from gathering, stitch through the gathered section for added security.

Now just turn the pillow right side out through opening in seam. Insert batting to desired firmness. You can also use your leftover scraps of fabric (really great for upcycling all those small bits of fabric) which will make it feel a lot firmer. A firmer pillow is more traditional. Then after you've filled your pillow, blind stitch opening closed.


Cover for Makura Pillow #2
The cover for this pillow has a ruffle, but this is a Western-influenced style. If you would like a more simple, or traditional, cover, just omit the ruffle.
To make the ruffle, press under ¼"/6mm, then another ¼"/6mm on both short ends and unnotched long edge of Ruffle. Topstitch close to fold.

Then, put in two rows gathering stitches along Gathering Lines on notched edge of ruffle.
On both short edges of Cover, turn under ¼"/6mm, then another ¼"/6mm. Top stitch close to fold.

Right sides together, line up seam allowances of Ruffle to long edge of Cover, aligning hemmed edges and notch 2. Pull up gathers to evenly distribute fullness.
Stitch along ½"/13mm seam allowance. Trim the seam allowances and serge or bind them your choice. I serged the edge because it is easier and quicker, but choose the finish you prefer.

If you are not making the Ruffle: On all four edges of COVER L, turn under ¼ in.(6mm), then another ¼ in. (6mm). Topstitch close to fold.
Ties
To make the ties, fold the Tie in half lengthwise, right side in. Using ¼"/6mm seam allowance, stitch along long edge.

Using a safety pin or a loop turner, turn Tie right side out. Cut each tie into three equal lengths. Turn ¼"/6mm of cut ends of Tie to the inside. Topstitch ends closed.

Line up three Ties with stars, extending Ties about ½"/13mm under hemmed edge of Cover. Topstitch in place, following previous stitching line.

Place other three TIES on dotted squares, stitch in place following squares.

To use the cover, center it on the pillow and knot the ties around the pillow.
You are finished, enjoy!
Folkwear would love to see your example of any of the 305 interior items. I may make a couple of pillows as gifts. Also check out the the sashiko quilting and shibori dyeing techniques included in this pattern. They are quite interesting as embellishments in general.


By Victoria Watkins
In light of the PDF release of our 305 Japanese interior pattern this month, I have put together a mini sew-along to talk about the process of making one of the zabuton cushions. This pattern features a ton of different interior pieces, though most are bedding. I chose to make myself the second zabuton option in this pattern, as I do enjoy sitting on the floor from time to time. In addition to this I knew that my cats would love the wide pillow, so I decided to make this floor cushion and cat bed combo!


by Molly Hamilton
The 305 A Japanese Interior pattern is one of a set of home goods patterns that Folkwear released in the 1990s. It is also, by far, the most popular of our home goods patterns. You can make up to 12 items from this pattern, plus the pattern includes a large sashiko design, as well as instructions for sashiko embroidery or quilting and shibori dyeing. Both of these techniques are beautiful ways to traditionally embellish garments or fabrics.
To give you an overview of the 305 A Japanese Interior pattern, I will go over all the items you can make in the pattern.

First, there are the futon, which is a general word for many types of cushions and quilted bedding. Zabuton are fairly large (24”x24”) floor cushions that are used for sitting. Of course, they can also be used on sofas or beds. This pattern has three options for making Zabuton, particularly as to the covering of the Zabuton. There is a very simple cover, a more complex folded (and stitched) cover, and one in between. Pattern pieces are included for the Zabuton.
Next, the Shikibuton is the bottom quilt. This is a single person-sized thick quilt that is laid on the floor and slept upon. The Kakebuton is a top quilt – and is slept under. Both of these items do not have pattern pieces, but measurements of fabric and instructions are provided for how to construct them.
There are two patterns (and instructions) for Makura, or sleeping pillows. Pattern pieces are included. These are pillows that are for resting the head. Makura #1 is most similar to a regular bed pillow. Pillow #2 is round and was often firm (perfect for keeping hair from getting disturbed too badly at night). There is also a pattern for a cover for the #2 Makura (to make it more decorative and to give the option of washing the outside). These pillows are much smaller than the Zabuton and are only 9"-13" wide. These pillows are also nice throw pillows for sofas or beds.
There are also instructions for making a folding foam mat. This is ideal for a small bed that can be folded up and stored easily. This can be used under the Shikibuton for extra padding and comfort. These folding mats are quite comfortable futon beds and could even be great for car camping. I love how they fold up and are easy to store.
This pattern also has instructions for making Noren, decorative curtains that can be hung at windows or across doorways. They can be used to separate spaces in a room as well. These are a beautiful place to use the sashiko embroidery (and the pattern provided) or special fabric. Traditionally Noren were made in a dark blue or brown and might have decorative border. You can make these just about what ever size you desire; instructions are given for how to measure and construct the Noren
Finally, this pattern provides instructions for making a Yogi, or quilted sleeping kimono. This garment was another way to stay warm when sleeping in cold weather. You can use any kimono pattern (or our own 113 Japanese Kimono) to make the yogi. The instructions tell how much extra fabric is need, batting required, and construction alterations for transitioning a regular kimono pattern to a yogi pattern.
My stepfather flew airplanes in the Coast Guard and spent some time in Japan in the 1960s and 1970s. He had a Kakebuton and folding foam futon mat which he had brought back from Japan, and which I absolutely loved to sleep on growing up. I enjoyed sleeping and lounging on the thick and soft brocade silk of the folding mat, and the Kakebuton was beautiful and warm and fluffy (also made of silk, but I'm not certain what it was stuffed with). Perfect for making a special bed on the floor for one person. Wonderful for when I wanted to sleep in the living room, or had a friend to spend the night. It is a memory I still cherish.
I hope the description of this 305 A Japanese Interior pattern might inspire you to try to make one or several of the items in this special pattern. They can be wonderful gifts for loved ones in your life (holidays or weddings especially). And they can create beautiful memories for you and your own family.

by Cynthia Anderson
Like French seams, flat felled seams encase the raw edge of the seam allowance creating a strong and clean finish that prevents fraying. Flat-felled seams are a typically found on clothing for men, children, and sportswear because of the strength and durability of the seam construction. If you own a pair of jeans, they are most likely have flat felled seams.
Depending on the look you want, flat felled seams can be made to appear on the right or wrong side of a garment. This seam treatment is a bit easier to do with more structured fabrics that are medium or heavy weight, though some lightweight fabrics are good too. Regular polyester thread works well, but consider using a heavier weight thread such as Button Twist (or doubling the tread feed) for a distinctive top stitch. The texture created by a heavier thread will stand out. You could even pick a contrasting color for an even bolder look. For a stitch that blends in to the fabric, match the regular-weight thread to the fabric. .
For this demonstration I am using a blue cotton shirting without a visibly right and wrong side. I am also using a standard straight stitch presser foot. You can purchase a special "Felling or Lap Seam" foot, but a standard foot works just fine. You could also use an edge stitch foot or zipper foot which can keep your stitching very straight when top stitching. I am using a regular weight polyester thread in white for each stitching line.
Note: Keep in mind that in this demonstration the right side has one line of visible stitching and the wrong side has two lines of stitching
To create flat-felled seams.
Pin and stitch on the seamline, right sides together, like you normally would. I am using Folkwear's standard 1/2" (13mm) seam allowance. Use the seam allowance specified for the pattern you are using.


Trim one edge of the seam allowance to ¼”(6mm) or by at least half of the width of the seam allowance. I have trimmed to approximately 3/8" (10mm) due to the weight of the fabric.

Turn the wider raw edge of the seam allowance under and press it over the trimmed edge, matching the raw edge to the first stitch line.


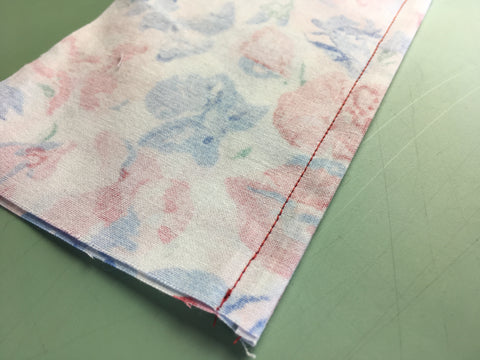
With the wrong side facing up, stitch close to the turned edge, keeping the stitching straight and even.

The regular straight stitching seen on the wrong side of the garment.


by Cynthia Anderson
There are several different ways to finish seams, depending on the sewing project. Finishing the raw edges of a seam keeps the fabric from unraveling and creates a stable and clean finish to the inside of a garment. Raw edges can quickly be finished on modern sewing machines using zig-zag, overcasting, or overlocked/serge stitches. Pinking shears are also an easy way to finish raw edges. While all these techniques are perfectly acceptable, there is something special, practical, and gratifying in making French seams.
Garments made with fine, sheer, and lightweight fabrics are ideal for French seams. This neat seam is sewn twice, encasing all the seam allowances in the seam itself. This creates a small, yet strong seam that keeps the raw edges from fraying. French Seams are especially nice in unlined garments, but work nicely in lighter-weight lined garments too.
The use of French seaming was popular in Edwardian garment making which is synonymous with fine handkerchief linen, cotton voile, and lawn. Before sewing machines were available, fine French Seams were sewn by hand. Luckily, French Seams can easily be made today using a sewing machine. This technique is not hard, creating a strong encased seam, with a lovely finish. French seams are ideal for finishing seams with fine fabrics, and perfect for lots of Folkwear patterns.
French seams are not ideal for all sewing construction needs. Heavy fabrics are not recommended as the folded over seam creates bulk.
Typically, only the shoulder seams, side seams, and the underarm sleeves seams are made with French seams. Sleeves that have a tight curve can be tricky, resulting in a finished seam that will not lay as nicely and may pucker-up. It is perfectly ok to pick and choose where French seams work best.
French Seam Using 1/2-Inch (13mm) Seam Allowance
Because Folkwear patterns use 1/2" (13mm) seam allowances this demonstration will as well. I am also using a fabric with two distinctly different sides to make working on the right and wrong side easier to follow.
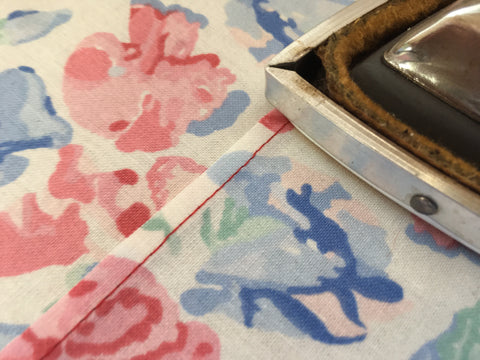
French seams are made by starting with the WRONG sides of the fabric together (not right sides together, as you normally would).

On the raw edge of your work, align and match any notches, stitch a scant 3/16-inch (4mm) seam.

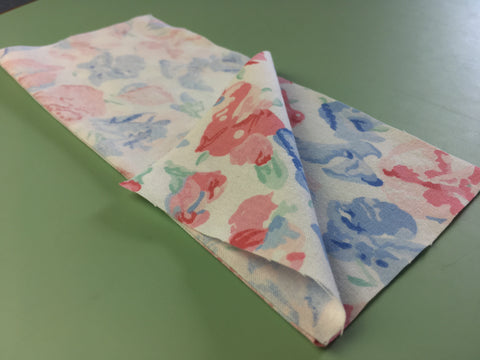
Press the seam to one side (either will do).
Turn right sides together, encasing the tiny seam, and press the edge neatly or pinch the fabric with your fingers to create a clean edge. The tiny seam should be sandwiched between (right side) the two layers of fabric. If your edges are a bit frayed or uneven, it is best to trim them before moving on.
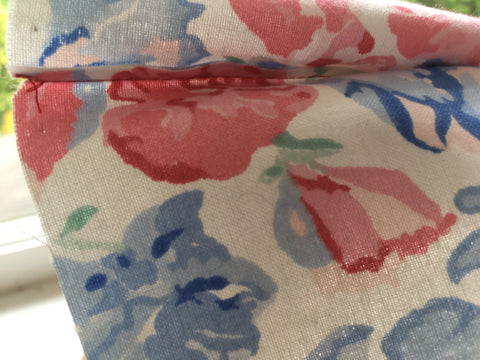
The scant seam allowance should be neatly encased in the final seam. The photo below shows the encased seam with the right sides together.

Now stitch on the seam line (which will be about 5/16-inch (8mm) from the edge) with the right sides together. You should avoid catching the tiny raw edge encased in the fold in the stitching since it is about 1/16" (1.5mm) shorter than the seam. But this is why it is important that the small first seam is trimmed and even. Back stitch at the beginning and ends of the stitchline.
Notice the seam allowance encased in the final seam in the right bottom corner of the photo below.
Press the seam towards the back if the seam is the shoulder, underarm sleeve, or side seam. If a sleeve seam, then press towards the sleeve.
French seam seen from wrong side:


If scant trimmed edge gets caught in the final stitching of the French seam, then the seam edge needs to be trimmed back more. You can un-pick the seam and trim the raw edges.

Only use up the amount allotted for the seam allowance. In this case the seam allowance is 1/2-inch (13mm). You will need to adjust your French seam calculations depending on the width of your seam allowance and how small you want the finished French seam. Experiment with different weight fabrics and varying seam allowances widths to see what the limitations are.
French seams have a long history for very good reasons. Extremely small French seams were a badge of pride and quality work for Edwardian and modern sewists alike. The beauty of this technique is just as viable today as it has ever been. Take advantage of machine sewn French seams in your sewing and enjoy a beautiful and gratifying seam making technique!

by Esi Hutchinson
Our new pattern, 161 Fisherman's Pants, is great for working in the garden, cleaning, doing yoga, lounging around at home, or just to put something comfortable on. We have made these pants in a variety of fabrics from raw silk to linen and they are great in everything.
When I thought about doing a sew along for these pants, I knew it would be quite simple as the instructions are not difficult. The seam finishes are the most important thing and might not be how you typically finish your seams. This pattern uses French seams and flat-felled seams to achieve a finished look for the pants, since you can actually see the "inside" of the garment when it is worn (waistband is folded down).
For this sew along, I thought it would be nice to give these pants a luxurious look by using a silky material. In my case, I am using a shiny polyester blend fabric that gives the look of silk. I thought that if I really like how the pants turn out I may just make them out of real silk. You can make these pants from lots of different kinds of fabric. Medium to medium weight cottons such as broadcloth, ikats, lightweight twills; linen, lightweight wool, or rayon would all be great. Or try Thai silk, silk shantung, or dupioni silk for special occasions. You can mix and match fabrics, making the waistband or ties (or pocket) from a separate fabric than the pants. Also note that the inside of the waistband fabric will be seen, so you might want to make sure you like the back of the fabric also. I've even seen these made with each leg from a separate fabric. if you do that, each leg takes about 1 yard of fabric, and the waistband 3/4 of a yard.
Take a look at the pattern and choose your size and cut out (or trace) the pattern. The sizing of these pants is very flexible. Many different sizes will fit many different bodies since there is so much ease, and the pants are wrapped to fit. I suggest choosing the size closest to your body measurements, or even a size smaller. If you would like to shorten or lengthen the pants legs do so now. The pants are designed to be ankle length. But, you could make them shorter, which is a very popular style too. If you want to changed the length, shorten or lengthen from the bottom cuff on the pattern piece. I shortened these pants by about 5 inches as I wanted a very cropped pants.
Starting Out
Cut out all your pattern pieces from your fabric. There are only four pattern pieces, and the pocket is optional. We designed these to have one pocket that is in front when you wrap the pants to wear them, but you could cut two pockets (one for each pants leg) if you like.

With right sides together, sew the Waistband Panels together at the side seams. Use French seams or flat felled seams and press to one side. I used French seams here. By the way, we will have an in-depth tutorial up in a few days on making French seams and flat felled seams.

Now, turn under one long edge of the waistband by ¼” (6mm) to the wrong side and then turn under again by ¼” (6mm) to form a hem. Stitch hem close to turned edge.

Optional Pocket
For the pocket, press under ¼” (6mm) seam allowance along top Pocket edge, and press under again by ¾” (2cm) and topstitch along folded edge.
Then press under ½" (13mm) seam allowance along remaining Pocket edges.
I am using two layers of fabric because my fabric is delicate and I don't want the stitching to pull when something like my phone is in the pocket. If you do this, sew the pocket pieces together with right sides together on only three sides. Leave the top open to turn to right side.

Turn right side out and press under ¼” (6mm) seam allowance along top Pocket edge, press under again ¾” (2cm) and topstitch along folded edge.

Pin Pocket to right side of one leg at position marked on pattern. Topstitch in place close to pressed edges, backstitching start and finish of pocket opening.

If you would like a pocket on the other pant leg do so now.
Sewing Legs Together
With right sides together, sew the center front and back seams together on the pants legs. Finish seams and press open or to one side, or use French seams when sewing together.
With right sides together, put front and back pants seams facing each other, and sew the crotch seam. It's best to start sewing at the inner curve (seamline) of the crotch and sew to one ankle hem, then sew the other side of the crotch seam the same way. Finish seams and press open or finish with a flat-felled seam. Clip seams at curves as needed.
I serged the crotch seams because I don't want the structure that flat-felled seams gives, and wanted that that area to have less structure to be more loose-fitting.

Waistband
With right side of waistband to wrong side of pant legs, align the unhemmed edge of the waist panel to the top of the pants. Match waistband seams to pants notches and waistband notches to front and back pants seams. Finish seam with a flat-felled seam and press toward waist panel. This seam will also be seen, so it is helpful to finish it completely (i.e. not just finish with a serge or zig zag stitch).

Tie
Press ½” (13mm) toward wrong side on each short end of the Tie. Press ½” (13mm) to wrong side on each long side. Fold Tie in half lengthwise with wrong sides together, and stitch along three sides, close to hem folds.
Sew center of Tie to back of waist panel where indicated on pattern pieces. Basically just below center of the back of the waistband. Secure the tie by sewing a rectangle and backstitching at beginning and end.

Finishing
Hem pants legs by turning up ¼” (6mm) and turn up again ¼” (6mm). Stitch close to fold.

Now the pants are finished, I will show you how to tie them to your waist.
First fold one side of the waist band to opposite side.

Wrap the tie around your waist and tie it in the front.

Lastly fold the waistband over the tie.


I love how comfortable and chic the pants look in this fabric! Get the pattern for these Thai Fisherman Pants here!

 Shorten the legs to make a cropped pair of pants. It is easy to shorten these pants at the cuff. The leg is straight from about half-way down the pants, so you can easily shorten them to your desired length.


Last, this show-stopping Iridescent Purple Silk Shantung from Mood Fabrics would make for an unforgettable garment. Despite being a solid, the color and texture are decidedly head-turning.


