-
Sewing Patterns
-
Fabric
- Sewing Supplies
- About
- Blog
- Gallery
-

By Esi Hutchinson
Making a pants fly can always be a bit tricky. And the 250 Hollywood Pants has a faced buttoned fly that sometimes causes a little head-scratching for customers. So we here at Folkwear thought it would be a good idea to show how to make the fly and little tips to make the process smoother. This tutorial will focus on the pattern pieces A (Pants Front), C (Right Fly and Facing), and D (Left Fly and Facing).
To make the fly, you will need to cut one Right Fly C and one Right Fly Facing C. These pieces should be cut as mirror images. For the Left Fly D, you need to cut one with the pattern piece face-down on the fabric for the main fabric. You also need to cut two of Fly Facings D so you have mirror images of each.
Below you can see the pieces I cut. I cut the facings from muslin so you can see the difference between the fly pieces and the facing pieces. However, you can cut all your facings from your main fabric if you wish. I also just cut the pants front with short legs so it is easy to see the fly.
I have three pieces for D, the Left Fly (one main fabric fly and 2 facings); two pieces foe C (one main fabric and one facing). It helps to label each piece and note which side is the right side/wrong side so you don't get confused. Note that below, I did not always label the right side of the fabric, so don't let that get you confused.

Lets begin!
Right sides together, stitch Knickers Fronts (piece A) together from box to bottom of the crotch seam, backstitching at box. Press the seam open; you may finish the seams using a serger, overcast or zig-zag stitch.
If your fabric is light-weight and your need more structure, interface your Fly pieces C and D (main fabric). Do not add interfacing to your facings.
Now, we start by working with the Fly and Facing C for the right side of the pant. 
Right sides together, stitch Right Fly C to Fly Facing C, matching notch 1 and backstitching at the box. 
Right sides sewn together.
Trim the seam, turn and press. Clipping to the box and trimming this seam is helpful before you sew the fly to the Front Right Pant crotch.
Press under 1/2 in. (13mm) along the remaining long raw edge (double notched side) of the Right Fly Facing C.

Right sides together, stitch Right Fly C (main fabric) to the right-hand side of Right Front A (as you wear it), matching notch 2. Backstitch at the box to secure. 
It is helpful to clip to the box on the pant seam after your have sewed down the Fly C to the pant. This will keep the rest of the seam flat when folding over the Fly C.
Press the seam toward the Fly C. Then pin the pressed-under edge of Fly Facing C over the seamline to the inside. Slipstitch Fly Facing, or topstitch on the right side of garment, to finish.


Now put aside this right side of the pants, and let's start working on Left Fly and Facing D.
A Left Fly and a Left Fly Facing
With right sides together, stitch Left Fly D to a Facing along the unnotched edge, and backstitch at the box. 
Clip into the seam to the box and trim this seam. Then turn right side out (i.e. put wrong sides together) and press.
Transfer the buttonhole markings to right side of Left Fly Piece (main fabric). Make the buttonholes, stitching through both Fly and Facing. It is best to make the buttonholes now because it is hard to maneuverer to make the buttonholes after the fly has gone in.
With right sides together, stitch the remaining Facing D to the remaining raw edge of Left Front A opening (again, ignore the double notches on Left Front A). Stitch from the waist to the box. Backstitch at the box to secure.
Clip into the seam to the box and trim the seam. Then turn Facing D around to the wrong side of Left Front A (wrong sides are now together) and press.

Right sides together.
Wrong sides together.
Now, trim 1/2 in. (13mm) off of both Left Facings D -- the one sewn to the Left Fly and the one sewn to the pants leg.

Then press under 1/2 in. (13mm) on the long single-notched edge of Fly D (main fabric), clipping curve as necessary to help press under.
You now have the Left fly ready to assemble.
Open out the Facing D that is stitched to the Left Front Pant A. Place the Left Facings D with right sides together and pin, matching the seams. The Left Fly D (main fabric) will have its folded-under seam allowance go around both Facings. Trim off a little more from the Facings if needed. 
Now stitch a few stitches between buttonholes, through FLY and both Facings, as marked on the Pattern.
You can see here that the folded-under seam of my Left Fly D was not yet folded around the Facings. It is probably better to do this before taking the stitches in case you catch the folded-under seam in the stitching.
Now turn the entire Left fly D to the inside, and pin the pressed-under edge of Fly D over the trimmed Facings. Topstitch through all the layers, close to pressed edge.
Overlapping bottom ends of both Flys, stitch Right and Left Fly together at bottom edge by topstitching on right side of the Left Front A as shown on the Pattern Piece for Right Fly C.
Now your are finished! I hope that cleared some things up. To me, the most confusing part is making sure you cut your Left Fly D (main fabric) with your pattern piece faced down. 

by Molly Hamilton
We all really love the 234 Cameos pattern. I love the details, the romance, the fun sewing challenges, and how feminine and pretty the tops come out.
I decided I wanted to make a sleeveless camisole to wear for myself this summer. I had already made one sample of View A (without the tucks and insertion lace) and wanted to try View B with the tucks and lace. After making View A, I knew I wanted to adjust a few things to fit me the way I wanted it to. These are simple adjustments, but I will walk you through what I did.

My daughter wearing View B of the sleeveless 234 Cameo. You can see it flares a bit at the hip and the straps are narrow.
First, I wanted the straps to be wider and closer to my neck (i.e. not so wide across the span). So I adjusted the pattern pieces for the front and back yoke by widening the straps toward the neck and making the neckline a little smaller.

You can see the original pattern piece on this tissue. I extended the line for the shoulder to make the strap wider (about 3" total) and connected this line with the center front (and back) using a hip curve ruler.
I also wanted a bit less flare in the lower part of the cami. This camisole was originally designed to have that flare to go over a back bustle or pad, and the peplum shape is fun. But, I wanted something a bit more fitted and modern. So I just straightened the lower curve of the side back and back pieces using a ruler on the pattern pieces to straighten the seam. This was a very easy adjustment.
I always recommend a muslin of your final pattern to make sure that the garment fits the way you want and to make any final adjustments that might be needed. With this pattern, you would not need to do any tucks, lace, or bias for a muslin. Just stitch together at the seam lines and front darts and try on. It's very quick!

I just used a straight ruler to draw a line from the side seam to the hem in the lower part of the shirt, removing the flare.
Note: I used French seams for all of my seamlines and this is an easy way to get a really nice finish on the inside of this top. French seams are perfect for this cami, especially when using fine and lightweight fabric. The fabric I used for this was a cotton/linen blend in an almond color. I really love the look of this cami in solids and prints, and lightweight fabric is needed.
I made the tucked yoke pieces first from the rectangles of fabric (Pieces N and M). Do not cut out the yokes first. It is far easier to make the tucks from these rectangles and then cut out the yoke pieces after than to try and make the tucks on the smaller yoke pieces. Making all the tucks on Pieces N and M is a bit laborious and takes some time, but it is not difficult.


This is the center back, which I did not cut on the fold, but traced onto the tucked fabric section where it was indicated on the pattern. Note the new strap and neck lines.


I used my modified yoke pieces to cut out the yokes from Pieces N and M after the tucks were made. If you are adding lace insertion, you can add the lace to Pieces N and M before cutting out the yoke pieces as well. I wanted to add lace, but I did not have very much lace of the type I wanted to use, so I added the lace just to the yokes after I cut them out. I also decided not to do true insertion lace. My lace has some scalloping on the edges which can make lace insertion slightly more difficult. And, I didn't really want to spend more time on the lace insertion. If you want to do lace insertion, though, read our blog post about it here.

My new pattern pieces cut from the tucked fabric. And I've added lace to the sections where insertion lace could be added. Note I did not add lace to the center front. This should be done as instructed in the pattern if you want to add it.
I just applied the lace to the top of my yokes and stitched it down with a narrow zigzag stitch. Note that y ou can choose a different width of lace than the pattern calls for. The lace I used was slightly smaller than the lace the pattern recommends, but it was the color and style that I liked best of all the lace we had on hand. You could add lace that is more narrow, or add two rows of narrow width lace (even using two different laces to create the look you want). You could even stitch ribbon down on each side of the lace if you wanted. There are a lot of possibilities.
My edging lace was also a bit narrower than the pattern called for. And was not as gathered as many gathered laces are. So to adjust for this, I eased the lace in places to have some extra room. And to adjust for the more narrow lace, I moved the lace to the edge of my stitching. You could also make a narrower bias binding (1/4" instead of 1/2"), but I like the wider bias to help cover seams and stitching. I moved the edge of the lace near the stitching line of the bias, and was careful to have it caught in the stitching. Again, there is some leniency in the size of edging lace you use. I had some edging lace on hand that I wanted to use - one that was a ecru color with a floral design. And I like the subtle, narrower lace. But you can use a variety of lace here, too.

Note that I placed the lace edge near the stitching line and not all the way into the bias. Because the lace is narrower, placing it this way means that it will not disappear in the bias but be at the edge.
Finally, I took in about 1/2" (13mm) at the back armhole where the side back and back come together. Again, this was an easy adjustment because it was at the seam, but it helped the armhole fit just a little better.
These were all the adjustments I made to this pattern, and I love how it came out. It fits well and is a pretty top. And, let us know what you make from this pattern!


by Molly Hamilton
Pintucks play a big role in our new 234 Cameos pattern. Both sewn versions have pintucks along the fronts and backs. Pintucks are often found in vintage garments like the one that this pattern is based on. They were popular in the late 19th and early 20th century, especially on blouses, camisoles, summer dresses, and children's clothes.
Pintucks are easy to make, but they definitely add time to your construction. The number of tucks in these camisoles is not terrible and is totally worth the extra work.
I am going to show you how I sew my pintucks in this post. However, there are a number of ways to create pintucks. If you want small pintucks that are more like a raised line of fabric, you can use a double needle with a tight tension and sew a straight line. You can also put a heavy thread going through the middle of it to give more depth to the pintuck. I have tried this method and while it is decorative, it does not give me the size pintuck I like.
To make pintucks, I transfer the markings from the top and bottom of the pintucks on the pattern to the fabric. I try to make sure the pintucks fall on the straight grain of the fabric. This makes making the pintucks easier and there is less distortion.


I connect the top and bottom of the pintuck, only where the fold of each pintuck will fall, not where the stitching is going to be.
Then, I press the pintuck with the transferred line at the edge of the tuck, with wrong sides of the fabric together. And I sew 1/8" (3mm) from the edge of the pintuck. I don't always backstitch at the beginning and end of the rows because the stitching will be cut when the pattern pieces are cut out (at least for this pattern). Also backstitching adds bulk to these tiny seams. And, if you really mess up, not locking the stitches makes it easy to pull them out and try again. Also, use a longer stitch that you normally would when making pintucks. This helps keep a smooth tuck without any puckering.


Having the pintucks so close together in this pattern (as they would be in most patterns from this era), can be a little challenging. However, I don't worry about which direction the pintucks go until I am finished with a section. Then I can press, with steam, the pintucks and get them folded in the correct direction. I will press from the front and the back of the fabric. A good iron is very helpful for making nice pintucks.

Here in the office, Esi makes her pintucks slightly differently. She pins the entire tuck before pressing, matching the "legs" of the tuck where the stitching goes. She stitches the pintuck, then presses it. And they come out quite well. Which goes to show there are many correct ways to make pintucks.

My pintucks are not perfect. But I don't expect them to be. I want them to be decent, but I am not a perfectionist. You don't have to be either - you can sew pintucks and get good looking ones without them being perfect. They will look just as good! And if you feel like any of your tucks are frustratingly wrong, just pull them out and do it again.


Tell us, do you have any tips or tricks for making pintucks? Do you love pintucks? Do you add them to your garments?

by Esi Hutchinson
Hello! First of all, I just wanted to say I love, love, love this pattern, 234 Cameos. I've made myself all the sewn camisoles from this pattern. I think they are a must-have in my wardrobe. These tops go with everything, truly versatile. I can wear them with a pair of jeans, skirts, dress pants; even wear them under overalls and the outfit would look super cute!
In this blog post I am going to show you some tips and tricks for making this blouse, using the long-sleeved version I made for myself. For this version, I used a cotton/linen blend and dyed the lace to match (fabric is Cotton Linen blend - Green Maze). I also took out the elbow dart and made a gathered sleeve, which I will also cover in this post.
Refer to my fabric suggestions post here for 234 Cameos to get an idea of what you could use to make this pattern -- for either the long or sleeveless versions. Light-weight options are best -- lawn, batiste, handkerchief linen, voile, rayon, silk.
Lace
I wanted to use the optional lace for this pattern, but I wanted the lace to match the green, which was a challenge. I did make one sample of this long sleeved top in a yellow linen with lavender lace trim that we had on hand in the studio. I really liked the contrast of the two colors in this blouse -- see the photo below of this sample.
 Yellow linen long-sleeved camisole with a light lavender lace and ribbon.
However, for the one I wanted to make for myself, I wanted the lace to closely match the color of the fabric. To do this I had to do lots of dyeing, and re-dyeing, to get the color as close as I could to the main green of the fabric. I used blue, green, and yellow Cushing "Perfection" Direct Dyes from my local store called Earth Guild and bought lace in the sizes suggested from Etsy. Depending on what fibers make up the majority of your lace, you will need to use dye for that specific content.
I used 100% cotton lace for the edging lace and 90% cotton to 10% nylon for my beading trim and insertion lace. Also think about the content of your lace and how it will react to heat. If you are using a 100% cotton lace and don't give it a wash first, it could shrink when you wash your garment and distort your final product. Also hot irons can melt some synthetic laces. So be thoughtful with your lace choice and care. By dying my lace, I made sure it was pre-shrunk. I also had to press it before using it and used a warm, but not hot iron.
Folkwear has recently stocked up on some lace, check out our lace and trim options here (and if dyeing it, do it at your own risk ;-)).
I got the color pretty close, with some variation, and it still blended in quite well with the fabric.

Dyed lace from left to right, 100% cotton to 90% cotton/10% nylon.
After my lace was ready, I began making the tucks, with patience, on the front and back bodice pieces of the long-sleeved version.

The back and both fronts with all tucks sewn (but not pressed).
If using insertion lace follow the sewing guide, and use it where you want. You don't have to add insertion lace and you don't have to do the "insertion". You can also just sew the lace panels to the designated area and leave them on top of the fabric. This look is very nice (and less work, and slightly more modest, if you are worried about having see-through panels in your shirt). I just sewed the lace right on top of the fabric without cutting the fabric away in the back, not the true use of insertion lace but makes it easier! If you want to learn how to do true lace insertion, read this blog post that will walk you through the steps for lace insertion.

Lace pinned to the front by the tucks. You can use nearly any size lace you want (not exactly what the pattern calls for). Adjust your tucks or add two rows of lace -- whatever you think looks best to you!
Assembling the neckline lace together requires some precision, so go slow and don't tug at your lace so that it does not become distorted and therefore create warps in your neckline. For sewing lace in this pattern (or any pattern, really), you should use a narrow zigzag stitch. If you have a very straight edged lace, a straight stitch might work, but the narrow zigzag is great.

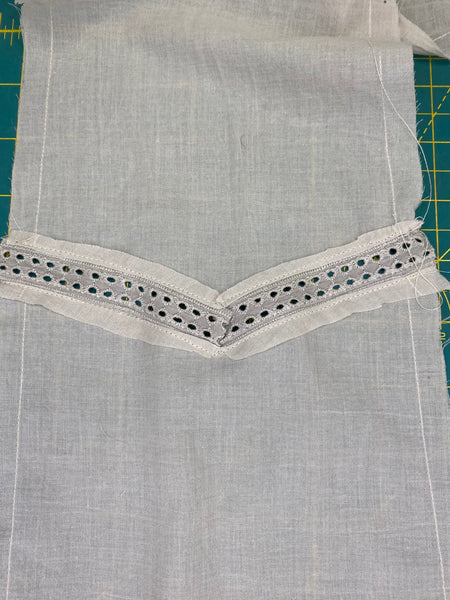
Neckline lace: insertion lace at bottom, beading in middle, lace edging at top. All sewn together.
The dart on the neckline lace is shown below. I've not seen that in other patterns with neckline lace before, but it makes so much sense to get the lace to fit to the neckline well.

Dart sewn into neckline lace (as instructed).

Neckline lace pinned to the bodice with right side of the fabric up.

Neckline lace on the inside of the blouse. You can see the dart on the left side.
I also added the beaded lace trim to the bottom of the bodice so ribbon can be run through it later. And added lace edging to the peplum before attaching it.
 Beading on the lower part of the bodice (inside).

Lace edging pinned to the peplum.
Cuff Dart to Gathered Sleeve
I did not use the dart on the sleeve that is in the pattern. That dart goes from the elbow to the cuff (Cuff dart), and is original to the original camisole and is a traditional way of shaping the lower sleeve. I didn't love how it looked on me and I wanted something a little less rigid. So, on the sleeve pattern piece, instead of cutting out the triangular opening at the bottom of the sleeve, I cut the sleeve keeping fabric where the dart would be and connecting the bottom of the two dart legs.

The original pattern piece laid on top of the fabric. I did not cut away the fabric that would make the dart, but left it and connected the dart legs at the bottom.
I cut the sleeves as shown above and the cuff as instructed in the pattern. I love the lace on the cuffs and had enough lace to add to both my cuffs.

The cuff with tucking and insertion lace on the top and edging lace on the bottom of the cuff.
When it came time to put the sleeve and cuff together, I sewed in two rows of gathering stitches at the bottom of the sleeve. I evenly distributed the gathers on the sleeve to fit the cuff and pinned the cuff insertion lace on the 1/2" (13mm) seam allowance at the bottom of the sleeve. I stitched the cuff and sleeve together, and then stitched the underarm of the sleeve. This is an easy modification that you can make to this pattern.

The new sleeve gathered into the cuff.
Other Tips and Tricks
I added a bit of interfacing for structure on the wrong side of the right front bodice before sewing my buttonholes. If you are using a light-weight fabric this is very helpful to stabilize the buttonhole area for making the buttonholes. You can always rip away the extra after you've sewn the buttonholes.

You can also space the buttons and buttonholes to your preference.
Also, for the tucks, you can use a slightly longer stitch length and that will help to keep them from puckering.
I was very satisfied with the outcome of this blouse. I think this pattern is straightforward, and even though the tucking and lace embellishment take time, it's so worth it when finished! I love this top and fabric. The sleeves turned out well. Getting the lace color to match was very challenging, though I was determined for it to work. Working with delicate lace calls for patience and gentleness (definitely test a zig-zag and straight stitch on the lace to decide which one is best to use for your specific lace). Overall, I think I did a good job. I hope you enjoy making 234 Cameos. And please show us your Folkwear projects -- as always!


Close up of the lace and tucks

Close up of the gathered sleeve.


by Esi Hutchinson
Folkwear recently re-released its 1980's pattern 234 Cameos, which is a versatile pattern that blends well with its late-Victorian origin and what is considered a popular vintage style of today. You can wear it for costuming, casual, or evening wear, depending on the fabric of course. 234 Cameos includes three sewn views, one long-sleeve and two sleeveless, with a crochet and knitted cameo pattern as well. Read more about this pattern on our blog!
For the sewn camisoles, the lace embellishment is encouraged, and Folkwear has a small lace and beading trim selection that work perfectly for 234 Cameos. And our fabric collection keeps growing and we are proud to carry a variety of beautiful quality fabric. Below are some of my fabric suggestions for 234 Cameos pattern of the month!
First is our handkerchief linen. We always try to have white handkerchief linen in stock, and it's probably one of Folkwear's most popular fabric, its washes really well and feels lovely on the skin. And it is perfect for a traditional vintage camisole.
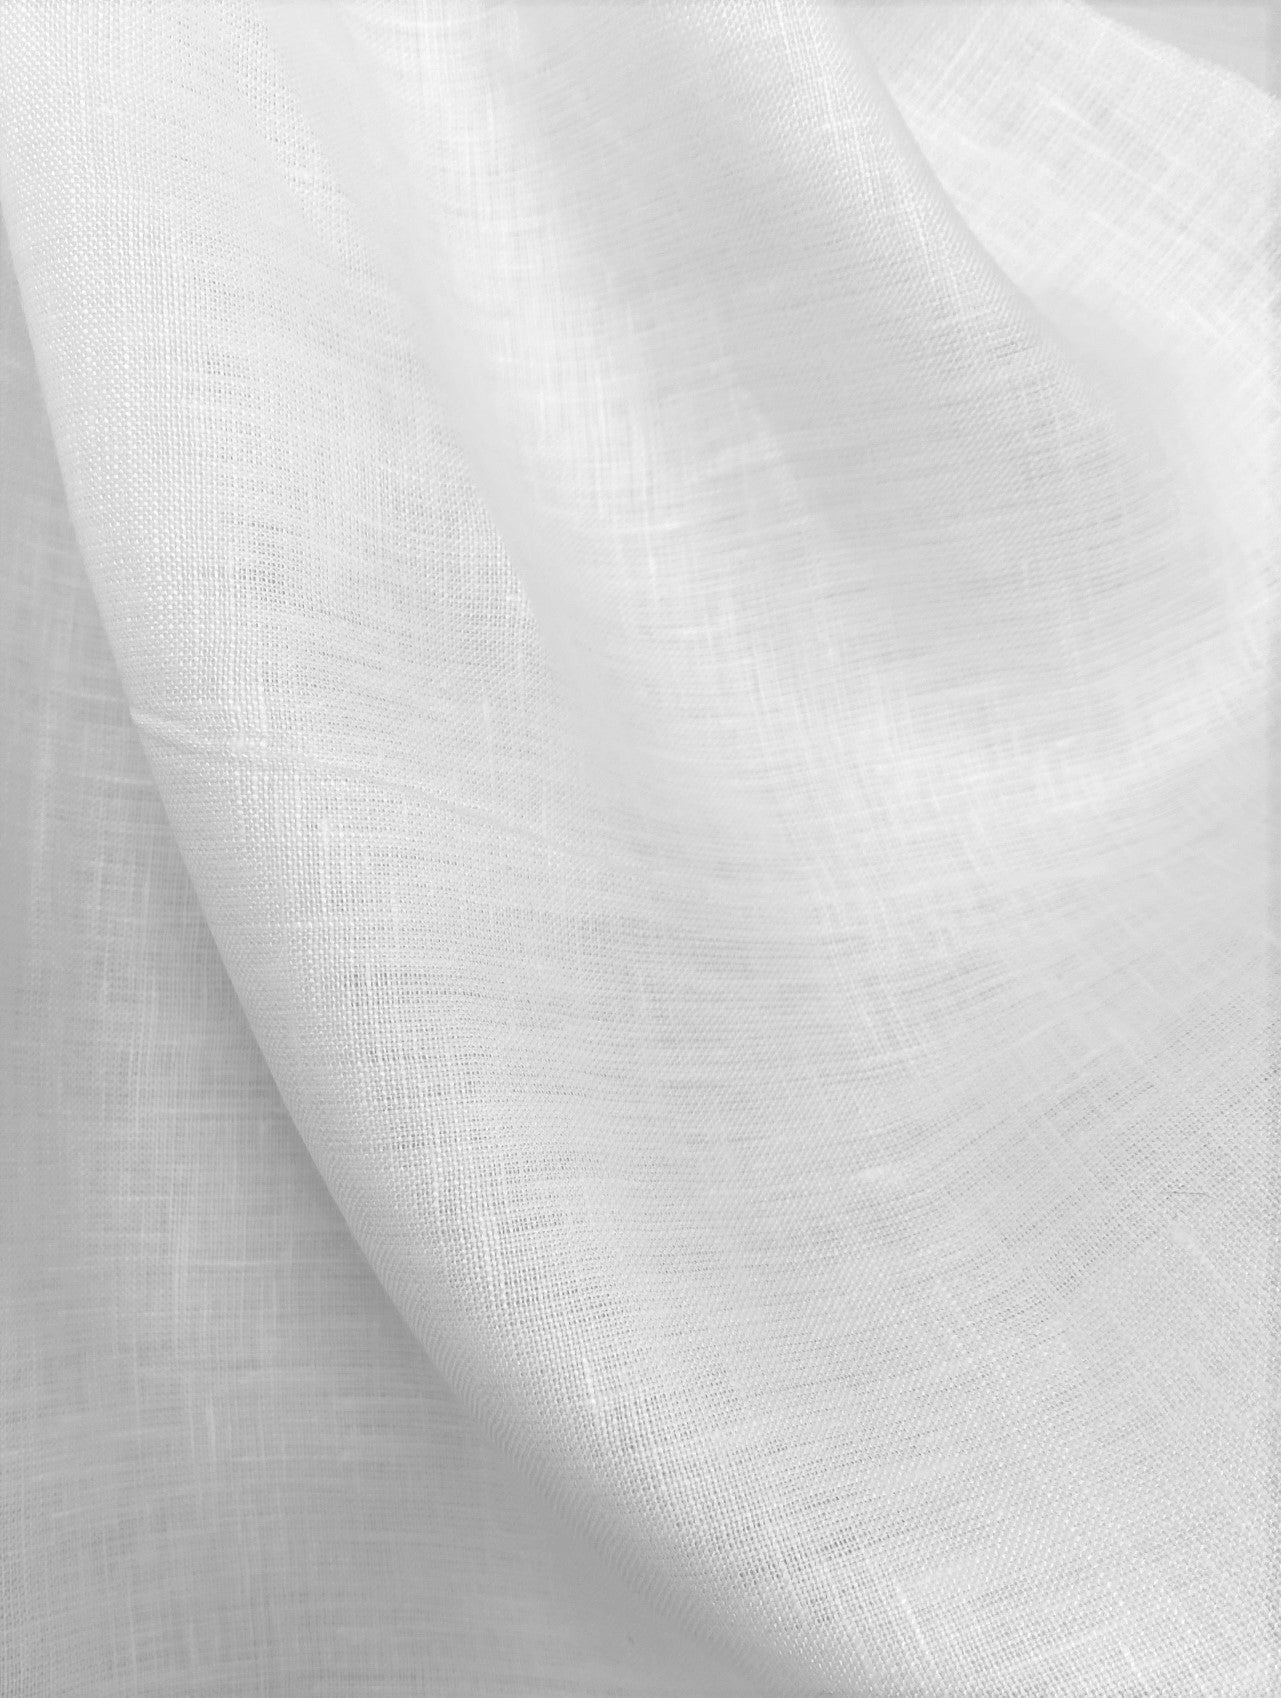
56" Handkerchief Linen - White
We also have a handkerchief linen in a pale blue that would be subtle color substitute and make a beautiful blouse.
We also have these great natural Indian cottons that are light weight and semi-shear and have some pretty embroidered designs woven in. These are very soft and feel amazing. These are a great choice for the camisoles, especially those that include lace insertion and edge lace. You can use them without the tucking and still have a delicate and interesting blouse.
Natural Indian Cotton - Neighborhood
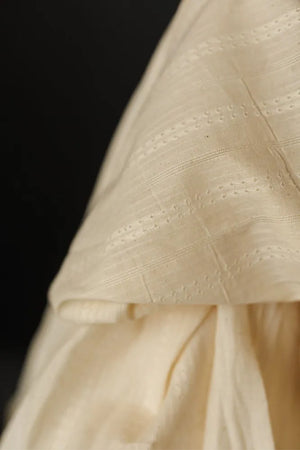
Natural Indian Cotton - Lady Luck
These floral flat seersuckers are new at Folkwear! I think these make a beautiful camisole that is lightweight and pretty. And, they are great fabrics for the summer -- lightweight and have a luxurious feel.

Flat Cotton Seersucker - English Garden

Flat Cotton Seersucker - Florence Garden Green

Flat Cotton Seersucker - Florence Garden Orange
Folkwear also has some lovely light cotton and cotton/linen blends in check patterns that actually work really well for this pattern. The long-sleeved peplum is cut on the bias and it makes an interesting detail. I made the green one at the top with a large check pattern (there's only a small bit of this fabric left).


We also have this pretty light-weight 100% cotton options that would work really well also as a print.

Cotton Lawn - Garden Peonies Yellow
I hope these suggestions help when thinking of what fabric to use for this new reprint of 234 Cameos! We love this pattern and used several of these fabrics when making samples. There will be some tutorials and sewing tips for this pattern on this blog in the near future, so stay tuned. Which fabric are you going to make your camisole in?

During the late Victorian and early Edwardian era, camisoles played a crucial role in women's fashion. These undergarments were not only functional but also served as a fashion statement. They were typically made of lightweight fabrics such as cotton, linen, or silk, which are known for their breathability and comfort. Unlike earlier styles of camisoles, late Victorian camisoles were often more embellished and decorative. They featured intricate lace trims, delicate embroidery, pintucks and ribbon accents, adding a touch of femininity to the undergarment. The undergarments were not only practical but also served as a symbol of modesty and femininity. They were designed to provide an extra layer of coverage under sheer or low-cut dresses. These late Victorian (and early Edwardian) camisoles were a reflection of the societal norms and fashion trends of the era. Their intricate designs and functional purpose make them a fascinating piece of fashion history that continues to inspire clothing today, and inspired us to bring back the pattern, 234 Cameos.
234 Cameos has been sitting in the Folkwear archives for many years. First published in 1985, this pattern went out of print at least 10 years ago and was never brought back (until now). And that is a real shame because this pattern is delightful.
234 Cameos consists of 4 patterns: two sewn camisoles, one long sleeve, one sleeveless (with two views); a knitted short sleeve camisole, and a crocheted sleeveless camisole. These designs come from the late Victorian and early Edwardian eras; the long sleeved camisole pattern is based on an original from the 1890s. These camisoles feature lots of lace worked into the patterns, from lace edgings to lace insertion to lace designs in the crochet and knit work.
I have tended to shy away from lace in my clothes, but I really loved the look of these camis (which is a reason we wanted to bring them back into print), especially with the lace. Not only is lace in clothing on trend right now, it adds romance and interest to your clothes, and it can be fun to sew with (learn new skills, loads of design possibilities).
This pattern took a lot of work, or re-work, to be ready to release. First, we had all the camisoles graded up. The original pattern was available in sizes 6-16, which is our current X-Small to Medium. Which is quite small. We had the sewn camisoles graded up to 3XL and the knitted and crocheted camisoles to 2XL. Then we tested the sewing patterns, then made sample garments. Which is when we really fell in love with this pattern! We loved working with the lace, loved the seemingly endless combinations of fabrics, views, lace, tucking, and modifications that can be made to make these very flattering camisoles. We actually loved the lace and beading so much (and had a time finding lace and beading we loved) that we decided to stock lace and beading in our shop. The lace and beading we have works perfectly with this pattern.
The long sleeved camisole has a darted sleeve, lace at the neckline and cuff, tucks in the front and back, as well as optional lace insertion. The waist is gathered into a flattering peplum. The scoop neckline and the waist is gathered with delicate ribbon through lace beading. We will soon have blog posts to show you modifications for the sleeve and how we made some of our samples.

Long-sleeved camisole in green cotton/linen blend.
Long-sleeved camisole in yellow linen with lavender lace.
The sleeveless camisole in this pattern has two views. Both have wide set scoop neck fronts, princess seams and darts to create a flair below the waist in the back (to go over a bustle in years past). View A has a plain yoke; the yoke of View B has pintucks and lace (insertion if you want). Both views have lace around the yoke and are finished at the neck and armholes with lace edging.

Sleeveless camisole, View B, with a plain yoke in a cotton with fine embroidered designs.

View A with a plain yoke in a flat seersucker print.

View B with a tucked yoke.


Back of the sleeveless camisole (View B) with tucked yoke and lace.
A beautiful chevron lace pattern is used to knit the short-sleeve knitted camisole. The waist and sleeves are gathered with ribbon or knitted cord and make a very pretty top. The sleeveless crocheted camisole has a lace pattern made into each side of the front, and is buttoned in the front. The waist is also gathered by ribbon or cording to create a pretty silhouette.

Crocheted camisole worn over the long-sleeved camisole (with the 206 Quilted Prairie Skirt)
Stay tuned for some blog posts showing more details and modifications for this pattern. We really enjoyed using this pattern to create samples (and garments we are going to continue to wear) and hope you enjoy it just as much!

A few weeks ago I took my children to Italy for a vacation. And since I work with cloth, textiles, and clothes everyday, I really took notice of what I saw there and learned. I wish I'd had more time to do a truly textile-focused trip to Italy. This time was mostly vacation on the Ligurian coast. Maybe next time! However, the colors, landscape, and food of the coast was also inspiring.


Pretty little doors and rock buildings everywhere.

Delicious fresh food everyday!
Linen
Italy is renowned for its linen. There are many linen mills in Italy producing luxury linens and everyday linens. Linen is seen everywhere - from towels to clothes. Men wear linen shirts, linen suits, linen pants. Women wear linen dresses, skirts, shirts, and pants. And especially in summer, linen seems almost ubiquitous - and nearly all of it is milled and sewn in Italy. And I would venture that linen was probably so prevalent partly because we were visiting in summer.
We carry quite a bit of linen in our shop and use it often. And most of it comes from Italy. It made me glad that we have access to this great fabric.
The colors I noticed most in linen clothes while were were in Italy (in the city and on the coast) were white, light blue, and tan. These are classic colors, great for summer, and go with just about anything. I also saw a lot of stripes - blue and white and tan and white. Darker colors were brown, dark olive, and navy blue. It felt so very classic for fashion and I loved it! I do love linen so much! I bought a couple of linen shirts while there.

Linen selection at a fabric shop.
Milan
We did have one long afternoon in Milan where I tried to fit in everything! I really wanted to go to the Dolce & Gabbana exhibit at the Palazzo Reale. The exhibit is called From the Heart to the Hands and goes through the end of July. Unfortunately there were no tickets available the day we were going to be there! So if you are going, get your tickets well in advance.
We went to see the fashion exhibit that explored the changing styles from the late 1800s to the late 1900s at the Palazzo Morando. It was quite good and it was really amazing to see all the other artwork in the palace, including the incredible wall cloth.

Fashion exhibit in the Palazzo Morando - this one from the 1950s reminded me off our 241 Fit & Flair (but with a bubble skirt!).

I loved this one from the 1920s - gorgeous silk with bias skirt (somewhat similar to our 237 Tango Dress).

Such stunning fabric and cut on this dress from the 1930s.

This jacket is actually from the late 1800s, and the fabric is a gorgeous jacquard - and reminds me of our Basics Jacket. This is anything but basic with that fabric!

Inside rooms of the Palazzo Morando.

Another room in the Palazzo Morando - this wall cloth was stunning!
We, of course, saw the Duomo, which is stunning. And the area around the Duomo is full of high end fashion shops -- Balenciaga, Prada, Alberta Ferretti, Cartier, Dolce & Gabbana, etc. Window shopping here is incredible! I couldn't afford to go in any of the shops, and it is a bit intimidating when there are guards at the doors! I saw a gorgeous gold cuff in one window with a ruby in it - for 110,000 Euros! So, we just stayed outside and walked along the avenues.

Duomo

Cartier -- so many diamonds!

I loved these fabric covered chairs in a Milan shop window!

Versace store

One of the shops we loved the most was the American Bookstore, which is a beautiful book shop with many new volumes, many very nice used books, and just out of reach above the shelves are very old and probably rare books. Not only were the book displays good and full, there were gorgeous displays of stationary, prints, artwork, journals, and paper. My daughter and I loved this store. And the prices were very reasonable. A book lover could spend hours here.
I also popped into a fabric store, of course. The easiest one for us to get to was Telerie Spadari. It is a high end shop that mostly makes fine shirts, pajamas, and day dresses from the Italian cotton and linen they carry. They also make and sell sheets and towels. It was a lovely store and the customer service was very kind. My youngest son found some linen he liked. He had been asking me for the whole week in Italy if I would make him a linen shirt so he could look like the men in Italy. So, I had to buy it, even though it was nearly $50/meter! And that was the cheapest fabric they had. They had some very fine cotton shirting, which felt so luxurious and was over $100/meter! While we were there, several customers came in to pick up shirts (or pajamas) that had been made for them. It was a fun store to visit. I also bought a meter of a Liberty fabric they had because my oldest wants to make a tank top from it. Since she sewed a skirt to wear in Italy (the first garment she's ever made, plus first time using a pattern -- see last photo), I had to encourage her new sewing hobby.

Fabric at Telerie Spadari

I love how the selvage is the color of the Italian flag. These were the $100+/meter shirtings.

With my bags from Telerie Spadari.

My daughter in her first home sewn garment - Maeve Skirt by True Bias.
Milan was a gorgeous city (and has some of the best gelato around). I wish I'd had more time to explore it. Drop a comment if you have other suggestions for visiting Milan!

by Cynthia Anderson (first written in April 2019)
What is typically hidden from sight is not generally expected to have much power, especially when it comes to effecting social change or imposing shifts on the world. However unexpected, underwear has proven to be powerful in shaping attitudes, bodies, and societies in complex and unexpected ways. As it turns out, the garments featured in our 203 Folkwear Edwardian Underthings pattern were present at the start of a revolution!
Great change rarely occurs due to one individual thing, but in a series of occurrences that take on a life of their own. The period known as the Edwardian Era, between the late 1890’s and the beginning of The Great War in 1914, would prove to be such a time. The changes that occurred would forever alter the trajectory of Western culture. The reverberations cast by this game-changing era are still felt in the world today, even down to our underthings.

The catalyst for this uproar of change was the Industrial Revolution in Britain (late 1700s to mid-1800s). It transformed an economy that had been based on agriculture and handcrafts to an economy based on large scale industry and mechanization. The steam engine, science, and mass production would literally lead the way.
With great industrial fortunes being made, so came the extreme displays of wealth, resulted in the Edwardian era also being given the lavish title La Belle Epoque (The Beautiful Era) and the Gilded Age. In part, this extraordinary show of excess was ushered in by the hedonistic lifestyle of Britain’s new king, Edward VII. The royal family were seen as fashion trend setters, while British high society reigned as the cultural elite, with everyone taking their cues from Edward’s extravagances, behavior, and attitudes. The photos below are typical of Edwardian women on display.


Middle-class women were quick to emulate their societal “betters.” Societies, which were mostly poor population, became the victims of this blind excess. Unfortunately, today’s “fast fashion” continues to give life to these same disparities.
The era also brought with it upward mobility felt mostly by the expanding middle-class and the wealthy. The poor were excluded, being often left worse off than before. It would seem the rich were unwilling to acknowledge the price their privilege was forcing upon society. Disparities in clothing held up a disturbing mirror.
With the Industrial Revolution came many new advanced technologies, with textiles at the forefront. The new advancements in fabric manufacturing would transform the production of clothing in ways never seen before. The volume of production would soar, allowing for a broader range in quality and pricing for almost every pocketbook.


Societal change was uneven, enabling some to take advantage of the new wave of possibilities, while others were shut out. With new opportunities women and their fashion began to shift in tandem. Some women were benefiting from new freedoms. The socially acceptable bicycle allowed for independence and mobility all at the same time. Hence, the practical bloomer or drawers became popular (one of the pieces in our 203 Edwardian Underthings pattern).

Literacy was on the rise and knowledge more accessible. The sewing machine enabled more ready-to-wear clothing production and women could more quickly sew their own clothing. Job opportunities due to the invention of the typewriter, telephone, and telegraph created opportunities where there had been none before. Despite the fact that many women labored in factories for subsistent pay, there was a new woman beginning to emerge. One that was better educated, interested in politics and social causes - and was on the move. A changing world for women meant a change in wardrobe too.
Possibly, the greatest impact on fashion due to the Industrial Revolution was the unexpected advancements in the manufacturing of lace and hosiery. This would change women’s underwear and our attitudes towards undergarments that still persist today.
 The woman in photo above maybe working on a lace making machine
The Edwardian Era is synonymous with lovely white-lacy-underthings. For the first time in history, lace was applied to underwear, and a lingerie industry was born! Lace transformed underwear from plain and practical to highly coveted items that appealed to women’s desire for delicate and feminine undergarments. Mass-produced lace would create an entirely new industry that would change the relationship with underwear and it’s place in the world forever.

Advertisements and fashion sketches in the ladies’ magazine of the day fueled the desires of the rich and poor alike. Access to mass advertising helped to transform underwear to lingerie almost overnight. There was already a plethora of popular undergarments at this time, including the corset, the chemise or camisole, drawers or bloomers, petticoats, crinolines, and all kinds of silhouette enhancing padding. However, the addition of lace would elevated the desirability of these familiar garments. Our 203 Edwardian Underthings pattern features the camisole, drawers, and petticoat and has instructions for crocheting lace for lace insertion or lace edgings to add to these underthings.
Women aspired to fine, delicate, and diaphanous lace-encrusted creations made of semi-sheer cotton batiste, voile, lawn, linen and silk, all beautifully decorated in lace and delicate touches of embroidery and ribbon. While fine cotton was the preferred fabric, taffeta and other crisp fabrics were used for petticoats and outer most layers of lingerie or underskirts.

The availability of mail order created a purchasing frenzy! Lingerie could be bought secretly, which added to its allure. Beautifully made and fine-quality lingerie was widely available during the Edwardian Era and was generally within the purchasing ability of most middle-class purses. The popularity and ease of mail order only helped to expand the joy of pretty lingerie. The fact that so many piece still exist on the market today, is a testament to the popularity of Edwardian lingerie.
The epitome of lingerie desire was in matching sets of lingerie items, with matching lace insertion detailing. Sound familiar? The relative cheapness of cotton along with more durable and affordable machine-made laces allowed undergarments to become more economical and practical, as well as pretty. Of course, it did not hurt that the range of lace designs was almost endless.
Soft pastel cotton fabrics were available for lingerie making, but white reigned supreme as the Edwardian aesthetic. White fabric also had the practical benefit of not being easily ruined when laundering. While technology in dyeing fabric was improving, one ran the risk of fabric not being colorfast and fading. Coveted lace dresses dominated fashion of the era and the impracticality of such dresses would set the wealthy apart from all other segments of society.
While the fruits of the Industrial Revolution were not enjoyed by everyone, a more democratic consumerism was born, allowing for a greater range of cheaper goods helping to lead the way. Insinuated into this newfound democracy, were the prurient desires of men. Hence, the most important items in a young woman trousseau shifted from fine table and bedding linens to lingerie.

The 203 Folkwear Edwardian Underthings Pattern is the perfect excuse to indulge yourself in the same luxuries as so many Edwardian-spirited women. This pattern consists of all the easy and versatile pieces you will need to find romantic inspiration - the camisole, petticoat, and drawers/bloomers. Watch for an up-coming blog on how to make the 203 Edwardian Underthings Pattern for everyday wearing - just in time for Spring!

We are excited to stock Folk Embroidery kits from Avlea Folk Embroidery. These kits contain all you need to add folk embroidery motifs to any project. You could add them to cuffs, collars, hems, borders, and plackets. You could add them to napkins, tablecloths, cushions, or tea cozies. These are really perfect for Folkwear patterns as well because the folk embroidery motifs complement our folk and vintage patterns.
These kits have 3 options: Garden, Geometric, and Woodland. Each kit comes with up to 7 motifs and borders to stitch, waste canvas, instructions, a needle, and a palette of thread that is complementary and beautiful. Once you have your fabric or project garment, the kit will have all you need to start stitching.

Some motifs and borders from the Floral kit

Some motifs from the Geometric kit

Some motifs and borders from the Woodland kit
I recently used the Woodland kit to add a small border to my 117 Croatian Shirt Dress. I love this dress (you can read more about me making it here) and thought it would be a great option for adding some folk embroidery to. I decided to add a short border to the cuffs of the dress. These cuffs have a neat little shaping to them and the border I picked has a similar roundedness to it. The colors in the kit were very complimentary to the dress color and I chose colors based on what I liked rather than what the instructions indicated. And of course, you can choose whatever colors you want to embroider these designs in (and not stick to what the instructions say).
I stitched the waste cloth/canvas that is included in the kit to the border with just one row of straight stitching. After I stitched the first row, I trimmed this canvas down to a narrow rectangle going across the cuff. There is plenty of waste cloth/canvas to do many embroidery projects!

After a few minutes of experimenting and counting at the beginning, I decided to use two holes in the canvas instead of one for each stitch. The canvas is 22-count which is quite small, and I wanted the stitching to go more quickly (and to have larger stitches), so I counted over 2 holes for each stitch, rather than 1. So you can experiment with what you think looks best for your project -- very fine stitches or larger ones. You could even count 3 holes for your stitches.
For this border, I just counted the repeats and started and ended where I wanted it to be after doing a little counting to basically center the design on the cuff edge. It was quite simple.

Once the embroidery is done, you easily pull out all the waste canvas threads by pulling the ends. This is particularly easy if you do a border design like this. Pull the short ends first. Trim the canvas closer to the embroidery if you need to. And if any threads get stuck, you can ease it out or trim it carefully out.

One of the things I like about embroidery is that it is up to the individual how it looks, and I like that it doesn't have to be perfect. Mistakes become charm in your designs.

I really like how this came out on my dress cuff!
These folk embroidery kits are great little projects and so much fun! I highly recommend them (they would make a fun sewing project to take on vacation too). Check them out and let us know what you think!

This blog post was written in 2020, but has been updated in 2024.
by Molly Hamilton
I am still working on my project goal of making our 227 Edwardian Gown from a gorgeous grey organic cotton voile and hand-dyed lace. (Fabric and lace naturally dyed from Botanica Tinctoria.) This is honestly the first time I have done lace insertion, and I am quite enjoying it. It is not nearly as difficult as I thought it would be, but it is a lot more time consuming than I realized. Hence, the dress is not finished. UPDATE: See the finished dress here in the photos in the pattern description (not me wearing it though) and above.
However, even though I haven't finished the dress yet, I want to show you the easy lace insertion technique that is used in this pattern so you can more easily do it on your own - for making this dress or the 205 Gibson Girl Blouse or 210 Armistice Blouse or in any project you want to do (napkins and tablecloths would be gorgeous and easy!).
See all our patterns that have lace insertion here. And our collection of lace here.
First, make sure your fabric and lace are pre-washed, or wash them before working on your project. Wash them as you plan to wash you finished garment. This is because if you wash you fabric and not your lace (or vice versa or neither), you can end up with lace that shrinks and fabric that does not and end up with a garment that is distorted or too small. You do NOT want to go through all the work of lace insertion to have this happen. My lace and fabric were pre-washed with very hot water during the dyeing process, so I don't need to worry about pre-washing/pre-shrinking either.
Another couple of tips: make sure your machine is at a tension that works well for your fabric (you don't want it eating up your lace or making it tight); and if your fabric is very fine, you can use spray starch to help sew and use the lace.
Also, make sure you have enough lace to do the project you have in mind. Honestly, I don't have enough insertion lace for this project, but I am making changes to the design to make it work. I bought out all the lace of this color that they had, so I had limits from the start. Which is fine - I am making it work.
There are two types of lace used in this project. First is insertion lace. This type of lace has two sides that are straight (or mostly straight). This lace is "inserted" in the garment and becomes part of the fabric. You need two straight edges on the lace to work.

The other type of lace is called edging lace and can be pre-gathered (or gathered) or flat edging. Lace with ruffles is gathered, or pre-gathered; lace that lays mostly flat is edging. But, both have one side that is mostly straight and one side that is scalloped or has some shaping to it.

We now carry insertion and edging lace in our shop and plan to add more. Check out all the lace and beading options we have here.
Usually, you start insertion lace on pattern pieces before they are sewn to any other pattern pieces. Sometimes you sew over seams, but we'll get to that below.
To sew insertion lace on your garment, you pin the lace down right on top of your garment piece where you want it to be - on the right side of your fabric. For corners, make a mitered corner. For curves, ease around the curve. And, don't cut your lace at the end. This allows for some extra lace that might be needed by the end of sewing the lace down.

Then sew along each edge of the lace. For curves (and corners), sew the outside edge first. I like to pin so that I sew on top of the lower end of the pins on the first edge, then pull them out as I sew long the second edge of the lace.


Welcome back to the 280 Resort Kaftan sew along! For Part 1, go here. We left off at finishing the front of the dress by joining the bodice, band, and skirt front. Today we will finish sewing the dress!
Adding Bodice Ties
Adding bodice ties to the inside of the dress allows you to be able to add some shaping to the kaftan when wearing it. You don't have to add the ties; they are optional. When the dress is finished, the ties are tied into a bow in the back when wearing it, under the dress, and pull the front tighter to the body. If you add ties, you don't have to tie them every time, of course. You can let them hang down on the inside of the dress. But, the dress that I made for the post is too short to not tie the ties each time (they hang down lower than the hem when not tied).
If you are adding ties, cut two lengths of twill tape or ribbon to be at least 25" long. You may want the ties longer, depending on the size you are making and how easy it is to tie backwards.
I used some twill tape we had on hand at the office. Place one end of one tie inside the two Center Front Bands, between the outer Band and the facing Band. Tack down the end to the facing Band (the Band on the inside of the dress). Place the end just over the seam line so that it will be sewn into the seam in the next step.
Note that you cannot finish the seams all in one go once the ties are added. I serged the seams, but skipped the area where the ties were placed. You would need to finish the short ends of the Bands before sewing them in place if you wanted them finished/serged.

The tie is pinned inside the Band facing here - you can see this is the inside of the kaftan.

I tacked the tie down to the inside of the facing with a zigzag stitch on my machine. I could have placed the tie slightly more to the inside so when I stitched the seam in the next step, the tie would be more securely sewn.

Both ties are added to the sides of the front.
Side Fronts
Now sew Sides D to each side of the dress front that we made in Part 1. With right sides together, match the notch on Sides to the seam line where the Skirt Front meets the Center Front Band. Sew from the top front to the bottom hem. Be sure to keep the ties free from the stitching, and watch that no gathers or extra fabric gets caught in the stitching. There is a lot of fabric here, so working one side a time is a good idea -- pin and sew the right side, then do the left side. Press the seams open, but if you are using the ties, you will want to press this seam toward the Side since the ties tie in the back.
 Matching the notch on Side D to the seamline of the Skirt Front and Center Front Band. Right sides are together.

Right side (as worn) is sewn to the front, and the left side (as worn) is pinned together. I finished these seams separately but pressed both toward the back since the ties tie in the back.
Back
Now sew the center back seam, with right sides together and matching notches. I actually cut my back on the fold, so I skipped this step. To cut the back on the fold, be sure to take out the 1/2" (13mm) seam allowance on the center back.
Next sew the shoulder seams. With right sides together place the back to the front, pin the shoulder seams together and stitch. Finish seams and press the open.

Shoulder seams are sewn and pressed open here. The back shoulder matches the the front and side shoulders.
Side Seams and Pockets
The pockets are added to the side seams. For detailed information about adding a pocket to a side seam (and to get a free side seam pocket pattern), read our blog here. Use a measuring tape to decide how far down you want the pockets to lie - usually a bit below the waist and just above the hip. Pin one pocket piece to the front and one to the back (be sure they are at the distance you decided upon) with right sides of pocket to right sides of dress. Stitch the pockets in place with a 1/4" (6mm) seam allowance. Press the pocket open and the seam allowance toward the pocket.
Now stitch the side seam. Match squares at the underarm and notches and pockets. Pin, then stitch from the square under the arm (back stitch to secure) to the top of the pocket and around the pocket bag. I usually stop stitching after I finish the pocket bag. And then start stitching again at the side seam, a few inches above the bottom of the pocket bag on the side seam. Stitch from the bottom of the pocket to the bottom of the kaftan.
Again, you can finish these seams before you start stitching, or you can finish them together or separately. The pocket seam should be finished together. If finishing separately, you can clip back seam allowance just above and below the pocket to release it to face the front and press the seams open.

Pocket placed right sides together on front of the dress.

Pocket pressed open and seam pressed toward pocket. I marked the place where I would start stitching the side seam on the lower part of the pocket. You can see I finished my seam before adding the pocket here.

Stitch the side seam from the square under the arm, down to the top of the pocket, around the pocket, and down again to the bottom.

Side seam pinned at the top square under the arm hole.
Now you need to clip the seam allowance at the square (just where your stitching ends) to the seamline, but not past it.
Turn 1/4" (6mm) to the wrong side all around the arm hole, and turn again. Then stitch from the top of the square under the arm all around the armhole, stitching the hem in place close to the folded edge. When I did this, I actually turned under and pressed 1/2" (13mm), then pressed under 1/4" from that seam allowance. I also turned under the corners of the side seam allowance under the arms and stitched with a short set of stitches (you could whipstitch them down).

Clipping to the square on the side seam below the armhole.

Clip nearly to the side seam but not through the seam allowance.

I turned under the seam allowance by 1/2" (13mm) in the armhole.

Then turned under 1/4" (6mm) from there to the inside of the seam, and stitched close the the folded edge.

The finished armhole!

I finished the top corner of the side seam, under the square by folding the corner to the inside of the seam allowance and stitching in place. This just gave a nicer appearance to the underarm, I felt.
Facings
If you are going to use interfacing for the facings, you should apply it now. Interfacing can be helpful to give a little body and support to fine and lightweight fabrics. You can use another fabric (like a lightweight silk) or regular interfacing. If you are using interfacing, be sure to use something that is appropriate for the fabric you are using (lightweight interfacing for lightweight fabric, etc.). Also, you can trim the interfacing by 1/2" (13mm) on each side of the pattern piece to reduce bulk in the seam allowances. I did not use interfacing for this dress since the fabric had a lot of body already.
Sew the Front Facing pieces together at the center front, with right sides together, from the bottom edge to the center of the square. You don't have to finish this seam since it will not be seen, but if your fabric ravels easily, it is a good idea to finish it. Press the seam open.

The Front Facings with right sides together, stitched from bottom to square.

Center front seam of the Front Facings pressed open.
Sew the Back Facing to the Front Facing at the shoulder seams, with right sides together. Again, you do not have to finish these seams. Press the seams open.

Front and Back Facings pinned together at the shoulder seams.
To finish the outer edge of this neck facing, press under 1/2" (13mm) on the outer edge of all the way around these pieces. You will need to overlap at corners and some curves. Stitch close to the folded edge to secure. Alternatively, you could serge the outer edge of the neck facing to finish it (or zigzag, bind with bias binding, or cut with pinking shears).
 The facing with 1/2" (13mm) pressed to the wrong side, along all sides.

I stitched this fold down close to the edge.
Now, with right sides together, pin and stitch the facing to the kaftan neckline, matching shoulder seams and center fronts. It is best to start and stop stitching at the center front square. If I don't line up my stitches perfectly, I will clip them a bit to get the centers to work well (or unpick and re-do it).

The facing is pinned to the neckline of the kaftan.
It is a good idea now to understitch the facing. Understitching helps keep the facing turned to the inside of the garment. Press the facing away from the dress and press the seam allowance toward the facing. Then stitch close to the seam allowance (1/16" to 1/8" away). You will not be able to get completely to the center front, but that is fine.
Trim, or grade, the seam allowance and clip the curves. Clip the curves right up to the understitching, but try to not clip the stitching. You can clip at right angles to the stitching, or clip at diagonals, and clip every few inches. You can also trim and clip the seam before you understitch, but you won't have much to go by and the clips can get bunched under the presser foot.

A close up of the understitching - the facing is to the left in the photo and the dress is to the right. The understitching is very close to the seamline.

Clipping the curves on the facing and neckline of the kaftan.
Now turn the whole facing to the wrong side of the kaftan and press well. I also recommend whipstitching the facing to the seam allowances at the center back, shoulder seams, and center front. This will help keep the facing in place.
All that is left is to hem the dress. Press up 1/2" (13mm) on the bottom raw edge and press, and then press up another 1" (2.5cm). Stitch in place near the folded edge. For my dress, I had a slightly larger hem since I made last minute adjustments to how short I wanted it. I also don't like cutting my hems too short in case I want to lower the hem line at some point. I used a blind hem stitch which worked great.
Now the kaftan is finished! And share your kaftan makes with us! Send an email or tag us on social media.
I love my new kaftan and will be wearing it often this summer.


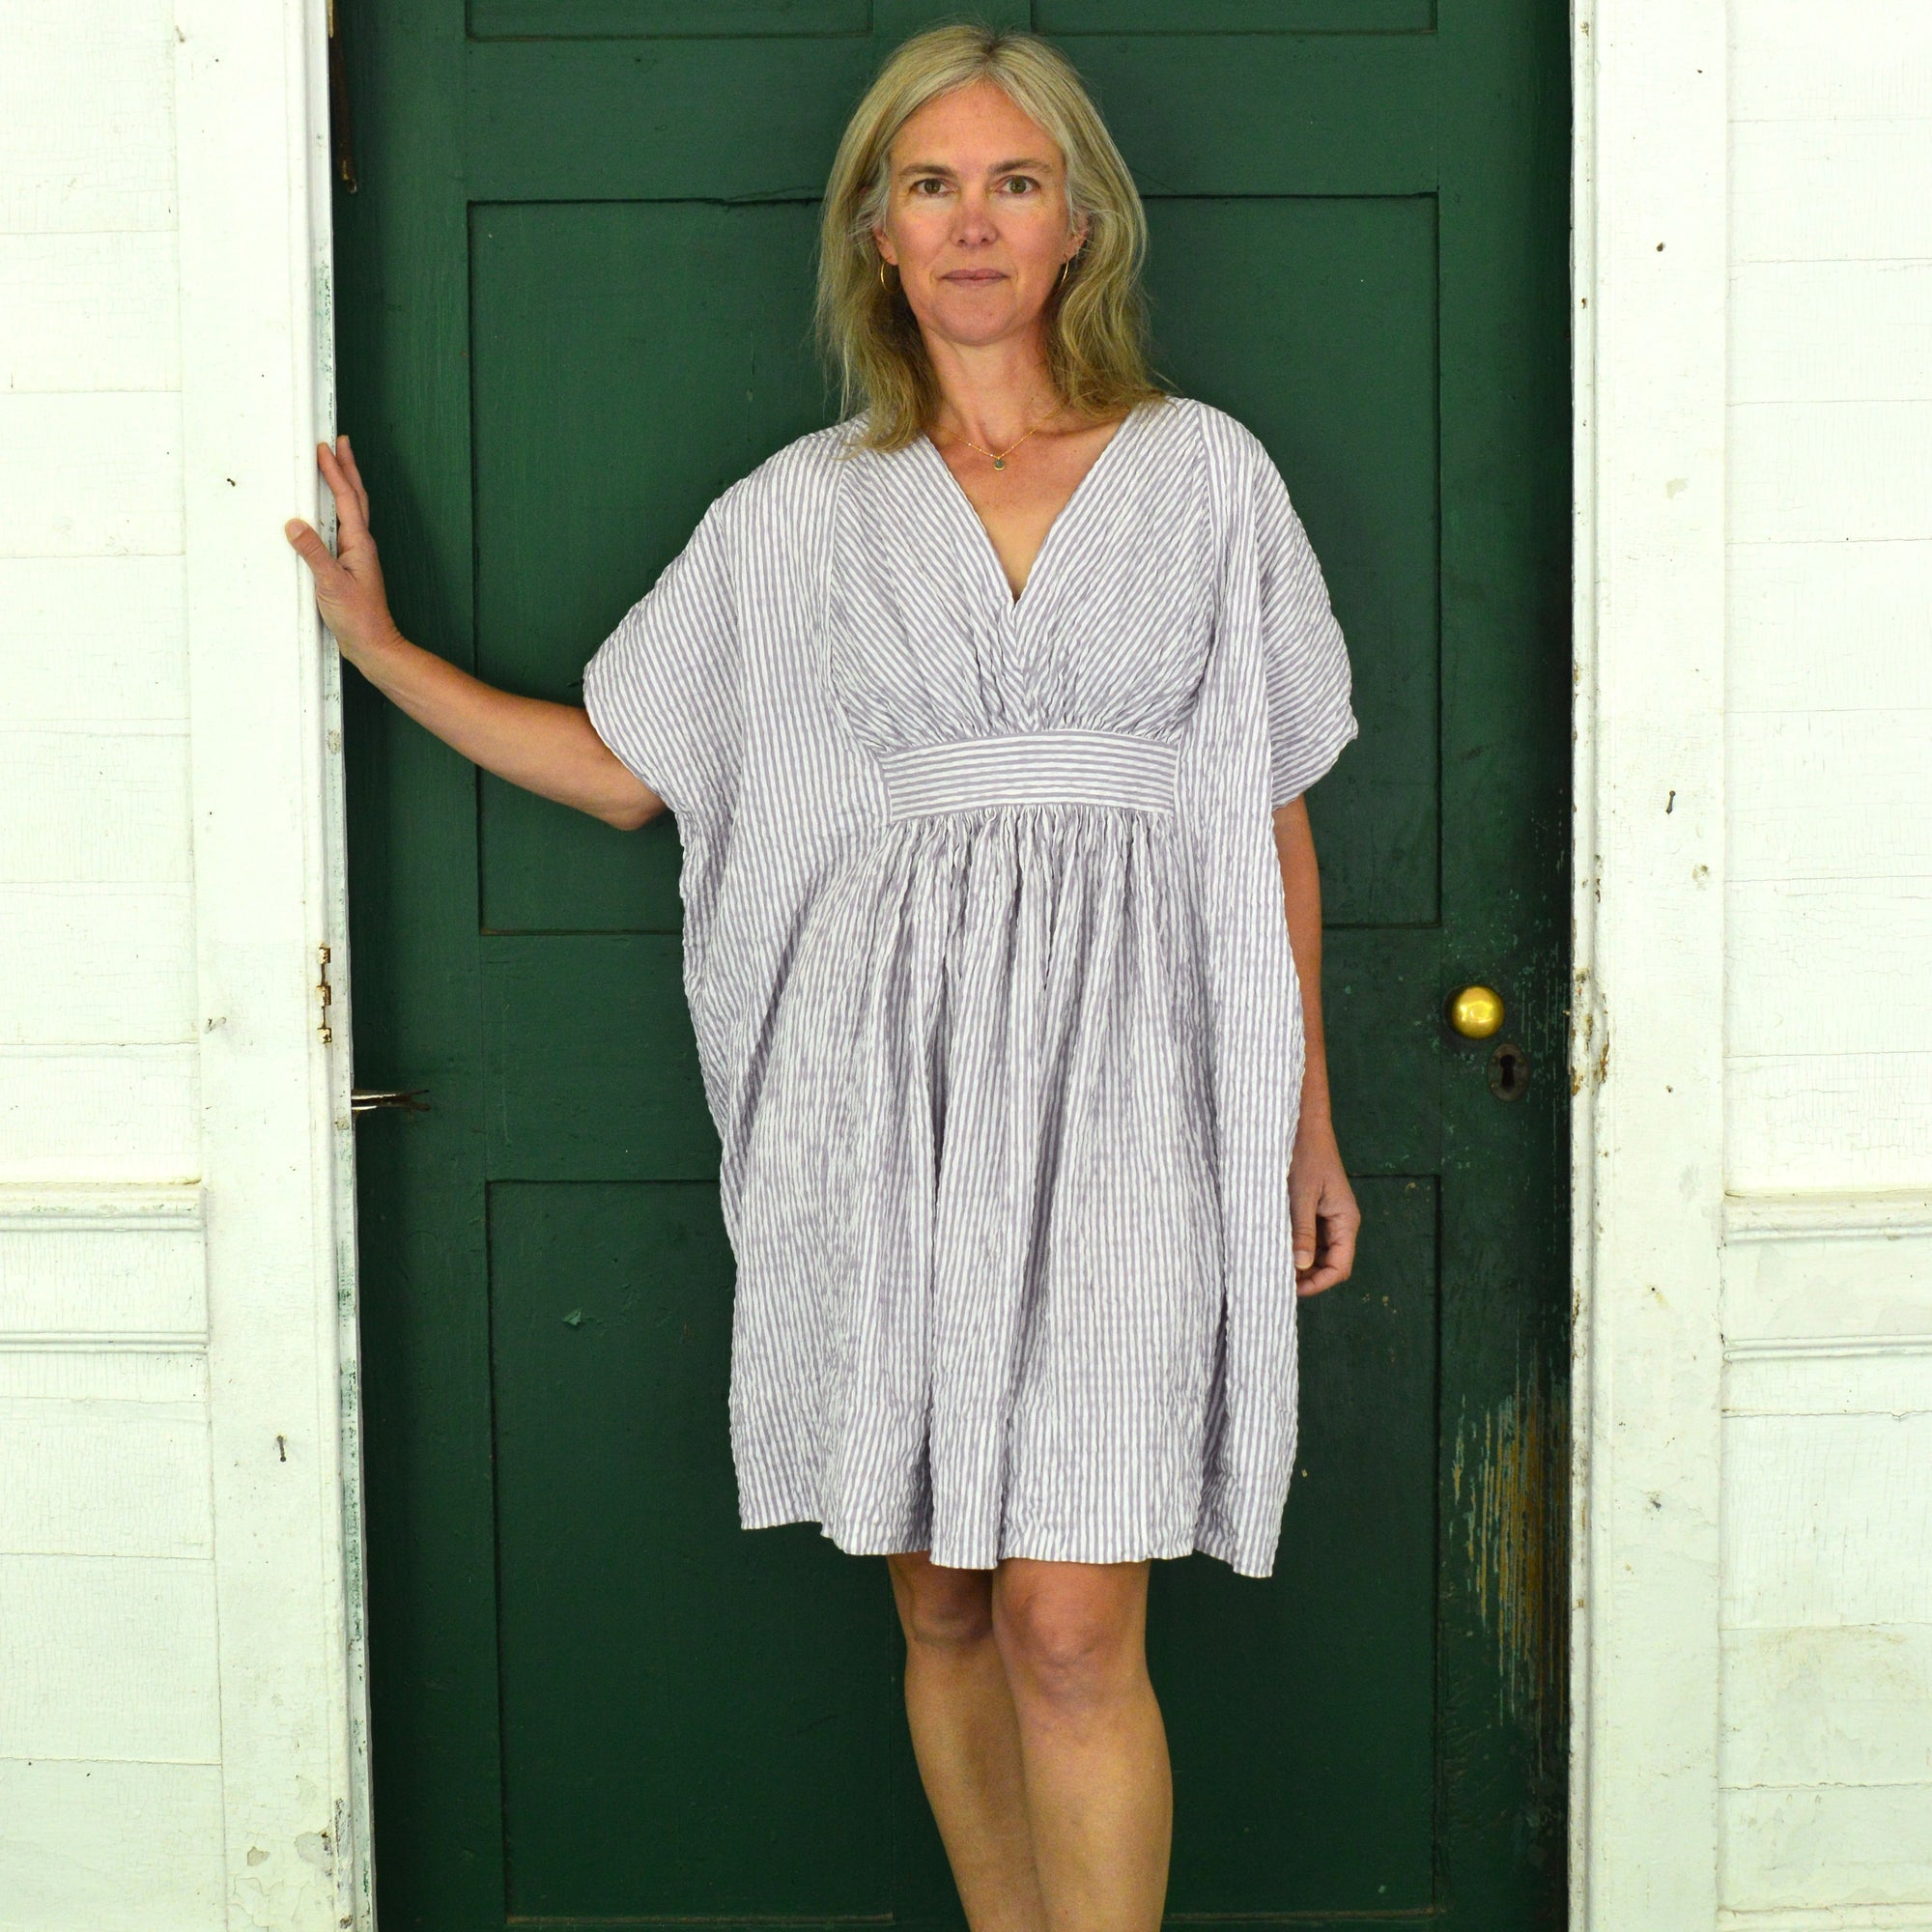
We are so happy to offer this 280 Resort Kaftan pattern! It is an easy-to-sew pattern to make a flowing and fun 1960s/1970s kaftan. The pattern is based on a vintage kaftan that was in our Folkwear garment collection. It features a faced V-neck, gathered bodice and skirt into a small front waistband, elbow-length sleeves, and ankle-length skirt.
In this sew along, I am going to go over the basics of how to make this dress, but I am also going to show some pattern hacks that I used to make this purple Resort Kaftan -- shortening the skirt and adding pockets. But we will start with the basics. This is Part 1; Part 2 is found here.
First, gather your materials!
Fabric
This kaftan is best made with light to medium weight fabric that has a nice drape to it, such as rayon challis, silk chiffon or charmeuse, handkerchief linen, or cotton voile or lawn. However, you could also make it in a slightly heavier or stiffer fabric for a bit of a different feel or look. A medium weight linen (like this Balenciaga linen) would be great and give more body to the dress. A silk dupioni, especially in a print, would make an elegant evening-type dress. A light-weight denim would have a sturdy feel. We had a customer say they were planning to make this pattern in a cotton flannel for winter!
For the dress for this post, I decided to use a seersucker that we had in stock. It is a stiffer fabric and I would consider it on the light side of medium weight. It has a lot of body. It is also a great fabric for summer. I knew I wanted to make the dress shorter with this fabric, so that is one of the modifications I will show in this sew along. And we will be getting some really pretty floral lightweight seersucker fabric soon (deadstock designer fabric) so check back with us. These fabrics will be great for this dress!


Notions
There are very few notions needed for this pattern. Thread, of course. But if you want to interface the facings, you need about 1/2 yard of interfacing. And if you want to add the inside side ties, you will need 50"-75" of ribbon or twill tape. I did add inside ties to this dress and it does make a difference to the shape when wearing it. I like the ties.
Other Supplies
You will also need the pattern, of course, which you can find here.
I also like to use tracing fabric to trace my patterns to cut out (and to make adjustments).
Sizing and Yardage
You can find the sizing and yardage chart on the back of the pattern envelope, in the first pages of the PDF pattern, or at this link (also linked at the bottom of the pattern description).
There is, of course, a lot of ease in this pattern, which makes it fairly forgiving for sizing. Check out the finished measurements to make sure you have plenty of room, but don't be too surprised at the ease. If you want to make adjustments to length, you will likely need to adjust your yardage as well. I made the skirt much shorter (by nearly 14"). If your bust is very large, you may want to make a full bust adjustment to the bodice.
I made a size small for this kaftan.
Cutting out the pattern
Once you have decided on the size you want to cut, cut out or trace your pattern. Again, I like to trace my patterns with this tracing fabric. For large pieces, like the skirts on this pattern, you could cut out the largest size and just fold out the edges that you don't need. This would save tracing fabric and still keep your pattern in tact.
If you are making any adjustments to the pattern, you should do so now. I shortened my skirt pieces (Front, Back, and Sides) by 12" (30.5cm) from the hem line, shortening the whole dress by 13.5" (34.3cm). I wanted a knee-length dress, and I used the finished length measurements (on the yardage chart) to judge how much to shorten the skirt pieces. The skirts are shorted at the hem edge because the side seams are straight edges. You could fold out the length in the lower middle of the pattern pieces instead. If you are lengthening the dress, you can add length to the bottom hems of all skirt pieces (Front, Sides, and Back).

Measuring 12" (30.5cm) up from the hem line. I wanted by skirt about 13.5" (34.3cm) shorter than the original.

Drew in a new cut mark (purple) on the pattern piece.

My new front skirt piece.
Once the pattern is cut out, you can place the pattern on your fabric. I like to wash and dry the fabric (with the same method I would when it is a garment) before cutting any pattern pieces from the fabric. This can be very important for fabrics like rayons which tend to shrink quite a bit.
The Skirt Front (A) can be cut on the fold or cut as two pieces. And, if you don't have quite enough fabric to cut the full width, don't forget that this piece is gathered into the bodice (or waistband of the bodice). So you can save some fabric and be flexible with the width of this piece. I made several of these kaftans by cutting Skirt Front A narrower than the pattern piece and it turned out just fine. So, I wanted to give you permission to do this, especially if you can save some fabric yardage by doing so!
For this dress, I cut Skirt Front A on the fold. I cut the Back and Side Front with the fabric layered so I could cut two at the same time. This was a bit tricky with seersucker (especially striped seersucker) as the fabric does not like to stay straight. I cut it on a carpet which helped a bit I think.

The largest pattern pieces laid out on my fabric on a carpet for cutting.
I cut the Center Front Band and Facings from the same fabric. And, I switched the direction of the stripes for the Center Front Band (still kept the pattern piece on the grainline).

Center Front Bands cut from fabric, on the cross grain.
For the Bodice, I wanted the stripes to go the same way as the neckline, so I cut it on an angle (or bias). I cut each side separately.

Cutting the Front Yoke on a bias angle so that the stripes will be parallel to the neckline.

Cutting the other side of the Front Yoke (note pattern piece is facing down).
I cut the Back and Front Facings as instructed; the Back Facing on the fold and the Front Facing with the grainline parallel to the selvage.
Finally, I cut pockets!
The side seams of this pattern are perfect for adding pockets. And the sturdier fabric of the seersucker made pockets a good idea for this dress. We have a free PDF pocket pattern on our site - you can find it in this blog post. Or you can draw up your own side seam pocket. I used the pocket pattern from our site and cut 4 pocket pieces. You probably won't need any more yardage to get pockets - they can be cut from the scraps of your fabric.

I cut 4 pocket pieces from the free pocket pattern on the blog.
Seam Finishes
All Folkwear patterns include a standard 1/2" (13mm) seam allowance, unless otherwise specified. You can finish the seams in several different ways. For this garment, I serged the seams and pressed them open (sometimes to the back). But, you can also do French seams in most places (at the center front, center back, side front if not using inside ties, shoulders, and even side seams if you clip to the square first). You can also finish by overlocking or with a zigzag stitch. You could also trim very lightweight fabric with pinking shears. Another option is to turn under just under 1/4" (6mm) to the back on each seam allowance and sew down.
Sewing the Front
Since I cut the Skirt Front on the fold, I did not need to sew a center front seam. If you cut your Skirt Front as two pieces, sew them together at the center front and finish the seams. This is a good place to do a French seam, or serge/overcast/zigzag and press the seam open.
Sew the center front seam of the Front Yokes, with right sides together, to create the bodice. Stitch from the bottom of the Front Yokes to the center of the square. Finish the seams and press open.

Front Yokes sewn together at center front. Right side facing up.
Then sew a stay stitching line at 3/8" (1cm) from the outer edge of the neckline. This will stabilize the neckline while the rest of the sewing is happening. Since I cut these yoke pieces on the bias (not true bias, but an angle), the neckline is quite stable already since it ends up being on the grainline rather than on a bias.
Next, sew gathering stitches at the bottom of the front yoke, between the side seams. Sew two rows of gathering stitches (set your machine to stitch long stitches) - one at 5/8" (1.6cm) from the raw edge and one a 1/4" (6mm) away in the seam allowance. Two rows of gathering stitches at this spacing will help to create even gathers.
Draw up the bobbin thread on each end of the gathering stitches to gather the front yoke to fit the length of the longer long edge of one of the Center Front Bands. Be sure to match the center front seam of the yoke to the notch on the Center Front Band. Adjust the gathers to be evenly spaced.

Bottom of front yokes gathered to fit the longer side of the Center Front Band. Wrong sides facing up.
Pin the gathered front yoke to the Center Front Band with right side together. Then pin the other Center Front Band with the right side of the Band to the wrong side of the front yoke. This will sandwich the yoke between the Center Front Bands. Stitch this in place. Then, trim the seams. You can trim all of them down to 1/4" or grade the seam allowance (trim the outer seam allowances a bit shorter than the inner seam allowance - this reduced bulk in one place). Press the Bands away from the yoke front. The band on the inside is now the Band Facing.

Sandwiched front yoke between the Center Front Band pieces (Band Facing is on top).

Trim or grade the seam allowances.

Center Front Bands stitched to the front yoke. Seam allowance is pressed toward the band.
Remove the gathering stitches.
Now sew gathering stitches along the top of the Skirt Front just as you did with the front yoke. And then gather the Skirt Front so that it matches the shorter long edge of the Center Front Band. Adjust the gathers so they are even, and pin the Skirt Front to the Center Front Band with right sides together, matching center fronts. Be sure to just pin the Skirt Front to the Center Front Band and not to the Facing also. Keep the Facing free and away from the stitching. Sew this seam, sewing the Skirt Front to the Center Front Band.
 Bottom of the Center Front Band pinned to the gathered Skirt Front. The Band Facing is not pinned or sewn to the Skirt Front at this point and is facing away.
Trim or grade the seam allowance and press it toward the Center Front Band.
Press 1/2" (13mm) to the wrong side on the free long edge of the Band Facing. Press the Band Facing over the Skirt Front/Center Front Band seam line and stitch in place. I recommend hand stitching this (with a whip stitch), but you could also topstitch this or stitch-in-the-ditch to secure the Facing over the seamline.
 Skirt Front is stitched to the Band and the Band Facing is free.
 I trimmed the seam allowance to reduce bulk. And folded and pressed down the free long side of the Band Facing to the wrong side of the fabric.
 I folded the Band Facing over the seamline of the skirt and band. This is from the wrong side of the kaftan front.
 Then I pinned the Band Facing in place and whip stitched the facing over the seamline.
In the next part of our sew along, I will show you how to add the ties to the bands on the inside, add pockets, and we will finish sewing this kaftan!


