- Home
- About
-
Shop
-
Sewing Patterns
-
Fabric
- Sewing Supplies
- Folkwear Clothing
-
- Blog
- Customer Gallery
- Contact

By Esi Hutchinson
A couple years ago, Cynthia, a former Folkwear employee, had the idea to make Folkwear's 229 Sailor Pants into a skirt, but we never had the time to make it happen then. But what a terrific idea! Since Folkwear is featuring the pattern this month, I decided to finally do it. This blog post will show you how I made the pants into a long skirt with waist darts and a bottom back slit for walking.
To make these adjustments, you will need tracing fabric or paper (you can purchase here). I've also found medical table paper to be great for this. You will also need a pencil, different color fine markers or pens, sewing measuring tape, ruler, and a French curve (optional).
First, refer to the sizing chart on the pattern to trace the Front/Back Pant A piece in your size. I traced a Size 30 using a brown marker to indicated that this is the original pattern piece (see photo below). I choose Size 30 because the hip measurement for size 30 fit my hips. My waist measurement would have been a Size 28. This pattern is drafted from a men's pant, so some women may need to make waist/hip adjustments (you can read about this here). For this tutorial, I think it is best to pick the size that fits your hips the best.


To lengthen: Slash between adjustment lines. Place paper underneath and spread pattern apart as necessary. Pin or tape added paper to pattern. To shorten: Make a pleat on adjustment line equal to one-half the amount you want to shorten.


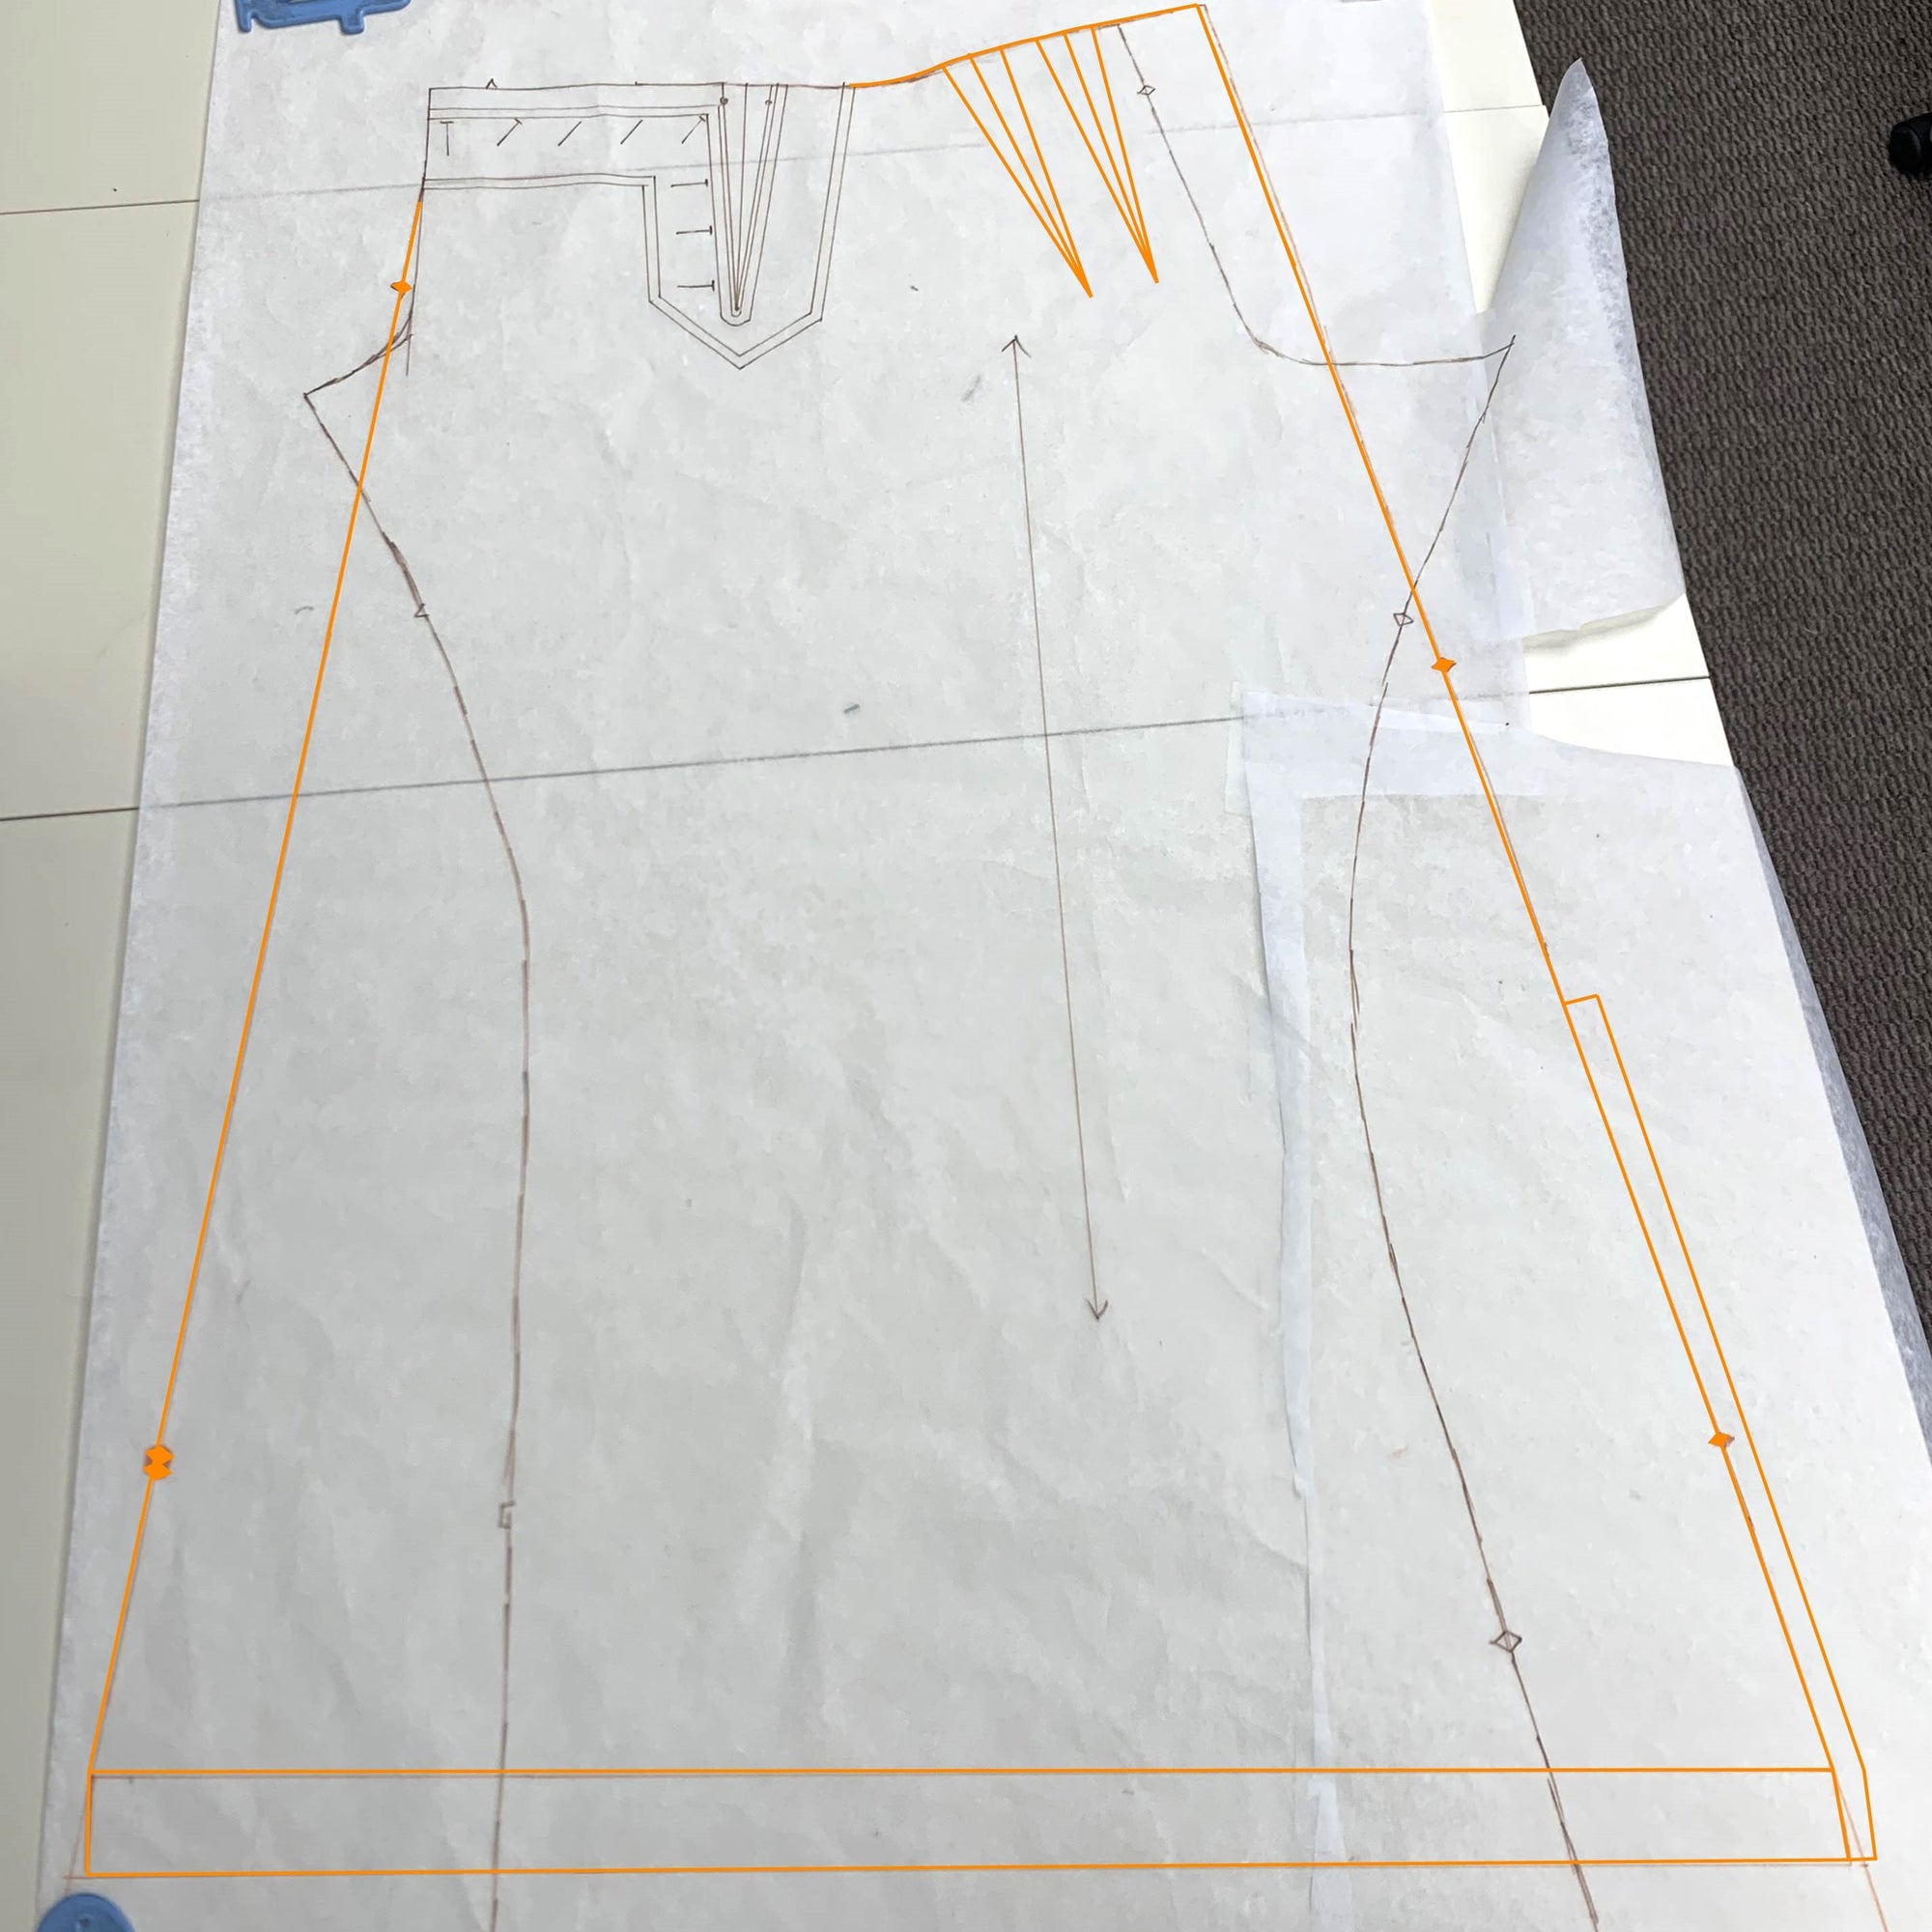
Since I knew I wanted the width of my skirt to be 60" (152.4cm) at the bottom, I knew for this pattern piece, the hemline width needed to be 31" (78.7cm) (30 inches for 1/2 the width of the skirt at the bottom and 1/2" seam allowance on each side).
From the point where my left side cutting line and hemline meet, I can measure out 31" (78.7cm) to the right to get where my back seam line at the bottom will be.

My hip measurement is 40" (101.6cm) and I wanted to add 4" of ease there, so I added 2" to this pattern piece at my hips. I went to where I marked my hips would be on my pattern piece A (just above the bottom of the crotch and draw a horizontal-ish line 22" (56cm) out to the right side of my pattern piece. Note that this pattern piece curves a bit as it wraps around the hip. You'll just make your lines parallel (-ish) to the waist of the pattern piece.

Then, I drew a diagonal line connecting my new hip line to the hemline on the right side. I extended this line toward the waist. I know that my waist is 28" (71.1cm) and I want the final width of my skirt at the waist to be 29" (73.7cm) (28" plus 1" of ease). However, this new side seam had now widened my waist line by 3" (7.6cm). To take out the extra width at the waist, I added darts to the pattern piece. I also added notches to both cutting lines on the right and left side seams and squared off the bottom cutting line to line up with the hem.


I decided to make two darts on that will end by my hipline which is now 7" (17.8cm) below the top of the pattern piece because I shortened my by pattern piece by 2" (5cm).
Starting with the dart closest to the center back, I drew the center fold line 7" (17.8cm) long and 2-3/4" (7cm) in from my center back cutting line. I also made this line parallel to the right side of the pattern piece (or cutting line). I then measured 3/4" (1.9cm) on either side of the center line of the dart and connected these dart legs to the bottom point of my dart. I made the second dart 3/4" (1.9cm) away from the first one in the same way.
I also wanted to add a slit at the back of the skirt for ease of walking. I decided my slit would be 19-1/2" (49.5cm) long. I measured up from the bottom and marked where the slit would end. Then I added 1/2" (13mm) seam allowance from the hem up to the slit mark. I planned to fold out 1/4" (6mm) and another 1/4" (6mm) in the seam allowance and topstitch on both folded edges of the slit.

The finished pattern piece A is above! I only wanted to change this piece and keep all the other pieces of the pattern the same. This makes the skirt so much easier to make! I made a muslin to see if it worked for me. I highly suggest making a muslin to troubleshoot this project before making it out of your final fabric. Better to be safe than sorry. There have been too many times I've skipped making the garment out of muslin, so I have definitely learned my lesson.


Darts on the backside (normally there would be a center back gusset where my hand is, but I will be using a full back seam).
The muslin worked out great! If you need to make more adjustments to the waist or hips, do so with what I have taught you above (or what you may already know) and make another muslin just in case. I was ready to sew the skirt with my garment fabric.
In Part 2 of this post series, I will show you my finished skirt!


Hazel Hardy
April 15, 2024
The skirt is a great idea! I never wear trousers, but I love the buttoned up front, and I’d definitely wear a skirt with that look. Looking forward to seeing the finished skirt, then I’ll get on and order the pattern to amend.