-
Sewing Patterns
-
Fabric
- Sewing Supplies
- About
- Blog
- Gallery
-
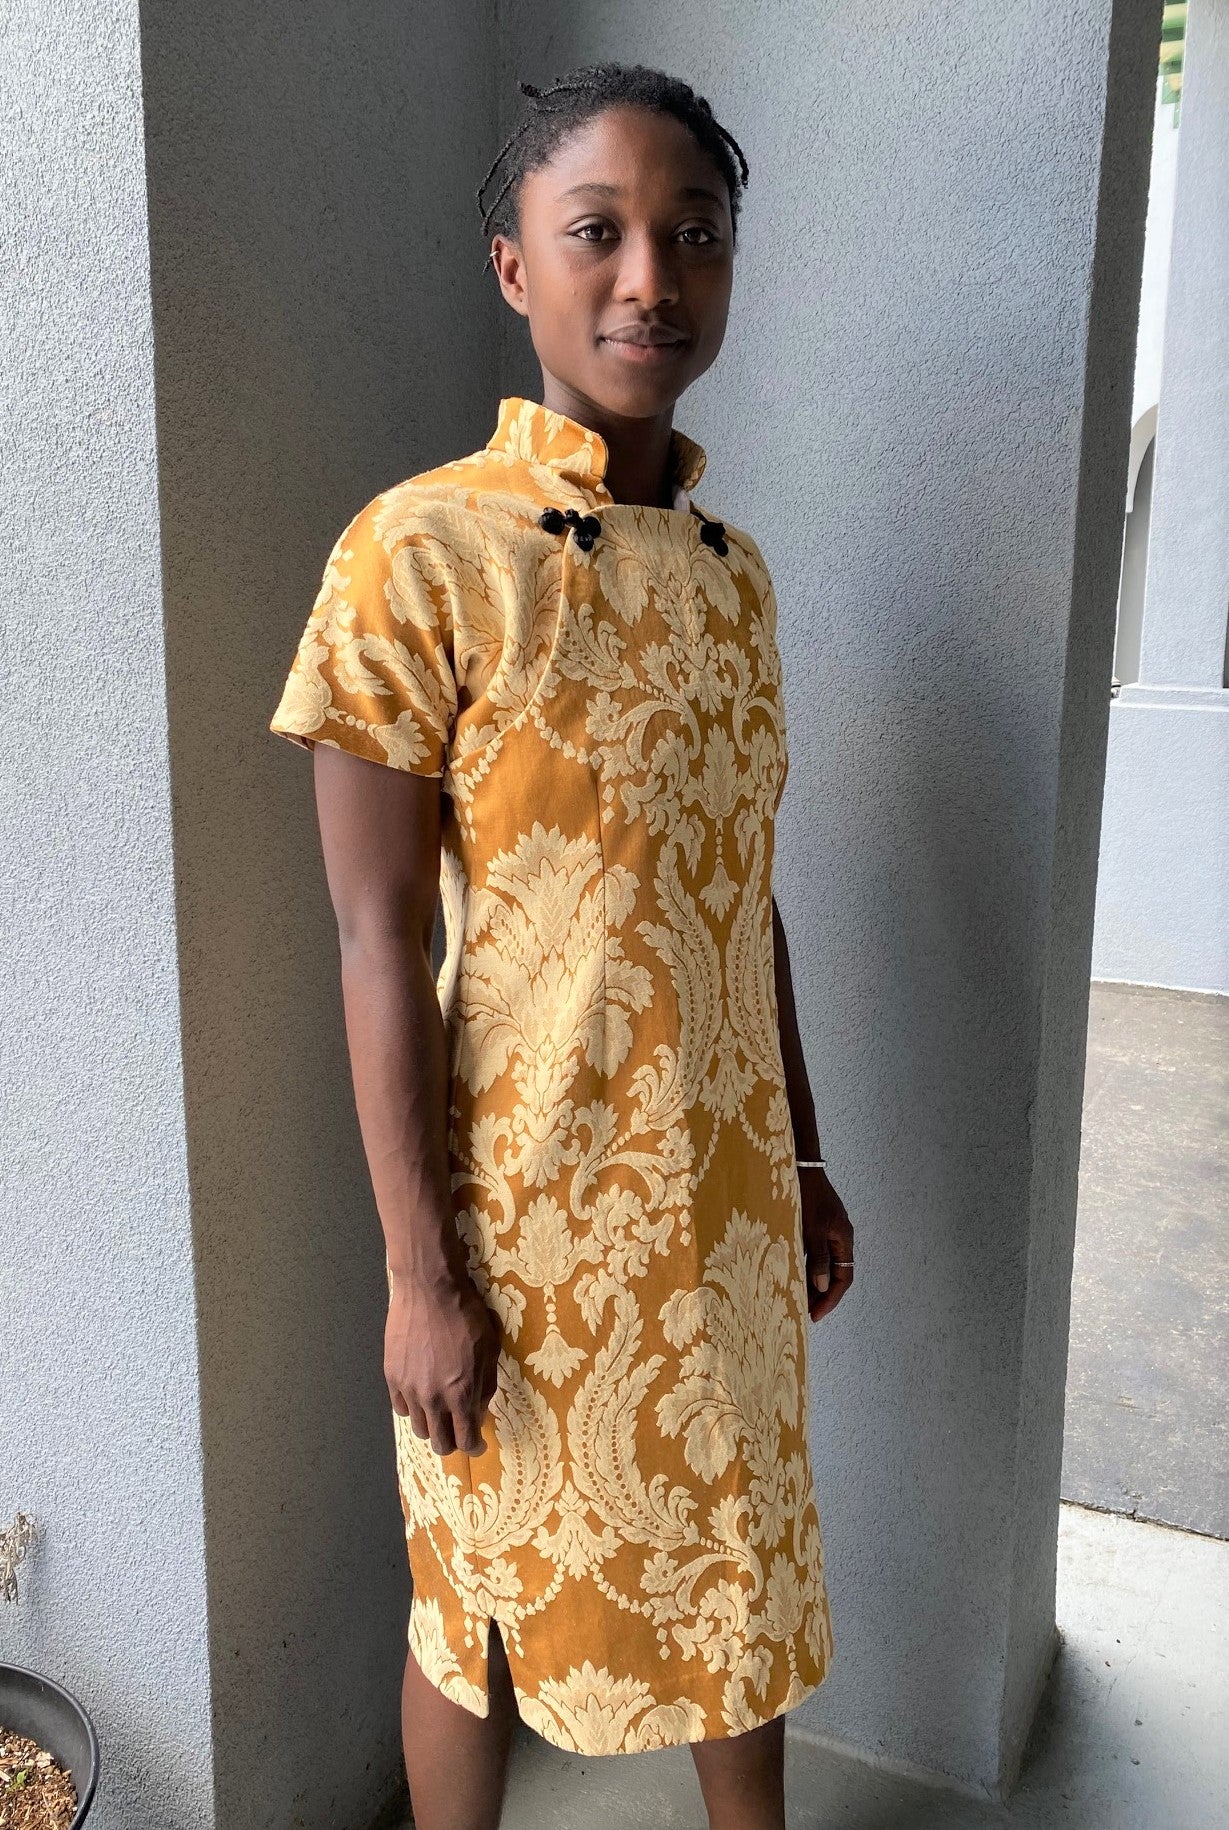
I have long admired this dress design and was thrilled to finally get the opportunity to make it! The slim body hugging curves have an allure that make the 122 Hong Kong Cheongsam dress so captivating. This dress is a beautiful blend of Chinese tradition and urban Western influences that emerged in the late 1920’s. It has an undeniable glamour that conjures up all kinds of elegant notions. And for sewists, what makes this elegantly provocative silhouette even more appealing is how simple and easy it is to make!
This 122 Hong Kong Cheongsam dress pattern is a pleasure to make, plus it goes together amazingly fast. If you need a fabulous dress at short notice, this one can be done in just an afternoon's worth of sewing.

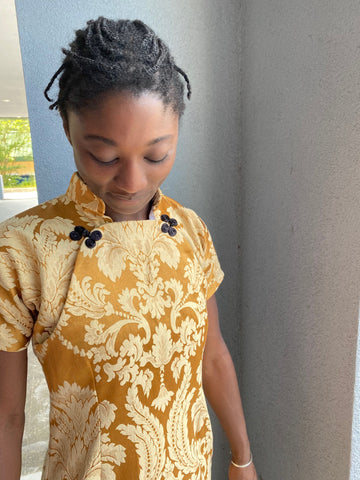
Now, that I have expressed the virtues of this dress, there are a few suggestions and hints I would like to share to make it even easier to sew. I made this particular dress as a sample for Folkwear, modeled here by Esi, and it is a great example of some techniques that are helpful for this pattern and which can be applied to other garment sewing.
I will be covering 1.) Using Directional Print/Design Fabric and 2.) Helpful Hints for Attaching Snaps
1.) Using Directional Print/Design Fabric
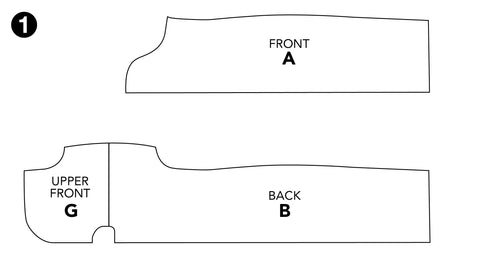
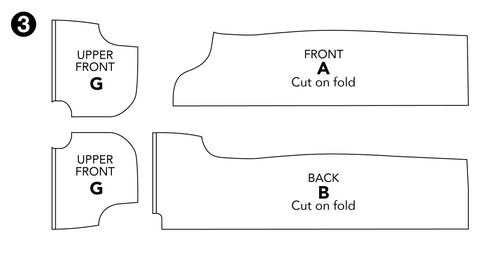
The front and back pattern pieces are each cut on the fold, which makes this a simple dress to construct. The back of the dress is comprised of two pieces in one. Notice the upper Font G and Back B are all one piece. See Illustration 1 below.
So this dress is literally only two pieces - a front and a back (pictured below). If you are using a solid fabric or a fabric with a non-directional print/design, this beautiful pattern has absolutely no issue what so ever. However, if you are using a directional print or napped fabric, you will probably want to make a few changes, as we did with the dress in this post.
If you are using a one-way-directional print/design (a pattern, print, design, or texture that runs up and down the fabric) as I have with this dress, then I have a few helpful hints to offer.
Matching the Pattern
The fabric I chose to use is made of a woven damask with a large one-way-directional pattern/design. Because the pattern is large, I decided that it was crucial that my front and back dress pieces be cut exactly the same, so the pattern would match at the side seams. It would look like a mistake if the pattern/design did not match at the side seams, especially considering how large the pattern/design is.
To address the matching, it made the most sense, to start laying and matching my pattern design from the bottom edges of both the Front A and Back B pattern pieces. I knew this would ensure that the sides seams would match. So far this is all straight forward. The Front A and Back B pieces match perfectly, having aligned the pattern working from the bottom edge of the dress up towards the shoulders.
Upside-Down? No worries.
Because the upper front and back of the dress are cut as one piece, and the fabric I am using has a one-way-directional print/design, the upper front is going to be up-side-down when worn unless I make a change to the pattern. This is because the back/upper front pattern piece goes over the shoulders from the back, meeting the front pattern piece at the chest. So with a directional print/design, the upper front will actually look upside down.
Upside Down Fix
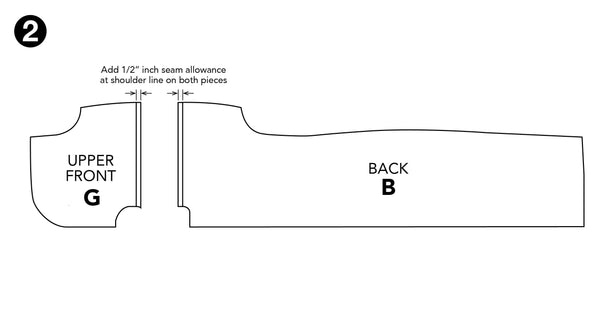
This issue of upper front being upside down can easily be remedied, by separating Upper Front G from Back B of the dress at the shoulder line indicated on the pattern. We will need to create a shoulder seam. All we need to do is cut the two pieces apart at the Shoulder Line and add 1/2 inch seam allowance at the shoulder line to both the Upper Front G and Back B pieces. See the illustration 2 below.
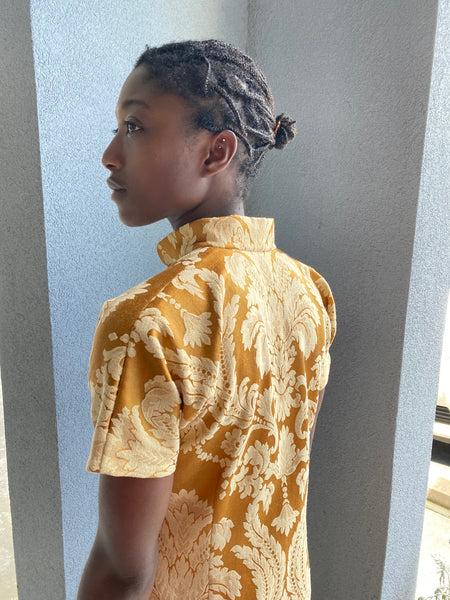
You can see the shoulder seam here that allowed the front to be turned so the design would be correctly positioned on the front of the dress.
Reposition Upper Front G
Now, that Upper Front G has been detached from Back B, the Upper Front G pattern piece simply needs to be turned around and placed on the fabric, so the one-way-directional pattern/design of the fabric is not upside down. The two Upper Front G pattern pieces should be placed as mirror images as seen below in Illustration 3. You should have pattern pieces Front A, Back B, which will both be cut on the fold. And cut two of Upper Front G . See the illustration 3 below.
Cut Out the Fabric
Now, that the pattern pieces are all sorted out, lets cut out the 122 Hong Kong Cheongsam dress. Place, and cut, pattern pieces Front A and Back B on the fold. Be sure to match the pattern/design from the bottom edges of both the Front A and Back B pattern pieces.
Cut two separate Upper Front G pattern pieces. In most cases you would probably want to make sure these pieces are also cut so the pattern is matching on each side. Because of the mirrored-image pattern/design of my fabric, I decided to cut the two Upper Front G pieces as mirrored images of each other.
Once all your pattern pieces perfectly aligned, matched-up, and successfully cut out, your fabric pieces should look similar to the pieces below when Front A and Back B are unfolded. Notice how the pattern/design for the front and the back are the exact same.
The two Upper Front pieces should look something like what you see below. Of course, your pattern/design will be different from mine. See illustration 4 below.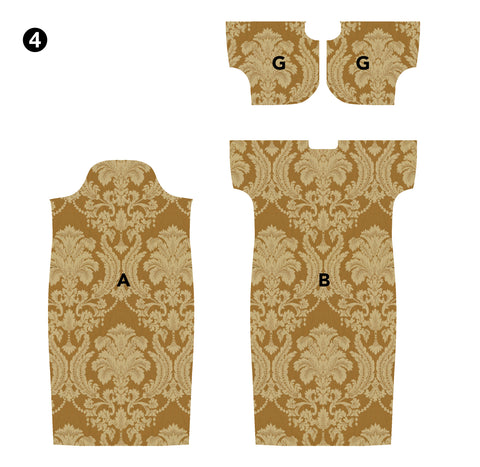
Now, continue to assemble your Hong Kong Cheongsam dress according to the pattern instructions.
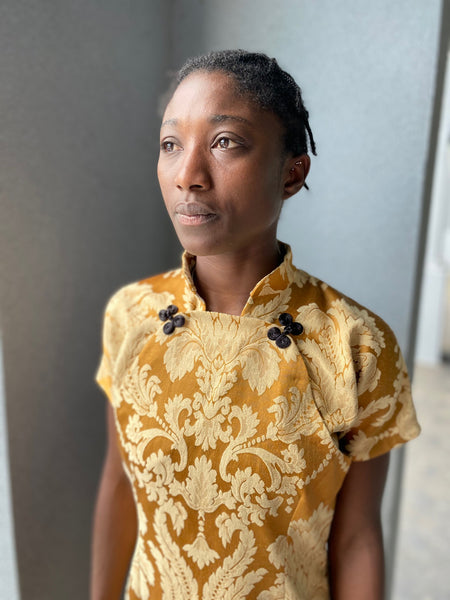
You can see the upper front fabric design is right-side-up at the shoulder areas, matching the design alignment of the front piece of the dress.
2.) Helpful Hints in Adding Front Hidden Snaps
Once the dress is constructed, the two pieces consisting of the front of the dress need to be secured to each other. Front A and Upper Front G become one to complete the interesting front design of the dress. The front of the dress opens and closes along the curved edges of Front A and Upper Front G, with hidden snaps to secure. Adding a bit of fusible interfacing will help the snaps work better and allow the front pieces to lay flatter.
Sandwich a small piece of fusible interfacing (about 1"x1") between the wrong side of Front Facing C and the wrong side of Front A as seen in the photo below. Position the piece of interfacing under where each snap will be sewn down. This bit of interfacing will help to catch the needle and thread when sewing on the snaps. The idea is to keep any sign of the underneath snaps invisible on the front of the dress.
 A bit of fusible interfacing helps to prevent catching the right side fabric of the front of the dress when sewing on the snaps.
Note: I have faced the Front Facing C with white interfacing. It is perfectly acceptable to turn the Front Facing C edge under using the 1/2 inch seam allowance as the pattern suggests.
 A reinforcing piece of fusible interfacing positioned under the snap.
Another technique to help prevent snaps from damaging your fabric is to add a scrap of fabric directly under each part of the snap. Each snap consists of two pieces that mate together when closed. Cut a small round of scrap fabric to place directly under each mate piece of the snap for a bit of reinforcement and protection. The back if the snap can be sharp and with enough detaching and reattaching of the snaps over time, the friction can damage the fabric.
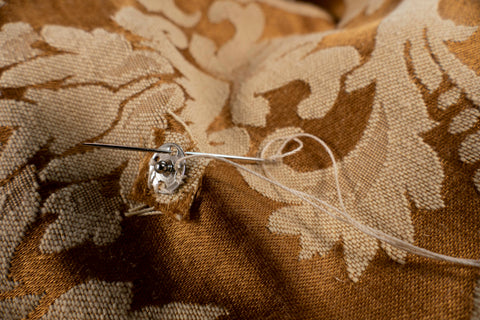
 Stitch the snap using a whip or blanket stitch, being sure to catch just a bit of the fusible interfacing underneath.
Align both mate pieces of the snaps and secure using a small scrap of fabric to strengthen and protect the fabric of the dress.
 Snap mate being stitched on the dress with a scrap of fabric for reinforcement.
Depending on the size of the snaps you use, will in part determine how many snaps you use. You may find using a larger number of tiny snaps is preferred over using a smaller number of larger snaps depending on the weight of your fabric. More tiny snaps tend to work well on lighter weight fabrics and larger snaps tend to work better on heavier fabrics.
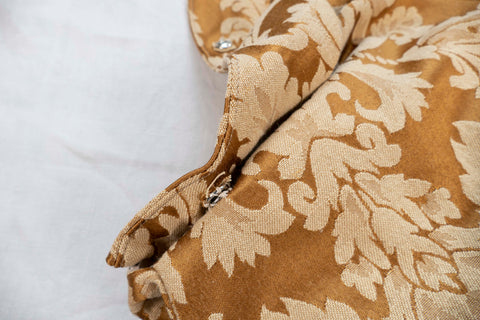
Snap mates all aligned and reinforced with a scrap of fabric underneath each snap mate.
After you get all your snaps sewn on, be sure to have a look at the decorative frog closure instructions included in the pattern. I made the easy frog closures out of black satin rat-tail. Remember that the frog closure are meant to be decorative, so put a utilitarian hidden snap closure under or nearly under the frog closure to be sure the two frog closure mates stay securely in place when closed.
I hope you find the thoughts and hints I have provided in this blog to be helpful. Sometimes, even though a pattern can be very simple to construct, being aware of a few little details can make all the difference in how pleasurable the project goes and how well it turns out. There is so much to know when it comes to sewing, therefore it is my hope and intention to provide you with as much frustration-saving-advice as I can think to provide.
As always, everyone at Folkwear hopes you are all well. We look most forward to seeing what you create using Folkwear Patterns. Hope you give the 122 Hong Kong Cheongsam dress a try!
Sew Well,
Cynthia


Mary Janet Beasley
January 25, 2025
i haven’t made anything in awhile, but this dress is gorgeous, and so simple – who knew?! The directional print is fabulous and i want one :-D i’d like to make one for a dear friend too