Skip to Content
    • Log in
    • Cart (0)
    • Checkout
    Menu
    • Home
    • About
    • Shop 
      • Sewing Patterns 
        • Folk Patterns
        • Vintage Patterns
        • PDF Patterns
        • Men's Patterns
        • Children's Patterns
      • Fabric 
        • Linen
        • Cotton
        • Silk
        • Wool
      • Sewing Supplies
      • Folkwear Clothing
    • Blog
    • Customer Gallery
    • Contact
    News

    Sewing the Basics Tunic

    February 04, 2022 5 Comments on Sewing the Basics Tunic

    Sewing the Basics Tunic

    by Victoria Watkins

    When I was developing the cover illustrations for our Basics line, I tried on a sample of each and took a photo of myself wearing them to have a reference to draw from. When it came time to document our tunic, I was enamored with the fit and drape. As such, I was thrilled when Molly asked me to do a sew-along with our tunic pattern with permission to keep the end result for myself.

    If you've read any of my fabric suggestion blogs before, you might've noticed that I always want to sneak in a playful, bold fabric. I am a fiend for a loud print, so when I saw this exciting cotton voile from Mood Fabrics, I knew it was perfect for this project. In my view, something airy with a gentle drape would be elegant with this pattern. 

    Cutting out the pattern: 

    This pattern only has three pattern pieces - the front/back and the facings.  All are cut on the fold of fabric.  You should choose a fabric that is wide enough to fit the size you need. 

    I tend to trace the pattern with tailor chalk onto the fabric before cutting it out.  This allows me to see the fabric and the print when I am cutting without paper being in the way.  
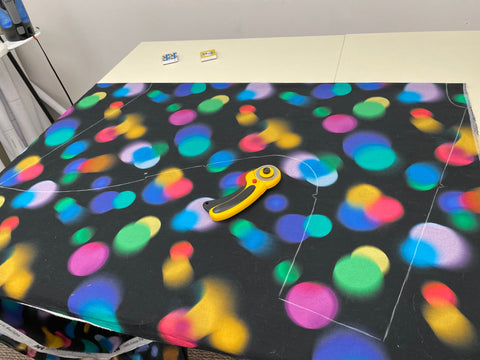
    Fabric with colorful polka dots on a black background, laid out on the table to be cut into garment pieces

    One trick I've picked up since I've started sewing more often is my way of marking notches in the cut fabric pieces. Before, I'd cut the notches outward as little triangles just like the pattern pieces, but now I make a small snip within the seam allowance to mark my notch. I find this so much easier to do, though it does take a keen eye to keep track of them all!  And it may not be the best choice for certain fabrics.

    A notch cut into fabric for the purposes of sewing
    Beginning sewing:
    Before doing any seaming, there are a couple preliminary stitch lines to do, and I highly advise you not to skip them. The first is stay-stitching along the neckline of the front and back pieces.  This keeps the neckline stable for applying the facing.  The second is a stitch that serves as a guideline for where the back slit will be stitched to the neck facing. The back slit stitching made the facing super easy to sew on, so don't forget it!
    After this point, you're free to sew the shoulder seams together.

    Stay-stitching along a neckline
    Staystitching within the seam allowance of the front neckline.

    Stitching guides for where the back slit will be stitched to the neck facing.
    The guideline for the back facing - beside the back slit.  You can also taper this toward the point of the bottom of the slit.

    Next, the interfacing must be applied to the inner neck facing. I have a couple thoughts on this. First, use a light-weight interfacing, obviously, if you're working with a drapey fabric. Second, I wish I thought to cut the interfacing about 1/2 inch (13mm) smaller around the seam allowances than the neck facing piece. This is because I chose to finish the neck facing by turning under 1/4 inch (6mm), pressing, turning another 1/4 inch (6mm) under, and then stitching close to the edge. The added interfacing made this difficult and added bulk, and I had to clip the curves on some of the more extreme areas for the first press of the hem. You could also overlock or zig-zag stitch both interfacing and fabric facing edges together, though I don't know if I'd have liked the look of that.  Either way, I'd recommend planning ahead to figure out the best method for what you'd like to do.

    Ironing on interfacing to a piece of fabricApplying interfacing to the facings.

    Clipping the curves of the neck facing
    Clipping the seam/hem allowance so I could turn the edges.


    Once that's done, it's time to sew the facing to the neck. First, I sewed around the curve of the neck, then sewed the back facing along the slit with the guidelines which I sewed earlier. Once that's done, I slashed along the slash line as marked in the pattern, and then trimmed the seams and cut into the corners of the bottom of the slit carefully but thoroughly so it would sit nicely when flipped around.  I pressed carefully and well after flipping the facing to the wrong side.  You could understitch the facing at this point as well.  That will help keep the facing to the inside of the tunic. 

    The facing sewn on along the slit lines

    Cutting a back neck slit along the slash line

    The other way to keep the facing to the inside of the tunic is to  tack the facing down at the shoulder seams. Below you can see that I've hand-stitched through the shoulder seam allowance and the facing on the inside. You could also invisibly tack the facing with thread that matches your fabric color along other areas of the neckline if you wished.  You could also topstitch the facing. This could add a design element to your tunic as the topstitching will be seen from the outside.

    Tacking down the neck facing to the seam allowance of the shoulder seam
    Tiny tacking stitches to keep the neck facing in place.

    I finished my side seams with pinking shears and my shoulder seams with a serger - trying different options. 
    The side slits start at about hip-height, and add to the already gracious ease of the garment. 


    All that's left is hemming!  When I was sewing, I used a print-off of instructions that were an old copy before it was edited, so I actually pressed 1/4 inch, then another 1/2 inch! It's supposed to be 1/4" (6mm) and 1/4" (to total 1/2"/13mm). I found it a little hard to hem around the curves of the side slits and the bottom hem when taking this much fabric into the hem, so I'd recommend adhering to the 1/4" (6mm) you're supposed to hem. In my excitement over hemming this piece, I didn't take any photos, but here is a finished image of me wearing it!

    Victoria wearing their finished tunic

    For closures on the back neck slit, you could use a hook and eye (which is what I've done), or you could check out a blog in which our Cynthia has done a fantastic job detailing how to create loop and button closures.  You could also leave the opening without a closure.  


    I'm very pleased with the finished product, and I'm very grateful to get to keep it for myself. I think it's one example of how fabric choice can really elevate these simple patterns!


    Tweet Share Pin It Email

    5 Responses

    Molly Hamilton
    Molly Hamilton

    May 16, 2022

    Hi Lisa. You can shorten this tunic at the side notches. Fold out half of the length you want to shorten it. Then you will need to true the lines to get a smooth line between the folded out/shortened section.

    Lisa Evans
    Lisa Evans

    May 09, 2022

    How do you shorten this? I’m 5’2" and wear a size 16-18 normally, and the larger sizes on this garment all but drag the ground. ?

    Selina
    Selina

    February 20, 2022

    Love it

    Selina
    Selina

    February 20, 2022

    Love it

    Carolyn Wallace
    Carolyn Wallace

    February 15, 2022

    My mother, long departed from this world, used to cut small notches into the seam. I did that for awhile, but have since stopped. I might start doing it again because I remember that I was more accurate with notch placement.

    Leave a comment


    Also in News

    African woman wearing the 147 Bunad, White blouse, red vest with embroidery, royal blue skirt and white embroidered with silver thread apron. She is standing outside in front of a brick building with greenery behind her.
    147 Norwegian Bunad Apron Sew Along

    April 30, 2025

    Continue Reading

    African woman wearing a white bunad blouse and royal blue pleated bunad skirt standing outside in front of a brick building and smiling with hands in her pockets.
    147 Norwegian Bunad Skirt Sew Along

    April 28, 2025 2 Comments on Sewing the Basics Tunic

    Continue Reading

    African woman wearing 147 white bunad blouse and red vest standing in front of a bring wall. With hands raised to the hem of the vest.
    147 Norwegian Bunad Vest Sew Along

    April 17, 2025 1 Comment on Sewing the Basics Tunic

    Continue Reading

    More Info
    • Patterns
    • Fabric
    • Blog
    • Stockists
    • Wholesale
    • Policies
    • Search
    Sign up for our newsletter

    Sign up to get the latest on sales, new releases and more…

    Contact Us

    info@folkwear.com

    P.O. Box 732, Fairview, NC 28730

    Office/Studio: 240 Clingman Ave Ext, Asheville, NC 28801

    828-628-2049


    © 2025 Folkwear. Powered by Shopify