-
Sewing Patterns
-
Fabric
- Sewing Supplies
- About
- Blog
- Gallery
-

by Cynthia Anderson
Learning how to make bias tape for binding is a liberating skill and one every sewist should have in their arsenal. Understanding all the possibilities available to you when faced with any task, gives you not only more options, but added confidence. In this blog you will learn how easy it is to make your own bias tape and how to use it to create a neat and clean finish to any raw fabric edge. You will then learn how to apply this same technique to make a front button-loop closure.
Bias tape can be used to cleanly finish the raw edge of fabric. The raw edge of the fabric is sandwiched between a strip of folded bias tape and stitched together to keep the fabric from unraveling and to create a finished edge. The bias tape is cut on the bias to allow it to slightly stretch and give, making it easy to smoothly go around curved edges. This is extremely important when binding a neckline or armhole. This finishing technique is used in any number of applications, like luggage and handbag construction... but most commonly used in making quilts and clothing.
There are a number of Folkwear patterns that incorporate bias tape binding! For this purpose of this blog, the Folkwear 108 Turkish Dancer pattern is featured. This pattern includes three easy to make and wear basic garments, an Entari (robe), vest, and cropped jacket. All three garments incorporate finishing edges using bias tape. And the Entari and vest both have a front closure made of button loops, using the same bias tape technique. Learning to make bias tape will open up a whole new world of sewing possibilities, and the 108 Turkish Dancer Entari is the perfect piece to entice and inspire you!
You can always purchase bias tape binding. However making your own is not hard, and it saves money, and helps give your scraps new purpose. And your creativity has no bounds!
Making Bias Tape
There are endless schools-of-thought, when it comes to making bias tape. However, the technique used in this video is ingenious and well worth learning, especially if you require copious amounts of binding and have a limited amount of yardage. This technique is also perfect for using up the scraps in your cabbage bin. The discouraging part of making your own seam binding often comes from the toil it takes to create one continuous strip that is long enough to meet the requirements of your project. While making bias binding is not hard, it can be bothersome to not have enough. This video is is a game changer!
Using a Bias Tape Maker
Once a long continuous strip of bias tape is cut to the width you plan to work with, the easiest and quickest way to make bias tape is to use a Bias Tape Maker. This handy tool is easily found where sewing notions are sold and are available in five different sizes; 1/4"(6mm), 1/2"(12mm), 3/4"(18mm), 1"(25mm), and 2"(50mm). We have three commonly used sizes in our shop.
It is important to predetermine the size (width) of binding you intend on using, before you cut any strips. Typically, the pattern will provide you with a recommended width and length. In order for your bias maker to make neat and tidy folded edges, you need to use a strip of fabric that is appropriate size for the size of maker you are using. The width of the small end of the maker is the width your bias tape will be. This small end is half the width of the large end. Therefore, the width of your bias fabric strip should be double the width of the final results. For example, I am making a 1/2-inch (12mm) binding and my strip is 1-inch (25mm) wide. There is a little bit of wiggle room in the width of the strip you use in the bias tape maker tool. It is preferable to have just a hair too much than too less. The idea is for the folded edges to be as even as possible and for the folds edges to barely touch in the middle. If your fabric strips are too wide or too narrow it will not work so well.
I am using a bias strip that is 1-inch wide. Insert the bias strip into the widest end of the the Bias Tape Maker, using a straight pin in the slot on the top of the tool, ease and pull the fabric strip through the small end. See the photos below to see how to get started feeding the bias strip through a Bias Tape Maker.


Keep the strip evenly fed through the wide end. This will help in keeping the folded edges even as the strip comes out the other end. Pull slowly, using the folding handle on the the Bias Tape Maker, pressing with a stream iron, as the folded tape comes out the end. Use the steam of the iron as you go to set the folds of the strip. The Bias Tape Maker folding handle ensures your fingers are as far from the steam of the iron as possible.

The following photos illustrate how to use the Bias Tape Maker in tandem with a steam iron. Of course, you can make your own bias tape, by meticulously measuring, folding the sides toward the middle, and trying to avoid singeing your fingers, but it is not recommended.


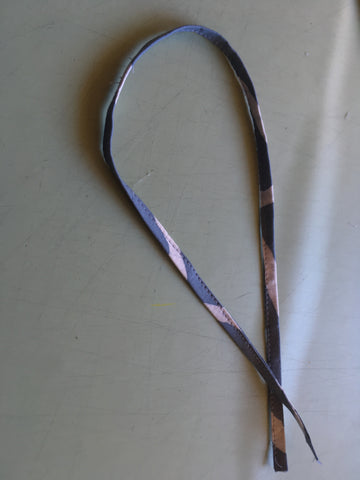
Next fold the folded strip in half length-wise and press again to set the fold. This creates the binding, and makes it a "double fold bias tape". Take your time to ensure a nice fold. Ideally, you want to fold and press so that the top edge is ever so slightly shorter than the bottom edge. The idea is that the underneath edge is wider, so that when sewing the binding from the top, the bottom edge gets caught in the stitching. See the photo below.


If required, trim the excess seam allowance according to pattern instructions. In this case, I trimmed leaving 1/8-inch seam allowance before attaching the binding.
Sandwich the raw edge of your fabric in the fold of the bias tape and secure in place using as many pins as needed to hold everything neatly together. Be sure to leave a bias tape tail of a few inches at the beginning and end of the edges you are working on (see third photo below). The tails will get trimmed and turned under in the end.


Using matching thread set the stitch length and tension so it is not too short or tight and not too long either. On my machine the this setting is around 3. Using a regular straight stitch presser foot on your sewing machine, place your work securely under the foot so that the fabric has good contact with the feed dogs. Use the edge of the foot as your stitching guide. In the photo below, you can see I am using the inner left edge of the presser foot as a guide. Position the needle so it aligns as close as possible to the inner edge of the bias tape, but not too close as to not catch the bias tape in the stitching. It might take a little fiddling to figure out what alignment configuration works best for you.

Once you are ready to stitch, take your time and stitch slowly to keep the stitches as aligned and evenly spaced with the edge of the bias tape as humanly possible. The idea, and sometimes the trick, is to catch the underneath edge of the bias tape in your stitching (this is why the tape is folded unevenly, as mentioned above). Often this is easier said than done. In part because you can not see the underneath of the fabric and the margin of error is hard to control. Do the best you can, knowing that it is highly likely that the underneath edge of the bias tape may have not gotten ALL caught in the stitching. It is ok. Simply enjoy a little hand stitching to secure the spots that were missed. You want to make the top of your bias tape stitching as neat as possible. This is the side that shows and therefore the only side that really matters. Remember, perfection can take the pleasure out of sewing.

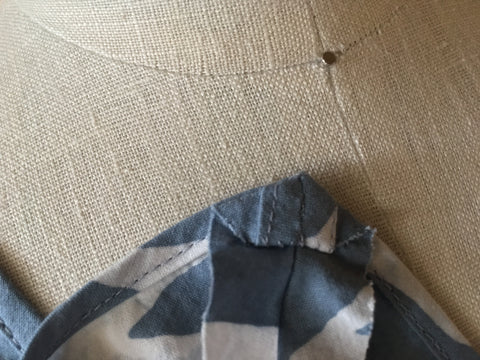
To finish the raw ends of the bias tape edge, trim away any excess, leaving enough turn under the edges of the bias tape according to the pattern instructions (usually 1/4-inch). Using your fingers or pins to hold the folded under edge in place, use a simple hand whip stitch to secure neatly into place. There are times when only hand stitching gives you the control you need. Below is a photo showing the pointed edge of the Entari sleeve hand stitched to finish. Notice how the binding is turned under and meets at a neat finish.
That's it bias tape made and edges beautifully finished.

Neck line edge finished.

Sleeve edge finished.
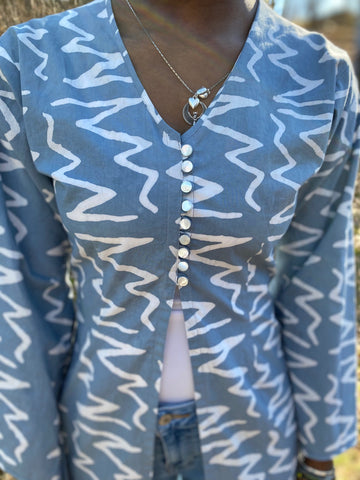
Making the Front Button-Loop Closure
This same easy bias tape technique is used to make the front button-loop closure for the Entari (robe) and vest featured in this pattern. These techniques are not exclusive to this pattern, but can be used on any garment that needs an interesting closure or a simple finishing detail. Not only is this perfect as a front closure, but works beautifully for a front or back neckline detail, a sleeve or cuff closure, a vent detail, or anything else you can dream up.

Bias Button-Loops Tips and Techniques
When making binding and loops the only rule is to avoid fabrics that want to unravel. Depending on your experience level and bravery, you may want to avoid fabrics that are too slippery or heavy to start with. Lighter-weight stable fabrics are much preferred when first attempting to make button-loops out of bias binding.
When making your own binding for button loops, consider how large or small button-loops need to be. This will in part depend on the size of the buttons, how many buttons, and spacing of the buttons and loops. Logically... small buttons will function and look better with small loops. Large buttons will need larger loops and more space.
Aesthetics and personal preference plays a part as well. The pairing of buttons and button-loops is an opportunity to get creative. Consider how much you want this detailing to stand out or fall back. Make the most of of the details in anyway that you choose.
As before, the fabric will need to be cut on the bias, in a fabric with a weight that will allow the fabric to nicely fold in on itself... just like we did with the edge binding. The bias cut will also allow your button-loops to bend and loop smoothly. By keeping your binding and button-loop fabric choice relatively light-weight will help avoid bulk and ensure ease of making, especially if you are working relatively small, as I am with this project.
Make the binding tape as you have already learned to. Fold the tape evenly, with the edges matching this time, and press to create clean edges. Pin to hold the fold securely in place with as many pins as deemed necessary. See the photos below illustrating these instructions.


Stitch as close to the edge as possible, being sure the top and bottom edges are caught in the stitching. See the photos below.


Now, that the binding tape is sew together, cut out the number of loops you need in the length needed, or according to the pattern instructions. You need to determine what buttons to use and their spacing out ahead of time.

Make a loop out of each cut strip, keeping the stitched edge turned to the inside of the loop. This detail simply makes for a cleaner looking loop. Be sure that all the loops have the stitched edge situated in the inside of the loop.


With each stitched inner edge of the loop touching, machine stitch each loop together approximately 1/2-inch (12mm) in from the raw edges. Sewing the loops together now will eliminate fiddling with trying to place them later.
Give the loops a bit of a study and take notice of what is the the right and wrong side of each loop. The loops in the photos pictured so far, are all right-side up. The scoop-shape of the loop will cradle the buttons and create a secure closure.

Turn each each button-loop wrong side up, as pictured below, and this time secure the loops again a little further up toward the loop. Instead of using the machine this time, simple use two or three whip stiches to secure. The idea is to close each loop up just a bit more, without the stitching showing on the front side.

Set the loop making aside for now. It is time to make the strips that the button-loops and buttons will be sewn to, creating the front closure to the 108 Turkish Dancer Entari pattern.
The button-loops and buttons need a platform or base that is both stable and strong. The closure point of any garment is considered a stress point, because of all the wear and tear this area inevitably experiences. So, this time the two strips will be cut on the straight grain and not the bias. Remember, bias stretches and gives. Therefore, not the stability and strength needed this time.
Cut two strips of fabric on the straight grain according to the pattern instructions. Again use the Bias Tape Maker to make strips with neat folded edges. Turn under the top and bottom edge 1/4" (6mm) and press.


With wrong sides together, pin and then stitch the button-loop strip to the right front, sewing around all edges to secure. Be sure the button-loops point toward the center front.


Even if you use a heavier weight fabric for the garment, the binding and loops could be made of a lighter weight fabric. It is perfectly fine to mix fabrics - just be sure to launder before cutting!
Now, sew the buttons to the left front so they correspond to the loop placement. You may find that a button with a shank works the best when using small loops.


Janis
November 24, 2022
I HATE the word “sewist.” What is the rationale for using it?