-
Sewing Patterns
-
Fabric
- Sewing Supplies
- About
- Blog
- Gallery
-

by Cynthia Anderson
Enjoying a cup of tea is a simple pleasure anytime. Having a pot of tea that remains perfectly warm with an insulating cozy just adds to the pleasure of tea time. Tea cozies also make a great gift for anyone who enjoys a spot of tea. Take the time to enjoy a cozy cup of tea this holiday season and throughout the year with this charming and utilitarian project.
In this blog, I will show you how to make a Tea Cozy and provide you with a free pattern. Plus I'm adding a recipe for a divine almond tea cake at the end so you can really have a wonderful tea time!
You can download the free pattern and instructions for this tea cozy here. It will take you through checkout, but the pattern does not cost anything.
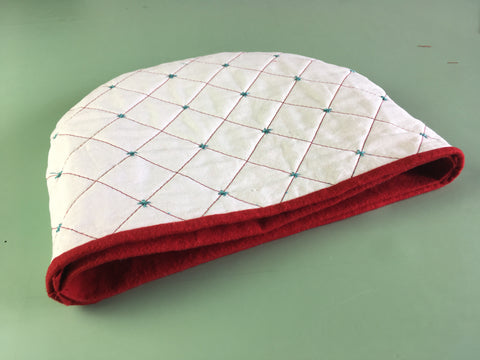
This cozy pattern was originally featured in Folkwear's 303 Home Collection: An English Cottage Kitchen. This collection of patterns included items that were found in Victorian era English cottage kitchens that combined the technology of the Industrial Revolution with the latest trends popularized by ladies' homemaking magazines. This Tea Cozy has an outer quilted tea cozy and a separate inner lining. The reason to have both is so that you can easily wash the lining when it gets tea on it, and protect your outer, more decorative layer. You can, of course, just sew the outer layer if you like.
Make your cozy as unadorned or decorative as you like. Add a stitched quilted pattern (included in this pattern), some embroidery, or leave plain depending on the fabric used and look you desire. Quilting can also be created by using free-form stitching made on your sewing machine, a drawn design of your own, a free pre-drawn design found on the internet, or no decorative stitching at all.
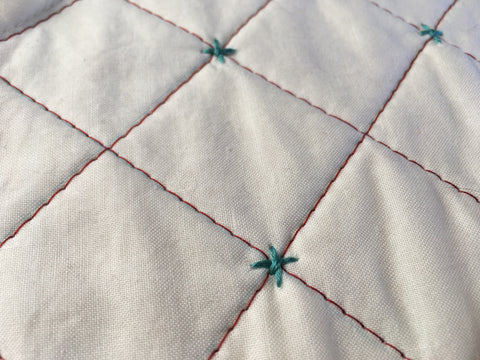
I made my holiday-inspired cozy out of 1/2 yard of white cotton for the outer cover, with a scrap of batting sandwiched between the outer cover layers for insulation. I quilted my tea cozy cover using a simple crisscross design using red contrasting machine stitching. I added hand-embroidered blue-green crossed-stitched stars to the intersecting quilting lines. I made the removable lining using 1/2 yd of red cotton flannel. To quicken the pace, I stitched the quilting lines using a sewing machine, but you could also hand stitch if you like. Because I love to add layered details to projects, I made a pair of yarn pom-poms (from yarn stash) to add to the cozy's holiday spirit and topped it all off with a red fabric covered button found in my button box.
Materials Needed:
With all the holiday fabrics in the craft stores this time of year, making a holiday-themed cozy is a snap. Use a holiday print, candy stripe, woven damask, or solid fabric. Cotton, linen, wool, and pre-quilted fabrics are good choices. Recycle and reuse a holiday tablecloth or pair of large napkins you already have or go for a holiday treasure hunt at favorite thrift store to find the perfect thing to make a cozy.
Have fun decorating your cozy, with ribbon, trim, lace, buttons, beads, embroidery, cross-stitch, applique, patch work, etc. Make a cozy to compliment an elegant tea set, an everyday tea pot and cups/mugs, a special Christmas themed set, or make a small cozy for a child's tea pot. If you have a mix-and-match crockery collection, make your cozy with a complementing aesthetic. No matter the look you like, have fun making a cozy all your own.
To Get Started
Pre-wash your fabric, because you will want to wash your cozy periodically. The batting should not be pre-washed, because it will come apart in the process.
Cut out the cozy pattern, paying attention to the cutting and seam allowance lines on the pattern. Cover R and Lining S are combined on the same pattern piece.
Cut out four of Cover R and cut two of Lining S on the fold. Both the lining and the cover use a 1/2" (13mm) seam allowance. Cut out two batting pieces using Cover R.

Quilt the Cover
I used the quilting lines on the pattern to trace the lines onto two of four fabric covers R, with a water soluble pen or use tailors chalk. Transfer any stitching designs to the right sides of two of the outer cover pieces before going any further. Typically, a decorative pattern is added to each side of the cozy, but feel free to only decorate one side.

Sandwich one piece of batting between two layers of fabric for Cover R, with wrong sides of fabric to the batting. If using pre-quilted fabric do not add any additional batting. If you use the pre-quilted fabric that only consists of a fabric layer and a batting layer, then add an addition layer of fabric so the batting is sandwiched.

Baste the three layers for each side of the cover together within the seam allowances to hold. Notice the drawn quilting lines are only needed on one side of each half of the cover. The stitching will show on both sides, but it is only necessary to draw the pattern on one side.

I traced over the drawn quilting lines with a machine stitch on each cover piece, with a longer stitch (#4), so the stitching would stand out.

Then using embroidery thread and an embroidery needle, I hand-stitched simple crossed-stitched stars where the quilting lines intersected, to add an extra detail.


With right sides together pin and stitch the two tea cozy Cover R pieces, along the curved edge, matching notch 8. Press the seam open about 4" (10cm) above the straight edge on each side.


Turn the cozy right side out. You can stitch the bottom edge if you like, but I didn't.

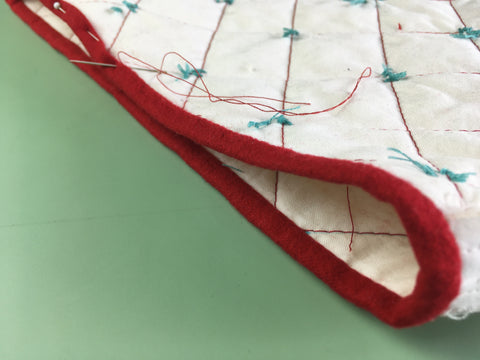
Bind the Bottom Edge of the Cozy Cover
Bind the bottom edge of the cozy cover using 1"(2.5cm) bias tape or ribbon. Make your own or use pre-made bias tape. I made my own using the same flannel fabric as my cozy lining. Learn how to make your own bias tape here.

Open out the bias tape and press under 1/2" (13mm) on one short edge.

With right sides together, line up and pin the turned under pressed end of the bias tape with one of the cozy cover seams. Continue to align and pin the bias tape to the raw edge of the cozy.

Trim off the bias tape so that the cut edge overlaps the first pressed under edge.

Turn/wrap the tape to the inside of the cozy and slip-stitch the remaining pressed edge to the previous stitching line created when attaching the bias tape. Below you can see the red stitching line to use as a guide.


Make the Lining
With right sides together, fold each cozy liner in half, matching notch 9. Pin and baste the raw edges together.

Now, pin and stitch the two liners halves together along the previous baste seam line, matching notch 9. Stitch through all the thicknesses, back-stitching at the ends.


If desired, trim the seam to 1/4" (6mm) and bind with bias tape. Or trim with pinking shears, serge, or leave the seam unfinished as I have.
Insert the liner into the cozy cover with the wrong side of the cover to the seam edge of the liner. The inside of the liner has the finished seam. The liner and cover are meant to be separate for easy laundering of the liner. Hand slip-stitch the lining to the cover at the side seams if you like.


Levana
December 19, 2022
Hi, is there a printer friendly version of the instructions? My printer cuts off the last several sentences of each page when I try to print the instructions in the blog. Thanks! Super cute pattern, looking forward to making it!