-
Sewing Patterns
-
Fabric
- Sewing Supplies
- About
- Blog
- Gallery
-

by Cynthia Anderson
Enjoying a cup of tea is a simple pleasure anytime. Having a pot of tea that remains perfectly warm with an insulating cozy just adds to the pleasure of tea time. Tea cozies also make a great gift for anyone who enjoys a spot of tea. Take the time to enjoy a cozy cup of tea this holiday season and throughout the year with this charming and utilitarian project.
In this blog, I will show you how to make a Tea Cozy and provide you with a free pattern. Plus I'm adding a recipe for a divine almond tea cake at the end so you can really have a wonderful tea time!
You can download the free pattern and instructions for this tea cozy here. It will take you through checkout, but the pattern does not cost anything.
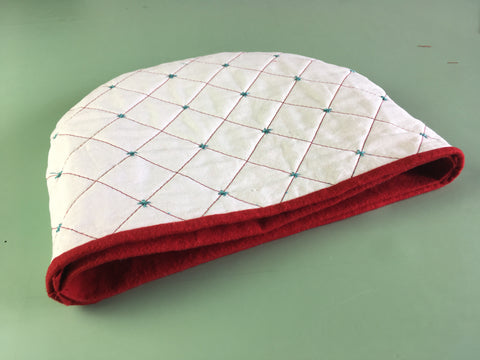
This cozy pattern was originally featured in Folkwear's 303 Home Collection: An English Cottage Kitchen. This collection of patterns included items that were found in Victorian era English cottage kitchens that combined the technology of the Industrial Revolution with the latest trends popularized by ladies' homemaking magazines. This Tea Cozy has an outer quilted tea cozy and a separate inner lining. The reason to have both is so that you can easily wash the lining when it gets tea on it, and protect your outer, more decorative layer. You can, of course, just sew the outer layer if you like.
Make your cozy as unadorned or decorative as you like. Add a stitched quilted pattern (included in this pattern), some embroidery, or leave plain depending on the fabric used and look you desire. Quilting can also be created by using free-form stitching made on your sewing machine, a drawn design of your own, a free pre-drawn design found on the internet, or no decorative stitching at all.
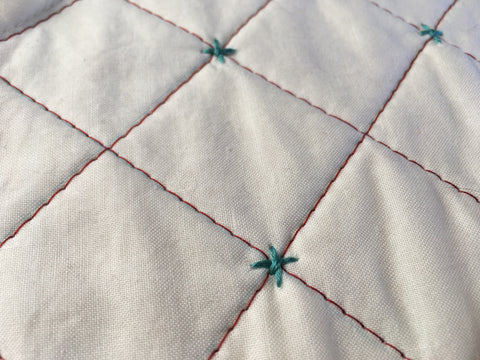
I made my holiday-inspired cozy out of 1/2 yard of white cotton for the outer cover, with a scrap of batting sandwiched between the outer cover layers for insulation. I quilted my tea cozy cover using a simple crisscross design using red contrasting machine stitching. I added hand-embroidered blue-green crossed-stitched stars to the intersecting quilting lines. I made the removable lining using 1/2 yd of red cotton flannel. To quicken the pace, I stitched the quilting lines using a sewing machine, but you could also hand stitch if you like. Because I love to add layered details to projects, I made a pair of yarn pom-poms (from yarn stash) to add to the cozy's holiday spirit and topped it all off with a red fabric covered button found in my button box.
Materials Needed:
With all the holiday fabrics in the craft stores this time of year, making a holiday-themed cozy is a snap. Use a holiday print, candy stripe, woven damask, or solid fabric. Cotton, linen, wool, and pre-quilted fabrics are good choices. Recycle and reuse a holiday tablecloth or pair of large napkins you already have or go for a holiday treasure hunt at favorite thrift store to find the perfect thing to make a cozy.
Have fun decorating your cozy, with ribbon, trim, lace, buttons, beads, embroidery, cross-stitch, applique, patch work, etc. Make a cozy to compliment an elegant tea set, an everyday tea pot and cups/mugs, a special Christmas themed set, or make a small cozy for a child's tea pot. If you have a mix-and-match crockery collection, make your cozy with a complementing aesthetic. No matter the look you like, have fun making a cozy all your own.
To Get Started
Pre-wash your fabric, because you will want to wash your cozy periodically. The batting should not be pre-washed, because it will come apart in the process.
Cut out the cozy pattern, paying attention to the cutting and seam allowance lines on the pattern. Cover R and Lining S are combined on the same pattern piece.
Cut out four of Cover R and cut two of Lining S on the fold. Both the lining and the cover use a 1/2" (13mm) seam allowance. Cut out two batting pieces using Cover R.

Quilt the Cover
I used the quilting lines on the pattern to trace the lines onto two of four fabric covers R, with a water soluble pen or use tailors chalk. Transfer any stitching designs to the right sides of two of the outer cover pieces before going any further. Typically, a decorative pattern is added to each side of the cozy, but feel free to only decorate one side.

Sandwich one piece of batting between two layers of fabric for Cover R, with wrong sides of fabric to the batting. If using pre-quilted fabric do not add any additional batting. If you use the pre-quilted fabric that only consists of a fabric layer and a batting layer, then add an addition layer of fabric so the batting is sandwiched.

Baste the three layers for each side of the cover together within the seam allowances to hold. Notice the drawn quilting lines are only needed on one side of each half of the cover. The stitching will show on both sides, but it is only necessary to draw the pattern on one side.

I traced over the drawn quilting lines with a machine stitch on each cover piece, with a longer stitch (#4), so the stitching would stand out.

Then using embroidery thread and an embroidery needle, I hand-stitched simple crossed-stitched stars where the quilting lines intersected, to add an extra detail.


With right sides together pin and stitch the two tea cozy Cover R pieces, along the curved edge, matching notch 8. Press the seam open about 4" (10cm) above the straight edge on each side.


Turn the cozy right side out. You can stitch the bottom edge if you like, but I didn't.

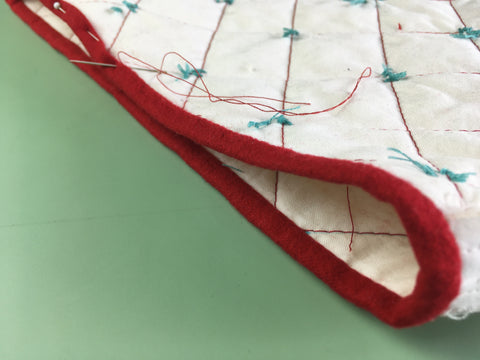
Bind the Bottom Edge of the Cozy Cover
Bind the bottom edge of the cozy cover using 1"(2.5cm) bias tape or ribbon. Make your own or use pre-made bias tape. I made my own using the same flannel fabric as my cozy lining. Learn how to make your own bias tape here.

Open out the bias tape and press under 1/2" (13mm) on one short edge.

With right sides together, line up and pin the turned under pressed end of the bias tape with one of the cozy cover seams. Continue to align and pin the bias tape to the raw edge of the cozy.

Trim off the bias tape so that the cut edge overlaps the first pressed under edge.

Turn/wrap the tape to the inside of the cozy and slip-stitch the remaining pressed edge to the previous stitching line created when attaching the bias tape. Below you can see the red stitching line to use as a guide.


Make the Lining
With right sides together, fold each cozy liner in half, matching notch 9. Pin and baste the raw edges together.

Now, pin and stitch the two liners halves together along the previous baste seam line, matching notch 9. Stitch through all the thicknesses, back-stitching at the ends.


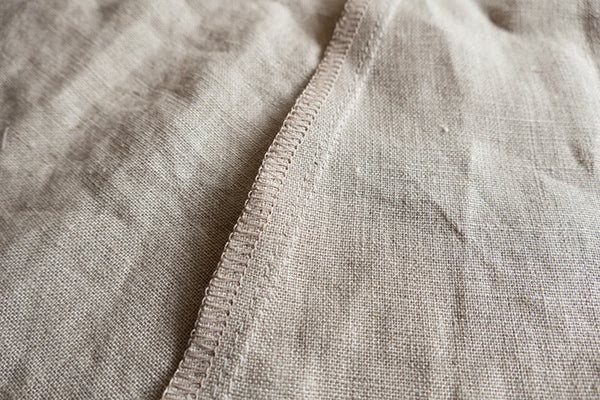
If desired, trim the seam to 1/4" (6mm) and bind with bias tape. Or trim with pinking shears, serge, or leave the seam unfinished as I have.
Insert the liner into the cozy cover with the wrong side of the cover to the seam edge of the liner. The inside of the liner has the finished seam. The liner and cover are meant to be separate for easy laundering of the liner. Hand slip-stitch the lining to the cover at the side seams if you like.


Parasols are not only a convenient and stylish way shield yourself from the suns rays, but a perfect accessory companion to one of Folkwear's most favorite and popular patterns. The Folkwear 261 Paris Promenade Dress is made even more perfect when paired with its very own parasol.
The 1920's styling of this easy-to-sew and easy-to-wear, pullover dress has a carefree, yet sophisticated aesthetic. The unique construction of this dress makes it easy to imagine all sorts of creative fabric combinations. Complete your 261 Paris Promenade Dress ensemble by coordinating the vintage-style drawstring hand bag that comes with the pattern and now a parasol, for the next time you want to make a truly vintage-inspired statement.
And, today we are going to show you how to make your own parasol!


For a bit of inspiration in making your own parasol read the History of the Parasol blog for an interesting stroll through the history of sun protection and much more. Learning to make your own parasol is not as difficult as you might imagine.
Knowing what to look for in a parasol or umbrella frame is important because the frame is the foundation of your project. Due to the superb quality and craftsmanship of antique umbrellas and parasols, their frames and handles can be found in good condition and are not hard to find if you know where to look. Flea markets, thrift shops, ebay, Etsy, and historical reenactment website shops are all excellent resources. Consider using an umbrella you already have... if the quality of the frame is good, don’t toss it out… recover, re-purpose, reuse. Enjoy anew!
Frame Structure
When looking for a frame to use, remember that the more sections or pie-shapes a frame has, the easier it will be to make the canopy fit. This is in part because the more reinforcing seams you have, the more stable the fabric will be. The narrower the width and the more seams there are, the more stable the fabric and therefore it will be easier to fit the canopy to the frame. The number of pie shapes corresponds to the number of ribs. The number of ribs corresponds to the seams. Parasols tend to be more elegant and daintier then umbrellas. So, parasols usually have more ribs, pie-shapes sections, and seams.

The frame and pieces needed to make a parasol.
The parasol frame and parts I am using in this tutorial were sourced at Vena Cava Designs (they also carry Folkwear patterns!). I ordered the Parasol Frame (Skeleton) kit (adult, straight handle).
This is an inexpensive and good quality frame. This frame is suitable for either a parasol or umbrella and a great option for trying out your making skills. The pattern we are providing here fits this particular frame. However, you can use this pattern, with some modifications, to fit most other frames that you might find.
Please note that I am referencing the parasol frame that is sourced in this tutorial. The pattern included has been made to fit this frame.
The Proper Fabric
The fabric you use to make an umbrella is different than fabric used for a parasol. Parasols were generally made of natural materials like silk, cotton, and linen and these fabrics are available at most fabric stores. Most natural fibers such as the ones mentioned have enough stretch and sometimes too much stretch when cut on an angel. For this reason the pie shaped pattern piece should be cut with the grain line indicated on the pattern (aligned with selvedge of the fabric).
When choosing a fabric, it is best to choose a fabric that is the same on both sides since you will see the wrong side of the fabric when he parasol is open.
Modern oil cloth and waxed cotton are fabrics that come the closest to original umbrella fabrics. Suitable waterproof fabrics will be made of synthetic nylon and woven from fine threads. These types of fabrics will not have much stretch, so pattern pieces will need to be cut on the cross-grain or with a curved edge on the bottom edge. Nylon frays easily (can cut with a hot knife or serge immediately). To avoid disappointment, do a bit of research if considering the use of waterproof fabrics.
If you are going to make the parasol canopy for the kit, or modify it for your own use, instructions are below.
You will need:
Fabric Layouts and Cutting Guide
Layout your pattern piece on your fabric and cut out 10 pieces to make your parasol. The diagram below shows how to create the parasol pattern piece used in this demonstration, if you do not print the PDF piece provided in the link above. Notice the grain line and lay your pattern out with the grain line parallel to the selvage.

Ten pattern pieces laid out on a 45" (114.3 cm) or 60" (152.4 cm) wide fabric, requires just over a yard (1m) of fabric. Note that these illustrations shows the fabric laying open and flat.


Note: The pattern pieces in the illustrations above are placed close to the edges of the fabric. If you think you may need more hem at the bottom edges, then allow for a bit more yardage. To be safe add an additional 1/4 yard (0.2286 m) of fabric.
If your pattern pieces are a different size than ours, you can lay the pattern pieces out on a piece of fabric the width you intended to use, and have a look at how the pattern pieces lay out and how you can make them fit. The illustrations above should help.
Sewing Guide
The 1/2" (13 mm) seam allowance for the long edges are included in the pattern. The 1/2" (13 mm) bottom edge seam allowance is included to produce a 1/4" (6.35 mm) hem. The narrow top edge of the pattern piece does not get a hem. This pattern is intended for a natural fabric to be cut on the selvage grain. I used a light weight linen for the purpose of this demonstration.
MAKE A MUSLIN FIRST!! This is my best piece of advice in attempting the making of a parasol or umbrella. Frames are not always perfect. Especially if your frame is an antique. Plus experimenting without feeling the pressure of messing up good fabric is always wise. And, you get to practice getting it right.
Step One: Sewing the Canopy
Once the fabric pieces are cut out, I recommend working with wedges in pairs. With the right sides of the fabric together, pin one long edge and stitched a 1/2" (13 mm) seam allowance. Then, move the needle over one or two notches and stitch again just OUTSIDE of the seam allowance. Back stitch at each end. This extra stitch line will help to create a bit more seam strength and stability.
If you want add a strap to fasten your parasol neatly closed, now is the time. Just pick a seam and insert the strap into the seam allowance, sewing all at once. Use a snap or a button to fasten the strap.

View showing a second reinforcing stitch just to the outside of the seam allowance.
Continued this method, working in pairs until all ten of the pie piece shapes are sewn together creating the circular canopy. There should be a hole in the center of the canopy. This is where the tip will come through.

Canopy all sewn up.
Press all seams in the same direction on the wrong or under side of the canopy. Press to set the seams and create a clean finish on the right or top side of the canopy as well.
Finish all the underneath seam allowances. Either, serge, pink, or trim. You could also do a faux flat felled seam. French seams and bound seams will be too bulky and are not recommended.
Seam finished with a serge. Notice the seam allowance stitch and the second row of reinforcing stitches.
Step Two: Top Strengthening Detail
The entry point where the tip-ferrule-post or top point, inserts into the fabric of the canopy is a major stress point and needs reinforcing to provide strength. The hole at the opening needs to be made smaller without adding fabric bulk. A couple of simple tricks will take care of both of these issues.
Make a short stay stitch approximately 5/8" (16 mm) around the hole opening in the top of the canopy. This will ensure all the panels stay in place and not over stretch when the parasol is opened and closed repeatedly.
A simple circle of fabric sewn to the underneath at the hole opening, will provide another layer of support and to be sure the canopy hole fits tightly to the tip-ferrule-post base.
From a scrap of the same fabric you are using to create your parasol, cut a 2-1/2" (6.35 cm) to 3" (7.62 cm) circle, using pinking shears. The idea is to not add any bulk to this area so finishing the edges with pinking shears serves the purpose well.
Fold the fabric circle in half and then in half again. Snip the tip of the point off with your scissors. Smooth out the circle and press to remove the ceases.

Fold the Circle of fabric in half and then in half again.
Depending on the nature of your fabric, it might be wise to Fray Check the edges to seal the edges. The linen I have used needed a bit of Fray Check for this very reason. Allow the Fray Check to dry.

Reinforcing linen fabric circle getting a touch of Fray Check.
On the underneath side, make sure all seam allowances are pressed in the same direction, align the hole of the small reinforcing circle with the opening of the canopy and sew the circle to the canopy approximately 1/2" (13 mm) from the center hole.
Push the tip of the frame through the hole of the circle to see how it fits. Clip the hole of the circle a tiny bit more if needed. The idea is to have the hole of the circle to fit snugly to the base of the tip-ferrule-post.
 View of pinked linen circle sewn to the canopy.
Below are a series of images showing you how the simple circular piece of reinforcing fabric is attached to the canopy and what an important role this little bit of fabric performs in maintaining the strength and integrity of a highly used stress point.


View of the pinked linen circle peaking through on the outside of the canopy before the being stretched and fitted to the frame.
With the canopy stretched over the frame and closed-up you can appreciate how much this simple bit fabric reinforcement provides to the integrity of the parasols construction.

View of the pinked linen circle peaking through on the outside of the closed canopy after being stretched and fitted to the frame.
Step Three: Hemming the Edge
Turn the widest edge or the bottom edge of the pie pieces under 1/4" (6.35 mm) and press. Turn under another 1/4" (6.35 mm) and press creating a straight edge. Press and pin the hem in place. Manipulate the connecting seam edges to lay as smoothly as possible. Top-stitch close to the turned edge, taking care to create a clean finish.

Pinning the hem.
Step Four: Adding the Rib Posts
Using button twist thread for extra strength, hand sew all the wooden tips to the wrong side of the canopy, at the seam allowance. Use the turned under hem as an anchor spot for sewing the tip to. You do not want to see any stitch work on the right side or top side of the canopy.

Gutermann button hole twist is ideal for attaching and strengthening the tips to the canopy.
The extra thickness of the turned under hem makes an excellent spot to sew on the tips and prevent the stitches from being seen on the top side.

Wooden tip securely sewn to the hem of the canopy.
Step Five: Test for a Proper Fit
Once you get a few tips sewn in place, give the fit a try. It will work best to sew your first few tips on opposite sides of the canopy from each other, to help with the tension. Place the top hole of the canopy over the tip-ferrule-post base. Then gently pull the fabric over the rib and insert the metal rib tip into the wooden tip sewn at the canopy edge. You want the fabric of the canopy to fit tightly over the ribs (each seam should correspond to a rib), once the rib end is inserted in the wooden tip. There should be some tension, but not so much that the rib begins to distort or twist from its intended position along the seam. If this does happen, there is too much tension, the panel is too short. To remedy, let out the hem a bit to lengthen the panel.
With the rib inserted in the tip you can see how the tip needs to be secure and strong due to the tension required for a proper fit.
Tension created when metal rib is inserted in wooden tip.
Note: It is important the fit is good before proceeding any further.

A perfect fit on the outside!

Perfect fit on the inside!
Step Six: Secure Ribs to the Seam Allowance
Your canopy should now be installed to the frame and fit perfectly. Even if the canopy fits beautifully to the frame, a bit more stabilization never hurts. Adding a thread tack will easily accomplish this task.
I have placed and sewn each tack 5" (13 cm) from the hem edge inwards along the rib. Using regular thread, double the thread up, and sew a few hand tacks as shown below.

Measure to determine tack location to help added extra stability for each rib.
Start on one side of the seam allowance, inserting the needle between the seam stitch line and the extra stitch line previously made in the assemble instructions. Make the stitch through the seam allowance and under the rib. Pull the needle through to the opposite side.

First pass through the seam allowance and under the rib.
Insert the needle over the rib, through the seam allowance at the extra stitch line, to the opposite side. Continue in this manner until you have made 5 to 8 passes, creating a neat and secure hold. The idea is to prevent any stitch work from showing on the top side of the canopy. Tie the thread off with a couple of knots on each side of the tack. Trim the thread close to the knot. Repeat for each rib.

Passing thread over the rib and continuing to make the tack.

Making tacks all the way around for each rib.
The Top Finishing Detail
One last finishing touch is required to tidy up the top of the parasol, where the canopy and tip-ferrule-post meet. This will conceal the reinforcing stitching lines and create a clean yet simple finishing flourish of interest. This not the only creative way to finish the top of your parasol, but it is quick and easy and adds just enough detail without being fussy.

Start with a strip of fabric measuring 1-3/4" wide by 8-1/2" long (4.445 cm x 21.59 cm). I like to utilize the selvage edge when ever possible to give an extra bit of strength and stability. So, I have cut my strip of fabric including the selvage. I turned and press the opposite long edge under 1/4" (6.35 mm). Then top stitched to create a finished edge. This edge will eventually show.

Finishing detail begins with a linen strip. Notice the top stitched turned under edge.
Next, sew a long gathering stitch 1/2" (13 mm) from the top stitched edge. Leave long thread tails on either end to make gathering easier. Make another long gathering stitch 1-1/8" (3 cm) from the top stitched edge. Leave long thread tails again.


You will need:


The carrier/holder strap in place and seam allowance sewn before turning right side out.
Note: Predetermine the length you would like the strap to be before sewing up the seam allowance.
With right sides together and the strap length out of the way of catching in the seam allowance, sew 1/2" (13 mm) seam allowance on the longest side and at the smallest end if you are sewing the end up. Trim the excess strap. Press the seam open. Finish seam or trim.
Turn right side out and hem the remaining ends using a 1/4" (6.35 mm) turn under and then turn under another 1/4" (6.35 mm). Top stitch close to the edge to finish. I chose to leave the bottom edge open so I hemmed it too.


Here is a simple and sweet pattern from the many that are included in the 302 Victoria's Boudoir pattern from Folkwear's home wear collection. Our pattern includes three different shapes for the sachet (we are only including two shapes here). Optional lace trims the outside of the sachet. And, this is a great pattern to try out those rarely-used embroidery stitches on your machine. You can add pretty stitching along the sides of the sachet before putting it together and make this a really beautiful and special project. You can also hand embroider initials to the sachet for a unique and special gift for someone. Our pattern includes templates for beautiful Victorian style letters. A romantic and easy project to sew a thoughtful gift or stocking stuffer (or host gift) for those on your holiday gift list. Or to use in your own clothes drawers!
I made the sachets above as gifts, and even embroidered one with my daughter's initials.
All these instructions, plus LOTS more are in our 302 Victoria's Boudoir pattern (40% off all this month).
CUTTING GUIDE FOR SACHETS
The pattern pieces, and the embroidery designs, are found in the file Pattern Pieces 302 Sachets. They can be printed on two pieces of regular printer paper from a home printer. First download the file to print the pattern (we made it to fit A4 paper too). This file also has an embroidery design and all the monogram letters.
For the Square Sachet you will need Piece R.
For the Round Sachet you will need Piece S.
If you plan to embroider your Sachet, do so before cutting pattern pieces from fabric. Trace outline and embroidery motif onto fabric before cutting the pattern out from the fabric. Allow enough fabric around traced outline to fit into embroidery hoop. Or, if you are using embroidery stitches on your sewing machine, it can help to draw a line that you want the embroidery to follow. And, make sure you stabilize the area where you will be stitching with embroidery stabilizer paper or interfacing. You should be able to tear away the stabilizer after embroidering. After embroidering, cut pieces from fabric.
SEWING GUIDE FOR SACHETS
NOTE: Shading denotes right side of fabric.
Prepare scented floral Potpourri for your sachet as explained below. (Or you may buy ready-made potpourri or lavender)
Instructions for both Sachet shapes are the same. The square sachet will be illustrated here.
 Right sides together, stitch two (unembroidered) sachet pieces together as a lining, leaving an opening between boxes for stuffing.
Turn right side out and press. Fill as full as possible with Potpourri. Slip-stitch opening together.
Optional: Baste pre-gathered lace to one remaining sachet piece, right sides together, with edge of lace on seam line, turning under first short edge of lace ½”/13mm. (If you have embroidered your Sachet, this will be the embroidered piece.)
Right sides together, stitch remaining sachet pieces (this will be the embroidered piece if using) together, sandwiching optional lace, leaving an opening between boxes. Turn right side out.
 Insert stuffed Lining into lace-trimmed Sachet. Slip-stitch opening together.
You can also make this sachet with just two fabric pieces from the pattern: Make as for the outer layer of the sachet and fill with lavender or potpourri.
POTPOURRI
"The drying of fragrant, natural ingredients and blending them into a potpourri became popular in the sixteenth century, when sanitation was primitive at best. Chamomile, lavender and fennel leaves were often sprinkled around the rooms of a castle to cover up unpleasant odors. In those days, herbs were also thought to possess mysterious, strange, and powerful properties. Aromatic leaves were supposedly able to cast out demons and save lives.In the 1500's, a Swiss pharmacist theorized that herbs embody the 'quinta essentia', the fifth essence, which medieval philosophers believed was the highest element after earth, air, fire, and water. Aromatic botanical compounds commonly became known as 'essential oils.'The term is still used to indicate pure fragrance oils such as those that are added to the ingredients in... potpourri to enhance and extend their natural scents.Today, the herbs, flowers, spices, and essential oils...have no magic powers - they just look and smell wonderful, adding a decorator touch to any room with a delightful, fresh fragrance."--Used by permission of Patti Howard of Victorian Fancies.
RECIPE FOR POTPOURRI:
This recipe comes to us courtesy of Patti Howard of Victorian Fancies.
1 c. dried rose petals
½ c. dried, crushed geranium leaves 1 tbsp. dried, slivered lemon rind
1 tbsp. whole allspice 3 crushed bay leaves
6 drops Rose-Geranium oil (available at many health food/craft stores)
Mix, sniff, and enjoy!
Note: The essential oil is not required, but it will prolong and enhance the natural fragrance of the ingredients. If you use the oil, it is nice to mix everything in a plastic bag, close it tightly, and place in a cool, dark place for a few days, shaking it up occasionally to blend the oil with the leaves and petals. This procedure can be repeated whenever the fragrance begins to fade.
EMBROIDERY STITCHES
Use this as a guide to select the right stitch for each particular motif:
Use 3 strands of embroidery floss or size 8 Pearl cotton.
Satin Stitch
This looks like the simplest of all embroidery stitches, with its over-and-over stitch, but in reality, it requires practice, patience and even tension. Stitch placement must be precise, entering and exiting exactly on the motif outline with the same distance between parallel stitches.
To fill in body of motif, work a series of straight stitches perpendicular (or slightly angled) to the transferred outline and parallel to one another.

Fig. 5 shows the satin stitch: out at A, in at B, up at C.
Where the design narrows down to a single line (as on the monograms), you will not be able to work the stitches parallel, but will have to stagger them. Fig. 6 shows an exaggerated scheme to handle the curves. (These stitches will closely resemble the stem stitch.)
Stem Stitch
Bring thread up at A- down at B- and up at C which is halfway between A and B (Fig. 7). Be sure to keep your needle on the same side each time. (Fig. 8).

For the downloadable PDF version of this pattern, go here.

This pretty little ornament is a great way to use up those beautiful fabric scraps you have left over from your sewing projects! The ornament uses origami techniques to make a tiny kimono that you can hang on a tree, in a window, or tie to a gift wrapping. Make a batch of them with your fabric scraps - it is fun and quick! It is also a great project to do with kids (you can just provide them the sewn together rectangle)!
Instructions are below, and you can download the instructions here for free!
You can make these ornaments out of fabric, or paper following similar instructions. If making from paper, only use one piece in the dimensions given.
Materials needed:
Instructions
Step 1
Begin with two rectangles that measure 4 ¼” (11cm) wide by 15 ½” (39.5cm) long. Fold under ¼” (6mm) along one short end of each rectangle and press. With right sides together and pressed-under edges aligned, stitch a ¼” (6mm) seam on three sides, leaving the pressed end open. Turn to right side, press lightly, and slipstitch opening closed.


Step 2
Select a favorite side, depending on the design of your fabric, and orient rectangle with favorite side facing up and one short end closest to you. Mark the center of the top short end. Fold under top edge 3/8" (1cm) to the back and press.

Step 3
Fold top corners down (toward you) to meet at the center and pin in place. Press. Measure 5 ¾” (14.5cm) down from pointed end at top. Mark and fold along this line, bringing lower end up to the back. Press.


Check measurements: from tip of point to lower edge should be 5 ¾” (14.5cm) and from tip of point to upper edge should be 3" (7.5cm).
Step 4
Mark a line level with the point and fold top edge down behind entire piece. Press.
Whole piece now measures 5 ¾” (14.5cm) from top to bottom.

Step 5
Fold ½” (13mm) along each side edge toward center.

Then fold back the back layer so that it is flat and makes a “hood” at the upper corners, creating small triangles. Press.


Step 6
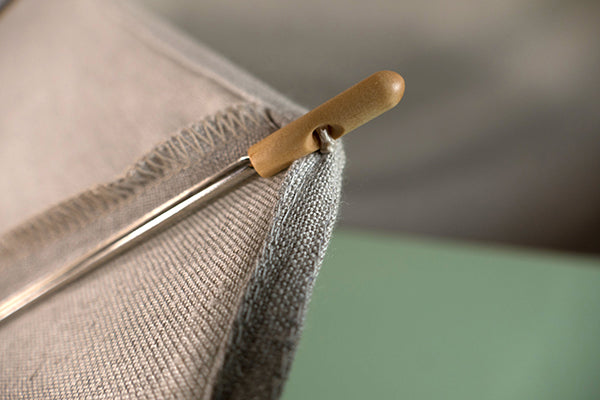
To form casing for skewer, fold top edge and flattened triangles to back 1/2" (13mm) (the center point protrudes above this fold). Press.

Step 7
Turn over and slipstitch folded edge to back of kimono. Insert skewer through casing; trim ends to desired length. To create hanger, tie a 6" (15cm) length of thread or cording to each end of skewer.

From the mid 17th century, and to this day, the well-dressed gentleman has never considered his costume complete without some form of neckwear. In 1636 the cravat became fashionable – after the custom of the Croats or Cravates serving in the French army, who wore a length of cloth around their necks to protect the throat.
The first cravats were wound around the neck and usually tied in a bow or with a black ribbon. In 1692, the Battle of Steinkirk (in Belgium) introduced a new fashion. The French cavalry, surprised by the enemy, rushed to the attack with the ends of their cravats flying or carelessly twisted and drawn through a buttonhole. The casual style popularized by their victory was taken up by women as well as men.
For several decades following, the cravat gave way to a neck cloth that was pre-folded and fastened in back – the stock. In the 1770s, a vogue for pastoral English tastes brought back the unconstructed cravat in the form of a large triangle or square of the finest linen or muslin.
After 1830 the collar began to turn down over the cravat, which evolved into the bow tie, the ascot, and the four-in-hand.
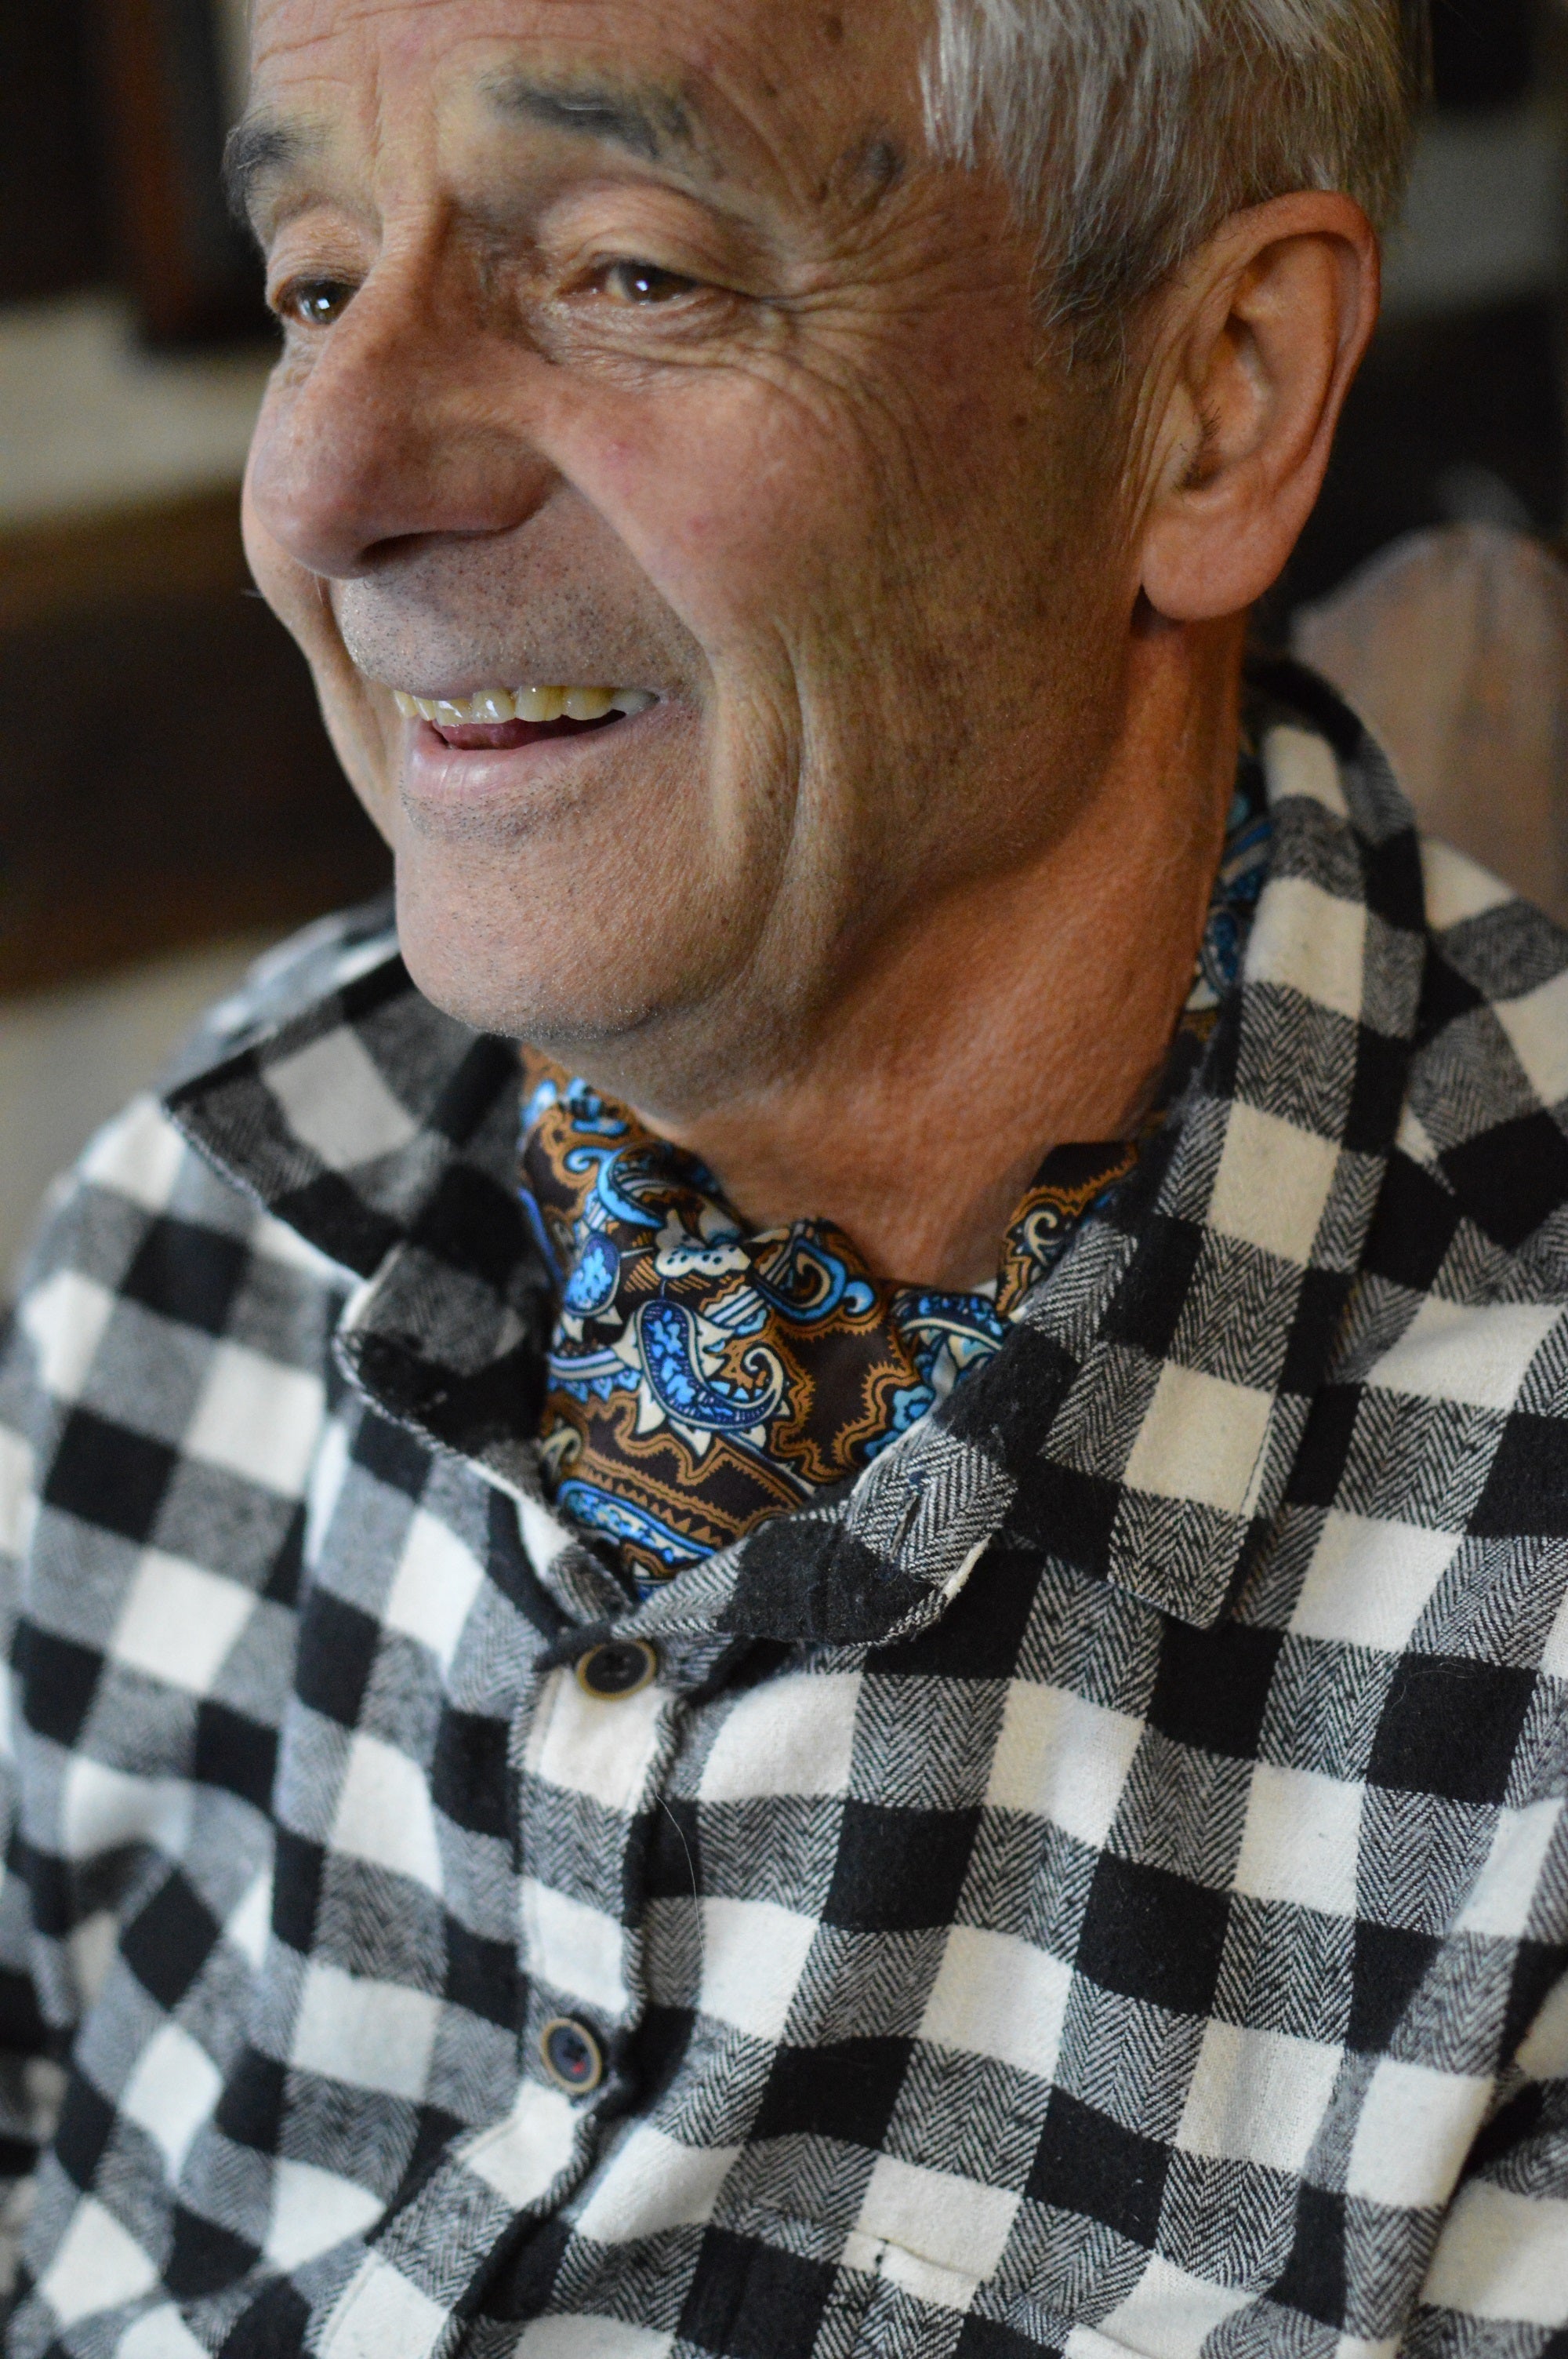
Today, the cravat is fashionable for men and women. It can compliment your outfit, provide a splash of color, and keep your neck warm. My British father-in-law wore one nearly everyday of the winter – under his dress shirts or denim work shirts. It gave him an air of gentility, and is a fun and useful accessory. The instructions provided below create a cravat similar to what he wears, or you can download them here. Simple to make and simple to wear, this pattern is a fun and quick make - a great holiday gift for anyone in your life.
Construction
The size and shape of cravats have varied over the centuries. In their earliest manifestation (c. 1680), they consisted of a rectangular strip of very fine lawn, the ends often trimmed with lace. By the end of the 18th century, a folded square or triangle had been adopted, folded into a band, with endless varieties and subtleties of knots. Early in the 19th century, cravats were pre-knotted and mounted on a fixed collar that fastened in the back by a button or a pin, although free-tying cravats were still used. Folkwear also offers the triangular cravat pattern in our 217 Poet's Shirt pattern, which is a versatile and adaptable for modern fabrics and fashions.
Choose fabrics that are fine, soft, and have a good drape. Often, modern cravats are made with paisley print silk or other printed patterned silk, with a soft and plain colored cotton lawn as backing.
This cravat
This cravat pattern is based on cravats my father-in-law wore all winter. They are made of silk paisley print and cotton fabric. They are pleated in the center for ease of wear and are very stylish. You can see the way he ties and wears his cravat at the end of this post.
Seam allowance for this pattern is 1/4".
MATERIALS
CUTTING AND MARKING
Wash and press fabric before beginning.
Cut one rectangle each from the silk and cotton measuring 42" long by 6" wide, each. To see pattern drawings, you can view or download this article as a PDF here.
Note: Most markings can be made just on the cotton piece (which can be a plain color and therefore easier to see markings). Use tailor's chalk, or your favorite marking pen/chalk/pencil/etc.
Mark a line across the center of the fabric (across your fabric at 21"). Line is perpendicular to the long sides.
Make two more lines, one 6 3/4" on each side of this center line. These will be your stitching lines when sewing down the pleats.
Mark a line, perpendicular to the long edge, 3 1/2" from each end of the long rectangle.
Mark the center of each short end of the rectangle and draw a line from the center to 1/4" inside the above line, on each side, to form a triangle. Transfer these diagonal lines to the other side of the fabric also. You will be stitching along these lines in the next step.


SEWING THE CRAVAT
Use 1/4" seam allowance.
Place right sides of fabrics together (I would consider the chalk marked side of the cotton to be the "right side"). Pin and sew 1/4" seam allowance on the long sides of the cravat. At the short ends, sew along 3 of the 4 diagonal lines formed in the previous step.
Turn right sides out. Press so that the ends form a nice flat triangle. You will be hand stitching one side end closed later.

Now it is time to form the pleats.
Draw, with chalk, horizontal lines every 1/2" from the top edge, going perpendicular to the 3 center lines. These marking lines should only go from the left-hand vertical line, crossing the center, to the right-hand vertical line. They do not need to go further.
Start folding from the top, place each horizontal line on the second one below it, so that you have 3 horizontal pleats. Press pleats.

Stitch across pleats along the 3 vertical stitching lines, backstitching at beginning and end to secure thread.

Whipstitch diagonal end closed.

How to wear:
This is how my father-in-law ties and wears his cravats.
First, hang this cravat around the back of your neck with one end shorter than the other.

Then, wrap the longer end around the shorter end two times.

Then, tuck the long end behind the wrap and bring it to the front and tuck it into the font of your shirt.


