-
Sewing Patterns
-
Fabric
- Sewing Supplies
- About
- Blog
- Gallery
-

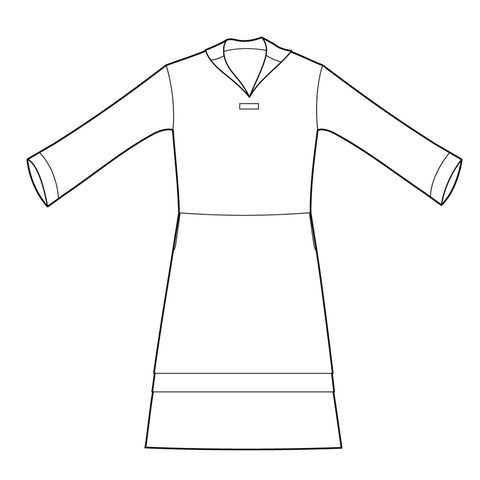
I am picking up here where we left off for finishing making the 149 Norwegian Busserull. For Part One, which includes sizing, fabric selection, and getting through the placket of the Busserull, see our blog post here.
COLLAR
If you prefer, you should interface the Collar before starting. You can cut interfacing to be one half the size of the length of the Collar and apply it to one side of the collar. Interfacing can help provide more stability for a lighter weight fabric. It also provides some stability for the buttonhole in the collar. I did not use interfacing for my shirt collar, mainly because my fabric was a heavier weight fabric and pretty stable.
Press under 1/2 inch (13mm) seam allowance on one long edge of Collar (if interfaced, press the long edge of the interfaced collar).

Then, with right sides together, fold the Collar on foldline (middle of length of the Collar). Stitch the short ends, trim corners, turn, and press.


We have another fun contest to celebrate Folkwear's 50th year! Over the years, we have heard from many customers who have collected Folkwear patterns. The cover illustrations are iconic and I often hear from people how inspirational they can be -- even if the pattern never gets made. And after 50 years of patterns, with over120 patterns that have gone to print, a large collection can be understandable!
So we want to see your Folkwear pattern collection! Email us a photo or post a photo to social media (and tag us so we see it!) of your Folkwear patterns. Let us know how many you have in your collection. Bonus for telling us which are your favorites!
The contest goes for the whole month of June. We will pick a random winner and a winner with the largest collection to get gift certificates to our shop. And, EVERYONE who participates gets a coupon code to use in our shop. So, send on your photos!
Email info@folkwear.com
Or tag us on Facebook @folkwearpatterns or Instagram @folkwearsewing.patterns
We can't wait to see your patterns and hear your stories!


by Molly Hamilton
This tutorial will show you how to make our newest pattern, the 149 Norwegian Busserull. I am breaking it down into two parts: part 1 includes the preliminary steps through sewing the front placket; part 2 will be sewing the rest of the shirt.
This folk work shirt is boxy, comfortable, and easy to sew. It has underarm gussets, a front placket, and short cuffs and collar. If you want to learn more about folk work shirts, read our blog post about them here.
The busserull is a traditional Norwegian work shirt, often made of striped red or blue fabric, but also made with solid linens or even plaids. Over time, this shirt took on meaning as an identifying symbol of Norwegian identity, and eventually became commonly worn in festivals as well as for everyday wear.
Suggested Fabrics
We suggest using a medium to light weight cotton, linen, hemp, or wool (or blends). But you could also do this in a lightweight denim. A chambray or linen would be elegant. Traditionally this shirt is made in a blue or red fabric (same color as Norwegian flag) with small white stripes. Our yardage charts show yardages for 45" or 60" fabric, so if you get a narrower fabric (as I did with this tutorial), know that you will need more fabric.
I used a red handloomed cotton with white stripes that was medium weight. This is a traditional color and type of fabric for this shirt. My fabric was only 30" wide, so I used an extra yard of fabric.

Notions
You will need thread to match your fabric and six 1/2" (13mm) buttons. If you are adding the back belt, you also need two 1" (2.5cm) D-rings or one 1" waistcoat buckle.
Sizing and Yardage
You can see the sizing and yardage chart here. If you are between sizes, you can grade between the sizes -- going from size LG at waist to size XL at hips for instance. Just make a smooth line between the sizes. The shirt, similar most folk work shirts, has a boxy fit and is meant to have a bit of ease. There is also extra room at the chest from the underarm gussets. If you are very small or don't need or want extra room in the chest, you can make the shirt without the underarm gussets (the last page of instructions in the pattern explains how to do this).
You can lengthen or shorten the body of the shirt at the hem. The front and back are cut as one piece so you need to lengthen or shorten the same amount at each end. If you adjust the length be sure to transfer the squares at the side seams to a new location (based on how much you lengthened or shortened). The squares mark where the shirt is left open below for "tails". You can lengthen or shorten the sleeve right in the middle of the sleeve, or at the hem. If you adjust at the hem, again move the pleat markings and squares.
You can also lengthen or shorten the front yoke. Again, transfer markings if doing so.
If you lengthened or shorten any pattern pieces, you may need to adjust the fabric requirements.
I made a size Small for this tutorial. And as I mentioned above, I had to use extra fabric to cut out my pattern because my fabric was 30" wide. I used 3.25 yards of fabric.
Seam Finishes
You can finish your seams in several ways. Turning the edges under and stitching is an option. Bound edges would be ok if using thick fabric, but is probably not likely for this pattern. You can even flat fell, or faux flat fell your seams. The easiest thing to do is to zigzag or serge your seam edges. I serged most seams.
Cutting
Use the cutting guide and layouts in the pattern, but also know that you can change it up as you see fit. The cuff, collar, and belt pieces can be cut on the cross grain if desired. And the placket pieces could as well, if needed. The sleeves are cut on the fold. And the front and back of the shirt, as well as the yoke, are cut as one piece with a hole cut for the head opening. Don't cut the front slash for the placket yet, but do cut the hole for the head. I like to trace the hole first and then remove the pattern piece and cut the fabric.


For the belt, you should add at least 3 inches to the Left and Right Belt pieces if you are cutting a XL to 3XL size. However, you may want to adjust the length later -- when you are putting the belt on the shirt. The belt is optional, so you can leave it off all together if you want.
Be sure to add markings to all your pattern pieces. I find that I like to mark the notches, circles, stars, etc. on the right side of the fabric (though for this one, I started with marks on the wrong side and transferred to the right side).

Sewing the Busserull
YOKE
Press under the 1/2" seam allowance on long un-notched edges of the Yoke Lining.

Then place the Yoke Lining on top of the right side of the Front/Back, with the wrong side of the Yoke Lining to the right side of the Front/Back. Line up the center back notch, shoulder lines, and front neck slash marks.

Baste within the seam allowance on the sleeve sides of the Yoke Lining and Front/Back. And edge stitch at the pressed under edges of the Yoke Lining. Then, stay stitch about 3/8" (9.5mm) from the neck edge. This helps keep the neck from distorting before the collar is attached.

Cut along the center front opening on the Front and Yoke Lining, from the neck edge to the center of the box. Cut through all layers. I like to mark a line from the neck to the square so insure that I cut the slash accurately.


PLACKETS
Place the long edge of the Underplacket (D) over the righthand edge of the center front opening with the wrong side of the the Front to the right side of the Underplacket. Match the small dots. Stitch from the neck edge to the small dot. This is a 3/4" (19mm) seam allowance.
Now move on to the Placket Piece. With right sides together, fold Placket E on fold line. Stitch around the lower edge, from the fold to the star. Clip off points to reduce bulk and then clip to the star. Turn right side out and press.


Place Placket to the left of the center front opening with right side of the Placket to the wrong side of Front. Match the raw edges. Pin and stitch the the raw edge of the Placket to the Front along the stitching line, from neck edge to star. This is also a 3/4" (1.9cm) seam.


We had a wonderful group of entries for our April Contest - Embroidery and Handwork on Folkwear patterns. Folkwear is known for (and founded on) the handwork details that can go into a traditional or historic garment. Many folk garments are embroidered -- for decoration and meaning -- and the the handwork can place the garment in a time and location. And Folkwear patterns are also used by art-to-wear makers who create amazing garments, incorporating traditional and modern textile arts to create unique and beautiful pieces. A Folkwear pattern is a canvas for creativity.
I am going to show off some of the entries for this contest because they are beautiful and inspirational. A huge thanks to everyone who sent in an entry! You are a talented group!
The 101 Gaza Dress is well known for the embroidery on the front. The gown is traditionally called a thobe and has distinctive Palestinian embroidery decorating it. Customer, Amy, used Folkwear's pattern to add to the bodice. And, Mary sent us this tunic she made (second below) from the 101 Gaza Dress in March.


Another pattern that has a lot of embroidery designs included is our 107 Afghan Dress. While some customers use our embroidery designs, this dress lends itself very well as a canvas for creativity. We had several stunning entries of the Afghan Dress.
Carolyn made the dress below many years ago, spending 200 hours on the embroidery and beading of the front and back panels, plus the fringe. Stunning!


Folkwear has a number of patterns for traditional folk work shirts, also sometimes called smocks. And our newest pattern, the 149 Norwegian Busserull, is another example of a traditional European folk work shirt. There are a lot of similarities among folk work shirts around the world. I define folk work clothes here as the traditional style of clothes worn for working in a geographic or cultural region. The style, construction, and design of clothes are passed down through generations and not usually taught in any formal education. Folk work shirts are based in traditions that are hundreds, if not thousands, of years old. And they were/are constantly evolving. Folkwear was founded on providing patterns for these clothes, and we have several traditional European work shirt patterns from the 19th and 20th centuries, as well as work tops from Ghana, Japan, and Mexico. Similarities in function and construction can be seen among these patterns and garments.
Loose and Comfortable
First, the work shirt, or smock, is meant for working, which means it is generally a loose-fitting and comfortable garment which allows plenty of room for movement. They are usually boxy, with wide shoulders, and can often be long in length (protecting the upper thighs). European work shirts are usually fitted at the wrists and neck. This helps keep a person warm in the many cold days of a Northern climate, but also keeps loose ends of the garment from getting caught in anything a person may be working on or with. The Ghanaian smock has no sleeves, allowing for room to move as well as keeping cooler in a warm climate. And Japanese work clothes often have wider sleeves, but the sleeve are usually shorter than more formal garments (again, keeping sleeve ends away from whatever work maybe done). Often these work shirts were made from a medium to heavy weight linen or cotton, but sometimes wool -- fabrics that would hold up well to being heavily worn.


Geometric Pattern Pieces
Another common feature in work shirts is the geometric forms of the pattern pieces. Pattern pieces are almost always rectangles, squares, and occasionally triangles. Folk shirts were usually made from handspun, handwoven fibers, which were often also hand grown and dyed. And if someone was spending all the time and work to make a fabric, it would be wasteful to cut the fabric into too many shapes, especially shapes with curves (like for a typical curved armhole which we now use). You would want to be as efficient as possible with the fabric yardage. These were not fancy clothes to show off wealth or status. You would want as little fabric waste as possible. Folk work clothes were the original "no waste" sewing. Using shapes like square, rectangles, and sometimes triangles, not only keeps fabric waste low, but also gives a sturdiness and strength to garments which is helpful when the clothes are used for working in fields, homes, or trades.

When you explore these patterns, you can also see that, depending on the traditional loom width size, these work shirt pattern pieces were made to the size of the loom width that would have been typical in the culture (or even village). So, the pattern pieces would be made to be the size of the loom, and either have larger seam allowances if the garment needed to be smaller (which you can clearly see in Japanese patterns like the yukata or hapi) or have panels added to the sides to make the garment larger, which you can see in the 116 Shirts of Russia and Ukraine. In West Africa, most looms are 6-9 inches wide, and you can see in the Ghanaian smock that these strips of cloth are sewn together to make the smock (and therefore can be made larger or smaller by the addition or subtraction of panels).

Shoulder Seams
Another feature we often see in a lot of work work shirts is the lack of a shoulder seam. Often, the fabric for the front and back are cut as one piece. In Japan, and other Asian cultures, there is a center back seam, but in many European (and in the Old Mexico Dress (based on the huipil), there is just a hole, or slit, cut for the head to go through. This is true for the Ghanaian smock as well. Instead of a shoulder seam, the European work shirts often have a shoulder yoke. This is an extra piece of fabric that goes over the shoulders, reinforcing the shoulders and providing some extra protection for the fabric during work. You can see this clearly in the 149 Norwegian Busserull, 102 French Cheesemaker's Smock, and 116 Shirts of Russia and Ukraine. Even the 148 Black Forest Smock (German smock) has extra fabric at the shoulders. The 148 Black Forest Smock and 102 French Cheesemaker's Smock do have a type of shoulder seam, but they are on either side of the shoulder yokes.


Underarm Gussets
Another distinguishing factor of a folk work shirt, particularly European, is the underarm gussets. These are usually triangles, or squares, of fabric that are added between the sleeve and body of the shirt at the underarm. This allows for the rectangular pieces of the sleeve and body to be joined and provide more room for arm movement as well as more room through the chest. You can see underarm gussets in 102 French Cheesemakers Smock, the 149 Norwegian Busserull, 103 Romanian Blouse, and 204 Missouri River Boatman's Shirt, and even in 117 Croatian Shirt (where the gusset is becoming a little more elongated and not a square or triangle, and showing how the shirt was evolving to become a more modern version).


Opening for Head
And that brings us to another feature of a folk work shirt. The opening for the head is sometimes created in the middle of the fabric section for the front and back. Some garments have a circle cut from the center of the front/back piece and this is then reinforced with the yolk and a collar. To make enough room for the head to fit, another slit is usually cut down the front of the shirt and several rectangles of fabric are sewn to make a placket. Sometimes this slit is finished very simply, without plackets (like the shirt in the 147 Norwegian Bunad or 123 Austrian Drindl -- both outfits that have evolved into festive wear). The 149 Norwegian Busserull, 116 Shirts of Russia and Ukraine, and 158 Ghanian Smock all are made with a hole in the pattern piece for the body with a placket covered slit in the front of the shirt (Ghanaian Smock is finished without a placket).

Instead of a circle cut for the head, some shirts are made with a slit cut for the head. The slit runs the direction of the shoulders, and another slit (finished with or without plackets) is cut in the front to help make room for the head to come through. The 204 Missouri River Boatman's Shirt is like this. A more stylized version is the 217 Poet's Shirt, which really is a work shirt that was adopted by the more well-to-do poets and upper class. The slit is cut in the fabric for the head and this slit also has a neck gusset at each end, which is a small triangle of fabric (similar to the underarm gusset) that allows more room at each end of the slit and also then reinforces the slit, so it won’t rip open, yet provides enough room for the head to come through.


Handwork
Another feature of folk work shirts that I find really beautiful is the addition of embroidery that is used to decorate the shirts. Embroidery and handwork can provide meaning to the garment, whether that is simply the addition of beauty to a garment that sees a lot of drudgery, or creates a nationalistic or cultural identity, or simply shows off the skill of the women who were often the ones creating these embellishments. Sometimes symbolism in the embroidery, or handwork, had meaning or implications for the work, the location, or the culture -- such as implications for wealth, health, or protection.
Embellishments to work shirts include embroidery, smocking, handmade lace, monograms, and even resist dying. You can also see the way that embroidery, and handwork, done to these work shirts became very important in some cultures. For example, the 103 Romanian Blouse is essentially a simple work shirt, but the classic and beautiful embroidery that decorates the front and sleeves of the shirt became a national symbol and the shirt now represents Romanian culture and identity. And now, the highly decorated Romanian Blouse is usually worn for festivals and special occasions. This is similar for the 221 English Smock. This shirt, at its core, is a simple work shirt with simple pattern pieces, underarm gussets, and a collar. But over the many years it was in use as a work shirt in England, it became more and more decorated with smocking and embroidery. The smocking was practical (at least at first) because it would pull some of the fullness out of the shirt at the sleeve cuffs and around the neck. The construction, smocking, and embroidery became symbols of British farm workers and laborers. And you can see the same with embroidered Mexican and Guatemalan huipils and Ghanaian smocks.


There are exceptions to the typical embroidered, or decorated, work shirt, of course. The 149 Norwegian Busserull and the 102 French Cheesemaker's Smock are both traditionally made of striped fabric with no other decorations, and may both have developed a little later in history than some of the other folk work shirts.
See our collection of folk work shirts and tops from around the world here.
Do you have further questions about folk work shirts? More to add to this general and brief overview? Let us know in the comments below.

We are celebrating 50 years of Folkwear with a series of sewing contests all year. We have been quite busy here at Folkwear over the last few weeks (and will stay that way for a few more), so we are late getting this month's contest announced. But, we are excited to do so because one of my favorite things about Folkwear patterns is that so many of them have options for embroidery or handwork. Embroidery and handwork has been a way of decorating clothes, and providing symbolic meaning to clothes, for millennia.
For this contest, here are the rules:
You can see a few examples of our patterns with embellishment details in them below.


In fall of 2023, Cynthia made this wonderful tutorial on how to adapt View B of the 211 Two Middies into a long dress with long sleeves. This just shows the versatility of the 211 Two Middies pattern - make it with long sleeves, make it into a dress. You can use this tutorial for adapting the pattern to what works for you. Make the short-sleeved version into a dress and you have a great sundress! Make the dress long or short -- it is a great shoulder season staple that way. It’s one of those designs that continues to inspire, no matter how much time passes or what season we're in.
If you’re looking for a project that blends classic structure with room to experiment, this one still holds up. Whether you’re returning to it or discovering it for the first time, it’s a reminder of how a single pattern can evolve into something entirely your own.
Take a look!
---------------------------------------
With fall weather upon us and the promise of much cooler temperatures, change is in the air. Part of this feeling of change comes with the excitement of a change in wardrobe! There is a simple comfort in being reacquainted with one’s old favorite clothes and being inspired to make new favorites as well.
One of the best things about Folkwear patterns is the excellent foundation they provide for making a garment all your own. In this blog post, I am going to show you how I made our 211 Two Middies pattern into a long-sleeved dress!
I turned View B from 211 Two Middies blouse pattern, into a dress perfect for fall! This blouse, with the nautical collar and all its great details, is one of those pieces that is welcome in any wardrobe no matter the season. It is the perfect warm weather blouse with it’s flattering short sleeves and nautical flare. Even if you do not want to make a dress, you can lengthen the sleeves and continue to enjoy wearing the Middy Blouse as the temperature drops. Lengthening the sleeves is easy… just decide on the length you would like and use the “lengthen or shorten here” line marked on the pattern for a warm and cozy version of the Middy Blouse to be enjoyed all winter long. You can also follow along in this blog to learn how.
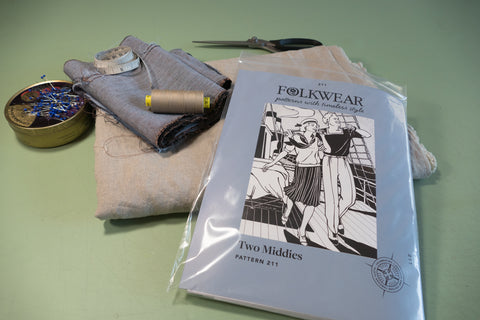
The 211 Middy Blouse pattern, fabric, and thread for making my dress.
The roomy fit of the Middy blouse makes it a perfect candidate for an easy transformation into a comfy dress. The bottom edge of the blouse is made even fuller or wider when the bottom band and little pleats are eliminated. The width of the bottom edge easily accommodates additional fabric for creating a dress.
There are any number of ways of adding a skirt portion to create a dress. The length of the blouse can be shortened or lengthened to change the position of the waistline. It just depends on the look you want and how you want your dress to hang. For a few examples, the blouse could be transformed into a dress by raising or lowering the bottom hem to create an empire waist or a drop waist or somewhere in between. The blouse and skirt portion could be combined and cut as one piece, or the skirt portion could be added separately with gathers or pleats. For this project, I used the Middy Blouse pattern as it is and simply attached a slightly A-line skirt to the bottom edge of the blouse (minus the bottom blouse band).
I made my dress using View B of the Middy Blouse as my foundation with only a few simple changes to alter the fit that allow for a bit of winter layering and a vintage aesthetic. For example, to create a roomier fit, I simply graded the side seams of the blouse to be wider at the bottom edge. To learn how to grade the side seams of the blouse check out the 211 Two Middies Blouse Sew Along: Day Three. The main consideration is being sure the bottom edge of the blouse is wide enough to easily clear your hip measurement to provide a nice hang and give you enough ease of movement.
The other adjustment I incorporated is to make the sleeves longer. I also decided to make the sleeves just a little bit fuller without having to disturb the armhole construction. To do this, I widened the sleeves slightly from the armhole to the bottom sleeve edge.
The blouse becomes a dress when a simple A-line skirt is added. To give the bottom of the dress a bit of interest I incorporated two horizontal pleats. I also added pockets to the side seams, because nearly all side seams are made better with pockets!
All details on how I made these adjustments are below!
Fabrics
I am using a mid-weight linen with a lovely drape and a scrap of leftover linen cross weave fabric for the collar and cuffs. Check out the fabrics for purchase on our website, where you will find some options for this project.
You will need additional fabric yardage for making the skirt portion and for adding length to the sleeves. I added an additional 1 yard (91cm) for the skirt portion and an extra 1/2 yard (46cm) for the sleeves. The fabric I used was 59 inches (150cm) wide.
Note: If you make length or width adjustments to the pattern pieces, be sure to re-check your yardage requirements before purchasing fabric.
Get Started
You will need to make adjustments to your pattern before cutting your fabric or starting to sew the dress.
Adding Length and Width to the Sleeves
The sleeve can easily be made longer or shorter, depending on your requirements. I decided to add width and length to the sleeves.
If you want to add width to the sleeve, do this adjustment first. I made the sleeve 1/2 inch (13mm) wider by grading the sleeve. To do this, I added 1/4 inch (6mm) just to the outer edge of each sleeve side seam, for a total of 1/2 inch (13mm). Remember this sleeve is comprised of a front and a back sleeve piece. Therefore, you do not add any extra width at the connecting center seam. Starting 1/2 inch (13mm) down from the under-armpit seam edge, draw a line connecting to the bottom edge of the sleeve at the added width (in my case at 1/4" wider than the sleeve bottom edge). Use a hip curve to create a smooth connecting line. This is your new outer cutting line for the sleeve. The idea is to widen the sleeve, without disturbing or altering the armhole opening.
After widening the sleeve, I was ready to lengthen it. I decided to lengthen my sleeve pattern to measure 19 inches (48cm) long, keeping in mind the 3/4-inch (1.9cm) cuff to also be added.
I simply cut on the "lengthen or shorten here" line to separate the sleeve into two pieces. Then I inserted another piece of tracing paper behind the two original sleeve pattern pieces, to allow for the increase and connect the top and bottom of the sleeve. Be sure the extra tracing paper is big enough to provide enough overlap on the back side to secure to the original pattern pieces with tape. A bit of tape added to the front side will help as well. Use a hip curve or French curve to create a smooth continuous line connecting the two separated pieces of the sleeve. Trim any access tracing paper away. Now the sleeve pattern has been lengthened and ready to use.
Using Swedish Tracing paper makes this task easy and it can be pinned and reused over and over.

Preparing the sleeve pattern pieces to make a longer sleeve pattern. Notice the graded outer edge.

The front and back sleeve pattern pieces graded and cut apart.

The sleeve pattern pieces separated with more tracing paper underneath to create a new longer sleeve pattern.

The two new longer sleeve pattern pieces.

The new longer sleeves sewn together.
Sidenote: I edgestitched the seams of this dress to add stability to the linen fabric I used. The seams benefit from the stabilization edgestitching provides and this is another way to finish the seam. This is especially relevant if a fabric is not tightly woven (and linen does tend to fray). This edgestitch technique is similar to a faux flat-felled seam, but the seam does not need to be finished together (serged or zig-zagged) so there is a little less bulk in the seam. To edgestitch the seam, press the seams towards the back of the garment and edgestitch on the back side of the seam. I edgestitched the shoulder seams, the sleeve seams, and the waist seam as I constructed the dress. Edge stitching adds a nice finishing detail and strengthens the seams, all at the same time.

The wrong side of the sleeve edge stitched with the seam pressed to the back.

Right side of the sleeve edge stitched on the seam.

The two sleeves sewn together and edge stitched.
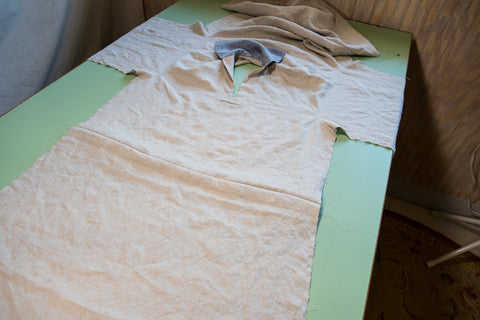
Becoming a Dress
I constructed the blouse portion of the dress according the pattern instructions, but left the underarm and side seams un-sewn. It is easier to sew the side seams all at once, after the skirt and pockets are attached.

The blouse portion is nearly complete, except for sewing up the under-arm seams and side seams.
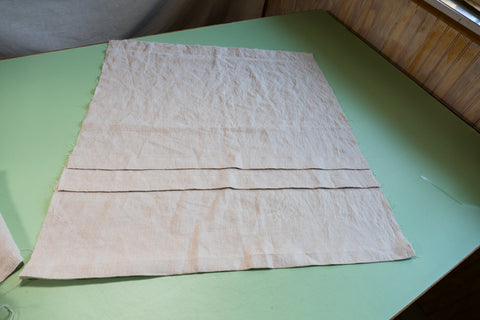
Now to construct the front and back skirt portions of the dress. The skirt I designed is a simple A-line with two horizontal pleats near the bottom to add a vintage touch.
The bottom edge of the blouse determines the width of the top of the skirt portion. The bottom edge of the front and back of my blouse measured 23.5 inches (60cm) wide, therefore the top of the front and back skirt must be the same. I cut the front and back of the skirt with my fabric folded in half, so the bottom edge of the front and back skirt was as wide as my fabric would allow (29.5"/75cm wide or half of the 59"/150cm wide fabric) and the top was 11.75 in.(30cm) at the fold (and 23.5"/60cm when opened).
You can cut your skirt as long (or short) as you want. I wanted my skirt to be a bit longer than mid-calf length, and I wanted to add pleats to the skirt for interest. The pleats meant that I cut the skirt about 4 inches longer than needed, to make two, 1-inch pleats. If you add pleats to your skirt, make sure you make the pleats at the exact same place on the front and back so they match when sewn together.
First, sew the front skirt to the front of the blouse at the bottom hem of the blouse. Then, sew the back skirt to the back of the blouse at the bottom hem of the blouse.
One of the two skirt pieces with its two pleats ready to be added to the bottom blouse edge.

Making sure the horizontal pleats of the skirt align.

The blouse and skirt portions are ready to be assembled.

The skirt and blouse pieces sewn together.
Adding Pockets and Sewing the Side Seams
Add the pockets to the side seams of the skirt before sewing up the side seams of the dress. The pockets are optional, but this is a perfect opportunity to try your hand at putting pockets in a side seam. To learn how easy side seam pockets are to make check out the Pocket Series: Side Seam Pocket blog.

Pinning the pocket pieces into the side seams to the skirt side seams.
Stitch the pockets in place first with one pocket piece on the right side of each side of the front and back of the dress. Make sure the pockets are at the same place on each side so they match when put together. Then press the pockets to the outside of the dress and press the seam allowance toward the pockets. Pin the dress side seams and stitch the seam allowance starting the the bottom edge of the dress and sew to the bottom edge of the pocket, being sure to back stitch. Then start the stitching again on the top edge of the pocket and continue up the blouse side seam, pivot at the arm pit and finish stitching at the edge of the sleeve. Then sew the pocket bags together. Repeat for the other side.

The side seam and pocket bag pined and sewn using the seam allowance.
Add the cuffs and little pleats to the sleeves according to the pattern instructions or simply hem to produce the length you require. Binding the sleeve edges would be a nice touch too.
Hem the bottom skirt edge and enjoy your new dress!


Back view of the Middy collar

Cuff and side seam pocket.

View of the pleat detail.
By using the 211 Two Middies pattern and making some simple changes you can turn this lovely blouse into a whole new wardrobe stable. Learning to look at a pattern with fresh new possibilities is a great way to create new versions of old favorites and enjoy your patterns even more.
We, at Folkwear, look forward to seeing what you are inspired to make!

Reintroducing a classic! While this original blog post is now 6 years old, it still holds up! Please enjoy this deep dive into this classic pattern, and all of the history that goes along with it!
We re-introduced the 211 Two Middies sewing pattern nearly 6 years ago! First published by Folkwear in 1980, 40 years later, we brought it back in a slightly different form - in a larger size range with with two handsome blouses for women and men based on traditional naval shirts of the past.

The sailor's Middy has been worn for countless generations by seamen, petty officers, and midshipmen (for whom it was named) on all the oceans of the world in navies from the U.S. and Great Britain to the Soviet Union and Japan. It has also been a constantly recurring feature of children's and women's dress since at least 1850 (in 1846 Queen Victoria and Prince Albert dressed their young son in a sailor outfit for a royal portrait that sparked this fashion trend). And, in April 1980, women in the U.S. Navy were issued white middies and bell-bottom trousers as official garb, replacing a less distinctive skirt and blouse.
View A is the uniform of seamen in the British Navy during World War II and for many decades earlier. The original was made of heavy white twill cotton with blue binding of dungaree cloth around the square neck opening. It was worn with white shorts and various head coverings depending on the sailor's origin. The odd-shaped self-patch across the back shoulders and down the center back exemplifies the persistence of naval tradition. It is a reinforcement to strengthen that section which was soiled by the sailor's pigtail worn in the 19th Century (and before). Heavy scrubbing with a brush and saltwater was needed to remove the natural oils, until the back wore out and had to be patched. However, read another reason for the patch below in the comments! You can make this shirt with or without the patch, but it also gives a chance to make an interesting color-block look to the shirt. It makes a good undershirt (and is great for wearing under our 270 Metro Middy Blouse).

View B is a collared Middy originating from 1927, and our original was khaki colored twill with no trim. The hip-banded style was adapted from navy-wear to sports clothes in the twenties, and was shown also in "sports silk, foulard, crepe de chine, linen and gingham”. Women and girls wore middies especially as sport clothes and for school until the 1920s when, at their height of popularity, the familiar square collars (as on this version) were added to garments for all occasions. This Middy collar, often trimmed with braid and/or stars, has been added to all styles of dress, from the modest bathing costumes and voluminously skirted gowns of Victorian times to the scanty flapper dresses of the Roaring Twenties. Small children, especially boys, have been outfitted in sailor suits since before uniforms in the British Navy were officially regulated in 1857. Royal princes from various European dynasties are frequently pictured arrayed with full insignia, ties, and often a whistle strung around the neck and tucked in the breast pocket. Neck ties are still part of navy dress. We teach a simple method of cutting and sewing a tie to add to this shirt version in the pattern. This shirt has a breast pocket and a tab to hold the tie.
The pattern also includes several pages of traditional decorative embellishment for View B - including how to use soutache and braid and how to embroidery the traditional stars.
Both of our shirts are sized for men and women; men for sizes Small to 2X-Large and women from X-Small to 2X-Large.
For inspiration for this pattern, we put a Pinterest board together with ideas for modern wear as well as images that show the historic context of this garment. Some of my favorites are below.

I've seen lots of middy tops in white and blue/navy, but red is also an excellent choice - the trim here is traditional, but perfect for a vintage-modern look too. The large collar is lots of fun! (Pinterest link)

From the runway - a middy top inspired look. Again, the trim is fun, and I like the different colored cuffs and collar - a great way to use fabric! (Pinterest link)

I would not have thought to use an eyelet fabric for this shirt until I saw this. And I love it! So pretty and feminine. (Pinterest link)

Love the older images of women wearing Middy Tops. These two women from University of Utah in their Middies with neck ties and skirts are very sporty. (Pinterest link)

I love this image too because it shows how the Middy was used as an "outdoor" outfit for women - for camping and sports. I like the short sleeves and knickers with the shirt. (Pinterest image)
Find our 5 day sew along that starts here, and tackles different aspects of sewing both views of this pattern.

by Molly Hamilton
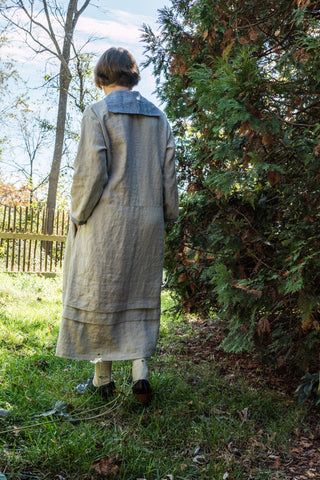
We finally were able to get our 239 Blonde Bombshell back into print this year. And, graded into larger sizes. And when we did, I realized what a simple dress this really is. It is a striking dress -- fitted at the top, but baring shoulders and back, with a large circle skirt. The dress can be made in a cotton for a summer sundress or in silk dupioni for a winter formal dress. And so much in between.
I knew I wanted to make one for myself when we finished the pattern update, and I decided to use a cotton satin batiste from our collection. The batiste has a bit of body, a floral print, and I knew it would work well. I decided to make the view with that is tied behind the neck, and I am going to list some tips and tricks to making this dress below, from my experience.
Tips and Tricks


I love this dress and how it turned out, and I've had lots of compliments on it. And I was pleasantly surprised how easy and quick it was to make. Now I want to make a few more in different fabrics. Have you made this dress? Any other tips you want to offer? Leave them in the comments.


Huge thanks to this article by Karen Skoglund, a long-time Folkwear fan and customer. She sent us this amazing article she wrote, with photos, when we had our Oldest Folkwear Contest last month. If you want to read the PDF, which is formatted and illustrated, you can go here (PDF, also printable). We are so grateful to Karen for this beautiful article.
I discovered Folkwear through a Fiberarts magazine advertisement, not long after the company began in 1975. Three women, handwritten instructions, patterns created on a school bus, it immediately spoke to me. It felt thoughtful, deeply intentional, and a little magical. I remember thinking, oh… these are my people!

My First Pattern: 201 Pairie Dress
It was the late 1970s, and my best friend Peggy and I were deep into our love of Little House on the Prairie. I actually made two dresses, one for me and one for her. Mine was purple, a coordinating cotton print calico. I remember carefully sewing French seams, already sensing that these patterns asked for a different level of attention and hand care. I embellished mine with vintage hand-crocheted lace, adding another layer of history to the garment.


We wore them when visiting historical villages to demonstrate bobbin lace making. Being there together in our Folkwear dresses made the experience feel deeply memorable. Peggy has since passed away, but when I think of that Prairie Dress, I know her memory is stitched into every seam. Yes, I still have it, and since it is wonderfully loose-fitting, it still fits me after all these years.

The original dress.
Early Love for Folkwear
Some of my earliest pieces included the #113 Japanese Kimono, the #111 Nepali Blouse, and the #148 Black Forest Smock, which I hand embroidered myself. I also made the #121 Guatemalan Gabacha. And for my twin brother, Kevin, I even sewed the #202 Victorian Shirt.


Patterns in order, above: 113 Japanese Kimono, 111 Nepali Blouse, 121 Guatemalan Gabacha, 202 Victorian Shirt.


148 Black Forest Smock, embroidered by me (originally this was 108 Black Forest Smock).
One of my favorite early pieces was #126, the Vests from Greece and Poland. I made and fully hand-embroidered two for myself, proudly wearing them to the New York Renaissance Festival.


126 Polish Vest, Hand embellished by me.
Wedding Dress: 227 Edwardian Gown
When Folkwear released the wedding dress pattern #227 Edwardian Gown in 1984, it felt like pure kismet. I was getting married, and I made my own wedding dress from that pattern. I sewed the #226 Princess Slip and even handcrafted the bobbin lace that trimmed the dress. I also made #222 Vintage Vests for the men to wear. Folkwear has been woven into so many moments of my life.


Made bobbin lace and sewed this dress for my wedding.

Walking down the aisle with dad.
Devoted Folkwear Archivist
When I discovered Folkwear, I wanted to make every single one. To date, I have sewn 46 Folkwear patterns, and I own every pattern Folkwear has ever released. I still have all my collections of catalogs starting from 1979 to current, a New York Times Style article from 1983, and a California feature on how to achieve the “Folkwear Look.”


Some of my collection of Folkwear pattern catalogs.

Family Circle Magazine article.
 This New York Times article especially spoke to me. It deepened my love for Folkwear. I still share these articles and patterns with my students in my sewing classes, as proof that inspiration once sparked, lasts a lifetime.
Folkwear Fashion Shows
One of the moments that truly deepened my love for Folkwear was March 25, 1983, when I attended the Annual Fashion Show of the Woman’s Club of Waldwick, sponsored by Run of the Mill fabric store in Wyckoff, NJ. The theme was “Fashions by Folkwear Patterns,” and seeing those garments come alive on stage completely sparked inspiration.
On June 20, 1987, Run of the Mill hosted another Folkwear fashion show, and this time, I was in it. I had 20 garments I had sewn included in the show! Folkwear Patterns even loaned garments for the event. The finale was my wedding dress, #227. It was thrilling!

224 Beautiful Dreamer, 109 Little Folks, and 110 Little Kittel

227 Edwardian Gown and 226 Princess Slip for the finale.
A Living Legacy
What makes Folkwear special to me isn’t just the clothing, but the philosophy behind it. These are thoughtful, timeless collections inspired by decades past. The patterns teach history through your hands. They encourage embroidery, handwork, experimentation, and patience. They remind you that craft matters.
Folkwear has been a constant companion in my life, supporting my curiosity, building my confidence, and bringing me joy again and again. I keep coming back to these patterns because they never rush you, and they never lose their soul.
What’s kept me returning for nearly five decades is how adaptable and enduring they are. I’ve worn them simply and I’ve embellished them deeply. I’ve watched them change alongside my own life, always relevant, always grounded.
Folkwear taught me how to honor tradition without freezing it in time. That philosophy hasn’t just shaped my wardrobe, it has shaped my teaching.
Throughout the years, I have continually threaded Folkwear patterns into my sewing classes, introducing my students to garments that carry a story. I am proud to be teaching at The Quilt Tree in Nyack, NY, where I taught Folkwear’s new Basics Overcoat pattern, guiding students stitch by stitch. I teach students to see these garments not as costumes of the past, but as timeless pieces they can truly live in.
Folkwear has grown alongside me, and I feel deeply aligned with its continued stewardship. To carry these patterns forward through teaching, sharing, and helping them find their way into modern lives through new hands and new stories, feels like meaningful legacy work. I am honored to remain part of Folkwear’s living story.


Patterns above, in order: Basics Overcoat, Basics Pinafore Dress, 107 Afghan Dress.

We hosted a contest in February for the oldest Folkwear make that our customers could share. We had many amazing entries -- some with photos (older and newer) and some with just stories (garments passed on or disappearing in ensuing years). It was fun to see what our incredible customers made over the years. We absolutely loved seeing and hearing about each garment, each project, and each story that went with the garments. Folkwear clothes hold special memories for people. They create connections between generations, between people, and across cultures.
Today, we are sharing a few more of the entries from this contest below. And, if you have a story about a Folkwear garment, share it in the comments. We all love to read them.
First, we have several items from our other contest winner (chosen at random), Sue. She says: "I started collecting Folkware Patterns in the late 1970s. Unfortunately, I only have a few of those patterns now. I made the mistake of loaning them out & never got them back. . . . I didn't take pictures of the many things I made with them. I sure wish I had!" Here are some of the photos she has.


We hosted a contest last month for the oldest Folkwear make that our customers could share. We had lots of amazing entries -- some with photos (older and newer) and some with just stories (garments passed on or disappearing in ensuing years). And, it was so fun to see what our incredible customers made over the years. We absolutely loved seeing and hearing about each garment, each project, and each story that went with the garments. Folkwear clothes hold special memories for people. They create connections between generations, between people, and across cultures.
We are sharing some of the entries from this contest below. And, if you have a story about a Folkwear garment, share it in the comments. We all love to read them.
First, from the winner of the oldest make (in 1976, 50 years ago), Chandra sent in some photos of garments. This is what Chandra had to say:
" . . . Mom, who learned how to sew from her grandmother and kept it up through most of her life. Her sewing accomplishments included winning a “Make it with Wool” contest as a High School student and helping me sew my own wedding dress. As the owner of The Bookcase, a used book store in Albuquerque, from 1975-1980, she was one of the first Folkwear pattern sellers in the country, as shown by an ad from the Summer 1978 edition of Mothering magazine. My Mom died of breast cancer in 2013, but her love of Folkwear lives on in me. My own first Folkwear garment was a Romanian blouse that I made while I was in High School in the early ‘90s to wear to a Renaissance fair. Among my numerous Folkwear projects, my favorites are the Navajo blouses and skirts I made for my nieces (who are Diné) to wear during their Kinaalta ceremonies."
The first garment is a Gaza Dress made from cotton broadcloth with the original embroidery design. Made in 1976.

The second is a Black Forest smock made from cotton flannel that was also made in 1976, Her mother wore it while she was pregnant. This was the original 108 Black Forest Smock (currently 148 Black Forest Smock).

Finally, there is a lightweight cotton Romanian blouse that was made sometime in the late ‘70s or early ‘80s, again including the embroidery design from the pattern -- from 1981 or 1982.


I also made my husband's linen shirt, based on the Folkwear #202 Victorian Shirt pattern, and made him a bowtie from the same blue fabric as my dress trim." See them both below!

I loved the clever way Susan made both her wedding dress and her groom's shirt from the 117 Croatian Dress pattern. She says, "I made our wedding clothes in the summer of 1979. . . . we were both enrolled at Washington State University. The fabric was a silky material, probably a polyester? And yes, we still have the clothes and the pattern! I loved the detail on the front, and the covered buttons. It was PERFECT for the wedding. And we loved that we were matching but weren’t over-the-top twins!"


And Debby, who said this of her wedding attire: "I had a few ideas in mind and was excited to get started. I headed to the local fabric shops to see what they had to offer. One of the shops carried Folkwear Sewing Patterns. As I looked through them, #204 the Missouri River Boatman’s shirt pattern caught my eye. I loved the billowy flow of its style. I decided this would be the one to make. Peach and Cream were my wedding colors. For my husband’s shirt I chose a soft mid-weight cotton fabric in cream. I wanted to add something special, a sentimental touch to each garment. The neck placket of the Missouri River Boatman’s shirt was a perfect area to add some hand embroidery. Choosing floss colors that complemented my dress, I stitched flowers and vines with 2 overlapping hearts into the design. As I worked on his shirt, happy-meditative forever memories formed in my mind. It was 44 years ago and I no longer have the shirt or the pattern, but I do have the attached photos to share."

Grace sent us this photo and said that she had made her husband-to-be a nightshirt from our 202 Victorian Shirt pattern, and "On April 23, 1988 we married. We wore outfits that were (loosely) inspired by traditional European folk costumes, including a basic white muslin shirt. My new sister-in-law sewed the shirts for us, using that same Victorian shirt pattern. My husband still wears his shirt and vest when he's feeling festive. Thank you, Folkwear, for being part of our family history!" The vest is 222 Vintage Vests.

And, Dee, whose bridesmaids wore our 246 Calico Day Dress for her wedding (and she made two of them): "These photos are from my wedding in September of 1980. They are all made from Folkwear Pattern # 246 Calico Day Dress , out of cotton calico in autumn colors. I chose this pattern as best to complement the Victorian style of my gown. The patterns were purchased at Joann fabrics, in San Mateo, California. This was a much smaller, very nice fabric store, a shadow of the giant Joann stores that have recent left the market. . . . These pictures are especially dear to me."

Beth, who made this dress for her brother's wedding: "I made the Garden Party Dress 220 back in 1983 to wear to my brother's wedding. It's a pink cotton blend print, and I used leftover fabric to make a bow for my hat. I borrowed the color theme from the pattern envelope. Loved the dress and still have it."


Suzette also made the 220 Garden Party Dress to attend a wedding: "I made up the Garden Party dress in 1987 or 8 to wear to my step sister's wedding.It was in cotton calico. Floral in pale pink, yellow and a light grey-green. I don't have it anymore but re-purchased the pattern and made it up again in my current size, in a Liberty of London floral in similar colors, in cotton Lawn.... I love the pattern. So flattering."

And this lovely, and very 1980s wedding dress (I love it!) from Angel: "My oldest Folkwear make was the Gibson Girl blouse which I used for my wedding dress on Aug. 19, 1984. I used a soft polyester fabric with a bit of a shine to it and added an elastic waistband covered with a satin cummerbund. I added tulle and pearls to a plain hat and the bridesmaids all carried parasols - very 1980’s!!! Our wedding was at 3:00 in the afternoon on an unbearably hot summer day!" She looks gorgeous!


There were some old and fun-loving Folkwear memories, in our entries. Marianne said: "I made my first Folkwear garment at age 16, in 1980. At the time, I was a large self-taught seamstress, although my (wonderful hippy) mother had made a few simple clothes for us when we were young. I had been trying to expand my repertoire with garments made with patterns from the big pattern companies at the time....until our (off-the-grid, homesteading back in the woods) neighbor took up a side gig as a representative for a new little pattern company called "Folkwear" (which I guess was 4 years old at the time), and those patterns totally rocked my sewing world! One of the first ones I made was the Edwardian Underthings, which I unwisely chose a very loose gauze for (not knowing how challenging the pin tucks would be). I made both the top and bottom of the pattern, but the petticoat ended up being pretty wonky in terms of how it fell with the stretch of the cotton gauze, so I ended up making another in a tighter weave. Thanks to a photo shoot that a family friend did of myself and two of my friends in the river that flowed behind our home, I have attached a photo of the three of us with me in my Edwardian Underthings (I am in the middle of the photo). I loved that top and wore it for many years....It was quickly followed by many other Folkwear pattern creations."

Another beautiful 203 Edwardian Underthings was made by Joellen who said: "When I got a new sewing machine I wanted to try out some of its features. Edwardian Underthings was my first endeavor. I used a feather stitch, insertion lace, gathers and pin tucks. For a while I used it as petticoat under big skirts. As best I can remember I made it in the 80s."


A few other early Folkwear makes of note are the 107 Afghan Dress. Several people said this was one of their favorite makes.
First, Rosanne who collaborated with friends all over the country to make this dress. "It was in July or August of 1980. I remember because I spread the pieces out on my kitchen floor in Columbus and tossed the shisha mirrors on the bodice, and then I gotdown on my hands and knees and glued each of the shisha in exactly the place it landed, because I wanted it to look really spontaneous and not overly designed. I remember that really clearly because it turned out so well. This dress is spectacular. My friend Ellen Specht, now living in Eugene Oregon, did all the sewing, designed and embroidered all the crewel around the mirrors along with the beading. It is an heirloom garment. Thanks for the opportunity to show it off after all these years."


Barbara made this beautiful 107 Afghan Dress to wear out when socializing: "I made this dress in 1978 from Folkwear pattern 107 Afghan Dress. I used cotton fabric for all the panels. The pattern came together quickly since it was straight stitching rectangular pieces of fabric. I sewed it on a Singer treadle machine that someone electrified."

Kris made this lovely 107 Afghan Dress:

Finally, I love this fun and festive 107 Afghan Dress by Jane: "I have always loved your patterns, and bought a lot of them from a local California fabric store in the 70’s and 80’s. The afghani dress was a fave. I made this dress out of scrap fabrics, and wore it to a Christmas party in 1994. My husband loved it, and it was a hit at the party!"

Stay tuned for a few more entries from last month's contest. There are so many great Folkwear makes and so many great stories. Thanks for all the submissions and for traveling along with these stories.


