-
Sewing Patterns
-
Fabric
- Sewing Supplies
- About
- Blog
- Gallery
-

by Esi Hutchinson
It is finally summer according to astronomical dates and Folkwear is featuring 252 Beach Pyjamas, a perfect one-piece for a hot summer day, while still covering up the body from the sun and looking stylish. Here in North Carolina it is hot! This pattern suggests to use fabrics that are airy, flowy and that drape gracefully on ones body. Silk, linen, rayon, chiffon, challis or even cotton are great fabrics for the Beach Pyjamas pattern. When looking at this pattern early last month, I was inspired by the lines of the garment and how they could be made as separate pieces. It is a fabulous pattern as a one-piece beach Pyjamas, but it can also be "hacked" into more options.
In this blog post, I will show you how I made just the top of the Beach Pyjamas for a great summer blouse.
In this history of our 252 Beach Pyjamas pattern, it says that often the Beach Pyjamas were made from fabrics with "bright cubist-inspired prints". I did not consciously choose this fabric due to this description, however the fabric I chose seamed to fit the 1920-30's style perfectly. It is a lightweight rayon with a small abstract design.
Planning
I was lucky enough to try on one of Folkwear's samples to see how I want to lengthen and shorten the waist yoke to fit my torso. I suggest you make a muslin to see what fit changes you might make to the pattern before working with your fashion fabric. The main idea is that I am just going to make the top portion of this garment to create a blouse - I want it to fit my body the way I like.


I decided I wanted to shorten the three yoke pieces at the waist and the placket by 2in. (5cm)
There are not lengthening and shortening lines on yoke pieces D,E and F, however there are waistline indicators for your size on those pattern pieces, you can use those as your lengthening and shortening lines.

If there is puckering in the pattern pieces after you have folded on top of your waistline, you can make small cuts where is it puckering so the pattern piece can lay flat.

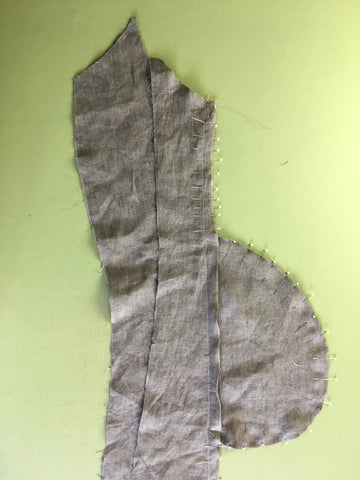
Here are all my shortened yoke pieces. I trued the side seam lines so they would be straight.

We will only be using pieces A-G, I-K which includes the Bodice, Collar, Yoke, Bindings, and Sash.

A nice thing about this sewing pattern is you can use French seams for fabrics that are delicate instead of overcasting or using a zig zag stitch. It causes less tugging and distress on the fabric. If your fabric moves a lot I would suggest basting your seams before using your final machine stitch length. This will prevent your garment from shifting too much. You can also read more about working with shifty fabrics in this blog post.
Constructing the Top
I sewed the bodice front/back with French seams at shoulder seams.

My favorite detail of the Pyjamas is the collar. It is very similar to the collar of 266 Greek Island Dress Jacket. To finish the outer raw edge of the Collar we will be using the Picot technique which the instructions suggest.
Picot: A rolled hem with a zig zag stitch sewn over the hem to hold it.
I do not have a rolled hem foot but you can picot a hem without one. You should practice first. I used a zig-zag stitch, with my stitching length at 1.30 and my stitching width at 5. I made sure the stitches pulled the outer edge of the fabric curling it up to encase itself.

Press under 1/8"/3mm on your practice piece, like the instructions say.

I made a couple of small stitches to attach a tail of thread to help me pull the fabric through at the start of picoting the hem.

Here is my practice picot hem. Adjust the tension, length and width of the stitch as needed for your preferred look.

I sewed a picot edge around the outer edge of the collar (after I practiced doing this edge). The picot edge gives a slight ruffling effect to the collar which I really liked. Now you can attach the collar to the bodice.

Pin wrong side of the Collar to the right side of Bodice front/neck edge, matching small dots, notches 2 and 3, and square to seam. Stitch, backstitching at small dots. Press both seam allowances away from Collar.
Trim seam allowance of Bodice only to a scant 1/8 in.(3mm).
I folded under 1/4in. (6mm) of the Collar seam allowance and folded it over the trimmed Bodice seam again, then stitched close to the fold, taking care not to catch COLLAR in stitching.
Continue with the pattern instruction steps, and stop after your have sewn on the Yoke.

I decided to get rid of the point that Yoke Right Front D has, it is there because it attached to the pant legs, but we are just making the top, so you can make it whatever shape you want. If your want keep it, great.

Take a ruler and cut a line to the shape you like. I did it like this.


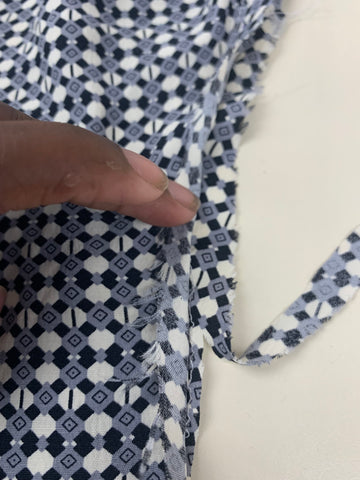
To finish the raw bottom edge of the yoke, you could use a Picot hem, bind the edges, or fold under 1/8-1/4 in. (6-3mm) and fold under again and stitch close to the folded edge. I used a picot stitch on the raw edges (folded under 1/8 in. (3mm) then using a zig zag stitch to enclose the folded edge).
Follow the instructions to place the hook and bar closure and adjust to better fit your body. Then add three evenly-spaced snaps closures to the placket.
For the Sash
You could use contrasting fabric or the same fabric for the Sash. I would suggest using the same or similar type of fabric. Cut four of pattern piece K two in one fabric and two in another, or all four in the same fabric (that is what I did).
Right sides together stitch short edges in whatever fabric combo you have and, press seam to one side a make a flat-felled seam. Repeat with other set of the Sash.
Again, picot the hem of the Sash by folding under 1/8 in. (3mm) on all raw edges of both Sash pieces. Then machine picot Sashes together.
I will not be tacking the Sash to the upper Yoke seam at side seam, as I want to be able to use it when and where I want. You can even use it as a head band.

We are finished! Personally I think the 252 Beach Pyjamas is a versatile garment, you could wear it to get drinks with friends, dancing, go out for a meal, wear to the beach! And now you can also make just a top from it. It is very flattering and comfortable, who doesn't love that!


by Cynthia Anderson
Today, in day three of the 160 Hawaiian Mu'uMu'u Sew Along, we will add the sleeves, make the yoke/yoke facing, and assemble the dress/sleeve/yoke in easy to follow steps. I am making View B (longer-sleeved version) for this sew along, though nearly all steps are the same for View C (short-sleeved version). We will have a tutorial on making the sleeveless version soon, as the steps are a bit different, especially for today's section. But for View A, today's sew along will not be applicable.
On day one, we gathered materials and figured out sizing and views. On day two, we created the dart and pocket and assembled the dress.
Sleeves
If you are adding short sleeves or the three-quarter length sleeves, make a double row of gathering stitches at the sleeve cap (between the open notches) as marked on the pattern. Remember to leave long thread tails for pulling the gathers.

With right sides together, stitch the sleeve together matching the notches. Finish and press the seams open. Repeat for the other sleeve.

This next part of the dress assembly can get a little confusing, but take it slow and pay attention to what matches with what and you won't have a problem. Matching notches and seams to notches is really important. We attach the underarm section of the sleeve to the dress first, then make the yoke and attach the yoke to the dress and upper part of the sleeve.
Add Sleeve to Armhole Opening on Dress
We need to attach the underarm section of the sleeve to the dress body first.
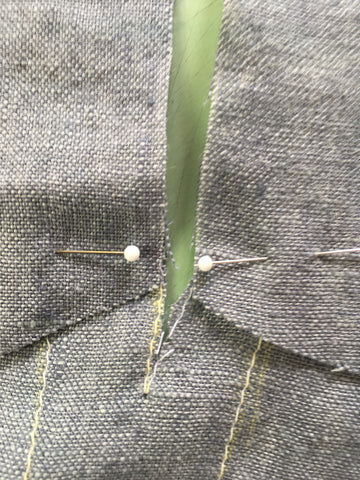
With right sides together, match the sleeve seam to the dart line on the dress body (the center red tip pin below). Match notch 17 and the star on the front of the sleeve to the star on Side Front.
Then, match the double notch 18 and the dot on the back of the sleeve to the Back/Side Front dot and seam on the dress. Finally, match notch 19 and the star on the sleeve with star on the dress back.
Stitch between the two stars (the outer red tip pins mark the stars). Repeat for opposite sleeve.

 Both sleeves attached to the dress at underarms.
Yoke and Yoke Facing
Remember the yoke has interfacing the yoke facing does not.
With right sides together, stitch the front and back yoke together at the shoulder seams, matching the notches. Press the seam open.

With right sides together, stitch together the center back of the yoke point matching the notches. Press the seam open.

Construct the yoke front and back facings just like you did with the yoke. If you have not done so already, run a machine basting stitch 1/2" (13mm) from the outer edge to use as a guide for turning the seam edge later.


Add Yoke to Yoke Facing
Pin and stitch yoke and yoke facing right sides together. Match center back, shoulder seams, and center front. Stitch the inner neck seam starting and ending at the center back. Be especially careful to start and stop the stitching in the same place at the center back as this will help the back look neat when turned. Alternatively, you could start stitching somewhere else along the neckline and pivot at the center back with the needle down in the fabric.

Trim, or grade, the seam allowances and clip every few inches to release the seam and make it easier to turn the yoke and have a smooth curve. Be sure not to clip through the seam stitching. Trim 1/4" (6mm) off, or grade by trimming slightly less off of the yoke facing than the yoke so the seam allowances are uneven.


Clip up to, but not through, the seam at the V at the center back. This clip is necessary to allow for turning the yoke/yoke facing.

Open the yoke/yoke facing, and press the seam allowance to the yoke facing.

Understitch, stitching the seam allowance to the yoke facing. Stitch close to the seamline of the yoke/yoke facing, stitching only the seam allowance and yoke facing together. This will keep the yoke facing from rolling to the outside and keep the neck looking neat.
Turn the yoke/yoke facing right side out and press the neck opening. If you choose not to understitch, roll the yoke slightly to the outside when pressing.


Now it is time to add the yoke to the dress and sleeve. Work this n sections as follows. Take your time and go slowly to make sure you have everything matching. Similar to add the sleeve to the dress underarm, there are lots of points that need to match, and now, also some gathers that need to be pulled to fit.
Add Yoke to Dress Front
Note: To make the yoke/sleeve/dress construction easier to see, I put the mu'umu'u on a dress form with the wrong side out.
Note: The red pins mark the match points of the yoke and dress.
Start working at the center front of the dress and the yoke (keep yoke facing out of pinning and stitching).
With right sides together, match and pin the yoke center front notch 14 to the dress center front notch 14.
Match and pin the yoke notch 15 to the dress side front/sleeve seam.
Match and pin the yoke notch 12 star to the dress Side Front/Sleeve seam star.
Repeat on the opposite side of the center front of the dress/yoke.
Now, stitch the yoke and front of the dress together between the side front/sleeve seam stars.

Add Yoke to Dress Back and Sleeve
Note: The red pins mark the match points of the yoke and dress.
With right sides together, match and pin the center back of the yoke to the center back of the dress.
Match and pin the yoke notch 16 to the dress Back notch 16.
Match and pin the yoke notch 13 star to the dress at the back sleeve seam star.
Pull the gathering threads on the dress, evenly spacing the dress back gathers to fit the yoke between the dress center back and the star at the back edge of the sleeve.
Stitch the yoke and back of the dress together between the back/sleeve seam stars. Pivot at center back with needle down in the fabric. Again, make sure the yoke facing is out of the way.

Attach Sleeve Cap to Yoke
Note: The red pins mark the match points of the yoke and sleeve cap/shoulder.
Match and pin the yoke shoulder seam to the sleeve notch 21.
Pull the gathers on the sleeve cap to fit the yoke.
Re-check that the gathers are evenly spaced, then stitch the sleeve cap between the star 13 (on back of sleeve) and star 12 (on front of sleeve) .


Turn under the remaining edge of the Yoke Facing at 1/2" (13mm) seamline. Fold the Yoke Facing to the inside of the dress and hand whip stitch the turned under edge of the yoke facing using the stitch line as a guide, slightly covering the stitching line.

With the dress/sleeve/yoke all assembled there are just a few easy finishing details to go. Join me for Day Four of the Folkwear 160 Hawaiian Mu'uMu'u Sew Along to add the optional interior shaping tab, finish the sleeve hem with elastic, and stitch the hem.

by Cynthia Anderson
Welcome to Day Two of the 160 Hawiian Mu'umMu'u Sew Along where we will create the darts and in-dart pockets, as well as create the front and back of the dress. In Day One of the sew along, we gathered materials, explored the pattern, and choose size and view to make.
I am making View B (with the 3/4 length sleeve) in a size small, but the instructions for both views with sleeves will be nearly the same. The fabric I am using is a mid-weight gray-blue linen, with pockets added to the front side dart. You may be wondering about how a pocket is added to a dart. I promise this is not difficult and you will love wearing this mu'umu'u with pockets.
To get started today, cut out the pattern pieces for your size and the view you want to make, according to the layout instructions. Don't forget to transfer all the needed markings to your fabric before you unpin and remove the pattern pieces from the fabric.
Seam Finishes: Finish seams as you prefer. There are a couple of places you could use French seams, but often you will want to press seams open and finish with serging or zig-zag stitching (or pinking).
Transfer Dart Marking
It is perfectly fine to transfer the pattern markings to your fabric in any method that works best for your project. But before you do, have a look at the method I have used for the dart and why.
First, I used tailor's chalk to transfer the dart outline to my fabric, because the ink of the water soluble pen I have is not easy to see on my fabric. Typically, I would make the marking on the wrong side of the fabric. This time, I transferred the marking to the right side of the fabric, because I planned to trace the chalk lines with a basting stitch. Since the basting stitching shows on the right and wrong sides of the fabric it really does not matter which side the transfer drawing is made.
I chose to make a basting stitch to outline the entire dart, because sometimes the chalk marking disappears before a task can be completed. Since this dart is large and it is handled quite a bit, I decided a removable basting stitch to be a good choice. The stitched outline also helps to maintain the integrity of the dart, preventing it from stretching.
Note: The basting stitch does not need to be removed unless it accidently ends up being visible on the right side of the mu'umu'u.

Another great way to transfer the larger dart lines is to use a piece of tracing paper and a tracing wheel. You can slip the tracing paper to the wrong side of the fabric and trace the dart cutting and stitching lines with the tracing wheel. The marks will be left on the fabric. You will need to move the tracing paper once or twice to be able to mark the whole dart, but it is fairly easy to do that and mark the entire dart. Be sure to use a tracing paper color that will contrast with your fabric. You can also use the basting marking method described above after tracing with the paper and wheel if you like.
Stabilize the Yokes and Yoke Facings
Anytime a fabric is cut with a curve, it becomes less stable. To preserve the shape and to stabilize the fabric, interfacing or stay stitching should be added. Most fabrics benefit from stabilization directly after being cut. Even if the fabric is just laying flat undisturbed, the weave will relax and the fabric will spread. If the fabric spreads or distorts, the pattern pieces will not fit correctly when they are sewn together.

Note: Adding interfacing is optional, but it is always a good idea unless you are confident in the stability of the fabric used. If you are not using interfacing, be sure to stay stitch all Yoke and Yoke Facing pieces.

To stay stitch, stitch just inside the seam allowance (seam allowance is 1/2" or 13mm) with a regular length stitch or shorter.
Tip: Try to avoid pulling or over handling these pattern pieces when stay stitching.

Prepare Dart for Pockets
The 160 Hawaiian Mu'uMu'u does not have a true side seam. Instead it has a long shaping-dart that acts as a side seam. The authentic mu'umu'u that inspired the drafting of this pattern did not originally have a pocket. However, the Folkwear team concluded that this dress was a perfect candidate for pockets.
If you do not want to add pockets, transfer the dart markings and make the dart according to the pattern instructions.
To add the pockets, the center of the dart needs to be cut away at the cutting lines, as seen in the photo below. Cut on the cutting lines for your size and cut carefully to the dot at the bottom of the cutting lines. This cut out space creates a seam allowance in which to attach the pockets. This might seem odd or even scary, but it is a standard way of installing pockets to a dart. If this is new to you, please do not hesitate to give it a try. Learning to sew is all about building your skill set.

Pocket Added to Dart
With right sides together, position and pin each pocket at the raw edge of the opening, matching the circles and stars.
Stitch the edges of the pockets to the raw edge of the dart along the seam line between the circles. (The white tip pins mark the circles. The red tip pin marks the star).


Stitch the pocket to the raw edge of the dart opening using 1/2" (13mm) seam allowance between the top and bottom circles.


Fold pocket to through to the inside (wrong side) of the dress, and press the seam towards the pocket.

Now, pin pockets, right side together, matching the notches on curve of pocket, and matching circle and stars. Pin the dart together matching the dart lines (above and below the pocket). Stitch from the top of the dart to the circle at the top of the pocket. Pivot, with the needle down in the fabric, and stitch from circle around the curve edge of the pocket to the circle at the bottom of the pocket and end with a backstitch. See the photos below.


Be sure the seams are aligned, and now stitch from the star (red tip pin in photo below) on the dart/pocket seam to the dart dot, leaving long thread tails at the bottom of the dart and tie off. Keep the pocket out of the stitching.

 The bottom of the dart threads tied.
Press the dart and pocket towards the front of the mu'umu'u. Repeat for the other pocket on the other Side Front.
The photo below shows the dart and pocket pressed towards the front of the mu'umu'u as seen on the wrong side.


Finished dart with pocket!
Add Front Sides to Center Front of the Mu'umu'u
With right sides together, matching notches and dots, pin and stitch each Side Front A to Center Front C as seen below. Press the seams open or towards the sides and finish.

Right side view of the finished front.

The Back
Make two rows of gathering stitches along the top of each Back B as marked on the pattern (between the open notches).

With right sides together and matching the (double) notches, stitch the Back B center seam. Try to keep the gathering stitches out of the center back seam. Gathering the back will be done at a later step.

Press the seams open and finish.

Sew Front and Back of Dress Together
With right sides together, stitch the front and back of the mu'umu'u at the side seams. Press the seams open or towards the back and finish.

There we have it. The body is constructed with pockets added to the darts. I hope Day Two of the mu'umu'u sew along went smoothly and you learned something new. Join in again for Day Three, for adding the sleeve to the armhole, constructing the yoke and yoke facing, and assembling the dress/sleeve/yoke.

by Cynthia Anderson
Folkwear excited to introduce the 160 Hawaiian Mu'umu'u pattern! To celebrate the debut of this new pattern, it is on sale for the month of July and comes with this sew-along! The pattern is offered in a paper or pdf version. If that were not enough, Folkwear's very own multi-talented Esi Hutchinson created the cover illustration!
The mu'umu'u is often overlooked due to it shapeless reputation. Once the Folkwear team examined an authentic mu'umu'u, it was apparent that this gem deserved to be rediscovered. We hope you share in our delight for this dress and find it to be a charming, comfortable, and versatile new addition to your wardrobe. You do not have to live on a beautiful tropical island to enjoy making and wearing this comfy dress in time for summer and beyond.
This loose and breezy garment, is considered aloha attire and has its origins in the 1800s when missionaries adapted their Mother Hubbard-style dresses to fit Hawaiian women. Originally a tool of assimilation, native Hawaiians have since reclaimed this dress to symbolize their heritage and its popularity has spread worldwide. Mu'umu'u is typically made of cotton and often features tropical floral, or traditional Hawaiian motifs.
Our sewing pattern features three views, each with a different sleeve option: sleeveless (View A), elbow-length (View B), and sleeve short sleeve (View C). The short sleeve is an open ruffle, while the longer sleeve has elastic at the cuff and falls to the elbow. All three dresses feature princess seams, side darts with cleverly hidden pockets in the dart (optional), and an interior elastic belt to add additional shaping to the front. The back is gathered to a pointed yoke and the front yoke is a smooth crew shape. The dress is loose fitting, yet it has a flattering silhouette that makes it perfect when the temperatures rise.
Front & Back Views

Focus of this Sew Along
In this sew-along I am making the version with three-quarter length sleeve and side seam/dart pockets out of a blue-gray linen (Mist) from Folkwear's fabric collection. This three-quarter length sleeve is a perfect summer/fall transition length and this beautiful neutral linen will go with just about everything (plus a solid fabric is helpful when doing a sew along). Both versions with sleeves are constructed in the same manner and the only difference is in how the sleeves are finished (and sleeve length, of course). The sleeveless version goes together a little differently, but we will cover that in another blog post.
Join in this four-day Sew Along and learn how to make this dress with step-by-step instructions, plus tips along the way. Below is the schedule breaking down the making of the Mu'umu'u.
Sew Along Schedule:
Day One: Introduction to Folkwear's 160 Hawaiian Mu'umu'u pattern and getting started: get the pattern, select fabric, gather materials, decide which version and size to make.
Day Two: Add optional pocket to side seam dart and stitch the front & back of the dress together
Day Three: Make the yoke/yoke facing, add the sleeves, and assemble the dress/sleeve/yoke
Day Four: Add interior elastic tab shaping, finish sleeve hem with elastic, and hem the bottom edge of the dress
Sleeveless option tutorial.
Fabric Suggestions
For summer, consider any number of light-weight fabrics such as cotton voile, lawn, muslin, ikat, rayon, seersucker, chambray, poplin, double-gauze, batik, brocade, eyelet, silk, and batiste. Also, any light to mid weight linen is a perfect choice as well. Typical fabrics for the mu'umu'u would be cottons with bright tropical prints. We will have a fabric suggestion blog (with links to great fabrics) out soon!
If you use a sheer fabric like voile, consider making the dress body out of two layers of fabric for a flowy, yet more opaque look. Then make the short or three quarter length sleeves out of a single layer of fabric, adding to the diaphanous aesthetic. Handkerchief linen, lined with a cotton voile or lawn would be a great option too!
Even though the mu'umu'u is synonymous with warm weather, this pattern can carry you into cooler temps too. The longer sleeve length adds to the versatility of the dress, making it a perfect fall wardrobe addition. Also remember that you can use the lengthen/shorten line on the pattern to make the sleeve any length you like. And you can use the lengthen/shorten lines to make the dress longer for cooler weather (or your style preference)
For Fall/Winter use a cotton flannel, mid-weight linen, or lightweight wool. Layer with your favorite slip, skirt, pant, leggings, or tights underneath for lots seasonal variations.
Fabrics with bold or subtle prints/designs are typical for an island inspired Mu'umu'u. Look for Hawaiian prints, block prints, checks, Madras plaids, small or large florals, and abstract designs like Ikats and batiks.
Consider making the yoke out of a contrasting fabric and/or add piping for a fun detail. It is always fun to make the pockets and yoke/yoke facing out of fabric that is different with the dress body. Since the yoke is cut on the bias, have fun playing with a striped or patterned fabric.
The yoke is also a perfect canvas for trying out your embroidery skills.
Yardage & Sizing Charts
See the sizing/yardage requirement and the finished measurement chart below (or at this link) to determine the yardage your size requires. Due to the loose fit of the Mu'umu'u, choose your size based mostly on your bust measurement, and note finished measurements below also. Molly made her Mu'umu'u in size SM (even though she measures MD at hip). I made the Mu'umu'u view C in a size SM as well. I am smaller through the shoulders and bust, while my hip measurement is a size medium. Because the dress is loose fitting, with plenty of ease the bust is my focus for fit. Even if you are confident about your size choice, consult the Finished Measurement chart to help make sure.
Hint: When you are unsure about the fit of a pattern that is new to you, measure the width of a garment you have that fits you like you prefer. With the garment laying flat, compare the underarm measurement to determine the bust. Measure and compare the waist, hip, or length as the case may be. This will help you to determine how much ease you prefer when choosing a new pattern size.


For Day Two of the 160 Hawaiian Mu'umu'u Sew Along, you will need to gather up your supplies, trace and/or cut out the pattern for the size and view you want to make, and prewash & dry your fabric. On Day Two of the Sew Along we will cut our fabric and start sewing. I hope to see you back here soon!

by Victoria Watkins
What makes color look good? Particularly, what makes colors look good in relation to one another? Having spent nearly half of my life practicing visual art, my immediate reaction is intuitive, something like, "I know it when I see it." However, to those among us who prefer fiber arts over mixing up oil paints, the finer nuances of color theory may be confusing. This is reflected in the update our owner Molly gave me from a recent workshop on the embroidery for the 142 Old Mexico Dress pattern. Some of the class noted that they found it confusing or intimidating to pick colors that worked well together. With that in mind, today's blog is a brief look into color theory, which is the study of how to apply colors in creative works.
There is so much to be said on the subject of color, but to be brief, there are three main components that make up what we call a color: hue, value, and saturation. Hue is what we generally mean when we refer to something as having a color. Red, green, and blue are examples of hues. To help you understand how hue is different from color as a whole, think about the difference between a highlighter and a school bus. They're both yellow hued, but certainly different colors. What makes them different are their values and saturation. Saturation refers to the concentration of the hue, while value (also referred to as brightness) refers to how "dark" or "light" the color is. This can be confusing until we think of color in terms of mixing paints, as art-based color theory does. To be less saturated, the hue has to be mixed with something else, either white, black, or grey. The amount of mixture creates the saturation, while the choice along the spectrum from white to black determines the value.
This all may be understandably confusing to folks who have not experimented with painting before, so don't worry if it feels overwhelming. The important thing to know is that there are three qualities that combine to create the variety of colors we see, and by choosing different variations on each of those qualities, we can create color combinations that are either harmonious or off-putting. While we can't mix paints ourselves to get the right color embroidery thread, we can definitely use these concepts to choose from the huge selection of skeins to select the perfect set of colors.
The key to understanding color relationships and building your intuition for choosing colors is to understand contrast. Contrast is the amount to which a quality is different to another quality. For example, white and black are considered to be high contrast because they're the furthest distance apart possible on the value scale. Similarly, anything along the black/white value scale is high contrast when compared to a highly saturated hue. Hue can be in contrast with itself around the color wheel, with the highest amounts of contrast being referred to as "complementary colors", which you may have heard of.
In essence, the way to have good color harmony is to think about contrast along one or more of these spectrums. If two or more colors that you choose have the same exact amount of two of the qualities, there needs to be a reasonable amount of contrast in the third. For example, if the value and saturation are the exact same, the hue should be different enough to make the colors stand out from one another. Good hue contrast is generally thought to be at least three "steps" away from each other on the color wheel. Otherwise, they become hard to distinguish and aren't very eye catching. Take the colors below for example. They're different, sure, but are they different enough?

What happens if we dramatically change the saturation (top), the value (middle), or the hue (bottom)? In the new version, each change creates a different conversation between the left and right. While they're not necessarily the sort of color palette I'd choose for myself, the four of them even look somewhat interesting together, too.

While we can make any number of changes to differentiate between two colors, the real balancing act is when we start looking at three or more. For beginners, my recommended strategy is to either focus on a single hue with different values and saturations (monochromatic), or different hues with an emphasis on their relationship to one another on the color wheel. Complementary, split complementary, analogous, and triad arrangements are some of the relationships you can choose from to make sure everything looks harmonious together. Don't forget to take the color(s) of your fabric into consideration as well!

By Shnatsel - Own work, CC0, https://commons.wikimedia.org/w/index.php?curid=17323196
Here is an example of staying with the same hue but changing the saturation (and a tiny bit of the value too, just based on my color-choosing instincts).

For a non-monochromatic look, here's a scheme built off of a split-complementary arrangement. Purple and a yellowish green form part of the split-complementary triangle, with pumpkin orange being the third. However, because that would be a very Halloween-ish combo, I left out the orange and instead tweaked the value and saturation of the purple and green to create a vibrant set of colors.

Hopefully, this crash course in color theory will be enough to get you started on choosing embroidery threads that work for your projects. When in doubt, you can always pay close attention to nature, as well as art and design that you see while out and about. Have fun, and happy hue hunting!

In 1851, the first attempt at a zipper was patent and named the "Automatic Continuous Clothing Closure." This device would take on different reiterations, a Worlds' Fair, and finally a 1930's children's clothing sales campaign to introduce the zipper as we know it. Adding zippers to children's clothing promoted self-reliance making it possible for little hands to dress themselves. In essence, the zipper helped to revolutionize wearing clothes for the young and old alike. Hence, our self-reliance, security, and convenience still somewhat depend on that interesting piece of tape with teeth. Besides, few things when used make the delightful sound in which they were named. Zip!
It is easy to take a zipper for granted until it no longer works, relegating a "broken" garment to the "to mend" box or worse. There is no need to shy away from this simple to use, yet ingeniously engineered device. In this blog you will see how to add a zipper to your sewing and hopefully help replacing one less daunting.
While there are different types of zippers meant for varying applications this blog will concentrate on adding the commonly used invisible zipper to a center seam. In Part One of this blog, the Folkwear 220 Garden Party Dress was adjusted, so it's authentic buttons and placket could swapped out for a zipper. Keep reading to learn how the 220 Garden Party Dress will get a zip up the back.
The key to a successful and stress-free zipper installation is in part about orientation. In this blog you will learn a few simple steps and tips to make installing a zipper easy!
Getting StartedYou will need an invisible zipper at least 24” (61cm) long (depending on your back length), fusible interfacing, thread, and a zipper foot for your sewing machine. Either an invisible zipper foot or a standard zipper foot will work. I will be using both types of zipper feet in this blog.
If you are not familiar with using an invisible zipper foot, give one a try, because they make installing zippers a breeze.
Zippers
They come in varying lengths, colors, and coil or teeth sizes. The coils/teeth are made of either metal or plastic. The tape is typically made of polyester, nylon, or cotton. You can purchase zippers in predetermined standard lengths or have a zipper cut to the length you determine.
Tip: If you use a custom-cut zipper, a thread bar-tack will need to be added to the end of the zipper tape to keep the slider hardware from slipping off.
A regular zipper with visible teeth (made of metal or plastic) can also be used, but if you prefer a less obvious zipper, then an invisible zipper is best.
Prepare to Add the Zipper
Invisible zippers close with interlocking coils or teeth made of plastic. Because zippers remain zipped-up until they are ready to be used the teeth tend to be tightly curled and need to be opened up to make stitching easier. Use your fingers to uncurl the teeth while pressing the coils/teeth flat with the tip of the iron. Be sure to turn down the heat (synthetic setting) on your iron to avoid melting the plastic coil/teeth. The coils should retract back a little bit. Do not try to press the coils so they remain perfectly or permanently flat.

Be sure the waistband, or any seams, a zipper will be added to are neatly pressed before adding the zipper.

Zippers take a lot of use; therefore it is a good idea to add a lightweight fusible interfacing (according to manufactures instructions) to reinforce each side of the zipper tape and the seams. Add the interfacing to the wrong side of dress center back, aligning the tape to the top and side edges of the fabric. I like to cut the interfacing 1" wide (if using a standard 3/4" width zipper) and cut the interfacing length equal to the zipper.

Be sure to fold and pin the waistband facing out of the way before adding the interfacing and for stitching the zipper to come.

Properly Orient the Zipper to the Fabric.
You may find it useful to orient yourself the same way every time for this process. I try to be consistent and start working with the right side (as you wear it) of any garment project. All the directions and photos that follow, use this orientation. But it does not matter which side you start with. The important part is to take your time and get the orientation correct.
Start with the right side of the dress/garment facing up.
Take note that the zipper has a right and a wrong side. Inspect the construction of the zipper and the right and wrong side will become evident to you. I find looking at the slider hardware to be the quickest way of determining the sides.
Place the wrong side of the zipper facing up, with the zipper open to the dress. Check that the right side of the zipper is to right side of the fabric.
Next, be sure the coils face away from the center back edge and towards the dress. The edge of the zipper tape should be positioned, running parallel to the center back edge of the dress.
Orient the zipper to the center back of the dress as seen below with the zipper completely open.


Use a seam guide, measuring tape, or ruler to make sure the zipper coils/teeth line up with the seam allowance. Align the coil/teeth at the 1/2" (6mm) seam allowance (1/2" from the center back edge), as seen in the photo below. Always use the seam allowance indicated on a pattern (in this case, it's 1/2").
Measure and pin the zipper tape to the fabric with the pins inserted parallel to the zipper. This will allow for easy pin removal when stitching. Check again to be sure the alignment is correct down the entire zipper tape and be sure the tape is not accidentally twisted.

Stitching with an Invisible Zipper Foot
Align the left groove of the zipper foot over the coil/teeth. With your fingers move the coils/teeth so it stands upright and fits in the groove of the zipper foot before beginning to stitch.
Use a medium length stitch. Avoid a stitch that is too tight (short) or too loose (long). Use Polyester thread because it is less likely to break.
Begin the stitching with a back stitch to secure the top of the zipper tape. Take your time and slowly stitch (to help prevent fabric from puckering) the full length of the zipper, removing the pins one at a time, before they reach the foot. Stop when you reach the slider hardware. make a back stitch about 1/2" (13cm) long. You will be unable to stitch any further, because the slider hardware will be in the way.

Notice the close-up view below, of how close stitching is made next to coils. The nice thing about an invisible zipper foot, is that the groove ensures the stitches are made at the correct distance from coil.

If using a regular zipper foot be sure to not stitch too close the coil/teeth. If the stitches are too close, the zipper will not open and close properly. If the stitching is made too far away from the coil/teeth, the zipper will show and not be held securely to the fabric.
Once one side of the zipper tape is sewn in place, go ahead and test the zipper by closing it. It should open and close easily and smoothly. If not, access the problem, unpick the stitching, and try again if needed.
This is also a good time to mark on the free zipper side where it will align with the waistband. This will keep the zipper from getting out of alignment when attaching the other side of the zipper to the dress. If you have a waistband, as this dress, does, mark on the zipper tape where it should meet the waistband so the right and left sides of the dress match up.

Unzip and add the opposite side of the zipper to the opposite side of the dress edge.

For the opposite side, pin the zipper (unzipped) to the fabric, making sure the right side of the dress is facing up. The wrong side of the zipper should still face up. Check that the right side of the zipper is to right side of the fabric.
If you started with the right side of the dress (as you wear it), then this is what your orientation should look like. (See photo below).
Remember the coils/teeth should be facing towards the dress and the edge of the zipper tape should be parallel to the center back edge.

Position the tape from the top edge of the fabric as before. Align the zipper at the waistband as marked.
Measure so that coils fall on the seam allowance as before.

It is easily for the zipper to get twisted, so check to be sure the zipper tape is laying flat.
Use the opposite groove of the invisible zipper foot to stitch this time. If you are following along, then the right groove is used.
Begin and end the stitching as before.

Test the Zipper
Now that the zipper is installed, zip it up and down to test that is closes easily and smoothly.
Give the zipped-up, right side of the dress a gentle press before continuing.

Stitch the Remaining Skirt Seam
With the back of the zipper still closed, lift the zipper tape out of the way. Sandwich the zipper in the seam allowances and pin the seam allowance down the remaining length of the skirt seam.
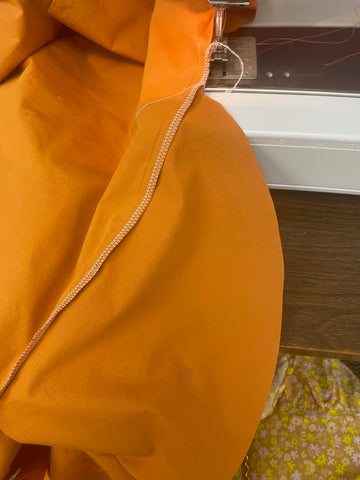
Switch the invisible zipper foot out for a more narrow standard zipper foot. Position the foot as close as you can to the left of the zipper. Start 1/2" (6mm) to 1" (2.5cm) above the end of the zipper stitching. Slowly stitch forward and then make a small back stitch.
The zipper causes bulk in this spot, making beginning the new stitch line on top of the zipper stitch line difficult, if not impossible. Do not try to force positioning the needle on top of or right next to the sandwiched zipper. Just get as close as you can. (See the photo below). This small amount of space is generally not enough to prevent the zipper and seam from looking nice once finished.

With the seam allowances matched and pinned, stitch down the remaining length of the skirt seam and end with a back stitch.

Press the seam open below the zipper.

Lift the zipper tape tail and press the seam with the tip of the iron. This area can pucker, so go gently.

With the right side of the dress back facing up, press the zipper seam lightly to create a smooth finish.

Finish the Waistband Facing
With the zipper successfully installed it is time to finish the interior waistband facing. Begin working with the wrong side of the dress back facing up, and with the wrong side of the waistband facing, facing up and laying flat. The long bottom edge of the waistband facing (top when open as seen below) should be turned under 1/2" (6mm).
Fold under and pin the short ends of the waistband facings on either side of the zipper. Be sure that the zipper slider hardware can easily move past the folded under edges. If the edges are too close to the zipper slider, the fabric may get caught. Press the edges.

Fold the down each of the waistband facings and align the long turned under edge of the facing using the parallel skirt stitching line as a guide. Pin the facing in place for a clean finished look.


Hand whip-stitch the the turned under short edges of the waistband facing to the zipper tape. Hand whip-stitch the turned under long edge to the skirt, using the stitch line as a guide.


I hope this blog has helped ease any zipper installation apprehension you may have had. It is easy to add an invisible zipper to clothing or so many other projects. Once you have tried installing a zipper a time or two, hopefully you will not hesitate to expand your sewing repertoire. Don't be surprised if you never look at a center seam the same way again.

The buttoned back of 220 Garden Party Dress is part of the charm (and authenticity) of this historic dress. It is a bit unusual in current dresses and can be a feature that is fun and interesting. However, it is not always practical. It can be hard to reach buttons in the back, and hard to manage buttoning them backwards. It certainly would be helpful to have a maid to help us when putting on this dress (as might have been the case when it was worn in the early 1900s), but since that is extremely unlikely, another option is to replace the button placket with a zipper.
It is always nice to have the option of a zip-up back closure when it comes to making dresses because they are fairly easy to use and insert. The Folkwear 220 Garden Party Dress back button closure and placket can easily be replaced with a zipper. This can be done to either the contemporary (View A) or traditional (View B) versions offered in the pattern. In Part One of this blog you will learn how to make a minor pattern adjustment, that will allow you to trade out button/buttonhole closure and the placket for a long invisible zipper. This technique will work on any dress or blouse that has a center back seam.
Keep reading to learn how this technique will enable you to add a button and placket closure or a zipper to the back of any center back seam, by simply adding or subtracting fabric.
In Part Two of this blog, you will learn a tried and true method for adding an invisible zipper to the Garden Party Dress and how to neatly finish the interior waistband facing.

The focus of this blog is to make an adjustment to the center back of the dress so a zipper can be added later. For the purposes of this blog I will not be making the entire dress. Instead, I am making a muslin of the dress back only for view A. You can make the adjustment as you construct the final dress if you like. However, be sure to read ahead so you are confident in what to do.
Pattern changes to be aware of:
If you want to try the adjustment along with me, grab some muslin or scrap fabric and cut out the Bodice Back B, Waistband/Waistband Facing F, and Skirt Back H pattern pieces as instructed.
Adjust the Back Bodice
In order to replace the button closure with a zipper on the back bodice, you need to determine how much overlap or turned under self-facing has been built into the pattern. This extra turned under fabric was originally built into each side of the back bodice pattern pieces to accommodate the buttons on one side and the buttonholes on the other side. In this case 1-1/2" (3.8cm) was added to the center back of each bodice piece.
All that is needed to accommodate the zipper is a seam allowance. Simply trim away the extra 1” ( 2.5cm), leaving a 1/2” (6mm) seam allowance at the Center Back or center back line of each back bodice pieces. See the illustration below.
Note: The Waistband/Waistband Facing and Skirt pieces do not need adjusting and are ready to use as is. Also, the flanges are not being used in making this muslin, because they are only decorative and do not effect the construction.

Add Waistband/Waistband Facing to Back Bodice
With right sides together, pin and stitch the Waistband to the Back Bodice, drawing up the gathers to fit, matching notch 6. The waistband edge should be even with the center back edge of the bodice.
Notice the red tip pin marks notch 6.

View of the wrong side with gathers drawn at center back edge to notch 6.

Pin the right side of the Waistband Facing to the wrong side of the bodice, matching notch 6. Be sure to not catch the Waistband in the pinning or stitching. Stitch in place using the previous stitching as a guide. End the stitching approximately 1" (13mm) from the center back edge. Fold back the un-stitched section of the waistband facing and pin to hold it out of the way in order to add the zipper later.

Add Skirt to Waistband
Remember to not stitch the skirt backs together as the instructions direct.
Make two rows of gathering stitches within the seam allowances at the top of the skirt edge. With right sides together drawn up the skirt to fit the waistband, pin, distributing the gathers evenly. Then, sew being careful not to catch the waistband facing in the stitching. Press the seam towards the waistband.


If you unpinned the un-stitched section of the waistband facing, like I did, to make construction easier, be sure to pin it back out of the way again before adding the zipper.

Repeat for the opposite back side to the dress.
You should now have a right and left dress back, consisting of the bodice, waistband/waistband facing, and skirt. The two separate backs will become one piece when the zipper is added.
In the Part Two of this blog you will learn a tried-and-true method for installing an invisible zipper to the back of the Folkwear 220 Garden Party Dress. And learn how easy it is to create a clean finish to the waistband facing.
If you have not already done so, take advantage of the sale price for the Folkwear 220 Garden Party Dress during the month of June and join in to learn how to zip it up the back!

by Victoria Watkins
I believe most of us who have any amount of interest in fashion has had the experience in which we have complimented someone's dress only to be told with enthusiasm, "Thanks! It has pockets!" Or, maybe you've said that to someone who complimented your dress! Today, I'll show you how I added pockets to our 142 Old Mexico Dress pattern, and give you ideas on how you can do the same. Plus, we are offering you a free template for an in seam pocket so you can add them to any garment that needs a pocket!
The 142 Old Mexico Dress is probably our most popular pattern. It is a breeze to sew, makes a dress or a shirt, and has lots of options for fabric or to add embroidery. I choose an orange organic poplin we had in stock at Folkwear to make this dress. I may add embroidery to it later (stay tuned for an embroidery color theory blog post!). Usually you would embroider before constructing the dress, but it is fine to add later as well - you can do whatever suits your fancy.

For this dress, the body assembly includes a yoke, a front, and a back. I could have chosen to just roughly measure to where I'd like the pocket pieces to sit and put them in in the first step, but instead I chose to construct the dress up until the side seams are to be stitched (yoke is finished). That way I could try on the mostly-sewn dress and physically determine where the pockets would fit best.

On the front and back pieces of the pattern, there is a dot near the underarm that designates where to stop stitching along the side seams - and where the lower part of the sleeve is inserted. Coincidentally, when trying on the dress to determine where the pocket would go, I noticed that my ideal spot for the pocket was slightly below that dot. In order to close the side seam and prevent the top of the pocket from flapping open with the sleeve pieces, it's necessary to have some amount of seam above the pocket. For my height, I chose to measure down 1.5 inches from that dot to mark the place where the top of the pocket piece would rest.

Next, I created the pocket pieces. Both sets of pockets (one on each side) need two pieces, so 4 needed to be cut out. This pocket piece has been used in several Folkwear patterns (and will be in a new pattern coming out next month!). You can download this pocket piece here. It prints on legal-sized paper (or A4 paper), or you can print on two sheets and piece together. This pattern piece includes markings for notches as well as alignment dots and stars. Line up the top dot on the pocket with the top of where you want your pocket opening to be.

The above photo shows the general placement of the pocket in reference to the yoke. To sew the pocket to the dress, I placed right sides together and raw edges matching, as you can see below.

I sewed the pockets to each side seam between the pocket dots, right sides together. Remember that these are sewn on before stitching the side seams. Then, I pressed the pocket pieces "out", away from the body of the dress.

With the pocket pieces pressed away from the dress body, you can then place front and back dress pieces together and align the right sides of the dress and automatically have the pocket with right sides together as well. The above photo shows the dots from both the original 142 Old Mexico Dress pattern, as well as the alignment dot I added for the pocket and the star marking on the pocket. These will be your reference for the following steps.
I sewed from the bottom mark (which is a box on the 142 tissue) up to the point where the star mark is on the pocket piece. Next, I sewed between the top dot on the dress and the dot marking the top of my pocket opening.
Before sewing the pocket bag pieces together, I chose to serge the side seams entirely to finish the raw edges. You can finish all edges how you like, but it's easier to do this now before the next step, which creates a segment of side seam that is difficult to access for seam finishing.
I sewed around the outside edge of the pocket bag (from the top dot on the pocket piece to the bottom dot), making sure to sew into the stitching of the side seam at the start and finish. I pressed the entire side seam and pocket toward the front of the dress, and then pinked the raw edges of the pocket to finish. Of course, you can use whichever finish you like on the pocket bag.

From there, I continued the dress as instructed in the pattern. I hope this guide inspires you to try adding pockets to your 142 Old Mexico Dress pattern, or any other dress with side seams that you're sewing!

by Molly Hamilton
You may have heard from other small, independent pattern companies (and I may have mentioned it before), but we are changing up how our sewing patterns are printed. We are transitioning our pattern printing away from the way our patterns have been printed for decades. While this behind-the-scenes decision making in our company could remain behind-the-scenes, I thought you might like to know why some of our patterns are out of print, just available as PDF, or why the prices are going up. This story isn’t only about supply chain issues, although they do affect us - pricing, gas/transportation, and paper shortages hit all industries. This story is about how and why our patterns are available in different formats and why it is my goal to have nearly all, if not all, our patterns available as paper patterns, while also digitizing our patterns so they can be available as PDF patterns and be preserved for the future.
For many years we have printed our pattern tissues, instructions, and covers at McCalls printing facility in Kansas. McCalls printing (and the associated pattern company) was bought by a large multinational corporation several years ago. They changed their business strategies. This past fall they shut down the Kansas plant and transitioned to a plant near Chicago, eliminating the only printer in the country who could print on wide format tissue. This printer served most smaller independent sewing pattern companies like ours. With the new plant, our pattern minimums increased by double and the only tissue option was a lighter tissue than we normally print on. We have printed on 12# white tissue for the last 5 years and the new option would only be 8# brown. The much higher minimum order would also mean that it would not make sense to continue to print our patterns that sell more slowly. If I ordered 1000 of a slow-selling pattern, it could take 20 years to sell them at their typical rate. That means 5+ years to break even on the investment, and we have to store the patterns and pay for the place to store them. It does not make economic sense for a small business like ours. The seemingly best business option is to only do PDF patterns, especially for these slower-selling patterns.
With all of these factors, it may not seem to make economic sense to have nearly all of our patterns available as paper patterns, but that is my goal. First, there is a demand for paper patterns. But for me, this is also an accessibility issue. Patterns only available as PDFs become less accessible to customers who don't have reliable internet access or don't have a computer and/or printer (or a print shop nearby). This is especially important for many of our folk patterns which we know are purchased for special occasion outfits. For example, I have seen this with our 120 Navajo Blouse pattern. It is a slow-selling pattern, and often (probably mainly) used by Navajo women to make clothes to wear for important occasions. We know from conversations with these women, and from our orders, that the print pattern is an important option for these customers. Having our patterns available as PDFs may give instant access to people internationally (and more tech-savvy customers), but paper patterns also provide accessibility in other ways.
Moving Forward
Before the McCalls plant shut down, I got as many patterns printed as I could. We do have some patterns with the lighter, brown tissue, and they are priced accordingly (see the 503 Poiret Cocoon Coat). Over the last 6 months I have explored options for printing so that we can have flexibility and the paper options we want going forward.
This is complex. Some of our pattern pieces are quite large and don't fit on most available wide-format printers. Many printers will not use paper less than 20#, which is quite heavy and expensive for larger print runs. After many conversations and much research, we have found some options that work.
We are currently working with two printers who can print at reasonable prices. They print on a bond paper, which is not the tissue we prefer, but still lightweight enough (and is more durable than tissue). As we have sized patterns up, we also have to use more paper to print the patterns, which also affects the price of the pattern. In some cases, very large pattern pieces won't fit on the paper available to print. We have to "tile" the pattern and you will need to place the pattern tissues next to each other to get the full pattern. For the largest pattern pieces, the price is higher because the printers need to charge more to meet their bottom line. This means some of our pattern prices will need to go up to afford the printing; but most will remain close in price to what we have currently. Because these printers do not have minimums we can print the number of patterns we need, which does save us some overhead costs and makes it convenient to make pattern changes or even to offer new patterns. We are using a local print shop for all our instructions and covers now, and we are assembling patterns in-house. The paper size for our instructions decreased a little, but it is not terribly noticeable. The local company does a great job and we are very pleased to work with them.
This is all to say that the printing process can be complicated and there are a lot of moving pieces - and we have a lot of patterns to print! Ultimately, we may also have to decide which patterns to keep in print, depending on how well they sell, the printing minimums for that pattern, the importance of accessibility, and the cost. These decisions will be hard as every pattern in our collection has fans who love it dearly.
If you have read to the end, I hope you have enjoyed a bit of information about how, and why, our patterns are available the way they are. As I mentioned before, it is my goal to have nearly all of our patterns available as paper patterns and PDFs. The road to doing so is sometimes tricky.
Please let us know if you have any questions about our pattern printing or what we are doing. And, as always, we deeply appreciate your interest in, and support of, Folkwear over the many years!


by Molly Hamilton
The 121 Guatemalan Gabacha has several authentic detailing options that can be used to decorate the yoke of this very cute dress (or apron). These techniques were used on the original dress samples Folkwear had, and were clever and simple enough that they were included in the pattern. So you can see the instructions for how to make these fun designs in the newly re-released (and re-sized, up to 54" bust) 121 Guatemalan Gabacha, but I am also going to show you how to do them here. You can also think about how these techniques could be used to decorate other sewing projects you have - blouses, shorts, table cloths, etc.
Trim
Trim plays an important part in finishing the handwork on the yokes of this dress. At least one yard of trim, such as ribbon, rick rack, or braid, is needed to cover the edges of the handwork. Trim can also be applied almost anywhere on the dress or apron. Six to eight yards would be enough to go around the neck and outer edges of the yoke, the pockets, and the top of the ruffle.
When choosing trim, consider contrasting colors or a matching trim to get the effect you wish. There is a lot of fun and creativity in adding decorations to the garment you are making. Let your imagination go wild!
Decorative Technique #1
This is the simpler of the two techniques. You will apply it to the yoke only. This technique should be applied after the yoke and yoke facing have been sewn together and before it is sewn to the dress. You will need about 1/8 yard (11.5cm) of extra fabric for this technique, and a little more if you cut the fabric on the bias.
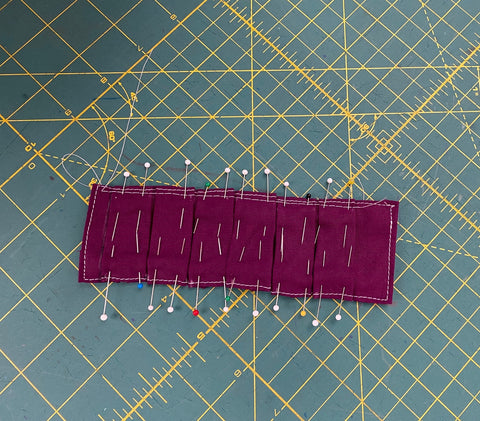
First cut two strips of fabric 15.75" (40cm) by 3" (7.5cm) and press under 1/2" (13mm) on all four edges of each strip. Topstitch to secure.

Make six 3/4" (2cm) full box pleats leaving 3/8" (1cm) on the right side and 1" (2.5cm) on the left side of one strip. To make the box pleats, mark off 3/8" and 1" at each end. Then mark every 3/4" (2cm) starting from 3/8" side of the strip. These marks will serve as a guide to make the box pleats. Be very accurate in order to keep the pleats even. I used chalk to mark on this fabric because the marks can be easily erased by rubbing, but I marked the end sections with an ultra washable marker (Crayola). Pin the pleats in place and press. Staystitch within the seam line.


Pin the pleated strip to the Front Yoke centering it between the sides of the Yoke and with the 1" (2.5cm) end flush with the seamline at bottom of Yoke. Topstitch the pleated strip to the Yoke (but not the yoke facing), close to the edges.


Now you can apply contrasting (or matching) trim around both sides and top of the pleats. Experiment to see what you like! Then, stitch the trim in place.


I'm just showing you what trim could look like, but I did not add any to this sample.
For the next step, use contrasting (or matching) strong embroidery thread and catch both edges of the first pleat in the center. I like to use 2 or 3 strands of DMC embroidery floss. Make three or four overcast stitches, pulling up the edges to meet, forming a tiny bow. Repeat for the remaining five pleats.


Repeat for the other strip and other side of the Yoke, and you are done! The yoke facing will cover all the interior stitch lines.
Video for this decorative technique #1:
Decorative Technique #2
This technique is a little more involved, but gives a really fun look to the dress or apron. It is perfect for using on a sleeveless summer version. You will also apply this technique after the yoke and yoke facing are sewn together but before the yoke is sewn to the dress. You will need about an 1/8 yard (11.5cm) of fabric for the bows, as well as an additional 1/4" yard (23cm) for the optional pleated ruffle.
Use the guide on the pattern tissue and transfer the markings for the diagonal slash lines to the Yokes. Draw a line between the triangle points to create a slash line and cut along the line to the triangles and then to each corner of the rectangle (along the triangle legs). Do this on the yoke and yoke facings.


Press the seams to the inside of the box, creating an opening that is 3/4" (2cm) wide. The length will vary by the size you are making.

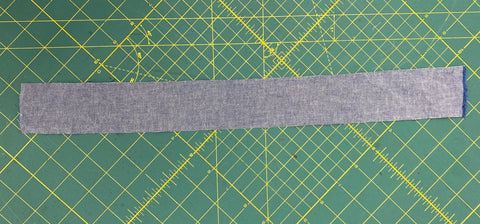
Now, cut a strip of fabric that is 2" (5cm) wide by 17½”/44cm long for XS-SM, 21”/54cm long for MD-LG, or 24½”/62cm long for XL-3XL. The length is not terribly important and you can make the strip longer if you want to have more small strips to use in the next steps. You can use the same fabric that you use for the dress or a contrasting or coordinating fabric. Use your imagination! Press under ¼”/6mm on the two long edges. Then press in half lengthwise and topstitch close to the two pressed edges.

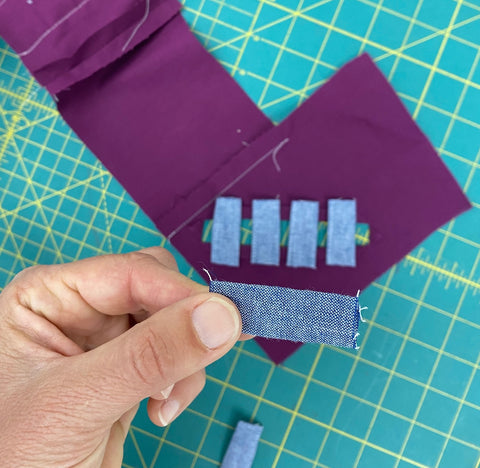
Cut this strip of fabric into equal pieces that are about 1.75" (4.5cm) long. You should have about 10 pieces for XS-SM, 12 pieces for MD-LG, and 14 pieces for XL-3XL.
Pin half the pieces across the 3/4" (2cm) opening on the wrong side of one side of the yoke facing, spacing them evenly. You can choose to put as many or as few small strips as you wish here. Topstitch the strips in place 1/8" (3mm) from pressed edge of opening. Repeat for the other side of the yoke facing. Note: I am not using a yoke facing in this tutorial, just one side of the yoke for an example. The technique is the same, but you will be applying this treatment to the yoke facing after the yoke and yoke facing are sewn together.


Also note that you could press these strips so that the seam line is not at the bottom (as above), but is press in the center of the strips so it is not seen from the front.

Fold the front yoke over the front yoke facing, sandwiching the inserted pieces between the yoke and facing. Line up the edges of yoke and facing and topstitch around opening close to the pressed edges. Again, I don't have the yoke for this step in the tutorial.
Using a contrasting (or matching) embroidery thread, make 4 or 5 overhand stitches in the center of both edges of each small inserted strip, pulling up edges to meet, to form a tiny bow - similarly to making the bows in decorative technique #1 above.


You can stop here and add trim around the edges as in Technique #1 (and as I did), or you can keep going with instructions in the pattern for adding a pleated ruffle that I will leave below. If you are going to add the pleated ruffle, don't add the trim until the ruffle is attached.

Pleated Ruffle (optional): I don't show how to make the pleated ruffle in this tutorial, but if you want to add it, cut four strips of fabric 2" (5cm) wide by 12" (30.5cm) for XS-SM, 15" (38cm) for MD-LG, and 19.5" (50cm) for XL-3XL. With right sides of one strip together, fold in half lengthwise and stitch the short ends together with 1/4" (6mm) seam. Turn and press.
Make 1/4" (6mm) pleats across the length of the strip, or as wide as needed to have evenly spaced pleats to fit the length of the opening. Place the ruffle along the length of the opening, and pin in place with raw edge of ruffle approximately 1/8" (3mm) from edge of opening. Topstitch close to the raw edge.
Apply trim (ribbon, rickrack, lace, etc.) flush with all edges of opening and covering the raw edges of the ruffle and the stitching lines.
---------------------------------------------------------------
So, I hope you will try one of these decorative techniques. They are really quite easy to do and are fun to add to your 121 Guatemalan Gabacha dress or apron. Let us know what you make, if you try one of these, and what you think!

We have had some questions lately about patterns that are good for pregnancy and nursing. And, honestly, Folkwear (founded by 3 women) has often incorporated designs for these functions of life into their patterns. And traditional folk clothing was also often, by default, designed to be able to be worn on pregnant bodies and/or provide access for nursing. I am listing some of our patterns below that can be good for pregnant and nursing folks. If you have more to add, please add in the comments!
Also, just to be clear, we believe that it should be a woman's choice to be pregnant (and to choose if to nurse, if possible).
102 French Cheesemaker's Smock - a roomy shirt with lots of ease and quite a bit of length; can definitely accommodate growing bellies and breasts. Also can be used as a nursing top. (PDF version here)
107 Afghan Nomad Dress: I know this dress has often been made as maternity wear by women over the last 40 years. The skirt attaches to a very short bodice (not bodice is somewhat fitted but very comfortable) and there is plenty of room for a baby bump. (PDF version here)
111 Nepali Blouse: This wrap blouse has several ties to provide easy access for nursing while maintaining coverage. It is popular as a nursing top.
113 Japanese Kimono: This pattern is classic for a comfortable robe to wear when pregnant or nursing. Great for resting post-partum. Also see 106 Turkish Coat (which is quilted, so is warmer) and 112 Japanese Field Clothing for roomy and adjustable coat/jackets. 113 Japanese Kimono PDF version, 106 Turkish Coat PDF version, 112 Japanese Field Clothing PDF version.
117 Croatian Shirt: Another roomy and long shirt with lots of ease. (117 Croatian Shirt PDF version)
119 Sarouelles: These comfortable and roomy (particularly the African and Turkish) pants are great for those last months of pregnancy when nothing seems to fit. These have plenty of room and are easily adjustable at the waist (made with ties instead of elastic, so you can make them just about any size you need). 119 Sarouelles PDF pattern.

121 Guatemalan Gabacha: This cute dress has plenty of room in the belly area and would work for early pregnancy months. (121 Guatemalan Gabacha PDF pattern)
128 Russian Settlers Dress: This dress is perfect for pregnancy and nursing. The dress is great maternity wear and the pattern has an option for creating it for easy nursing access post-partum. (128 Russian Settlers Dress PDF version)
 This customer made the 128 Russian Settler's Dress for post-partum nursing, but said she wished she'd also made it for her pregnancy.

We loved this linen viscose 129 Russian Settler's Dress that a customer made for her pregnancy.
142 Old Mexico Dress: An easy dress to get on and off with plenty of room for a growing belly. Probably best for earlier months of pregnancy. The shirt would be good for nursing as it has room and is short and easy to pull up to nurse. (142 Old Mexico Dress PDF version)
151 Japanese Hakama and Kataginu: I would not have thought of this outfit as maternity wear, but someone in our Facebook Group made the Hakama (pants) and said, with the kimono, it was the most comfortable maternity clothes they wore the whole pregnancy - worn with her 113 Japanese Kimono below. (151 Japanese Hakama and Kataginu PDF pattern)

201 Prairie Dress: This dress is often made as a maternity dress. And the front has an option to make the dress easy to access for nursing babies. (201 Prairie Dress PDF version)
202 Victorian Shirt: Another very roomy and long shirt that has been made for maternity dresses. Very cute! (202 Victorian Shirt PDF version)
270 Metro Middy Blouse: This blouse has a bit of a bell-shape and buttons in front that can make it great for easy-access for nursing. (270 Metro Middy Blouse PDF version)
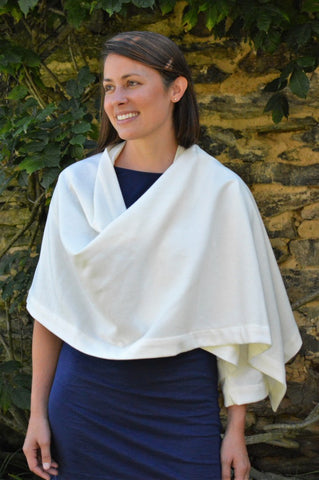
271 Sunset Wrap: Perfect as a layer to wear to cover up when nursing in public (if you prefer). (271 Sunset Wrap PDF pattern)

by Cynthia Anderson
Today I am going to show you how to make the iconic Folkwear 233 Glamour Girl Dress a little more appropriate for summer by shortening the sleeves to make a short-sleeved version. I will show you how to do this with test muslin fabric so you can try it yourself and make the adjustments you might need to get a good fit for a short sleeve.
Dress Details
In the 1930’s and 1940’s movie stars held the American public in thrall and this figure-flattering dress was emulated by many. Movie studios published still photographs of their stars in elegant attire, and fans clamored for the chance to copy the dress, coiffures, and make-up of their favorites. Folkwear’s Glamour Girl Dress is a stunning example of early 1940’s styling, designed to emphasize feminine curves, to drape elegantly, and give the wearer an aura of discreet sexiness.

A close-fitting bodice is highlighted by a narrow “V” neckline. The front bodice and skirt gather into a curved midriff that ties at the center front, providing snug individual fit. A fitted back hip yoke ensures a smooth line. The flared skirt drapes gracefully at center front and back bias seams. And, the three-quarter length sleeves are distinctively gathered at the elbow. The dress zips at left side seam for ease getting in and out. And, of course shoulder pads are essential for the proper fit of the early 1940’s silhouette; but feel free to leave them out as desired.
Three skirt lengths are offered in this sewing pattern: the ankle length of our original evening gown, a 1940’s daytime length, and a strictly contemporary mid-calf length.
Note the reasonable yardage requirements, which reflect the need to conserve fabric during the Second World War. And read more about the history of fashion during that time on our blog here.
Fabric Choices for Warm Weather
This dress has a lovely drape you will want to keep. Any light to medium weight fabric with drape will do. Silk or rayon crepe, satin, challis, or soft cotton make beautiful choices. To make this dress a go-to in your summer wardrobe, use cotton lawn, bamboo, silk/cotton blend, or linen. Choose a fabric that is soft enough to allow for the subtle built-in shaping at the neckline. Be sure to have a look at Folkwear's fabric selection.
Make a Test Muslin
It is best to test any sewing pattern adjustments by making a cotton muslin first. I am going to show you how to transform this glamorous dress into an breezy summer version, by shortening, and slightly widening, the sleeves in a test muslin.
If you are making this dress for the first time, I recommend making a test of the entire dress to ensure a good fit and length. If you only want to test this short-sleeve adjustment, you can just make a muslin of the bodice and sleeves. For this short-sleeve adjustment, you will make the dress as instructed in the pattern, but with the new sleeves.
Design a Short Sleeve for the Dress
Note: Shortening the sleeves will eliminate the gathering detail on the lower portion of the sleeve. The gather is a great feature, but doesn't work for short sleeves. But, the short sleeves will keep you cooler in warm weather.
Sleeve fit is different for everyone and varies depending on the pattern used. How you prefer to wear your sleeves is personal preference and totally up to you. If the sleeve looks or feels too tight or is not as comfortable as you would like in your test muslin, then an adjustment is in order.
A good sleeve fit requires an adequate amount of fabric to go around the arm, plus a little bit more. This extra amount of fabric is called ease. All commercial sewing patterns are designed with some kind of ease.
It generally takes one to three inches of ease for a woven sleeve to fit comfortably at the bicep and allow for a full range of motion, but this can depend on your size and the cut of the sleeve. If a sleeve feels too narrow there is not an adequate amount of ease. Adding 2"(5cm)-3'(8cm) will create more width and room. It does not take a large amount of ease to make a big difference in how a garment fits and feels. Making a simple sleeve width adjustment is not hard to do.
If you are happy with the fit, amount of comfort, and look of a sleeve pattern as is, then leave well enough alone. Go with the sleeve from the sewing pattern straight out of the package.
Sleeve Fit: For the short sleeve in this pattern, you probably want a little more room at the bicep than the fitted long sleeve for comfort and ease of movement. To figure out if the sleeve in this Glamour Girl Dress pattern is roomy enough, start by measuring the circumference of your arm at the bicep (usually the widest part of your upper arm). Take the measurement with your bicep flexed.
Compare your bicep measurement to the sleeve pattern at the upper sleeve or bicep point, as the case may be. Your arm circumference measurement should be at least 2-3 inches less than the pattern measurement. If you feel a little more room may be needed at the bicep, I will show you how to add the ease needed below.
Sleeve Length: To create a new short sleeve for this dress, trace the sleeve pattern for your size using Swedish tracing paper (or any paper that is transparent enough to see through) using the shorten/lengthen line as the cut line for the bottom sleeve edge. You can always make it a bit shorter, but don't forget the hem. I recommend a 1" (2.5cm) hem; 1/2" (13mm) turned up twice. If you decide to shorten your sleeve further, indicate the final length with a horizontal line. The hem will be added when the ease adjustment is made.
Now that you have the length of your sleeve, cut out the sleeve pattern and pin it to the test fabric (on grain for testing). I prefer to cut the sleeve pattern out without the hem added. I find it easier to make the ease adjustments and add the hem on the test muslin. This method preserves your original sleeve pattern, so it does not need to be recreated if you make a mistake or decide to readjust the ease.
Note: This is not a full sleeve adjustment. Which means the armhole and the sleeve seam are not disturbed or altered. This adjustment is made by adding width to the bottom of the sleeve edge only. Then a line is drawn to connect and grade the underarm edge to the bottom of the sleeve. This creates a gradual width increase down the length of the sleeve, ending at the bottom edge. We are widening the sleeve to create a short sleeve because the cut and fit of the Glamour Girl Dress's sleeve is fairly narrow.
Adding Ease
The sleeve for your pattern size may still need more ease added to make it fit well. Even though the sleeve pattern was designed with ease built-in, adding a bit more can make for a more custom fit.
To widen this sleeve, extra width (ease) needs to be added. The amount of ease listed for the sizes below should be considered a maximum. This adjustment is meant to make a narrow sleeve design a little bit wider for comfort. For a basic rule of thumb, you can use the numbers below for your size to add some extra room (ease) to the bottom of a short-sleeve for this Glamour Girl Dress. You can, of course, add a little more or a little less, depending on how you prefer the sleeve to fit.
Making the Adjustment
With the sleeve pattern pinned to the test fabric, draw a horizontal line that extends beyond each side of the bottom sleeve edge.

Divide the amount of ease you are adding in half and add this half-measurement to each sleeve edge on the drawn horizontal line, as seen below.
In this case, I am making a size medium and adding 2" (5cm) of ease. The 2"(5cm) of ease is divided in half, adding 1"(3cm) to each side of the sleeve edge. Remember that the seam allowance has already been added to the pattern and you do not need to add more.

Using a French curve or hip curve draw a smooth line connecting the under sleeve edge to the newly added width. The connecting line can have a slight curve or be more straight.
Using a hip curve will allow you to experiment with the degree of curve the line has. More ease can be gained through out the sleeve edge if there is less curve to the line drawn.


Draw the same curved edge on the opposite sleeve edge.


Draw a perpendicular line at the newly widened edge. Extend the line down to accommodate the hem to be added.
Determine the total hem depth and divide it in half. In this case, I am adding a 1" (2.5cm) hem. Draw a horizontal line parallel from the bottom edge of the sleeve that measures half the hem depth, 1/2-inch (13mm) in this case.


Stitch up the sleeve right sides together as normal and add the sleeve to the armhole according to the pattern instructions. And if you want, shorten the skirt hem for cool comfort!
For a bit more fun, also consider changing up the curved midriff and back yoke. These details are perfect for playing with pattern design direction or cutting on the bias. Try these options on a test muslin to see what you like.
The Folkwear 233 Glamour Girl Dress paper pattern and pdf is on sale the month of May. Not only is it a great pattern for summer, but it is always nice to get ahead in next season's sewing. You will not regret the adding the long sleeved version of this dress to your upcoming Fall/Winter wardrobe!
Hope you enjoy making and wearing this shorter sleeve version of the Folkwear 233 Glamour Girl Dress! As always, share what you make!!


