-
Sewing Patterns
-
Fabric
- Sewing Supplies
- About
- Blog
- Gallery
-

Folkwear's newest pattern! Cover illustration by the talented, Candii Kismet.
Folkwear is excited to start the sew along for our new pattern, 229 Sailor Pants - just in time for fall sewing. Read about the pattern and history of the sailor pants to get a feel for the pattern and learn about its history. In the 229 Sailor Pants sew along, all the unique details, elements, and construction will be broken down into eleven detailed and manageable sessions. We will learn and have fun making these uniquely constructed and flattering pant. I hope you will join me for this sew along and create a bit of nautical sewing history of your own!

Below is an outline schedule to help you prepare for what you will be making each day of the sew along.
Sew Along Schedule
Day 1: (today) Preparation- select size, selecting and preparing fabric, getting to know the pattern, prepare the pattern
Day 2: Cutting and assembly of the front and back of the pant
Day 3: Adding a welt pocket to the back waistband
Day 4: Waistband and waistband curtain.
Day 5: The front buttonhole facing and attaching it to the pant
Day 6: The front dart gusset and attaching it to the pant
Day 7: Front coin pocket option and adding waistbands to pants
Day 8: The center back gusset and back eyelet facing
Day 9: Pant assembly and leg godet
Day 11: Finishing the details (button placement, making eyelets, and hemming)
Materials you will need.

... and all the usual tools and notions: pins, scissors, pattern weights, pencil for tracing, measuring tape or ruler, iron and ironing board. And a sewing machine in good working order. A serger is always nice for finishing seams and edges, but not essential to this project - you can zigzag any seam edges to finish on a regular machine.
First, get your Folkwear 229 Sailor Pants Pattern, and think about any sizing and lengthening considerations you may want to implement. The coin and welt pockets are optional. The leg godets are optional, too. Read the pattern instructions to familiarize yourself with the pattern, and have a close look at all the possible considerations before we start.
Fabric & Design Details
Our pattern comes from an original WWII Navy sailor pant, made of Melton wool. Originally, sailor pants were made as work-wear from fabrics such as denim and cotton canvas. These fabrics were common and are still good choices. For the purpose of this sew along, woven fabric is recommended. Due to the slashes we will be making, a fairly tightly woven fabric would be best. A fabric that wants to spread once cut will not be the best choice for the first time you try this project. There are also areas in this project where the layers of fabric can get thick, making a mid-weight fabric easier to work with. Check out our fabric suggestions for this pattern for some good ideas.
Note: Whenever I am on the fence about a fabric weight choice, I consider the areas where the garment will gain thickness due to layering or turning. Fold the fabric the number of layers that will occur, hold the layers between your finger to help you gauge the thickness. Decide if this thickness is too bulky or ok? You can always use a hammer to help with the matter (reduce bulk), which is actually a legitimate tailoring technique.
To ensure a fabric will be easy to work with, look for mid-weight cotton twill, cotton canvas, denim, broadcloth, flannel, etc. Linen and wool are good choices too. For this sew along, I am using a Cotton Sanded Twill in Gray, which has a 60" (154cm) width. We have stocked this fabric because it is ideal for making this pant. This Sanded Twill also comes in Navy. Have a look at the Fabric Suggestions for the 229 Sailor pant on our blog.
When picking out your fabric remember that this pattern is loaded with details and elements just waiting for your creative inspiration. Have fun with the lining and welt pocket pieces … add a bit of unexpected whimsy to be discovered in your design. The buttons, buttonhole stitching, eyelets, and top stitching can be subtle or a feature that stands out. Try your hand at some fine finishing techniques too. I will be adding a bound seam to the back gusset, to finish it off. There are so many details in this pants design just waiting for an special added touch.
Once you have decided on a fabric, consult the size and yardage requirement chart on the back of the pattern.
Sizing, Yardage, and Adjustment Considerations
The 229 Sailor Pant pattern is intended for both women and men. Sizing is is based on waist measurements (sizes 30-42), and the sizing chart provided includes the finished measurements for waist, hip, and upper thigh measurements. Start with the waist measurement you require, and then consider the hip and upper thigh measurements next. This pattern can also be graded between sizes. For example, if your waist measurement is 34" (86cm) at the waist, but you measure 38" (97cm) at the hip, you can pencil in a line from the waist to smoothly go to the 38" (97cm) measurement at the hip. This will allow you to keep the waistband pieces the same as for the waist size. See the sizing and yardage chart (also below) and on the back of the pattern, to help you decide your size and the amount of yardage needed.

The leg of the 229 Sailor Pant is a bit different in construction from most pants designs. This design has no side seam. The inner lower leg seam also incorporates a godet to achieve the classic bell-bottom look. Because of the godet feature, most leg length adjustments should happen at the designated "Shorten or Lengthen Here" line printed on the leg portion of the pattern.
If you need to shorten the leg length, fold the pattern up into a pleat along the adjustment line equal to 1/2 the measurement you wish to shorten. Pin or tape your pattern into place. You do not need to cut your pattern, just take up the extra length by folding up a pleat.
To lengthen, slash along the adjustment line; place extra paper underneath and spread the split pattern pieces to equal the measurement required; pin or tape the extra paper to the pattern pieces to secure.
Note: You can eliminate the godet for a smaller leg flare and a more typical leg silhouette. This also allows for more adjustment in length at the hem.
The crotch length can easily be adjusted in the same manner, using the adjustment lines labeled "Lengthen or Shorten Here" printed on the pattern. Follow the same instructions outlined above to adjust (lengthen or shorten) your pattern piece at the crotch. These pants are high-waisted, and a quick muslin can help you decided if you need adjustments.
Note: If making any sizing adjustments to the pattern pieces, yardage requirements may change.
Have a look at the instructions as to how the pattern pieces layout, as well as the width of the fabric. Purchase enough fabric, depending on the yardage width, for the size you require.
Note: Making a muslin is recommended when trying a new pattern for the first time, especially when making adjustments. Feel free to Sew Along using an inexpensive fabric first.
Prepare Your Fabric
Once you have your fabric, it is a good idea to test for washability and shrinkage. Cut a small swatch 3"x4" (8cm x 10cm) of fabric from the corner of your yardage. Place the swatch on a piece of paper and trace around it. Keep the tracing for a reference. Wash and dry your swatch the way you intend on laundering your finished garment. Now, lay the swatch back down on the tracing and compare. Did the swatch shrink? Did the fabric change in an unacceptable way? If your yardage shrank in a substantial way, you may need more yardage or a different fabric. This little test helps to eliminate any unfortunate surprises resulting in disappointment.
If you are fine with your swatch test, go ahead and prepare to wash and dry your yardage according to how you intend to launder the final garment, or according to any care instructions that the fabric requires.
Before you wash, you can serge the raw edges, or sew a straight stitch or long basting stitch, to the raw edges of your fabric yardage. This will prevent your fabric from unraveling and getting tangled, when being put through the rigors of washing and drying.
After you launder your fabric, determine the right side of the fabric. If it is not apparent, you can choose which will be the right side. Thread a needle with a bit of contrasting thread and catch a few threads of the right side of the fabric, in the selvage. Tie the marking thread off with a few tiny knots to secure. This step can save a lot of time second guessing yourself on which is the right side.
Give your fabric a good pressing, not only to smooth it out so the pattern will lay down well, but to force yourself to give the fabric one last inspection before you lay out your pattern.
Trace off your pattern
In order to preserve your pattern and keep it intact, consider tracing off the pattern size you require and make any adjustments needed on the traced pattern and not on the original. News print or a roll of paper will work. However, Swedish tracing paper is really fabulous for this. Swedish tracing paper behaves like a cross between paper and fabric. It is durable (will take endless pinning and folding) and, is transparent enough to make tracing your pattern easy. It takes both pencil and ink well. It irons well too.
Trace and cut your pattern out accurately. Be sure to add all notches, dots, and instructional markings too.
Join me for Day 2 of the Folkwear 229 Sailor Pant Sew Along!

Our 229 Sailor Pants originate from those worn by WWII Navy seamen. The back-story behind this pattern is that a veteran of WWII came to Isabelle Lott (long-time pattern grader for Folkwear) because he wanted to wear his Sailor Pants to his squadron reunion. However, he no longer fit in the pants. Isabelle drafted a pattern from his original pants and graded them to fit. Then, Folkwear was able to use her pattern to make these 229 Sailor Pants!

Cover illustration by Candii Kismet
This style and design have been worn as part of the Navy uniform, or "Crackerjack" uniform, for many decades; and the nautical style influenced fashion for more than half a century. These iconic high-waisted, bell bottom pants are loaded with all the elements and details of the original, such as the distinctive buttoned front flap closure, lace-up back eyelet gusset, back welt pocket, and inner leg godet. A small hidden coin pocket is tucked neatly in the front waistband seam. All the details of this pants design reflect the practical sensibilities of a uniform combined with a casual sophistication that remains timeless.
Our pattern is intended to be worn by men or women. Sizing is based on waist measurements, and we provide finished waist, hip, and upper thigh measurements. Don't forget that the back gusset provides an extra couple of inches at the waist if needed. And, the pattern can be graded between sizes. For example, if you are a size 34 at the waist, but 38 at the hip, you can pencil a line from the waist to smoothly go to 38 at the hip. You can keep the waistband pieces the same as for the waist size. See the sizing and yardage chart here.
Some of the distinct features:


In the 1910s, women's fashion trends moved towards loose, flowing gowns reminiscent of Classical Greek costumes. These style liberated women's bodies from corsets and other (multitudinous) undergarments. Simple gowns with voluminous fabric, like this Paris Promenade Dress, were shaped with decorative cords or sashes and accessorised with long strands of beads, cords, tassels, and/or pendants.
This simple, but elegant, dress is made from just three main pattern pieces. The dress shape is defined at the waist with a fabric sash that can pass underneath the bib-shaped underdress to tie in the back. The three sections of the dress are also great for putting together interesting fabrics and fabric combinations (prints, colors, stripes, textures, etc.), as well as for adding creative embellishments (around the lower skirt, outline the overdress, or around the bateau neckline.
We do, however, often get questions about this dress and its construction. It is fairly simple once you get the hang of it, but at first glance (and without the whole pattern in front of you), it can be a bit confusing. The construction is different than a typical dress construction - i.e. skirt, bodice, sleeves, collar/facing. In this pattern there is a dress, overdress (and lining), and skirt. A lot of fabric is needed for the dress, in several different sections or main pieces, so understanding how it goes together can help when picking out fabrics, especially if you want to do combinations of fabric. We have a blog post on fabric suggestions which may help you decide what type of fabric to use and give ideas on combinations (many of the suggestions may not longer be available, but the ideas may help).
I'm going to demonstrate below how this pattern goes together using paper cut into the shapes of the main pattern pieces. This is a good technique to use if you want to see what colors or prints might go together well, or to experiment with the look you want before cutting into fabric.
First, here are the main pattern pieces: Overdress and Lining (left), Dress (center), Skirt (right)

When they are cut on the fold, they will look like this:

The Dress (top) has the neckline/opening cut into the top (or middle) of the piece. The Lining (right) is cut from the same piece as the Overdress (left). And the Skirt is cut to have a "V" at the top. There will be one Dress, but two of everything else. I am only showing one Lining, one Overdress, and one Skirt to show how this goes together on one side (front).
First, the Overdress and Lining and sewn together along to top. The Lining will be behind the Overdress, but will be seen from the outside, similar to how a large pocket lining is seen on the outside occasionally, depending on how the wearer moves.

Then, the Skirt is sewn to the Overdress at the bottom of the Overdress.

The Lining is sewn to the bottom of the Dress (the dress is folded so that there is no shoulder seam and the neck opening is at the top). And, the Overdress is folded up over the front of the dress. Now this would make an extremely long dress, much too long for anyone to wear. So, there is one more step.

The skirt is folded up underneath the dress to be sewn to the Lining on the inside. This encloses all the seams inside the dress as well (except for the side seam), and makes the dress a "normal" length.

You can color or draw on the pieces to decide how you might want to have your dress designs - how to put colors, prints, or stripes together.

You can see this is a fairly easy dress to put together, but unusual at the same time. The Overdress is sewn, at the top, to the Dress, and sashes and facings are added. It makes an elegant gown.
One other tip when making this dress, is that there is a LOT of ease in the dress, and many people (including me) often size down one or two sizes to reduce the amount of fabric in the dress. A muslin might be a good idea - and you can just make it with the Dress piece only - to see if the sizing feels good to you.

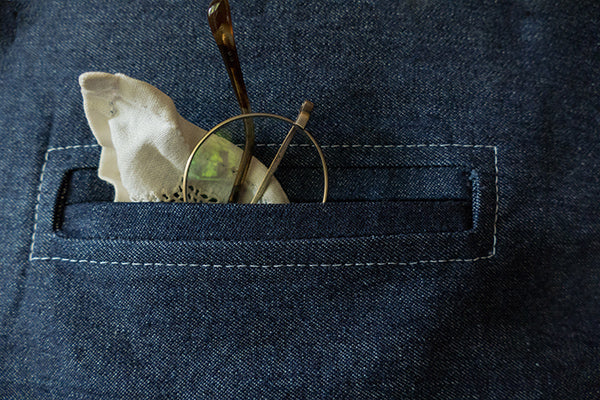
Have you admired the welt pocket, but deemed it too complicated or beyond your skill level? Follow along this blog post and hopefully you will discover how simple this welt pocket design is to make. There are many methods in making a welt pocket, incorporating one or two welts. Here, we are going to learn how to make a double welt pocket, with a simple, yet beautifully engineered technique, without the usual separate welt pieces. This simple technique creates welts by fold the fabric is place!
Welt pockets are a great addition to any number of garments that require an extra touch of tailored flair. Folkwear offers many patterns that either have welt pockets in them or would be made even more perfect with addition of a welt pocket. Folkwear's 124 Bolivian Milkmaid's Jacket, 209 Walking Skirt, 222 Vintage Vest, 230 Model T Duster, 251 Varsity Jacket, and 263 Countryside Frock Coat, just to name a few favorites. And, the welt pocket design demonstrated here will be featured in our brand new Folkwear pattern (released very soon)!
The welt pocket goes by many names… jet, bound, slit, and besom. This pocket design has a long history of adding to the functionality of men’s waist coats, jackets and pants. "Welt" refers to the narrow fabric strips that bind and cover the edges of pocket openings, which can be single or double. The actual pocket bag is hidden away inside the garment… sometimes between the lining and the outer garment fabric, which keeps it perfectly contained.
As history would have it, women’s clothing has been mostly absent of pockets. It would seem that only women's clothing deemed truly functional, was suitable enough for the addition of pockets. One can only guess that this is the reason welt pockets were sometimes found in tailored women’s clothing like riding habits, which were close cousins to men's riding jackets. Learn more about the pocket history here.
Learning to make a welt pocket is not difficult, but measuring precisely and ensuring accurate placement and stitching. Pocket placement is an important consideration,for ease of accessibility and comfort. Most welt pockets are located at breast level and just above the waist on jackets, vests, etc. Placing pockets within seams and darts can cause extra issues, but not once you have a bit more experience. Thinking about how the inside pocket bag will hang is also a factor. You do not want to see the bulge of items within your pockets. Welt pockets are usually placed horizontally on garments, but they can be vertical or at an angel as well. Once you get the hang of the construction you will see all kinds of new possibilities in incorporating the welt pocket into your wardrobe. It is always worth having new skills in your back pocket (pun intended)!
In this demonstration I am not actually making a finished garment, but showing you how to make a welt pocket as if it were going into a garment. This is a great way to try your hand at not only the craftsmanship that is required for a well constructed welt pocket, but you can easily experiment with different fabric weights and fabric combinations. The welt is a great detail that can be played up or down. The detail may be small but it can add an unexpected touch of whimsy or elegance… all it takes is creative consideration.
Getting Started
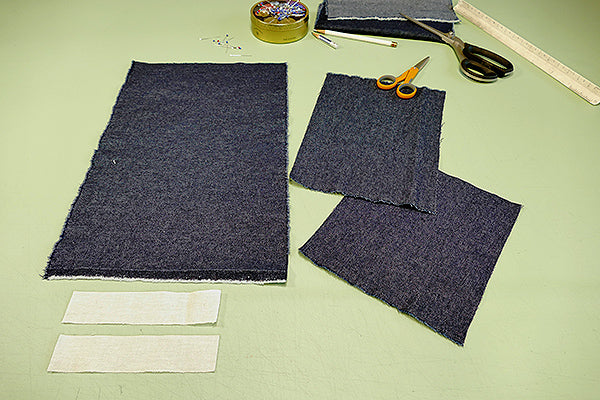
You will need:
The fabric I am using for the demonstration is a lovely Merchant & Mills 8 oz. denim. This is a nice weight of fabric with two distinct sides. Having distinct sides will help with seeing the right and wrong sides of the fabric as we work.
The weight of your fabric will somewhat determine the size of your welts. Remember that heavy weight fabric, when folded over is thick. When using a thick fabric you may want to make your welts larger, which requires a larger rectangle pocket opening. For this exercise, pick a light weight to medium weight fabric to help ensure good results and to make things easier to manage. Light weight fabric will help in making precise and clean folds, seams, and corners.
Only two pattern pieces are used to make this pocket. These two pieces will be referred to as the “Pocket Welt" (which is slightly larger at 7”x 9” (18x23cm)) and “Pocket Bag” (slightly shorter at 7”x 7-3/4” (18x20cm)). The rectangular opening on the “Pocket Welt” measures 3/4”x 5” (1.9x13cm).
The fabric you use that represents the “Garment” will need to be larger than the pocket dimensions. I am using a piece of fabric measuring 9”x 15” (23x38cm).
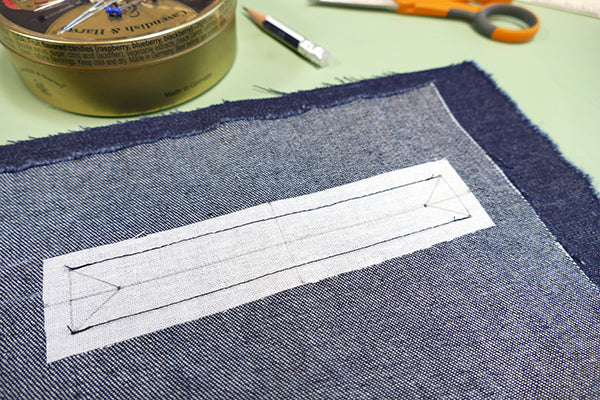
Determine where on your garment fabric you would like your pocket to be placed. For demonstration purposes, I am centering the pocket opening between the width of my fabric and 2” (5cm) down from the top edge of my Garment fabric. Mark the four corners of the pocket opening (3/4"x 5"/1.9x13cm) on the garment fabric using sewing pins or mark with a pencil. These markings now determine the placement and opening of the welt pocket.
Step 1: Adding Fusible Interfacing
Iron a lightweight fusible piece of interfacing measuring 1-1/4”x 5-1/2” (3.17x13.9cm) to the wrong side of the garment fabric, over the pocket opening markings. The fusible interfacing gives you an easy place to draw your guide lines and using it will help stabilize the fabric once you cut the corners to prevent fraying out at the corners.
Iron another piece of fusible interfacing the same dimensions to the wrong side of Pocket Welt, also aligning over the pocket opening markings. Accurately draw the rectangle pocket opening onto the fusible interfacing on the Welt Pocket with a pencil or water soluble marker. The corners should be at right angles.
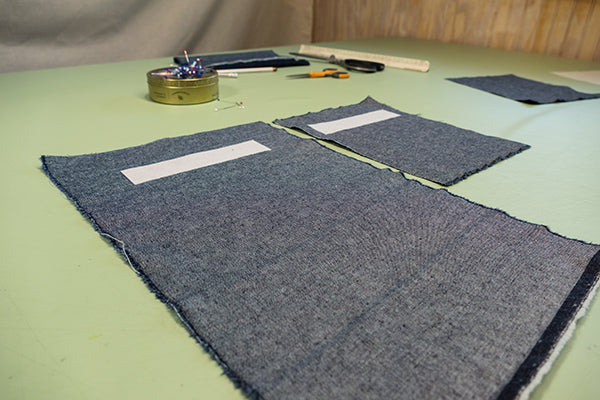 Fusible Interfacing ironed to the wrong side of the Garment fabric and the wrong side of the Pocket Welt .
Step 2: Sew the Pocket Welt and the Pocket Bag
Stitch the Pocket Welt and the Pocket Bag at the bottom, with right sides together. These two pieces now become the pocket.

Step 3: Align The Openings
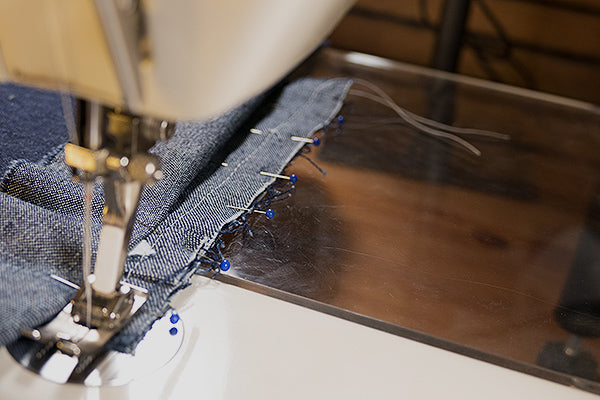
Pin the right side of the Welt Pocket to the right side of the garment at the welt pocket corner markings, making sure to match and align the corners of the pocket opening.
 Using pins to align the corner dots on the Garment fabric and the pocket welt.
The right side of your Garment fabric should be facing up and the wrong side of the Welt pocket should be facing up.
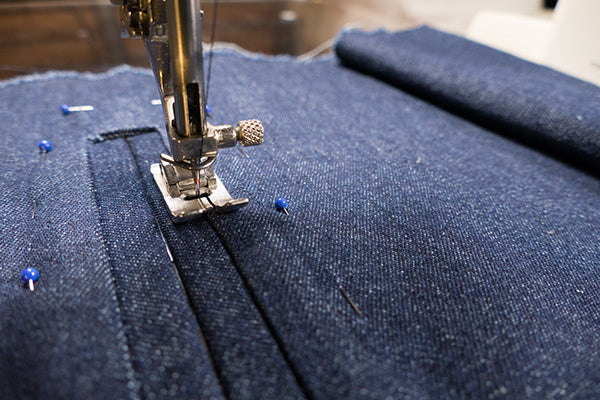
Step 4: Stitch Welt Pocket Parallel Lines
To secure the Pocket Welt/Pocket Bag to the Garment fabric, stitch along the horizontal (longer) parallel lines of the welt pocket opening. It is important to make sure you start and finish in the same place for each line. This is important to ensure a rectangular pocket opening (rather than a parallelogram or a skewed pocket opening). Back stitch at each end.
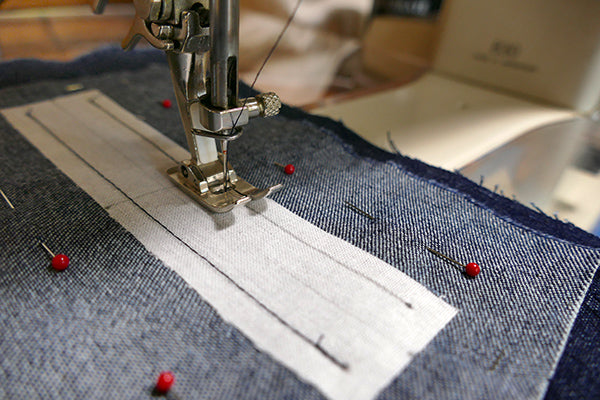
Sewing parallel horizontal lines of welt pocket.
Now that the welt opening is attached to the Garment, the engineering gets fun!
Step 5: Prepare & Cut Slit Pocket Opening
Draw a horizontal center line between the two parallel lines you just stitched. Measure in 1/2” (13mm) from the vertical, or short ends, of the rectangle and mark with a dot. Drawn in lines from the dot to the corners to create cutting guide lines.
The horizontal stitching lines and drawn guide lines.
Fold the pocket in half (use a pin to be sure the center line is aligned) and cut a small slit through all the layers of the fabric. This initial snip will help you get started in cutting the center horizontal slit line.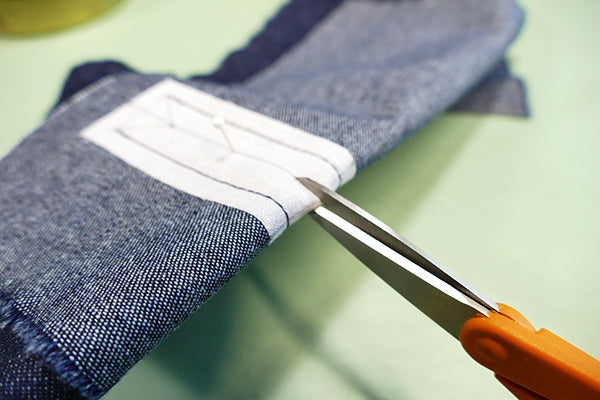 Initial snip to help with cutting the pocket slit opening.
Continue to cut along the center line and stop at the dot you marked. Then cut diagonally, to the corner edges using the guide lines you drew in. Cut as close a possible, without cutting into the stitching and cut just up to the corner and not beyond.
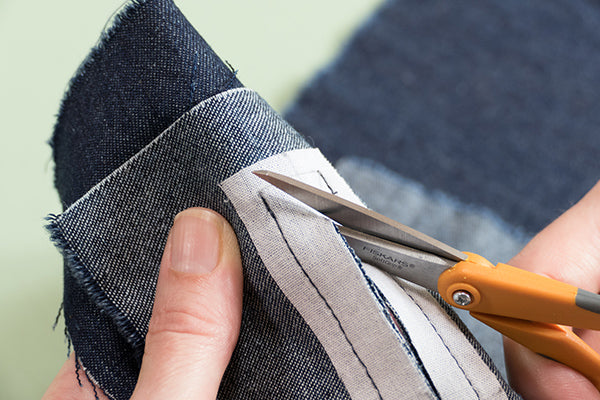 Carefully cutting the pocket slit opening and cutting to the corners.
Step 6: Pull the Pocket Bag Through the Slit
Now we need to pull the whole pocket bag through the slit to the other side (which is the wrong side of the garment fabric).
 Pocket bag being pulled through to wrong side of Garment fabric.
 View of fabric pulled to other side, before shaping the rectangular opening.
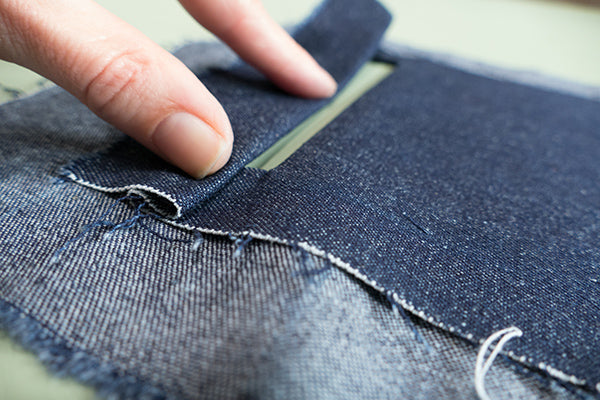
Step 7: Shape the Pocket Opening
Take a minute and get re-oriented. The right side of the garment should be facing up and the right side of the Pocket Welt/Pocket Bag should be seen facing up through the opening. The interfacing pieces will not be visible.
Now, use your fingers to manipulate the stitched edges of the rectangle opening into a straight crisp edges. Gently pull and twist the fabric to set the shape of the corners and pinch with your fingers to create right angle corners.
 Shaping the rectangle with your fingers.
The idea is to create a well crafted rectangular opening that will soon get its welts. Once you are satisfied with the rectangle pocket opening, press to set.
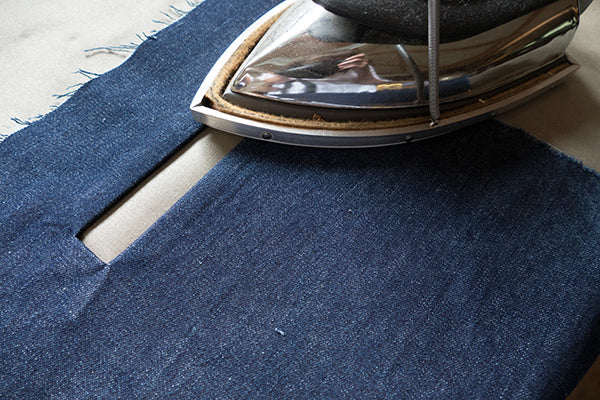
Press rectangle pocket opening to set the edges and corners.
Step 8: Creating the Welts
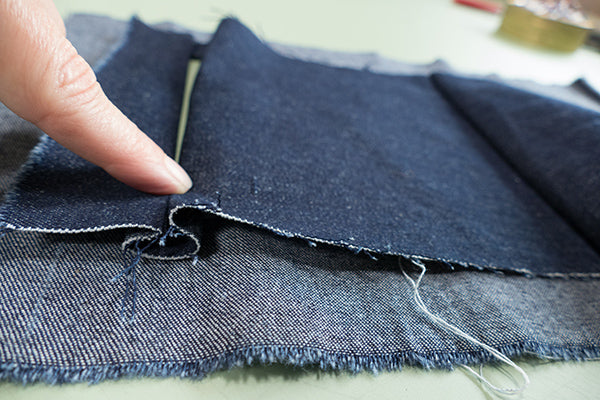
Now turn your work over, with the wrong side of the Garment fabric and the INSIDE of the pocket should be facing up.
Now, we are going to make the welts. To do this, simply fold the top of the Pocket Welt into a pleat so that the top half of the pocket opening is covered. To help ensure the pleat aligns exactly with half of the opening, mark the center of the short edges as a guide. Press the top welt into place creating a nice clean edge to the pleat and pin to secure.
Fold top of the pocket welt into a pleat covering half of the opening.
Now, fold up the bottom of the Pocket Welt into a pleat so that the bottom half of the pocket opening is covered and meets in the center. Be sure that each welt pleat is the same width and align touching in the center. Press the bottom welt into place to secure and create a nice clean edge to the pleat.
 Fold up the bottom of the welt pocket, making a pleat, covering the bottom half of the pocket opening.
Turn your work over, so the right side of the garment is facing up, and inspect your welts. Realign and press again if you need to. Make everything as neat as you possibly can.
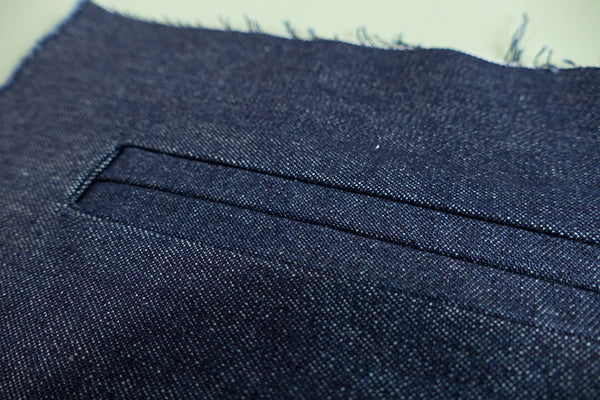 Welts folded and aligned in place and pressed to set.
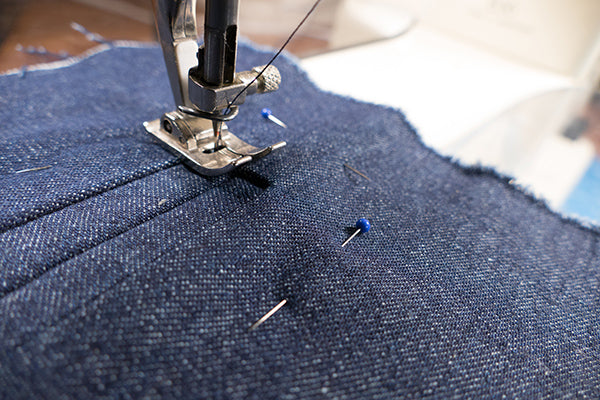
Step 9: Sew Welts in Place
Now, the welt needs to be secured in place. There are three suggested techniques to tack the welts in place and secure the integrity of the pocket construction. I will demonstrate all three versions to create a detailed finish and completely ensure a secure pocket opening. Be sure the pocket bag is out of the way before you start.
Version 1: Stitch and back tack the shorter vertical edges of the pocket opening on the inside of the pocket opening. This secures the welts to the underneath of the pocket. Use thread that blends into the fabric when using this version.
 Stitch and back tack the shorter edge to secure the welts underneath the pocket.
Version 2: Edge stitch or stitch-in-the-ditch all the way around the inside of the welt. Use thread that blends into the fabric when using this version.
Edge stitch or stitch-in-the-ditch all the way around the inside of the welt.
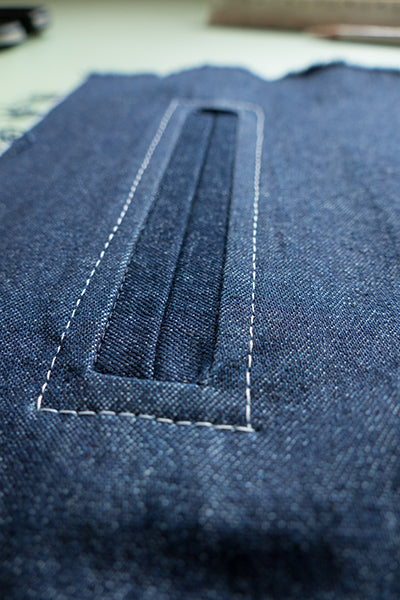
Version 3: Top stitch all the way around the pocket opening outer edge. This not only secures the pocket, but adds a detail that can be played up or down. Use a thread that blends with your Garment fabric or use a contrasting thread to stand out. If using a contrasting thread, avoid back stitching. Top stitching adds a casual or sporty aesthetic, so if you are going or a more elegant look you may want to skip top stitching.

Top stitching around the pocket opening creates a nice detail and secures the welts in place.
Note: Instead of pivoting your sewing at the corners. Leave a long tail thread (top thread) on the right side of your work and an equally long (bobbin thread) tail on the underneath side of your work. Thread the top thread to a needle and pull through to the underneath side. Using the ending stitch length to determine where to pull the thread to the underneath side. To secure the stitch, tie the two threads together a few times and cut to tidy the long threads.
The only part that remains is to sew up the pocket.
Welt Pocket top stitched and almost done. Notice the crisp corners.
Step 10: Stitch Up The Pocket Bag
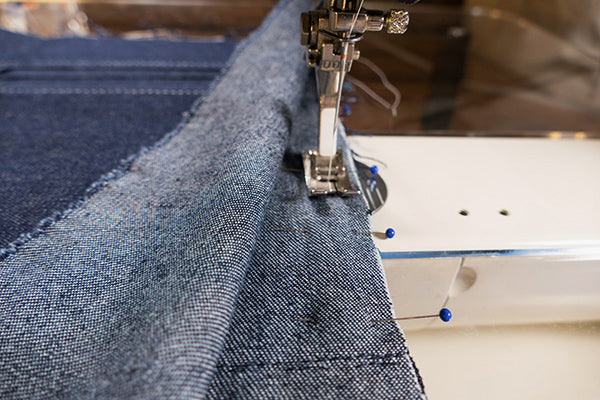
Fold the Pocket Bag up to face the Pocket Welt. Align the sides and pin into place. Then, sew both sides of the pocket using a 1/2" (13mm) seam allowance. Being sure to back stitch at the start and finish. Finish the pocket edges in any technique you prefer when making a finished garment.
Sewing the side seam of the pocket.
Now, the top of the pocket needs to be sewn up. With the right side of the Garment facing up, fold the top of the fabric down over the welt. The idea is to move the garment fabric out of the way so you can sew the top of the pocket together and get as close as possible to the welts.
Sewing to close the top of the pocket bag.
The Welt pocket exercise is complete... simple and quick.
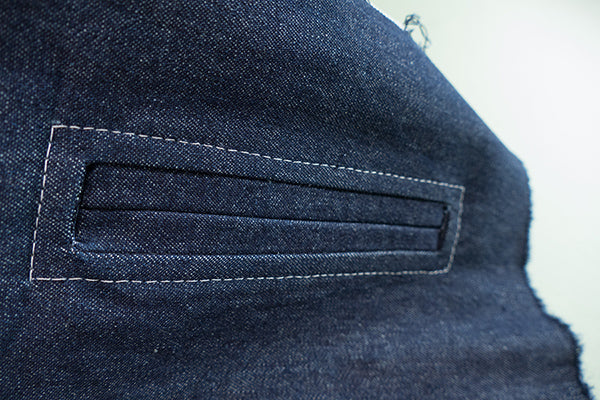
Pockets are welcome any time of the year in my wardrobe, for they provide a practical and hidden receptacle for any number of items. For me, the promise of cooler temps means pockets needed for tissues, gloves, and gathered acorns - along with keys and a cell phone. Consider adding a handy and elegant welt pocket to your next fall sewing project. Check out the accompanying video in Folkwear's Pocket Series: Make a Welt Pocket, for additional help.
I hope this tutorial will sooth any anxieties you may have had about trying a welt pocket or taught you a new welt pocket technique! The next time you make a pair of pants, pajamas, a blouse, a coat, a jacket, a vest, a cap - or anything with a lining - consider adding a welt pocket. Pockets add practicality as well as pleasure-in-wearing to clothing.
Be sure to look for the release of Folkwear's exciting new pattern! Besides being a perfect fall wardrobe staple, it features a Welt Pocket and many other interesting details to learn and master!
Sew Well,
Cynthia

Parasols are not only a convenient and stylish way shield yourself from the suns rays, but a perfect accessory companion to one of Folkwear's most favorite and popular patterns. The Folkwear 261 Paris Promenade Dress is made even more perfect when paired with its very own parasol.
The 1920's styling of this easy-to-sew and easy-to-wear, pullover dress has a carefree, yet sophisticated aesthetic. The unique construction of this dress makes it easy to imagine all sorts of creative fabric combinations. Complete your 261 Paris Promenade Dress ensemble by coordinating the vintage-style drawstring hand bag that comes with the pattern and now a parasol, for the next time you want to make a truly vintage-inspired statement.
And, today we are going to show you how to make your own parasol!


For a bit of inspiration in making your own parasol read the History of the Parasol blog for an interesting stroll through the history of sun protection and much more. Learning to make your own parasol is not as difficult as you might imagine.
Knowing what to look for in a parasol or umbrella frame is important because the frame is the foundation of your project. Due to the superb quality and craftsmanship of antique umbrellas and parasols, their frames and handles can be found in good condition and are not hard to find if you know where to look. Flea markets, thrift shops, ebay, Etsy, and historical reenactment website shops are all excellent resources. Consider using an umbrella you already have... if the quality of the frame is good, don’t toss it out… recover, re-purpose, reuse. Enjoy anew!
Frame Structure
When looking for a frame to use, remember that the more sections or pie-shapes a frame has, the easier it will be to make the canopy fit. This is in part because the more reinforcing seams you have, the more stable the fabric will be. The narrower the width and the more seams there are, the more stable the fabric and therefore it will be easier to fit the canopy to the frame. The number of pie shapes corresponds to the number of ribs. The number of ribs corresponds to the seams. Parasols tend to be more elegant and daintier then umbrellas. So, parasols usually have more ribs, pie-shapes sections, and seams.

The frame and pieces needed to make a parasol.
The parasol frame and parts I am using in this tutorial were sourced at Vena Cava Designs (they also carry Folkwear patterns!). I ordered the Parasol Frame (Skeleton) kit (adult, straight handle).
This is an inexpensive and good quality frame. This frame is suitable for either a parasol or umbrella and a great option for trying out your making skills. The pattern we are providing here fits this particular frame. However, you can use this pattern, with some modifications, to fit most other frames that you might find.
Please note that I am referencing the parasol frame that is sourced in this tutorial. The pattern included has been made to fit this frame.
The Proper Fabric
The fabric you use to make an umbrella is different than fabric used for a parasol. Parasols were generally made of natural materials like silk, cotton, and linen and these fabrics are available at most fabric stores. Most natural fibers such as the ones mentioned have enough stretch and sometimes too much stretch when cut on an angel. For this reason the pie shaped pattern piece should be cut with the grain line indicated on the pattern (aligned with selvedge of the fabric).
When choosing a fabric, it is best to choose a fabric that is the same on both sides since you will see the wrong side of the fabric when he parasol is open.
Modern oil cloth and waxed cotton are fabrics that come the closest to original umbrella fabrics. Suitable waterproof fabrics will be made of synthetic nylon and woven from fine threads. These types of fabrics will not have much stretch, so pattern pieces will need to be cut on the cross-grain or with a curved edge on the bottom edge. Nylon frays easily (can cut with a hot knife or serge immediately). To avoid disappointment, do a bit of research if considering the use of waterproof fabrics.
If you are going to make the parasol canopy for the kit, or modify it for your own use, instructions are below.
You will need:
Fabric Layouts and Cutting Guide
Layout your pattern piece on your fabric and cut out 10 pieces to make your parasol. The diagram below shows how to create the parasol pattern piece used in this demonstration, if you do not print the PDF piece provided in the link above. Notice the grain line and lay your pattern out with the grain line parallel to the selvage.

Ten pattern pieces laid out on a 45" (114.3 cm) or 60" (152.4 cm) wide fabric, requires just over a yard (1m) of fabric. Note that these illustrations shows the fabric laying open and flat.


Note: The pattern pieces in the illustrations above are placed close to the edges of the fabric. If you think you may need more hem at the bottom edges, then allow for a bit more yardage. To be safe add an additional 1/4 yard (0.2286 m) of fabric.
If your pattern pieces are a different size than ours, you can lay the pattern pieces out on a piece of fabric the width you intended to use, and have a look at how the pattern pieces lay out and how you can make them fit. The illustrations above should help.
Sewing Guide
The 1/2" (13 mm) seam allowance for the long edges are included in the pattern. The 1/2" (13 mm) bottom edge seam allowance is included to produce a 1/4" (6.35 mm) hem. The narrow top edge of the pattern piece does not get a hem. This pattern is intended for a natural fabric to be cut on the selvage grain. I used a light weight linen for the purpose of this demonstration.
MAKE A MUSLIN FIRST!! This is my best piece of advice in attempting the making of a parasol or umbrella. Frames are not always perfect. Especially if your frame is an antique. Plus experimenting without feeling the pressure of messing up good fabric is always wise. And, you get to practice getting it right.
Step One: Sewing the Canopy
Once the fabric pieces are cut out, I recommend working with wedges in pairs. With the right sides of the fabric together, pin one long edge and stitched a 1/2" (13 mm) seam allowance. Then, move the needle over one or two notches and stitch again just OUTSIDE of the seam allowance. Back stitch at each end. This extra stitch line will help to create a bit more seam strength and stability.
If you want add a strap to fasten your parasol neatly closed, now is the time. Just pick a seam and insert the strap into the seam allowance, sewing all at once. Use a snap or a button to fasten the strap.

View showing a second reinforcing stitch just to the outside of the seam allowance.
Continued this method, working in pairs until all ten of the pie piece shapes are sewn together creating the circular canopy. There should be a hole in the center of the canopy. This is where the tip will come through.

Canopy all sewn up.
Press all seams in the same direction on the wrong or under side of the canopy. Press to set the seams and create a clean finish on the right or top side of the canopy as well.
Finish all the underneath seam allowances. Either, serge, pink, or trim. You could also do a faux flat felled seam. French seams and bound seams will be too bulky and are not recommended.
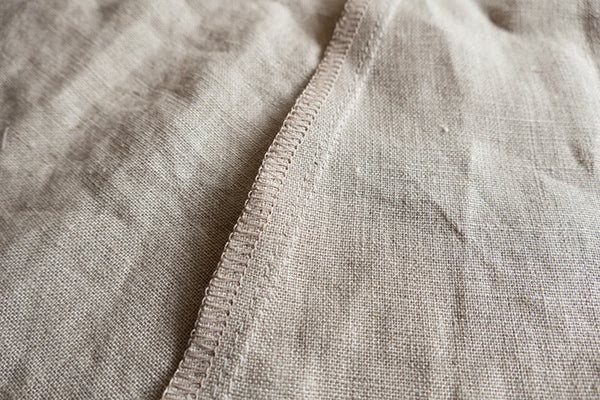
Seam finished with a serge. Notice the seam allowance stitch and the second row of reinforcing stitches.
Step Two: Top Strengthening Detail
The entry point where the tip-ferrule-post or top point, inserts into the fabric of the canopy is a major stress point and needs reinforcing to provide strength. The hole at the opening needs to be made smaller without adding fabric bulk. A couple of simple tricks will take care of both of these issues.
Make a short stay stitch approximately 5/8" (16 mm) around the hole opening in the top of the canopy. This will ensure all the panels stay in place and not over stretch when the parasol is opened and closed repeatedly.
A simple circle of fabric sewn to the underneath at the hole opening, will provide another layer of support and to be sure the canopy hole fits tightly to the tip-ferrule-post base.
From a scrap of the same fabric you are using to create your parasol, cut a 2-1/2" (6.35 cm) to 3" (7.62 cm) circle, using pinking shears. The idea is to not add any bulk to this area so finishing the edges with pinking shears serves the purpose well.
Fold the fabric circle in half and then in half again. Snip the tip of the point off with your scissors. Smooth out the circle and press to remove the ceases.

Fold the Circle of fabric in half and then in half again.
Depending on the nature of your fabric, it might be wise to Fray Check the edges to seal the edges. The linen I have used needed a bit of Fray Check for this very reason. Allow the Fray Check to dry.

Reinforcing linen fabric circle getting a touch of Fray Check.
On the underneath side, make sure all seam allowances are pressed in the same direction, align the hole of the small reinforcing circle with the opening of the canopy and sew the circle to the canopy approximately 1/2" (13 mm) from the center hole.
Push the tip of the frame through the hole of the circle to see how it fits. Clip the hole of the circle a tiny bit more if needed. The idea is to have the hole of the circle to fit snugly to the base of the tip-ferrule-post.
 View of pinked linen circle sewn to the canopy.
Below are a series of images showing you how the simple circular piece of reinforcing fabric is attached to the canopy and what an important role this little bit of fabric performs in maintaining the strength and integrity of a highly used stress point.


View of the pinked linen circle peaking through on the outside of the canopy before the being stretched and fitted to the frame.
With the canopy stretched over the frame and closed-up you can appreciate how much this simple bit fabric reinforcement provides to the integrity of the parasols construction.

View of the pinked linen circle peaking through on the outside of the closed canopy after being stretched and fitted to the frame.
Step Three: Hemming the Edge
Turn the widest edge or the bottom edge of the pie pieces under 1/4" (6.35 mm) and press. Turn under another 1/4" (6.35 mm) and press creating a straight edge. Press and pin the hem in place. Manipulate the connecting seam edges to lay as smoothly as possible. Top-stitch close to the turned edge, taking care to create a clean finish.

Pinning the hem.
Step Four: Adding the Rib Posts
Using button twist thread for extra strength, hand sew all the wooden tips to the wrong side of the canopy, at the seam allowance. Use the turned under hem as an anchor spot for sewing the tip to. You do not want to see any stitch work on the right side or top side of the canopy.

Gutermann button hole twist is ideal for attaching and strengthening the tips to the canopy.
The extra thickness of the turned under hem makes an excellent spot to sew on the tips and prevent the stitches from being seen on the top side.

Wooden tip securely sewn to the hem of the canopy.
Step Five: Test for a Proper Fit
Once you get a few tips sewn in place, give the fit a try. It will work best to sew your first few tips on opposite sides of the canopy from each other, to help with the tension. Place the top hole of the canopy over the tip-ferrule-post base. Then gently pull the fabric over the rib and insert the metal rib tip into the wooden tip sewn at the canopy edge. You want the fabric of the canopy to fit tightly over the ribs (each seam should correspond to a rib), once the rib end is inserted in the wooden tip. There should be some tension, but not so much that the rib begins to distort or twist from its intended position along the seam. If this does happen, there is too much tension, the panel is too short. To remedy, let out the hem a bit to lengthen the panel.
With the rib inserted in the tip you can see how the tip needs to be secure and strong due to the tension required for a proper fit.
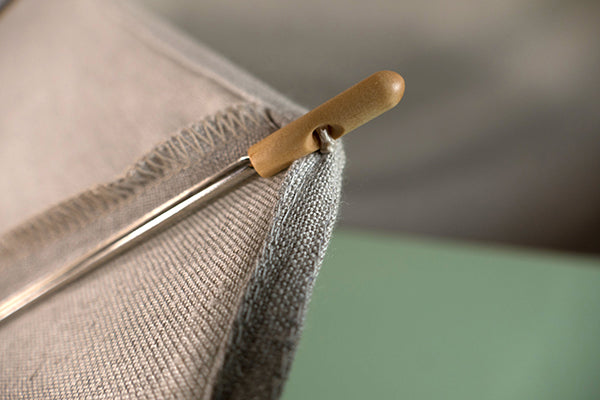
Tension created when metal rib is inserted in wooden tip.
Note: It is important the fit is good before proceeding any further.

A perfect fit on the outside!

Perfect fit on the inside!
Step Six: Secure Ribs to the Seam Allowance
Your canopy should now be installed to the frame and fit perfectly. Even if the canopy fits beautifully to the frame, a bit more stabilization never hurts. Adding a thread tack will easily accomplish this task.
I have placed and sewn each tack 5" (13 cm) from the hem edge inwards along the rib. Using regular thread, double the thread up, and sew a few hand tacks as shown below.

Measure to determine tack location to help added extra stability for each rib.
Start on one side of the seam allowance, inserting the needle between the seam stitch line and the extra stitch line previously made in the assemble instructions. Make the stitch through the seam allowance and under the rib. Pull the needle through to the opposite side.

First pass through the seam allowance and under the rib.
Insert the needle over the rib, through the seam allowance at the extra stitch line, to the opposite side. Continue in this manner until you have made 5 to 8 passes, creating a neat and secure hold. The idea is to prevent any stitch work from showing on the top side of the canopy. Tie the thread off with a couple of knots on each side of the tack. Trim the thread close to the knot. Repeat for each rib.

Passing thread over the rib and continuing to make the tack.

Making tacks all the way around for each rib.
The Top Finishing Detail
One last finishing touch is required to tidy up the top of the parasol, where the canopy and tip-ferrule-post meet. This will conceal the reinforcing stitching lines and create a clean yet simple finishing flourish of interest. This not the only creative way to finish the top of your parasol, but it is quick and easy and adds just enough detail without being fussy.

Start with a strip of fabric measuring 1-3/4" wide by 8-1/2" long (4.445 cm x 21.59 cm). I like to utilize the selvage edge when ever possible to give an extra bit of strength and stability. So, I have cut my strip of fabric including the selvage. I turned and press the opposite long edge under 1/4" (6.35 mm). Then top stitched to create a finished edge. This edge will eventually show.

Finishing detail begins with a linen strip. Notice the top stitched turned under edge.
Next, sew a long gathering stitch 1/2" (13 mm) from the top stitched edge. Leave long thread tails on either end to make gathering easier. Make another long gathering stitch 1-1/8" (3 cm) from the top stitched edge. Leave long thread tails again.


You will need:


The carrier/holder strap in place and seam allowance sewn before turning right side out.
Note: Predetermine the length you would like the strap to be before sewing up the seam allowance.
With right sides together and the strap length out of the way of catching in the seam allowance, sew 1/2" (13 mm) seam allowance on the longest side and at the smallest end if you are sewing the end up. Trim the excess strap. Press the seam open. Finish seam or trim.
Turn right side out and hem the remaining ends using a 1/4" (6.35 mm) turn under and then turn under another 1/4" (6.35 mm). Top stitch close to the edge to finish. I chose to leave the bottom edge open so I hemmed it too.


Garden Parasol, Frederick Carl Frieseke / Public domain
by Cynthia Anderson
Parasol and Umbrellas are sometimes thought of interchangeably. Depending on the culture, circumstance, and time period, the meaning of this instrument varies, but the purpose is consistent. It is fascinating to think that we continue to carry a personal-hand-held-portable-folding-canopy, over our heads to protect us from the sun and rain -- a design actually implemented thousands of years ago. The meaning and purpose of the parasol has radically changed with history, while its practicality has persisted. When you consider the origins of this retractable protective canopy, it seems some things can not be radically improved upon.
Parasol comes from the Latin "para-", to shield or protect, and "sol" which means “sun.” The parasol is generally smaller than the umbrella in size and considered a ladies accessory meant to protect skin from the sun, but this was not always the case.
Ancient Origins
The earliest parasol like device can be found depicted in the art of the Ancient Egyptians, from the 5th Dynasty around 2,450 BC. The sun protective device was made of palm leaves or feathers and looked something like the parasols carried in the Pope’s processions.

Wikimedia Commons / Public Domain; Relief of the Persian king Xerxes (485-465 BC)
The parasol is thought to have begun its sun protective legacy in ancient Persia (and surrounding areas), then drifted to China and to Southeast Asia, eventually arriving on the subcontinent of India. From there the parasol would spread to the hot, dry climates of Egypt, Greece, and Rome. The fall of the the Roman Empire would suspend the proliferation of the parasol for nearly a thousand years. During the middle ages the parasol would mostly disappear. A reappearance would occur sometime during the 14th to 16th century Italian Renaissance Revival.
It appears that from the very beginning of the parasol’s history, it was used as a protector from the harming rays of the sun, but only for a chosen few. This protection was reserved solely for those of high status, royalty, and the privileged. The parasol became a symbol of dignity and holiness. Pale skin undamaged by the sun also became a differentiator of those of high status. This trend would evolve from representing only the holy few, to a coveted ideal aesthetic only achieved by the wealthy of society. The poor had to work manual labor in the sun, which allowed a privileged few the status of undamaged complexions. Unfortunately, injustice and bias has a long and wide-reaching history. Even the parasol would evolve into a tool representing oppression of the most vulnerable.
Eventually in China, pale skin would translate into a symbol of purity of morality, an ideal bestowed upon women. Hence, the parasol would be accepted for all of society. Although the parasol of the common person would be constructed of paper, a less prestigious material. Common people were not allowed a parasol covered in fabric. Fabric and fine silk fabrics would be relegated strictly to the privileged. Once again, the parasol was used a symbol of exclusion in society.
Parasol Arrives in Europe
Europe was slow in adopting the parasol. By the 1620’s, the parasol did show up in a few French engravings. These parasols were large, heavy, and unwieldy even when carried by a sturdy male attendant, charged with protecting a wealthy patron. The heavy fabric canopy was made of oilcloth, barracan, which is made of camel hair or grogram, a blend of silk, mohair or wool. Less expensive models were made of straw. The stays or ribs of these parasols were made of whalebone measuring approximately 30 inches long and secured by a large metal ring, on handles made of solid wood.
 Wikimedia Commons / Public Domain; Charles Le Brun (1619-1690) painting of Le Chacelier Ségúier
By the late 1680’s the fashionable French were very sartorially aware and ripe for new and exotic trends. The French were enchanted by stories and tales depicted in art about the exotic world of the Far East. This previously unknown land and all its intrigues were unveiled by the opening of the Silk Road trade routes. Availability of fine materials would elevated the parasol to an elegant accessory for well-to-do women. The parasol, alongside the fan, would become popular items, in part due to the interest in the Asian aesthetic. These new trade routes would provide a plethora of materials that would enable elegant women to indulge their whims with fripperies of fine silk fringes, feather plumes, handles made of exotic woods and ivory, and colorful delicate silk and taffeta fabrics. The previously practical and dull parasols were left behind for those less trendy, which translated to mean those less wealthy women.
 Wikimedia Commons / Public Domain; 1872 Painting of the Ponte Nuef by Auguste Renoir depicts promenading parasols.
To coincide with the popularity and trendy sporting of the latest parasol concoctions, a tiny shop sprang up on the Pont Neuf in 1769. This shop’s sole purpose was to rent a coveted parasol to simply be paraded across the bridge where it was returned on the other side. It would seem frivolity was all the rage for those who could afford it.
The dainty quality of the parasol comes not only from its petite size, but from the more delicate and finer fabric from which it was originally made. Fine cotton lawn, calico, linen, and silk were the historical fabrics of choice. European ladies made the parasol a fashion statement when it became an accessory that coordinated with their clothes or activity. Most accessories become a canvas for decoration and the parasol became the perfect showy addition to women’s finery. Matching ensembles and parasols was a way of displaying wealth and status. However, these highly decorative shows of femininity failed miserably in wet weather and were only relegated to fair days.
A Rainy Island's Influence
At this point the practicality of the parasol to protect from the sun, but its failure to repel rain, became a turning point and the umbrella would begin to unfurl. Due to the obvious practicality of this accessory and technological advancements in fabric making in Europe, the parasol would eventually evolve into the umbrella. The modern word umbrella comes from the latin word "umbra" meaning “shade.” However, shade would not suffice. Most historians agree that the umbrella we associate with rainy days, came into being in the 1700s. The first patent that related to mass umbrella production was taken out in 1786, in England and the ribs were constructed of whalebone.
 Wikimedia Commons / Public Domain / Unnamed; Elizabeth Bennett and Mr. Darcy?
The first attempts at waterproof umbrellas were made from oiled silk, which were awkward, and did not open and close well when wet. This operational short coming, along with other prejudices may have been a contributing factor as to why European countries were a bit slower to adopt the umbrella. It would be the French, Italians, and the British that would not only eventually adopt the umbrella, but make it a status symbol of craftsmanship. It would be the British, more than any other country, that would make the umbrella a national symbol of British-ness.
However, this would take some time to come into being, due to prejudices that challenged manliness. In the UK the waterproof umbrella was perceived as an unfortunate emblem of not being able to afford a carriage. Initially the umbrella was considered a distinguished feminine accessory and men would have never been willing to face ridicule for sporting such an effeminate form of weather protection. Men would stubbornly continue to claim a hat and a cloak perfectly adequate masculine equipment, no matter how torrential the weather.
In the early 1750s, an English doctor by the name of Jonas Hanway, claimed this prejudice to be absurd and would end up changing the status of the British umbrella forever. But, not before he would face public ridicule in the streets of London for sporting an umbrella he had purchased while in France. Obviously, Hanway had witnessed the practical use of the umbrella while on his visit. His fellow Londoners would find themselves in an uproar over his audacity. The citizens of London took extreme offense to Hanway carrying a contraption they associated with being a "dirty Frenchman" (this was at a time leading up to war between British and French). And the umbrella was considered to be strictly of a woman’s domain. Hence, a man carrying an umbrella was no gentleman and committing a effeminate sin. Doctor Hanway would persist in the practical use of an umbrella in order to protect himself from the weather for all to witness, despite the outrage. He exclaimed he would not risk his heath over silly societal norms that considered carrying an umbrella a weakness of character. By the late 1700s and early 1800’s men had forfeited their reluctance concerning the umbrella and joined the women in their acclimation to its benefits. With this coming around of male sensibilities, the umbrella also became known as a "Hanway," due to the good doctor's common sense and persistence.
Even though the collapsible umbrella was developed around 1800, it would experience some developmental growing pains. The first collapsible design was not as reliable as needed, the ribs would break, the canopy material would tear or disintegrate. Many fabrics used for the canopy would mildew if not allowed to dry properly. The desire to develop a fully functioning umbrella was apparent, for 121 patents were filed in 1850 alone.
By The early Victorian Era, improvements in metallurgy arising from the Industrial Revolution lead to stronger alloys for umbrella ribs. Finally, the development of steel as a replacement for whalebone ribs would give the umbrella the staying power it needed. It would be Henry Holland of Birmingham England who secured the first patent for metal ribs, to be followed later by Samuel Fox.
The great exhibition of 1851 in Britain was proof that a thriving umbrella and parasol industry had been well established. Umbrellas were becoming more popular, but were still considered a novelty made of fine fabrics. However, the Great Exhibition would change the trajectory of the umbrella, due to the Sangster brothers who owned an umbrella manufacturing company. The brothers won a prize at the exhibition, for alpaca wool fabric-covered umbrellas. Fabric made of alpaca wool was inferior to the fine quality of silk, but was much cheaper and sturdier. Hence, this would lead to alpaca wool fabric becoming the sturdy material that wet weather umbrellas would be made of and become the protective salvation of the wet and blustery island. Alpaca wool became a highly popular textile in British umbrella manufacturing in the 1850s.
In addition to such practical strides the umbrella would make as a result of the Great Exhibition of 1851, the official catalog of the Great Exhibition of the Works of all Nations listed a new patent for a weaponized umbrella! It was described as a new patent for a traveling umbrella design, featuring a folding handle, and a stiletto for defense. Wonder if Sherlock Holmes placed an order?
The English and the French continued to love their parasols, which became popular and regular features in fashion magazines and newspapers. They remained light and elegant, and were sold in a wide range of styles and colors well into the early 19th century. Fine fabric such as silk chiffon, taffeta, and satin remained popular. Fringe, lace, and embroidery were commonly added details. Whether bought from an enticing store window or custom made to accompany a specific outfit, the variations and possible combinations were endless. With all the elaborate handle designs to chose from, a woman’s parasol could be a creative culmination of her personality, tastes and most importantly reflect her wealth. Insects and animals were carved into bone, ivory, or wood handles. Porcelain handles were painted with delicate flowers and flourishes. Shell such as abalone and mother-of-pearl were also inlaid into handles. Gimmicks such as watches being embedded in handles was a thing too.
A French Umbrella & Parasol combo called the en-tout-cas, became popular in the mid 1800’s. This adaptation had the function of protecting against the rain and the sun. “En-tout-cas” translated into “in any case.”
The most bizarre or remarkable parasol, depending on how you look at it, was owned by Queen Victoria herself. It is documented she had a parasol made consisting of chain mail layered between two layers of silk to hopefully protect her against an assassination attempt. It is rumored that this was Prince Albert's idea after John Francis had made two attempts at threatening her life.
Changing With The Times
By the end of the 19th century umbrellas were seen less of a novelty and more of a convenient practical device. During the 18th and 19th centuries quality parasol and umbrella makers had their own retail shops and often offered repair services along with their wares. The repair and refurbish trade flourished during this time. Less expensive and cheaper made umbrellas were sold on the street.
If there was a decline in the popularity of the umbrella at the turn of the 20th century, the automobile was considered the culprit. Umbrellas specifically designed for motoring were encouraged, but the truth was that people were inclined to walk less. One can only imagine the spectacle caused by wrestling a parasol due to an increase in wind and car speeds. The car provided protection from rain and weather, especially when the retractable roof was added as a feature. Even though the umbrella and parasol would take an inevitable back seat to the automobile, it would remain part of the symbolic uniform of a true British gentleman none the less. The notorious British weather and the umbrella would be eternally paired no matter future trends.
 Wikimedia Commons / Public Domain; Two ladies enjoying the beach with Asian-inspired paper parasols.
The end of the 20th century was a time in which all things Asian enjoyed a renewed spotlight in the fashion world of the West. The Asian inspired flat-paper-sunshades were all the parasol rage and continued to sustain in popularity even though a real storm was brewing!

Wikimedia Commons / Public Domain; Vogue cover illustration from 1919.
The 1920’s, with all its radical changes and influences would alter women’s lives forever. These new changes would usher in a different fashion wave of sorts, which would alter the long standing position of the parasol as a female accouterment. Instead of protecting the fine complexions of women, the parasol became an impediment to the growing popularity of the status symbol of a leisure life spent outdoors. The sun tan became all the rage for white women. By the 1930s the parasol industry was in peril. The attitudes about tanned skin made a complete flip. Skin tanned by the sun became a symbol of wealth and pale skin came to suggest one was too poor to have the free time required to achieve a tan or afford a vacation. A tan came to represent a leisurely life, which in turn indicated wealth and status. The parasol would never regain its status.
Americans had never fully embraced the fashion of the parasol. Some how it was snubbed and considered ridiculous. One could deduct that Americans held a fervor to remain as isolationist and shift away from European influences even when it came to sun protection. As it would turn out, protection from the rain would continue to be universally desired. By 1950 Americans did embrace the “unisex” umbrella, which remains in use today.
Due to fluctuations and cosmic shifts alike and due to the changing of world of economics and fashion forces, the umbrella and the parasol remain, but they do not enjoy the status they once embodied. We have become accustomed to taking the umbrella for granted. It remains useful, yet due to cheap imports the umbrella could be treated as an after thought and its loss considered no big deal. Even worse, the umbrella is regarded as disposable. However, for those of us who value a sturdy and reliable umbrella, this loss is regrettable.
It would seem that our current society has adopted more of a nostalgic relationship with the umbrella, and in some circles even the parasol. It is not that we do not need or use umbrellas, but the casual hooded jacket has a lot to answer for.
For many, the parasol and umbrella are reoccurring old friends kept alive through period piece films and art. One can only ponder whether the impressionists painters became so popular to modern audiences, in part because of the images of romantic women sporting parasols in fields of poppies?
 Wikimedia Commons / Public Domain: James Smith & Sons est.1830
Luckily, a good quality umbrella can still find reverence. Europe’s oldest umbrella shop has been in continuous operation since it was established in 1830. James Smith & Sons continues to bridge the gap between the historical and modern needs of those requiring a well crafted umbrella. As history would have it, James Smith & Sons services continue to encourage creative umbrella designing, repair and refurbishment.
It has not been so terribly long ago that the parasol enjoyed celebrity status and certain indicators may suggest a revival. The internet is crammed with proof of a romantic connection, with offerings for “wedding parasols.” The historical costuming and historical bounding communities are making and sporting parasols as if their popularity never skipped a beat.
To coincide with global warming threats and concerns, the popularity of a multi-purpose parasol/umbrella combination with UV protectant that is also waterproof, is spreading beyond Japan's borders. The streets of Japan are a kaleidoscope of umbrellas no matter the weather, indicating that the Japanese still embrace their cultural ties with the parasol. The dual strategy of fashion and sun protection is proving to be more relevant than ever. One does not have to look far beyond the world news to find umbrellas shielding populations in underdeveloped countries already suffering the results of harsh weather changes. Hopefully, as we face future climate issues, we will have learned needed lessons in protecting each other.
Due to the current pandemic, restaurants are having to reconfigure their business where possible to accommodate for outdoor seating. Might this create an uptick in demand for sun protective brand fabrics to make more patio umbrellas? Other sun and rain protective fabric developments may follow. It is hard to predict the weather, but one can bet that the parasol and umbrella will endure.
It is worth considering that the even though the umbrella and parasol have experienced fluctuations in importance and status over the centuries, we have yet to develop a truly better method of shielding ourselves from the rain or sun.
Despite the parasols sometimes sorted history, it still remains a perfect device to do what it was originally designed to do... protect from the harmful rays of the sun. The beauty of history is that the construct can be re-written with mindful concern and application. Hopefully, with a better understanding of where we have come from, it will be apparent that sun protection should be equal for all.
With that thought I hope this blog on the History of the Parasol has unfurled a better appreciation for the retractable-personal-hand-held-portable-folding-canopy device that continues to serve us well. In order to encourage you to repair, refurbish, or make anew, your own parasol. A parasol pattern is coming soon!
So don't forget to make a parasol to go with your favorite Folkwear pattern! If you have not made that perfect parasol outfit yet, here are a few great patterns to get you inspired and beautifully turned out to enjoy a perfect fair weather day.
For an Asian inspired outfit, the 122 Hong Kong Cheongsam or the 139 Vietnamese Ao Dai would be trés elegant.
For a Victorian or Edwardian look the 205 Gibson Girl Blouse or the 210 Armistice Blouse paired with the 209 Walking skirt would be a fetching choice for an afternoon picnic tea or a slow float about in a punt. If you are dreaming of a truly romantic wedding, the 227 Edwardian Bridal Gown would be made even more enchanting if accompanied by an elegant lace or silk parasol... for the bride and her bridesmaids.
Of course, the 237 Tango Dress or 264 Monte Carlo Dress would make any occasion special and a parasol is just another excuse to add more flounce to the effect!
No day at the beach would be complete without a parasol to shade one from the heat while lounging in the 252 Beach Pajama or while wading at the waters edge sporting the 253 Vintage Bathing Costume.
Folkwear's perfect parasol pairing at the moment has to be the 261 Paris Promenade Dress (which happens to be on sale this month). What promenade does not need a parasol?!
Of course, there are so many more Folkwear patterns to consider. This list should be enough to get you started daydreaming of your own parasol paired ensemble.
Credit Sources:
https://en.wikipedia.org/wiki/Umbrella
https://fashion-history.lovetoknow.com/fashion-accessories/umbrellas-parasols
https://sharonlathanauthor.com/parasols-and-umbrellas-an-interesting-history/
http://www.katetattersall.com/parasols-during-the-early-victorian-era/
https://artsandculture.google.com/usergallery/YAISMX_YucmALg
https://www.heddels.com/2018/09/taking-cover-the-long-history-of-the-umbrella/
https://www.thoughtco.com/what-is-colorism-2834952
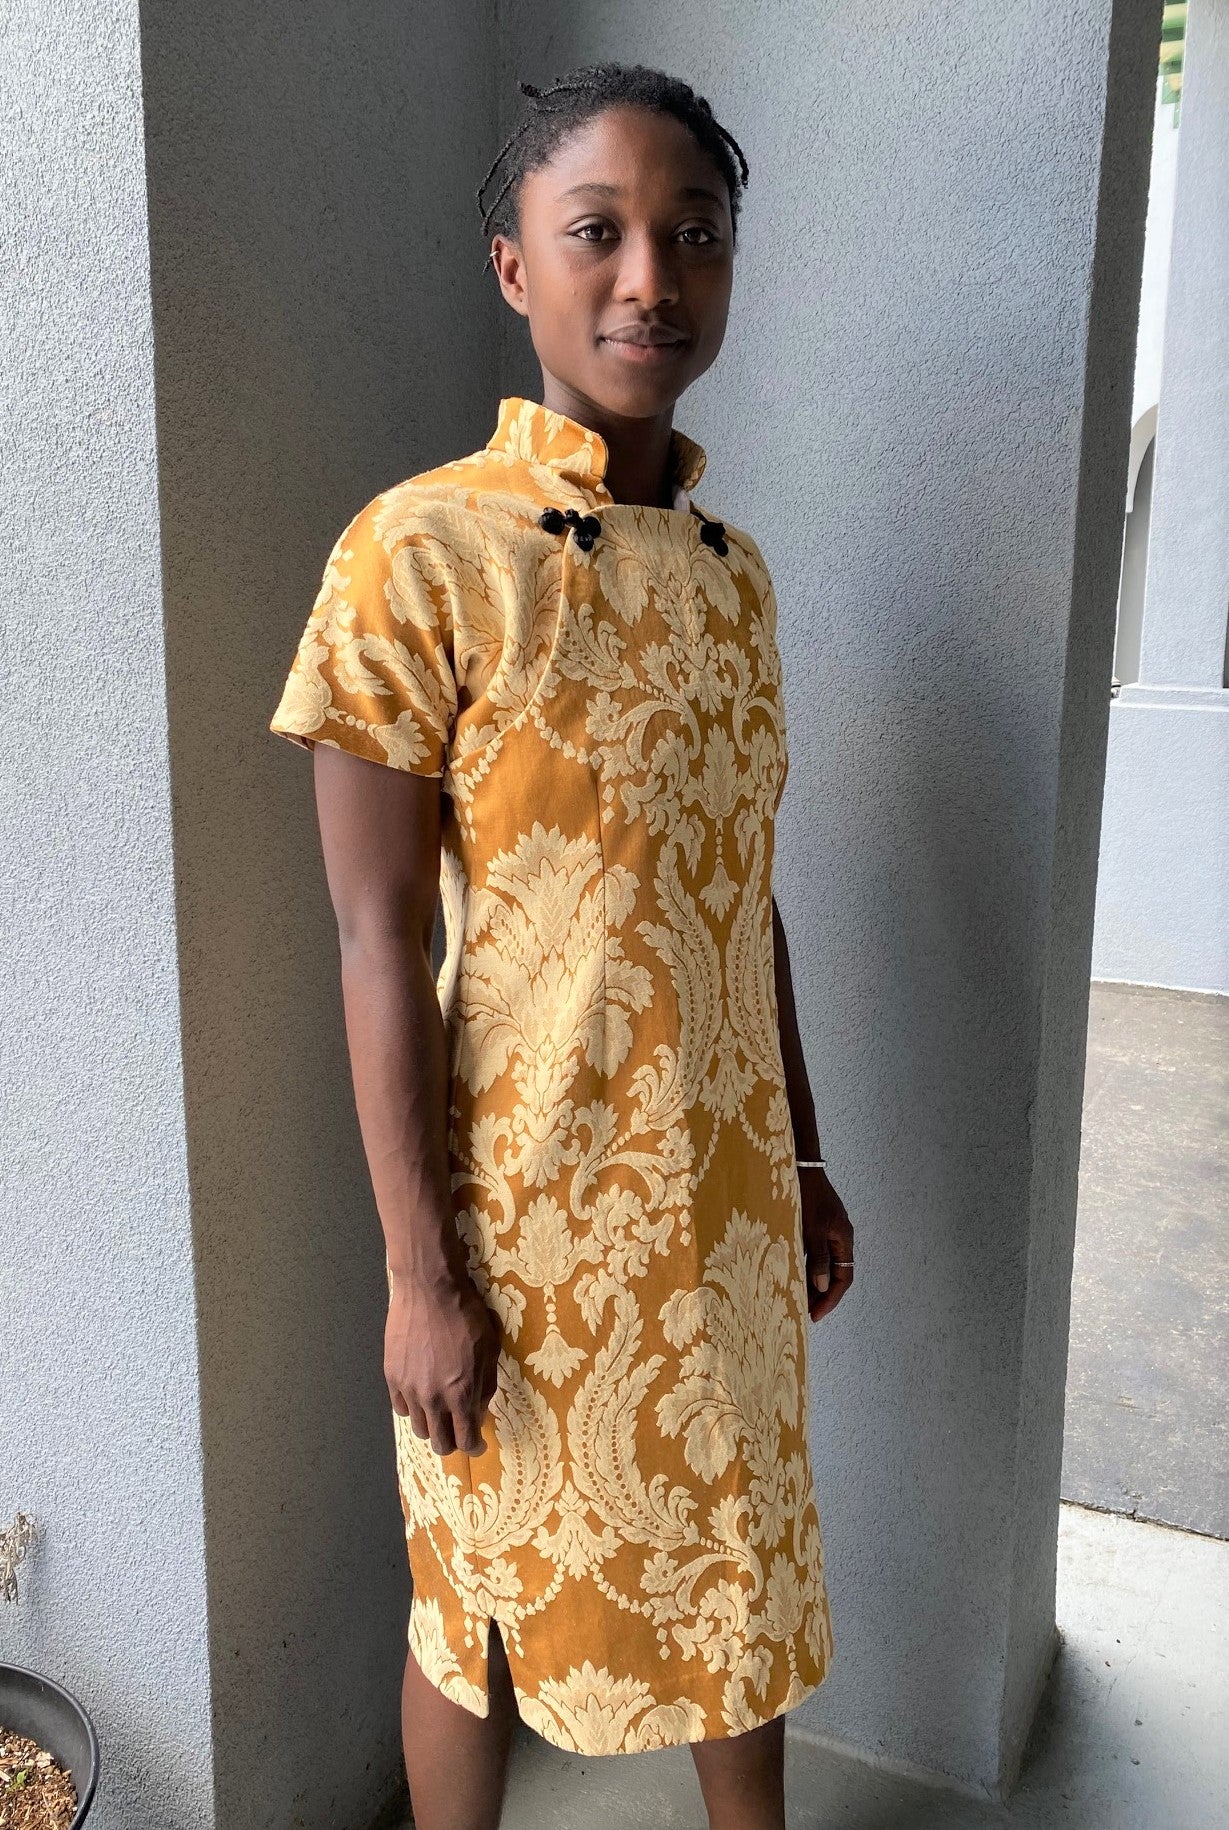
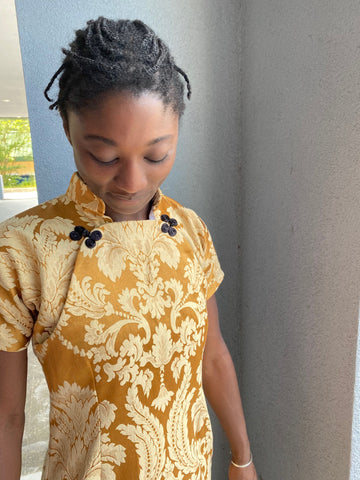
I have long admired this dress design and was thrilled to finally get the opportunity to make it! The slim body hugging curves have an allure that make the 122 Hong Kong Cheongsam dress so captivating. This dress is a beautiful blend of Chinese tradition and urban Western influences that emerged in the late 1920’s. It has an undeniable glamour that conjures up all kinds of elegant notions. And for sewists, what makes this elegantly provocative silhouette even more appealing is how simple and easy it is to make!
This 122 Hong Kong Cheongsam dress pattern is a pleasure to make, plus it goes together amazingly fast. If you need a fabulous dress at short notice, this one can be done in just an afternoon's worth of sewing.

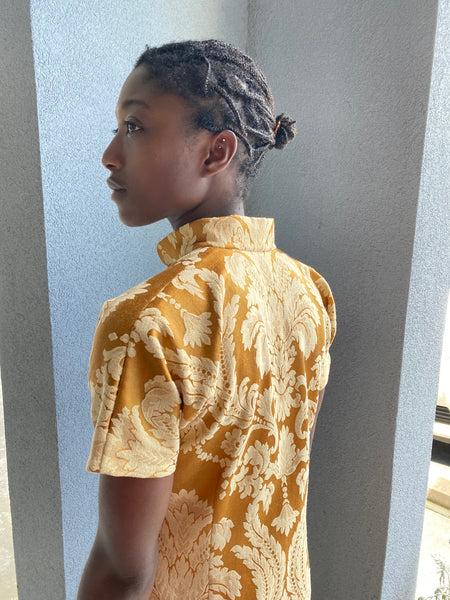
Now, that I have expressed the virtues of this dress, there are a few suggestions and hints I would like to share to make it even easier to sew. I made this particular dress as a sample for Folkwear, modeled here by Esi, and it is a great example of some techniques that are helpful for this pattern and which can be applied to other garment sewing.
I will be covering 1.) Using Directional Print/Design Fabric and 2.) Helpful Hints for Attaching Snaps
1.) Using Directional Print/Design Fabric
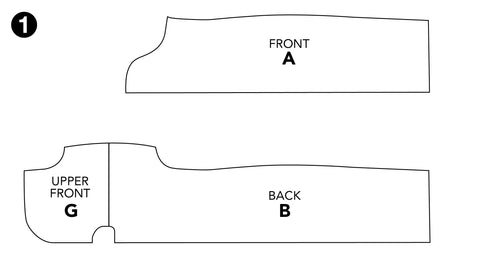
The front and back pattern pieces are each cut on the fold, which makes this a simple dress to construct. The back of the dress is comprised of two pieces in one. Notice the upper Font G and Back B are all one piece. See Illustration 1 below.
So this dress is literally only two pieces - a front and a back (pictured below). If you are using a solid fabric or a fabric with a non-directional print/design, this beautiful pattern has absolutely no issue what so ever. However, if you are using a directional print or napped fabric, you will probably want to make a few changes, as we did with the dress in this post.
If you are using a one-way-directional print/design (a pattern, print, design, or texture that runs up and down the fabric) as I have with this dress, then I have a few helpful hints to offer.
Matching the Pattern
The fabric I chose to use is made of a woven damask with a large one-way-directional pattern/design. Because the pattern is large, I decided that it was crucial that my front and back dress pieces be cut exactly the same, so the pattern would match at the side seams. It would look like a mistake if the pattern/design did not match at the side seams, especially considering how large the pattern/design is.
To address the matching, it made the most sense, to start laying and matching my pattern design from the bottom edges of both the Front A and Back B pattern pieces. I knew this would ensure that the sides seams would match. So far this is all straight forward. The Front A and Back B pieces match perfectly, having aligned the pattern working from the bottom edge of the dress up towards the shoulders.
Upside-Down? No worries.
Because the upper front and back of the dress are cut as one piece, and the fabric I am using has a one-way-directional print/design, the upper front is going to be up-side-down when worn unless I make a change to the pattern. This is because the back/upper front pattern piece goes over the shoulders from the back, meeting the front pattern piece at the chest. So with a directional print/design, the upper front will actually look upside down.
Upside Down Fix
This issue of upper front being upside down can easily be remedied, by separating Upper Front G from Back B of the dress at the shoulder line indicated on the pattern. We will need to create a shoulder seam. All we need to do is cut the two pieces apart at the Shoulder Line and add 1/2 inch seam allowance at the shoulder line to both the Upper Front G and Back B pieces. See the illustration 2 below.
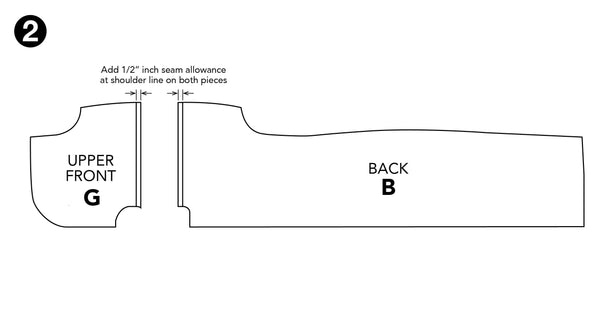
You can see the shoulder seam here that allowed the front to be turned so the design would be correctly positioned on the front of the dress.
Reposition Upper Front G
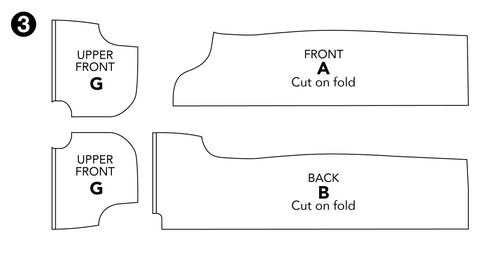
Now, that Upper Front G has been detached from Back B, the Upper Front G pattern piece simply needs to be turned around and placed on the fabric, so the one-way-directional pattern/design of the fabric is not upside down. The two Upper Front G pattern pieces should be placed as mirror images as seen below in Illustration 3. You should have pattern pieces Front A, Back B, which will both be cut on the fold. And cut two of Upper Front G . See the illustration 3 below.
Cut Out the Fabric
Now, that the pattern pieces are all sorted out, lets cut out the 122 Hong Kong Cheongsam dress. Place, and cut, pattern pieces Front A and Back B on the fold. Be sure to match the pattern/design from the bottom edges of both the Front A and Back B pattern pieces.
Cut two separate Upper Front G pattern pieces. In most cases you would probably want to make sure these pieces are also cut so the pattern is matching on each side. Because of the mirrored-image pattern/design of my fabric, I decided to cut the two Upper Front G pieces as mirrored images of each other.
Once all your pattern pieces perfectly aligned, matched-up, and successfully cut out, your fabric pieces should look similar to the pieces below when Front A and Back B are unfolded. Notice how the pattern/design for the front and the back are the exact same.
The two Upper Front pieces should look something like what you see below. Of course, your pattern/design will be different from mine. See illustration 4 below.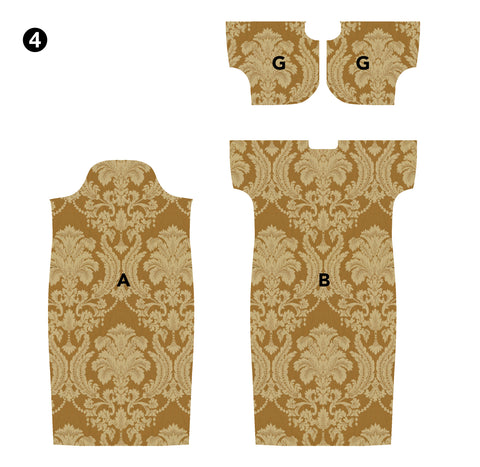
Now, continue to assemble your Hong Kong Cheongsam dress according to the pattern instructions.
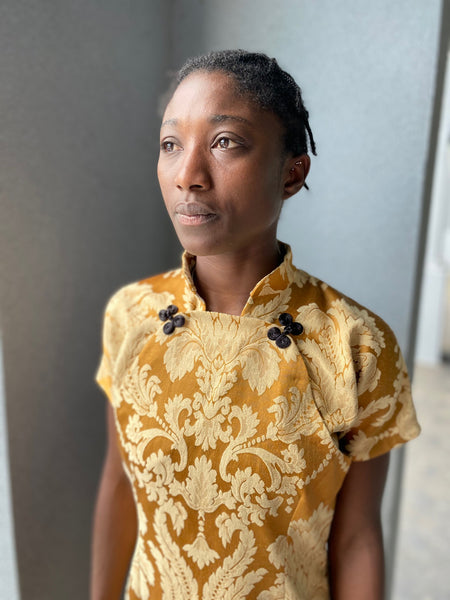
You can see the upper front fabric design is right-side-up at the shoulder areas, matching the design alignment of the front piece of the dress.
2.) Helpful Hints in Adding Front Hidden Snaps
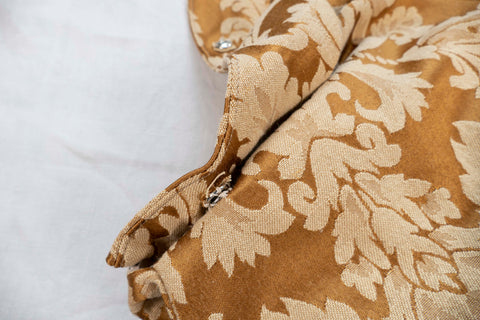
Once the dress is constructed, the two pieces consisting of the front of the dress need to be secured to each other. Front A and Upper Front G become one to complete the interesting front design of the dress. The front of the dress opens and closes along the curved edges of Front A and Upper Front G, with hidden snaps to secure. Adding a bit of fusible interfacing will help the snaps work better and allow the front pieces to lay flatter.
Sandwich a small piece of fusible interfacing (about 1"x1") between the wrong side of Front Facing C and the wrong side of Front A as seen in the photo below. Position the piece of interfacing under where each snap will be sewn down. This bit of interfacing will help to catch the needle and thread when sewing on the snaps. The idea is to keep any sign of the underneath snaps invisible on the front of the dress.
 A bit of fusible interfacing helps to prevent catching the right side fabric of the front of the dress when sewing on the snaps.
Note: I have faced the Front Facing C with white interfacing. It is perfectly acceptable to turn the Front Facing C edge under using the 1/2 inch seam allowance as the pattern suggests.
 A reinforcing piece of fusible interfacing positioned under the snap.
Another technique to help prevent snaps from damaging your fabric is to add a scrap of fabric directly under each part of the snap. Each snap consists of two pieces that mate together when closed. Cut a small round of scrap fabric to place directly under each mate piece of the snap for a bit of reinforcement and protection. The back if the snap can be sharp and with enough detaching and reattaching of the snaps over time, the friction can damage the fabric.
 Stitch the snap using a whip or blanket stitch, being sure to catch just a bit of the fusible interfacing underneath.
Align both mate pieces of the snaps and secure using a small scrap of fabric to strengthen and protect the fabric of the dress.
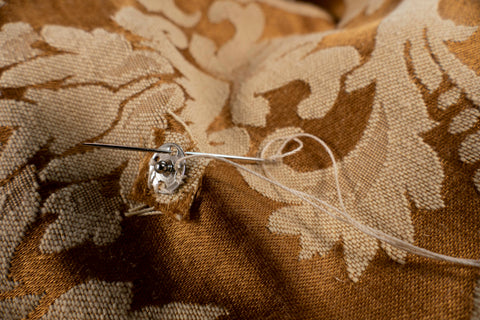 Snap mate being stitched on the dress with a scrap of fabric for reinforcement.
Depending on the size of the snaps you use, will in part determine how many snaps you use. You may find using a larger number of tiny snaps is preferred over using a smaller number of larger snaps depending on the weight of your fabric. More tiny snaps tend to work well on lighter weight fabrics and larger snaps tend to work better on heavier fabrics.
Snap mates all aligned and reinforced with a scrap of fabric underneath each snap mate.
After you get all your snaps sewn on, be sure to have a look at the decorative frog closure instructions included in the pattern. I made the easy frog closures out of black satin rat-tail. Remember that the frog closure are meant to be decorative, so put a utilitarian hidden snap closure under or nearly under the frog closure to be sure the two frog closure mates stay securely in place when closed.
I hope you find the thoughts and hints I have provided in this blog to be helpful. Sometimes, even though a pattern can be very simple to construct, being aware of a few little details can make all the difference in how pleasurable the project goes and how well it turns out. There is so much to know when it comes to sewing, therefore it is my hope and intention to provide you with as much frustration-saving-advice as I can think to provide.
As always, everyone at Folkwear hopes you are all well. We look most forward to seeing what you create using Folkwear Patterns. Hope you give the 122 Hong Kong Cheongsam dress a try!
Sew Well,
Cynthia

Day 5: Making the neck tie
Throughout history some items of clothing have had design elements built into them that serve a well thought out purpose. Each subtle details of the Middy Blouse View B (from 211 Two Middies pattern) is unique and has a function of its own. The distinctive collar served as extra protection from the sun on the shoulders of seamen. The pocket could hold any number of things, the scarf provides a cloth to wipe the brow or tie back ones hair, and the tab holds the scarf in place. The hip band provides an alternative to tucking the shirttail in a bottom garment waistband, which allows for comfort and ease of movement while looking finished and tidy. The Middy Blouse View B is loaded with details that create a balanced aesthetic. No matter what detail captures your attention first, this Middy Blouse design has so much to offer.
There is one more element to be added if you so choose, and is included in the pattern. The Middy is hardly complete without the useful and charming detail of the Pencil Scarf or Triangular Scarf. Even if you do not pair a scarf with a Middy Blouse, knowing how to make a scarf is a useful and easy skill. Scarfs are the decorative and utilitarian accessory perfect to wear with all kinds of outfits!

Fabrics That Make Good Scarfs
Scarfs can be made from any fabric, it just depends on the aesthetic you prefer. You may want a flowing look or a stiffer look, but a light- to medium-weight fabric is going to be best. I have chosen to use a piece of white cotton lawn to make a pencil scarf to accessorize my Middy Blouse View B. Rummage about in your fabric stash or even your scrap bin to find the perfect bit to make a new accessory!
Other fabrics work well too! Try cotton voil, cotton lawn, handkerchief linen, silk noil, silk haboti, silk charmeuse, organza, stretch velvet, georgette, knits, rayon, gauze, flannel, etc. Basically, any fabric that will tie, knot, or drape is a good choice.
Do consider that fabrics that have an obvious right and wrong side might not be the best choice as both sides will be seen when worn.
Make a Triangular Scarf
It is fun and easy to make a simple scarf. A scarf can be the focal point of any ensemble and made from endless combinations of fabrics and edge finishing details.
A scarf can be made small or large or any size in between, and can elevate the look of so many items in your wardrobe.
Note that the measurement of your scarf can be anything you choose depending on desire and application and how much fabric you have.
The instructions below recommend using a measurement of 36"x 36", which utilizes just the right amount of fabric to provide not only a interesting visual touch, but can lend a bit of protection and comfort when the elements require it.
Start with a square piece of fabric measuring 36" x 36" square. Use the illustration below to guide you through the process.
Starting at the top right corner, fold the cloth on the diagonal, matching the bottom left corner. Press to create a crease. Then unfold to reveal the crease. Use the crease as a cutting guide.

Or use a straight edge to draw a diagonal line from opposite corners to create a cutting guide. Cut the diagonal line to create two separate triangles to make two scarfs (one for you and one to share!).

Make A Longer Pencil Scarf
The height of the Roaring Twenties was the heyday of the Middy Blouse. This popular look was finished off with an accessory referred to as the Pencil Scarf or "silks" that were worn under the sailor collar of the Middy Blouse and pulled through the tab below the front opening.
This version of the scarf is cut on the bias. Fabric cut on the bias has a bit of stretch, resulting an easy drape around the neck. But that does not mean you could not utilize any long straight piece of fabric to make a tie.
The pencil scarf is perfect for knotting, tying in a bow, looping loosely, wrapping around the neck or waist, or simply hanging open... whether cut on the bias or on the straight grain.
The illustration below shows how to make a bias cut scarf from a rectangular piece of fabric. Fold a rectangle of fabric as demonstrated in the illustration bellow to create a bias strip, using the folded creases as a guide. Note you can make the bias strip that will become your scarf any width your fabric will allow. Make a wide scarf, make a skinny scarf... the possibilities are endless!
This illustrated instruction uses a rectangular piece of fabric measuring 50" x 36" which will make a scarf measuring 3-1/2 inches wide and approximately 51 inches long. Adjusting the measurement of your fabric will allow you to change the length, or width, of your scarf.
Fold the left bottom corner up to match the top edge of the fabric. Press to make a crease.

Unfold the the fabric to reveal the first crease.

Fold the right top corner down to match the bottom edge of the fabric. Press to make a crease.

Unfold the the fabric to reveal the second crease.
Cut along the guide lines created by folding the creases or draw a cutting guide line using a straight edge. The bias cut strip in the center is the Pencil Scarf.
Note: I cut the length of my Pencil Scarf to make it shorter.
Finishing Scarf Edges
Once you have cut a piece of fabric to make a scarf all you have to do is finish the edges. The edge finishing is a great place to have fun and get creative. You can make it quick and easy, or take time with hand sewing. Finishing edges is a perfect opportunity to get creative and really customize your look. Use a contrasting thread to give your scarf an unexpected pop of color or use a subtle color for a softer look.
Use your imagination and have a look in your materials stash for a bit of inspiration. Any number of materials could be use to finish your scarf edges. Some possible choices to consider would be: embroidery thread, sewing thread, yarn, seam binding, lace, or soft ribbon. Another option would be to simply turn the raw edge under a couple of time and stitch in place. Leaving the edges raw or creating a frayed edge has a look of its own. Once again the options are endless and only limited by your imagination.
Adding an edge finishing touch can be done by hand, sewing machine, or serger. Any hand embroidery stitch, such as a blanket stitch would be a charming touch. A zig-zag stitch made on a sewing machine would be quick and easy. Applying a bit of lace to any scarf edges could be done with a simple whip stitch by hand or an edge stitch sewn on a machine.
I have chosen to use a very easy and quick rolled hem made on my serger.

Making a rolled edge on the serger to finish my scarf edges.

Never overlook a scrap of fabric again!
Thank You for joining me in making Folkwear's newly released 211 Two Middy Blouse Pattern. I hope you found my thoughts and processes in making these two charming blouses useful. Folkwear is very excited to offer this pattern once again and we would love to see what you create! I look forward to making and doing with you again.
Stitch well,
Cynthia

Today we are finishing up View B from 211 Two Middies, sewing the sleeves and hip band. Check out Days 1 (prep), Day 2 (View A), and Day 3 (starting View B).
Let's get to finishing up View B!
I can not tell you how excited I become when a garment I am working on, finally starts to take shape. I am happy to say that I am most pleased with my Middy Blouse View B results thus far. I so hope you are equally pleased with your project as well. We will be finishing up this version of the Middy Blouse by adding the sleeves and hip band, plus some finishing top-stitching and pleat details.
To finish up the making of the Middy Blouse View B, we will be using the remaining pattern pieces: Front Sleeve M, Back Sleeve N, Cuff O, and Hip Band P. Take notice that there is a women's and men's Cuff O and Hip Band P.
Below are the remaining pattern pieces we will be working with.

Final Pattern Adjustments Before Cutting Out Your Fabric
If you have not already done so, trace and cut out the remaining pattern pieces and make any adjustments required. We made grading adjustments in Day Three of the Sew Along to Front G and Back H of View B. If you made adjustments to the sides of the front an back of your blouse edges, you will need to make the same grading adjustment to Hip Band P with this Sew Along.
Grade the Hip band
To grade Hip Band P, add new strips of tracing paper to either side of the Hip Band P and secure with tape. Draw a horizontal line straight off the top and bottom edges on each side of the Hip Band P. Since we added 1/4 inch to each side of the front and back, we will add 1/4 inch to both sides of the Hip Band P. See the illustration below.
 How to easily grade the Hip band P.
Simple Sleeve Width Grading
I have decided to grade the width of the sleeve pieces and cuff for a bit more room as well. The pleats could have been eliminated on the sleeve to garner more room, but I really like the look of the pleats and did not want to loose them. I added an extra 1/4 inch to the bottom edges of the front and back sleeve pieces and 1/4 inch to either side of the cuff. I graded my sleeve pieces and the cuff as demonstrated in the illustration below.

Use a hip curve or French curve to create a smooth continuous drawn line (the blue line in illustration) connecting the added measurement at the bottom edge with the tip of the sleeve edge. Do the same for the front sleeve and the back sleeve. the idea is to only add width to the bottom of the sleeve and leave the edge of the arm pit undisturbed.
How to Lengthen or Shorten Your Sleeves
The sleeve can easily be made longer or shorter, depending on your requirements. Use the line labeled "lengthen or shorten here" for lengthening or shortening. I decided to lengthen my sleeve by 1/2 inch.
Simply cut on the "lengthen or shorten here" line to separate the sleeve into two pieces. Then insert another piece of tracing paper behind the two original sleeve pattern pieces, to will allow for the increase. Be sure the extra tracing paper is big enough to provide enough overlap on the back side to secure to the original pattern pieces with tape. A bit of tape added to the front side will help as well. Draw a line to connect the two separated pieces of the sleeve. Trim any access tracing paper away. Now the sleeve pattern has been lengthened and ready to use.

To shorten the sleeve length, simply fold your pattern piece up making a pleat equal to one-half the amount you wish to shorten. tape it or pin in place to secure. There is no need to cut your pattern piece, simply pin or tape it in place. Keep it in tact for future use.
The Remaining Cut Out Fabric Pieces
Cut out all the remaining pattern pieces - two of each - if you haven't already. Your remaining fabric pieces should look like the illustration below.

Be sure to mark the right side of each of your cut out fabric pieces. Mark all instructional markings, such as the notches and pleats. It is not necessary to mark the button placement on the Hip Band. The button placement will depend on the size button you use and it is easy enough to measure the placement out when the time comes.
Step Three: Sleeves and Side Seams
The sleeve construction for this version of the Middy Blouse View B is comprised of a front and a back sleeve, along with a very simple, yet clever, cuff to finish the sleeve off. The sleeve quickly and easily attaches to the body of the blouse while laying flat.
First, make the pleats before sewing the front and back sleeve piece together.
The construction for the men and women's sleeve differs only in that the women's version has pleats and the men's does not.
Only the Women's Sleeve Gets the Pleats
Working on the right side, using the transfer markings for the pleat on both the Front Sleeve M and Back Sleeve N. Fold the pleat to the outside edge, matching markings, pin to secure, and press into place. Baste the pleat down just inside the 1/2 inch seam allowance to hold it in place.

Pleat on sleeve folded to the outside edge of the sleeve, pressed and baste stitched in place.
Now that the pleats are made, sew the the sleeve front and back together. With right sides together, matching the notches on the straight sides of each sleeve, pin and stitch together using the 1/2 inch seam allowance. Press open and finish seams, or finish seams together and press toward the back of the sleeve.
It is easy to get the sleeves confused and not realize it until it is time to sew the sleeves onto the body of the blouse. Ask me how I know? This is why marking the right sides of your fabric pieces is always a good idea.

Front Sleeve M and Back Sleeve N pinned right sides together.

Wrong side of sleeve with seams pressed open.
Due to the light weight of the handkerchief linen fabric I used to make my Middy Blouse View B, I decided to top-stitch on either side of the sleeve seam to create some extra strength and to add a bit of structural body to the sleeve. The top-stitching also anchors the seam allowance on the wrong side of the sleeve.
I chose to make my top-stitch with a thread that matches my linen fabric. A contrasting top-stitch thread could just as easily been used for a more contrasting and decorative design element. In this case I really like the subtle but addition detail that top-stitching lends. I used my ever so handy blind hem presser foot as a guide to accomplish this neat and easy detail.

Top-stitching on either side of the sleeve seam with blind hem presser foot as a guide.
Add the cuff to the Sleeve
Now that the sleeve is constructed, lets add the cuff. Do take note that adding the cuff is a bit different than expected... pleasantly so! The finishing work is easily done before sewing the sleeve to the body of the blouse.
With right side of the cuff to the wrong side of the sleeve, match the notch and edges. Ease the cuff and the sleeve into place and pin to secure. Stitch at the 1/2 inch seam allowance.

Cuff pinned to sleeve.
A Thought on Easing & Pinning
You may notice that I sometimes use a lot of pins and wonder why? This is a habit that ensures things stay where they are intended. When adding the cuff to the sleeve there is a fair amount of easing the pieces into alignment, so they fit together properly. If the pieces do not fit right, then the fabric will pucker and get caught up on itself when stitched. I like to take the extra time on the front end of tasks to help with my success rate, so I can keep moving forward. With all the time and attention this process takes, I pin a lot to help reduce the amount of do overs.
Easing needs to occur when two pieces meant to fit together don't. As in the this case, the cuff in a tad longer than the sleeve. This is in not an unusual occurrence in sewing and is often done on purpose to create dimensionality in the finished garment.
To make easing the cuff and sleeve together easier, start by aligning the notches first. Then work at aligning the outer edges. Being sure the 1/2 inch seam allowance intersections (Addressed in Day Three), align properly.
Think of the notch as an anchor that should not move. Pin it down first. Consider the outer edges as solid anchors too. Pin them down. Start easing and pining on either side of the notch. I like to divide the section I am trying to ease in half. Working in halves until the section is all eased into place and secured with lots of pins! This task takes a bit of time, but it pays off by creating a nice smooth fit that is a pleasure to sew, with no fiddling.
Back to Finishing the Cuff
After stitching the cuff to the sleeve, press the seam towards the cuff. Turn the remaining long edge of the cuff under 1/2 inch. Then, fold the cuff in half, having the folded edge cover the stitched seam. Make sure both cuffs are the same width. You can fold the cuff up as far as you like, making a wider cuff, as long as the stitched seam does not show on the right side of the fabric. Top-stitch to secure the cuff to the sleeve and to create a neat clean finish all in one go!

Cuff sewn to sleeve edge, seam pressed towards the cuff, and cuff edge turned under 1/2 inch.

The cuff folded in half and pinned to the sleeve.

Another view if the cuff pinned to the sleeve and ready to be top-stitched in place. Notice the crisp cuff edge.
The nice thing about this cuff design is that the hemming is already done before the sleeve is even attached to the blouse.

Top-stitch to secure the cuff to the sleeve and to create a neat clean finish all at once.
Add Sleeves to the Blouse
With right sides together, match notches 7 and 8. Ease into alignment and pin to secure. The Sleeve Back H (the smaller sleeve piece) should be positioned at the Blouse Back H. Stitch on the 1/2 inch seam allowance. Press the sleeve according to how you are finishing the seams, and finish the seams. The sleeve is now set. How easy!

Sleeve pinned at body matching notches 7 & 8.
I have pressed the seam towards the sleeve and top-stitch the sleeve edge to add the reinforcing details top-stitching provides.

Sleeve edge top-stitched to add reinforcing detail.
Side Seams
The blouse is about to become a functioning garment now! With right sides together, match the under arm seams and pin into place. Match the sleeves at the cuff edge and pin in place. Match the box, above the vent opening, and pin in place. Stitch the side seam on the 1/2 inch seam allowance, from the cuff edge to the vent box, back stitching at each end to secure. Press the seams open and finish.

Side seams pinned and ready to be sew up.
The Vent
The vent serves as an opening at the bottom of the blouse where the hip band is connected. Because this is a pull-on-over-the-head design, the vent helps with easier access as well as being a lovely detail. Once the hip band is applied the effect is useful and distinct.
With the seams pressed open, turn the seam allowance under 1/4 inch and press. Turn again another 1/4 inch. Press and stitch close to the turned edge to secure. Create a horizontal stitch at the top of the box or vent opening to reinforce. Due to the pull-on-over-the-head design, this small area above the vent becomes a stress point, so it is best to give it a bit of extra strength with a few back stitches.

Step Four: Hip Band and Finishing
The pleats at the bottom edge of the blouse are a quiet complement to the pleats on the sleeve. Note that there is one pleat on each side, both front and back of the Middy Blouse View B for women. And there are two pleats on each side, both front and back of the Middy Blouse View B for men.
Use the pattern placement guide for the pleats. Working on the right side of the blouse, fold the pleat towards the outside edge, match the pleat edges. Press to create a crisp fold to the pleat. Pin and baste the pleat in place inside the seam allowance. Do this for all the pleats on the front of the blouse and the back of the blouse.

Hip Band
The Hip Band is the final piece to be attached and our blouse will be assembled! With right sides together, fold the Hip band in half lengthwise on the center fold and press. Stitch the short ends on the 1/2 inch seam allowance. I have pinned the length and the short ends to ensure everything lines up straight, before I press . . . just in case.
 Hip Band pinned to ensure all edges are straight.
 Pin the short ends and stitch the short ends on the 1/2 inch seam allowance.
Trim the excess seam allowance and the corner tips to create crisp corners and edges when turning to the right side.

Seam allowance trimmed away.

Corner edge trimmed carefully to help create a crisp corner when turned right side out.
With the hip band turned right side out it is time to do the final pressing before attaching the hip band to the blouse edge. Press the bottom folded edge of the hip band, and press the side seams.

Hip Band turned right side out and pinned again to align before the final pressing.
Sometimes the corners need a little help to crisp up the edges. It can be a simple as pulling the seam stitching out with a straight pin or needle. Perform this technique gently to prevent distorting the straight edge of your work.

Using a straight pin to gently pull the seam to shape a crisp corner.

Press, rolling the seam to the wrong side slightly. This will keep the seam from being seen on the right side of the garment.
Attaching the Hip Band
Attaching the hip band to the blouse is the same technique used in attaching the cuff to the sleeve. If you were surprised to find how nicely the cuff and sleeve went together, you will be equally please with this next step.
To attach the Hip band to the bottom edge of the blouse, match and pin right side of Hip Band to the wrong side of the blouse. The Hip Band is meant to sit on the hips loosely and the blouse edge billow softly on the band. As you align and pin, ease the two pieces if necessary. Stitch into place using the 1/2 inch seam allowance and press the seam towards the hip band.


Seam pressed towards the hip band.
Fold under the raw edge of the hip band 1/2 inch. This turned under edge should slightly cover the stitch line. Use the stitch line as a guide, but also measure the depth of your hip band to be sure this measurement is consistent across the length of the hip band. Measure from the bottom edge of the hip band to the turned under edge to ensure a consistent depth. You do not want one end of your hip band shorter than the other. Pin the turned under edge as you go.

Turning edge of hip band under 1/2 inch.

Another view of the turned under edge.

The hip band all pined down and ready for top-stitching.

Press the turned under edge to create a crisp edge.
Finishing the Hip Band
One of the things I like most about the Middy Blouse View B design, is how the finishing of the edges happens so easily and neatly. This is a technique that can be applied to other sewing projects as well. So, make a note, as to what you learned in applying the sleeve cuffs and the hip band, in this project. It is often handy to have alternative and smart techniques for finishing, cuffs, hip bands, and waistbands.
The top-stitching serves as a finishing stitch, as well as a construction stitch. Sew a top-stitch close to the pressed edge using a blind hem presser foot as a guide. Remember to remove the pins as you stitch to them. The blind hem presser foot does not hurdle the pins very well, which will disturb the clean finishing stitches. A final top-stitch does all the work.

Final Top-Stitching on the hip band.
Final Button Detail
Make the button holes on each side, of the front of the hip band edges. Your buttonholes placement will depend on the size and the number of buttons you decide upon, but our pattern suggests 3 half inch buttons. Sew and secure the buttons on the right side of the back hip band. Sew buttonholes on the front hip band on each side.

Three buttonholes on the front edges of the hip band.

Three Mother-of-Pearl buttons are the final touch on the hip band.

Another up close look at the hip band button detail.
I hope you are as pleased with your Middy Blouse View B results as I am. This blouse has so many details that blend together beautifully to make an interesting piece that invites closer inspection to fully appreciate all it has to offer.

Finished Middy Blouse View B

Back View Of Middy Blouse View B.
The last day of the sew along is tomorrow! We will finish with the neck tie - a perfect compliment to this shit.

For day three of the 211 Two Middies Sew Along, we are doing to start on View B of the pattern - cutting out the pattern, fabric, and begin on the front/back, neck and collar. Check out Day 1 and Day 2 of the Sew Along!
This much-loved Middy blouse design (View B from 211 Two Middies pattern) has become synonymous with the iconic nautical aesthetic that came into being in the early 1920's and has endured over a century later. It's popularity continues because not only of its carefree charm, but it is as practical to wear, as it is comfortable. The multiple details of this blouse add so much character to what is actually a very easy blouse to make. The well proportioned iconic collar is the initial detail that sets this blouse apart from other over-the-head-pull-on tops. The unique sleeve construction and hip band with subtle pleats, are not only easy to execute, but worthy of closer inspection.
Once you realize how easy and quick this blouse is to make, you will most likely adopt this Middy Blouse as a new staple in your wardrobe. I am very excited to be sharing the making of this blouse with you, for it is a favorite, that I make nearly every season!

Trace the pattern pieces for the front of the Middy Blouse View B.
Let's get started! For today's Sew Along, we will concentrate on the making of the front of the blouse.
First, trace and/or cut out View B pattern pieces: Front G and Back H, Front Facing I, Tab J, Pocket K, Collar (& Facing) L.
You can also cut out the other pieces to this pattern at this time: Sleeve Pieces M and N; Hip Band P; and Cuff O. We will be using these pieces in tomorrow's Sew Along installment. There are different hip band and cuffs for men's and women's sizes, so make sure you cut the one you want to use.

Pattern Pieces needed for Middy Blouse View B
Making Pattern Adjustments and Preparing Fabric for Cutting
Before pining your pattern pieces to your fabric, take a moment to consider any sizing adjustments you might like to make. While a size small fits me just fine through the bust measurement, I have decided to make a bit of an adjustment to the width of the bottom of the blouse where it joins to the hip band. A little bit more width at the bottom would allow for a tad more room, therefore easier wearing. I am going to make this adjustment to the pattern pieces I have already traced and cut out. These adjustments could just as easily be made before cutting out the traced pattern.
Pattern Grading Adjustment
This adjustment is easily accomplished with a simple technique referred to as "grading" between sizes. This simple and subtle grading technique only deals with adding a bit of width added in the side seams.
Adding a 1/4 inch seam allowance at the side seams of the blouse bottom edge (both front & back), as well on the side seam edges of the hip band will add about an inch to the width at the hips, grading the hip size to between a size Small and Medium.
When making adjustments, do so on a traced pattern. It is always a good idea to keep the original pattern intact.
Start by adding a new piece of tracing paper to the back of pattern pieces Front G and Back H. Add extra tracing paper that is large enough to make the adjustment needed. Secure the new strip of tracing paper to the pattern piece with a bit of tape on the back side. You may want to tape on the front too.
With the new strip of tracing paper securely in place, draw a horizontal line straight off the bottom edge of Front G and Back H. Then add the measurement width required depending on the size you are making. For my blouse I am adding a measurement of 1/4 inch to the bottom edge of Front G and Back H.

Using a straight edge ruler, draw a straight line connecting the arm pit curve point to the 1/4 inch measurement increase just made. The original edge of the blouse is a straight 90 degree angle, so this grading line is subtle and does not change the shape of the blouse or the drape in a noticeable manner.
Cut Pattern Pieces from the Fabric.
Note that I am only pinning the pattern pieces we are using for this portion of the Sew Along. The other pieces will be featured in the next Sew Along Day 4. Go ahead and cut all your pattern pieces at this time if you like.
You will cut one each, on the fold, of Front G and Back H; one each of Front Facing I, Pocket K, and Tab J; two each of Collar and Facing L, Sleeve pieces M & N, Hip Band P, and Cuffs O. Do not cut the slash line on the Front or Front Facing. We will do this in another step.

Your fabric pieces should look like this illustration.
Step One: The Front Of Middy Blouse B
The detail elements (pocket, tab, and front facing) on the Middy Blouse View B all have a function and add interesting charm. The Front Facing is sewn on as a re-enforcing detail that will only be seen near the collar on the front side of the blouse. The Pocket and Tab details are prepared and applied to the front before the shoulder seams of Front G and Back H are assembled.
Prepare and Add the Front Facing
To ensure a neat and clean turned under edge for the Front Facing, simply create a turning guide using a straight stitch along the 1/4 inch seam allowance. Do not back stitch at the beginning or end of the stitching as this will allow you to easily remove the stitching when finished. Turn under the side edges and curve toward the wrong side of the fabric. Clip around the curve, as needed and only to the stitching, so that the turned under fabric will lay down smoothly and flat. Press to create a smooth crisp edge. Once the edges are turned under and pressed, the stitching guide line can be removed.
With right sides together, pin the Front Facing to Front G. Match the center opening slash line and the boxes matching your size, at the bottom of the slash line.
Sew a straight stitch, 1/4 inch on either side of the slash line, tapering at the bottom to the box.


An illustration of the stitch line and slash line have been added for clarity.
With small scissors carefully cut the slash line to the box. Do not cut into or beyond, the stitch line. You may or may not want to carefully clip away a small amount of the excess seam allowance (if your fabric is loosely woven skip the clipping).

Turn the facing to the wrong side of Front G. Using your fingers to help shape the edges and the bottom curve and press.

Secure and neatly finish off the facing on the inside, or wrong side, of the blouse by hand stitching or topstitching on the sewing machine right at the edge of the facing. The stitching happens on the wrong side of the blouse, using the Front Facing edge as a guide. I have chosen to top-stitch on the sewing machine. Remember, the top-stitching will be seen on the right side, so take your time to help ensure a nice finish.

Make Tab J
To make the Tab J, fold lengthwise with right sides together. This time stitch a 1/4 inch seam allowance along the long edge and one of the short edges. Trim the seam allowance to make turning easier and eliminate bulk, then turn the tab right side out. Tuck the remaining short side raw edge under, and press.

Using the the markings on pattern piece Front G, apply the finished Tab by top-stitching down on the short edges. Be sure to back stitch a few times to secure and reinforce the tab.
Make Pocket K
Using the guide on the pattern, turn and press under 1/2 inch at the top of Pocket K. Turn under another 1/2 inch and press again for a total of a one inch. Press to create a crisp edge. Stitch a topstitch close to the pressed edge to finish the top edge of the pocket.
Fold the remaining edges under 1/2 inch and press, but do not top-stitch. The remaining top-stitching comes a bit later when the pocket is sewn to the blouse front.

Note: If adding any details or embellishments to the pocket, do so before the pocket is applied to the blouse. We will be covering embellishments on the last day of the sew along, so stay tuned if you are planning to add any details.
Add Pocket and Tab Details to the Blouse Front
Next, position and pin the pocket to the left side of Front G, as indicated on the pattern, or in the position that suits you. Be sure all the raw edges are turned under and neatly pressed. Pin the pocket to the blouse front. Top-stitch close to the pressed edge and pivot at the bottom point and corners. Back stitch at the beginning and end to secure. You can also re-enforce the top corners by stitching a small rectangle or triangle.
Position the tab according to the placement on the pattern, centering under the front slash opening, and pin into place. Secure the tab in place and re-enforce the sides by stitching the short ends of the tab several times.

Step Two: The Shoulder Seams and Collar
With all the Front G details made, the shoulder seams are sewn up next. With right sides together pin the shoulder seams, matching the notches of Front G and Back H. Stitch on the 1/2 inch seam allowance, and press the seams to the back of the blouse, and finish.
I have chosen to finish the seams together in this blouse, and therefore all seams will be pressed in one direction, which is normally to the back of the garment.

After having pressed the shoulder seams, I decided to top-stitch the seam right at the edge. This is often a prudent exercise, for the top-stitching not only holds the seam allowance towards the back of the garment. But it also creates some strength at a stress point, especially for a thin weight fabric like the handkerchief linen I am using to make View B. You can also finish the shoulder seam with a serger before stitching it down. This creates what is often called a faux flat-felled seam.

A blind hem stitch presser foot is an excellent tool for top-stitch along an edge.
The Collar
The blouse is coming along, but the addition of the collar is the point where the blouse really starts to take shape.
If adding any details or embellishments to the collar, do so while the collar is two separate pieces. It is much easier to work with flat fabric and before the two collar pieces are pined and sewn together. Be sure that any embellishments or details do not fall with in the seam allowance, unless this is your intention. We will be covering embellishments in the last day of our sew along, so stay tuned!
With right sides together, pin all un-notched edges of the collar. Leaving the neck open for turning right side out. This opening in the collar is where the collar attaches to the back neck edge and the front side edges. Stitch at the 1/2 inch seam allowance, back stitch when pivoting at the corners for reinforcement. This will help maintain the corners when the seams are turned right side out. Trim the seam allowances and turn right side out. Press the edges, being sure to roll the edges slightly to the underneath side of the collar. This will create a neat finish, which is also a simple, but telling tailoring technique. This "underneath" side of the collar is called the facing (or collar facing).
 Collar edges all pined and ready to be sewn up.
With right sides together, match and pin the center back notch of only the underneath side of the collar, or collar facing, to the center back neck notch of the blouse. Then pin the collar facing edge to the front edges on either side of the neck opening on the blouse. Start pinning from the center working out to the edges. Do this on the right and left side of the center back point. You will need to carefully ease the two pieces together, adjusting the pinning as you go. Stitch the collar facing and the back neck edge together, using the 1/2 inch seam allowance. Notice that the upper collar is still not attached and is waiting its turn.

The under collar pinned to the back neck edge. Notice that the upper collar is unattached at this point.
Carefully clip the curve of the neck edge to allow the fabric to spread slightly and therefore lay smoothly at the back of the neck. Make the clips into the fabric edge stopping slightly before the seam stitching. Be very careful to not clip into or beyond the seam stitching. If you do, you will be cutting into the collar and back of the neck! Be sure to leave the upper collar free. Turn under the edge of the upper collar to create the finished edge of the inside back of the neck. Use the neck stitching as a guide as where to turn the edge under (you will turn under the collar by about 1/2 inch). The turned under edge should conceal the stitching edge.

Clip the curve at the neckline before securing the upper collar.
Next we need to sew the upper collar to the back neck edge, by hand using a simple whip stitch or if you are a seasoned sewist you can use the stitch-in the-ditch method.
Here I am going to concentrate on using a hand-stitch method while rolling the neck of the collar. Despite what you might think, hand stitching is a very satisfying and relaxing task. It can also go surprisingly fast and look much better in instances like this. There are times in sewing, when the results using the sewing machine are simply not as nice as a hand sewn stitch. Hand stitching is a good option for finishing work and it allows for more control. The stitch placement and size are easily controlled if done by hand.
The most important part about hand stitching is to pin the area you need to stitch with as many pins as it takes to hold the fabric securely. The pins help to keep the edges together so you can concentrate solely on the stitching. Remove the pins one at a time as you stitch. Hand basting the collar to the neck is also a great option so that you don't prick your fingers and hands while hand stitching the collar down. Just sewing a running stitch, going in and out of the fabric every 1/2' to 1" along the seam.
Before you begin the final hand stitching of the turned under collar edge to the back of the blouse neck, it is important to note that a subtle technique should be incorporated. This technique will help to ensure a nice roll at the back of the neck. Your neck and shoulders have a roll and so should the neck edge of the blouse. The goal is not to have the collar lay completely flat against the neck and shoulders of the blouse.
To make this slight roll, hold the collar at the neck between your thump and fingers and allow the collar to drape backward over your hand. This slight roll that happen naturally when the fabric falls backward, is all that it takes to make the roll. Use a few pins to hold the roll in place.
Because the collar has rolled backward, a bit of the 1/2 inch turned under seam allowance has been consumed by the roll. You will find the 1/2 inch turned under edge you had to work with has now been reduced by as much as 1/4 inch. This is what you should expect.
First begin turning under the edge, at the outer edges of each side of the collar, being sure the folded edge lays flat and tucks under. Move the edges of the collar and the edge of the blouse opening up to each other so they meet aligning perfectly. Notice where the collar and the neck edges align in the photo below.

Turning the upper collar edge under so it tucks up and into the edge of the blouse opening.
When turning the finishing edge under, use the neck stitch line as a guide. You want to cover up the neck stitching line with the turned under edge. Pin the turned under edge in place to secure while hand stitching.

Creating the neck roll, while pinning the upper collar to the back of the neck of the blouse

The upper collar rolled and pinned into position to ready for hand-stitching.
Next begin the hand whip stitching. Keep your whip stitches evenly spaced as small as possible. When working, stitch right up to the pin, then remove the pins as you go. Whip stitch all the way across the back of the neck and secure your thread by tying a double knot. Before snipping my thread I like to put the thread back on the needle and slip the thread under a few stitched to conceal the thread tail.

Raw edge of upper collar turned under and being hand whip stitched to finish the neck edge.

Hand stitched collar edge. Notice the nice roll of the neck.

With the collar hand stitched on the front blouse details are complete.
Hope you found this portion of the Middy Blouse View B Sew Along informative and enjoyable. Join me for Day Four and we will complete View B of the Middy Blouse.

Welcome to the Sew Along for the Folkwear 211 Middy Blouse View A. Check out the prep work in Day 1 of the Sew Along. Today, we are going to get into quite a bit more detail than even the pattern instructions give, so I hope it helps you make a beautiful shirt, as well as teaches some tips and tricks to have in your sewing toolbox!
The Middy Blouse View A is a very easy blouse to make with a touch of a nautical aesthetic, which can be played up or down. The construction is really simple and the details can be made as subtle or as interesting as you like. This blouse can be made in so many creative fabric and trim combinations. Which makes View A of the Two Middies pattern, simple but surprisingly different every time you make it!
Below is an illustration of the back of View A which includes its most unique feature. The patch originally served as a protective element that could be replaced. Back in the 18th century navies, men's oily and dirty pigtails hung down their backs, staining their shirt backs. The patch protected the shirt and could be replaced when too worn out from scrubbing (or too dirty). Consider this patch a design element, to either add interest or to treat more subtly - or consider it a hearkening back to naval tradition. Have fun with it!

Trace and Prepare Your Pattern

Let's get started! First, trace and/or cut out View A pattern pieces: Front A, Back B, Patch C, Trim D & E, and Sleeve F.
 So simple and so few pattern pieces!
Preparing the Pattern Pieces and Making Adjustments
Before you cut the fabric out, stop. Look at your pattern and consider if you want to make any simple adjustments. This blouse can be made with or without a shoulder seam. The length of the body and sleeves can all be changed very easily using the "lengthen or shorten here" line on the pattern pieces.
Prepare the Front & Back of Pattern
For this project I am cutting the body of the blouse in one piece, as the pattern indicate.! Prepare the body pieces of the pattern by matching up the Shoulder Line of Front A and the Shoulder Line of Back B. Instead of cutting one of the front and one of the back each on the fold, the two pieces are combined (aligned) at the shoulder line. Resulting in making just one pattern piece, that is then cut at once on the fold. Hence, there are no shoulder seams. How easy!

Match the shoulder lines on both the Front A and Back B to create one pattern piece to be cut on the fold.
Note: If you are making View A, directional prints will not work, because the front and back are cut as one piece. As a result, if you position the print to run or lay going in the right direction on the front, the problem is the design on the back of the blouse would end up being upside down. This issue can easily be remedied, by cutting the front and back separately and sewing at the shoulder like you normally would.


Align A & B on the shoulder line and tape into place to secure.
Adjusting the Sleeve
The sleeve can easily be made longer or shorter, depending on your requirements. Use the line labeled "lengthen or shorten here" for lengthening or shortening. I decided to lengthen my sleeve by 1-1/2 inches. Simply cut on the "lengthen or shorten here" line to separate the sleeve into two pieces. Then insert another piece of tracing paper behind the two original sleeve pattern pieces, to will allow for the increase. Be sure the extra tracing paper is big enough to provide enough overlap on the back side to secure to the original pattern pieces with tape. A bit of tape added to the front side will help as well. Use a hip curve or French curve to create a smooth continuous drawn line (the green line in illustration below) connecting the two separated pieces of the sleeve. Trim any access tracing paper away. Now the sleeve pattern has been lengthened and ready to use.
 To shorten the sleeve length, simply fold your pattern piece up making a pleat equal to one-half the amount you wish to shorten. There is no need to cut your pattern piece, simply pin or tape it in place. Keep it in tact for future use.
This technique can be used to adjust the length of the blouse body as well. If you lengthen or shorten the body of the blouse, be sure to make the same adjustment to both Front A and Back B pattern pieces to ensure they are the same length.
View A has it's "lengthen or shorten" line at the bottom hem, so just extend the side lines/seams of the pattern down as long as you want. To shorten, move the bottom hem line up as far as you desire.
Note: If you make length or width adjustments to the pattern pieces, be sure to re-check your yardage requirements before purchasing fabric.
Cutting Out Pattern Pieces
Now, that all the pattern pieces have been adjusted, we are ready to cut out the fabric pieces using the pattern as a guide. I have decided to work with the fabric right side up and wrong side together (note: it is perfectly acceptable to work opposite, wrong sides up and right sides together) and matching selvages, pin your pattern pieces to the fabric, or hold them down with pattern weights. Pay attention to grain lines on each pattern piece and the placement of the pattern pieces to be cut on the fold.
Cut the combined Front A & Back B once on the fold (remember the two pieces are taped together). Cut one patch (Piece C). Cut two sleeves (Piece F) on the fold. And don't forget to cut out the neck trim pieces (two of Piece E, two of PieceD).
 Illustration of fabric cut out using pattern pieces.
Before you remove the pinned pattern from the fabric, be sure that all notches and center points have been marked, on all the fabric pieces. Also, be sure to mark the right side of each fabric piece with a pin once the pattern piece has been removed.
A good habit is to place your marking within the seam allowance if using a pin. This can help prevent the pin from damaging your fabric depending on the delicacy of the fabric. If using a fabric that could be damaged due to using a pin, make your mark using a fine needle and contrasting thread within the seam allowance to indicate the right side.

Right sides of fabric marked using pins inside the seam allowance.
Step One: The Patch
In order to help ensure the patch has a neat and evenly turned under edge, sew a stitch line to use as a turning guide. On the right side of the patch fabric, except for the top edge (I accidentally pressed the top edge in the picture below, but you don't need to do it), stitch a long straight stitch, at the 1/2 inch seam allowance. Make the stitch all the way around the patch edges to create a guide. Do not back stitch at the beginning and end of your straight stitch lines. Only use this stitch line as a guide, later the stitch will be removed. Stitching one continuous line will make removing the stitch line more difficult, so it is fine to stitch each side separately.
Now, working on the wrong side of the patch, using the stitch line you just created, press the edges inward 1/2 inch on all the edges, except the top edge. The top edge will attach to the back neck and does not need to be turned down.
Clip the curves and corners and press all edges down firmly and cleanly. Use the stitch guide line to help you with the corner clipping too. Be sure to not clip into or beyond the stitch guide edge.
Once your edges are nicely pressed in place, the stitch line can be carefully removed, leaving a beautifully even crisp edge finish.


The patch edges all turned under and ready to be attached to the back of the blouse.
Carefully align and pin the patch in place on the back of the blouse. Be sure the top edge of the patch is laying flat. Match the notches and center line of the patch and center back of the blouse to help with alignment.

Topstitch the patch to the back of the blouse. Position your needle close to the edge of the patch, and stitch 1/16" from the edge. An edge stitch or blind hem stitch foot makes a good guide tool for this task. Remember to remove the pins as you come up on them as the blind hem presser foot does not hurdle the pins very well, which will disturb the clean finishing stitches. Topstitch slowly and pivot at the corners to secure and create a finished look. The patch is a very revealing detail, so take your time and enjoy the beautiful crafted results!

An edge stitch or blind hem stitch foot makes a great guide when topstitching along the patch edge.
Step Two: Prepare the Neck Line for the Trim
Once the patch is successfully attached, prepare the rectangle neckline of View A. Work on the right side, sew a straight stitch line at the 1/2 inch seam allowance around the neck rectangle, to help as a guide for clipping the corners and turning the edges. Just for good measure, I added another straight stitch line around the outer most edge of the rectangle (about another 1/2 inch from the first) to provide stability and to help prevent the fabric from unraveling too much.
Use the stitch line as a guide for snipping the corners and folding the edge of the fabric to the right side. Fold the edges to the right side of the fabric. Press to create a clean finish.

The trim on the neckline could be made of any number of things, like solid, embroidered, or striped ribbon, handmade or pre-made purchased bias tape, twill tape, braid, soutache, or embroidered decorative trim. No matter what you decide to use, just remember that neck details tend to draw the eye in and therefore becomes a focal point. So keep this in mind when deciding what kind of detail you want to apply.
Note: Wash and dry your trim material or ribbon before using.
The trim for this project can be cut using the pattern piece D & E. Simply turn the raw edges under the 1/4 inch as the pattern suggests, and press into place for a clean edge before applying.
Another easy method that produces the same results... but just a bit quicker... is accomplished with a tool called a bias tape maker. I have chosen to cut my trim pieces using the pattern and then use a bias tape maker, which worked great! Use an iron to press the edges as you slowly pull the tape out of the bias tape maker tool. This is a very handy tool for all your bias making needs (and Folkwear has a selection to purchase from)!
If you don't have a bias tape maker, you can use the instructions in the pattern. Just fold each long edge of Pieces D and E toward the center of the fabric and press.
The pattern recommends these neck trim pieces to be cut on the straight grain of the fabric. However, t is perfectly acceptable to use a bias cut fabric for the trim. Since the trim will not be going around curves, it is more efficient to cut on the straight grain of the fabric.


The neck of View A getting ready for applying the trim strips. Trim made with bias tape maker. Notice the folded over edges of the neck opening will be covered with the trim strips.
Attaching the Trim Strips
Apply the shorter side neck trim strips (Piece E) first. You do not need to turn under the short edges of these pieces. Pin and align the trim right up to the edge of the neck opening. The folded over raw edges of the shirt will be covered and disguised by the trim strips. This is a really nice raw edge finishing technique to remember for future projects!

Stitch the shorter trim strips down with a topstitch on the sewing machine. Stitch 1/16 inch from each edge of the trim.
Once the shorter trim strips are applied, then pin on the longer strips. Turn the raw end edges under and make sure the edges are straight and squared off neatly.

Topstitch the longer trim strips on each side of the strip, in the same manner as the shorter trim strips. Be sure to back stitch at the beginning and end either side of each strip to secure.

Topstitching completes the neck trim.
Step Three: Sleeves & Seams
Find the shoulder placement: Match the boxes near the bottom of the side seam. Smooth out the blouse fabric and align the bottom of the armhole (armsyce) as well. Where the shirt if folded at the top of the blouse is the top of the shoulder. It is important to locate the shoulder placement, or center point, despite not having a shoulder seam.
To find the sleeve center point, simply fold the sleeve in half.
The sleeve center point must match up to the shoulder center point. Place pins to mark the center points of the shoulder placement and the sleeves center fold to help with alignment. Work with the project right side up.

Pin indicates center point of shoulder edge.
To find where the alignment of the sleeve and blouse armhole seam allowances match up, measure out the 1/2 inch seam allowance intersection of each edge, using pins as markers then match up the pins. Be sure right sides are together.

Find the 1/2 inch seam allowance intersection on both the armhole and the sleeve pieces marking with pins to help with alignment.
With right sides together, match the center points and side edges, pin the sleeve to the body of the blouse and stitch in place using 1/2 inch seam allowance.

Sleeve pined to the body of the blouse and ready to be stitched.
If doing a flat-felled seam, press sleeve seam allowance towards the body. Or press towards the sleeve if serging or using another method of seam finishing.
See the pattern instructions for flat felled seams (we will also have a tutorial of this technique soon!).

Pressing the seam.
Sew up the Sides Seams
Now that the sleeves are attached we are ready to sew up the side seams. With right sides together, matching notches, and underarm seams. Sew the side seams together starting at the box that indicates the top opening to the side vent and back stitch. Continue sewing the side seam up towards the sleeve and finish with a back stitch at the sleeve edge. Press the side seams open to flat felled the seams. If using another seam finishing method, the seams are generally pressed towards the back of the garment.

Step Four: Finishing the Vents and Hem
With seams pressed open, starting at the vent box marking, turn the seam edge under 1/4 inch.

Turn the edge under again another 1/4 inch, for a total of the 1/2 inch seam allowance. Press and stitch close to the turned under edge, up one side, across the seam, and down the other. Back-stitch horizontally, a few times at the top of the box to help reinforce the vent opening.

Hem the Sleeves and Bottom Edge . . . and that is it!
Determine the depth of the hem you would like for both the sleeves and the bottom hem of the blouse. Turn the hem edge to the wrong side of the fabric by half the hem measurement, pin to hold in place, and press.

Then, turn half the hem measurement up again, pin to hold in place, and press.
For example: I have chosen a hem of one inch. I first turn the hem up 1/2 inch and then again 1/2 inch, for a total of one inch.

Either stitch your hem in place by using a whip stitch or edge stitch done by hand, or use a straight stitch, or top-stitch, close to the turned edge using a sewing machine.

Notice the hem stitch is close to the turned edge for a neat finish.

Finished bottom hem and side vent finish.
I hope you are as pleased with your finished Middy Blouse as I am. I am already thinking of all the other fabric and trim combinations I would like to try!


There is yet another version of this blouse to make! I hope you will join me for day three of this sew along, where we will start the construction of the iconic Middy Blouse View B.

Folkwear is excited to re-release our favorite nautical-inspired blouses, the 211 Two Middies, just in time for easy, breezy summer wearing. These are the perfect pieces that provokes a smart, yet carefree, aesthetic with just a touch of nostalgia.
Read about the Middy Blouse history and the inspiration for this pattern re-release in our previous blog post!
The 211 Two Middies pattern provides two different blouse versions (View A & View B) that will surely become seasonal staples in any wardrobe. You can find this pattern in either a printed or a downloadable pdf version. The size offerings for women range from XS to 2XL and S to 2XL for men.

Today, we are starting a Sew Along for both middy shirts in this pattern. These blouses don't take a lot of time to sew, allowing time for creative embellishments or to make a neck tie (all part of the pattern)! Join us over the next few days to sew your own middy blouse. Here's the schedule:
Day 2: Cutting and sewing View A
Day 3: Cutting and sewing View B - front, back, neck facing and collar
Day 4: Finish sewing View B - sleeves and hip band
------------------------------------------------------------------------------
Day 1: Preparation
First, get the pattern (it's on sale through the 26th!). Then, you can move on to selecting fabric, gathering materials, and figuring out what you are going to make and how!
Selecting Fabric
Sometimes a specific pattern and fabric just seem made for one another and the pairing is easy, but just about any fabric is perfect for this Middy blouse project as long as it is not too heavy.
If you need a bit of inspiration or if you are not sure where to begin, be sure to see the Folkwear Pinterest board for different inspiring Middy Blouse looks and our fabric suggestion blog post.
Below is a collection of woven cottons and linen fabric swatches from my collection that would all be perfect for a Middy blouse.

This pattern is perfect for light weight woven fabrics, such as shirting, cotton lawn, voile, handkerchief linen, mid-weight linen, chambray, gingham, oxford cloth, silk noil, etc. Any fabric that has a relatively light hand and drapes well would be suitable for this project, especially for warm weather wearing. A good test to help determine a good weight of fabric to use, is to double the fabric over and hold between your fingers and ask yourself if it feels too bulky? This technique helps in determining if a fabric will work well for pleats, gathers, or if it will make a nice crisp corner when the fabric is turned.
For cooler temps this pattern could be made with just about any weight of cottons such as twill, light to medium weight linen, flannel, denim, fine wale corduroy, or a light weight wool would all do.
Just the right knit would provide lovely results too. A medium weight knit like a double knit cotton or wool jersey, a firm 6 oz jersey Rugby type fabric, or even a ponte would be ideal. Look for double knit micro fibers in medium weights. If using a knit for the Middy Blouse, the knit needs to to be stable, which means some stretch, but not so much that the shape of the blouse can not be maintained due to too much loose drape and stretch.
For this sample, I am using a lovely pale gray cotton for the blouse body, with a blue-green cross weave linen for the neck trim for view A. For View B I have chosen a soft periwinkle blue handkerchief linen for the blouse body and a white cotton lawn for the tie.
Yardage, Sizing, and Adjustment Considerations
Once you have decided on a fabric, consult the yardage requirement chart on the back of the paper pattern or included in the PDF pattern instructions. You can choose a size based on the measurements in the chart. I considered the bust measurement first for both View A & View B, keeping in mind the loose fit. The chart (below) is meant as a guide for the basic aspects of body to garment measurements. You can also see the yardage chart through this link (PDF). We will learn some simple grading techniques using the chart measurements to allow for some easy adjustments.

Consider Simple Grading?
Simple sizing adjustments can be made using this pattern. For example, if you find the blouse pattern for the View B fits you nicely, but the band might not fit as loosely as you prefer, then a simple adjustment may be in order. If your bust is size Small but hips are size Medium or Large, you can adjust by grading a bit between sizes. Adding a 1/4 inch seam allowance at the side seams of the blouse bottom edge, as well on the side seam edges of the hip band should do the trick. This technique is called "grading." The general grading rule of thumb when adding or subtracting width at the side seams is 1/4 inch to 3/8 inch for sizes 6-18 and 3/8 inch to 1/2 inch for size 18 and up. The grading term describes the re-aligning of the original pattern and the newly added measurement. This simple and subtle grading technique will be demonstrated in the making of the Middy Blouse View B. So stay tuned!
Note: Due to the minor size adjustment described here, the fabric yardage will not be affected.
Determine your size and any adjustments you might require and purchase your fabric accordingly. Do not forget the width of your fabric matters. Be sure to purchase enough fabric to lay your pattern out properly and the way you intend. Design elements like stripes or pattern design should be considered. You will need to consider if your fabric design is directional and therefore you need to carefully plan how your pattern pieces will lay out, this may require more fabric yardage. Matching plaids will require consideration and most likely more fabric to enable matching.
If you are making View A with the front and back combined as one pattern piece, note that directional prints will not work, because the front and back are cut on the fold as one piece. As a result, the print on the back of the blouse would end up being upside down. This issue can easily be remedied, by cutting the front and back separately, adding seam allowances, and sewing at the shoulder like you do!
Extra Details
Be sure to read the bonus material provided in the Folkwear 211 Two Middies pattern for ideas and instructions on some great embroidery designs to add to your blouse. It is easy to add extra detailed touches with ribbon, soutache, twill tape, patches, and braid, but some elements need to be added before the shirt is completely put together. The nautical theme is just one of many possibilities to explore!
Preparing Fabric
Once you have your fabric, it is a good idea to test the fabric for washability and shrinkage. Cut a small corner of fabric from your yardage that measures approximately 3"x4" rectangle. Place the swatch of fabric on a scrape piece of paper and trace around it. Set the tracing aside to use as a future reference. Wash and dry the fabric swatch according to fiber content recommends, or in the manner in which you intend to care for your finish garment. Then place your fabric swatch back down on the tracing to determine if your fabric shrank or changed in any way. Not all fabrics behave the same. Washing and drying gives you better insight into how your fabric will behave in the real world of washing and wearing. This simply allows you to make any needed adjustments forehand to help prevent disappointment.

Trace around the edges of the fabric swatch on a scrape of paper.
 Tracing a a fabric swatch helps to see if the fabric shrinks after washing and drying.
It is also important to wash all of your fabric yardage before beginning. If your fabric has a loose weave, you might consider securing the raw cut edges first so it doesn't unravel. This is a simple, yet practical extra step. On your sewing machine sew a straight stitch or long basting stitch to keep the raw edge of the fabric from unraveling or getting tangled due to loose threads. Using a serger for this purpose is an excellent choice as well.

A serge stitch helps prevent the raw edge of the fabric from unraveling when washed.
This is also a good time to determine the right or wrong side of your fabric. It may be perfectly obvious for some fabrics, but not so much for others. If you have trouble determining the right from the wrong side, simply pick a side and stick with it. If you are unable to decide no one else will ever know the difference. Indicate the side you deem to be the right side, buy marking it using a needle and contrasting thread. Just catch a few threads of the fabric and tie the marking thread off with two or three tiny knots to secure.
Once your fabric is all washed and ready to go, give it a good pressing not only to smooth it out, so the pattern will lay down well, but to force yourself to give the fabric one last good inspection before you lay out your pattern. Inspect for any flaws in the fabric that you want to avoid. Occasionally when being manufactured fibers can break, or snatches and pulls can happen or, discoloration can occur. When ironing the fabric I intend to use for this project I came across a perfect example of a flaw. I knew it had been noticed, because the inspector left a visible tie thread at the edge of the selvage, adjacent to the flaw.
 The white thread tied to the selvage indicates a flaw in the fabric to be avoided.
Be Respectful of the Grain...
For this project I am using a woven fabric and before pinning the pattern to the fabric, it is important your fabric is "on grain." This means your fabric grain must be straight. Grain refers to the lengthwise and crossgrain yarn of the fabric. It is important that fabric is on grain so your garment will fit and drape correctly and have the effect you intend. Always remember to have respect for the grain to avoid disappointment.
The vertical and horizontal yarns are always at right angles to each other. The fabric was woven on a loom this way and this is how it comes off the loom - with the grain perfectly aligned at right angles.
If a fabric does not match up at right angles it is off grain, and the grain must be restored. To return the yarns of the fabric to their original rectangular position, the horizontal ends (the cut or raw ends) need to be straightened. Note that we are only concerned with the horizontal grain. The vertical grain (the selvedge edge) has already been established as straight by the loom along the selvedge edge.
If your fabric has a "woven in" guide, like a stripe, line, plaid, or check your task is quite easy. You can trust the thread creating the stripe, line, etc. to be straight, because it had to be woven straight.
The next best thing and the easiest method of restoring the grain, is to tear the fabric. This creates an edges that is straight and is perfectly perpendicular to the selvage, making it easier to layout your fabric so that the grainline is straight. Many fabrics tear easily, but not all. It is best to make a small test first. Make a cut through the selvedge and just into the fabric, with the point of your scissors and give the fabric a gentle tear. If it tears easily, proceed tearing carefully. If you are not used to tearing fabric, this process can be a bit unnerving, but all will be fine. Torn fabric grain should be straight.
If your fabric will not allow for tearing (as in the case I encountered with the handkerchief linen I am using for this project), then try pulling a thread to create a straight guide to cut by. To do this cut into the selvedge and into a small amount of the fabric, just enough to pull a crosswise yarn with your fingers. The idea is to pull the thread to create a guide to cut by. Do not try to pull a thread all a in one go, the entire length of your fabric. The thread will most likely break, so pull a short distance, then cut.
 Fabric gathers up along pulled thread.
When you pull the thread sometimes the fabric will gather up along the pulled thread. Simply smooth the fabric out a bit without pulling too much and cut along the guide the pulled thread has created. Continue the whole length of the fabric.
 Smooth gathered fabric out a bit and use pulled thread as a guide to cut by.
Just know that sometimes the fabric is not cut properly straight when you purchased it. Sometimes a printed design is unfortunately not printed straight on the fabric, which is most unfortunate. Sometimes nothing can be done to fix this issue. Not all fabrics are created equal and knowing what to look for in fabric quality can help to avoid disappointment.
Be aware that when fabric is not straight, you can lose precious inches, once the fabric is straightened. For this reason it is wise to buy a little bit more fabric than the pattern calls for. My rule of thumb is 1/4 of a yard more than I think I will need... just to be safe.
In the photo below you can see the attempts taken to find the straight edge of the fabric. I moved over gradually in order to determine the least amount of fabric to be wasted. This photo illustrates how incorrectly the fabric was originally cut. However, it is straight now!
 The wasted fabric removed to restore the grain line.
Gather Your Materials:

... and all the usual tools and notions: pins, scissors, tracing paper, pattern weights, pencil for tracing, measuring tape or ruler, iron and ironing board. And a sewing machine in good working order.
If you decide to do any of the embroidery options provide in the pattern instructions then you will need embroidery thread, needles, and embroidery hoop for hand work.
Ready to Begin!
My inspiration comes from blue skies, white billowy clouds, warm sand, and sea glass. I have decided upon a pale taupe-gray cotton for the main body of View A, with a blue-green linen cross weave for the neck trim. For View B, I have chosen a beautiful light blue handkerchief linen and a very light weight white cotton lawn for a neck tie.
 Fabric and notions for Middy Blouse View A
 Fabric and notions for Middy Blouse View B
I hope this start of the Sew Along has given you some useful things to think about in planning your project. Have fun gathering your materials and dreaming up ideas for your Middy Blouse! I am off to trace my pattern and I will meet you back here to begin Day Two: Cutting & Sewing of the Folkwear 211 Two Middies View A.


