-
Sewing Patterns
-
Fabric
- Sewing Supplies
- About
- Blog
- Gallery
-

by Cynthia Anderson
The Folkwear team is delighted with the response to the new 160 Hawaiian Mu'umu'u! We hope this versatile dress will become a welcome addition to your wardrobe, no matter the season.
The 160 Hawaiian Mu'umu'u Pattern (and pdf version) is offered with two different sleeve length versions (View B & C) and without sleeves (View A). The construction for the sleeveless version is very different from the versions with sleeves. We have a sew along for the sleeved version (specifically, View B). The construction of the dress for sleeved or sleeveless versions is the same up through Day Two (Day One is learning about the pattern and gathering materials). In Day Three, I teach how to add sleeves and construct the yoke, which is not relevant to the sleeveless version (View A). But, Day Four is the finishing steps which is the same as for the sleeveless dress (other than finishing the sleeves, which you don't need). The sleeveless version (View A) is covered here.
In this blog, I will be making a test muslin to show you how to make the sleeveless version (View A). I am not going to make the entire dress. Instead I am making the dress from the waist up just to demonstrate how the sleeveless version is constructed. In this version the Yoke/Yoke Facing and the Armhole/Armhole Facings come together to create the sleeveless armhole.
Note: Have a look at the 160 Hawaiian Mu'umu'u Sew-Along: Day One, Day Two, Day Three, and Day Four blog posts for more details and tips in making this mu'umu'u.
Pattern Pieces Needed
To make the sleeveless version you need to cut the following pattern pieces according to the pattern instructions: Side Front A, Back B, Center Front C, Front Yoke H, Back Yoke I, Front Armhole E, and Back Armhole F. Be sure to transfer all the needed markings before unpinning the pattern from your fabric.
Interfacing
Adding interfacing is optional. Even thought I am making a test muslin, I am adding fusible interfacing to the Yoke and Armhole Facing pieces.
The fusible interfacing is added to the wrong side of one Front Yoke H and the two Back Yokes I. These pieces will be the YOKES. The non-interfaced pieces will be the YOKE FACINGS.
Interfacing is also added to the wrong side of all the Front Armhole E and Back Armhole F pieces.
Constructing the Dress
Construct the dress as we do in Day One and Two of the sew along: make the darts (and pockets), sew Side Front and Front together, sew Back (with gathers) together, and Back to Side Front.
The difference in construction will be the yokes and armholes.
Armholes Facings
With right sides together, stitch one Front Armhole E to one Back Armhole F, matching the notches. These two pieces create the Armhole Facing. Repeat with other pieces.

Press the seam open.


Add Armhole Facing to Dress:
With right sides together, stitch the Armhole Facing to the dress armhole, matching the Armhole Facing seam to the dart stitch line on the dress. Make sure the Front Armhole Facing is going toward the front of the dress and the Back Armhole Facing is going to the back of the dress.
Repeat for the other armhole.
Clip and trim the seam allowances.
Press the trimmed seam allowance towards the facing and understitch, stitching the facing to the seam allowance. This will help to hold the facing to the inside of the armhole.

Turn the facing to the inside of the garment and press.
Baste the edges of the facing to the dress at the front and back within the seam allowances. This extra hold helps to keep the Armhole Facing in place as you continue working.

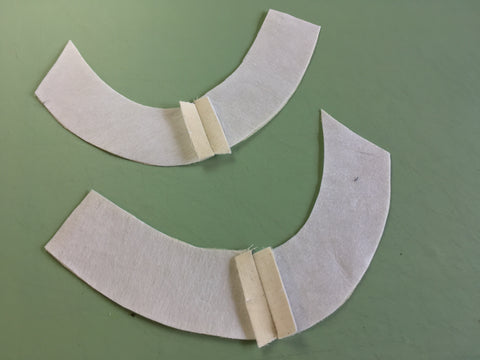
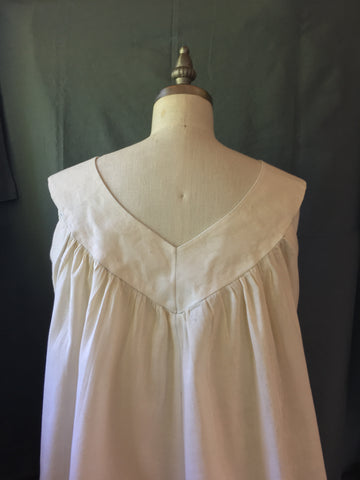
Make the Yoke
With right sides together, stitch the interfaced Yoke Fronts to Yoke Backs at the shoulder seams, matching the notches. Repeat with Yoke Front and Yoke Back Facings. In the photo below the Yoke (top) has the interfacing and the Yoke Facing (bottom) does not. (Due to the angle of the photo the pieces do not appear to be the same, but they are.) Don't forget to stay stitch the edges of the Yoke Facings, as this will keep them from pulling out of shape during construction. I did not staystitch them for this tutorial, and it worked out fine, but I do recommend you doing that to the un-interfaced Yoke pieces.


With right sides together and matching the shoulder seamlines and the center front notches, stitch the Yoke and Yoke Facing together along the inner curve of the neck edge.

Trim the seam and clip the curves.

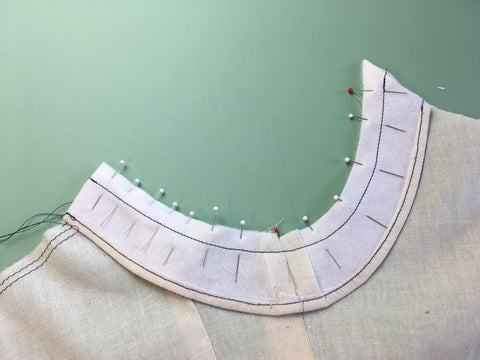
Keeping the right sides together, pin and align stars, notches and shoulder seams (marked by red tip pins below) of Yoke and Yoke Facing at the outer edges. Stitch between the stars at notch 12 and 13 on each side of the shoulder seam. Backstitch at the beginning and end of the stitching.

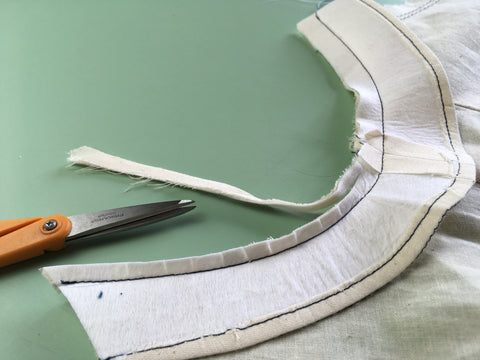
Clip to the stars and trim 1/4" (6mm) away from the seam allowance between the notches.

Turn the yoke assembly right side out. Press, slightly rolling the seam towards the facing.

Open the Yoke and Yoke Facing at the center back, then with right sides together, match the notches and center back seam, sew the center back of the yoke assembly. Pivot the stitching at the point of the V.


Turn right side out and press seam to one side.
Turn the Yoke/Yoke Facing right side out and press the edges of the point, slightly rolling the seam towards the facing.

Add Yoke to the Dress
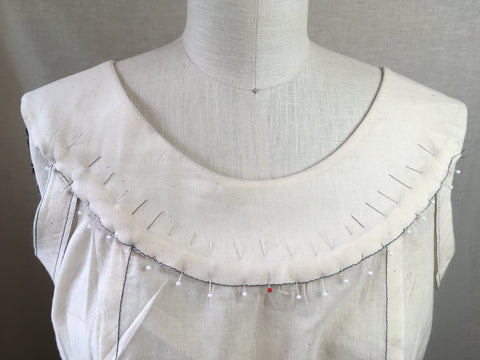
Note: To make the yoke/dress construction easier for you to see, I put the Mu'umu'u on a dress form with the wrong side facing out.
Note: The red pins mark the match points of the yoke and dress.
With right sides together, match and pin the center front notch 14 on the yoke to center front notch 14 on the dress.
Match and pin yoke notches 15 to the dress Center Front/Side Front seams.
Match and pin the star at notches 12 on the yoke to the stars on the Side Fronts of the dress.
Once the yoke is pinned stitch between starts at notches 12.

Press the seam allowance toward the yoke.

With right sides of the outer back yoke to the right side of the dress back, match the center back seams and notches 16. Match the stars on the back with stars at notch 13 on the yoke. Pull up the gathering threads evenly to gather the dress to fit the back yoke.

Stitch from the center back to one side, ending stitching at the star. Repeat on the other side of the back yoke, stitching from the center back to the other star. Keep yoke facing out of the stitching.
Press seam towards the facing.
Finish the Yoke Facing
Turn under 1/2" (13mm) on the seam line of the bottom yoke facing edge, on both the front and back (use the basting stitch you put in earlier, if you did that optional step).


With the wrong side of the dress facing up, pin the front Yoke Facing to the interior of the dress. Use the stitch line as a guide for matching the turned under edge, and stitch the facing to the dress with a whipstitch.
The armhole facing tucks neatly into the front and back Yoke/Yoke Facing.

Remove the basting and gathering stitches if needed.
Pin the back Yoke Facing using the stitch line as a guide for matching the turned under edge, and whipstitch facing to dress.
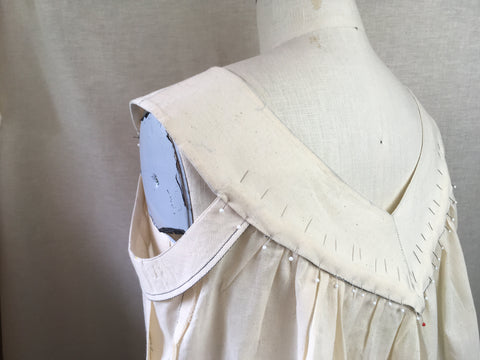
The Yoke/Yoke Facing and Armhole Facing create the sleeveless armhole of the mu'umu'u.


I hope you find this blog and the 160 Hawaiian Mu'umu'u Four Day Sew-Along all you need to ensure this pattern is a pleasure to make. The Folkwear 160 Hawaiian Mu'umu'u is on sale through the month of July, in either paper or pdf versions.


Molly
September 26, 2022
This is part of the pattern. This blog post is just giving a tutorial, or sew along, for how to do it – providing extra help if needed to make the sleeveless version (which is included in the pattern).
Thanks!