-
Sewing Patterns
-
Fabric
- Sewing Supplies
- About
- Blog
- Gallery
-

Victorian kitchens combined the technology of the industrial revolution with the latest frivolities popularized by ladies’ homemaking magazines. This oven mitt pattern (from our out-of-print English Country Kitchen pattern) is perfect for making a useful gift or for decorating an old-fashioned kitchen. Make one or several. Use different combinations of fabrics, or use up scraps in your fabric stash - these mitts (or pot holders) don't take a lot.
You can use pre-quilted fabric to make a quick and easy oven mitt, or use our optional quilting pattern (or use your own) to add a fun embellishment.

Materials Needed:
Suggested fabrics: Soft, absorbent, washable fabrics such as cotton, linen, or blends. Pre-quilted fabrics. Thicker quilted fabrics would be best. For batting, we recommend polyester (dacron) or wool batting since cotton has a tendency to ball up. Be sure to use a batting that is rated as safe for heat resistant projects.
Notions: Thread
Yardage Requirements
|
|
fabric and batting for quilting |
pre-quilted fabric |
|
45” (115cm) fabric |
1 yard (91cm) |
⅝ yd (56.3cm) |
|
60” (150cm) fabric |
⅝ yd (56.3cm) |
⅜ yd (34.3cm) |
|
45” (90cm) batting |
⅜ yd (35cm) |
--- |
Cutting Guide for Oven Mitt
Pre-shrink fabric if necessary and press. Check grain of fabric and straighten if necessary. Permanent press fabrics cannot be straightened. Choose Cutting Layout below corresponding to fabric width and type (quilted vs. unquilted) you are making.
Place pattern pieces on right side of fabric. Be sure all grain lines are parallel to selvage. Before removing Pattern Pieces from fabric, transfer markings to wrong side of fabric, using chalk, tracing wheel, or tailor’s tacks.
If working with unquilted fabrics, you will also need to cut batting for Piece V. If using pre-quilted fabric, do not cut batting.
Cut Piece U on the fold of fabric as indicated.
If you are quilting a motif on Oven Mitt END SECTION, cut Piece V ½ in. larger on all sides than Pattern Piece. After quilting is complete, cut Piece V to exact size of Pattern Piece before constructing Oven Mitt.
Cutting Layouts


Sewing Guide for Oven Mitt
NOTE: If you plan to embellish your Oven Mitt with a quilted motif, refer to Quilting the Snowflake Motif below before assembling.
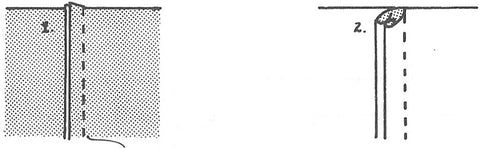
For Pre-quilted Fabrics: Press under ¼ in. (6mm) along straight edges of END SECTION V. Turn again on seam line and stitch along pressed edge.

Right sides together, stitch END SECTIONS to MAIN SECTION U, matching notches. Trim seam and turn right side out.

Press under ¼ in. (6mm) along remaining raw edges of MAIN SECTION. Turn again on seam line and stitch along pressed edge.

For Unquilted Fabric: Sandwich batting between two layers of fabric for END SECTION V, wrong sides of fabric to batting. Baste layers together within seam allowances.

Pin remaining two batting pieces to wrong side of opposite ends of MAIN SECTION U. Baste just within seam line of curved edge.

Machine stitch along straight edge.

Wrong sides together, baste remaining MAIN SECTION to MAIN SECTION with batting around entire outer edge, sandwiching batting.
To attach END SECTIONS to MAIN SECTION, follow instructions for pre-quilted fabric, above. When hemming raw edges of MAIN SECTION, treat both layers as one.

Quilting the Snowflake Motif
Download the snowflake motif here.
NOTE: Quilting of design motifs should be completed before final cutting out of Pattern; cut both fabric and batting layers ½ in. (13mm) larger on all sides of pattern. Piece will be cut to proper size after quilting is completed. This helps in case quilting changes the size of the pattern piece.
NOTE: You may use this design for quilting on your oven mitts, or you may want to use another design, or create your own. You can also quilt these mitts very simply with gridded straight lines by machine. You would not need a motif to quilt, but just space your lines evenly along the pattern pieces.
Materials
Transferring the Motif
Use a tracing wheel and dressmaker’s carbon to transfer the motif. Line up the motif with the grain of the top fabric. If you wish to use an iron-on pencil, be sure the experiment first with your fabric. The pencil can smudge if the iron is left on it too long, and it may not wash completely from some fabrics. If drawing your own motif, or creating grid lines, you can use any transferable marking tool you wish and draw directly on the fabric pieces. Be sure your marking tool can be washed off easily.
Quilting the Motif
Baste layers together as follows: Sandwich batting between top and bottom layers, lining up all edges. Beginning in the middle, baste to outer edges on the lengthwise and crosswise grainlines. Then baste edges together. You may also want to baste from the middle outward on the bias.
Use a hoop or frame 2 in. (5cm) larger on all sides than the motif. Quilting is traditionally done with thread the same color as the fabric, but you may wish to add color. If hand quilting, we recommend quilting needles #8 or #10, which bend easily for running stitches.
You may quilt this design by hand or by machine. The lines are straight and easy to follow. If quilting by machine, you can leave long thread tails and tie off and pull them into the middle of the quilting before cutting.
Hand quilting stitches: Whichever stitch is used, there should be about 10-12 stitches per inch (4 or 5 per cm), evenly spaced. To begin, knot end of thread and pull through lining into batting (if knot comes through all layers, make a larger knot). To end thread, make the last stitch a back stitch and run thread through batting. Use a quilting stitch (going up and down vertically through the fabric) or a running stitch to quilt.
After quilting, use Pattern Piece to cut fabric to size, taking care to match the center of motif with the center of Pattern.

by Victoria Watkins
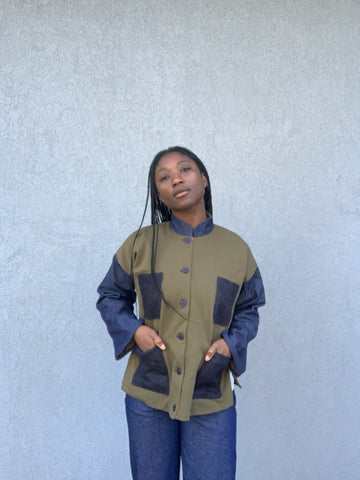
I've had the 126 Vests of Greece and Poland pattern in my personal collection for a while now, just waiting to use it. Since it is this month's featured pattern, I decided now was the perfect time. I was totally shocked how quickly it worked up!

This was one of those projects that I had entirely planned out in my head before I started working. I had a cut of colorful floral print fabric in my stash that I felt would be perfect for a vest, and I knew I wanted a simple waist-length piece. After reviewing the two short vest options, I decided to go with the Polish vest, but gave it a twist.
I chose to make quite a few modifications to the pattern, but they all were in the name of simplicity. First, I chose to omit the bottom peplum/frill section and have just a plain hem. I also noticed that the fabric I chose had a beautifully contrasted back to it, so I planned to make the vest reversible. To do this, I had to leave off the lining and finish the edges with a binding.

The binding was the longest part of the process. If I had chosen to line the vest (without the peplum), then this project would've been done in two hours maximum. That's including cutting out the fabric and all. If you want a short afternoon project, you really can't beat this pattern!
I did assume that the vest would fit and didn't choose to make a muslin before sewing, and I really need to stop doing that. The vest did come together and mostly fit, but I sized up from my measurements thinking it would work better fro going over clothes. However, then the straps wanted to sit at the edges of my shoulders. I fixed this after sewing by tucking a sneaky little dart in the back of the neck. I think most people will have zero issues with fit, given how simple the design is. I was able to get everything sorted out in about 30 seconds after trying it on.


All in all, I'm very excited for this vest. The pattern (126 Vests of Greece and Poland) is a great stash buster project because it uses such little fabric. I'm already considering making more from other miscellaneous bits from my fabric hoard. It is really perfect for using those special, fun pieces. Do you have fabric in your collection that would be good for this vest? Let us know!

by Victoria Watkins
When we decided that each of us at the office wanted to make a garment from our 219 Intimacies pattern, I immediately had a vision. I love mid-century style clothing, and regularly choose foundation garments and shapewear to help achieve the look I'm going for. Despite this, I didn't have a one-piece slip to wear with my dresses.
The slip is no longer a staple in contemporary wardrobes, but for any detail-oriented vintage enthusiasts, it's useful. Whether it's to compensate for a lack of lining in a white dress, to smooth out the textures from shapewear, or to just feel more put together, retro fans will want a slip in their closet.

For fabric, I wanted something comfortable in a nude color close to my skin tone, as well as something high-quality that would last. For that reason, I chose a silk charmeuse from our friends at Dharma Trading Co.
This was my first time working with real silk, and I definitely learned a few things. This pattern is cut on the bias, which lends to its beauty, but of course it also makes it more unstable on the edges of pieces. I wondered before construction if I should stay-stitch everything, but I didn't. The instructions don't say to stay-stitch, but after finishing the slip I really wish that I did. If you're working with something slinky and slippery like a charmeuse, I really recommend doing a stay-stitch around the neckline of the shell and the facing at the very least. You can also read more about working with bias cut fabrics and slippery fabrics in this blog post. Using tissue under the stitching can also be helpful.
I also made some fit modifications to the slip. The first muslin I made had the lower points of the insets hitting somewhere between my hip and my waist. The fit looked okay, but it didn't look like it was made for me, and if I'm going to make something for myself, I might as well take the opportunity to make it perfectly to my frame. I decided it would look better if I raised the style lines of the inset to hit at my waist, and tested that out with an additional front piece mockup before sewing with the fashion fabric.

Difference between my altered bodice pieces and the standard ones. Mine is on the left, the standard cut of the same size is on the right.
I have to admit, this project strained the limits of my skillset. I decided to use French seams to finish the interior, because serging them felt a little crude for the luxurious silk. I found myself managing alright with this process, but the curves of the insets on the bodice were definitely a challenge with the French seams. What really gave me trouble was attaching the facing to the neckline edge. As previously mentioned, the lack of stay-stitching caused issues, and here's where they really showed. It felt like a fight to get them to match up after the insets had been manipulated to sew them to the body pieces.

French seam finishes on the interior of the slip.
After wrangling the neckline and facing together, I noticed that the facing wanted to curl and turn to the outside of the slip, even after pressing. I tacked the facing down at seams, but it still wants to poke out if I'm not careful. I think that this also has something to do with the lack of stay-stitching, so I really recommend doing that if you're working with a pliant fabric like this. I chose to understitch the facing to try and help with this problem.

 Molly said that she's seen some people styling silk slips as dress and wearing sweaters over top or layering.
All in all, I'm still very pleased with this slip. Even though there are some slight flaws, the fact that it's an undergarment means that I can relax a little. I learned a lot while working on it, and I'm excited to have it to wear under my vintage dresses.
Hopefully this gives you ideas for ways to use our 219 Intimacies pattern!

By Esi Hutchinson
After I made the adjustments made to the teddy (Part 1 here) from the 219 Intimacies pattern, I was able to confidently begin my final garment. I washed and pressed my fabric (a sanded cotton twill) and began following the instructions. Make sure you've added at least half yard of fabric extra to the required yardage in your size before your start cutting.


I followed the pattern instructions without any other changes until the side seams. I sewed the right side (as you are wearing it) together and kept the left side open in order to install the zipper. A side zipper is the easiest way to get in and out of this garment as a romper, and is pretty easy to add to the side seam. I didn't want to have a crotch opening (as the pattern indicates for the teddy).

To add the zipper
You could use an invisible zipper here, but I used a regular garment zipper. I measured 1/4" (6mm) above the top of the zipper, drew a line, and cut at the line to trim down the top of the zipper so it would fit easily with the facing.

To find the best zipper length, I measured from about 2" (5cm) below the bottom of my armpit (that's is where the zipper will start, at the top of the romper) to the widest part of my hips.


The length I need for my zipper was 17" (43cm). I probably could have made it 2-3" (5-7.8cm) shorter. I marked the side seam on the front/back at 1/4"/6mm below the top left side of the garment, and also 17" below that mark. I basted the side seam together from the top to the lower zipper mark, and then stitched (with a regular stitch length down to the bottom hem of the romper.

I stitched a tight zig-zag over the zipper at 17" below the top to make a new zipper stop, which you might need to do if you don't have the exact zipper length you want. It is easy to make a zipper shorter (you can't make it longer though!). To do this, set the width of your zig-zag as wide as you can and stitch length to zero.


Next, I pinned one wrong side of the zipper to the wrong side of the basted seam, like so. I place the zipper teeth so they are aligned with the seamline, and the top of the zipper is 1/4" (6mm) below the top of the romper.

To sew the zipper down, I move the needle to the side farthest away from the zipper teeth and stitch using a zipper foot. I move the slider down when starting stitching and move it back up when continuing down. You could also hand baste the zipper down before stitching with a machine.


I pivoted my stitching and stitched over the zipper teeth at the 17" mark, just above my new zipper stop.

Then I continued to stitch up the other side of the zipper, the same way. Continue stitching the zipper in the same way as the other side.
When finished, I removed basting stitches that held the seam in place.


Continuing with construction: Facings
I stitched the facings with the right sides together only (on the right side as you wear it).

Trim seam and press open.
The instructions indicate to press the bottom edge of the facings to the wrong side. You could also serge, zig-zag or overcast the raw edges. I serged the bottom edge, instead of pressing.
I stitched the facing to the top of the romper, starting and finishing on either sides of the zipper.

I turned the facing to the inside of the romper and pressed. You can topstitch close to pressed edges, though I did not do that as I prefer the look without topstitching here.
I folded under, and pressed, the remaining raw edges of the facing at the sides by the zipper. Then I slip stitched them to the zipper tape, taking care not to stitch too close to the zipper teeth (the stitches might interfere with the slider movement.

To keep the facing from flipping out, I hand tacked the facing to center front and center back and right side seam, as you can see in images below.


Gussets
I attached the gussets as the instructions indicate, but did not add any buttonholes/buttons, of course. So, I did not need to fold the shorter long edges.
I stitched the curved edges of the front and back gusset to the box, and finished the seams by pressing open and serging.

I stay-stitched along the stitchline on the front and back, on either side of the slash line (tapering to and pivoting at the box). Then, slashed to the box.

I stitched the gussets to the front and back matching seam lines (raw edges won't be even at the top of the slash), and using a Using a 1/4" (6mm) seam allowance. I made sure to backstitch at the box to secure stitching.

I used a zig-zag stitch to encase the raw edges.

On the short straight edges of both gussets, I basted the raw edges together using a 1/2" (13mm) seam allowance.

Since, based on the original instructions, I would have pressed under 1/2" (13mm) twice to create the button and buttonhole seam, I trimmed away 1/2" (13mm) from raw edge (at the basting line). Then I stitched using a 1/2" (13mm) seam allowance.

I pressed this seam open and finished the edges.

Finishing
Finally, I tried on the romper to determine the exact length to hem. For thicker or heavier fabric, like this twill, I used a wider hem of about 1-1/4" (3cm) because if you used a narrow hem on thick fabric it will roll up. So make sure you give yourself enough length for a wider hem.
I trimmed down the hem on my legs and made a new cutting line, allowing for a 1-1/4" (3cm) for the hem.

I folded under 1/4"/6mm then 1"/2.5cm and stitched near the fold.

I finished!!!
I'm so glad I made a muslin, sometimes it can be tiring to have to make one but it's better to be safe than sorry. I really like the sanded twill fabric because it's very utilitarian, which I'm attracted to. I really like to work with my hands and be constantly creative with different mediums and this fabric is tough and easy to wash, and the dark color won't stain easily. I'll be wearing this romper out and about when it gets warmer for sure!
I hope you liked this blog post, and please show us what you made from #219 Intimacies (tag us on social media with #folkwearpatterns and #Folkwear219)
Below, I paired the romper with 145 Chinese Pajamas Jacket I made last month. You can check out the blog post here for that sew along. I can layer this romper while the temperatures are still a bit cool, and wear it on its own when summer comes!


by Esi Hutchinson
In my previous 219 Intimacies Teddy sew along blog, I mentioned I might make the teddy into a casual romper to wear outside the privacy of the home. Well... I did it! The 219 Intimacies pattern has four garments to make from it - the camisole, tap pants (knickers), slip, and teddy. This blog post will show you how I made adjustments to the teddy to fit more like a romper. In my next blog post I will show you how made the romper and added a side zipper, as well.
Fabric
To make the teddy into a romper, you will need at least an extra half yard of fabric for the yardages given in your size. I started with the size 12 and that worked well for me. The bias cut has a little "give" to it so even though it might skim my size, it fits perfectly.
Instead of using fabrics that the pattern suggests for the teddy, I used a 8.5 oz. (280 gsm) cotton sanded twill in a dark color that we have it in stock in our fabric collection. You could use suggested fabrics for the teddy such as silk charmeuse, crepe, habotai, etc., however, obviously make sure they not transparent. For a romper, I wanted fabric that was more substantial and would hold up to daily wear and movement and layering. Other fabrics that would work well would be other colors of the sanded twill, Tencel twills, sturdy linen, and even medium-weight denim.
Pattern Adjustments
I can't emphasize enough that you should make a muslin, even after making the following adjustments (that I made). You might need to alter the fit a little more or adjust things differently. I made two muslins and still made a couple of adjustments to the fit after that.
First, I used Swedish tracing paper to trace the teddy pattern pieces. This paper transparent and is great to write on and make adjustments with. You can cut it, tape it back together, and even sew on it. We sometimes use pieces from other projects and tape them together and reuse them. It is fairly sturdy stuff and great for adjustments.
To start, I wanted to adjust the height of the crotch on the front and back pattern pieces, and lengthen the legs of the Romper. I used the slip length marked on the pattern for my romper length. I also had to extend the stitching and cutting lines for the crotch to the new hem line (which you don't see below, but I did do a bit later).

I wanted the crotch seam brought up quite a bit higher than the teddy crotch falls (which is more comfortable for nighttime wear). To do that, I folded along the lengthen/shorten line the amount I wanted to raise the square marking the top of the crotch. I shortened this first version by 5" (12.7cm).

After shortening the pattern piece, the sides were not even, so I had to true, or adjust, the lines to have the same angle again. To do this, I just used the cut line from the top of the teddy/romper and folded out the bottom (overhanging) part.


The other pattern adjustment I needed to make was on the front and back gussets. I measured from the square at the top of the crotch on the front/back to the hem of the new pattern piece. This was 11" (28cm) for me. So I extended each gusset piece to be the same length.

Muslins
I simply followed the pattern instructions to make my muslin.


The only change to the instructions I made was at the sides seams. You need an easy way to get in and out of the romper without the crotch being open (i.e. appropriate for everyday wear). On the final version I plan to sew in an invisible zipper on the left side, but for the muslin, I did not add a zipper. Keep this in mind as you create your own romper. I'll cover how I added my zipper in Part 2 of this pattern hack.

I sewed the longer gussets in the same way the pattern instructs.

More Pattern Adjustments
I tried on my muslin on to see how it fit. And, I didn't like the fit of this first muslin. I had shortened the pattern piece too much, and realized I only needed to take out about 2" (5cm), not 5".
However, instead of adjusting at the lengthen/shorten line again, I really just wanted to lower the crotch (where the gussets meet) and keep the same leg length. You can also change the gussets to adjust the crotch to get a better fit, which is what I did.
I liked the way the front crotch fit, but did not like the back crotch fit (not enough room). This meant I really needed to adjust the gusset pieces, specifically, the back gusset. I aligned the square of front gusset (top of crotch) to the square on the front/back piece (I adjusted the top of the crotch by lowering it 2" from the first adjustment). Then, I butted up the edges of both gusset pieces and lowered the back gusset piece by about an inch to give me more room in the back crotch.
Then, I drew a line to connect the gussets pieces like you can see in the image below - which became my new cut line. These then became my new pattern pieces. I tested the fit again before making my final garment. I adjusted the hem of the gussets to work with the length of the romper before cutting them from my main fabric.

So my new pattern adjustments were to lower the top of the crotch (the square) by 2" (5cm) and adjust my gusset pieces to provide a bit more room in the crotch.

I finished making my adjustments and then started on my final garment.
In the next blog post, I will make my final romper from the sanded twill with a side zip. Hopefully my experience will help you hack this pattern to make a romper!

by Esi Hutchinson
Folkwear is featuring our #219 Intimacies this month! Since there are three different garment styles in this pattern, Molly, Victoria, and I decided to each make something from it for ourselves. It is a pattern we have all had our eyes on, just waiting to making something from it, and this was the perfect opportunity. You could make a slip, teddy, camisole, or tap pants/knickers from the pattern. I chose to make the teddy because I think it's so cute, and I don't really have any elegant nightwear in my wardrobe. I also think the teddy fits my style and comfort the best.
This pattern is also available as a PDF, you can get it here!
In this blog post, I'll be showing how I dyed the silk for the teddy as well as how I constructed it.
Fabric and preparation
The teddy calls for fabric that is that is light and drape-y -- something like silk charmeuse, crepe, habotai, cotton voile, or a handkerchief linen.
However, if you want to make the teddy for non-sleepwear, it would be cute in a lightweight denim for a summer outing to the beach or a lunch dat. You could also use a Tencel twill or medium-weight silk/cotton for a more structured and casual look. As always, you should check out our fabric collection to see if there is anything you could use that would fit perfectly for your style and comfort. Pre-wash and press your fabric before cutting.
You will also need two ⅜”/10mm buttons for gusset (or you may use snaps).
Optional: This pattern has instructions for crocheted lace and edging, appliqued lace, scalloped hem finishes, and ribbon rosettes. Keep those embellishment options in mind when you are deciding what you want to make and how you want it to look!
I wanted to use a silk crepe fabric for my teddy, however I didn't like any of the colors I saw online. I ended up getting a white silk crepe from Dharma Trading for me to dye! I planned to dye the fabric to use to make the teddy (not dye the teddy after it was made, though you could do this also). YouTube is a great source for learning how to dye using different dye methods. Also, most online stores will provide the instructions on how to use the dyes they sell. I also highly recommend fabric dyes from Dharma Trading Co. and Earth Guild.
And since it often happens to crafters, the idea in my head did not quite come out the way I planned. First, I had a little mishap when dyeing my fabric. I wanted to dye the fabric a mint green, but the fabric came out blue when using Cushing direct dyes for animal fiber fabric. A good lesson to definitely test a small swatch before you do the whole fabric. I often use these dyes at home so I trusted it completely. The Cushing direct dyes works amazingly well for plant fibers such as cotton, rayon, and linen, however when it comes to silk it can get tricky and not come out the color expected. Anyway, I had to re-dye my fabric using a lemon yellow Jacquard Acid Dye, these dyes are way more promising for using with silks. I didn't end up with the color I wanted initially, but the color I got I actually really love, it's more of a chartreuse. You can cut out your pieces and then dye your fabric or dye your fabric before cutting (or dye the finished garment), up to you. You should think about possible fabric shrinkage, fraying edges, or uneven dyeing, depending on your dyeing methods, and choose the option the best suits your project.

After you have dyed your fabric additionally you can also wash it using Kieralon or Synthrapol to get out the excess loose dye.


Now I can begin sewing the teddy!
These garments don't require a lot of fabric but it can be tricky when pieces are cut on the bias. Test the layout and then rearrange your pieces if needed. You can also read some sewing tips about cutting and sewing with silky and bias cut fabrics here.
Note: Read Authentic Detailing for Intimacies before beginning if you want to finish your garment with any lace appliques and/or lace edging techniques for this pattern.
I recommend using a French seam for most of the seams. I will indicate when it is probably wise not to use a French Seam.
How to sew a French seam: Wrong sides together, stitch seam only a scant 3/16”/5mm (Fig. 1). Press to one side. Turn right sides together and stitch on seam line, taking care to include previous seam (Fig. 2).
A good tip when sewing with silk, silky fabrics, or bias cut fabric is to baste your seams before using the final stitch length. This will prevent unwanted shifting.
With silk, you want to press really well because it shifts a lot, you can spray your fabric with water and use steam, this will make your pressing nice and crisp. Again, you might want to test your pressing with heat and water on scraps of your fabric before using on your garment.
STEP ONE: BODY
It is easier and neater to use a lapped seam (described below) on the Front and Back Inset seam. Or, you can use a use a standard seam if you'd rather.
For a Lapped seam, press under ½"/13mm along the Inset piece.

On the wrong side of the Front, I placed the pressed edge of Inset along right side of seam line of of the Front (matching notches), and pinned on the wrong side to make sure that the raw edges are even.

Turn to the right side and pin on the right side taking the pins out from the wrong side and hand-baste in place.

Baste through all three layers, then on the right side top-stitch along the pressed edge.

Do the same for the Back.


Now you can remove the basting stitches.
Overcast seams by hand or machine to finish these seams.
Now with right sides together, baste then stitch the front and back together. You can use a French seam for this step, but I pressed the seam open and serged the raw edges.

STEP TWO: STRAPS AND FACING
Press under ¼"/6 mm on both long edges of the Strap.

Fold in half lengthwise along Center Fold Line and you can baste, then stitch, close to both long edges.

With right sides together, hand or machine-baste the straps to top points of the back insets.

Now you can try on the teddy to determine the strap length: place a pin at point where top of the Front inset meets desired length of the strap. Trim off excess of STRAP so that it measures ½"/13mm beyond pin.
Hand or machine-baste the strap to the Front inset with right sides together, making sure STRAPS are not twisted before your sew the facing (or add lace edging).

Note: You can omit the facing if you are finishing your garment with lace edging.
Stitch facings together at side seams, and clip inner corners to dot as marked on pattern piece.

You can either press under ¼”/6mm along lower edges of facing or finish with a zig-zag or serger. I serged the bottom raw edges of facing to finish.

Now you can stitch the facing to the body with ¼”/6mm seam line, sandwiching strap ends (make sure not to catch the straps in the stitching in other places).

Clip to seam at Center Front and Center Back to help with a smooth turning of the facing to the inside.

Turn facing to inside and press. Top-stitch close to pressed edges.

You can baste the lower edge of the facing to the teddy. You can top-stitch or slip-stitch by hand along pressed edge. Since my fabric is light and silky, I whip-stitched the facing to the center inset and front/back seam lines, as well as the side seams. This keeps the facing from popping to the outside and hides the stitches on the inside (they aren't seen on the outside of the teddy).


STEP THREE: GUSSETS
Stitch the Front Gussets together at curved edges, to the box (with right sides together). Backstitch at box to secure. I used a French seam here.

Repeat with the Back Gussets.
Press seams open if you did not use a French seam, and zig-zag or serge the raw edges.
Press under ½”/13mm on the short straight edge with button and buttonhole markings on both gussets. Turn another ½"/13mm and stitch along pressed edge.

Stay-stitch on the seam line, ¼”/6mm from the slashline on front and back of teddy, tapering to and pivoting at the box at the top of the slashline.

Now, cut on the slashline to the box.

With right sides together, match seam lines and boxes of the front gusset to the front of the teddy using a ¼”/6mm seam line. (Raw edges will not be even at the top of Slash.) Backstitch at box. I would NOT use a French seam here as it would be way too tedious.

Pivoting at the box, stitch adjoining side of front gusset to front.
Repeat with the back gusset. Press seams away from gussets.

Zig-zag raw edges together to finish.

STEP FOUR: FINISHING
Note: If you plan to finish your garment with lace edging or hand-scalloped edging, disregard Hem instructions below.
Press under ¼”/6mm on bottom raw edge, turn again ¼”/6mm and stitch close to pressed edge around leg opening, starting and ending at gusset edge.

Make two buttonholes as marked on Pattern Piece of front gusset. And, sew two buttons on back gusset. OR, you may apply snaps instead, which I did - using sew-on snaps.

My teddy is finished! I think it turned out pretty well. I love the color I ended up with. Remember if you dyed your garment fabric wash it by itself several times just in case it continues to bleed. With silk its best to handwash or dry clean.
The trickiest part of this pattern for me was the front and back gussets. You can practice beforehand if you have never done it before. For me, silk is the hardest fabric to work with but I love the challenge. It was so rewarding when finished - and feels luxurious and comfortable. I'll be wearing this to sleep! And maybe I'll make one to wear outside my home!


Several Folkwear pants patterns have drawstring waists, including 119 Sarouelles and 145 Chinese Pajamas. These pants are comfortable, easy to wear, and very easy to sew. They are also easy to fit, with lots of room (or ease). All these qualities make them popular options when picking a pattern for pants. Customers love them for casual day pants, pajama pants, and yoga or exercise pants.
Drawstring waists are very traditional and were used extensively for centuries to keep pants at the waist. However, the invention of elastic has made pants even more comfortable and easy to wear. I am going to show you how to add elastic to the waist of these drawstring pants of the 145 Chinese Pajamas, but the same instructions and ideas will translate for just about any drawstring pants.
First, check to see how wide the waistband finishes, which will help you decide which elastic width to purchase. Generally, you want to have elastic that is the same width or slightly narrower than the waistband width. The waistband of the 145 Chinese Pajamas finishes at 3/4", and I used 3/4" wide elastic. You definitely don't want to use elastic that is wider than the waistband's finished width.
If you want to still have a drawstring in the waistband for aesthetic reasons, or to help with waist fitting, you should leave the opening in the center front of the pants for the drawstring to be pulled through. Below you can see the two dots where I will not stitch the front together. You can also see the mark that shows where the waist will be folded down to make the waistband. This pattern does not have a separate waistband piece. Sewing tip: I used red tipped pins to indicate where to stop stitching.
If you do not want to add a drawstring to the elastic waist, simply sew right through the dots (or opening for the drawstring) in the center front.

Below you can see the front of the pants sewn together with the opening made for the drawstring. I've also finished the seams and pressed the top for the waistband. You can see the opening for the drawstring from the front when the waistband is pressed down in the second image below


You will sew your waistband down as normal, but leave a 1" to 1-1/2" (13-19mm) opening in the center back of the pants to feed the elastic through. You won't use the drawstring opening for the elastic because it is a bit small and when you sew the elastic together, you don't really want that seam in the front, if possible. So start and stop sewing the waistband at the center back as shown below.


Now you will need to cut the elastic for the waistband. You want to cut the elastic 1" (13mm) smaller than your waist measurement (or where the pants will fall on your waist). So if you waist measurement is 30", you will cut the elastic to be 29". Some people recommend 2" smaller than your waist, but you will also take out another 1" when seaming the elastic. And I find this the most comfortable, but you can test what you think is best as well. It is easier to cut the elastic slightly smaller once you've put it in the waistband than to add to the elastic if you cut too small to begin with.
You will feed the elastic through the back of the waistband. To do this, I use a bodkin, but you can also use a large safety pin. Try to keep the elastic un-twisted while feeding through the waist. And once through, make sure it is not twisted. Make sure you don't pull the tail end of the elastic into the waistband. You can pin it to the pants just outside of the waistband so it doesn't pull through.


Once the elastic is fed through the waistband (and make sure it's not twisted), take the two ends and overlap them by about 1/2" (13mm). Stitch together on your machine with a wide zigzag stitch or stitch a box with a straight stitch over the overlap. Be sure to backstitch and stitch over your stitches several times to secure the elastic ends together. This is a good time to try on the pants to make sure you like how the elastic fits. You can make adjustments now to make the elastic smaller if you like.

Tuck the elastic into the waistband.

Now topstitch the opening of the waistband closed.

The elastic waistband is complete. If you are adding a drawstring to the pants, you can do that now.

I made my drawstring from scraps left from cutting out these pants. I cut right along the selvage edge to make a long piece that was about 1 inch wide. I folded 1/4" (6mm) to the inside on both long edges and then folded the piece in half and sewed along that edge to create 1/2" wide drawstring. You want the drawstring to be your waist width plus at least 12 more inches to have a tie.

Feed the drawstring through the front opening of the pants, on the outside of the elastic that is in the waistband.


Once you have fed the drawstring through the waistband and it comes out again, make the two ends even and tie them how you prefer (or don't tie - it's up to you!).


Shortening pants legs, or sleeves, is one of the most basic pattern adjustments you might need to make. It is a simple step that can be helpful for getting pants (and sleeves) to fit correctly. Sometimes, it may seem best to just hem the amount you want to shorten out of your pants, but sometimes shortening at the hem changes the way the pants should fall or finish at your ankle. For instance, the 145 Chinese Pajama pants are slightly tapered at the ankle, and they have a cuff that is attached to the bottom hem. So, if you shorten at hem, the taper is removed a bit and and cuff won't fit quite right.
So, it is usually best to shorten at the lengthen/shorten lines indicated on the pattern pieces. I am going to show you how to do this simple step with our 145 Chinese Pajamas.
To know if you need to shorten (or lengthen) pants, you can measure your inseam and compare it to the inseam of the pattern. You could also make a muslin of the garment, try it on, and decide if it needs to be shortened. I like this option a lot because different patterns fit in different ways, so a muslin can help with all kinds of fitting issues. You can also use Swedish tracing fabric to trace your pattern, baste together and try on. Then make adjustments right from the traced pattern.
First, you want to fold out 1/2 the amount you want to shorten the pattern piece by. For instance, if you want to shorten pants by 1", you will fold out 1/2" of the pattern piece at the shorten line. This is because when you fold out 1/2", you are actually folding two 1/2" sections that are stacked on top of each other, so 1" is taken out of the pattern piece total.
Make sure you are folding out the same amount across the whole lengthen/shorten line.

When you have an even fold across the whole pattern piece, tape the fold so it does not shift when using the pattern piece.

That is pretty much all there is to shortening a pattern piece. The only thing that might be needed is to even out the edges where the pattern was shortened. This is called "trueing" the edges. You can eyeball this, or use a straight or curved ruler, depending on what your pattern might need and what you are comfortable doing. I used the very slightly curved end of a hip curve ruler to true my lines.

You can draw the lines in or trim the pattern pieces to fit.

And that is all there is to it! You can see a shortened pants leg below.


by Esi Hutchinson
When I realized the #145 Chinese Pajamas would be the featured pattern for the month of February, I got inspired by the lines of the jacket to make a modern jacket for myself from the pattern. In this post, I am going to do a sew along, as well as show you the modifications I made for my jacket.
We also just made this pattern available as a PDF pattern you can get it here! The pattern is unisex and goes up to size 2XL, and includes the cuffed jacket and drawstring pants. The jacket is fully lined with four pockets and one inside pocket! The casual loose-fitting pants can be made with a drawstring or elastic if you prefer. To add decorative flair, the cuffs of the pants, pockets and collar of the Jacket can be made of contrasting fabric. The jacket is fully lined and if you make the full length sleeves, they are folded back to reveal the lining - so the lining can also be made of a contrasting fabric as a design feature.
While this pattern comes with the Jacket and Pants to be made into a pajama set, I'm always thinking of how to change up Folkwear patterns to fit my style, especially if it is a more westernized rendition. The true characteristics of this jacket that originated in Chinese culture is the mandarin collar and button-loop frogs front closures. The sleeves are constructed in a way that many older, traditional garments are made (compared to how most jackets and shirts are made nowadays). You will see when reading this blog post.
I'll be showing how I made this jacket using scraps from previous Folkwear projects. There are so many fabric scraps that we sewist accumulate, why not make some more garments from them?
Fabric and preparation
If you want something that is light and drape-y, use soft and flowy fabrics such as silk charmeuse, synthetics, cotton voile, linen or silk velvet (that would be fun). For a more structured look and feel, use lightweight wool, brochade, denim or corduroy, you can also use twill or other similar fabrics. Medium-weight silk and cotton would be great as well. For the Lining, use a fabric that is either similar to or lighter weight than the main fabric. Check out our fabric collection in case there is something that you might like for this pattern. Pre-wash your fabric before cutting. If you are going to use a thicker fabric, consider going up a size in the pattern for possibly a more comfortable fit, especially if you plan to wear it over other clothing.
Optional: You can buy contrasting fabrics for any of the pattern pieces. Make sure it's a similar weight and feel, as you want the structure of the jacket to remain the same. The sleeves, collar, and pockets can be made from different fabrics. For my jacket, I used denim for my pockets because I want them to be sturdy (since I often put my phone in the pocket). I also used denim for the outside of collar D (for the facing, I used my lining fabric).
I picked out some dark indigo shades of denim and green is my favorite color right now, so I was happy to see the big scrap of green twill we had left. I used a scrap of raw silk for my lining, which looks nice and also makes it warmer.

The jacket is quite long, and generally should hit the mid to upper thigh. I shortened it by about 6" (15cm).
To shorten, make a pleat along the marked adjustment line equal to one-half (for me it was 3" (7.6cm)) the amount you wish to shorten, pin or tape in place.
And if you wish to lengthen (you could definitely make a long coat from this pattern), slash along the marked adjustment line; place extra paper underneath and spread the split pattern pieces as necessary; pin or tape the added paper to the pattern pieces. Smooth the lines between the new lengths.

NOTE: If you shorten the front and back of the jacket, you will also need to shorten the front facings by the same amount (you can see the pieces I shortened above).
I also shorted the sleeves by 3" (7.6cm). The sleeves in this pattern are quite long because they are supposed to be turned up as a cuff, to show the inside lining fabric. I did not want a turned up cuff, so shortening by 3 inches made the sleeves the correct length for me. Make sure when shortening your sleeve you give enough room for the attachment to the lining. You are suppose to be able to fold ½” (13mm) to the inside and then another 1” (2.5cm) more, so be sure to keep 1½” (3.6cm) for this step. You can also see what I did to modify this when getting to the sleeves and lining below.

Cut out all your pieces. Be sure to cut out the pattern pieces from the correct fabric and lining that you choose. Follow the instructions for which pieces to cut (and how many!). For the facings, you can cut from your main fabric, or from the lining fabric to reduce bulk.

My main body pieces and facings.

My sleeves, pockets, collar, and linings.
NOTE: Pressing is as important as careful sewing. Construction goes more smoothly, and the finished garment looks better if you press as you sew. Be sure to press all seams flat to set the stitches; then press seams open or to one side, as instructed. Experiment with different heat settings and pressing cloths on scraps of the selected fabric before pressing actual garment pieces.
Lets get started! I am going to go through how I made this jacket. Similar to a sew along, but I have made a few changes to the pattern to suit my taste.
JACKET BODY:
STEP ONE:
Staystitch neckline edges of front and back outer and lining pieces.

With right sides together, sew Top Pocket to Top Pocket Lining pieces along straight edge. Press seams open. Repeat with Bottom Pocket and Bottom Pocket Lining pieces.

With right sides together, sew Pockets to Pocket Linings along outer curved edges, matching notches and leaving open between dots. Trim seam allowances, turn right side out, and press. Slipstitch openings closed. I pressed under to topstitch for the next step.


Pin Pockets to Fronts where marked on pattern pieces, and topstitch in place. Backstitch at top corners or pull thread tails to wrong side and tie off. My fabric is so dark I didn't feel the need to do that, however it does make a nicer, more professional finish in my opinion. And if you feel the pockets will get a lot of wear, you can put a bar tack at the top of the corners of the pockets.

With right sides together, sew Fronts to Back at shoulders. Press seams open.

COLLAR
Staystitch neckline edge of Collar pieces.

If you want to use interfacing do so now. Fuse or baste interfacing to wrong side of one Collar piece. I did not use interfacing since my main fabric was fairly heavy and stiff.
With right sides together, sew Collar pieces together along outer edge. Trim seam allowances, turn to right side, and press. Remember, I cut my second collar piece (collar facing) out of the lining fabric.

With right sides together, sew neckline edge outer Collar to Jacket neckline between squares at center front, matching notches at center back. Clip neckline edge as necessary to fit.

Clip neckline seam allowance to squares. Press seam toward Collar.

Turn under remaining Collar neckline edge by ½” (13mm) and slipstitch it to neckline seam, covering the stitching.
SLEEVES AND SIDE SEAMS
This sleeve design is a little different than typical modern sleeves (but it is more similar to traditional/folk sleeves). With right sides together, sew SLEEVE C pieces to Jacket at armholes, matching notches. Press seams open.


With right sides together, sew underarm/side seams from Sleeve hem to star below the square, matching notches and backstitching at star. Press seam open, clipping underarm curve as needed.

Clip to star.

INSIDE POCKET
Fold inside Pocket right sides together and stitch around outer edge, matching notches and leaving open between dots. Trim seam allowance, turn right side out, and press. Slipstitch opening closed.

Pin inside Pocket to Lining where marked on pattern piece and topstitch in place. I am right-handed so I placed the pocket on the left front lining.

FRONT AND HEM FACINGS
With right sides together, sew Right Front Facing to Front Hem Facing, matching notches and ending stitching at dots. Sew Left Front Facing to remaining Front Hem Facing, matching notches, and ending stitching at dots. Press seam open.

With right sides together, sew two Side Slit Facing pieces to each Front Facing assembly, matching double notches, and ending stitching at dots. Press seams open.


With right sides together, sew remaining Side Slit Facing pieces to Back Hem Facing, matching double notches, and ending stitching at dots. Press seams open.

Press under ½” (13mm) along inner edges of each Hem Facing assembly.

Clip side seam allowances of Front and Back lining to star. If you didn't clip to the star on the outer fabric above do it now.

With wrong side of Right Front Facing to right side of Right Front Lining, edgestitch along inner pressed edges. I suggest Basting outer raw edges together.
Repeat with Left Front Facing and Left Front Lining.
NOTE: Front edge of Facing G piece will extend beyond Lining Front edge.


Repeat with Back Hem Facing and Back Lining.

Here I am undoing what I did to edgestitch along the inner pressed edges of facings to Lining.

Left Front.

Back piece.

LINING
With right sides together, sew Front Lining pieces to Back Lining at shoulders, matching notches, as you did with fabric pieces. Press seams open.

With right sides together, sew Sleeve Lining pieces to Jacket Lining at armhole, matching notches, as you did with fabric pieces. Press seams open.

With right sides together, sew underarm/side seams from Sleeve Lining hem to star, matching notches and backstitching at star, as you did with fabric pieces. Press seams open, clipping underarm curves as needed.

With right sides together, slip Sleeve Lining over Jacket Sleeves and sew Lining to Jacket along left Front Facing edge, from square at top to bottom edge. Press seam toward Facing.
Starting at right front neckline, pin Lining to Jacket body, aligning hem edges, matching stars at Side Slit.
. 
Fold Left Front Facing along foldline. Baste, then stitch, pivoting at tops of Side Slits. Trim seam allowances.

Fold top of Left Front Facing at foldline, matching square, and sew across top from square to outer edge. Trim seam allowance, turn Jacket right side out through neckline, and press.

Turn under ½” (13mm) along Lining neckline edge, clipping curves as needed, and slipstitch to Collar seam. Sew a few extra stitches at shoulder seams to reinforce.

Pull Sleeves to inside of Jacket (wrong side out). Matching raw hem edges. If you baste the raw edges together it is helpful.

I changed up this next step a bit to work for the jacket I made (which does not have the "turned up" sleeve cuffs). I turned the outer sleeve hem under by 1/4" (6mm) (instead of 1/2") and then under again by 1/2" (13mm) (instead of 1") and pressed. Then I stitched the folded pressed edge to secure the outer jacket to the lining. You could also slipstitch the hem, catching only the folded edge and lining so the stitches won't show on the right side.

Instead of adding in the button-loop frogs front closures as the pattern calls for, I made buttonholes on the right side of the jacket front about 3/8" (1cm) away from the right front seam. I also re-spaced the buttons since I shortened the jacket so much.

To place the buttons I laid the Right front over the Left front extended facing, making sure not to overlap the collar. The end of the buttonhole is where I placed the farthest hole in the button on the left font facing. This keeps the facing from being seen when the jacket is buttoned.

Here is the finished Jacket!!! I really like the combination of colors I used. I love Jackets, and I volunteered quickly to make this one for myself, as well as to create this Sew Along. This jacket is now part of my big Jacket collection! I hope you enjoyed this sew along and please show us what you make from 145 Chinese Pajamas.


by Victoria Watkins
When I made a test sample for the 510 Passionflower Top, I quickly noticed that I would qualify for a small bust adjustment. At first I was worried that the process of fit adjustment would be too difficult, but I was able to get a nice fit with the help of Molly's guide to adjusting this top. Today I'll talk a little bit about the process of fitting the bodice to my own measurements and body.
First, Molly discussed how to find out your cup size. A difference of 1" between high bust and full bust counts as an A cup. Upon measuring, I found that my own chest was actually closer to a half inch of difference. (I wonder how you'd refer to that? A-minus cup?) However, just as a starting point, I decided to use the math and proportions for a regular A cup like described in the original guide. If it was too wide, I could bring it in later. However, I found that the ease was alright for this pattern, since it's more of a flowy, comfortable piece. For this reason, I didn't increase the width of the darts any more than outlined in the original post.
The placement, height, and direction of the bust apex is a huge factor on how this pattern will fit. In the pattern, apex is assumed to be about 1.5" above the center dart point. However, every body is different. You may need to adjust the apex point on the tissue to be where your bust fits. This may be .5" to 1.5" from the dart point.
After making the first muslin and trying it out, I noticed a few issues that needed to be corrected. It seemed like there was some slack at the center front seam of the bodice, and the cups looked very pointy and didn't conform to my body as I'd have liked it to. I consulted with Molly, and she let me know that I should shorten the darts to give myself at least a half inch of room from the dart point to the apex.

So, that's what I did with the second muslin. I kept the width of the darts the same at the bottom and drew a new point, tapering the new dart legs to that spot for each one. You can see the original darts (blue) and the new ones (purple) in the photo below. This fit was closer, but it soon became apparent that I'd have to squish my chest together unnaturally to get the cups to fit. I needed to move the darts toward the side seams a little bit in order to accommodate my wider bust points (i.e. they are not as close to each other as the pattern tissue would have them).

In order to determine how much to move the darts, I marked where my actual apex sits, directly onto the muslin. Since the centermost dart should sit directly under the apex, I was able to measure the distance between the two and move the darts in that direction. To move the darts, I simply cut into the most recent muslin, moved the cut piece to the left the appropriate amount, and taped it down.

When tracing a new piece out of the cut one, I made sure to smooth out areas of the pattern to maintain the hemline. Once I tried out this fit, I was pleased enough with the results to call it a day!
When you do this process for yourself, the measurements and proportions may be entirely different to what I've described here, or what the Small Bust Adjustment post by Molly outlines. Every body is different, so do your best to make an educated guess on how to start, then refine from the initial attempts. The custom-fitted clothing will be worth the efforts in the end!

by Molly Hamilton
About 5 years ago, I bought several meters of a beautiful wool plaid when I was in England. It was a wide fabric that was 100% raised, milled, spun, and woven in England. And, it was such a pretty fabric and was so "local" that I was smitten. Of course, it was quite expensive, but I bought some anyway thinking that I would figure out what to do with it at some point - hoping to make a jacket or coat. And so it sat in my fabric stash since then. It finally stood out to me the other day when I was looking through the fabric for something else. So I pulled it out and laid it out and thought about it for a few hours. I thought about making our 230 Model T Duster from it (we just put out the PDF version), modifying it to be shorter (and adding different fabric for the facings). But even shorter, this would have been a stretch with the small yardage I had, plus all the seams (princess seam, back seam with a pleat) would have made matching the plaid impossible with the yardage I had. And that much unmatched plaid would have driven me crazy. Plus I really wanted to show off the plaid and not cut it up too much since I think it is so pretty. Esi saw me contemplating the fabric and suggested the Basics Overcoat. Which was a brilliant suggestion. It is simple, I could easily shorten it (and make it smaller), and it has large pattern pieces so I wouldn't have to break up the plaid. But I did make some changes to the pattern to get the results I wanted and to make the most efficient use of the fabric.
 My fabric!
I only had 2 meters (2.2yards) of the fabric. But it was 150cm (about 60") wide. So, I obviously did not have enough to make the entire, full-length coat. But with some modifications, I could make the Basics Overcoat pattern work.
 The fabric is folded in half, and you can see that the pattern "as is" doesn't really fit on the amount of fabric I have available.

First, I traced a size XS for the pattern (I used Swedish tracing fabric). This is still very wide so if you needed to, you could narrow the width at the shoulder and make the sleeve a bit longer. But it worked for me, as I did want to use as much fabric as possible. I shortened the pattern, taking about 12" (30cm) from the bottom. I also decided to make the turned-under facing on the front as a separate piece. This saved a lot of fabric and I could make the facing with a linen that coordinated well. If you do this, remember to add the 1/2" (13mm) seam allowance that you will need. I also cut the back on the fold rather than as separate pieces. This kept the plaid intact and saved a little more fabric. I had to make sure to take out the 1/2" (13mm) seam allowance for this modification. You can see how the pattern is laid out above.
With these modifications, I could fit all the pattern pieces on the fabric! I couldn't match the side seam plaid, but it wouldn't be terrible, and it was something I could definitely live with.
I cut the front facings from a coordinating linen using the front facing from the front piece, but adding a 1/2" (13mm) seam allowance so that it could be sewn onto the fronts.
I also wanted the coat to have a bit more heft to it, so I decided to fully line the coat with a winter white wool gabardine we had in stock. It is medium-weight and drapey, and coordinated well, so I thought it would be great. And it was easy to sew with, very warm, and gave the perfect amount of heft to the coat.
To make a full lining, I cut the lining with the front and back pattern pieces: cutting the back on the fold, and cutting the front to where the facing folds over, and adding a 1/2" (13mm) seam allowance. So the front lining pieces were about 4" (10cm) narrower than the front pieces. I also cut the lining a few inches shorter than the outer coat.
I sewed the facings to the lining first, along the front. And I sewed the outer front and back together at the shoulder and side seams. And I sewed the lining front and back together at the shoulder (leaving the facings free) and at the side seams.
Then, with right sides together (back of lining to back of outer fabric), I sewed the facing (that was attached to the lining) to the front of the outer fabric on both sides. And I turned the coat so that the inside of the lining and outer were facing each other. Now the coat is lined!
I basted the neck together. But, I also wanted some stability and for the lining to not bulge out or move too much when I wore the coat or took it on and off. So I did a technique used in the padded jacket of 112 Japanese Field Clothing and the lined coats of 114 Chinese Jacket, and I sewed the seam allowances together inside the coat. I sewed just in the seam allowances and just on one side of the seam allowance of each one. I did a few with the machine, but honestly, it was just as quick and much easier to do it by hand. I did the shoulder seam allowances too. Sewing these allowances together is more like basting. The stitching doesn't have to be precise or short. This is just to keep the lining from moving around much.
After I did this, I basted the sleeve lining and outer fabric together at the cuff seam also. I basically followed the instructions in the pattern from there on. I did baste the collar on by hand before sewing it on (this is a trick I often to with tricky collars, which in my opinion are most of them). And for the hem, I folded the outer coat up and sewed it by hand to the lining. You might notice in these photos that the back is hanging a bit funny at the bottom. I need to pick out that section of stitching and re-sew the hem to the lining. It is bagging a bit. But that is an easy fix - and something that can happen with lined coats. Just need to be a bit careful, and sometimes hang them.


I did find that this wool did not press easily. But I love the smell of the wool with a warm iron and steam (maybe that's a bit strange?). And I didn't mind the mis-matching plaid side seams. I am really happy with the coat! I need to put buttons on it, but that has always been something I usually wait on doing. I will figure out which buttons I like over the next few weeks and add them when I am ready!


I hope this coat inspires you to think about what you can do with this pattern (and the special fabric you might have in your stash)!
Let me know if you have any questions about this pattern or what I did!
 Wearing my coat in our office warehouse. Boxes and boxes of patterns behind me!

by Esi Hutchinson
This short blog post will focus on the optional lace insertion for 510 Passionflower Lingerie Top. Adding lace insertion to this pattern can really up the wow-factor. You can add lace to the bodice, on the outer layer or through both the outer and lining for a more see-through look. Folkwear has another blog post about lace insertion that you can refer to for more information and some basic instruction: How to sew Lace Insertion.
For the Passionflower Lingerie Top, you will need about 1-1⅝yds (.9-1.5m) lace. You may need less if you are just wanting to add to the front bodice pieces, or if you just want to add a small design. Before purchasing lace, you can measure the area you want to cover with lace insertion to get a more accurate understanding of how much lace you will need.
I used a synthetic black lace. Be aware when using synthetics to be careful when pressing, use a low heat setting, or else you might melt the lace (and ruin your iron).
For this demonstration, I only cut out the bodice pieces A and B as well as the Lining and followed the instructions for only the Bodice construction. Construction of the bodice goes forward as normal.
 Wrong side of my bodice pieces (outer and lining).
 Front bodice outer and lining sewn together.
 Front bodice turned right side out with lining.
Beginning of Lace Insertion
Pin the lace near the top edge of the bodice, or wherever you wish to have the lace. As you are stitching you may have to adjust the lace depending on the stretch of the lace.
Stitch the top and bottom of the lace about 1/8-1/4" (3.2-6.4mm) from the lace edge with a short straight stitch or a narrow zigzag stitch. Use a narrow zig zag stitch if your lace has a lot of stretch.

Turn to the inside of the bodice and spread the outer layer open the lining. You will cut the lace leaving about 1/4"(6.4mm) seam allowance. Be very sure not to cut into the lace or Lining.
 Here I am cutting away the fabric from behind the lace, leaving about 1/8"-1/4" (3-6mm) allowance.
 Here all the fabric has been cut away from behind the lace.
Press the seam allowance away from the lace, if your lace is synthetic press lightly and/or use a low heat setting.

Now, stitch close to the pressed edge, with a short straight stitch or a narrow zigzag. This keeps the cut edge out of the lace, finishes more cleanly and helps prevent fabric from fraying.


Now you can fold the bodice lining back down and proceed with the pattern. If you want, you can do this same process with the lace through both layers of the bodice (outer fabric and lining). This will make the top a bit more see-through which can be a fun effect. You will need to deal with both layers in the seam allowance, but careful pressing and sewing the edge can work well. A very light-weight fabric that does not fray easily is helpful.


