-
Sewing Patterns
-
Fabric
- Sewing Supplies
- About
- Blog
- Gallery
-

Our new 510 Passionflower Lingerie Top expands our size range to 4XL (58" bust). And since this pattern relies so much on the bust fit, we also offer each size with three cup options (B, C, and D). We want to help you with sewing fit, so this post will show how to measure to get your correct size and how to make a Small Bust Adjustment (SBA) in case you are an A cup (as I am).
To figure out which size, and cup size, is best for you, look at the size chart. The bust measurement is going to be the most important for this pattern, but you can also look at the finished measurements to make sure the empire waist (just below your bust, or mid-ribcage) will fit. I am on the larger end of a size Small, so I usually check finished measurements and cut a size Small. If I need to adjust to add a little bit at the hips, I will grade out to the next size up, but with this pattern there is so much ease in the hips (it's basically a circle skirt) that I don't need to worry about that.
To find your bust cup measurement, you need to take your high bust measurement and your full bust measurement. The difference between the two gives you your cup size. If there is a 2" difference, cut a B cup; if a 3" difference, cut a C cup; if a 4" difference, cut a D cup. So for instance, if your high bust measures 34" and your full bust measures 37", you will cut a Medium size from the C cup front piece (37-34 = 3" and 37" bust is our size Medium).


High bust measurement

 Full bust measurement
The difference between my full bust and high bust measurement is 1", which is an A cup. So, for this pattern, the B cup will be a bit large and can have some bagginess that I might not like. So I am going to show you how to make a Small Bust Adjustment (SBA) for this bodice piece in case you need to make this adjustment also. I highly recommend making a muslin (or two or three) to make sure the fit is how you want it to be. Every body is different. Your bust apex may be different, or your shape may need other adjustments. A muslin will help you get a better fit even after this SBA.
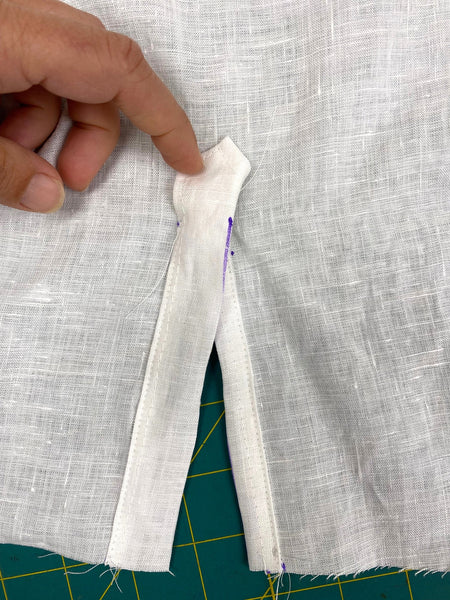
Small Bust Adjustment for Passionflower Top
First, it helps to outline the darts in the size you are making with a colored pencil or marker. I used yellow below. Then draw a line through the center of the center dart, up through the dart point. I drew this is pink below.


 The bodice piece with seam allowance noted, darts outlined, and line through center dart (and apex) drawn).


by Esi Hutchinson
Folkwear is excited to introduce our new sewing pattern, 510 Passionflower Lingerie Top. The babydoll sewing pattern is sized XS-4XL with three cup sizes for each size. The full, above-knee skirt has an open front and drapes beautifully to a slightly lower length in the back. Instructions for optional lace applique and lace insertion are included in the instructions. I'll soon have a blog post showing how to do the lace insertion for this garment, so stay tuned!
While this pattern makes really cute sleepwear babydoll lingerie, it also can be a great casual top to wear in warm weather. For this sew along, I will be making the Passionflower Lingerie Top into a shirt you could wear casually. It has a charming character to it with the curved skirt and picot hem finish that allows it to curl at the edges - it's very cute!
Lets get started!
Fabric and preparation
Fabric suggestions for this pattern include lightweight or medium-weight cotton, cotton gauze, linen and blends, voile, batiste, rayon challis, silk, charmeuse, and very lightweight silk velvet with drape. You want something that is light and with a good drape. For lingerie, you might want to try something sheer or semi-sheer. For this top, I used an organic cotton voile in a dusty pink. I used the same fabric for the bodice lining, though you could choose a different fabric for the lining (especially if you are sewing with sheer fabrics). Folkwear has several colors of these cotton voiles in our fabric collection in case there is something that suits you for this pattern. I always recommend that you pre-wash your fabric before cutting the pattern out.
Optional: If you are doing lace applique and or lace insertion you will need 1-1⅝ yds (.9-1.5m).
Optional: If you like, you can use 1¼yd (1.1m) ribbon for straps instead of the strap pieces for the pattern. This can look really nice if you also add a ribbon applique to the top of the bodice (you'd want more ribbon then - about 3 yards).
Fitting and cutting out the pattern
You need to choose the size that best fits your bust and waist measurements, with bust being the most important. Also look at the pattern's finished measurements. The waist of the top, is an empire waist is fits just below the bust. You can measure there to make sure the fit is going to work for you at that point.
Once you choose a size, you will need to choose the bodice cup size to fit your bust. To find best cup size, measure your full bust and high bust. If there is a 2” difference, choose B cup; if a 3” difference, choose C cup; and if a 4” difference, choose D cup. If have a 1" difference, stay tuned - we will have a Small Bust Adjustment tutorial very soon. I used the B cup for this pattern. To make it easier to see the dart lines (or cutting lines) on the pattern, I use a marker to outline the size I want along the appropriate line(s).
Cut out the pattern pieces for your size, and refer to the Yardage chart for finished measurements as well if you need to adjust any of the pieces.
STEP ONE: Bodice Construction
It's helpful to highlight the darts for your size, so you don't get mixed up with the other dart placements.

Transfer the dart lines on the outer fabric and lining of the Bodice A. I used tracing paper and a tracing wheel.

With right sides together, sew the three darts on Front A pieces. Be sure to have the dart lines transferred to the wrong side of the fabric so it is easy to see where to pin and sew. It is helpful to sew each dart separately before pinning the other darts out. Instead of backstitching at the point of the dart, sew off the fabric and cut long threads then tie the thread ends together several times to secure. This makes a cleaner dart point. Press darts flat, then press toward Center Front. Repeat with Front Lining pieces.

With right sides together, sew Front pieces together along Center Front seam. Press seam open. Repeat with Front Lining pieces. You don't need to finish these seams as they will be enclosed in bodice.

With right sides together, fold Strap in half lengthwise and stitch long edge. Trim seam allowances. NOTE: As an alternative, you may use satin or lace ribbon for the strap.

Turn Strap right side out, and press.

Baste Straps to right side of outer Front (not lining) between dots, as indicated on pattern, matching raw edges.

With right sides together, sew Back pieces to Front at sides, matching notches. Press seams open.
Repeat with Lining pieces.

With right sides together, sew the Front/Back outer fabric to Front/Back lining along Center Back, underarm, and neckline edges, matching Center Fronts and side seams, and taking care to keep open strap ends clear of stitching. Trim seam allowances and clip corners. Turn right side out, and press. On Lining, press up ½” (13mm) to the wrong side, or inside.

Turn right side out, and press. If you want to add a lace insertion or applique do so now. We will have a lace insertion blog soon. If you want to applique lace, or ribbon, to the top of the bodice, place where you want it and pin in place. Use a short stitch to secure the lace or ribbon along the outside of the piece(s). You can stitch through both outer and lining layers, or you can open the bodice up and stitch through the top/outer layer only.

STEP TWO: Skirt Construction
With right sides together, sew Skirt Back pieces together along Center Back seam, leaving skirt open above notch. I finished this seam with French Seams. Press seam open, or press to one side if using French Seams, and press seam allowance open above stitching on both sides.

Press under raw edges of seam allowances by ¼” (6mm) along unstitched portion of Center Back, and press under again by ¼” (6mm) to enclose raw edge.
Topstitch close to pressed edges, pivoting at notch and crossing over seam allowances to return on opposite side.

With right sides together, sew Skirt Front pieces to Skirt Back at side seams, matching notches. Again, I used French Seams here.

Staystitch top edges of Skirt by stitching ⅛” (3mm) away from seamline, in seam allowance, using short stitches.
To create the picot skirt hem, set machine on long, wide zigzag stitch and sew along bottom and front edge of the Skirt. Work with the wrong side of fabric facing up and be sure that outer swing of machine needle encloses the raw edge. NOTE: If your fabric unravels easily, you may want to press under the raw edge ¼” (6mm) before beginning so that the swing of the needle encloses the pressed edge. Also, you may want to tighten the upper thread tension to create a scallop effect. The picot stitching gives the hem a bit of a wavy effect.
Instead of this picot edge, you could also finish the hem by serging, hand or machine roll hemming, pressing under raw edge and slipstitching, or topstitching lace edging to raw hem edge. These options all give a bit of a different effect and provide many options for the hem.


Overlap the curved Center Fronts of Skirt by ½” (13mm) and baste across overlap along top edge. Make sure raw edges of overlapped top edge are matching, so Skirt Fronts will drape correctly.

STEP THREE: Skirt and Bodice Finishing
With right sides together, sew Skirt to bodice outer fabric only, matching notches and side seams. Clip Skirt seam allowance close to staystitching as needed to ease in stitching. This can take a little bit of finaggling to get everything lined up, but the staystitching and clipping really help. Press the seam toward bodice.
Optional: Instead of sewing just the outer layer of the bodice to the skirt, you could baste the raw edges of the Outer Bodice to the Lining and sew both, as one piece, to the Skirt. You will need to finish the raw edges with a zig zag or serger like I did below on another sample I made of this pattern.


Outer layer of bodice pinned to skirt.

Press under ½” (13mm) to wrong side on Lining if you haven't done so already.

Slip stitch pressed lining edge over previously stitched seam, encasing the seam.

STRAPS
Pin Strap ends to inside of Back pieces where indicated on pattern pieces. Adjust for fit or comfort.
I drew a line indicating the final length, and a line ½” (13mm) below it indicating the cutting length. Where my finger is, is where I will cut the strap to fit my body.
I folded the strap into itself by ½” (13mm) and pressed.

Stitch the strap end to inside of the back bodice between the dots. I stitched very close to the edge of the bodice. You could also slipstitch this close to the edge for an invisible seam. Matching thread also helps, but I wanted the seam to show for this sew along. Another option that I tried and liked, is to finish the ends of these straps (you can do that when the sew the straps by sewing one short end together when sewing the long side together). Then, you can tie the straps behind your neck to make a halter style top.

Now just sew a bra closure, hook and eyes, or snaps to inside of Bodice at Center Back. I prefer snaps for this top, but a bra closure or hook and eye are perhaps more secure.

If you don't like the gap in the back of the skirt, you can sew on more closures, like snaps, to close it. I don't mind it at all so I left it open. The snaps provide a bit more overlap in the back also so it doesn't gape.

Now you are finished with your 510 Passionflower Lingerie Top!

Looks cute with a jacket!

And with jeans!


And I love the back!

This babydoll lingerie top is perfect in lightweight fabrics with good drape. You can sew it up with anything from cotton to silk to rayon. You can make it with sheer fabrics or seme-sheer fabrics for sexy lingerie, or you can sew it up in solids or prints for a fun summer top.
The pattern suggests lightweight or medium-weight cotton, cotton gauze, linen and blends, voile, batiste, Swiss dot, rayon challis, silk, charmeuse, or very lightweight silk velvet with drape. If you use charmeuse or another slippery fabric, we highly suggest checking out the tips for sewing with these tricky fabrics. And if you choose lace or sheer fabrics, we have another blog post with lots of tips for sewing with them too.
So, now I want to provide some suggestions for fabric that I think would be great to use for this pattern.

First, Folkwear has a few great fabric options. We have some beautiful organic cotton voiles in several colors. This one is called Alma and is very pretty. You can see others in our cotton fabric section. We've used these fabrics to make several samples. The fabric in the very top image is our teal voile.

I absolutely love a silk/cotton blend, and this one from Harts Fabrics is gorgeous with a beautiful sheen. They also have several colors of this fabric in stock!

This silk charmeuse (also from Harts Fabrics) is a unique color and very pretty! This lingerie top would feel so luxurious in this fabric.

This Nani Iro double gauze from Bolt Fabric Boutique is lovely and would make a fun top in for this pattern. There's a little metalic woven throughout this fabric.

I also love this semi-sheer burnout velvet from Marcy Tilton Fabrics. This would be so gorgeous in this pattern. Helpful hint for using fabric that is expensive - you can make the bodice lining from a different fabric (a cheaper silk or lining fabric).

Finally, this silk chiffon from Oak Fabrics is fun and pretty and would make a very sexy lingerie top!

by Esi Hutchinson
Folkwear recently made 114 Chinese Jacket into a PDF pattern as well as updating the size range to XS-3XL. This pattern features 3 jacket views with 3 different lengths (short and fingertip length for Views A and B and short, fingertip length and long (mid-calf) for View C). We are excited to be able to offer the pattern as a PDF (it has been often requested) and to have a larger size range.
This sew along will focus on View B with the fingertip length for the Jacket, but will aide you on the other views and lengths of this jacket. View B is fully lined, has facings on the outside, and incorporates all the sewing techniques all the views have to offer. I will be eliminating the piping trim as well as the embroidery embellishment since the fabric chosen for this jacket is has its own flair.
This pattern incorporates decorative facings, trims, and embroidery designs traditional to the Chinese culture, though some have also been fitted in a more western context because of history of trade, war, and peace. In addition to the research given in the pattern (historic information, lore, and traditional embellishments), we encourage you to continue to research and gain respect for what this culture and history has allowed Folkwear to share with the world.
On that note, lets begin!
Fabric
To make View B of this Jacket, you need to pick an outer layer fabric and a lining fabric. If you want to make your own frog closures or bias for contrasting piping (if you are using them - instructions for this are in the pattern, but I won't be showing that in this tutorial), you will need additional contrasting fabric.
Fabric suggestions for this pattern include silk, or silk-like synthetics, medium and light-weight cotton, or even lightweight wool. For linings you can use lightweight silk or cotton. Since the front and back are cut as one piece, it is best to not use fabric that has a one-way design or nap. If you happen to strongly desire to use a fabric like that, we suggest you use the same "hack" Cynthia did when making the 122 Hong Kong Cheongsam with a directional print.
I chose a teal brocade we had in the shop and a pink silk dupioni for the contrasting facings. For the lining I used an organic cotton voile we had in stock in a coordinating teal color.

Other than thread, no other notions are needed for this pattern, but if you are planning to embellish with embroidery or paint (or make frog closures or piping), read the instructions in the pattern for further notions.
Cutting out the pattern
One of the things that is important to do with this pattern is to tape pattern pieces A and B together at the shoulders and cut as one piece with no shoulder seam. This is typical for many traditional clothes from Asia - and it wastes less fabric.
For View B, the facings are on the outside, so using a contrasting fabric is an important design element. When cutting these facings, be sure to place them as indicated on the pattern. Most of them are placed printed side down (this will be important if your facings are one-side print). Also make sure you note which length you are cutting for the facings and for the front/back.
Also, be sure to cut the Overlap (C) with print side down when cutting the lining.
Step One: Front
With right sides together, stitch Front/Backs of Outer Layer together at center back, matching notches. Press seam open. If your fabric unravels a lot use a serger or zig-zag to finish the raw edges.

Stitch Front Overlap C to the left-hand center front edge with right sides together, matching notches. Press seam open (finish if desired).

Step Two: Armband
Instead of applying the flat piping to the armbands or facings I simply pressed under 1/4" (6mm) on unnotched edges.
Baste notched edge of Armband I in place on Sleeve D, 3/8” (1cm) from edge, matching notches, with wrong side of Armband to right side of Sleeve.
Blind-stitch or top stitch folded edge of Armband to Sleeve. I top-stitched on the folded edge.


Right sides together, stitch Sleeve D to Front/Back A/B, matching notches. Press seam toward Sleeve.
 I had to place the jacket on the floor so you could see the whole thing folded out!
Step Three: Side Seams
Fold the Jacket at shoulders, right sides together, and pin underarms and sides of Front and Back together, matching Sleeve seams. Stitch from sleeve cuff to the bottom hem, and stitch again at the underarm curve to reinforce the curve. Clip curves as necessary and press seam open.

Step Four: Jacket Lining
To make the Jacket Lining, follow the steps above (omitting the facings), but attach Front Overlap C to right-hand center front edge, right sides together. Omit the armband step.

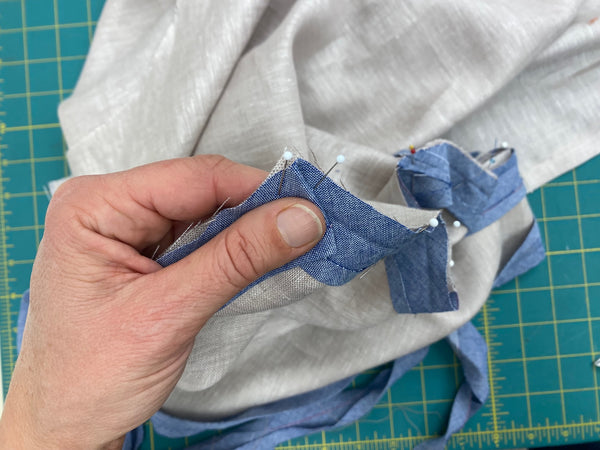
Lay Outer Layer, turned inside out, on table (or floor), with Back up and Sleeves spread out. Lay Lining on top of Outer Layer, also turned inside out, but with Front up.

Outer Layer and Lining will be back-to-back.

TO HOLD LINING IN PLACE: Spread side and underarm seam allowances open. Pin Front seam allowances of Lining and Outer Layer together and stay-stitch by machine- or hand-basting 1/4” (6mm) from raw edges of Sleeve and side seam allowances, leaving the underarm curve free. The idea is to stitch the seam allowances together so that the lining stays in place when turned inside the jacket.


Turn the Lining right side out to the inside while turning outer layer right side out as well. Smooth layers together carefully and pin raw edges of Outer Layer and Lining together.


Machine- or hand-baste layers together at neckline, cuff, side overlap, and bottom of Jacket, stitching 3/8” (1cm) from raw edges.

Finish right-hand center front edge by turning under both layers 1/4” (6mm), turning under again 1/4” (6mm), and stitching. You are just creating a narrow hem here.

Right sides together, stitch Neck Facings E together at center back, matching notches.

Stitch left center front of Neck Facing E to unnotched straight center front end of Overlap Top Facing F. Press seams open.

Finish unnotched edge of Neck Facing/Overlap Top Facing with pressing under 1/4" (6mm) or with bias piping (instructions are in the pattern). Press seam toward Facing.

Finish Overlap Side Facing G by pressing under 1/4" (6mm), or piping, in same way on unnotched edge. Right sides together, stitch mitered ends of Overlap Facings F and G together, matching notches.

Press under 1/2” (13mm) seam allowance on either end, at neck E and at mitered bottom end of G Piece.
With right side of Facings to Lining of Jacket, pin raw edges together, carefully matching center back and front seams and notches 5, 6, and 7. Stitch as pinned, maintaining an even 1/2” (13mm) seam allowance.

TO JOIN HEM FACINGS
1. Stitch two opposite Hem Facing Pieces J at notched ends, right sides together, to form Back Hem Facing.

2. Stitch remaining J Pieces on both unnotched end of Back Hem Facing.

3. Stitch Overlap Hem Facing K to J on left-hand side (when right side up), matching notches. Press seams open.

Finish long unnotched edge with pressing under 1/4" (6mm), or bias piping, I did above. Press under notched raw short end of J by 1/2” (13mm).

With right side of Facings to Lining of Jacket, pin raw bottom edges together, matching seams and double notches. Stitch.

Step Six: Cuff Facings and Finishing
Finish unnotched edge of Cuff Facings H in same way as other Facings. Right sides together, stitch ends of each Cuff Facing together. Press seam open.

Slip Cuff Facing over Sleeve with right side of Facing to Lining of Sleeve. Pin, matching double notches and underarm seams. Stitch.

TO FINISH ALL FACINGS: Trim seam allowances of outer layer only (as you can see in the photo below), leaving full 1/2” (13mm) on Facing. Clip at curves and trim corners. Turn Facings to outside of jacket and press. Attach Facings to Outer Layer by blind-stitching under pressed edge (or with piping), or top stitch or slip stitch by hand (which is what I did). Take care not to catch Lining if you are blind stitching or slip stitching. Stitch along all inner edges and mitered corners.

Turn facing H to the outer layer, Slipstitch pressed under edge (or piped edge) to outer layers, or topstitch which I did here on the sleeve.

Step Seven: Collar
The Mandarin collar is optional. We recommend adding a layer of interfacing if you are using it to provide a bit more structure to the collar. Stitch collar L pieces together right sides together all the way around, leaving open between stars. Trim seam allowances and corners.

Turn right side out and turn in the open ends between the dots and press. Loosely slip stitch the collar onto the neckline of the jacket. Traditionally, this is done so that the collar can easily be taken off and washed (or replaced) when needed.
Step Eight: Closures
If you don't want to buy or make your own frog closures you can use snaps (as I did). Use the frog placements on the Overflap piece C to place your frogs or snaps. Transfer those marks on the right side of the jacket.

Here is the final 114 Chinese Jacket View B Fingertip Length.
 Front
Front
 Back
Back
That is all there is to it! Show us what you make with this pattern in our Customer Gallery or social media!
Folkwear owner, Molly shows off how this coat looks. I love the contrasting facings (but would choose a fabric that presses better next time!). It makes a really beautiful coat!


I want to start out by saying that at Folkwear, we are incredibly grateful for our amazing customers! Year after year, for over 40 years, people have been using Folkwear patterns to make clothing (from everyday wear to fancy dress), costumes for theater and movies, reenactments, and to connect with their cultures. From very simple garments to complex and intricately embroidered clothes, we are honored to be a part of all of these sewing adventures. And delighted by our Folkwear fans. Thank you for your support of this small business.
I always like to give our customers a little glimpse into the last year and what we accomplished (and remind us here at Folkwear). I am glad to be carrying this company on into the future.
New Pattern Releases
Patterns Re-released. These are generally patterns that Folkwear used to publish, that we brought back in a larger size range, but there are a few that were only PDF patterns for the last few years and now are available as paper patterns too!
PDF patterns released (we often up-sized these PDF patterns if the original range was small).
There were so many blog posts with amazing sewing tutorials and how-to's, histories, and garments that we made, but I'll list a few highlights below.
We also updated our website this summer. And I spent a month in England with my children. Living and working there was so very good for us and I hope to find a similar option this summer as well. I love that Folkwear allows me to travel and is a job I can often do while away.
We will now spend time over the next several weeks planning for 2023. We will likely have a few new patterns out, and will continue to develop PDF patterns, as well as provide tutorials and sew alongs for our patterns. We will also likely expand our fabric selection. We would love to hear from you! What would you like to see Folkwear do in the coming year? What patterns? What products? What tutorials or sewing information would you like us to have?

Esi developed this cute little embroidery design that could be added to anything from our 109 Little Folks dresses to aprons to tea towels. Repeat the design to be as long as you want (embroider a table cloth!). This is a simple and quick cross-stitched design with Christmas trees and poinsettias that finishes at about 5-3/8" x 2-7/8" (13.6cm x 7.3cm). We suggest colors (green, red, and yellow/gold), but use your imagination to come up with some vintage or sparkly colors schemes!
You can find the pattern, with instructions at this link (PDF). And we have instructions below as well, though you will need to download or print the pattern from the link to see the design.
Materials:
Cut Scrim
Cut scrim strips at least ½”/13mm larger on all sides than design area. See specific garment designs for actual sizes needed.
Prepare scrim
Presoaking scrim makes it much easier to remove after stitching is completed, but you don't have to presoak it. Soak in cold water for about 5 minutes to soften. Do not wring. Lay out on a towel and straighten grain of scrim so it will dry true. When dry, or nearly so, press, taking care not to pull grid lines askew.
Note: Soaking shrinks some scrim slightly, up to one hole per inch, thereby reducing the finished size of the design by 1/10th. Designs included in this pattern should be relatively unaffected by this.
Attach scrim
Pin in place matching grain of scrim with grain of fabric. Baste to fabric.
Begin stitching
Start at the top, center of the design (of each figure) and work outward. Holes in scrim correspond to + on graph, as needle passes through the hole only, and must not catch threads of the scrim. Each graph square represents one Cross Stitch, 10 sts per inch = 10 holes per inch. Use a #10 crewel embroidery needle, and take great care not to catch threads of the canvas, but to pass through the fabric below. Pull stitches up snugly to compensate for removal of scrim. Begin and end threads by running 1”/2.5cm tails under completed stitches on wrong side of fabric.
Stitching
Cross Stitch as indicated on graphs on the design, starting at the center top of each design. It is important to cross the stitches in the same direction. You may work the first half of the stitch in vertical or horizontal rows, crossing on the return course. In small areas it is generally easier to cross each stitch individually (figures on left below).

Remove scrim
When design is completed, remove basting and fray edges of the scrim so you can grasp the ends one at a time and carefully pull the threads straight out. Pull shorter edges first, holding embroidery near pulling place to avoid distortion. If you have not used presoaked scrim, you will probably have to wet the entire area to loosen weave of scrim. Any scrim threads which have been caught by embroidery must be delicately cut out. In embroidered areas given in this pattern, there is little likelihood of distortion which might require blocking.

by Molly Hamilton
I really love Cynthia's Cookie Apron pattern. I like the wrap around/cross back apron design (much better, in my opinion, than a tied apron). There are no ties that can come loose, and there is lots of coverage. And the pockets are great and very customizable. However, the one issue I have when I make it, is that sometimes I don't have fabric wide enough to fit the pattern. This is especially true of the larger sizes. The main pattern piece is very wide. However, there is an easy solution to this problem that I will show you today, along with a simple binding finish rather than using the facing from the pattern. This hack will save you fabric when you might not have quite enough.
Actually, there are a couple of solutions to having fabric that is not wide enough for this pattern - one is to cut two separate pieces and have a center front seam (you can read about how to do that here in the sew along, Day 1). Or you could also the apron on the cross grain, which works well for smaller sizes or for wide fabrics.
But, what I wanted to do was to use a narrower width (45"/115cm) fabric and use as little fabric as possible. I wanted to use one of the organic linens that we have in stock and make the largest size. I really didn't need quite such a full apron, so I just let the selvage edges of my fabric become the sides of the apron.

You can see when I laid out the pattern, the pattern hangs over the edge of the folded fabric. I traced the size I wanted (Large) and simply cut to that selvage edge at the top and bottom of the pattern. You could also choose to leave the bottom edge straight if you want, rather than have it curve around. This will also keep fabric waste to a minimum.

If you are using the facing piece of the pattern, you will want to make sure it fits on the fabric the same way (i.e. on the fold and cut to the selvage). You can make the apron just as it says in the pattern, or you can make a few other changes I will show here. If you'd rather not hem all around the apron, you can leave the selvage edges un-hemmed. This is nice, especially if the selvages are pretty or if your fabric is heavy. I chose to turn the selvage edges under one time on my apron, and did not finish them. This reduces bulk and keeps the same tone on the right side of my fabric.

I also chose to not use the facing piece (saving me more fabric) and just covered all the top edges with bias binding. I made 3/4" (2cm) binding from scraps of fabric in my scrap fabric pile (using this tutorial). You will need 4-5/8 to 4-3/4 yards of bias binding if you are just binding the top of the apron. If you are also going to bind the sides and bottom of the apron, you will need an additional 3-1/4 yards of binding.
I like making my own binding because I can use my scraps, and have colors and patterns I can't find in ready-made bias tape. But, that does mean that I sewed the binding twice - once with right side of binding to wrong side of the apron. And once again when it is folded over the the right side of the apron, topstitching it down. If you use ready-made bias tape, there is one side that is longer than the other on the tape, and you could bind the edges in one pass, with the shorter side of the tape on the front/right side of the apron.

I mitered my corners as I went. On the wrong side of the apron, I sewed to about 3/8" to the corner and stopped, then started again 3/8" on the other side of the corner. I folded the fabric at an angle when it was folded to the other side. This worked well and made sewing mitered corners on the right side very easy (just folded the corners to make the miter and sewed it down with the machine).

I hemmed the bottom edge (turned up 1/4" then a 1/2"). And the apron was done!

I even had room in the fabric scraps from the apron to cut all my pockets for the pattern, but I ended up only using the top pocket and I moved it to waist height. I added some bar tacks to the top corners for security.

I sewed the straps to the front of the apron, but you could use buttons and buttonholes if you like (or sew the straps to the back of the apron).
I am very excited to gift this apron to my mother's husband this year. He happily washes all the dishes after nearly every meal and he recently hinted that he would like one of my aprons to keep his clothes clean while he washes dishes! This project only took me about 1.5 hours start to finish. And, if you have ready-made bias tape, it will be shorter. I highly recommend this pattern - Cynthia's Cookie Apron. And this sewing "hack" gives you more options for fabrics and finishes to use. Happy sewing!


by Esi Hutcheson
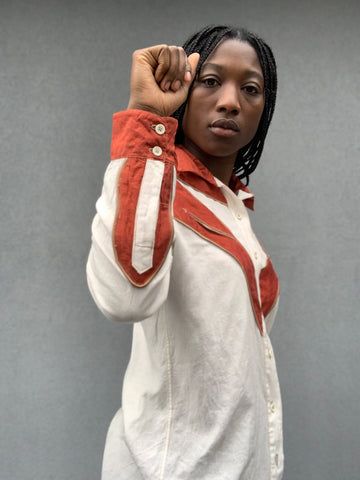
We recently made our 212 Five Frontier Shirts into a PDF version with updated sizing - now in range XS-2XL. In this blog post I will show you how to make piping trim as well as piping the decorative yokes, plackets, and pockets for the decorative cowboy shirt for Views D and E of this pattern.
Early Considerations and Plans
Views D and E have a cutout western motif for the front of the shirt, and a curved yoke for the back of the shirt. You can use different color (and type) fabrics for the yokes and the piping trim for lots of options for how you want your shirt to look. Note: you can also make this shirt without these curved yokes for a simple button-down shirt, but I really like the design and wanted to make a shirt with these fun yokes.
There are an infinite amount of color combinations I could have gone with. I knew I wanted a white linen base for my shirt, but I struggled picking out colors for the yokes, plackets and piping. I printed the line drawing for View D and colored it in to see what I was drawn to. This is an excellent way to make decisions for your sewing ideas. You can print the line drawings (easy to do from the PDF pattern) and color them in, or sketch them out in a notebook.


I found a burnt orange silk dupioni scrap big enough to use for the yokes and plackets, as well as a metallic burnt umber poly silk blend scrap for my piping. I really liked this combination.
Making Piping
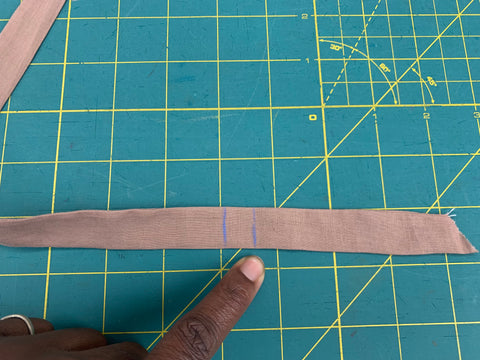
To make your own piping, you'll need cord - at least 3 to 5 yards. When you buy typical piping cord there will most likely be enough, at least for this pattern. I used silky cord, but twine will work as well, the cord needs to be around ⅛”/3mm in diameter. I wanted to create my own piping because I thought it would look best with the fabric I am using for the yokes and plackets. For this shirt, you could buy piping, but making your own is not very hard and gives you many more options for colors and fabrics.

You will need strips of fabric at at least 1½"/2.5cm wide cut along the grainline or bias. I cut on the grainline and it was fine, but bias cut will give you more flexibility for tight curves. You can create your piping at minimum one yard increments, or as long as you'd like. The pattern calls for 5 yards of piping, however I used 3 yards and made a size Medium in View D. To make enough bias (or cut on the grainline) binding for piping you will need about 1 yard of fabric.
To make continuous strips on the bias, you can watch our video tutorial on how to do this with a small amount of fabric (or click here to watch the video). This technique works well for cutting the fabric needed for the piping.
Place the cord in the center of the fabric strip, leaving a tail of cord sticking out of one end (to make sure the cord doesn't get pulled through the piping).

Fold the fabric in half wrong sides together lengthwise encasing the cord. Pin in place and stitch using a zipper foot or piping foot. Stitch very close to the cord, leaving 1/2" to 3/4" seam allowance.


You have made your own piping.

Making the Yokes and Inserting Piping
I changed the Front Yoke K, taking away the scalloped curves at the bottom edge. They look super fun, but I wanted it to be more simple. Feel free to change up the design how you like.

To begin piping the bull's head yoke. Mark stitching lines for bull’s head yoke on the right side of yoke K, but do not cut yet. I used tracing paper and a tracing wheel ( Folkwear sells both of those items) to transfer all the marks needed for the yoke and pocket opening placements.

Then, trim the pipping down to ⅜"/1cm from the seam. That is the seam allowance needed for piping the bull's head of the yoke.

Line up raw edge of piping with marked cutting lines, clipping piping as you pin, and leaving an extra ½”/13mm of piping at either end.

Using a zipper foot, and starting with upper curve of bull’s head, stitch to dot, and repeat in same way with bottom of bull’s Head, making sure not to catch the seam allowance of the other piping.


When you are finished with both sides, cut away the bull’s head, clip to each dot and press raw edges to inside.


Cut down the piping seam allowance to ½”/13mm to pipe the bottom edge of FRONT and BACK yokes K and M in the same way, pivoting at dots (if you are following the pattern - remember, I made my yoke curved rather than scalloped). Clip to each dot. Press raw edges to the wrong side.

Trim the cord of the piping on both yokes K and M by pinning the piping cord in place, then pull the cord at each end slightly, and trim off ½”/13mm to reduce bulk in seam corners. Be sure not to pull the cord out! Pin carefully (or even stitch the cord in place with a few hand stitches). And you can also stitch the ends of the cord on the wrong side of the garment in place so it won't come out.


Pin yokes K to the two fronts, and making sure the design meets at the center front. Topstitch on yokes close to piping, using a zipper foot. Baste the raw edges at shoulder and arms.

How To Sew "Smile" Pockets
These "smile" pockets can be used on Views D and E of the 212 Five Frontier Shirt pattern. But, you could also add them to any fun shirt you are making. The "smile", of course, refers to the shape of the opening of the pocket - small smiles on the front of the shirt. These are really slit pockets, and you can reinforce the corners with some hand embroidery, or a few stitches, or with small patches.
First, cut down your piping seam allowance to ¼”/6mm from the stitching.
Beginning with the bottom of the stitching line of the pocket opening, line up the stitching on the piping to the stitching line on the pocket opening. Pin in place and stitch using a zipper foot.
Stitch piping on ¼”/6mm seam line, tapering to ⅛”/3mm at dots, and leaving ½”/13mm of piping at either end (stitch along the stitching line on the pattern piece, if using). Backstitch at beginning and end.


Folding seam allowance of piping back out of the way, repeat with piping at top. Pin the piping on the top edge of the pocket opening in the same way as the bottom. Stitch (keep the seam allowance from bottom section of piping out of the way).

Trim the cord at the corners in the same way as for the front and back yokes K and M to reduce the bulk.

Before sewing the pocket you can zig zag, serge or pink the raw edges of the pocket pieces (O and P).
Right sides together, pin back pocket bag O to front over top pocket piping. Stitch wrong side up, over previous stitching line. However you will not see the previous stitching line, so when stitching using the zipper foot make sure you can see the piping bulge from underneath the pocket bag piece, and that will help you follow the stitching line the best you can. You could also trace the line onto the piece if that helps.


Do the same with front pocket P - attaching it to the bottom of the pocket opening.

Now, slash on Slash Line as marked on the pattern and clip to the dots at the corner. Turn pockets and cord ends to inside and press.

Right sides together, stitch back pocket and top pocket together, being careful not to catch in front piece N.

The Pockets are finished! Look at the 212 Cowboy Lore for decorative reinforcement for the pocket smile on the last page.
Back Yoke
Sew the back yoke and piping using the same method you did for the front.


Piping for the Decorative Sleeve Plackets
Trim the piping seam allowance down to ⅜"/1cm. for the seam allowance for the decorative placket.
Pipe edges of decorative placket V in the same way as I did for the yokes, and clipping curves where necessary. Press raw edges under to wrong side. When you apply the decorative cuff to the sleeve, just stitch close to the piping with a zipper foot.


Continue with your instructions to finish your shirt!
Thank you for reading, Folkwear would love to see your version as always! Here is mine! I love it so much. It was a challenge for sure but I'm proud of myself now I can pipe my own yokes and any future yokes to come.


by Victoria Watkins
The 251 Varsity Jacket is fully lined, and has knit cuffs, neckband, and waistband. The pattern actually has instructions for knitting your own cuffs and bands, which you can see in the image above. This jacket is also perfect for adding embellishments to - letters, embroidery, pins, trim. You can add the embroidery before or after sewing the lining, but just keep everything aligned well if adding after lining.
In this post, I am going to provide some suggestions for lining fabrics and ribbing. You can read my fabric suggestions for the 251 Varsity Jacket here. Since the lining and ribbing of a jacket can be a statement in itself, I decided to dedicate this second post to these suggestions. Here we will be looking at some ideas for both the lining of the retro Varsity Jacket sewing pattern as well as where to find ribbed/knitted trim for this jacket.
Linings
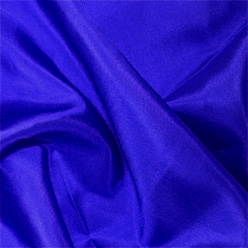
The inside of a jacket is the perfect spot for a soft, smooth texture. Dharma Trading has a variety of lovely silks in numerous colors. You could choose to line your jacket with something bold like this affordable royal blue silk habotai, or you could pick a color that is more neutral to match the outside of your jacket.
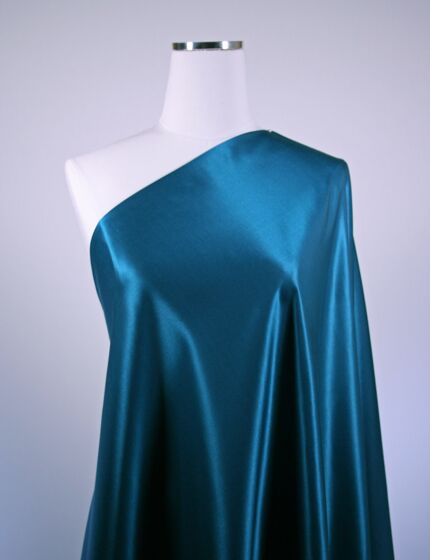
This teal cotton/silk blend from Hart's looks like it would be luxurious to slip into on a cold morning. Sew it into an orange, yellow, or gold jacket shell for a beautiful contrast!

I always think it's so smart when I see a fun patterned lining in sewing. This red and black polyester houndstooth fabric from Mood can be a fun little secret that you get to show off when hanging your varsity jacket from the back of your chair or a coat rack.
Ribbing
In addition to lining considerations, you also need to make decisions about the trim on your varsity jacket. If you're feeling bold, you might choose to hand knit the cuffs, waistband, and collar of your jacket. In that case, I recommend any of the wool yarns on knitpicks.com that get you to the weight and gauge you need. However, for anyone who is not handy with a set of knitting needles, you're going to need to find some manufactured rib fabric.
Ribbing fabric is fairly easy to come by, but to find the best results, you can search for things using terms like "ribbing", "athletic rib knit fabric", or "cuff rib fabric". There are a variety of sources, Ebay and Etsy are a good place to search.
When you're choosing a rib fabric, be sure to note how wide it is. The yardage given is for the cuffs and waistband cut with the fabric folded, and when I ordered ribbing for our sample jacket, I accidentally ordered too little. Many of the sport rib knits available are wide enough to cut one piece of the cuffs, waistband, and collar from, but be sure you have enough to cut all you need.


We are back with another holiday gift guide! We have suggestions below for gifts to make to give or gifts to give the sewists in your life.
These are some of our favorites as well as some of the most popular from the Folkwear collection of patterns and supplies. Some of them are even FREE patterns!! What are you going to make or give this holiday season?
For the Home
We have a new free pattern this year! A traditional quilted tea cozy that would make a lovely gift, especially paired with some tea, or tea cakes, or a tea pot. This is a quick and easy project! And so sweet.

I also really love the oven mitts pattern that we published last year. I found some similar ones in England over the summer in beautiful floral prints and want to make more (inspired by those British mitts) this holiday season for some friends. Another gift this is perfect paired with baked goods (or a bread tin).

#305 A Japanese Interior. This sewing pattern makes a great gift to give, but it also has quite a few beautiful pillow, or cushion, patterns that would make great gifts. You could make the sitting cushions, the sleeping pillows, or the folding futon for some fun and interesting gifts.
Quick and Easy Gifts to Wear (little to no fitting required)
Cynthia's Cookie Apron. A really fabulous (and quick) gift to sew! It really make a wonderful and extremely useful apron that anyone would love to wear - in the kitchen or in the garden.

This great Carry-all Bag that can be used for shopping or for going to the beach. It is a really nice way to use a up a yard or so of fabric and makes a quick and easy gift. It's a free pattern too!

#112 Japanese Field Clothing. Another great pattern to gift, but it also makes great work clothes - the pants are perfect for gardening and the jacket is a lovely jacket to wear around the home.
Just for the Sewist
Tracing Fabric. This amazing Swedish Tracing Fabric is a sewist's dream. Perfect for tracing patterns, it can be sewn together to test fit or how a pattern goes together, before starting on your fashion fabric. It is see-through and strong. You can also draw on it to test embroidery placement or other ideas. Sewists love it!

Gift card. A perfect gift for the sewist in your life - someone who loves our patterns or would love to try our patterns.

A buttonhole cutter. This is such a great feeling tool - so sharp and a really special item to have in your sewing toolbox. We use ours all the time!

Bias Tape Makers. A sewing must-have (in my opinion!). These make sewing bias tape so much easier! And we do use them a lot.

by Cynthia Anderson
Enjoying a cup of tea is a simple pleasure anytime. Having a pot of tea that remains perfectly warm with an insulating cozy just adds to the pleasure of tea time. Tea cozies also make a great gift for anyone who enjoys a spot of tea. Take the time to enjoy a cozy cup of tea this holiday season and throughout the year with this charming and utilitarian project.
In this blog, I will show you how to make a Tea Cozy and provide you with a free pattern. Plus I'm adding a recipe for a divine almond tea cake at the end so you can really have a wonderful tea time!
You can download the free pattern and instructions for this tea cozy here. It will take you through checkout, but the pattern does not cost anything.
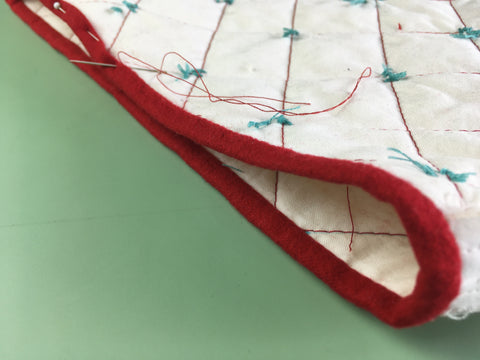
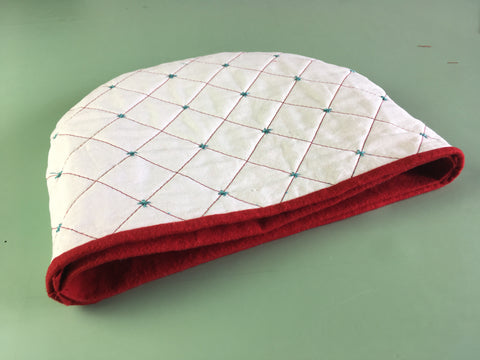
This cozy pattern was originally featured in Folkwear's 303 Home Collection: An English Cottage Kitchen. This collection of patterns included items that were found in Victorian era English cottage kitchens that combined the technology of the Industrial Revolution with the latest trends popularized by ladies' homemaking magazines. This Tea Cozy has an outer quilted tea cozy and a separate inner lining. The reason to have both is so that you can easily wash the lining when it gets tea on it, and protect your outer, more decorative layer. You can, of course, just sew the outer layer if you like.
Make your cozy as unadorned or decorative as you like. Add a stitched quilted pattern (included in this pattern), some embroidery, or leave plain depending on the fabric used and look you desire. Quilting can also be created by using free-form stitching made on your sewing machine, a drawn design of your own, a free pre-drawn design found on the internet, or no decorative stitching at all.
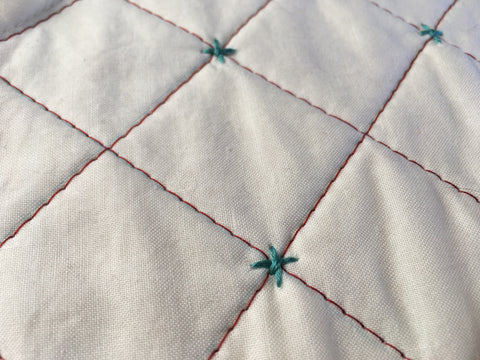
I made my holiday-inspired cozy out of 1/2 yard of white cotton for the outer cover, with a scrap of batting sandwiched between the outer cover layers for insulation. I quilted my tea cozy cover using a simple crisscross design using red contrasting machine stitching. I added hand-embroidered blue-green crossed-stitched stars to the intersecting quilting lines. I made the removable lining using 1/2 yd of red cotton flannel. To quicken the pace, I stitched the quilting lines using a sewing machine, but you could also hand stitch if you like. Because I love to add layered details to projects, I made a pair of yarn pom-poms (from yarn stash) to add to the cozy's holiday spirit and topped it all off with a red fabric covered button found in my button box.
Materials Needed:
With all the holiday fabrics in the craft stores this time of year, making a holiday-themed cozy is a snap. Use a holiday print, candy stripe, woven damask, or solid fabric. Cotton, linen, wool, and pre-quilted fabrics are good choices. Recycle and reuse a holiday tablecloth or pair of large napkins you already have or go for a holiday treasure hunt at favorite thrift store to find the perfect thing to make a cozy.
Have fun decorating your cozy, with ribbon, trim, lace, buttons, beads, embroidery, cross-stitch, applique, patch work, etc. Make a cozy to compliment an elegant tea set, an everyday tea pot and cups/mugs, a special Christmas themed set, or make a small cozy for a child's tea pot. If you have a mix-and-match crockery collection, make your cozy with a complementing aesthetic. No matter the look you like, have fun making a cozy all your own.
To Get Started
Pre-wash your fabric, because you will want to wash your cozy periodically. The batting should not be pre-washed, because it will come apart in the process.
Cut out the cozy pattern, paying attention to the cutting and seam allowance lines on the pattern. Cover R and Lining S are combined on the same pattern piece.
Cut out four of Cover R and cut two of Lining S on the fold. Both the lining and the cover use a 1/2" (13mm) seam allowance. Cut out two batting pieces using Cover R.

Quilt the Cover
I used the quilting lines on the pattern to trace the lines onto two of four fabric covers R, with a water soluble pen or use tailors chalk. Transfer any stitching designs to the right sides of two of the outer cover pieces before going any further. Typically, a decorative pattern is added to each side of the cozy, but feel free to only decorate one side.

Sandwich one piece of batting between two layers of fabric for Cover R, with wrong sides of fabric to the batting. If using pre-quilted fabric do not add any additional batting. If you use the pre-quilted fabric that only consists of a fabric layer and a batting layer, then add an addition layer of fabric so the batting is sandwiched.

Baste the three layers for each side of the cover together within the seam allowances to hold. Notice the drawn quilting lines are only needed on one side of each half of the cover. The stitching will show on both sides, but it is only necessary to draw the pattern on one side.

I traced over the drawn quilting lines with a machine stitch on each cover piece, with a longer stitch (#4), so the stitching would stand out.

Then using embroidery thread and an embroidery needle, I hand-stitched simple crossed-stitched stars where the quilting lines intersected, to add an extra detail.


With right sides together pin and stitch the two tea cozy Cover R pieces, along the curved edge, matching notch 8. Press the seam open about 4" (10cm) above the straight edge on each side.


Turn the cozy right side out. You can stitch the bottom edge if you like, but I didn't.

Bind the Bottom Edge of the Cozy Cover
Bind the bottom edge of the cozy cover using 1"(2.5cm) bias tape or ribbon. Make your own or use pre-made bias tape. I made my own using the same flannel fabric as my cozy lining. Learn how to make your own bias tape here.

Open out the bias tape and press under 1/2" (13mm) on one short edge.

With right sides together, line up and pin the turned under pressed end of the bias tape with one of the cozy cover seams. Continue to align and pin the bias tape to the raw edge of the cozy.

Trim off the bias tape so that the cut edge overlaps the first pressed under edge.

Turn/wrap the tape to the inside of the cozy and slip-stitch the remaining pressed edge to the previous stitching line created when attaching the bias tape. Below you can see the red stitching line to use as a guide.


Make the Lining
With right sides together, fold each cozy liner in half, matching notch 9. Pin and baste the raw edges together.

Now, pin and stitch the two liners halves together along the previous baste seam line, matching notch 9. Stitch through all the thicknesses, back-stitching at the ends.


If desired, trim the seam to 1/4" (6mm) and bind with bias tape. Or trim with pinking shears, serge, or leave the seam unfinished as I have.
Insert the liner into the cozy cover with the wrong side of the cover to the seam edge of the liner. The inside of the liner has the finished seam. The liner and cover are meant to be separate for easy laundering of the liner. Hand slip-stitch the lining to the cover at the side seams if you like.


by Molly Hamilton
Our 212 Five Frontier Shirts pattern has so many amazing details on these five shirts, especially on the cuffs, and especially for Views D and E. These two shirts are a bit of a modern take on Western shirts - and very classic at the same time. This shirt is actually my go-to button-down (or snap-down as the pattern suggests). The drafting and fit are great and the details are really nice. You can make this shirt as Western as you want with the rounded yokes and piping and "smile" pockets. But you can also make this a very classic shirt by just leaving out those details. However, you will be adding a placket to the sleeve. Here, I am going to show you how to sew the placket so this step will be less intimidating, especially if you've never done one before. This is a typical two-piece sleeve placket design (sleeve + placket piece).
First, make sure you transfer all pattern markings to the fabric pieces. Here I forgot to transfer the fold line on the longer side of the placket piece, but I do have the dots and you'll see where the fold goes pretty easily. I like to use ultra-washable markers to transfer on linens or cottons. And this brings me to another cautionary note for my tutorials: sometimes do as I say, not as a do. But also, be flexible and do what makes the most sense to you - or what YOU want to do!
For the 212 Five Frontier Shirts, the sleeve is cut on the fold, but the markings for the placket opening is only placed on back side of the sleeve. Make sure you have mirror images with the two sleeves (you don't want one placket on the front of the sleeve and one on the back).
Press under side seam allowances of Placket piece. Baste near the fold and trim the seam down to about 1/4" (6mm). Then press under the seam allowances of the pointed end of the placket. Try to keep a nice even point at the top, so adjust the fabric as necessary. Baste the point and trim the fabric.
Then place the right side of the Placket to the wrong side of the Sleeve, matching slash lines and stitching lines. Pin in place and stitch on the stitching lines (they are 1/4" (6mm) from the slash line). Pivot at the dots. I use a slightly smaller stitch length for this step to provide some more stability.

Now carefully cut along the slash line to the bottom of the V, and then carefully cut to the dots at the corners, making sure not to cut into the stitching.

Now, pull the Placket to the right side of the sleeve. Press the slashed edges toward the Placket. Note that now the Placket sides are on the opposite side as when they were on the wrong side of the sleeve.