-
Sewing Patterns
-
Fabric
- Sewing Supplies
- About
- Blog
- Gallery
-

Folkwear has a surprising number of children's patterns. Some are perfect for making a cute dress or nightgown, some are perfect for dress up or costume, and some are used for traditional dress or ceremony. Many of our children's patterns have an adult counterpart, such as 218 Child's Frontier Shirt and 212 Five Frontier Shirts, or 213 Child's Prairie Dress and 201 Prairie Dress, and 110 Little Kittel and 148 Black Forest Smock, etc.. Some occur in the same pattern - 141 Korean Han Bok and 120 Navajo Blouse and Skirt. These two, in particular, are often made for special events and traditional ceremony by people of the cultures. But there is also the 221 English Smock (so very cute) that includes a children's pattern. And, then the very popular 154 Child's Scottish Kilt and Jacket (to go with 152 Scottish Kilts).
I want to highlight a few of these great patterns that I made because they are often overlooked. They are mostly fairly easy and quick garments to sew They also can be made with fun and cute fabrics and usually don't take a lot of fabric to make anyway.
Sewing for special children in your life is rewarding and fun.


by Esi Hutchison
The Basics patterns are a great for novice sewers and we really encourage our customers to have fun with these patterns (and all of our patterns in general of course). However, the Basics are especially non-intimidating in terms of the construction which can allow easier alterations, options for finishing, and embellishing that can make these pieces fit your style. This blog post will focus on the Basics Pants but altering them into shorts. Warmer weather is coming, so get ready and start making some summer outfits with this great pattern. I was wanting a pair of simple and comfortable shorts so I decided to show how I altered the Basics Pants in shorts for myself.
Fabric Suggestions:
For casual and formal looks one could use light to medium weight fabrics such as linen, wool, gabardine, twill, lightweight denim, nylon, polyester. We recently have gotten a batch of beautiful raw silks that would be perfect for these shorts. Check out our fabric. Hopefully something will inspire you.
For bedtime you could even make these out of flannel or lightweight, soft fabrics of silk, cotton, rayon, synthetics, or blends such as crepe, challis, batiste, voile, or satin. Even a soft jersey would work.
There are so many options for different occasions, casual, formal, bedtime, outdoor activities . . . for making the shorts and or pants.
I am also going to show you how to add a drawstring instead (or in addition to) the elastic waistband in this post.
Making the Shorts
If you are not confident in diving straight into making the shorts from your final fabric I advise you to make a muslin first. If you haven't read our blog post for sewing these pants, please refer back to that for altering the rise of the pants because I will be using the same technique for the shorts that I made for myself. This post also has all the basic constructions details.
Measure how long you would like your shorts to be, I went with 15½" (39.4cm) which includes the ½" (13mm) seam allowance at the top. They will sit approximately around your natural waist. Include the final waistband width which is 1¼ (3.18cm) and the length or your desired hem, for me I decided to go with a 1½" (3.8cm) hemline, my idea is to fold under ½" (13mm) then fold under 1" (2.5cm) for my hem .
With the measurement of the front/back pieces and your hem take away your waistband width and that is the length you will cut the front and back of the pants to make your shorts, my total length will be 17" (43.2cm) You can also just decide how long you want the inseam to be, and cut your shorts that length, plus a hem allowance. If you do this, be sure to take into account the 1/2" (13mm) seam allowance at the top of the inseam.

Draw a line across the pattern pieces at the length you want your shorts to be on the Front and Back pattern pieces. Those will be the pieces for the Front and Back of the Shorts.
Sewing the Shorts
Lets get started. The instructions are still the same as for making the Pants, except they are shorter!
Pattern pieces cut out.

With right sides together, sew one POCKET C to FRONT A between boxes, matching notch 1. Don't forget to clip ⅜" (1cm) into seam allowance to boxes. Trim corner and seam allowance between boxes.

The key detail of these shorts are these sweet flap pockets, which could easily be embellished with an embroidered pattern or a button sewn on the keep the pocket down.

Inner leg seam stitched.

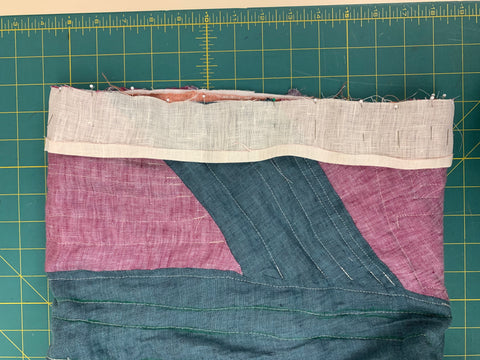
Waistband pinned.

Adding a Drawstring
If you want to add a drawstring, mark where you would want the tie to come out after the waistband has been sewn to the shorts, but before you fold the waistband down and stich to the inside of the shorts. The drawstring holes can be hand or machine sewn eyelets or buttonholes. In this case I have decided to go with buttonholes. Mark them an inch away from each other from the center front (or wherever you have chosen to place them). I used a visible thread on this muslin so you can see exactly where I put the openings for the drawstring. Cut the buttonhole or eyelets open before moving forward.

After you have made your drawstring holes, fold the waistband to the inside along the foldline, stitch in the ditch or slipstitch on the inside of the shorts.

Insert your drawstring through one hole, around the waistband, and out through the other hole. You can use a safety pin or bodkin attached to your string to do this. You can use a sturdy ribbon or string for your drawstring.

Hem your shorts hand sew your pocket flaps down if you haven't already. And you are done!

Once I made the muslin I knew for sure what I liked and what I didn't like from the fit of the shorts, the style and length. And, I made my final shorts from my fashion fabric with the adjustments I wanted.
I chose a less casual look for the shorts and used a green herringbone wool for my final pair.
These are my fabric pieces.
And, here is the result! I love these shorts. They are very comfortable and will be easy to wear in the spring with a pair of short boots or trainers.


by Esi Hutchinson
Hello, it's me, Esi, again. I will be showing everyone how I made the Basics Pants today. The fitted measurements are stated on the back of the paper pattern or in the PDF instructions, check that out because first I will show you all how I changed the rise of the pants to better fit me, and hopefully fit you the way you would like them to.
Starting Considerations
Fabric: These pants can be made in lightweight or medium-weight fabrics. They have an elastic waistband so heavier weight fabrics will be quite bulky at the waist. We made several samples in linen, cotton, and linen blends and one sample in a medium-weight twill. For this sew along, I used a light-weight wool.
Notions: The Basic Pants only need thread and 1" (2.5cm) wide elastic. The elastic should be cut 1-2" shorter than your waist measurement.
Sizing: These pants are sized XS-3XL. While there is plenty of ease, you may still need some adjusting. I suggest making a muslin first to see if you need any fit adjustments before cutting you main fabric. You can also adjust the rise and the length of the pants. These pants have a high waist and will most likely sit on or close to your natural waist. Measure the existing rise of the pants in your size excluding the seam allowance (1/2" [13mm]) on the top and bottom of the rise. Include the measurement of the finished waistband which will be 1-1/4" (2.18cm) wide. Use a measuring tape to see if the rise suits you. If not, adjust for your taste.

I decided to take away 2-1/4" (5.72cm) from the front rise of the pants and kept the rise of the back of the pants the same because I realized this would fit me better. To do this, I marked a line above the lengthen and shorten line for the rise equal to one-half the amount I wished to shorten, in my case it would be 1-1/8". I made a pleat along the marked adjustment line, and taped it in place. Smooth lines to get a smooth adjustment.
 Note: I am using an older/draft version of the pattern, but it has the same shapes.
The inner leg seam of the front and back pieces need to line up, however since I changed the rise of the Front piece, the Front and Back side seams will not match. I now had to change the shape of the top of the Back piece to match the front at the side seams.
I put the Front and Back pieces together matching the inside leg seams. I made a line on the Back side seam where it matched the Front at the side seam and connected it to the top of the back rise on the Back piece. You can cut or fold this top section above the line off. This is the new top of my Back piece. You can also adjust the notches to line up at this point if you need to.
It is always a good idea to make a muslin first to see how the fit will work for you. I did make a muslin to decide how I wanted to change the rise and fit of the waist and crotch. This helped a lot get the right fit for my main pair of pants.

Seam Treatments: Seams can be serged or flat-felled or faux-flat felled. Just choose what look you want. Often pants with flat-felled seams look a little more casual than pants without. It might be good to test it with a small piece of your fabric just to see how it will look.
Cutting the Pattern
I chose to use a light-weight wool, to give it a formal look and a warmer feel since it is still winter.
I didn't have enough fabric for the waistband to be cut in one piece, so I cut two long pieces the same width as the waistband, sewed them together, and cut the waistband from that piece. So my waistband has an extra center seam.
You will need to cut one waistband, two front legs, two back legs, and four pockets.

Sewing the Basics Pants
Pockets: With right sides together, sew one Pocket to Pants Front between the boxes (from top, pivoting at the corner and down to the other box on the side), matching notch 1.

Clip ⅜" (1cm) into seam allowance to boxes. Trim corner and seam allowance between boxes.

Turn pocket to the inside and press. Repeat with remaining front. You have just created the flap of the pocket.

With right sides together, sew a matching pocket piece to the curved raw edge of pocket between boxes, matching notch 2 and keeping front piece free from the stitching. You'll need to pivot at the top corner. Clip pocket seam allowance to square. Repeat with last pocket piece.

Zigzag or overlock the sides of the pocket raw edges to finish the seams. The top seam will be enclosed in the waistband and doesn't need to be finished.

Baste top edges of pockets to fronts along waist seamline to keep it all together and keep the pocket from shifting.

Turn pocket flaps down and press.

Front and Back: With right sides together, sew front and unstitched portion of pocket to Back at side seams, matching notches 1 and 3 and squares. Be sure to keep pocket and pocket flap free of stitching above the square. Press seam open.
I hadn't quite decided how I wanted to finish the edges at this point. Perhaps a faux flat-felled seam, or just pressing the seam open and over locking. So I decided to see what it would look like on a sample of fabric.
This is the faux flat-felled seam, it gives the pants more structure and can take away a bit of the drapery aspect of the fabric depending on what kind of fabric you are using. I decided not to use it and just overlock the raw edges.

Optional: On right side, you can reinforce the bottom of the pocket opening by stitching a bar tack through all thicknesses. For a bar tack I used a tiny zig-zag stitch. Test how wide and close you would like your zig-zag stitches to be on a scrap of fabric.

Stitch front to back along inner leg, matching notch 4. Press seam open.

Turn one pant leg right side out and slip into the other pant leg, so right sides are together. Stitch crotch seam, matching inner leg seams and notches 5 and 6. Stitch crotch curve again, 1/8" (3mm) from previous stitching in the seam allowance. Trim the seam allowances close to second stitching and/or overcast or serge raw edges. This reduced bulk in the crotch area. Press the remaining center front and center back seams open, clipping curves if necessary.

Turn the pants right side out. Don't fret they will look quite larger than your waist, but nothing a waistband and elastic won't fix.

Waistband: With right sides together, fold the Waistband in half, and stitch the short end. Press seam open. You don't have to finish this seam as it will be enclosed in the waistband, but if your fabric ravels easily, you might want to overcast or serge it.

With right sides together, stitch waistband to pants, matching boxes to side seams and front seams, and waistband seam to center back seam of pants. If you had to make your waistband like I did, I matched both seams in my waistband to the side seams of my pants. Then, press seam allowance toward waistband.

Press under ¼" (6mm) along raw edge of waistband.

Then, fold the waistband in half to the inside of pants so wrong sides of waistband are together and pressed-under edge slightly overlaps the waistline seam. Baste the waistband in place by hand and then stitch in the well of the seam on the right side along the waistband, leaving about 1" (2.5cm) seam open at center back waistline. You can also slip-stitch the pressed-under edge of the waistband to the waistband seam on the wrong side. That is what I chose to do instead of stitching-in-the-ditch/well. You can see the opening in the waistband for the elastic below.

Cut a length of elastic 2 inches (5cm) less than your waist measurement (if you haven't already), and thread it through the waistband from the center back opening. Overlap ends of elastic 1/2" (13mm) and stitch securely several times with a zig-zag stitch or a small box of straight stitches. Tuck elastic back into waistband and slipstitch center back opening closed. Personally, I like to stitch a seam and then stitch down the edges of the elastic to create a flat surface on waistbands. I stitch the seam several times to keep elastic secure.
Optional: You can stitch across the waistband at the center back seam several times, to keep the elastic from shifting. I chose to stitch in the well on the side seams of my waistband to keep the elastic from twisting.

Finishing: Press under ¼" (6mm) at pants hem; turn under again 1/2" (13mm) and topstitch.

You can also hand tack the pocket flaps down on the underside of the corner of the flap. Or you could add small decorative buttons here too.

The pants are finished! I like the fit and feel of these pants. They are comfortable and they look great.
In my next sew along will show you how I made the Basics Pants into Shorts.


I love our new Basics Pinafore Dress pattern! And when we were deciding who was going to make which pattern for the Basics Sew Along's, I volunteered to do the Pinafore Dress because I really want a couple for my own wardrobe. This simple pattern is quick to sew, flattering to wear, and has many customizations. It is available as a PDF pattern and a paper pattern. I am going to cover a couple of options for very simple pattern hacks in this sew along. I am going to make it a little shorter and change up the strap placement a little. But, today we are mainly going to cover how to sew the dress with a few tips and tricks.
Dress Considerations
Fabric: We suggest light to medium weight fabric for this pattern. This could be broadcloth, poplin, linen, wool, or even a sturdy knit. You could also use denim, twill, or even canvas (depending on the look you want). A fabric with a little drape is nice, but if you want a bit more structure, go for a stiffer fabric. For our original samples, we made one in a chambray, one in an African Wax Print, and one in a medium weight (soft) upholstery fabric. For this sew along, I choose a cute striped block print cotton in a light weight canvas. It made a dress that feels sturdy - almost like an apron or art smock. I really liked it.
Notions: I choose a white thread and two blue 3/4 inch (24cm) buttons I had in my stash. Buttons are an easy way to be creative with this dress. They can be a fun and beautiful feature of this simple style. They can also be simple and easy.
Sizing: This dress has plenty of ease in it. It will fit well over other clothes. Finished measurements are on the pattern, so you can choose to go up or down a size as you need. I would normally wear a size Small to Medium, but I decided to go with XS as I may wear this dress in the summer as well with less clothes underneath. I also tried on our XS sample and it fit well over my shirt and pants so will also be fine in the winter over clothes. And, I tend to like my clothes a little fitted.
Yardage: Since I am making the XS, I can use 45" (115cm) wide fabric (or wider). The larger sizes can only be cut from wider fabric - 54" or 60" fabric. But, you can also create a front seam in the dress to accommodate narrower width fabrics (instead of cutting the fabric on the fold). Just add 1/2" seam allowance to the front/back pattern piece and the front/back facing pattern piece at the center and you can use just about any width fabric. Also, since I decided to shorten the dress, I did not need as much yardage and the shorter dress also easily accommodated narrower width fabric. Just something to keep in mind.
Seam Treatments: Most seams in this pattern do not need to be finished as they are hidden. But if your fabric ravels easily, you might want to serge or zigzag your seam edges before covering them or turning them. For the front/back side seams, you could use a flat-felled seam or faux flat felled seam (these would be good for denim or heavier weight fabrics for informal dresses). Or, if you are using a lightweight fabric, use a French seam for the side seams. I chose to serge the side seams, but then my serger decided to not thread, so I just zig-zagged the side seam edges.
Cutting the Pattern
Since I wanted to shorten the dress fairly significantly (by 12"/39cm) to be knee length, I made a 6" (15cm) pleat in the pattern below the pocket placement (where the lengthen shorten line is). This shortened the dress by 12 inches.

There are a couple of options for the side seam at this point. I could have traced a new line from below the seam allowance of the armhole to the bottom edge of the dress, or I could reduce the width of the pattern at the bottom. I decided to reduce the width of the pattern at the bottom because there was still plenty of room in the dress and the fabric I used was a little stiffer and would not drape quite as nicely when so wide.
 Option for tracing a line from below the underarm seam allowance to the edge of the bottom hem. Just follow the ruler line to create this.

Option 2 - fold the pattern over to line up with the seam line coming from side of the top of the dress.
I am also notorious for cutting the shortest possible length of fabric for a pattern and making do. So of course, I cut only just over 2 yards of fabric for this shortened dress and then did not have enough fabric to cut the facings on the fold. A great solution to a problem like this is to cut the facings from a different fabric (a lighter weight color-coordinating fabric would be good), but I decided to just add 1/2" seam allowance to the facing piece and have a center seam in the facings and cut these from the fabric I had. This worked fine, though it did add a little extra bulk in the garment. Not enough to be an issue, but it is something to consider if you do something similar.
 I added 1/2" (13mm) to the center of the facing piece (in red washable ink) instead of cutting on the fold. I then cut 4 of each.
The other adjustment I made while cutting the pattern out was to raise the pockets about 1.5" (3.5cm). This is just personal preference, but it is a great time to make any adjustments like that. Be sure to transfer all the pattern markings to your fabric.
 Pocket placement dots raised by about 1.5 inches on pattern piece. I transferred markings to the fabric.
Everything else was easily cut from the yardage I had, and similarly to the cutting layouts in the instructions.

Ready to sew!
Note: I press my fabric and seams at each step. It is best to press your seams flat, then open. Pressing is an important step.
Pockets: I pressed under 1/2" (13mm) seam allowance on lower edge on each Pocket Band and trimmed to 1/4" (6mmm). The lower edge is the edge with the stars. If your fabric frays easily or is very lightweight, you can skip the trimming - or finish the edge with a serger or overcast stitch.

Lower edge of Pocket Band pressed up.

Trimming the seam to 1/4" on lower edge of Pocket Band.
With right sides together, I stitched each Pocket Band to the top of a Pocket, pivoting at dots and backstitching at the stars.
 Pocket Bands on top of Pocket pieces.

Pocket Bands stitched in place.
I clipped just the pocket seam allowance to the stars on each side of the pockets. Then trimmed the seam allowances and turned the band to the inside of the pocket.


Then, I pressed under 1/2" (13mm) seam allowances on the remaining pocket edges. If your fabric ravels easily, it might be a good idea to finish these edges first by serging or zig-zag stitching.


And, I topstitched the pocket band down with a straight stitch (backstitching at the ends). This is a great place to use some decorative stitching - maybe one of the fun stitches that your machine can do. You can also hand stitch the pocket band down if you don't want any stitching to show to the front of the pocket.

I pinned the pockets to the right side of the front piece (you can choose which piece you want to be front or back in this pattern) where I'd put the markings for the pockets. When pinning, I like to pin the pocket in place at the markings, then make any small adjustments that may be needed to make the pocket look correct. I then pin along the sides and bottom of the pocket. I also make sure to pin the top of the pocket closed to insure that it won't gape when finished (make sure the sides of the pocket are pinned in the correct place). And I stitched the pockets in place on the sides and bottom, stitching 1/16" from the edge. I back stitched several times at the top sides of each pocket to secure them in place. You could add bar tacks here as well to secure the pockets.

Straps: The pattern calls for interfacing on the straps (or one side of the straps). If you feel your fabric is sturdy enough, you may want to skip this step. While my canvas fabric seemed sturdy, I really hate it when my dress straps loose their shape, so I did apply interfacing to the wrong side of one pair of strap pieces.

Interfacing (white) applied to wrong side of one set of straps.
With the right sides together, I stitched one interfaced strap to one un-interfaced strap along two long edges and one short edge. The idea is to leave open the short edge that will be sewn into the back of the dress and to sew closed the short edge that will be part of the front button closure. I trimmed the seams again. This reduces bulk in the strap. And I turned the strap right side out and pressed it well. If you have a lightweight fabric, you may not need or want to trim the edges.
 Straps right sides together ready to be sewn.

Straps sewn together on three sides with seam allowances trimmed.

Turning a strap right side out. This can be a bit of a pain to do. I also use a pointer/turner tool to poke out the corners as best as I can once it is turned.

Straps turned to right sides and pressed.
Depending on the look you want, you can topstitch the stitched edges of the straps now - 1/16" from the edge. This will also provide more structure for the straps. I did not topstitch my straps in this project.
Next I sewed the raw edge of each strap to the right side of the back at the placement marks. I like to get the straps right to the edge of the seam allowance on the outside. I stitched the straps in place at the seam allowance (1/2"/13mm) and then stitched again about 1/8" (3mm) from the first stitching.


Sew Front to Back: Next, I sewed the Front to the Back at the side seams. The front has the pockets, the back has the straps. If you have lightweight fabric, you could do French seams here. You could also finish these seams with a serger, zig-zag, or overcast stitch. These are the only seams that will be seen/felt on the inside of the dress. Be sure to press the seams open or to one side, depending on how you finish your seams.

Facings: If you are going to interface your facings, you should do it now. I chose not to interface the facings since this fabric had some heft and I didn't want to add more bulk to the seams, or the facing area.
As I had to cut the facings without a fold, I stitched each pair together at the center front with a 1/2" (13mm) seam allowance, and pressed it open.

I then sewed the facings to each other at the side seams. And, I clipped to the dots at the inside corners of the front and back facings. Clipping these corners allows you to fold up the seam allowance along the bottom of the facing.


I folded up the seam allowance and gave it a good press. At the side seams, I clipped the corners off the side seam allowance and folded the hem over each other as at a corner.


Trimming the allowance from bottom of turned up facing.

It is a good idea to baste (use a very long machine stitch) close to the folded edge to keep this hem in place. I forgot to baste, but it worked out fine.
Then, with right sides together, I stitched the facing to the dress, matching the side seams.

I clipped into the seam allowance along the curves to release the seam so it would turn easily to the inside. I like to clip my seams on an angle, and you can see that below.


Then, I trimmed the seams and clipped the corners. You can trim the seams straight (taking off about 1/4"/6mm), or you can grade the seams - trimming a little less on one seam than the other. This also helps reduce bulk but also can help with the bulk of the trimmed seam showing through to the right side of the fabric. With a graded seam you get a little less bulk where the seams are trimmed.
 Graded seam - you can see that the each seam was cut separately to a different length.
I turned the facing to the inside and pressed it well. I used a point turner to try and get sharper corners (also just pulling the straps will pull the back corners out easily). I also rolled the seam slightly to the inside so that the facing would not poke out from the inside.
 Facing turned to inside dress.

Rolling seam slightly to inside.


It is a good idea to baste or pin the facing in place at this point. You will be topstitching from the inside to secure the facing in place to the inside of the dress. The topstitching will show through to the right side so you want to do a pretty neat job of it. That is why pinning or basting may help. I started my stitching at the center back, but starting at a side seam is probably a better idea. You will need to pivot stitching at the inside corners of the facing and at the side seams.

Finishing: You can hem the dress now. Because of the curved hem, I turned up 1/4" (6mm), pressed, then turned up another 1/4" (6mm) and pressed. You could also turn up a bit more hem and use a blind stitch to hem and ease around the curve.
Buttons: To be honest, you could probably sew the straps in place and not need buttons to get it on and off, but they do make it easier to fit and get in and out of the dress. The pattern indicates to sew the buttonholes on the straps and buttons on the front. This will help if you need to adjust the buttonholes to make the straps slightly longer or shorter - just adjust where the buttonholes on the straps go. You can make horizontal or vertical buttonholes. You can read all about buttonholes here. But, you can also change things up. I decided to put my buttonholes on the front of the dress, and the buttons on the straps. This is another way to adjust the strap sizing (move buttons up or down the straps as needed). I made horizontal buttonholes. This is an easy way to make some design changes to the dress.
 Deciding where to put the buttons and straps.

Decided to put horizontal buttonholes on the front, straps will go to the inside (buttons are resting on the dress).
I love how this dress turned out. I am planning on wearing it with leggings (or jeans) and boots in the winter and t-shirts or tanks in the summer. It feels like sturdy work clothes but fun and feminine at the same time.
I hope this sew along helps you when making your Basics Pinafore Dress - with ideas and inspiration as well as fundamental construction. Please share what you make in our Customer Gallery and/or on social media (and tag us!).


by Victoria Watkins
When I was developing the cover illustrations for our Basics line, I tried on a sample of each and took a photo of myself wearing them to have a reference to draw from. When it came time to document our tunic, I was enamored with the fit and drape. As such, I was thrilled when Molly asked me to do a sew-along with our tunic pattern with permission to keep the end result for myself.
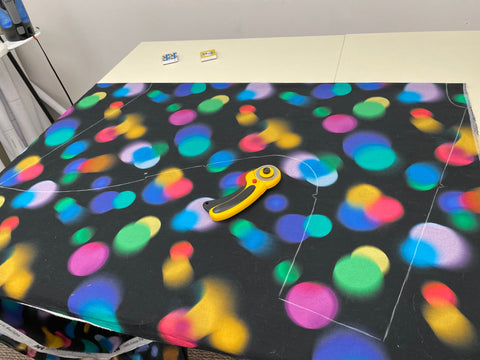
If you've read any of my fabric suggestion blogs before, you might've noticed that I always want to sneak in a playful, bold fabric. I am a fiend for a loud print, so when I saw this exciting cotton voile from Mood Fabrics, I knew it was perfect for this project. In my view, something airy with a gentle drape would be elegant with this pattern.
Cutting out the pattern:
This pattern only has three pattern pieces - the front/back and the facings. All are cut on the fold of fabric. You should choose a fabric that is wide enough to fit the size you need.
I tend to trace the pattern with tailor chalk onto the fabric before cutting it out. This allows me to see the fabric and the print when I am cutting without paper being in the way.
One trick I've picked up since I've started sewing more often is my way of marking notches in the cut fabric pieces. Before, I'd cut the notches outward as little triangles just like the pattern pieces, but now I make a small snip within the seam allowance to mark my notch. I find this so much easier to do, though it does take a keen eye to keep track of them all! And it may not be the best choice for certain fabrics.


 Applying interfacing to the facings.
Clipping the seam/hem allowance so I could turn the edges.
Once that's done, it's time to sew the facing to the neck. First, I sewed around the curve of the neck, then sewed the back facing along the slit with the guidelines which I sewed earlier. Once that's done, I slashed along the slash line as marked in the pattern, and then trimmed the seams and cut into the corners of the bottom of the slit carefully but thoroughly so it would sit nicely when flipped around. I pressed carefully and well after flipping the facing to the wrong side. You could understitch the facing at this point as well. That will help keep the facing to the inside of the tunic.


I'm very pleased with the finished product, and I'm very grateful to get to keep it for myself. I think it's one example of how fabric choice can really elevate these simple patterns!


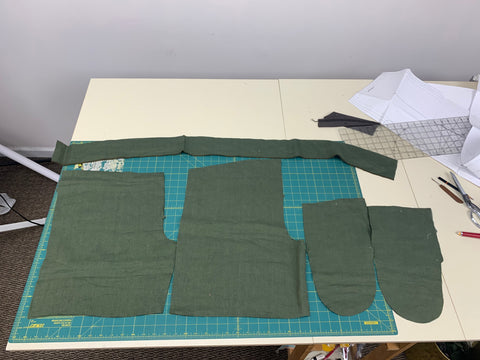
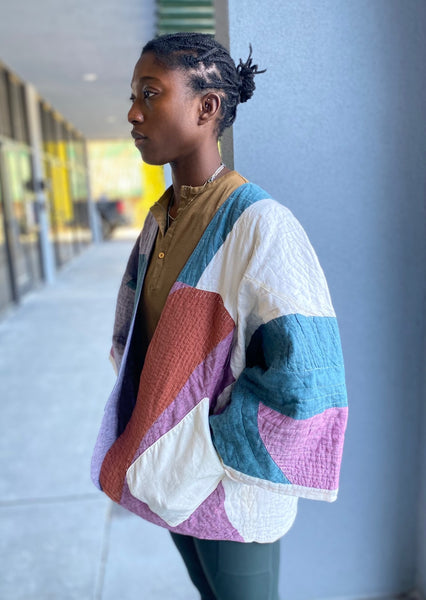
by Esi Hutchinson
Hello! Today I will be showing everyone how I made a quilted jacket from the Basic Jacket pattern using an arbitrary patchwork assembling process, similar to Crazy Quilting.
I was inspired to do this by the quilted jackets that went into our inspiration post, as well as all the gorgeous scraps of linens we had laying around (we have most of these linens in stock here), as well as crazy quilts that I'd seen in the past. Here is a linked video about Crazy Quilting. The Crazy Quilt - The Ultimate Stash Buster! - YouTube
This was my first time quilting a garment, so I will give a few tips on what worked and did not work for my personal process. Making a patchwork garment is a great way to use the scraps that you haven't wanted to throw away of your main fabric, and with this project you can do the outer and possibly the lining if you have enough scraps.
I have selected most of the linen scraps that Folkwear had left over from previous projects and started to cut them up into large shapes with straight edges. You may cut them into whatever size and shape you wish, or cut them into equal sizes and shapes to make the patchwork process more straight forward.
This is how I started. I just cut straight edges on the scraps and started to sew them together to make a large piece of fabric that I could cut the pattern from.


It is helpful to press after you have sewn each piece together. Either pressing the seams open or pressing them to one side. Don't worry about finishing the raw edges, because you will be quilting all three layers of fabric together encasing each edge. And, the jacket has a lining so you won't see the inside.


Every now and then I placed the pattern piece on the patchwork cloth I was assembling to make sure it would be big enough.

Sometime later I came out with this.

Make sure to press the patchwork fabric well before cutting out the pattern from it. It's important that the pattern pieces are cut out to be the same size before your start to sew the jacket together. This will prevent a headache when sewing the jacket together as well as bunching when quilting the jacket.
I cut out my pieces for the Outer Layer from the patchwork above. I serged the edges around the pattern pieces, but depending how sturdy your fabric is you may not need to finish the edges. For fabric edges that are on the bias or loosely woven fabrics, it may be best to just staystitch the edges of the pattern pieces, especially around the curves. Actually, it would probably be best to staystitch all the edges of the pattern pieces before finishing them.


Now that the outer layer is done, it's time to cut the lining and inside batting. For this jacket, I used a white flannel for a lightweight layer.
If you'd like, you can use the same patchwork process for the Lining that you used for the Outer Layer, if there are enough scraps. I had large enough pieces in two different colors that worked for the Lining.


Flannel cut from the same pattern piece as the jacket.


Now that the front and back pieces are all cut, check again if they are all the same size, and trim edges if needed.
I then followed the instructions from the pattern: With right sides together, sew outer Front/Back pieces together at center back seam. Press seam open. Repeat with lining and with flannel (batting).
Then, I basted the raw edges of lining to the flannel wrong sides together, making it one piece.

With right sides together, I stitched the Front to Back outer layer at underarm/side seams; trimmed and clipped seam allowances, and pressed seams open. I repeated this with the lining/flannel layer.

Decide where to place the pockets. You can place them as indicated in the pattern, or angled up further from the original placement lines indicated. I angled the pockets up a little bit, then topstitched the pockets to the outer layer of fabric. I decided to use one solid color for my pockets, I thought it would be a nice contrast. If you want to quilt the whole jacket (i.e. also under the pockets), you will need to add the pockets after the jacket is finished and hand-stitch the pockets to the jacket.

I put together all layers of the Jacket as instructed.
If you wish to not stitch along neckline and hem edges as indicated in STEP THREE of the instructions, just layer the fabrics as they would be in a finished jacket. You can baste the layers together to prevent shifting and then trim any excess fabric from the edges when you are finished. However, you will have to bind the neckline and hem edges. You can use bias tape to finish the edges.
Quilting Time!
I practiced stitching on a separate piece I made similar to the Jacket to get a sense of the thickness I would be working with and whether or not to change the tension and the length of the stitch. Troubleshoot with your sewing machine to see what length and tension works best with your fabric thickness. I used the stitch length 3 so it would not be too tight and easier for me to take out stitches if I made a mistake.

 Practicing on more scraps
Now starting to stitch onto the Jacket. I bascially decided to give each scrap section its own stitching design.


Drawing onto the fabric is helpful, it makes the planning process easier. Use a fabric marker, Crayola markers are washable.


This is what the inside looks like so far.

Planning the lines for the back of the Jacket.

 Almost done!

I am finished quilting the Jacket, and used the same color for the cuffs to match the pockets. The cuffs neatly and easily bind the sleeves. This is basically the same method you would use to bind the front, neck, and hem of the jacket if you stacked the layers.
My only other advise would be to baste the layers together a bit more than I did to avoid shifting fabric. I enjoyed this project (such beautiful linens!), and I hope you are inspired to try something like this yourself!
Here is the final product! Thank you! Check out the pattern here, and try it yourself!


The patterns in our Basics Collection are perfect as a base for creativity - from fabric selection to embellishments to styling - these patterns can take you in many directions. Today I am going to share a few ideas for creating and styling the Jacket and Tunic. And check out our Pinterest inspiration board for more ideas and to get your imagination working while thinking about what you want to make with these patterns.
Jacket
The Basics Jacket is short and boxy, has wide built-on sleeves, and is fully lined. The front and back are sewn as one piece, with a back seam, and there are pockets!
First, if your fabric has a large print or stripes/plaids, etc., you don't necessarily have to have the back seam. You can cut the front/back as one piece by placing the pattern piece on the fold (taking out the 1/2"/13mm seam allowance). Just make sure your fabric is wide enough to do this.
Fabric choice is another consideration for making this jacket. You can make this jacket out of everything from heavy-weight denim to light-weight silk chiffon. Medium to heavy weight fabrics, or fabric without a lot of drape, will give you a boxier look, a more utilitarian jacket (good for outerwear, work, etc.), and will potentially be warmer. Fabric with drape and lightweight fabrics will be perfect for warm weather, making a cover up, or as a daily-wear jacket.
For one of our samples, we made the Basics Jacket from a kantha cloth, lining it with muslin (cause kantha can be expensive to use for both outer and lining) and using the back-side of the kantha for the pockets. For a heavier jacket, lining with another section (or back-side) of kantha would be warm, cozy, and beautiful.


This jacket is also perfect for quilting. The two layers (with or without a layer or batting in between) make it a great choice for adding the interest and warmth of extra stitching for loft. Make it in solid colors or patchwork. Either would be beautiful. We saw several quilted jackets that inspired Esi to make one from linen scraps we had left over from other projects. She will have a blog post soon about how she made her quilted jacket. Check out the inspiration (Pinterest links) below and Esi's jacket.
 Pinterest link (Eileen Fisher).
 Pinterest link (Anthropologie).
Esi's quilted Basics Jacket
Finally, because this jacket is fully lined, it is very easy to make a reversible jacket. Esi has a blog post about how she made the jacket reversible using two beautiful organic linens.


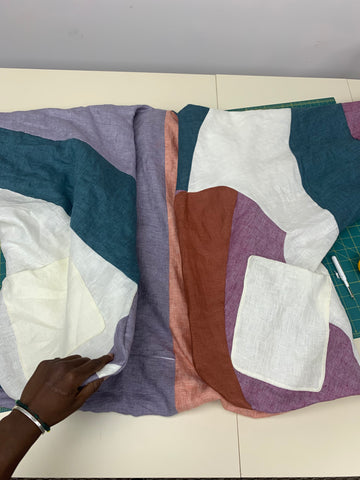
Hello, my name is Esi, and I am a Creative Assistant at Folkwear. Today I will be starting a new sew along for making a reversible Jacket using the pattern from the new Folkwear Basics Collection. The great thing about the Basic patterns is that it allows and encourages personal creativity through different embellishment techniques, embroidering, bead work or painting. One could even quilt themselves a Jacket from this pattern (hint: I'll be doing that in another blog next month!). However, this sew along will be more basic with a little twist by making the Jacket reversible. The Basics Jacket comes in sizes XS-3XL - the sizing and finished measurements are stated in the pattern.
Choosing Fabric
First, I selected a fabric that would keep the jacket light and breezy. I used a coral and and off-white linen - one for the outer layer, one for the inner layer. You can choose any fabric that is medium to light weight for this jacket. Even heavier weight fabrics like bottom weight wools or denim would be fine. Since the jacket is seamed around the edges, the bulk can be an issue if the fabric is too heavy. For a reversible jacket, the outer layer and inner layer should be about the same (or the same) weight. If you are making a regular jacket (i.e. not reversible), then you could use a lighter weight fabric for the inner layer. It would be best that the inner layer fabric is the same weight or lighter weight than the outer layer.
Cutting Out the Pattern and Fabric
For the reversible jacket, cut out all of the pattern pieces except for the cuffs in each of the two different colors you have chosen.
You will also need to cut out an extra set of pockets so you will have one set on the inside and one set on the outside of the reversible jacket. You will need to cut 8 pocket pieces rather than just 4. You can cut pocket inside and outside pieces from the same fabric or from different fabric.
For the Cuffs, we will be using half of the original Cuff C and adding a 1/2" (13mm) seam allowance to make one Cuff with two different colors. One color will go to one side, the other color will go to the other side - when the jacket is finished.
To do this, take the pattern piece C and draw two lines, one in the center and another 1/2" (13mm) away from the center line. The line 1/2" (13mm) above the center line will be your new cutting line. To be able to use the Cuff pattern piece again, just fold the remainder of the pattern piece to the back at the new cutting line. And remember to transfer the notch mark to your new cutting line.

Now, cut four of Cuff C with the new cutting line: two in one color and two in the other color.
If not making a reversible jacket, you can just cut the cuffs as the pattern says. Or, even if you are making the jacket reversible, you can just choose one color to be the cuff, and not make this adjustment to the cuff. Just cut out cuff as pattern says.
Sewing
Making this jacket reversible means that we are going to sew the jacket together a little out of order from the pattern.
We will start with the cuffs: with right sides together sew two different color cuff pieces together with a 1/2" (13mm) seam allowance. Trim, and press seams open. repeat step with other Cuff.


Now we are ready to assemble the Jacket.
STEP ONE: JACKET FRONT AND BACK
Staystitch neckline edge on JACKET FRONT/BACK A, from center back to notch 3 on all four pieces. To staystitch, stitch ⅛" (3mm) from seamline within seam allowance, ⅜" (1cm) from raw edge.
With right sides together, sew one set of Front/Back pieces together at the center back seam, matching double notches 1. Press seam open. Repeat with other set of Front/Back pieces.
 Stitching center back seam of white linen layer
With right sides together, stitch Front to Back of one color at underarm/side seams, matching notches 2 and 5. Trim seam allowances, clip seam allowances along curved underarm area, and press seams open. Repeat, with other color.
 Stitched underarm/side seam of coral linen layer.
STEP TWO: POCKETS
With right sides together, sew two POCKET B pieces together, leaving open 2" (5cm) to turn on one side of the pocket. Trim seam allowances and corners, notch curves on the bottom of pockets, turn right side out, and press gently. Slipstitch opening closed. Repeat with remaining Pocket pieces. If using different fabrics for the inside and outside of the pocket, be sure to match them correctly (i.e. one inside fabric to one outside fabric).
Optional: Top stitch close to top edge of pocket (side that is not sewn to jacket).
 Two sets of pockets. One will go on one side of the jacket and one of the other. I also had one more of each of these - for two pockets to be on one side and two on the other - for a reversible jacket.
Decide where you want to place the pockets. I have chosen to place them straight up and down and not angled as the pattern indicates.
On one jacket layer, baste pockets to right side of front. Stitch close to outer edge of pockets. Backstitch at each end. Tie off thread ends at dots. Bartack at opening edges for a more secure pocket opening.
 White pockets on coral layer.

Coral pockets on white layer
STEP THREE: LINING
Turn one jacket right side out and slip into the remaining jacket, so that right sides are together.

White layer inside coral layer. you can see that I have pockets on both layers.
Stitch along neckline and hem edges, matching center back and side seams, and notches 3. Trim seam allowances.

 Everything is lined up nicely and I just stitched around the edges of the neck, front, and back.
Turn the jacket right side out through one sleeve, and press the neckline and hem edges gently.
On right side of jacket, topstitch along neckline and hem edges. Topstitching will keep the jacket layers from shifting much.
 Jacket right side out and topstitched.
Baste raw edges of sleeves together, within seam allowance, with wrong sides together, matching side seams and notches 4.
 Sleeve layers basted together (along where arrow is pointing).
STEP FOUR: CUFFS
With right sides together, stitch each SLEEVE BINDING C piece together at short ends. Press seams open.
 Short ends stitched together of reversible cuff piece.
Press up ½" (13mm) seam allowance along one edge; trim seam allowance to ¼" (6mm).
 Turning up 1/2" (13mm) of the coral fabric on this cuff piece.
With right sides together, stitch binding to sleeve end, matching notches 4 and seam lines. Trim seam allowance and press seam toward binding. I made this jacket so that the white cuff side showed on the coral side of the jacket; and the coral side of the cuff showed on the white side of the jacket.
 This is the inside of the cuff. Cuff is sewn to the sleeve and seam is pressed to toward the cuff.
You can now turn the pressed edge of binding to the inside of sleeve so that it slightly overlaps previous stitching and baste in place. You will be folding the cuff on the stitching line created in the first step when you put the two colors together. On right side, stitch in the well (i.e., stitch in the ditch) of the sleeve/binding seam, making sure to catch the binding on the inside with stitches. Or you can slipstitch the binding on the inside. I stitched in the ditch, making sure my bobbin thread matched the color of the cuff below it.
 Stitching in the ditch - stitching the cuff down.
You now are finished with your reversible Jacket! Pockets on both sides, this is a fun jacket to be creative with.


by Molly Hamilton
Folkwear continued to stay busy this year, growing, creating more patterns, adding more PDFs. We also added a few new people to our team. Victoria joined us in March and has been packing and shipping orders since then, as well as sewing samples and creating art for Folkwear. We have a new bookkeeper (thank goodness, because I was becoming overwhelmed doing it myself), and a new social media manager (the other Cynthia).
There have been some major personal challenges for me this year (I lost my husband to his illness and am now a single mom of four children), but we have also had some business challenges. Mainly, our pattern printer shut down for good. We have worked to transition to new options and continue to work to get the best prices and quality for our pattern printing. This has also encouraged us to digitize as many patterns as we can - also making them into PDFs at the same time. We have also expanded the sizing of several patterns as they have come up for printing. And I am excited to partner with Sarah Pedlow of ThreadWritten for her workshop on Mexican Embroidery. I also took a class with her this past year and it was so much fun - a perfect way to spend a relaxing afternoon, learning and stitching with other women.
Here are a few accomplishments made at Folkwear this year.
New pattern releases:
PDF patterns released:
Patterns sized up this year:
Tutorials:

Sew-alongs in 2021:
Cynthia A. wrote some interesting pieces on fashion and clothing history:

We also made a number of new garments for Folkwear samples and to wear for ourselves.

We did a lot this year. We juggled a lot, we managed a lot, and we accomplished a lot. We weren't perfect. Things went awry at times; sometimes mistakes were made. But, that is part of the process. I am immensely proud of and grateful for our Folkwear team. These women are talented, kind, and hard-working, and have carried the company through this year beautifully.
And a HUGE THANKS to our customers who have supported Folkwear this year (and reached out to me personally). It means a lot that you support this small and hopeful business. We hope that 2022 looks a bit brighter and that Folkwear keeps thriving.
And we wish for you, a wonderful new year!


This simple, fully-lined jacket is the perfect piece - no matter the season. The roomy fit, simple open front design, and built-on sleeves create a lovely jacket that can be made with many different fabrics. The design features a back seam and side seams, patch pockets, and bound sleeve openings. Because this jacket form is so simple, it makes a perfect canvas for creativity. Show off your quilting, applique, fabric painting, or embroidery skills. Use coordinating or unique combinations of fabric for outer layer and lining - the possibilities are endless. This is also an easy project to make a reversible jacket (we will have instructions on our blog in January).
Available as a PDF pattern, on pre-sale now for 25% off (you will get a link for the pattern on January 1)

Our easy-to-sew, low-calf-length pinafore dress features two patch pockets with pocket bands and wide straps that button in front. A perfect everyday dress that can be worn in any season, it is practical and simple. Wear over a shirt and leggings for winter, or on its own or with a tank top for summer. This makes a great lounge dress, work/garden smock, or comfortable dress to wear out and about.
Available as a PDF pattern, on pre-sale now for 25% off (you will get a link for the pattern on January 1).

These simple, elastic-waist pants are super comfortable. Easy to sew and easy to wear, they feature a high-rise waist and front pockets with a pocket flap detail that is fun to embellish (add embroidery or buttons!). The waistband casing can be altered for a drawstring if that is preferred. Make these in a crisp cotton for work, twill for gardening, or soft flannel for lounging.
Available as a PDF pattern, on pre-sale now for 25% off (you will get a link for the pattern on January 1).

This easy-sew tunic pattern features a handkerchief hem, side vents, and dolman, three-quarter length sleeves. The fit is roomy and loose, making a comfortable and stylish piece to wear over leggings or jeans. The high neckline is closed in the back with a hook-and-eye at the slit. Gorgeous in silk for a dressy look or perfect in a rumpled linen, this tunic can be an everyday piece to wear again and again.
Available as a PDF pattern, on pre-sale now for 25% off (you will get a link for the pattern on January 1).

Available as a PDF pattern, on pre-sale now 25% off (you will get a link for the pattern on January 1).


Welcome back! Its Day Two of the Cynthia's Cookie Apron sew along and we will finish up the apron by adding the facing, get a quick lesson on how easy it is to roll seam edges for a clean garment edge finish, hem the edge on the apron, and consider different ways to finish and attach the straps.
Go here for Day One of the sew along.
Finishing the Center Front Seam (if not cut on fold)
If you cut your apron on the fold, this step does not apply. Since I cut my apron body in two pieces instead of on the fold, my apron has a seam on the center front. I have decide to finish the edges of the center front seam by simply turning the edges under and securing with a machine stitch close to the folded edge. Because my fabric is textured due to the pucker of the seersucker fabric, the stitching is barely visible.
However, this may not be the case for other fabrics. If you do not want to see the stitching on the apron front, you can hand-whip-stitch the turned under edge for a nearly invisible finish on the right side of the apron. You can also bind the edges or serge to finish edges. Finishing the center front edges should be done prior to attaching the facing and hemming.

Adding Facing to Apron
Facing Considerations: Facings are a great way to finish a garment's raw edges and strengthen areas that get a lot of wear, all at the same time. However, this apron can be made without the facing if you like, but you will need to consider how to finish the raw edges. Or, you could line the entire apron. Binding the edges with bias tape would also work, while also providing an extra design element to your project. A serged or zig-zag stitch edge would be a great option for an apron that needs to be made quickly. Depending on the weight or thickness, ribbon would also serve as a nice edging, but only if the ribbon will lay smoothly along the curved bottom edge such as Petersham.
Since this apron version is meant to be rather nice and I intend to wear it a lot, I am adding a facing. My fabric is a heavier medium weight, so I have not added interfacing. It is fine to interface the entire facing or just the straps area if you feel your fabric could use a bit of strengthening. If you intend to add interfacing now is the time. Add either sew-in or fusible interfacing to the wrong side of the facing.
Note: Use an interfacing weight that is close to or lighter in weight to the fabric you are using. Interfacing that is too heavy, will result in too much bulk, especially on corners and when the edges are turned.
Hint: Using fusible interfacing you can eliminate bulk in the strap seam allowances. Cut the interfacing just shy of the seam allowance. To do this cut the interfacing 1/4-inch (6mm) smaller than the pattern piece on all edges. This will give all the extra structure needed without the interfacing getting caught up in the seam allowance and it's stitching, therefore eliminating the bulk in the strap area. This will also allow for easier turning of the straps.
Sewing Facing: With wrong side facing up, turn under the bottom edge of the Facing B by ½” (13mm) and press. Top stitch close to turned under edge. Add interfacing to facing or straps now, if desired.
Note: To eliminate bulk at the bottom edge on the facing don't include the interfacing in the turning of the edge.


With right sides together pin and stitch the Facing to the Apron, using ½” (13mm) seam allowance around all edges.


Trimming the Facing Edges
Clip corners and curves, and trim the seam allowance of facing and apron where facing is attached. This eliminates bulk and makes turning the facing easier and allowing for nice pressed finished edges. Take your time to carefully trim the 1/2-inch (13mm) seam allowance approximately by half and clip curves, as shown below.
Clip off the turned under tails on each side of the facing .


Carefully trim the bottom edge of the facing where it is attached to the apron as shown below. Do not trim away any of the apron hem. The remaining turned edge at the bottom of the facing will neatly tuck into the inside of the facing when turned right side out. This will create an uninterrupted edge to the turned under edge and hem.


The photo below shows the edges you need to trim on the facing.
Hold On: Don't trim the strap ends unless you are confident about the strap length.

Once the seam allowances are trimmed by half, clip the seam allowances on the curves. This will release the fabric creating a smooth finished curved edge when the facing is turned right side out and pressed.

Note: Be careful to not clip into or beyond the stitching.

Clip the slightest of curves too. Even curves that are not well pronounced, benefit from clipping.

Clip the corners of the strap edges (if sewn up and confident of the length) and bib front.

Turn the Facing and Apron right side out. The edges and corners should turn easily. The straps are like any tube and are a little trickier, so take your time and turn the strap portion right side out slowly, until the strap finally appears.
Note: Surgical clamps with teeth are handy tweezer-like tools good for turning tubes, loops, or straps. Because of the sharp teeth take care not to damage your fabric. I could have used my clamps for this turning task. However, the straps were easy enough to turn with just my fingers.


Rolling the Edges
If you are new to edge rolling, or not quite sure of your technique, I am sharing what I learned to do.
Rolling the edges of a garment is a small detail that gives your work a professional finish. The idea is to roll the main fabric slightly over and towards the facing to keep the facing edge from peeking out and being visible on any garment you make. This is especially true when the facing is a different color or a different fabric all together from the fabric used to make the main body of the garment. This is not a hard task, but some areas like straps can be tight and fussy. Sometimes heavier fabrics need a bit of massaging to make them cooperate in order to make the edges roll nicely.
Because the seersucker fabric I used is on the heavy side of a medium-weight, with elastic thread woven into the fabric to make it pucker, I decided to roll the edges and pin them in place before pressing.
Hint: After taking the time and effort to roll the edges you will be happy you used pins to secure the roll in place. You can roll the edges when pressing if you like. However, I find it helpful to at least try to ensure some tasks will go well before handling hot objects.
Hint: Use glass tip pins when using an iron. Plastic tip pins melt leading to ruin.
I began rolling the edges that I could get my hands into first. Simply, use your fingers on both the top and under sides of the fabric and tease the apron edge towards the facing or inside of the apron. Once you have the edge rolled, pinch the seam on the right side edge with your fingers and pin to hold, then press, as seen in the series of photos below.
In the photo below, my fingers on my right hand are under the fabric (sandwiched between the wrong sides of the apron and facing) and my right thumb is on the right side of the fabric. I am using my left hand to pinch and finesse the roll.


Pins make pressing the roll edge easier.

Because of the way the straps are constructed, working your fingers on both the under and top sides is not an option. Instead, you will need to use a different technique. Roll the edges to the back of the strap towards the strap facing using your fingers in a rolling back and forth motion, until you can massage the fabric to a slight roll. Have a look at the video below to get the idea.
In the photo below you can see the edge of the strap slightly rolled to the back left edge starting at the bottom and working up the strap edge.

Hem the Apron
With wrong side of Apron facing up, turn and pin the side/bottom apron edge under 1/4-inch (6mm), then again 1/4-inch (6mm) and press. Top stitch close to turned under edge.
Tip: If you follow my blogs closely, you will have noticed how much I utilize a basting stitch guideline in my sewing. This technique eliminates having to measure as you go when turning or hemming an edge.
For this hem, machine baste 1/2-inch (13mm) from the edge. This stitch line can then be used as a guide to turn the edge under 1/2-inch (13mm), then turn under the raw edge 1/4-inch (6mm) or in half again, meeting the inside of the fold. Turn and pin as you go using the stitch line as a guide, then press and stitch the edge to finish. Once you are done stitching the hem in place, the basting stitch guide is easily removed.
You might be thinking... if the instructions tell me to turn the edge under 1/4-inch” (6mm), then again 1/4-inch (6mm)... then why not make a 1/4-inch (6mm) basting stitch to use as a guide. You can. But a 1/2-inch (13mm) guideline is easier to control and keep accurate.
If you look closely at the edge of the fold you can see the white basting stitch line guide.

Below the raw edge is turned under again into the fold.

Turning and pinning the hem takes time, but the basting stitch guidelines eliminates the need to measure.

Finishing the Straps
Try on the Apron with the straps crossed in the back to evaluate the fit. The straps are intended to be sewn on the outside front of the Apron, but you can also finish them on the inside of the Apron. It simply depends on if you want them to be visible.
Note: When it comes to straps, sometimes you really cannot evaluate how long they should be until the end. Aprons are not typically fit sensitive, but the length of the straps matter somewhat for comfortable wearing. Personally, I prefer to add extra length to my straps when cutting, just in case. Too much length can always be trimmed away. If you are making this as a gift, you should be fine with the strap length of the pattern.
If you added extra length to the straps and they have ended up being too long, trim the excess, but remember to include the seam allowance. Turn the edges to the inside for a nice finish. Press and stitch the edges together to close, using a machine stitch close to the edge or hand-whip stitch.
Once straps are the length you want, you can sew the straps to the apron front. Sew a small box 1.5”x1.5” (3.8x3.8cm) over the strap ends at the top of the apron front. This will secure the straps to the apron. If you want the straps sewn to the inside of the apron front, do the same as above, just put the strap ends on the inside of the bib.

OR if you are not in the mood for making buttonholes as it turned out to be my case, add a non-functioning button anyway, minus the buttonhole. Position the button on the strap as if using a buttonhole, then stitch it on going through the strap, and apron/facing layers. No one will know the difference. I added buttons to the pockets too... just because.


Hint: Snaps can be used as well. You could even use a snap to the underside of the strap (with its mate on the bib front) for practical reasons and add a button on the right side of the strap for a decorative touch. Large snaps will work best.

OR, if you want to add proper buttons and buttonholes to your apron. See the blogs Buttonholes 101: Part One and Two on Folkwear’s website if you need assistance.
Adjust the Straps
You can alter the fit of your apron by making the straps adjustable. Position the button on the bib as you normally would for a buttonhole and stitch it in place. Depending on the amount of adjustment you would like, make more than one buttonhole spacing them in even increments that you determine... maybe make two or three? Of course, you will need plenty of strap length to do this.

Since I am pretty sure you will make more than one apron, consider giving this a try. Making adjustable straps is especially handy if making an apron for a child in your life. Be watching for an apron for little people coming soon!
I hope you have enjoyed making the Folkwear Cynthia's Cookie Apron. It is truly a pleasure to share something I personally enjoy so much. I can hardly wait to see what you make! Please share your creations and include yourself "in action" wearing your apron on Folkwear's Customer Galley (if you purchased the pattern, you can review it with photos too!)
Happy Apron Making!!!
Cynthia
P.S. Don't forget to try my cookie recipe for the holidays.


By Cynthia Anderson
This is Day 1 of the sew along. For Day 2, go here.
Today I am going to start a sew along for Cynthia's Cookie Apron. This sew along will be two days, covering not only how to sew the apron, but all the tricks and tips for working with different fabrics and widths as well as options for finishing. Today we select and cut fabric and sew on the pockets.
Each day, I find myself slipping on this cross-back apron no matter what I intend on doing (not just baking cookies!) simply because I am addicted to so many handy pockets. Besides protecting your clothing with a really nice amount of coverage and adding an extra layer of warmth when it is cold out, this apron is as fun to wear as it is practical. If you are like me, you will make yourself an apron for gardening and dirty jobs, an apron for cooking, an apron for sewing and knitting, and an apron for house cleaning. And you can expect friends and strangers alike to want one too.
I decided to share this pattern through Folkwear, because I was asked "where did you get your apron" every time I wore it to the grocery store, hardware store, or the garden center. Yes, I often forget I am still in my apron when I go out. The practical charm of this apron seems to speak for itself.
This apron comes in a range of three sizes, Extra-Small/Small, Medium/Large, and Extra Large/2XL. Make it for yourself or make as a gift to someone special. Make it to liven up your holiday making or simply to enhance your everyday chores.
Front and Back Views

Gathering Materials
Fabric Choices: Any light to mid-weight woven fabric such as cotton and linen. Quilting cotton is a good choice as well. Sizes XS/SM will only fit on fabric 54” (127cm) or wider and MD/LG and XL/2XL will only fit on fabric 60” (150cm) or wider. See below for tips on using narrower fabric.
If there was ever a garment just begging to be used as a canvas for creativity, aprons are it. Mix and match fabrics, add trims, ribbon, lace, buttons, snaps, hand and/or machine stitching, embroidery, cross-stitching, appliques, hand painting, and anything else you can think of. Of course, there is a simple beauty in a simple fabric with a touch of top stitching or not. You cannot go wrong with anything you are inspired to create.
Notions: Thread; two ¾” (2cm) buttons for straps (optional).
Interfacing can be used for the facing, but not required depending on the weight of the fabric used. The straps can be interfaced and not the bib portion if you like. If using interfacing, ¼ yard (.23m) is required.
CUTTING YOUR FABRIC: Sizing, Adjustments, and Considerations
There are some adjustments to consider before cutting the pattern from fabric. You will first want to determine the size you want to make. This pattern has a lot of room for each of the sizes. You can go by the grade rule we have for it to get pretty close to the size you want. The bust is probably the most important measurement for this pattern since there is lots more ease everywhere else. But, remember the cross-back straps will also allow for some room as well. If you fall between measurements, you can likely go with the smaller size. If your measurements are larger than the pattern indicates, you can pull the center fold like away from the fold to add width to the pattern without other changes.
Also, before cutting into your fabric, predetermine the strap length required for comfortable wearing. If you would like the straps to be longer/shorter or to make them adjustable, add or subtract the length you desire to the ends of the strap portion of the pattern before cutting the fabric. Remember to add a seam allowance to the adjustment.
Hint: If you want to make your apron a bit wider, pull the center front edge of the apron body pattern piece away from the fold half the measurement needed.
Working with Fabric Width and Wide Pattern Pieces
This apron design provides nice coverage both front and back, but this makes the pattern pieces very wide. Due to this extra bit of roomy coverage, some fabric widths may be a bit too narrow for the pattern to be cut on the fold. This is not an uncommon occurrence when making garments with width and trying to use what you have on hand. Cutting on the straight-grain fold is ideal, but not always possible.
Depending on the width of your fabric and the size you wish to make, you may or may not need to cut on the crossgrain. Don't let less-than-ideal fabric width be a deterrent to making the larger sizes. Working with and around fabric width is an unavoidable aspect of the sewing experience. In this sew along I will share my thought process in working with a fabric I already had and making it work for this apron pattern, despite its narrower width.
Because my stash is a great place to shop for fabric, I decided on a mid-weight cotton seersucker stripe, which has a bit of holiday candy cane flair. Below, you can see how a size small fits on the fold (on grain) of this 52 inch (150cm) wide fabric. The fabric is a tad too narrow. Not to worry, there are options for working around this issue!


Cutting on the Cross-Grain
One Option would have been to cut my apron body on the fold with the fabric folded on the cross-grain. This would have forced the stripes to run horizontally on the body of the apron. Which would work, but was not what I wanted. However, this is a good project for cutting on the cross-grain, especially if using a solid fabric that is the same on both sides and does not have any directional concerns like nap. Luckily, lots of solid fabric fit this description.
Fabric that is stable can handle being cut on the cross-grain and is perfectly fine for this project. However, you do want to avoid cutting on the cross-grain if the cross-grain gives too much when gently pulled.
Cutting Using a Single Layer of Fabric
Another option is to open up the yardage, right side of the fabric facing up, so the fabric is in one layer and cut two sides of the apron making a center front seam. If you use the fabric in this way, it may be helpful to trace a second pattern for the apron body to make sure all the pattern pieces fit and lay out as they should.
Because I really wanted the stripes to run vertically, my only option was to open the fabric out flat for the positioning of the apron body pattern pieces. Because my fabric was the same on both sides and the pucker of the seersucker was not directional, it did not matter if the two apron body pattern pieces were not positioned going in the same direction.
Notice the Patch Pocket is positioned to be cut on the cross-grain and the Triangle Tissue Pocket is positioned to be cut on the straight-grain. Working with stripes is a great way to get creative.

Cutting two halves means you have a seam in the center front of the apron. Because, this method of laying out the pattern creates a center front seam, seam allowances are needed. You can add 1/2-inch (13mm) seam allowances to the center front of the apron when cutting out the pattern or simply pull the pattern away from the selvage edge 1/2-inch (13mm), as I ended up doing in the photo below. The nature of the seersucker fabric and the aligning of the stripes makes the center seam hardly visible.

Note: If the fabric did have directional issues to consider, then I would have needed a bit more yardage, so both apron body pattern pieces could be flipped and positioned going in the same direction while lying flat. Or, be sure the fabric is wide enough to accommodate cutting on the fold.
Learning to factor in "fabric width" is a part of the sewing experience. Simply put, fabrics come in varying widths and every sewist eventually is faced with "how do I make this work?"
Since my fabric was not wide enough to cut the apron body on the fold, I cut two pieces with seam allowances added. In the photo below the two apron pieces are pined and stitched with right sides together, using the 1/2-inch (13mm) seam allowance. The seam is pressed open. The only difference between cutting on the fold verses cutting two pieces is the center seam.

Below is a close-up view of the center seam of the apron body with the right side facing up. The pin indicates the center seam. Because of the seersucker fabric pucker and the aligning of the stripes the seam is hard to see.

Laying Out the Apron Facing. If cutting the apron on the fold, whether on the straight-grain or the cross-grain, then the facing should be cut in the same manner. If cutting the apron flat, you can either cut two facing pieces on grain, just like the apron body pieces, with added seam allowances, or cut the facing on the fold.
Even though, I cut the apron body laying flat with added seam allowances, I went ahead and cut the facing on the fold. Since the center front of the apron is sewn using a 1/2-inch (13mm) seam allowance, the apron is now the same width-wise as it would be if cut on the fold. So, the facing should fit perfectly.
Below the Facing and the Bib Pocket are cut one on the fold.

Cutting the Patch Pockets with Optional Tissue Pocket
Really deep pockets make an apron a great place for keeping things as you go about your daily "making and doing." The patch pockets on this apron design are not only deep, but they sit a bit high on the apron to prevent any objects from falling out when bending over. Another feature is the Tissue Pocket that really requires no explanation and is a nifty pocket for storing little things like rings, buttons, lip stick, as well as items that need their own specialized location like a tissue or hanky. Below are all the pocket pieces needed to get started. Notice how I switched the directions of the stripes to add a bit of whimsy and interest.

SEWING THE APRON
Patch Pocket
Fold under the long side edges and bottom edge of each of the rectangular Patch Pocket by ½” (13mm) and press.

Turn under the top edge of each patch pocket by ¼” (6mm), then again ¼” (6mm), and press. Stitch close to turned under edge.

Repeat for other Patch Pocket.
Triangle Tissue Pocket
The Tissue Pocket is sewn to the Patch Pocket creating a small triangular pocket to keep small things like rings or a tissue handy.
Turn under and pin the two angled edges of each Tissue Pocket by ½” (13mm) and press.

Turn under and pin the top edge of each triangle by ¼” (6mm), then again ¼” (6mm) and press.

Trim excess corners at each edge of triangle. Stitch close to turned under top edge.

Below is the right side view of the Triangle Tissue Pocket with all the edges stitched and trimmed. Notice the pin holding the bottom point of the triangle neatly in place before being added to the Patch Pocket.

Repeat for other Triangle Tissue Pocket.
Add the Triangle Tissue Pocket to the Patch Pocket
With wrong side of Triangle Tissue Pocket to right side of Patch Pocket, align the top edge of the triangle to the top edge of the patch pocket.
The pins on the top of the Triangle Tissue Pocket are used to provide extra hold when stitching. The top edge is not sewn closed.

Pin and stitch along the angled sides close to the two angled edges. Leave the top of the triangle open creating a triangle-shaped pocket.


Repeat adding other Triangle Tissue Pocket to the other Patch Pocket.
Bib Pocket
Turn under the two side edges and bottom edge of Bib Pocket by ½” (13mm) and press.

Turn under the top edge of bib pocket ¼” (6mm), then again ¼” (6mm) and press. Top stitch close to turned under edge.
Below is the wrong side of the bib pocket facing up, with the top edge turned under and stitched.

Adding Pockets to Apron
With right sides of apron facing up, place wrong side of Patch Pocket-Triangle Tissue Pocket Combo and Bib Pocket to apron front aligning with dots as indicated on the pattern. Pin and stitch each pocket close to the pocket edge on the side and bottom edges. Be sure to backstitch at open edges of pockets. Top edges are left open.
Note: When adding the Patch Pocket-Triangle Tissue Pocket Combo the pockets are positioned on the apron body at a slight angle when the apron is laying out flat. This is a trick that will allow the pockets to hang straight when worn. The pocket placement on the pattern might seem odd... but it is intentional.

Optional Pencil Pocket
To create a Pencil Pocket, stitch a vertical line slightly wider than a pencil through both layers of the Bib Pocket and Apron. You can make more than one pencil pocket or make additional pockets any way you like using this technique. I made a pocket for my spectacles the same way, by making the vertical stitching line a bit wider than my spectacles. Be sure to back stitch at the beginning and end if the vertical stitching line for stability.
Masking tape or removable tape makes a great stitching guide. Simply decide the width needed, being sure to leave a tad of room for an easy fit, then add tape as a guide, and stitch.
Below, the spectacle pocket is taped off on the left side of the bib and the pencil pocket is taped off on the right side of the bib pocket.

Using tape as a stitching guide is quick and easy. Just go slowly to avoid stitching into the tape. Notice the needle alignment to the tape guide below.

Stitching the on the left side of the tape, using the tape as a stitching guide to make the pencil pocket.

To make the spectacle pocket, the stitching is made on the right side of the tape.

When stitching is complete, simply remove the tape.

Now, the Patch Pocket-Triangle Tissue Pocket Combo and Bib Pocket are sewn to the apron body and the extra pockets on the bib are done too. Pockets make a great apron even better. Plus, after a busy day of making and doing, if something goes missing... just look in your apron pockets.

Join me on Day Two of the Apron Sew Along, to learn how to add the facing, finish the straps, and hem the apron. This pattern will be featured throughout the month of December and just in time for making yourself or someone special charming gift.


 Basics Collection

