-
Sewing Patterns
-
Fabric
- Sewing Supplies
- About
- Blog
- Gallery
-

We have written many posts on Halloween and costumes over the years! So today I am going to just round up these posts so you can revisit them all, get ideas and inspiration, and get to work on your (or someone else's) fabulous costume.
First, we have a detailed tutorial on making a witches hat. Which is perfect to pair with our 207 Kinsale Cloak (or 208 Child's Kinsale Cloak). We show you how we made the cloak for a child's costume (and decorations) here. And make the cloak even spookier with this tutorial on adding bats, a ruff, and a magic wand to the cloak!

Turn the 213 Child's Prairie Dress into a very cute witch's costume (also perfect for Harry Potter robes).

Dressing up as a character from Outlander? We have you covered in this blog post!

Want to make a great costume from the 1950s? The poodle skirt from our 256 At the Hop pattern is great for a blank canvas for design, as this blog post shows you.

Recently, we put together a list of Phryne Fisher costume ideas. She has constantly been an inspiration to many Folkwear fans (and we love her too!). You can see all the ideas for a costume with our patterns here.

Finally, some compiled costume inspiration from years past:
Costume inspiration for adults and kids from 2022!
Halloween at home - costume inspiration from Hollywood during the 2020 pandemic.

The clothes of Phryne Fisher, or "Miss Fisher", the protagonist of the popular TV series Miss Fisher's Murder Mysteries, have been inspiration to countless people. Phryne Fisher has the best vintage style! The series is set in the 1920s and there are loads of amazing clothes to be inspired by. And she wears them so well! We love Miss Fisher's clothes here at Folkwear as well, and hear from many of you about how much you love them also, so thought we would do a little "Find That Pattern" from some of her on-screen outfits.

First up, this this great bright red cheongsam. Popular in the 1920s, this dress developed from a Westernized version of traditional Chinese dress. You can make your own with our 122 Hong Kong Cheongsam.


Western fashion was strongly influenced by Asian fashion and art in the 1920s, and a kimonos (and haori) show up in several Miss Fisher episodes. This particular one has stunning embroidery on black silk. You can make something similar with our 129 Japanese Hapi and Haori or 113 Japanese Kimono patterns.


To get the look of this safari jacket and suit, you could use our 130 Australian Bush Outfit. The series (and books and movie) take place mostly in Australia, so this pattern is perfect! Our pattern has jacket, trousers, and shorts for men and women.


Next is this wonderful sailor outfit for a jaunty stroll down the boardwalk (or jetty) - a middie shirt with a classic pleated skirt. Use our 211 Two Middies to make a shirt like this! Extend the length to get the same look - lengthen/shorten lines are provided for the body and sleeves of this shirt.


Finally, this stunning coat can be made with our 503 Poriet Cocoon Coat - a design from the early 1920s. So elegant!

We do have a few other patterns that would also work for a Miss Fisher inspired outfit, such as our 269 Metropolitan Hat, our 1920s Flapper Dress (PDF), and our 270 Metro Middy Blouse.
Which patterns do you like the best? What Miss Fisher outfits would you like to recreate?

The lingerie sewing patterns that Folkwear debuted this year (510 Passionflower and 511 Juliette's Dream) are heavily influenced by the baby doll lingerie that developed and was popular in the late 1940s and the 1950s. Baby doll lingerie brings to mind sweet and sexy garments - lacy and loose and very short. Baby dolls are loosely defined as a garments with an empire waist and a skirt ending above the knee. This type of lingerie often has lace, frills, or bows on the hems, seams, or straps, giving it a typical lingerie look.
Baby doll lingerie is credited to clothing designer Sylvia Pedlar who created super-short nighties in the early 1940s as a response to war-time fabric shortages. Before this time, women's nightwear was generally long and voluminous, similar to our 224 Beautiful Dreamer. These newer short gowns were quickly called baby doll lingerie, though Ms. Pedlar reportedly did not like the term and would not use it.
Sylvia Pedlar was a successful designer who studied fashion in New York and quickly started her own fashion brand, Iris Lingerie, in 1929. She ran the company successfully until it closed in 1970, winning several fashion awards for her designs along the way. Ms. Pedlar focused on high quality lingerie and designs that drew on past romance as well as the seduction and sexual freedom of the 1960s. Not only did she bring the baby doll to popularity, she also developed a toga-like negligée designed for women who slept in the nude. In addition, she re-worked Victorian-style nightwear and added exquisite machine-made white work to many of her designs. But, for Folkwear, the baby doll gown she developed and popularized is what inspired our 510 Passionflower Lingerie Top and 511 Juliette's Dream (and several other designs we have in various stages of development).

Sylvia Pedlar design from 1962. Metropolitan Museum of Art, pinterest link.

Sylvia Pedlar design from 1958. Metropolitan Museum of Art, pinterest link.
 Inside label of an Iris Lingerie nightgown designed by Sylvia Pedlar.

The sleeping toga designed by Sylvia Pedlar, on the cover of Life Magazine, 1962. Pinterest link.
Baby doll lingerie balances cute and sexy and has a definite sassiness. The flowing skirts float out from under the bust to a very short, seductive length. And the lace and bows on hems and seams connote innocence of little girls outfits. However, sheer fabrics and often very low necklines are not at all childlike. Baby doll lingerie of the 1950s and 1960s could be made of several layers of sheer fabric in white or pastel colors. And as the lingerie style developed, jewel colors, black, and lace added to the interest of baby doll lingerie. Usually baby dolls were made with nylon, chiffon, or silk, and were embellished with ribbons, bows, and lace, making them flirty and feminine garments to wear.

Early babydoll lingerie designs - advertisement.

Vintage baby doll lingerie styles. Pinterest link.

Vintage baby doll lingerie dress with layers of fabric and short sleeves.

1960s Baby doll lingerie. Pinterest link.
While the baby doll lingerie style has waxed and waned in popularity, it has stayed a staple of lingerie design. Over the years, many changes have been made. The skirts have been made slightly longer, or even shockingly shorter. Necklines have been high and low, square, rounded, or made into deep V's. Some baby dolls have sleeves, some just small straps. Brighter colors have been used and skirts have been made less full. Some styles are open in front, and black has become a popular color. Not only all these changes, but baby doll lingerie turned into dresses - the baby doll dress became popular in the 1960s and 1970s thanks to Mary Quant's designs - and stayed a classic dress design. And now, for instance, now one may see a baby doll lingerie is not just worn as nightwear but worn over jeans and high heels. The nightwear-to-daywear trend includes this cute frock.
The juxtaposition of baby doll lingerie - sweet and innocent and sexy and seductive - has been what is intriguing and interesting of this style. And the style is surprisingly flexible, going from nightwear to daywear, from modest to quite the opposite. We hope you enjoy the options and possibilities with our patterns 510 Passionflower Lingerie Top and 511 Juliette's Dream.

By Esi Hutchinson
We have been excited about our new pattern #511 Juliette's Dream. It is one of a couple of patterns that have been sitting in Folkwear's development stage for many years - for several sets of vintage-inspired lingerie in larger sizes. We released the #510 Passionflower Lingerie Top earlier this year, and now #511 Juliette's Dream.
This lingerie baby doll dress comes in two views and sizes XS-4XL. View A has a lined bodice cinched at center front, and a two-tiered full layered skirt that dips lower in the front and back. View B includes an unlined bodice with an open front, as well an open-front full circle skirt with crisscross straps in the back. Both views have an empire waist with three cup sizes for each view. Juliette's Dream can be made into sassy lingerie in silks or sheer fabric, can be casual day wear with pants or leggings, perfect for a spring or summery day!
I am going to show you how I made View A of Juliette's Dream in this blog post, along with some tips and tricks for successfully sewing this cute top.
Fabric and Preparation
This pattern needs fabric that is light and drapey. Soft and flowy fabrics such as silks (charmeuse, habotai, crepe de chine, silk synthetics) or lightweight cotton voile, or lightweight linen, tencel/linen, tencel/twill, lyocell. For lining, use the same weight (or lighter weight) than your main fabric. For simplicity, I would use the same fabric as your main fabric.
Always pre-wash your fabric before cutting, unless it is laundered fabric.
For fun options, you can use contrasting fabrics for the upper and lower layers of the Skirt or even the Front Band D. Or, make the upper skirt in a sheet fabric or sheer lace. You could also make the outer bodice with sheer lace to match, using a solid lining layer.
I made this sample of View A with a tencel twill, and used the same fabric for all layers (and lining). It is very drapey, but has enough structure (and is not transparent) to make this garment work well as a top to wear out.
Sizing
Choose bodice cup size to fit your bust and cut the size that fits best according to measurements in the yardage chart. To find the best cup size, measure your full bust and high bust. If there is a 2” (5cm) difference, choose B cup; if a 3” (7.6cm) difference, choose C cup; and if a 4” (10.2cm) difference, choose D cup. To facilitate cutting out the pattern, mark your size along the appropriate cutting line(s) with a colored marker. The yadage chart also has approximate finished measurements, if that helps you decide which size to cut. I used the size Small for this project.
Seam Finishes
The bodice of View A is fully lined, but you may still want to finish seams if you have fabric that easily frays. Skirt seams can be finished with a French seam, or you could finish by serging or zigzag stitch. If you are using very lightweight, fine fabrics, you may want to hand finish seams or using pinking shears for a lightweight finish. The skirt hems are finished with a picot stitching, but I'll cover that later.
Cutting Out Your Pattern
Make sure you are using the different cutting lines for the specified view and for the two skirt layers needed for View A. Remember to also cut lining pieces for Bodice Front A and Back B. If you are using slippery fabric like silk, sheers, or lace, we have some great tips on cutting out the pattern here: sewing with sheers and lace, sewing with sheer fabrics, and sewing with bias or slippery fabrics. It really is best to cut everything in one layer of fabric for this pattern, especially for the skirts. And our layouts show how best to do that.


Pattern pieces cut out of fabric
Lets begin assembling!
Constructing the Bodice
First we sew the bodice pieces together. Right sides together, sew center front seam on Front Bodice A, and repeat with lining. Press seams open.

Pinning of Front Bodice Front A Outer Fabric and Lining

Pressing of curved seam for Bodice Front A
Then, right sides together, sew front bodice to Back Bodice B at side seams matching notches. Repeat with the lining. Press seams open.

Pinning of Front A to back B right sides together
Next we add the straps. Fold Strap C in half lengthwise with right sides together and sew along the long edge. Trim the seam allowance, and turn and press. Do the same for both straps. I like to use a safety pin or bodkin here to easily and quickly turn a narrow strap like this right side out. Pin/fasten one end of the strap and thread it through the tube of fabric to turn the whole thing right side out.

Close up of Strap C sewed right sides together
Sew straps to right side of front where marked on pattern, just inside the seam line. I sewed several rows of stitching to secure the straps..

Strap C pinned and basted to Bodice Front A
Now, place a row of gathering stitches ⅛” (3mm) on each side of the center front seam on the front of the bodice. Keep the center front seam allowance in gathering stitches to keep the area neat.

Gathering stitched placed on either side of center front of bodice.
Pull the gathering threads until the center front measures 2” (5mm) or as short as you can depending on the fabric you are using. Stitch gathered fabric close to center front seam to hold gathering in place. Repeat with the lining.


With right sides together, sew the outer bodice to the lining at the neckline and center backs, matching notches. Trim the seam allowance, clip corners, and clip to the center front stitching line. Turn right side out and press.

Pinned bodice lining to outer fabric at neckline and center back
Now, fold Band D right sides together lengthwise and sew using ⅛” (3mm) seam allowance. Turn to right side with a bodkin or saftey pin and press. You can press it with the seam to one side, or with the seam in the middle.

Sewn Band D right sides together at ⅛”/3mm seam allowance
Wrap the band around the center front over the gathered fabric, sandwiching both outer fabric and lining. Sew the band to the bodice at the bottom of center front within the ½” (13mm) seam allowance. I find that hand tacking the band to the bodice with a few stitches at the top and center of the gathers keeps the band in place better and looks good.

Band D wrapped around gathered Center Front.
Finally, baste lining to outer fabric on lower raw edge to keep everything in place for when you sew the bodice to the skirts.
If you want to cover your bodice/skirt seam with the lining, do not baste them together here. You will also want to keep the band on the inside (lining side) free of stitching so you can fold it all together over the seam allowance.
Skirt Construction
First, with right sides together, sew center front seams on Skirt Front E matching double notches. Do this to both the upper and lower skirts.

Pinned Center Front of Skirt Front F
Next, with right sides together, sew the center back seam from the dot to lower hem on Skirt Back F (again for both upper and lower skirts) matching the triple notches.


I serged the seams here to finish the skirt seams.
Now with right sides together, sew the skirt front to the skirt back at both side seams matching notches. Do this to both layers of skirt. This is a great place to do French seams, but I also just finished my seams with a serger.
Press all skirt seam allowances open (if not using French seams).

Pinned Skirt Front to Skirt Back at side seam.
We hem the skirts now to have less bulk to manage if trying to hem later. To create a picot (or false picot, as some call it) skirt hem set your machine for a long, wide zigzag stitch and sew along the bottom edge of your skirt. Work with wrong side of fabric facing up and be sure that outer swing of machine needle falls just outside the raw edge and the inner swing goes in far enough to keep the stitching from pulling out. If your fabric unravels easily, you may want to press under the raw edge 1/8-1/4" (3-6mm) before beginning so that the swing of the needle encloses the pressed edge. Also, you may want to tighten the upper thread tension to create more of a scallop effect. I highly suggest you practice this on a strap of fabric to get the stitch length, width, and tension that gives you the results you want.
For my skirts, I turned up 1/8" and used the folded edge as my edge for the picot hem. The picot hem will also give you a slight wave to the hem since you are working on the bias of fabric so there is a little stretch that happens.
Other hem options include serging, hand or machine roll hems, pressing under raw edge and slipstitching, or topstitching lace edging to turned under hem edge.

Folded edge of hem
Wow look at that hem, I love it!
 Finished hem.
To finish the skirts, clip to dot on both layers of the skirt back.

With right side of upper skirt to wrong side of lower skirt, sew the skirts together at the center back seam between the dot and the waistline.

Turn upper skirt to right side over under skirt and press seam. You will have finished the back opening with this seam, and both skirts should fall with their insides facing the inside of the skirt (upper skirt inside will face outside of lower skirt and lower skirt inside will face the wearer).

Now, baste both skirts together at the waistline. I would also stay stitch the Skirt waistline since its a curve, and this will help it from shifting when pining and sewing to the Bodice.

Skirt and Bodice Finishing
With right sides together, sew skirts to bodice at waistline, matching notches. Press seams toward bodice. Turn under the edge of the seam allowance at the center back and hand stitch to bodice lining.

Pinned skirts to bodice at waistline
Serge or zig-zag (or finish how you wish) this seam allowance.
Another option is to sew just the outer bodice to the skirts. Then fold under the seam allowance on the bodice lining and slip stitch that over the skirt/bodice seam. You will need to keep the front band in place and fold it into the seam allowance of the lining.
For closures, you can attach a wide bra closure to the center back, or sew on hooks and eyes where marked on the pattern. Or you can make your own button and loop closures.
Sew bias strip into spaghetti to form into 3 loops to match your button size, and handsew loops to the inside of the center back bodice as marked on pattern. I cut a bias strip about 10"(25.4cm) long. You don't need that much but it's better to have more than not enough. Your loops need to be at least a minimum 3/8"(9.5mm) longer than your buttonhole size to account for the 1/4" (6mm) to stitch them to the bodice and 1/8" (3mm) extra for the button hole. I'll show how I did mine below, but for more tips and a great tutorial on making buttonhole loops, check out this blog post.

Ironing my hand made bias strips.
Fold bias stirps in half to measure 1/4" (6mm) and stitch the long edges together to make the spaghetti straps.

Folded bias binding in half, ready to sew to make spaghetti straps for the loops.
Cut your loops the size you need and sew in place on the left side of the center back.

Sew buttons to right side back bodice, matching up with the buttonhole loops.
Fit the straps by trying on the top, and sew them into place on the inside of the back bodice where marked on the pattern.
You are now finished!
Super cute right? The layered skirt is a neat feature. I love the picot hem and it drapes and moves so beautifully.


Every now and again one gets to witness a societal shift up close. As they say, “times they are a changing” or at least coming into clearer focus for all to see. As my Grandmother would have said… the flap jack not only has been flipped, but has landed out of the pan with the revealing side up! The realization that things are not exactly as they may have been portrayed is where we are at. The question is what do we do with this peeling back of the veneer? History has many sides and the truthful telling of the collective experience is the only thing that leads to a truly shared history. We at Folkwear have always felt the need and responsibility to educate ourselves and others about the historical and ethnic patterns we represent and promote. The unassuming pocket could seem like a less controversial place to start. Once again perceptions have been flipped. Knowing is understanding.
The pocket seems like such a simple and humble feature. A hidden, yet secure place within one's clothing to conveniently hold and keep items with you as you go about your daily life. Pockets have been around a long time and as it turns out they have a history more interesting and sordid than you might have imagined. How is it that something as practical and hidden as a pocket could be subtly manipulated and denied to half the population through out history?
When you consider a pocket as a perfect metaphor for something that can be taken for granted, then you can begin to see the privilege it embodies.
This focus of this blog follows the lineage of the European pocket history tree.
Think about it . . . compare the closets of men and women. No matter how formal or casual the garments in each respective closet, there is a huge disparity. That disparity is the sexist and political divide of the obscure pocket. Simply put, pockets allow freedom and choice for one sex and deny the same for the opposite sex.
To get the full pocket evolutionary picture let's start at the beginning. The pouch was the progenitor to the pocket.
The oldest proof (so far) of a human sporting a pocket-like feature was a mummified fellow found frozen in the alps in 1991. Otzi or “Iceman”, as he is now known, is thought to have lived around 3,300 BCE. At 5,300 years old Otzi’s was found to be a perfectly preserved and clothed specimen of the ancient world. Otzi had held his plethora of secrets well, as enthusiastic researchers were to discover. One of the most interesting items Otzi was wearing was a pouch that was sewn to his belt. The contents of his pouch held a cache of useful items including a scraper, drill, flint flake, bone awl, and a bit of dried fungus. This link to the ancient world just goes to show how the need to carry about useful things has always been relevant.
The medieval period was a time when at least pouches were equal among the sexes. Men and women in the 13th century carried items in small pouches made of leather or cloth that were tied to their waists by rope. These pouches hung innocently on their outer clothing for the world to see. As societies grew and became more urban-like, crime swiftly followed. Hence, the pouch and its contents were hidden from view. Men wore their pouches tied to the body under their jackets and tunics. Women wore their pouches tied at their waists under their skirts. Slits were cut in clothing to make for easy access to the pouch. This prevented having to disrobe, which in a sense made men and women equal pouch wise. This method of wearing pouches continued for several more centuries.
It was not until the 17th century that the pouch made a significant leap that would have a profound impact on fashion and culture, thus securing a strict unequal divide between the sexes. The modern pocket was born for men, but excluded women. The pocket experience was quite different for men than women. The jackets, waistcoats, and breeches of men had pockets sewn directly into the seams and fabric lining of their clothing much as they still are today. This compact world allowed men to conveniently carry the accouterments that their privilege and status assumed. In turn the freedom of movement in public was allotted to men as well. Men carried money, keys, weapons, tobacco, writing pencils and little notebooks.
In comparison women were relegated to relying on pockets with slits or top openings, that were tied around the waist sandwiched between layers of undergarments. According to the Victoria & Albert Museum the average woman in 17th century wore a single layer of petticoats and two layers of undergarments. The pocket was hidden, but could be accessed, though not as easily, through slits or openings in the clothing. So, even though a woman could carry personal items around with her in public, she often could not access her possessions in public.

From this moment onward, the pocket became a direct correlation in the disparities, inequalities, and freedoms between men and women. Pocket inequality was born. In the 17th century women bore the brunt of insecurity and lack of status by having to secure their possession on their bodies. Women were not allowed freedom on any level. The need for women to have any sort of control over their lives is reflected in the use of their pockets.
The Victoria & Albert Museum describes any number of indispensable items that were to be found in women’s pockets of the 17th thru 19th centuries. Because people often shared a bedroom and furniture, a pocket was the only private and safe place to store small personal possessions. These items might include, but not limited to, money, jewelry, keys, glasses, gloves, watches in cases, snuff boxes, little note books, bibles, or diaries. Pockets were also a handy place to keep everyday implements like a pin cushion, thimble, pencil case, knife, scissors, and even a nutmeg grater! If that were not enough to stuff in one's pockets, there were the “Objects of Vanity” essential to personal grooming, like a mirror, comb, tooth comb, perfume or scent bottle. Because convenience and privacy were often hard found, one would carry snacks and even bottles containing alcohol about in pockets, so when a moment presented itself, one could take advantage of it. The Industrial Revolution would result in even larger pockets hanging about women’s waists because there were more goods to put in them. This in turn would inspire the need for the modern handbag. Which of course was also the invention of a man. But that comes later.
The only leveling of the field was the threat of thieves. Even though the pocket was a handy feature for allowing men and women alike to carry items on their person, pockets also left both sexes vulnerable to theft. As a result of the “pocket thief” we get the term pickpocket. Men had their wallets lifted from their pockets or even more dastardly, the pocket was actually slashed and the contents fell out. Women being the "fairer sex" and practically loaded down with items, were particularly vulnerable to theft. The strings of women’s pockets were literally cut from their bodies and the dismantled pocket contents scattered to the ground, where thieving scavengers would scoop up the fallen wares. A person was lucky if they were not injured from the use of a swift sharp knife. Pickpockets often traveled in packs so victims would most likely have been accosted or restrained by more than one thief and rendered helpless.
Stolen items were expensive to replace, and a collection of items took time to afford and obtain. It was a rare occasion that the police were not called. Pawn shops and other establishments would have been places to launder stolen items, the burden of retrieval was on the victim. Damage to clothing was also a serious offense. All clothing, even women’s pockets, were expensive and the average person did not have spare items to replace their stolen or damaged articles of clothing.
As the 1790s approached and the French Revolution began to stir, women’s fashion made an abrupt turn. Of course, this change in what was determined acceptable dress may have flown under the radar of women, but this change in fashion was very much calculated. As in all aspects of society, men were in charge and that also included the steering of fashion trends and dictating the motives behind them. Women’s clothes went from layers upon layers of respectable yardage which kept a woman’s nether region obscured from the gaze of men, all the while the bust portion of the body was revealed to the advantage of any and all male viewers.
The high fashion silhouette that women would adopt next was that of a Grecian Goddess. Think Jane Austen. The figure hugging dresses with high under the bust waistlines created a long straight column. This type of dress obscures any sign of a natural waistline. These dresses were made of layers of sheer cotton and linen fabrics. Gone were the full skirts made of silk and heavy brocades that could conceal almost anything underneath (though the bust was still an exposed feature).
Meanwhile, back in England the Industrial Revolution was gaining momentum in technological innovations in the textile industry. Which corresponded with the simultaneous destruction of the centuries old cotton industry of India. England would literally destroy India’s cotton industry, so it could take the industry for its own, in order to provide the much sought after and lucrative cotton fabric. If that were not bad enough, the British would then turn around and sell the cotton back to India at a highly tariffed rate. This is another history lesson of its own.
During the period of the French Revolution, internal and external pockets were banned from women’s clothing. Women now wearing the straight column silhouette, had to reveal their pockets to the world in the form of tiny highly decorated purses called reticules (and we have a pattern for one here). These minuscule purses were considered ridiculous, because they were barely large enough to carry a handkerchief or a coin. The idea was to prevent women from concealing any sort of revolutionary materials. The radical new silhouette was sold to women on the notion that no one would want to look like someone who had met their unfortunate fate at the guillotine.

If that were not enough, the reticule was so tiny for another reason. Women had no need to carry anything of consequence that allowed any form of independence. Women were sold on the idea that a dainty reticule was a status symbol indicating a leisurely life, with a husband taking care of the finances. From this point on, the purse was cemented and here to stay. The pocket and women drifted apart, while pockets became the monopoly of men.
As early as the 1840s and through the end of the century, dresses were once again gaining in fullness and a single pocket might be sewn into the front side seam. These pockets were demur in size, accommodating maybe a handkerchief. Dressmakers and home sewists were slipping pockets in their dress discreetly. For the next while one can assume that the pocket issue lumbered along for women and men continued with notions of pocket exclusivity.
The turn of the 20th century brought on protests by women for independence. A direct symbol of that long denied independence was the pocket. Instruction manuals on how to sew pockets into clothes gained popularity with women. In the 1800s, the Rational Dress Society launched campaigns fighting for more practicality and freedom of movement in women’s clothing and to abolish the corset. The Society had ideas of the perfect dress for women, and modern-thinking women were enthusiastic converts. A 1910 “Suffragette suit” became the rage, which sported six to eight pockets which were easily accessible, and some were in plain sight!
With WWI gearing up, women clothes were becoming more practical and large pockets were becoming the norm. The pocket and women would finally unite and momentarily solidify. To say that the 1920s was a time of great change is an understatement… it was not called the “Roaring Twenties” for nothing. Fashion and life would change because women were taking the reins like never before. Women were fighting for the right to vote. Because of WWI women took the jobs held by men who went off to fight. The longer skirts of the Victorian and Edwardian era were being replaced with a slimmer and more practical silhouette. This new fashion was taking on the styles and details of men’s clothing and pockets were an essential element of this change. The pocket became a symbol of independence once only truly enjoyed by men. Women took on a rebellious attitude in nearly all aspects of life and ran with it. With the men away, women could have their day and their pockets.
During this time, Coco Chanel attempted to liberate women with her designs made of jersey and with her love of pockets. The Met Museum writes, "The fabric draped well and suited Chanel’s designs, which were simple, practical, and often inspired by menswear, especially the uniforms prevalent when World War I broke out in 1914."
A very unexpected phenomenon appeared among women sporting pockets. A new posture that Coco Chanel helped epitomized was described as a sort of slouch. This new posture became prevalent because women finally had somewhere to put their hands! The slouch was a reflection of the relaxed attitude and confidence that only a pocket could provide. The proper way to stand and pose one’s hands had lost its power over women to the pocket. Of course, men were well versed in the slouch.
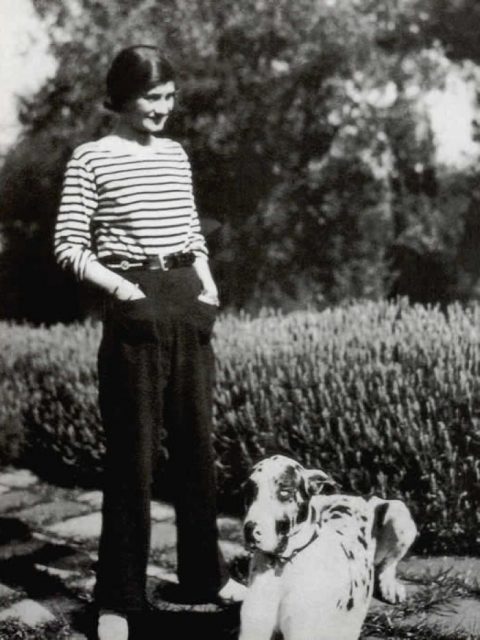
Coco Chanel demonstrating the pocket slouch.
The momentum made by women came to a halt due to a worldwide depression and the men who returned from war felt entitled to the resume the jobs and status they had left behind. Women were forced to readjust to the reestablished order, but their spirits had been ignited and that was enough to change their views of themselves in ways that had never struck women before.
With the patriarchy back to intervene once again, restraining women through a conceived imaged of themselves, the ideal persona for women and pocket saga would continue. Men coming home from the war did not want to see women in clothes that liberated them (i.e. men's clothes). Women were expected to exude femininity, which meant an extremely slim silhouette that would not accommodate pockets. Pockets were once again a man’s monopoly. The “New Look” introduced by Christian Dior was the new fashion. It is an iconic look… think June Cleaver. JOFA.org puts it best…"Christian Dior bon mot: "Men have pockets to keep things in, women for decoration." Tease apart that quote and you get a fairly essentialist view of gender roles as they play out in clothing. Men’s dress is designed for utility; women’s dress is designed for beauty. It’s not a giant leap to see how pockets, or the lack thereof, reinforce sexist ideas of gender. Men are busy doing things; women are busy being looked at. Who needs pockets?"

Dior 1947 SS Collection Silhouette; Pinterest image link: Chrisitan Dior
The fashion industry took things a step further and decided that pockets were no longer necessary for women. The handbag industry barged in and seduced women convincing them that the handbag was the answer to all their portable needs. The attitude was that as long as women are denied pockets they would be forced to rely on supporting the lucrative industry of handbags. Hence, an entire industry was sustained by excluding pockets from women’s clothing. To support this theory women were told that pockets ruined the female silhouette… pockets made the hips wide, the behind too big, too lumpy, or some such nonsense. Once again, a man's idea of what a woman should look like for the sake and lucrative benefit of guess who. The handbag was also elevated as a status symbol, which played upon women's desire to be fashionable, leaving women with an even more expensive insecurity.
Women still long for pockets for good reasons. Pockets allow people to easily walk through life comfortably and securely. Which in turn allows a certain level of confident preparedness in public. The pocket is internal and secret which makes it very different from a bag or handbag. A handbag is externally carried and leaves one vulnerable. If a handbag is lost or stolen, then everything in it goes as well. No wonder most women have a love/hate relationship with their handbags. While pockets are not perfect, they do allow for a certain freedom in not having to think or worry about what you are carrying in them… you can forget about your keys, knowing they are secure in a territory all your own. There is freedom in not having to worry.
The ship is slowly turning course. Doors continue to open or in some cases are being kicked in by those who have previously been denied entry. Who participates in the once off-limits segments of society is shifting. The history of the pocket has not changed much since the end of WWII, with the same saga. Now, women contend with skinny jeans, shrinking pockets, fake pockets, and the ever-growing size of cell phones. Things are changing once again. The underbelly of fast fashion has been flipped and the industry is grappling with what to do. The pandemic has forced a hand in so many aspects of life that were already shifting.
Fortunately, there is a huge uptick of women-owned indie companies supporting the making of women's clothes and a lot are offering pockets! Women are taking a deciding role in all aspects of their lives and that includes the making and wearing of clothes. The sewing community is thriving and installing pockets as if in a mad dash to the finish-line! The dream of pockets and independence for women is there for the taking. One gets the sense that a quiet but steady pocket revolution continues.
Choice is the greatest liberator of all. Sometimes all you have to do is choose to empower yourself. Everything that has steered the disparity in the history of the pocket and in fashion, as a whole, has been a construct. It has all been made up and marketed for consumption. The story we are told or the one we tell ourselves can be rewritten to suit ourselves. Sewing is an act of liberation and freedom. Knowing how to simply sew a button on a shirt matters. Making your own clothes gives one agency. Those who sew would never dream of forfeiting the freedom to make what they want, how they want. My goal, and hope, is to inspire and encourage you to make something that will fold in on itself, many times over with pleasure and a sense of accomplishment.
With that thought, I hope to leave you with a better understanding of the part the pocket has played in molding our ideas of each other and ourselves.
Knowing how to add a pocket to an existing garment or sewing pattern is important. There are so many different design options when it comes to pockets, so be watching Folkwear's blog for lots of pocket inspiration (and a couple of free pocket patterns) and information in the weeks to come!
As always, the team at Folkwear relishes seeing what you have been inspired to make. I hope you find freedom and joy in making your own pocket history!

by Molly Hamilton
When we were developing the Pinafore Dress Basics pattern, we considered making this expanded dress option part of the pattern. But, we ultimately decided not to offer it because it would have used too much paper for printing (and therefore be much more expensive). We decided we would show how to make this expanded version in a blog post (here!). This hack is a fun way to get a very flowy dress that is unique and interesting. It is also a great way to wear an oversized dress and make it feel fun. The back detail is interesting and you can use your fancy button you've been saving in your stash for the back.

First, you need to have the Basics Pinafore Dress pattern. This dress hack adds about 12" of fabric to the dress on each side, and the extra fabric is wrapped to the back and buttoned for shaping. You will need at least 1.5 yards (or 1.4m) extra fabric and a button to make this version. I used a lightweight cotton/linen blend that had a great drape. I suggest using a lighterweight fabric since this does add quite a bit of fabric to the dress. This hack is also best for a dress you plan to layer - perfect with a t-shirt or tank top for summer (or over a bathing suit) or long sleeves or sweater for cold weather.


To make the Dress
First, add about 12" to the side of your Pinafore Dress pattern as shown in the drawing below. Add the same amount to the side of the dress Facing. You do this by just drawing a new side seam line about 12" from the original side seam, and connect the side seam to the underarm seam. Just try to keep the same necklines for Dress Front/Back and the Facing so they will match when you sew them together.
Dress:

Facing:

Your new pattern piece for the Dress will not fit on any fabric when it is placed on the fold - the new piece is too wide. Unlike the original Pinafore Dress (which is placed on the fold), this dress needs to have a front and a back seam. You need to cut 4 pieces of each Front/Back and add 1/2" (13mm) seam allowance to the center Front and center Back. You will cut the four Front/Back pieces on fabric laid out flat.
I recommend using a fabric without nap, pile, or one-way design because then you can cut the pattern pieces upside down to fit them as close as possible and be the most efficient with fabric. This dress version increases the yardage needed by at least 1.5 yards if you cut the pieces without nap. With nap or one-way design, you will need at least 2.5 more yards of fabric.
You will also need to cut the front facings in 4 separate pieces. Be sure to add 1/2" (13mm) seam allowances to the center front/back of each facing piece.

Sew the dress up as the pattern instructs, but sew the dress front and back together at centers (and the facings, if you cut 4 pieces) before moving forward with construction. Note: I cut my Front/Back pieces with the centers on the selvage so I did not need to finish those seams.

Finish the dress as instructed, and once the dress is complete, you just need to add a button and buttonhole to the sides of the dress so it can be wrapped to the back and secured with the button. I marked where I wanted the buttonhole on the folded side of the dress, so that the buttonhole was made through all layers of fabric (front and back). I did the same with the button placement and sewed a button near the side seam of the dress, through all layers of fabric (front and back). Forgive my not-beautiful buttonhole (it was made in haste, but perfectly functional).

This hack is so simple, but makes a really fun, very flowy dress that is perfect for summer days. I love lounging in this dress! And I am wearing it several times a week so far this summer - after work, going to the pool.
It can also be a great warm weather dress - the extra fabric can add some warmth and this is a perfect dress for layering.
To see a short video of how I button this dress, go here.


Guest post by Victoria Watkins
Hot weather means breezier clothing, and the 160 Hawaiian Mu’umu’u pattern is one of the breeziest in the Folkwear catalog. I recently sewed my own mu’umu’u to fight against the heat and stay stylishly comfortable. This pattern makes a really cute dress that is flattering and fun (and cool) to wear. And it has pockets! Today I’ll share some tips on sewing the sleeveless collar/yoke assembly in the mu’umu’u pattern, because it can get a little tricky.
Before you do anything, make sure to look at the instructions closely. One sneaky potential mistake is to sew together the pointed back “V” of the yoke and facings together. If you’re a more intuitive sewist, you may naturally do this. However, the V point needs to be left free in order to complete later steps. I made this mistake before reading the instructions closely, and I had to unpick it and start over.
If you choose to interface the pieces, do this before any assembly. The curves of the yoke and facings can stretch, so I was careful not to let them stretch on the bias before I was able to staystitch. I am not the biggest fan of fusible interfacing with lighter weight fabrics. This time, I chose to use a plain white cotton fabric as interfacing, and it worked nicely! I needed to gently hand baste the interfacing to the main pieces, but it worked without issue.

After interfacing one side of the assembly, I made sure to stay stitch each individual piece (yoke, dress neckline, and armholes and facings) along the inner curved edges. Stay stitching is when you stitch just inside the seam allowance, usually with a smaller stitch length than normal, so that the fabric doesn't stretch when you are putting your pattern together. If it stretches when being manipulated (pinned, pressed, moved around, etc.) then the pieces may not fit together correctly when it is time to put them together. Necklines and underarm seams are often stay stitched so they don't stretch out before facings or collars are added. I was very deliberate and careful with this process, because I was present for the testing and development phase of this pattern, and I remember having issues with the yoke not lining up, due to stretching out before assembly. This time, stay stitching worked great!

After sewing the assembly pieces together for both the yoke and the facing, I laid both of them out, right sides together. The first stitch is made along the inner curve of the horseshoe shape, continuous from one end to the other. Be sure to clip, trim seams, and to press (understitching if you chose). However, after you treat the seams, you’ll need to open it back up to the same right-sides-together orientation for the next step. You can see in the photo below that I have understitched the yoke assembly and have turned it so that right sides are together again.

There are notches marked on the pattern pieces that indicate where to create a line of stitching on the outer edge of the yoke assembly. This stitching will make the top of the armhole, built into the yoke. I sewed these on both sides, and trimmed the seams. It helps a lot to clip about a half inch into the fabric where the notches are, so that the yoke sits nicely once turned right side out. The easiest way to flip the yoke is to pull the pointed ends down and through the unstitched open curve of the front piece.

This next part may be the trickiest. You’ll need to open the pointed ends of the yoke assembly up flat and place them right sides together. Grab the points of one facing side together and turn them sideways. You’ll have the right shape if you end up with something that looks like a mermaid fin! Take extra care not to twist everything into a piece that won’t lie flat when completed.


Sew along this V as directed in the instructions. I recommend reinforcing the point of the V with another line of stitches around the point. Or, you could make your stitch length smaller for the immediate area around the point of the V, then continue as usual.
Once you’re done, you should have a completed yoke assembly that is ready to be sewn to the rear of the dress!

Now you just sew this yoke into the dress, closely following the instructions (and notches) in the pattern. And the dress is nearly completed.
I love the one I made and I am enjoying wearing it out, even in this summer heat! Are you planning to make a 160 Hawaiian Mu'umu'u? I highly recommend this pattern - it is a fun sewing challenge and makes a great dress with several options.


We brought 224 Beautiful Dreamer back into print after many years because so many of our wonderful customers asked for it. And no wonder. There are basically no other sewing patterns out there for wide dreamy nightgowns with the old-fashioned ruffles. These Edwardian-era gowns are comfortable as well as romantic. They harken to a time of simple elegance, even while sleeping.
While this pattern is mostly likely to be used for nightgowns, it really does make a cute day dress too. Wear it as a tunic style dress or belt it at the waist. You can eliminate the ruffles if you finish with piping or sew the yokes and cuffs together at the seams rather than finish with ruffles. You can also shorten the sleeves if you want to. You can see how we eliminated the ruffles on the child's version (225 Childhood Dreams) in the photos of the dress with bird prints on the product page. You also don't have to add the side front placket for the dress. This just provides more room to get in and out of the gown, but it may not be necessary.
Below I am going to show some fabric suggestions for this gown - for nightwear and for day wear. Let me know what you would make this gown in, and what you would wear it for.
First, the classic . . . white voile. This was, historically, what this nightgown was made from in the early 1900s. Use the voile for ruffles (or in a different color!) or use a pre-made eyelet or lace in place of the hand-sewn ruffles. We carry this organic cotton white voile in our shop.

We also have some lovely organic linens in stock, several of which I used to make my mother a nightgown from this pattern. Linen is lovely for sleeping -comfortable and it helps to keep the body temperature regulated.

For a dress, I really like the idea of a viscose in a pretty print, like this floral viscose challis below. Eliminate the ruffles (if you want) and this can be a dress with lots of movement and will look great belted.

Another option for either a nightgown or for a cute dress would be this lawn from Harts Fabric. Add contrasting ruffles, eyelet, or lace; or make it without any ruffles for a floaty dress.

Another pretty lawn is this berry and leaves print from Bolt Fabric.

Finally, this gown made with flannel cotton might be the coziest thing you will ever wear. I would go for a lightweight flannel rather than a heavy weight. There are a ton of solid flannels, plaid flannels, and flannels with cute prints. Plaid flannels could be interesting with placement of the yoke and the ruffles on the fabric. But, I like the two printed flannels below, foxes from Bolt Fabric and a woodland print from Harts Fabric.


What fabric would you like to make our 224 Beautiful Dreamer pattern in?

When we brought 224 Beautiful Dreamer back into print, I thought about how I might use this pattern in my own life. I don't tend to wear nightgowns anymore, though I absolutely love the idea of them and have several in my drawer. They are so romantic and beautiful, not to mention comfortable. Unfortunately, I can be a restless sleeper and my tossing and turning can make a nightgown wind around me like a towel being twisted.
But I know my mother loves a good nightgown and Mother's Day was coming up. This pattern fits all the categories for what she likes in a nightgown - wide enough to move easily and freely, long sleeves to be warm, and long enough to be below the knees. I had a beautiful teal linen in stock and I wanted to try View B with the ruffles and collar, but I wanted a little bit of a change of color for the ruffles so used a light tan color for the ruffles.

I made a couple of changes to the pattern when I made this gown. First, View B is the longest view, at ankle length (for 5'6" person). I knew she would not really like an ankle-length gown, so I shortened it by about 9 inches. I also made the neckline without the buttoned placket. While the button placket is great for people with mobility issues or anyone who want an easier in-and-out, it was not necessary for her AND I also wanted a quicker sewing project.
This pattern takes a lot of fabric, but shortening the gown by 9" did save a lot of fabric (close to 1.5 yards). I also got creative with pattern piece placement. I made a size XL. One of the things I really like about this pattern is that the sizing fits a lot of different bodies. The XL fit my thin tall daughter (measures XS) quite well and it also fit her friend very well who measures in the larger end of our XL range. So if you are making this for someone else and don't have their measurements, you can guess to get close and you will likely be fine.
The instructions and illustrations are easy to understand. My only tips are to be sure to mark the pleat lines (fold lines and stitching lines - stitching lines are most important) well. And to take a little time with the ruffles. To get good looking ruffles, be sure to use two lines of gathering stitches. I like one in the seam allowance (about 3/8" from edge) and one just outside the seam allowance (about 5/8"). This helps shape the ruffle really well.

My mom LOVES her new nightgown and was so happy to get a new nightgown in a beautiful color she likes. And I'm always glad to sew things for people I love - and a major bonus when they like them! Are you going to try the 224 Beautiful Dreamer pattern?


by Esi Hutchinson
The 241 Fifties' Fit and Flair pattern is an old revived folkwear pattern with updated sizes from XS-2XL. The Fit and Flair comes with three different necklines - a jewel neck, wide V-neck, and turtleneck - hopefully enough to pick from to best suit your style.
The style of this dress accommodates to the 50's aesthetics of simplicity, figure flattery of every kind with a full skirt and natural waist. This dress can be formal or casual depending on which fabric you choose. Here are some fabric suggestions for our pattern of the month of May!
I am bias towards these fabrics we have in stock here at Folkwear and I do think they would be great to use for this pattern.
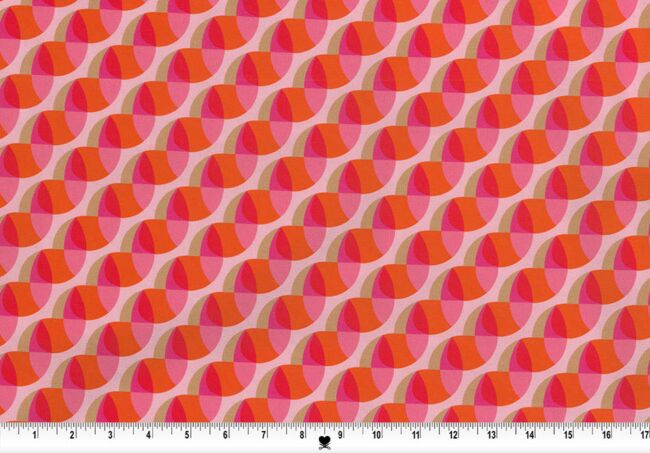
This raspberry red hand block pattern from Jaipur is lightweight and would be ideal for a summery dress. Beautiful polka-dotty pattern.

We also have some new Italian viscose fabrics which would be gorgeous in this pattern and give the dress lots of movement and flair. I love this challis and the art deco floral pattern.

For some fabrics that give you more of a imitative retro 50's style, I've listed below.
This is a stretch poplin with a really cool retro design from Harts Fabric. There is only a little stretch with a very crisp fabric, so it would likely work very well.
And, if you want to make a dress like Molly did (top photo) with African Wax Prints, you can order 6 yards at a time (for about $20 total), which works well for this pattern, from the huge selection at AKN Fabrics (Molly's favorite shop for African fabrics in NYC). One option is below.


A few weeks ago I decided I wanted to make a short summer version of our 241 Fifties' Fit and Flair Dress for myself. This pattern can go through all the seasons depending on the fabric and neckline you choose, but you can also shorten or lengthen it (we show you how here) for the season. I also wanted to make short sleeves and add cuffs for my version. And, I am going to show you how I did that here.
Shortening the sleeves
First, I wanted short sleeves, so I literally just marked where on the front and back pattern pieces where I wanted the sleeves shortened to, keeping the new line parallel to the original cuff line. I also took into account that I wanted to add a cuff which would be about 1-1/2" wide, so shortened the sleeve to accommodate that cuff. The new line I drew is really the seam line (where I want the sleeve ending), so I added 1/2" (13mm) back in for the seam allowance to make the new cut line.


Since the sleeves are dolman sleeves, I wanted the curve a little higher so that the short sleeve wouldn't be too wide on my arms. I used a curved ruler to narrow the dolman sleeve and connect the underside of the sleeve with the side seam. Make sure there is a 90 degree angle from the cuff cut line to the seam line before curving the pattern piece.


I did all this on the front pattern piece, and then did the same to the back pattern piece. It is important to make sure the front and back shoulder seams are the same, as well as the side seams. You can measure them to make sure, or put the pattern pieces up next to each other to make sure the seam lines are going to match. If one is off, adjust it so they are the same. The opening of the front and back sleeve at this point was the same. Below you can see the front and back shoulder seams are pretty even.

Once my sleeves are the way I wanted them to be, I drafted a cuff. I wanted a 1.5 inch cuff so I traced a 2.5 inch wide cuff to be the same length as the cut line on my sleeve. Then I added in my seamlines and a center fold line down the middle. Below you can see the draft cuff placed on the front piece at the sleeve to make sure it will fit. Cut lines and seam lines are labeled, and the foldline is marked.

Then took out 1/2" on the top short side of the cuff because I wanted to cut one cuff piece and not sew cuffs together at the shoulder seam also (like the sleeve is done). I made sure my seamlines matched with the cuff and I was ready to cut out the cuff from my fabric.


I cut two cuff pieces, on the fold.

When it came time to finish the dress, first I folded down 1/2" on one long side to the inside of the fabric. Then, I sewed each cuff piece, right sides together, at the short ends (opening the fold when I did that). I re-pressed the 1/2" fold.


With right sides together, I sewed the cuff to the dress sleeve, matching the cuff seam with the underarm seam of the dress.

I pressed the seam toward the cuff and trimmed 1/4" off the seam allowance and the folded-over edge. Then I pressed the cuff at the center fold line to the wrong side of the dress and hand stitched the cuff to the inside, over the seam line. If you want to, you could stitch the cuff to the wrong side of the dress (right side of cuff to wrong side of dress) and fold it to the right side of the dress and topstitch down.


Other considerations: If you want a deeper cuff (one you could fold up again), cut your cuff piece at least 3" wide. Also, depending on your fabric, you may want to interface at least once side (above the fold line) your cuff. My fabric was fairly stiff, so I did not interface my cuff.


We have recently re-released the 241 Fifties' Fit and Flare pattern - in a larger size range and with a few better fit adjustments. The dress in this pattern has a fitted waist, waist darts, dolman sleeves, and a full skirt. There are also pockets in the front seams of the dress! The pattern also offers 3 neckline views to make.
One of the easiest adjustments to make for our 241 Fifties' Fit and Flare dress is to shorten the skirt. I am going to show you how to do that in this blog post. The same technique can be used to make a longer skirt for this pattern as well.
From the package, the skirt falls to about calf length on a 5'6" person. But, if you want it shorter, as I did, you need to do more than just fold out the amount of fabric to shorten from the lengthen/shorten lines, as you might with another pattern. To start with, this pattern does not have lengthen/shorten lines for the skirts because they are cut so that the fabric falls on the bias. It is also a very full skirt and the width of the skirt increases quite a bit over the length. This makes it very hard to just fold out the length desired.
So, you need to measure where you want the skirt to fall, and take out that amount from around the hem of each skirt piece.
For me, I wanted the skirt at just above knee length. I measured where that would fall on one pattern piece of the skirt, and marked it on the pattern piece. I did this by holding the pattern piece at my waist and marking it. This step could also be done with a measuring tape and measuring down from the waist to the desired length, and transferring that measurement to your pattern piece. It also really helps to have someone to help you measure, because if you are bending down to mark on your own body, the pattern or tape will shift and your measuring will not be accurate.
I decided to take out 8-1/2" from the skirt to get to the length I wanted. But, be sure to take into account a 1/2" (13mm) hem allowance, which will be folded out of the length you are going to cut. Add that 1/2" back in to the length you want. So, I ended up taking 8" out of the length of the skirt.
To do this, I first I measured 8" up from them, all the way around the hem on a skirt piece, marking the length every inch or so.


Then, I used a tailors curved ruler to connect and smooth the markings I'd made. This gives a nice and even cut line to use.


Then, I simply cut off the extra fabric from the skirt pattern piece. I did this for each skirt pattern piece.

A few other things to consider, this skirt ends up having a lot of fabric on the bias, so you should let it hand for a day before hemming. Then measure the skirt from the ground and see if you need to adjust the hem to be even. The dress I made had a pretty stable fabric, but I still ended up cutting about 1/2" (13mm) off on some sides of the hem to even it out.
You can measure from the ground when your dress is on a dress form or another body (again, it helps to have someone here to assist). Mark the shortest point and measure along the hem, from the ground, to that point. Again, connect the lines with a curved ruler and chalk (or other marking device), and cut off the extra fabric. Now it is ready to hem.
And, you've created a shorter skirt! And a very cute dress!


