-
Sewing Patterns
-
Fabric
- Sewing Supplies
- About
- Blog
- Gallery
-

by Molly Hamilton
The 305 A Japanese Interior pattern is one of a set of home goods patterns that Folkwear released in the 1990s. It is also, by far, the most popular of our home goods patterns. You can make up to 12 items from this pattern, plus the pattern includes a large sashiko design, as well as instructions for sashiko embroidery or quilting and shibori dyeing. Both of these techniques are beautiful ways to traditionally embellish garments or fabrics.
To give you an overview of the 305 A Japanese Interior pattern, I will go over all the items you can make in the pattern.

First, there are the futon, which is a general word for many types of cushions and quilted bedding. Zabuton are fairly large (24”x24”) floor cushions that are used for sitting. Of course, they can also be used on sofas or beds. This pattern has three options for making Zabuton, particularly as to the covering of the Zabuton. There is a very simple cover, a more complex folded (and stitched) cover, and one in between. Pattern pieces are included for the Zabuton.
Next, the Shikibuton is the bottom quilt. This is a single person-sized thick quilt that is laid on the floor and slept upon. The Kakebuton is a top quilt – and is slept under. Both of these items do not have pattern pieces, but measurements of fabric and instructions are provided for how to construct them.
There are two patterns (and instructions) for Makura, or sleeping pillows. Pattern pieces are included. These are pillows that are for resting the head. Makura #1 is most similar to a regular bed pillow. Pillow #2 is round and was often firm (perfect for keeping hair from getting disturbed too badly at night). There is also a pattern for a cover for the #2 Makura (to make it more decorative and to give the option of washing the outside). These pillows are much smaller than the Zabuton and are only 9"-13" wide. These pillows are also nice throw pillows for sofas or beds.
There are also instructions for making a folding foam mat. This is ideal for a small bed that can be folded up and stored easily. This can be used under the Shikibuton for extra padding and comfort. These folding mats are quite comfortable futon beds and could even be great for car camping. I love how they fold up and are easy to store.
This pattern also has instructions for making Noren, decorative curtains that can be hung at windows or across doorways. They can be used to separate spaces in a room as well. These are a beautiful place to use the sashiko embroidery (and the pattern provided) or special fabric. Traditionally Noren were made in a dark blue or brown and might have decorative border. You can make these just about what ever size you desire; instructions are given for how to measure and construct the Noren
Finally, this pattern provides instructions for making a Yogi, or quilted sleeping kimono. This garment was another way to stay warm when sleeping in cold weather. You can use any kimono pattern (or our own 113 Japanese Kimono) to make the yogi. The instructions tell how much extra fabric is need, batting required, and construction alterations for transitioning a regular kimono pattern to a yogi pattern.
My stepfather flew airplanes in the Coast Guard and spent some time in Japan in the 1960s and 1970s. He had a Kakebuton and folding foam futon mat which he had brought back from Japan, and which I absolutely loved to sleep on growing up. I enjoyed sleeping and lounging on the thick and soft brocade silk of the folding mat, and the Kakebuton was beautiful and warm and fluffy (also made of silk, but I'm not certain what it was stuffed with). Perfect for making a special bed on the floor for one person. Wonderful for when I wanted to sleep in the living room, or had a friend to spend the night. It is a memory I still cherish.
I hope the description of this 305 A Japanese Interior pattern might inspire you to try to make one or several of the items in this special pattern. They can be wonderful gifts for loved ones in your life (holidays or weddings especially). And they can create beautiful memories for you and your own family.

by Cynthia Anderson
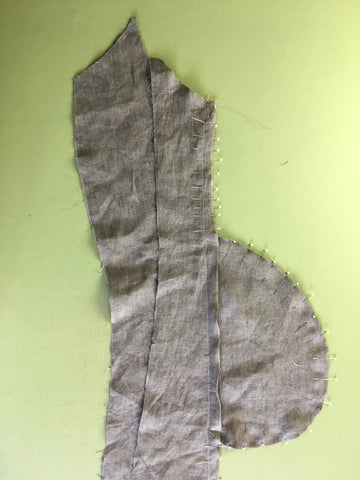
Like French seams, flat felled seams encase the raw edge of the seam allowance creating a strong and clean finish that prevents fraying. Flat-felled seams are a typically found on clothing for men, children, and sportswear because of the strength and durability of the seam construction. If you own a pair of jeans, they are most likely have flat felled seams.
Depending on the look you want, flat felled seams can be made to appear on the right or wrong side of a garment. This seam treatment is a bit easier to do with more structured fabrics that are medium or heavy weight, though some lightweight fabrics are good too. Regular polyester thread works well, but consider using a heavier weight thread such as Button Twist (or doubling the tread feed) for a distinctive top stitch. The texture created by a heavier thread will stand out. You could even pick a contrasting color for an even bolder look. For a stitch that blends in to the fabric, match the regular-weight thread to the fabric. .
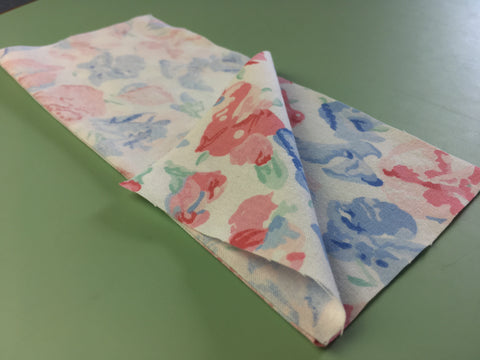
For this demonstration I am using a blue cotton shirting without a visibly right and wrong side. I am also using a standard straight stitch presser foot. You can purchase a special "Felling or Lap Seam" foot, but a standard foot works just fine. You could also use an edge stitch foot or zipper foot which can keep your stitching very straight when top stitching. I am using a regular weight polyester thread in white for each stitching line.
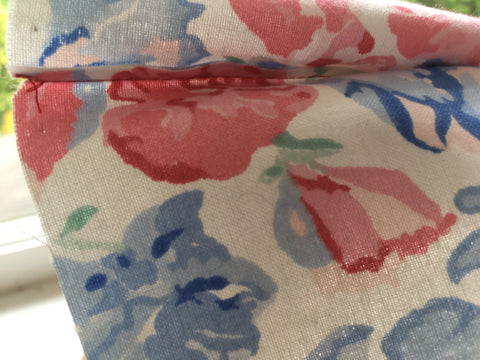
Note: Keep in mind that in this demonstration the right side has one line of visible stitching and the wrong side has two lines of stitching
To create flat-felled seams.
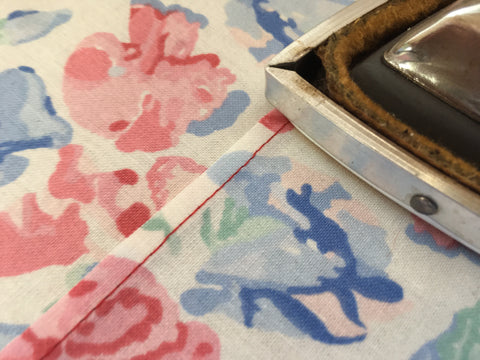
Pin and stitch on the seamline, right sides together, like you normally would. I am using Folkwear's standard 1/2" (13mm) seam allowance. Use the seam allowance specified for the pattern you are using.


Trim one edge of the seam allowance to ¼”(6mm) or by at least half of the width of the seam allowance. I have trimmed to approximately 3/8" (10mm) due to the weight of the fabric.

Turn the wider raw edge of the seam allowance under and press it over the trimmed edge, matching the raw edge to the first stitch line.


With the wrong side facing up, stitch close to the turned edge, keeping the stitching straight and even.

The regular straight stitching seen on the wrong side of the garment.


by Cynthia Anderson
There are several different ways to finish seams, depending on the sewing project. Finishing the raw edges of a seam keeps the fabric from unraveling and creates a stable and clean finish to the inside of a garment. Raw edges can quickly be finished on modern sewing machines using zig-zag, overcasting, or overlocked/serge stitches. Pinking shears are also an easy way to finish raw edges. While all these techniques are perfectly acceptable, there is something special, practical, and gratifying in making French seams.
Garments made with fine, sheer, and lightweight fabrics are ideal for French seams. This neat seam is sewn twice, encasing all the seam allowances in the seam itself. This creates a small, yet strong seam that keeps the raw edges from fraying. French Seams are especially nice in unlined garments, but work nicely in lighter-weight lined garments too.
The use of French seaming was popular in Edwardian garment making which is synonymous with fine handkerchief linen, cotton voile, and lawn. Before sewing machines were available, fine French Seams were sewn by hand. Luckily, French Seams can easily be made today using a sewing machine. This technique is not hard, creating a strong encased seam, with a lovely finish. French seams are ideal for finishing seams with fine fabrics, and perfect for lots of Folkwear patterns.
French seams are not ideal for all sewing construction needs. Heavy fabrics are not recommended as the folded over seam creates bulk.
Typically, only the shoulder seams, side seams, and the underarm sleeves seams are made with French seams. Sleeves that have a tight curve can be tricky, resulting in a finished seam that will not lay as nicely and may pucker-up. It is perfectly ok to pick and choose where French seams work best.
French Seam Using 1/2-Inch (13mm) Seam Allowance
Because Folkwear patterns use 1/2" (13mm) seam allowances this demonstration will as well. I am also using a fabric with two distinctly different sides to make working on the right and wrong side easier to follow.
French seams are made by starting with the WRONG sides of the fabric together (not right sides together, as you normally would).

On the raw edge of your work, align and match any notches, stitch a scant 3/16-inch (4mm) seam.

Press the seam to one side (either will do).
Turn right sides together, encasing the tiny seam, and press the edge neatly or pinch the fabric with your fingers to create a clean edge. The tiny seam should be sandwiched between (right side) the two layers of fabric. If your edges are a bit frayed or uneven, it is best to trim them before moving on.
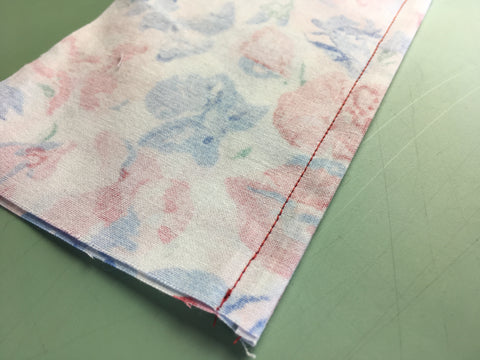
The scant seam allowance should be neatly encased in the final seam. The photo below shows the encased seam with the right sides together.

Now stitch on the seam line (which will be about 5/16-inch (8mm) from the edge) with the right sides together. You should avoid catching the tiny raw edge encased in the fold in the stitching since it is about 1/16" (1.5mm) shorter than the seam. But this is why it is important that the small first seam is trimmed and even. Back stitch at the beginning and ends of the stitchline.
Notice the seam allowance encased in the final seam in the right bottom corner of the photo below.
Press the seam towards the back if the seam is the shoulder, underarm sleeve, or side seam. If a sleeve seam, then press towards the sleeve.
French seam seen from wrong side:


If scant trimmed edge gets caught in the final stitching of the French seam, then the seam edge needs to be trimmed back more. You can un-pick the seam and trim the raw edges.

Only use up the amount allotted for the seam allowance. In this case the seam allowance is 1/2-inch (13mm). You will need to adjust your French seam calculations depending on the width of your seam allowance and how small you want the finished French seam. Experiment with different weight fabrics and varying seam allowances widths to see what the limitations are.
French seams have a long history for very good reasons. Extremely small French seams were a badge of pride and quality work for Edwardian and modern sewists alike. The beauty of this technique is just as viable today as it has ever been. Take advantage of machine sewn French seams in your sewing and enjoy a beautiful and gratifying seam making technique!

by Esi Hutchinson
Our new pattern, 161 Fisherman's Pants, is great for working in the garden, cleaning, doing yoga, lounging around at home, or just to put something comfortable on. We have made these pants in a variety of fabrics from raw silk to linen and they are great in everything.
When I thought about doing a sew along for these pants, I knew it would be quite simple as the instructions are not difficult. The seam finishes are the most important thing and might not be how you typically finish your seams. This pattern uses French seams and flat-felled seams to achieve a finished look for the pants, since you can actually see the "inside" of the garment when it is worn (waistband is folded down).
For this sew along, I thought it would be nice to give these pants a luxurious look by using a silky material. In my case, I am using a shiny polyester blend fabric that gives the look of silk. I thought that if I really like how the pants turn out I may just make them out of real silk. You can make these pants from lots of different kinds of fabric. Medium to medium weight cottons such as broadcloth, ikats, lightweight twills; linen, lightweight wool, or rayon would all be great. Or try Thai silk, silk shantung, or dupioni silk for special occasions. You can mix and match fabrics, making the waistband or ties (or pocket) from a separate fabric than the pants. Also note that the inside of the waistband fabric will be seen, so you might want to make sure you like the back of the fabric also. I've even seen these made with each leg from a separate fabric. if you do that, each leg takes about 1 yard of fabric, and the waistband 3/4 of a yard.
Take a look at the pattern and choose your size and cut out (or trace) the pattern. The sizing of these pants is very flexible. Many different sizes will fit many different bodies since there is so much ease, and the pants are wrapped to fit. I suggest choosing the size closest to your body measurements, or even a size smaller. If you would like to shorten or lengthen the pants legs do so now. The pants are designed to be ankle length. But, you could make them shorter, which is a very popular style too. If you want to changed the length, shorten or lengthen from the bottom cuff on the pattern piece. I shortened these pants by about 5 inches as I wanted a very cropped pants.
Starting Out
Cut out all your pattern pieces from your fabric. There are only four pattern pieces, and the pocket is optional. We designed these to have one pocket that is in front when you wrap the pants to wear them, but you could cut two pockets (one for each pants leg) if you like.

With right sides together, sew the Waistband Panels together at the side seams. Use French seams or flat felled seams and press to one side. I used French seams here. By the way, we will have an in-depth tutorial up in a few days on making French seams and flat felled seams.

Now, turn under one long edge of the waistband by ¼” (6mm) to the wrong side and then turn under again by ¼” (6mm) to form a hem. Stitch hem close to turned edge.

Optional Pocket
For the pocket, press under ¼” (6mm) seam allowance along top Pocket edge, and press under again by ¾” (2cm) and topstitch along folded edge.
Then press under ½" (13mm) seam allowance along remaining Pocket edges.
I am using two layers of fabric because my fabric is delicate and I don't want the stitching to pull when something like my phone is in the pocket. If you do this, sew the pocket pieces together with right sides together on only three sides. Leave the top open to turn to right side.

Turn right side out and press under ¼” (6mm) seam allowance along top Pocket edge, press under again ¾” (2cm) and topstitch along folded edge.

Pin Pocket to right side of one leg at position marked on pattern. Topstitch in place close to pressed edges, backstitching start and finish of pocket opening.

If you would like a pocket on the other pant leg do so now.
Sewing Legs Together
With right sides together, sew the center front and back seams together on the pants legs. Finish seams and press open or to one side, or use French seams when sewing together.
With right sides together, put front and back pants seams facing each other, and sew the crotch seam. It's best to start sewing at the inner curve (seamline) of the crotch and sew to one ankle hem, then sew the other side of the crotch seam the same way. Finish seams and press open or finish with a flat-felled seam. Clip seams at curves as needed.
I serged the crotch seams because I don't want the structure that flat-felled seams gives, and wanted that that area to have less structure to be more loose-fitting.

Waistband
With right side of waistband to wrong side of pant legs, align the unhemmed edge of the waist panel to the top of the pants. Match waistband seams to pants notches and waistband notches to front and back pants seams. Finish seam with a flat-felled seam and press toward waist panel. This seam will also be seen, so it is helpful to finish it completely (i.e. not just finish with a serge or zig zag stitch).

Tie
Press ½” (13mm) toward wrong side on each short end of the Tie. Press ½” (13mm) to wrong side on each long side. Fold Tie in half lengthwise with wrong sides together, and stitch along three sides, close to hem folds.
Sew center of Tie to back of waist panel where indicated on pattern pieces. Basically just below center of the back of the waistband. Secure the tie by sewing a rectangle and backstitching at beginning and end.

Finishing
Hem pants legs by turning up ¼” (6mm) and turn up again ¼” (6mm). Stitch close to fold.

Now the pants are finished, I will show you how to tie them to your waist.
First fold one side of the waist band to opposite side.

Wrap the tie around your waist and tie it in the front.

Lastly fold the waistband over the tie.


I love how comfortable and chic the pants look in this fabric! Get the pattern for these Thai Fisherman Pants here!

 Shorten the legs to make a cropped pair of pants. It is easy to shorten these pants at the cuff. The leg is straight from about half-way down the pants, so you can easily shorten them to your desired length.


Last, this show-stopping Iridescent Purple Silk Shantung from Mood Fabrics would make for an unforgettable garment. Despite being a solid, the color and texture are decidedly head-turning.

by Cynthia Anderson
The Folkwear team is delighted with the response to the new 160 Hawaiian Mu'umu'u! We hope this versatile dress will become a welcome addition to your wardrobe, no matter the season.
The 160 Hawaiian Mu'umu'u Pattern (and pdf version) is offered with two different sleeve length versions (View B & C) and without sleeves (View A). The construction for the sleeveless version is very different from the versions with sleeves. We have a sew along for the sleeved version (specifically, View B). The construction of the dress for sleeved or sleeveless versions is the same up through Day Two (Day One is learning about the pattern and gathering materials). In Day Three, I teach how to add sleeves and construct the yoke, which is not relevant to the sleeveless version (View A). But, Day Four is the finishing steps which is the same as for the sleeveless dress (other than finishing the sleeves, which you don't need). The sleeveless version (View A) is covered here.
In this blog, I will be making a test muslin to show you how to make the sleeveless version (View A). I am not going to make the entire dress. Instead I am making the dress from the waist up just to demonstrate how the sleeveless version is constructed. In this version the Yoke/Yoke Facing and the Armhole/Armhole Facings come together to create the sleeveless armhole.
Note: Have a look at the 160 Hawaiian Mu'umu'u Sew-Along: Day One, Day Two, Day Three, and Day Four blog posts for more details and tips in making this mu'umu'u.
Pattern Pieces Needed
To make the sleeveless version you need to cut the following pattern pieces according to the pattern instructions: Side Front A, Back B, Center Front C, Front Yoke H, Back Yoke I, Front Armhole E, and Back Armhole F. Be sure to transfer all the needed markings before unpinning the pattern from your fabric.
Interfacing
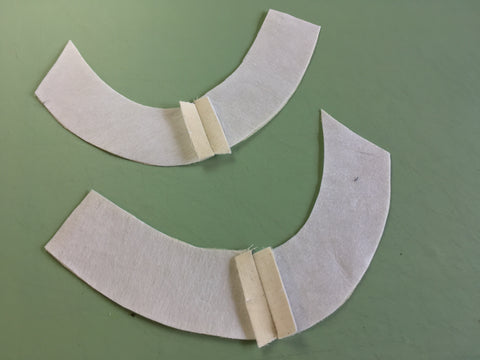
Adding interfacing is optional. Even thought I am making a test muslin, I am adding fusible interfacing to the Yoke and Armhole Facing pieces.
The fusible interfacing is added to the wrong side of one Front Yoke H and the two Back Yokes I. These pieces will be the YOKES. The non-interfaced pieces will be the YOKE FACINGS.
Interfacing is also added to the wrong side of all the Front Armhole E and Back Armhole F pieces.
Constructing the Dress
Construct the dress as we do in Day One and Two of the sew along: make the darts (and pockets), sew Side Front and Front together, sew Back (with gathers) together, and Back to Side Front.
The difference in construction will be the yokes and armholes.
Armholes Facings
With right sides together, stitch one Front Armhole E to one Back Armhole F, matching the notches. These two pieces create the Armhole Facing. Repeat with other pieces.

Press the seam open.


Add Armhole Facing to Dress:
With right sides together, stitch the Armhole Facing to the dress armhole, matching the Armhole Facing seam to the dart stitch line on the dress. Make sure the Front Armhole Facing is going toward the front of the dress and the Back Armhole Facing is going to the back of the dress.
Repeat for the other armhole.
Clip and trim the seam allowances.
Press the trimmed seam allowance towards the facing and understitch, stitching the facing to the seam allowance. This will help to hold the facing to the inside of the armhole.

Turn the facing to the inside of the garment and press.
Baste the edges of the facing to the dress at the front and back within the seam allowances. This extra hold helps to keep the Armhole Facing in place as you continue working.

Make the Yoke
With right sides together, stitch the interfaced Yoke Fronts to Yoke Backs at the shoulder seams, matching the notches. Repeat with Yoke Front and Yoke Back Facings. In the photo below the Yoke (top) has the interfacing and the Yoke Facing (bottom) does not. (Due to the angle of the photo the pieces do not appear to be the same, but they are.) Don't forget to stay stitch the edges of the Yoke Facings, as this will keep them from pulling out of shape during construction. I did not staystitch them for this tutorial, and it worked out fine, but I do recommend you doing that to the un-interfaced Yoke pieces.


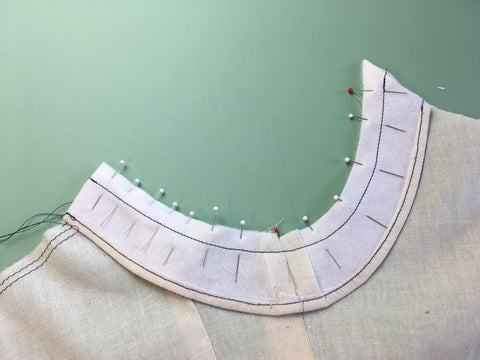
With right sides together and matching the shoulder seamlines and the center front notches, stitch the Yoke and Yoke Facing together along the inner curve of the neck edge.

Trim the seam and clip the curves.

Keeping the right sides together, pin and align stars, notches and shoulder seams (marked by red tip pins below) of Yoke and Yoke Facing at the outer edges. Stitch between the stars at notch 12 and 13 on each side of the shoulder seam. Backstitch at the beginning and end of the stitching.

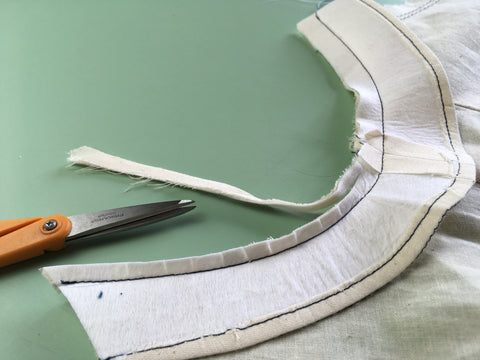
Clip to the stars and trim 1/4" (6mm) away from the seam allowance between the notches.

Turn the yoke assembly right side out. Press, slightly rolling the seam towards the facing.

Open the Yoke and Yoke Facing at the center back, then with right sides together, match the notches and center back seam, sew the center back of the yoke assembly. Pivot the stitching at the point of the V.


Turn right side out and press seam to one side.
Turn the Yoke/Yoke Facing right side out and press the edges of the point, slightly rolling the seam towards the facing.

Add Yoke to the Dress
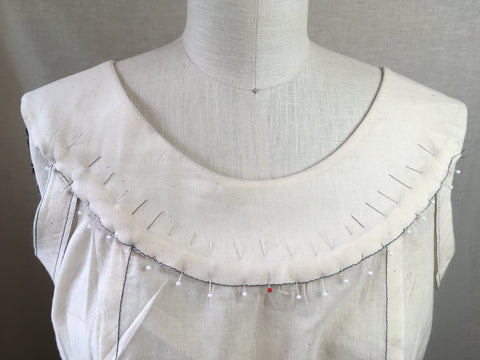
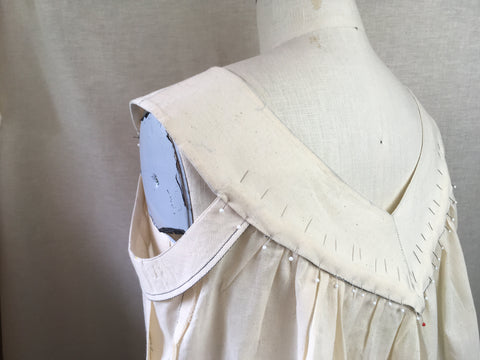
Note: To make the yoke/dress construction easier for you to see, I put the Mu'umu'u on a dress form with the wrong side facing out.
Note: The red pins mark the match points of the yoke and dress.
With right sides together, match and pin the center front notch 14 on the yoke to center front notch 14 on the dress.
Match and pin yoke notches 15 to the dress Center Front/Side Front seams.
Match and pin the star at notches 12 on the yoke to the stars on the Side Fronts of the dress.
Once the yoke is pinned stitch between starts at notches 12.

Press the seam allowance toward the yoke.

With right sides of the outer back yoke to the right side of the dress back, match the center back seams and notches 16. Match the stars on the back with stars at notch 13 on the yoke. Pull up the gathering threads evenly to gather the dress to fit the back yoke.

Stitch from the center back to one side, ending stitching at the star. Repeat on the other side of the back yoke, stitching from the center back to the other star. Keep yoke facing out of the stitching.
Press seam towards the facing.
Finish the Yoke Facing
Turn under 1/2" (13mm) on the seam line of the bottom yoke facing edge, on both the front and back (use the basting stitch you put in earlier, if you did that optional step).


With the wrong side of the dress facing up, pin the front Yoke Facing to the interior of the dress. Use the stitch line as a guide for matching the turned under edge, and stitch the facing to the dress with a whipstitch.
The armhole facing tucks neatly into the front and back Yoke/Yoke Facing.

Remove the basting and gathering stitches if needed.
Pin the back Yoke Facing using the stitch line as a guide for matching the turned under edge, and whipstitch facing to dress.
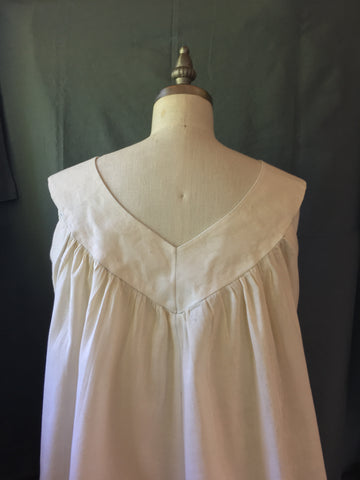
The Yoke/Yoke Facing and Armhole Facing create the sleeveless armhole of the mu'umu'u.


I hope you find this blog and the 160 Hawaiian Mu'umu'u Four Day Sew-Along all you need to ensure this pattern is a pleasure to make. The Folkwear 160 Hawaiian Mu'umu'u is on sale through the month of July, in either paper or pdf versions.


In a perfect world you could just click and purchase ANY Folkwear pattern anytime you want. Unfortunately, it doesn't always work that way. We get questions all the time about older Folkwear patterns that are not currently in print. We have about 20 to 25 patterns that we don't offer in our shop and are no longer in print.
We know many of our older patterns are hot items at estate sales and antique stores and eBay. If we could, we’d have every pattern available in every size and every version. We’d also have perfectly clean, well-stocked sewing studios where little elves brought us tea and cookies every afternoon, but that’s a whole different fantasy.
So, why don’t we make every pattern that Folkwear has ever published available right now? The reason for each pattern is different, and some patterns have multiple reasons we are not yet bringing them back. Here's a little bit about the current process and difficulties of printing because sometimes that is relevant also. Some reasons we don't have a pattern in print right now:
What should you do if there is an out-of-print Folkwear pattern that you would love for us to reissue? Well, the first thing is to let us know by adding the pattern number to our "Wish List". We are always looking for input and letting us know the patterns you are seeking can help us make decisions about which patterns to bring back!
Tell us which patterns you are looking for right here. We love hearing from you and learning what you want to sew (and how you sew).

by Cynthia Anderson
In this final day of the 160 Hawaiian Mu'umu'u sew along, we will complete the finishing details by adding an interior elastic tab for shaping, hem the three quarter sleeve (View B) with elastic, and hem the bottom edge of the dress. These finishing details for the interior shaping belt and hemming are the same for all views.
Check back to our other posts for Day 1, Day 2, and Day 3 of this sew along. The next blog post will show how the yoke is attached with the sleeveless version, as this sew along just focused on the dresses with sleeves (View B and View C).
Shaping Belt Tab (optional)
The interior belt tab can be hooked on the interior of the dress to provide shaping at the waist. The tab/hook helps to add shaping by holding the fullness of the back of the dress in place. Of course, this is an optional feature, but it is a great way to add some interest and formality to this dress.
If you have not already done so, cut out two pairs of the belt tab and two pieces of 3/4" (20mm) elastic the length indicated for your size according to the pattern instructions. You will also need the bow tie hook and bow tie eye pieces as seen below. You can find these bow tie hook and eye sets at fabric stores (Dritz is one brand) or you can order them online. They are easy to find. You will not need the slider in the set, just the hook and eye.

Thread the hook onto one length of elastic and an eye on the other length. Fold the elastic in half with the shorts ends together.
Sandwich one folded elastic strip between two piece of the belt tab holder with right sides together a seen below.

Stitch the short ends of the belt tab, being sure to securely catch the double layer of elastic in the seamline. Make another pass of stitching to secure the elastic.

Stitch each outer edge of the belt, leaving the wide end open. Trim the seam allowances and corners, then turn and press.

Trim the raw wide ends of the belt holder evenly and finish the open edge or turn the ends under 1/4" (6mm) and stitch to close to the fold. Repeat for the second belt tab.

Add the Belt Tab
The wide edge of the belt tab aligns to the seam allowance of the Side Front and Back seam, between the dots as marked on the pattern. Stitch the belt tabs to the seam allowance. If the seam is pressed open, stitch to the Back seam allowance, and the wide end is covered by the seam allowance.
Note: It does not matter which side the belt tabs are sewn to, but the hook should face towards the back of the dress as seen below.

The belt tabs hook together as seen on the interior, or with the wrong side of the dress facing up.

Finishing the Cuff, View B
To finish the three quarter length sleeve, turn under the raw edge of the sleeve by 1/4" (6mm) and press. Turn under again 1" (2.5cm) and press.


Leave 1/2" (13mm) to 1" (2.5cm) opening at the sleeve seam. Stitch close to the folded-under edge to create a channel.

Cut two pieces of 1/4" (6mm) wide elastic to be 1/2" (13mm) wider than your arm circumference at your lower forearm (or where the sleeve will fall on your arm.) It may be a good idea to measure the circumference of your arm where the sleeve will hit your arm when wearing the dress, and make the elastic fit where it will hit your arm.

Thread the elastic through the channel and pin the ends of elastic together. Adjust as needed and overlap ends of elastic 1/2"(13mm). Stitch the ends of the elastic together on the sewing machine. Make a few passes of stitching to securely hold the elastic.
Tip: Add a safety pin or bodkin to one end of the elastic to help feed the strip through the channel. Be sure to secure the elastic tail with a pin to keep it from pulling through.

Close the opening of the channel by hand or machine. Repeat for the other sleeve.

To finish View C, simply turn under the hem as indicated in the pattern, and stitch close to the folded edge.
Hem the Bottom Edge of the Dress
Hem the dress by turning up 1/2" (13mm) and then again 3/4" (2cm). Stitch, or blind hem stitch, close to the folded edge using a machine or hand stitch. You may need to ease the fabric a bit when hemming to keep the fabric from creating folds in the hem.


Hope you have enjoyed making this new Folkwear pattern: 160 Hawaiian Mu'umu'u! To celebrate the pattern's debut, it is on sale for the month of July. It is offered in a paper or pdf version, in sizes XS-3XL. Enjoy the versatility of this pattern by making it year around.


by Esi Hutchinson
It is finally summer according to astronomical dates and Folkwear is featuring 252 Beach Pyjamas, a perfect one-piece for a hot summer day, while still covering up the body from the sun and looking stylish. Here in North Carolina it is hot! This pattern suggests to use fabrics that are airy, flowy and that drape gracefully on ones body. Silk, linen, rayon, chiffon, challis or even cotton are great fabrics for the Beach Pyjamas pattern. When looking at this pattern early last month, I was inspired by the lines of the garment and how they could be made as separate pieces. It is a fabulous pattern as a one-piece beach Pyjamas, but it can also be "hacked" into more options.
In this blog post, I will show you how I made just the top of the Beach Pyjamas for a great summer blouse.
In this history of our 252 Beach Pyjamas pattern, it says that often the Beach Pyjamas were made from fabrics with "bright cubist-inspired prints". I did not consciously choose this fabric due to this description, however the fabric I chose seamed to fit the 1920-30's style perfectly. It is a lightweight rayon with a small abstract design.
Planning
I was lucky enough to try on one of Folkwear's samples to see how I want to lengthen and shorten the waist yoke to fit my torso. I suggest you make a muslin to see what fit changes you might make to the pattern before working with your fashion fabric. The main idea is that I am just going to make the top portion of this garment to create a blouse - I want it to fit my body the way I like.


I decided I wanted to shorten the three yoke pieces at the waist and the placket by 2in. (5cm)
There are not lengthening and shortening lines on yoke pieces D,E and F, however there are waistline indicators for your size on those pattern pieces, you can use those as your lengthening and shortening lines.

If there is puckering in the pattern pieces after you have folded on top of your waistline, you can make small cuts where is it puckering so the pattern piece can lay flat.

Here are all my shortened yoke pieces. I trued the side seam lines so they would be straight.

We will only be using pieces A-G, I-K which includes the Bodice, Collar, Yoke, Bindings, and Sash.

A nice thing about this sewing pattern is you can use French seams for fabrics that are delicate instead of overcasting or using a zig zag stitch. It causes less tugging and distress on the fabric. If your fabric moves a lot I would suggest basting your seams before using your final machine stitch length. This will prevent your garment from shifting too much. You can also read more about working with shifty fabrics in this blog post.
Constructing the Top
I sewed the bodice front/back with French seams at shoulder seams.

My favorite detail of the Pyjamas is the collar. It is very similar to the collar of 266 Greek Island Dress Jacket. To finish the outer raw edge of the Collar we will be using the Picot technique which the instructions suggest.
Picot: A rolled hem with a zig zag stitch sewn over the hem to hold it.
I do not have a rolled hem foot but you can picot a hem without one. You should practice first. I used a zig-zag stitch, with my stitching length at 1.30 and my stitching width at 5. I made sure the stitches pulled the outer edge of the fabric curling it up to encase itself.

Press under 1/8"/3mm on your practice piece, like the instructions say.

I made a couple of small stitches to attach a tail of thread to help me pull the fabric through at the start of picoting the hem.

Here is my practice picot hem. Adjust the tension, length and width of the stitch as needed for your preferred look.

I sewed a picot edge around the outer edge of the collar (after I practiced doing this edge). The picot edge gives a slight ruffling effect to the collar which I really liked. Now you can attach the collar to the bodice.

Pin wrong side of the Collar to the right side of Bodice front/neck edge, matching small dots, notches 2 and 3, and square to seam. Stitch, backstitching at small dots. Press both seam allowances away from Collar.
Trim seam allowance of Bodice only to a scant 1/8 in.(3mm).
I folded under 1/4in. (6mm) of the Collar seam allowance and folded it over the trimmed Bodice seam again, then stitched close to the fold, taking care not to catch COLLAR in stitching.
Continue with the pattern instruction steps, and stop after your have sewn on the Yoke.

I decided to get rid of the point that Yoke Right Front D has, it is there because it attached to the pant legs, but we are just making the top, so you can make it whatever shape you want. If your want keep it, great.

Take a ruler and cut a line to the shape you like. I did it like this.


To finish the raw bottom edge of the yoke, you could use a Picot hem, bind the edges, or fold under 1/8-1/4 in. (6-3mm) and fold under again and stitch close to the folded edge. I used a picot stitch on the raw edges (folded under 1/8 in. (3mm) then using a zig zag stitch to enclose the folded edge).
Follow the instructions to place the hook and bar closure and adjust to better fit your body. Then add three evenly-spaced snaps closures to the placket.
For the Sash
You could use contrasting fabric or the same fabric for the Sash. I would suggest using the same or similar type of fabric. Cut four of pattern piece K two in one fabric and two in another, or all four in the same fabric (that is what I did).
Right sides together stitch short edges in whatever fabric combo you have and, press seam to one side a make a flat-felled seam. Repeat with other set of the Sash.
Again, picot the hem of the Sash by folding under 1/8 in. (3mm) on all raw edges of both Sash pieces. Then machine picot Sashes together.
I will not be tacking the Sash to the upper Yoke seam at side seam, as I want to be able to use it when and where I want. You can even use it as a head band.

We are finished! Personally I think the 252 Beach Pyjamas is a versatile garment, you could wear it to get drinks with friends, dancing, go out for a meal, wear to the beach! And now you can also make just a top from it. It is very flattering and comfortable, who doesn't love that!


by Cynthia Anderson
Today, in day three of the 160 Hawaiian Mu'uMu'u Sew Along, we will add the sleeves, make the yoke/yoke facing, and assemble the dress/sleeve/yoke in easy to follow steps. I am making View B (longer-sleeved version) for this sew along, though nearly all steps are the same for View C (short-sleeved version). We will have a tutorial on making the sleeveless version soon, as the steps are a bit different, especially for today's section. But for View A, today's sew along will not be applicable.
On day one, we gathered materials and figured out sizing and views. On day two, we created the dart and pocket and assembled the dress.
Sleeves
If you are adding short sleeves or the three-quarter length sleeves, make a double row of gathering stitches at the sleeve cap (between the open notches) as marked on the pattern. Remember to leave long thread tails for pulling the gathers.

With right sides together, stitch the sleeve together matching the notches. Finish and press the seams open. Repeat for the other sleeve.

This next part of the dress assembly can get a little confusing, but take it slow and pay attention to what matches with what and you won't have a problem. Matching notches and seams to notches is really important. We attach the underarm section of the sleeve to the dress first, then make the yoke and attach the yoke to the dress and upper part of the sleeve.
Add Sleeve to Armhole Opening on Dress
We need to attach the underarm section of the sleeve to the dress body first.
With right sides together, match the sleeve seam to the dart line on the dress body (the center red tip pin below). Match notch 17 and the star on the front of the sleeve to the star on Side Front.
Then, match the double notch 18 and the dot on the back of the sleeve to the Back/Side Front dot and seam on the dress. Finally, match notch 19 and the star on the sleeve with star on the dress back.
Stitch between the two stars (the outer red tip pins mark the stars). Repeat for opposite sleeve.

 Both sleeves attached to the dress at underarms.
Yoke and Yoke Facing
Remember the yoke has interfacing the yoke facing does not.
With right sides together, stitch the front and back yoke together at the shoulder seams, matching the notches. Press the seam open.

With right sides together, stitch together the center back of the yoke point matching the notches. Press the seam open.

Construct the yoke front and back facings just like you did with the yoke. If you have not done so already, run a machine basting stitch 1/2" (13mm) from the outer edge to use as a guide for turning the seam edge later.


Add Yoke to Yoke Facing
Pin and stitch yoke and yoke facing right sides together. Match center back, shoulder seams, and center front. Stitch the inner neck seam starting and ending at the center back. Be especially careful to start and stop the stitching in the same place at the center back as this will help the back look neat when turned. Alternatively, you could start stitching somewhere else along the neckline and pivot at the center back with the needle down in the fabric.

Trim, or grade, the seam allowances and clip every few inches to release the seam and make it easier to turn the yoke and have a smooth curve. Be sure not to clip through the seam stitching. Trim 1/4" (6mm) off, or grade by trimming slightly less off of the yoke facing than the yoke so the seam allowances are uneven.


Clip up to, but not through, the seam at the V at the center back. This clip is necessary to allow for turning the yoke/yoke facing.

Open the yoke/yoke facing, and press the seam allowance to the yoke facing.

Understitch, stitching the seam allowance to the yoke facing. Stitch close to the seamline of the yoke/yoke facing, stitching only the seam allowance and yoke facing together. This will keep the yoke facing from rolling to the outside and keep the neck looking neat.
Turn the yoke/yoke facing right side out and press the neck opening. If you choose not to understitch, roll the yoke slightly to the outside when pressing.


Now it is time to add the yoke to the dress and sleeve. Work this n sections as follows. Take your time and go slowly to make sure you have everything matching. Similar to add the sleeve to the dress underarm, there are lots of points that need to match, and now, also some gathers that need to be pulled to fit.
Add Yoke to Dress Front
Note: To make the yoke/sleeve/dress construction easier to see, I put the mu'umu'u on a dress form with the wrong side out.
Note: The red pins mark the match points of the yoke and dress.
Start working at the center front of the dress and the yoke (keep yoke facing out of pinning and stitching).
With right sides together, match and pin the yoke center front notch 14 to the dress center front notch 14.
Match and pin the yoke notch 15 to the dress side front/sleeve seam.
Match and pin the yoke notch 12 star to the dress Side Front/Sleeve seam star.
Repeat on the opposite side of the center front of the dress/yoke.
Now, stitch the yoke and front of the dress together between the side front/sleeve seam stars.

Add Yoke to Dress Back and Sleeve
Note: The red pins mark the match points of the yoke and dress.
With right sides together, match and pin the center back of the yoke to the center back of the dress.
Match and pin the yoke notch 16 to the dress Back notch 16.
Match and pin the yoke notch 13 star to the dress at the back sleeve seam star.
Pull the gathering threads on the dress, evenly spacing the dress back gathers to fit the yoke between the dress center back and the star at the back edge of the sleeve.
Stitch the yoke and back of the dress together between the back/sleeve seam stars. Pivot at center back with needle down in the fabric. Again, make sure the yoke facing is out of the way.

Attach Sleeve Cap to Yoke
Note: The red pins mark the match points of the yoke and sleeve cap/shoulder.
Match and pin the yoke shoulder seam to the sleeve notch 21.
Pull the gathers on the sleeve cap to fit the yoke.
Re-check that the gathers are evenly spaced, then stitch the sleeve cap between the star 13 (on back of sleeve) and star 12 (on front of sleeve) .


Turn under the remaining edge of the Yoke Facing at 1/2" (13mm) seamline. Fold the Yoke Facing to the inside of the dress and hand whip stitch the turned under edge of the yoke facing using the stitch line as a guide, slightly covering the stitching line.

With the dress/sleeve/yoke all assembled there are just a few easy finishing details to go. Join me for Day Four of the Folkwear 160 Hawaiian Mu'uMu'u Sew Along to add the optional interior shaping tab, finish the sleeve hem with elastic, and stitch the hem.

by Cynthia Anderson
Welcome to Day Two of the 160 Hawiian Mu'umMu'u Sew Along where we will create the darts and in-dart pockets, as well as create the front and back of the dress. In Day One of the sew along, we gathered materials, explored the pattern, and choose size and view to make.
I am making View B (with the 3/4 length sleeve) in a size small, but the instructions for both views with sleeves will be nearly the same. The fabric I am using is a mid-weight gray-blue linen, with pockets added to the front side dart. You may be wondering about how a pocket is added to a dart. I promise this is not difficult and you will love wearing this mu'umu'u with pockets.
To get started today, cut out the pattern pieces for your size and the view you want to make, according to the layout instructions. Don't forget to transfer all the needed markings to your fabric before you unpin and remove the pattern pieces from the fabric.
Seam Finishes: Finish seams as you prefer. There are a couple of places you could use French seams, but often you will want to press seams open and finish with serging or zig-zag stitching (or pinking).
Transfer Dart Marking
It is perfectly fine to transfer the pattern markings to your fabric in any method that works best for your project. But before you do, have a look at the method I have used for the dart and why.
First, I used tailor's chalk to transfer the dart outline to my fabric, because the ink of the water soluble pen I have is not easy to see on my fabric. Typically, I would make the marking on the wrong side of the fabric. This time, I transferred the marking to the right side of the fabric, because I planned to trace the chalk lines with a basting stitch. Since the basting stitching shows on the right and wrong sides of the fabric it really does not matter which side the transfer drawing is made.
I chose to make a basting stitch to outline the entire dart, because sometimes the chalk marking disappears before a task can be completed. Since this dart is large and it is handled quite a bit, I decided a removable basting stitch to be a good choice. The stitched outline also helps to maintain the integrity of the dart, preventing it from stretching.
Note: The basting stitch does not need to be removed unless it accidently ends up being visible on the right side of the mu'umu'u.

Another great way to transfer the larger dart lines is to use a piece of tracing paper and a tracing wheel. You can slip the tracing paper to the wrong side of the fabric and trace the dart cutting and stitching lines with the tracing wheel. The marks will be left on the fabric. You will need to move the tracing paper once or twice to be able to mark the whole dart, but it is fairly easy to do that and mark the entire dart. Be sure to use a tracing paper color that will contrast with your fabric. You can also use the basting marking method described above after tracing with the paper and wheel if you like.
Stabilize the Yokes and Yoke Facings
Anytime a fabric is cut with a curve, it becomes less stable. To preserve the shape and to stabilize the fabric, interfacing or stay stitching should be added. Most fabrics benefit from stabilization directly after being cut. Even if the fabric is just laying flat undisturbed, the weave will relax and the fabric will spread. If the fabric spreads or distorts, the pattern pieces will not fit correctly when they are sewn together.

Note: Adding interfacing is optional, but it is always a good idea unless you are confident in the stability of the fabric used. If you are not using interfacing, be sure to stay stitch all Yoke and Yoke Facing pieces.

To stay stitch, stitch just inside the seam allowance (seam allowance is 1/2" or 13mm) with a regular length stitch or shorter.
Tip: Try to avoid pulling or over handling these pattern pieces when stay stitching.

Prepare Dart for Pockets
The 160 Hawaiian Mu'uMu'u does not have a true side seam. Instead it has a long shaping-dart that acts as a side seam. The authentic mu'umu'u that inspired the drafting of this pattern did not originally have a pocket. However, the Folkwear team concluded that this dress was a perfect candidate for pockets.
If you do not want to add pockets, transfer the dart markings and make the dart according to the pattern instructions.
To add the pockets, the center of the dart needs to be cut away at the cutting lines, as seen in the photo below. Cut on the cutting lines for your size and cut carefully to the dot at the bottom of the cutting lines. This cut out space creates a seam allowance in which to attach the pockets. This might seem odd or even scary, but it is a standard way of installing pockets to a dart. If this is new to you, please do not hesitate to give it a try. Learning to sew is all about building your skill set.

Pocket Added to Dart
With right sides together, position and pin each pocket at the raw edge of the opening, matching the circles and stars.
Stitch the edges of the pockets to the raw edge of the dart along the seam line between the circles. (The white tip pins mark the circles. The red tip pin marks the star).


Stitch the pocket to the raw edge of the dart opening using 1/2" (13mm) seam allowance between the top and bottom circles.


Fold pocket to through to the inside (wrong side) of the dress, and press the seam towards the pocket.

Now, pin pockets, right side together, matching the notches on curve of pocket, and matching circle and stars. Pin the dart together matching the dart lines (above and below the pocket). Stitch from the top of the dart to the circle at the top of the pocket. Pivot, with the needle down in the fabric, and stitch from circle around the curve edge of the pocket to the circle at the bottom of the pocket and end with a backstitch. See the photos below.


Be sure the seams are aligned, and now stitch from the star (red tip pin in photo below) on the dart/pocket seam to the dart dot, leaving long thread tails at the bottom of the dart and tie off. Keep the pocket out of the stitching.

 The bottom of the dart threads tied.
Press the dart and pocket towards the front of the mu'umu'u. Repeat for the other pocket on the other Side Front.
The photo below shows the dart and pocket pressed towards the front of the mu'umu'u as seen on the wrong side.


Finished dart with pocket!
Add Front Sides to Center Front of the Mu'umu'u
With right sides together, matching notches and dots, pin and stitch each Side Front A to Center Front C as seen below. Press the seams open or towards the sides and finish.

Right side view of the finished front.

The Back
Make two rows of gathering stitches along the top of each Back B as marked on the pattern (between the open notches).

With right sides together and matching the (double) notches, stitch the Back B center seam. Try to keep the gathering stitches out of the center back seam. Gathering the back will be done at a later step.

Press the seams open and finish.

Sew Front and Back of Dress Together
With right sides together, stitch the front and back of the mu'umu'u at the side seams. Press the seams open or towards the back and finish.

There we have it. The body is constructed with pockets added to the darts. I hope Day Two of the mu'umu'u sew along went smoothly and you learned something new. Join in again for Day Three, for adding the sleeve to the armhole, constructing the yoke and yoke facing, and assembling the dress/sleeve/yoke.

by Cynthia Anderson
Folkwear excited to introduce the 160 Hawaiian Mu'umu'u pattern! To celebrate the debut of this new pattern, it is on sale for the month of July and comes with this sew-along! The pattern is offered in a paper or pdf version. If that were not enough, Folkwear's very own multi-talented Esi Hutchinson created the cover illustration!
The mu'umu'u is often overlooked due to it shapeless reputation. Once the Folkwear team examined an authentic mu'umu'u, it was apparent that this gem deserved to be rediscovered. We hope you share in our delight for this dress and find it to be a charming, comfortable, and versatile new addition to your wardrobe. You do not have to live on a beautiful tropical island to enjoy making and wearing this comfy dress in time for summer and beyond.
This loose and breezy garment, is considered aloha attire and has its origins in the 1800s when missionaries adapted their Mother Hubbard-style dresses to fit Hawaiian women. Originally a tool of assimilation, native Hawaiians have since reclaimed this dress to symbolize their heritage and its popularity has spread worldwide. Mu'umu'u is typically made of cotton and often features tropical floral, or traditional Hawaiian motifs.
Our sewing pattern features three views, each with a different sleeve option: sleeveless (View A), elbow-length (View B), and sleeve short sleeve (View C). The short sleeve is an open ruffle, while the longer sleeve has elastic at the cuff and falls to the elbow. All three dresses feature princess seams, side darts with cleverly hidden pockets in the dart (optional), and an interior elastic belt to add additional shaping to the front. The back is gathered to a pointed yoke and the front yoke is a smooth crew shape. The dress is loose fitting, yet it has a flattering silhouette that makes it perfect when the temperatures rise.
Front & Back Views

Focus of this Sew Along
In this sew-along I am making the version with three-quarter length sleeve and side seam/dart pockets out of a blue-gray linen (Mist) from Folkwear's fabric collection. This three-quarter length sleeve is a perfect summer/fall transition length and this beautiful neutral linen will go with just about everything (plus a solid fabric is helpful when doing a sew along). Both versions with sleeves are constructed in the same manner and the only difference is in how the sleeves are finished (and sleeve length, of course). The sleeveless version goes together a little differently, but we will cover that in another blog post.
Join in this four-day Sew Along and learn how to make this dress with step-by-step instructions, plus tips along the way. Below is the schedule breaking down the making of the Mu'umu'u.
Sew Along Schedule:
Day One: Introduction to Folkwear's 160 Hawaiian Mu'umu'u pattern and getting started: get the pattern, select fabric, gather materials, decide which version and size to make.
Day Two: Add optional pocket to side seam dart and stitch the front & back of the dress together
Day Three: Make the yoke/yoke facing, add the sleeves, and assemble the dress/sleeve/yoke
Day Four: Add interior elastic tab shaping, finish sleeve hem with elastic, and hem the bottom edge of the dress
Sleeveless option tutorial.
Fabric Suggestions
For summer, consider any number of light-weight fabrics such as cotton voile, lawn, muslin, ikat, rayon, seersucker, chambray, poplin, double-gauze, batik, brocade, eyelet, silk, and batiste. Also, any light to mid weight linen is a perfect choice as well. Typical fabrics for the mu'umu'u would be cottons with bright tropical prints. We will have a fabric suggestion blog (with links to great fabrics) out soon!
If you use a sheer fabric like voile, consider making the dress body out of two layers of fabric for a flowy, yet more opaque look. Then make the short or three quarter length sleeves out of a single layer of fabric, adding to the diaphanous aesthetic. Handkerchief linen, lined with a cotton voile or lawn would be a great option too!
Even though the mu'umu'u is synonymous with warm weather, this pattern can carry you into cooler temps too. The longer sleeve length adds to the versatility of the dress, making it a perfect fall wardrobe addition. Also remember that you can use the lengthen/shorten line on the pattern to make the sleeve any length you like. And you can use the lengthen/shorten lines to make the dress longer for cooler weather (or your style preference)
For Fall/Winter use a cotton flannel, mid-weight linen, or lightweight wool. Layer with your favorite slip, skirt, pant, leggings, or tights underneath for lots seasonal variations.
Fabrics with bold or subtle prints/designs are typical for an island inspired Mu'umu'u. Look for Hawaiian prints, block prints, checks, Madras plaids, small or large florals, and abstract designs like Ikats and batiks.
Consider making the yoke out of a contrasting fabric and/or add piping for a fun detail. It is always fun to make the pockets and yoke/yoke facing out of fabric that is different with the dress body. Since the yoke is cut on the bias, have fun playing with a striped or patterned fabric.
The yoke is also a perfect canvas for trying out your embroidery skills.
Yardage & Sizing Charts
See the sizing/yardage requirement and the finished measurement chart below (or at this link) to determine the yardage your size requires. Due to the loose fit of the Mu'umu'u, choose your size based mostly on your bust measurement, and note finished measurements below also. Molly made her Mu'umu'u in size SM (even though she measures MD at hip). I made the Mu'umu'u view C in a size SM as well. I am smaller through the shoulders and bust, while my hip measurement is a size medium. Because the dress is loose fitting, with plenty of ease the bust is my focus for fit. Even if you are confident about your size choice, consult the Finished Measurement chart to help make sure.
Hint: When you are unsure about the fit of a pattern that is new to you, measure the width of a garment you have that fits you like you prefer. With the garment laying flat, compare the underarm measurement to determine the bust. Measure and compare the waist, hip, or length as the case may be. This will help you to determine how much ease you prefer when choosing a new pattern size.


For Day Two of the 160 Hawaiian Mu'umu'u Sew Along, you will need to gather up your supplies, trace and/or cut out the pattern for the size and view you want to make, and prewash & dry your fabric. On Day Two of the Sew Along we will cut our fabric and start sewing. I hope to see you back here soon!


