- Home
- About
-
Shop
-
Sewing Patterns
-
Fabric
- Sewing Supplies
- Folkwear Clothing
-
- Blog
- Customer Gallery
- Contact

I feel that the 148 Black Forest Smock and the 110 Little Kittel are under-appreciated Folkwear patterns. They are fun to make, and really quite easy, with lots of options for special customization. Embroidery can be added to the neckband, cuffs, pocket openings, and/or shoulder yokes. And, the patterns include embroidery designs to use! Different fabrics combined for fun color blocking. And, the smocks make a simple silhouette that is easy to wear and can be made formal or informal depending on fabric - and made into a dress or shirt, depending on length!
I made the 110 Little Kittel for my daughter a few years ago from a beautiful blue corduroy. I really wanted to add embroidery, but did not have time to do hand-embroidery, so I tried out some stitches on my machine to simulate the embroidery designs included in the pattern. It was not hard at all and a lot of fun to figure out which stitches to use (and finally use some of those stitches my machine can do, but I never use). If you use your sewing machine to embroider, make sure to use a stabilizer on the back side of the fabric - interfacing or a tear-away stabilizer will work fine.
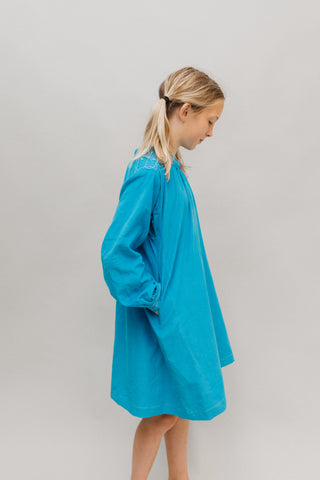

This past week, I decided to make a 148 Black Forest Smock for myself. I wanted to make a simple smock (no embroidery) made into a short dress that I could wear with boots for winter. I had a great, warm brown fabric in my stash, but it was a knit. I decided that the medium-weight knit might be perfect for this pattern and it would be fun to see how it could work out. And, then I could show you how to do the same!
The fabric is some combination of wool and/or mohair and synthetic. It is thicker and heavier than a jersey and is a 2-way stretch, with over 50% stretch. It is probably easier to use a knit with a little less stretch, but this fabric worked just fine.
There were only a few adjustments I made to the pattern to work for a knit fabric, and I am outlining those below. I followed the instructions in the pattern for everything else. I did not cut the welts (noted below) and I did not cut or use the shoulder yoke facings (only cut and used one set of shoulder yokes and did not face them). I used a serger for sewing most seams; exceptions are outlined below as well. If you don't have a serger, just use a zig-zag or stretch stitch for seams. I cut the smallest size, and since this pattern has a lot of ease, and I would be making it from a knit, this was perfect. This is a traditional-style garment and one of our oldest patterns, so the sizing and construction is a little different from typical modern construction. It is fairly easy to size the pattern up by adding to the front and back side seams and to the sleeve seam, as needed.

Pockets
First, I cut all the pattern pieces as I would have for a woven fabric, except that I did not cut the welts for the pocket.
But, I cut all the pocket pieces with an extra long section where it joins the smock so that I could use the technique for welt pockets that is a little easier to do and does not require an extra welt piece. I added about an inch extra to the part of the pocket that juts out to join the body of the garment.
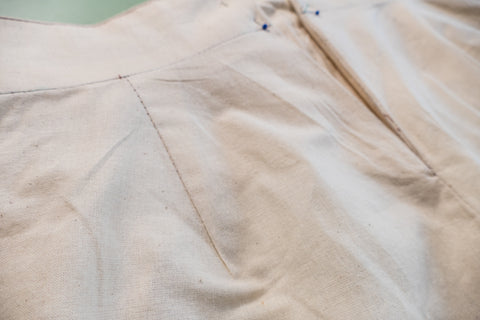
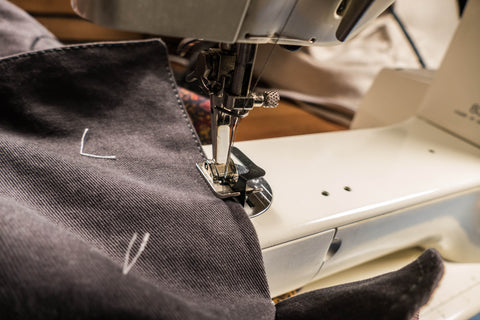
The first step in making the smock is to add the pockets. To do this one-welt pocket without the welt, I started by putting the two pocket pieces (front and back) together over the pocket opening. I've marked the corners of the welt pocket and the opening on the side piece with a purple marker. Then, I centered the pocket pieces over the opening and lined up the edges of the pocket with the opening line of the pocket.

I sewed, with a regular sewing machine and a straight stitch, along both long edges of the welt pocket, starting and ending at the corners of the welt pocket (marked with purple).

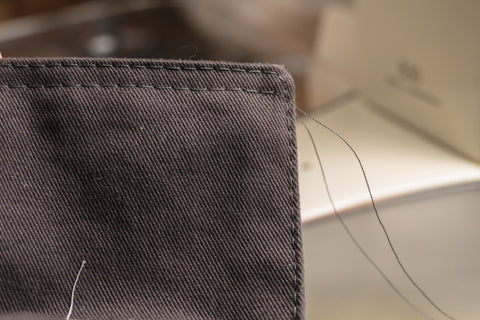
Then, I cut the welt pocket opening to 1/2" of the ends and snipped to each corner (don't cut the pocket pieces, just the side panel piece, as seen below). Note that the side panel is facing up in the photo below, and the pocket pieces are on the other side.


Any one who sews, knows what a challenge fitting can be. The ultimate joy in learning to sew, and what makes it so rewarding, is the pleasure that comes from wearing clothes that fit and bring you joy.
This blog is intended to help you make minor changes that can make a big difference in how your Folkwear's 229 Sailor Pants fit. If you are in between sizes, a simple grading technique can make all the difference. Or, if your waist is quite a bit smaller than you hips, a couple of easy-to-make darts can be all that stands between you and a good fit. Adjusting the depth of the crotch can make a difference too.
The 229 Sailor Pants pattern was directly taken from an authentic pair of sailor pants from the 1940's. Part of the authenticity of this design, means there are no side seams. However, side seams do allow for more options when it comes to shaping a garment, especially when considering the curves of the female body. However, adding side seams is a future blog.
Despite this sailor pant design having no side seams, a few simple and helpful adjustments will give you a better understanding on how to make the 229 Sailor Pants fit your shape. Because, there are no side seams to this pant design and the front has all the opening flap and darts, most sizing adjustments need to be made to the back of the pants.
Even though the techniques demonstrated here are simple, it is always best to make a test muslin first. All the adjustments for this blog are done making a muslin. Other than the adjustments, the pants are made according to the pattern instructions. We will be focusing on the back seam and waistband of the pants, mainly. Since the fit of the leg is not the focus of this tutorial, I only constructed the pants to the knee.
To make sizing adjustments you need to consider the widest part of the body first. The widest part of your body can vary depending on your body shape. If your waist is the widest part, start by choosing the waist size that matches your measurement. The focus of this blog concentrates on making adjustments for the waist, hips, and crotch.
If your hips are the wider part of your lower body, there are a couple of approaches to take depending on how much difference there is between your waist and hip measurement.
Simple Grading Between Sizes
Sometimes, the difference between your hip and waist measurements are not all that dramatic, but you still fall in between pattern sizes. For example, while the size 32 might fit nicely in the waist, it might be too narrow through the hips. In this case, keep the size 32 waist and make the hips wider by using the size 34 pant pattern. This the technique Molly used when making her red corduroy Sailor Pants above.
So you can more clearly see what is being demonstrated, I traced (using Swedish tracing paper) the size 32 pants pattern piece and laid it on top of the size 34 pattern piece. These pattern pieces are not nested next to each other, so it helped to trace it and move it. I used the Center Front edge and notches for alignment. The grain line and "lengthen or shorten here" line printed on the pattern can be used to ensure alignment as well.
Draw a Grading Line
Below, the line between sizes, or grade line, is drawn in red between the size 32 at the waist and the size 34 toward the hip area. You want to create a smooth continuous line between the sizes. Doing this widens the hip area to size 34 while allowing the waist to remain unaltered. Notice this grading line runs slightly into the crotch area without altering this area too much. Trace your new pants pattern piece, staying with size 32 at waist and following the red line to size 34 for the rest of the pants.

A size 32 traced on Swedish tracing paper aligned over the original pattern and the new grading line drawn in red.
This technique works fine when grading between just two sizes. However, this technique does not always work well if you need to grade between more than two sizes. Too much grading forces the fabric off grain or distorts the crotch area, which results in an unfortunate wonky look. When making a minor grading adjustment, the measurement threshold or limit is approximately 1/2 inch (13mm) or less.
Adding Darts at the Waist
If the difference between your hip and waist measurement greater than one size, a different approach using darts can be used. For example, I started with an original size 36 pant pattern (because of my hip measurement) and then shaped the excess fabric using darts to create a 32 inch (81cm) waist. Below is the size 32 waist band and the size 36 pant cut from muslin.
In this case, the difference between the size 32 waist band and the hip of the size 36 pattern is 2 inches (51mm) for each back side of the pants. The idea is to reduce the extra two inches (51mm) to fit the waistband. To do this, the 2 inch (51mm) dart needs to be folded in half, creating a one inch (25mm) width at the widest part of the dart. The location of the dart should be positioned, at the waist edge, over the fuller part of the body, or where you are round. The point of the dart points toward the fullest part of the rear end, and ends about one inch from the fullest part. Often this is about half-way between center back and side waist, but try out the location in a muslin and adjust before making your final fitting. Add a dart in the same location (mirror image) to each side of the back waist to create the needed shape.

With wrong side facing up, the dart drawn at the pant waist.

The dart folded in half takes up the excess fabric.
A "V" shaped dart is used to eliminate the excess fabric at the waist and create a 3-dimensional shape. Start with a back stitch at the widest part of the dart and stitch along the angled guide line, ending in a point. At the end if the point, leave a long thread tail and tie the the treads off to secure.
Press the darts to create smooth finish.

The dart sewn starting from the widest point and ending in a point.
Hints: Generally, you press darts toward the center front or back. Also, the curvier the body, the larger the darts usually need to be. You can even create two darts, one larger, one smaller.

The dart pressed toward the center of the pant and pinned to the waistband.

Another view of the waist with a dart, pinned to the waistband and ready to be sewn.

The waist and waist band now align due to the dart.

A close up view of the dart pressed toward the center of the pant and sewn in place.
View of the dart on the right side of the pants.

Darts with the right side of the pants laying flat.

Pants with darts creating shape at the waist and curve of the hips.

Another view showing how the darts allow for the curve the backside.

Side view... notice the dart placement.
It is worth understanding the varying methods for calculating dart positioning. However, it is also acceptable to let the excess fabric determine where the darts need to go. This is often an adequate method of figuring out good dart placement in order to give a pleasing shape to your garment. If there is excess fabric in the sides, then the dart should be at the side seam area. If the excess fabric is at the side back area, then your darts need to be positioned there.
Some curvier figures may required a combination of dart positioning, or two darts (one smaller, one larger) in the waist and/or side seam areas. Because everyone is shaped differently, it is worth experimenting to determine what works best for you. The rules of sewing are not written in stone. But it does help to understand prescribed methods and techniques, to help you determine what works best for you.
Adjusting the Crotch Depth
The final fit adjustment to consider is the depth of the crotch. The "lengthen or shorten here" line printed on the pattern, can be used if you need to adjust the depth of the crotch area. To shorten the length, simply fold your pattern piece up making a pleat equal to one-half the amount you wish to shorten.

Make a shortening pleat.

Pin the pleat in place and ready to use.
To add depth to the crotch, simply cut on the "lengthen or shorten here" line to separate the pattern into two pieces. Then insert another piece of tracing paper behind the original pattern piece, to will allow for the increase. Be sure the extra tracing paper is big enough to provide enough overlap on the back side to secure to the original pattern pieces with tape. A bit of tape added to the front side will help as well. Use a hip curve or French curve to create a smooth continuous drawn line connecting the two separated pieces. Trim any access tracing paper away and the adjusted pattern is ready to use.

Separate the pattern by cutting on the "lengthen or shorten here" line.
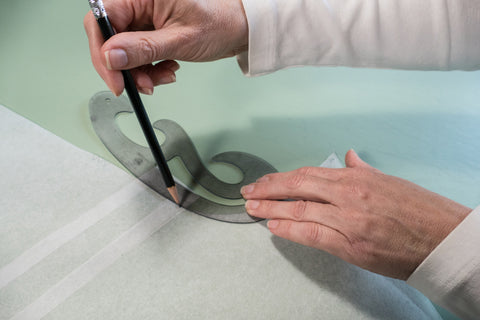
Use a French curve to create a smooth continuous drawn line connecting the two separated pieces.

Pattern separated, adjusted, trimmed and ready to be used.
I hope these basic fitting adjustments prove helpful in fitting your Folkwear 229 Sailor Pants. Learning to fit is a process and patterns are meant to be the starting point in this process. Learning how to take a two dimensional fabric and mold it to a 3-dimensional body is an art form in itself. I hope this blog will help you in your fitting journey.

The in-seam pocket, or pocket lining, as it is often called, is perfect to add to the side seam of a pocket-less skirt or dress. You can add this pocket to any pattern, or garment in your wardrobe, that has a side seam.
Be sure to see how to make other pocket options on our Pocket Series blogs. Have a look here to learn how: Pocket Series: Make a Welt Pocket and Pocket Series: Patch Pocket.
Choose a pocket fabric lining much like the fabric of the garment you are adding the pockets, or a lighter-weight fabric. A lightweight woven cotton will typically work well as a pocket lining for any woven fabric. Silk pocket linings are particularly nice in wool garments. If using a knit fabric, stick with a knit fabric for the pocket lining too. The idea is to choose a fabric that is similar in weight to the fabric the garment is made of, but have some fun and use a pocket fabric that might add a bit of the unexpected.
Using a tape measure and decide how far down you want the the pocket to sit below the waistline. This measurement should be situated so that your hand finds a natural feeling entry into the pocket. If the pocket is placed too high or too low it will feel awkward.
You can draw out your pocket shape freehand, or use our downloadable pocket (link at the bottom of the blog). Cut four pieces to make the front and back of the pocket bag - two for each side of the garment.
Using your predetermined pocket-placement measurement, mark the placement for the top and bottom edge of your pocket on the side seams of the front and back of your garment. Align and pin one pocket piece to the front and back of the garment on each side of the garment. With right sides together stitch the straight edges of the pocket to the garment edge, matching the top and bottom markings for the opening, using a 1/4 inch (6mm) seam allowance. Using a 1/4 inch (6mm) seam allowance keeps the seam from being too visible, because it sits further inside the pocket.

Press each pocket piece to the outside, then press the seam allowance toward the pocket. You can understitch the pocket seam here if you want. It can help prevent the pocket bag from coming out when being worn. To understitch, stitch the pocket to the seam allowance just on the inside of the seam.
Now with both pocket pieces sewn and pressed in place, place front and back of garment together (right sides together), and stitch the seams of the garment above and below the pocket. Use the seam allowance that already exists in your garment or the seam allowance indicated on the pattern.

Stitch the pocket pieces together using 1/2 inch (13mm) seam allowance or the measurement specified, being sure the straight edges and notches align. Clip the back seam allowance at the corners where the garment and pocket seams meet. Press the pocket toward the front.
Trim the the pocket seam allowance if you like. Depending on the weight of your fabric, will in part determine how or if, to finish the raw pocket edges. The idea is for the pocket to not be visible and create a smooth finish that will not be visible from the right side of the garment. Using a pinking shear finish or trimming the pocket seam allowance will suffice in most cases.


Remember when making your next project that nearly all side seams are made better with pockets!

Like our other featured pattern this month, the 242 Rodeo Cowgirl Jacket, has lots of options for making this pattern uniquely yours. There are three options for the jacket - with different yokes, fringe, pockets, and option for waist ties. It is a perfect canvas for embroidery as well. Add a fun western-themed embroidery design, or studs, to the front and back yokes and/or pockets.

I decided to make two samples of this jacket this month. First, I wanted a western-styled jacket that was a little more subdued and would be part of our permanent collection. I chose a needlecord corduroy for the main fabric, and the apricot brandy organic linen, which complimented well, for the yoke facings, undercollar, and cuff facings (both fabrics are from our shop). I used buttons made of hemlock from Favour Valley Woodworking. I made Version B (without fringe). This version has western-style shaped front yoke and sleeve cuff facings. I decided to sew the yoke and cuff facings on without turning under the seam allowance (and use no backings). This would allow the linen to fray and give a "rustic" look to the jacket. The only modification I made to the pattern was to sew the cuff facings on before sewing the sleeve completely together. This is because the design of the cuffs makes it difficult to sew/topstitch onto the sleeve after the sleeve is sewn together.
I really like how this jacket came out - subtle, rustic, and definitely western/cowgirl.


I also think this jacket pattern is perfect for making a simple, unlined jacket that can be worn everyday. It doesn't need a theme (i.e. western theme), but is actually just a great pattern for an everyday jacket.
So, I looked in my stash of fabric and decided to try to make the jacket from some backstock heavy/sweater knit fabric I have. I love this fabric and have a bunch of it (I bought the bolt when I found it). I think it is a designer fabric, but can't remember who (Dolce & Gabbana??).
I decided to take our some of the seams because the print on my fabric is large and I didn't want to break it up with the front and back princess seams. So, I took out the princess seams of the front and back. Now, typically this would alter the fit of the jacket, but since my fabric is a knit, there is a little stretch and I knew it would not make a huge difference. I put the pieces together, taking in the seam allowances as best I could, and I added a few darts in my pattern when cutting the fabric to accommodate the shape of the jacket.
 Pattern taped together and laid out of the fabric to be cut.
I made a few other slight modifications to the pattern. First, I cut the collar facings on the wrong side of the fabric so there would be a contrast at the collar. And, I took in fabric at both the top of the armscye and sleeve shoulder a bit. The pattern is designed for using shoulder pads (or large shoulders) and has a lot of ease in the sleeve shoulder, but I did not want to use shoulder pads for this jacket, so I just took out a bit of the extra fabric that would have been there.
Since I was serging the jacket together, and I had fewer pieces, and was not using any yoke or cuff facings, this jacket came together very quickly, even with hand-sewing (whipstitching) the front/collar facings and hem. It is a jacket I could wear everyday! Especially since I added pockets too (from the pattern). This jacket is basically View A with some simple moderations (no yoke/cuff facings, no front/back seams).


The pattern, 126 Vests from Greece and Poland, provides amazing detail about how to sew and create traditional long and short Greek vests as well as a typical Polish vest. The pattern provides authentic embellishment designs and instructions for creating appliques, as well as adding braid, soutache, sequins, and beading. You can create something very traditional or very modern - whatever you make will be unique and beautiful.
I have taken two approaches to making the short Greek vest when sewing up two samples in the last few weeks. First of all, I love the short Greek vest because of its simplicity - three pattern pieces, super quick to sew, and lots of options for embellishment, and the cut is very cute.
For my first sample, I wanted to add some trim to make it a bit more "folkwear". I used a braided trim, embroidered ribbons, and hand-made bias binding. The Greek vests can be finished with fold-over braid or bias binding, and I liked this option because it adds a bit more color to the vest.

I used traditional black fabric (this was a woven wool-blend remnant I had in my stash and I would recommend a tighter woven fabric than this one). I laid out my trims on the pieces to see how much detail I wanted and how I wanted them arranged, then I pinned them down and sewed them into place. Even with the extra machine-sewing to add these trims, this vest was very quick to make. Making the bias tape took just as long as making the vest. I'll do a tutorial on how to make a ton of bias tape all at once - this technique is also taught in this pattern.


I then decided to make a more modern (and quick and dirty) version of this vest to wear in the office this winter. The lovely thing about a vest is that it can keep you warm while leaving your arms free to move. I get cold in the office in the winter (because of my eco-friendly habit of keeping the thermostat pretty low). I often have to wear a jacket. But, I thought a vest would actually be better to let my arms move more freely when typing, maneuvering patterns, measuring, and sewing. And, I had a remnant of the beautiful Merchant & Mills jacquard fabric. So, I cut the vest, and since this is a fabric that ravels terribly, I decided to just serge all my edges to finish them and sew the vest up quickly. Making this version took less than an hour - cutting to finished sewing. It definitely could be made more beautiful by the addition of some Liberty of London bias binding (that's my idea anyway), but for now, this is perfect for keeping me warm at the office. And, I love the fabric and cut of the vest!

So, take a look at this vest pattern! It is a lot of fun, and there are tons of options for making the three vests in the pattern. And, the pattern is now available in larger sizes (XS-2XL) and as a PDF pattern.
What would you make? What embellishments would you use? What unique take do you have for one of these vests? We love to see what you make!
You can tag us on social media, or send us photos (mail@folkwear.com), or add to our Customer Gallery.

Finishing the details
We are finishing up all the final details on the 229 Sailor Pants today: button placement/buttonholes, making eyelets, and hemming
Check out Day One, Day Two, Day Three, Day Four, Day Five, Day Six, Day Seven, Day Eight, Day Nine, and Day 10 of the Sew Along in making the 229 Sailor Pants!
Buttons and Buttonholes
The feature that makes the iconic 229 Sailor Pants stand out from all other pant designs is the button-laden front flap. It truly gives these sailor pants the character we associate with this classic design. The application of so many buttons, and the thread color you use to make the buttonholes, can really allow you to get creative. The color, size, and how many buttons you choose to use will determine the final aesthetic touch. The thread color used to make the buttonholes can blend with the buttons or make the buttons stand out by using a contrasting color.
Depending on the size and placement of your buttons, you can have 12-16 buttons on these pants front. Tradition says that navy pants have 13 buttons for the 13 colonies, but some say that is a nice, but untrue, tale. Our original had more than 13 buttons, and other sailor pants have had 12 buttons and up to 16 buttons. However, for a totally different and more minimalist look, you could replace the buttons with snaps instead. Just remember the the front flap, or buttoned broadfall front, requires a reliable and secure closure. You could use snaps in combination with a couple of well-placed buttons, too.
After you have decided on the buttons and thread combination for the front flap of your pants, you will need to take the time to assure the proper placement of your buttons. I always test making buttonholes on a scrap of fabric that simulates the thickness of the fabric before making buttonholes on my main garment.
Mark your buttonholes using the pattern as a guide. I have used pins to mark the center position of each button. Once the final buttonhole position was determined, I used a line made with chalk to use as a guide. Sew eleven to fifteen buttonholes on the front flap, depending on the look you want and button size. For larger buttons (3/4" (19mm) or larger), use fewer buttonholes. Space the buttonholes evenly with one buttonhole positioned in the center front of the flap. Sew one (vertical) buttonhole on the left Front Dart Gusset. Sew one (horizontal) buttonhole on the center front of the left waistband. Buttonholes can be sewn diagonally or vertical along the top of the flap. Buttonholes should be horizontal along both sides of the flap and at the waistband. Sew on the buttons. The center front button will pass through two buttonhole layers -- the Front Dart Gusset and the front flap.

Mark the center placement of each button with a pin.

Lay the buttons out to be sure they look evenly spaced.
In the photo below notice the center button hole is sewn in the center front seam. Simply cut the thread in the center front buttonhole to creating the hole.

Making the buttonholes using a white chalk line as a guide.

The horizontal buttonhole on the waistband.

All the buttonholes have been sewn.
Use Fray Check on the front and back of each buttonhole to help add stability to the buttonhole threads and help keep the fabric from fraying when you cut the buttonhole hole. Test the Fray Check on a swatch of your fabric to be sure it does not damage the look of your fabric. Most threads are made to be color fast, but it never hurts to give it a test too.

Once the Fray Check is completely dry, I like to cut the buttonhole opening using an fine blade to make a small slit through the fabric layers. This slit will help make cutting the hole with scissors easier. You can also use a buttonhole cutter (we have one in our shop) to cleanly cut the buttonholes.

Using a fine blade to make a slit through the fabric layers.

Using fine tip scissors to carefully cut the button holes open.

Heavier buttonhole twist (thread) and buttons all ready to be sewn to the pants.
When sewing the buttons onto the pants, I find it helpful to create anchor points first. By attaching the center button on the waist holds the front of the pant in place. Then add the buttons to the corners. Then align and add the center button on the flap.
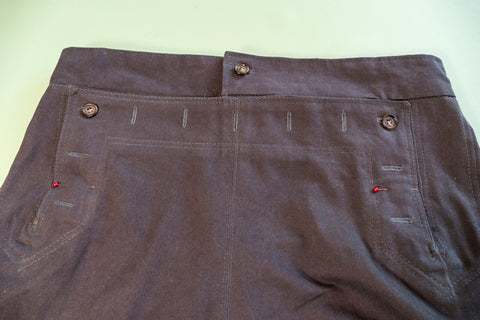

Notice the buttonhole on the waistband is horizontal and the buttonhole on the front dart gusset is vertical.

The center button passes through two buttonholes.
When using four hole buttons, I like to sew only half the button onto the pants until I am sure the buttons are positioned perfectly and aligned in the buttonholes.

Only half of the button is sewn onto the pants until alignment is perfect.

All the buttons sewn in place on the front of the pants.

Another view of the buttons and buttonholes finished.
Eyelets
Eyelets are another feature that can be as creative or subdued as you like. I am going to show you how to make handsewn eyelets for your pants, but depending on your fabric and aesthetic, you might want to use small grommets. Grommets will probably be best for thicker denims, etc.
Handsewn eyelets comprise of a couple of steps: making a hole, sewing a running stitch around the hole (optional), and then making (buttonhole) stitches around the hole.
Embroidery thread is perfect for making eyelets and it comes in a plethora of beautiful colors. Embroidery thread is typically comprised of multiple threads, and I am using three threads at a time to make my whip stitches. Due to the thickness of the embroidery thread you will need a needle with a relatively large eye, such as an embroidery needle. However, embroidery needles do not typically have a super sharp point, so you will actually be piercing the fabric as make your stitches.
Some machines have an eyelet stitch (often found with the buttonhole settings). You can use this stitch to make the running stitch around the eyelet hole. You can sew this before or after making the hole, but I like to do the machine stitching before.
Mark eyelet holes on the center back using the pattern markings. Use an awl to create a hole for each eyelet (make sure not to cut through the center back gusset). The idea is to spread apart the fabric with the awl. We have a tapered tailor awl in our shop that works very well for this step. Always be careful using awls, as they can be very sharp (Molly has drawn blood a few times when making her eyelets). If you cut the eyelet hole with scissors you would cause the fabric to fray or come apart, but it is possible to cut with a punch as you might when using grommets. Make a line of running stitches around the hole to secure the fabric. Then, use a simple over-under satin stitch, or blanket stitch/buttonhole stitch, to embroider the eyelets. Embroidery thread or top stitching thread is a good choice.

Using three threads at a time to make the eyelets.

Use an awl to pierce through the waist band and center back eyelet facing.

Using an awl to create the eyelet hole.

Mark a guide to stitch the eyelet.
Tie a knot at the end of your embroidery thread, begin the stitch on the front side of the eyelet below the hole. Pull the thread through to the back side and then send the needle back through the hole to the front. The idea is to create a wide whip stitch around the hole to serve as a guide for stitching and to hold the hole open while you work. After you have made the first pass of stitching, continue stitching until you have filled in the gaps.

The needle coming back through the hole creating the first stitch.

Pulling the embroidery thread through the hole to make the first stitch.
 The first pass of whip stitches in creating the eyelet.

Filling in the eyelet with a whip stitch.

After you eyelets are complete, thread a string or lace through the eyelets and tie at the top.
Hem Pant Legs
Working with the wrong side up, create a one inch hem by either turning the hem up 1" (2.5cm) with a serged edge, or by turning up 1/2" (13mm) then another 1" (2.5cm), or desired length, and press. You may need to ease the curved edge of the hem on the godet to make it lay nicely. Pin the hem in place and stitch close to the folded edge (or serged edge).

Working on the wrong side, measuring a one inch hem on the curved godet edge.

The hem pinned and ready to be machine sewn.

The pants hemmed.
That's it! We have now made the NEW Folkwear 229 Sailor Pants. I hope you are pleased with your results and feel more confident in your sewing! Thanks for joining us.
Don't forget to tag us on social media when you are showing off your Sailor Pants! #folkwearpatterns #folkwear229 #folkwearsailorpants

Topstitching
You did it! You put together the 229 Sailor Pants and all its great features. I so hope your are pleased with your project results and that you found this sew along helpful. The only thing left to add are the final details.
Check out Day One, Day Two, Day Three, Day Four, Day Five, Day Six, Day Seven, Day Eight, and Day 9 of the sew along for each step in making the 229 Sailor Pants!
The topstitching is next and it is optional. Topstitching is a great way to add interest to your work and it is not difficult. It does help to practice and know some simple techniques before working on your final project. Here are a few things to know to help you create beautiful topstitching results.
Tips for Topstitching
First, for best results topstitching your pants, it helps to topstitch in the order outlined in these instructions. With that said be sure to press any areas you are about to top stitch.
We are finally going to utilize those top stitching lines we transferred from the pattern to our fabric. If you remember this was one of the first things we did when cutting out the fabric. In general, you will topstitch 1/16" (1.5mm) from the edge of the seam, and if you wish, add another 1/8" (3mm) or more in from the first row of topstitching.
Have a look at the presser feet in your collection. I find the blind hem presser foot, or an edge stitch foot, and the regular straight stitch foot handy when topstitching. A blind hem, or edge stitch, foot will allow you to use the ditch created by seams; by aligning the plastic foot guide with the seam "ditch", and moving the needle to one side, when stitching. These feet provide a guide for stitching that can help keep you evenly distanced from the seam.
I am using a combination of the regular straight stitch foot and a blind hem foot for my topstitching. The idea is to utilize as many guide options available to you as possible to get the most even topstitching lines.
Experiment and practice topstitching with scraps of the same fabric you are using to make your pants. Simulate the layers of fabric you will be stitching through. Experiment with stitch length and the tension too. For best results use a longer stitch (3-4 stitch length) and adjust the tension to make a stitch that lays smoothly and evenly on each side of the fabric. You may need to adjust the tension depending on the thickness of the fabric.
Note: The look of your top stitching will, in part, depend on the performance and the power of your sewing machine. A machine that is in good working order matters. All sewing machines are not created equally and they do perform differently.
To help keep your top stitching neat and uniform, do not feel you must top stitch in one continuous line, especially at corners or turns in the topstitching. You can topstitch in segments instead of pivoting at corners and intersecting points. Begin and end each segment of your topstitching leaving a long thread tail (top thread) on the right side of the pant and an equally long (bobbin thread) tail on the underneath side of the pants. Thread the top thread tail to a needle and pull through to the underneath side. Use the ending stitch length to determine where to pull the thread to the underneath side. To secure the stitch, tie the two threads together a few times and trim. The idea is to avoid back stitching where you can for aesthetic reasons.
The benefit of working in this method, is it will allow you to redo or adjust your topstitching in segments instead of having to redo an entire portion. Plus, corners tend to be sharper when using the long thread tail technique.
Now all that is left, is to decide what thread and what color of thread to use for your top stitching. Top stitching thread adds a detail that can be played up or down. Use a thread that blends with your garment fabric or use a contrasting thread to stand out. The benefits of a topstitching thread that blends with your fabric is that small mistakes are less noticeable. But, a contrasting thread is a fun detail. I decided to use a thread that blends with my fabric and it is the same thread weight I used in constructing my 229 Sailor Pants.
You can use thread specially made for topstitching as well, and it comes in a variety of colors (though you may need to search online for all the colors). Thread made specifically for topstitching is thicker or heavier than regular weight thread. If you chose to use this type of thread, you should use regular weight thread in the bobbin. Thicker thread does not perform well in the bobbin. You will need to adjust the tension to get the two differing weights of thread to behave properly together. This is not difficult, just take the time to experiment. You could also use buttonhole thread, or even double up your regular thread to create a thicker thread (two threads through the needle). You can also use the triple stitch (if you machine has it) to get a thicker looking topstitching line with regular thread. This technique can work well, but sometimes can get out of sync and look a little messy.
Begin Topstitching
Just as a note, any and all topstitching is optional - you can choose which pieces to topstitch. But, if doing topstitching, it helps to follow the order below.
Front Dart Gusset Facings
First, we topstitch the inner Front Dart Gusset Facings starting at the top seam edge ditch, stitching downward to the bottom of the gusset, ending where the gusset is hidden behind the Front Buttonhole Facing. Before you start stitching, be sure you have a long thread tail and start your stitching in the seam where the Front Dart Gusset and the top of the pants connect. Do not back stitch. Once you have completed the topstitching, thread the top thread tail to a needle and pull the other side and tie it off, knotting a few times. Trim the excess thread tail. It is ok to finish with a backstitch here, because the edge is hidden.

In the photos below I am using a straight stitch presser foot, aligning the edge of the fabric and the edge of the foot as a guide. In order to create smooth and even stitching around the curved edges of Front Dart Gusset, slow your stitching way down and use the hand wheel, if needed, guiding your fabric as you go.


Topstitching using the edges as a guide.


Front and Back Crotch
Topstitch on each side of the center front and center back crotch seam. When working on the front, start at the top of the front flap. I am using a blind hem foot using the ditch created by the seam as a guide. My needle is positioned to the right of the center needle position and the center seam. Start at the top edge with the needle positioned on one side of the center seam. Remember to leave a long thread tail. See the Illustration below showing the topstitching on either side of front and back crotch center seam.

It is up to you to either catch the pressed-open seam allowance on the inside of the pant in your topstitching or not. This will in part depend on how you want to finish your seams. I prefer to catch the seam allowance in the topstitching, because it adds strength to the crotch seams.
If you find your topstitching stitch length to be uneven or varying in length, just slow down. Try to keep the fabric moving smoothly through the feed dogs without pushing or pulling the fabric. When the fabric drags going through the feed dogs, the stitching can become tighter and the stitches smaller. Sometimes it is hard to maintain a regular stitch length, especially through thick layers. The power of your machine really does factor in. Don't get discouraged if your topstitching is not perfect. I topstitch in segments for this very reason. It is helpful knowing you do not have to remove all of your work if you are unhappy with a segment.

Stitching to the right of the center of the front crotch.

Stop at the crotch intersection and end your stitching the same way you began -- with a long thread tail. Trying to stitch over the thick crotch seam intersection layers and will most likely not result in a smooth topstitch. Stitch the front and back crotches one at a time, meeting where the seams intersect. Repeat on the back crotch seam using the same process.

Topstitching on either side of the front crotch seam.

Topstiching the back crotch using the bind hem foot, using the ditch as a guide.

Pulling the top thread at the crotch seam to the inside of the pants.

The front and back crotch topstitched.
Front Darts and Flap
Stitch the inner topstitching lines around the darts first. Start at the waist on the outside edge of a dart, stitching down the side of the dart, and back stitch at the point. You will catch the Front Dart Gusset assembly in these stitches, which will add to a more organized and secure front assembly. Repeat on the other dart.
The idea is to stitch close to the edge, to secure the edge of the darts. I chose to use a blind hem foot for this topstiching task to demonstrate how the blind hem foot could be used. Feel free to use what ever method works best for you. See the illustration below for beginning the topstitching on the outside edges of the inner darts.

I started the stitching at the waist on the outside edge of a dart, using a blind hem foot, using the ditch of the seam, as a guide. When you get to the dart point, make a back stitch. This is a stress point and it needs reinforcement.

Now, open the flap and stitch from the bottom of the dart point, up the front buttonhole facing (front flap), across the top of the front flap, and down the inner side of the other dart. Make sure to keep the Front Dart Gusset free of these stitches. See the illustration below for stitching the inside edges of the darts and flap.


Stitching up the edge of the flap, while avoiding catching the Front Dart Gusset in the stitches.
When stitching up the up this front flap, across the top of the front flap, and down the inner side of the other dart, I am using the front flap edge as a guide. Like I mentioned before, I used this foot to demonstrate how it could be use on this portion of the topstitching. I could have used the blind hem foot solely for stitching in the ditch and then switched to a regular straight stitch foot. Deciding which foot use simply takes knowing how a particular pressor foot works and deciding what then works best for you.

Stitching across the front of the front flap/buttonhole facing.
Stitching down to the other dart.
Reinforce the dart points with a bartack. A bartack is made by stitching several wide and tight (3-5 wide and almost 0 stitch length) stitches. You can also add some decorative bartacks here if you wish - make a triangle, square, or make the stitching narrow and tight to "draw" these shapes on this stress point to reinforce the dart point.

Stitch a second row of topstitching here if you like. I like the look of a second row of topstitching and I am using a regular straight stitch foot, aligning the edge of the pressor foot with the first line of topstitching as my guide. I am making my topstitch 1/4" (6.4mm) from the first stitch line. Simply stitch a parallel line next to the first row of stitching you created.

Starting the second row of topstitching.

Topstitching the top flap edge, aligning the edge of the presser foot and the first stitching line to use as a guide.
Leaving a long thread tails at the corner, before starting the next perpendicular row of topstitching on the front flap.

Continuing to topstitching the front flap.
Slow down as you prepare to reach the turn at the dart. Stop, put your needle down into your fabric and take a minute to read the helpful hint below.

Stitching to the dart and keeping the Front Dart Gusset Facing out of the stitches.
Helpful Hint for Sewing the Second Row of Topstitching Around the Dart Point.
Tight curves are often a challenge to maneuver and I knew I would need some extra help. First, I stitched the second topstitching row down each side of the dart and stopped just shy of where the stitching line begins to turn. I left long top threads and bobbin threads as we have discussed.
To make life easier, I cut a circle out of not too sticky masking tape, precisely the size of the half circle to be sewn at the bottom of the dart. I positioned the tape circle at the end of the dart. I began my stitching around the circle by inserting the needle directly into the last stitch where I left off. I stitched around the tape circle slowly, hand turning the stitching wheel, using the circle edge as a guide. I left long thread tails at the beginning and end of my half circle stitching. Leaving the long thread tails gives you enough thread to work with if you need to adjust your stitching where the straight line of stitching ends and the curve stitching begins.
Gently remove the tape circle and use it again for the other side. Once you have your stitching adjusted and it is looking good, pull the long tails using a needle to the inside of the pants and tie off.
Repeat on the other side using the same technique. Use the same tape circle for the stitching the other side... no need to cut another one.

Starting to stitch around the tape circle guide.

You can see where I started and stopped stitching around the circle edge.

Gently pulling the tape circle away to be used again on the other dart point.

The tape circle guide really did help me keep my topstitching clean and uniform.
Outer Topstitching on Front Flap
Now that we have topstitched around the darts and the flap, it is time to use the stitching guides we transferred to the front of the pants from the pattern. When I first cut out my pants, I marked the corners and points of the top stitching design onto the front of the pants, according to the guide on the pattern, using tailors tacks. I only made tailors tacks for the outer-most stitching line. Below is an illustration of the main topstitching design to be added to the front of the pants.

By now most non-permanent markings like chalk or pencil would have long disappeared or smeared. However, permanent markings like ink are are not recommended. So, tailors tacks are a good solution. Tailors tacks are simply two threads, knotted on the right and wrong sides of the fabric. This often proves helpful, because you can see the tailor's tacks on both sides of the fabric. The tailors tacks I made are still there, ready for me to use, and can easily removed once I have finished my topstitching. Water soluble marker may also be helpful for marking the topstitching lines.
You can measure out your lines and draw out them with chalk or you can use my cheat sheet method. Personally, I feel better with a physical guide. So, I am using masking tape that is not too sticky, to connect the tailors tacks to create a template to guide my stitching. Whichever technique you choose to use, it is only necessary to create a guide for one of the two rows of stitching. The first row of stitching you create can serve as the guide for the second row... if you choose to stitch it.
I have chosen to copy the top stitching just as it is seen on the pattern. Using the masking tape I simply connect the tailors tacks, being sure that the tape corners and edges align cleanly and sharply. I am making a tape guide for the outer/bottom edge only.
The idea is to topstitch right up to the edge of the tape, without catching or stitching into the tape. If you stitch into the tape it can be tedious to remove. It is worth the effort to create a clean edge tape template before you start stitching.

Align the tape using the tailor's tacks as a guide.
Stitch the outer topstitching lines around the darts, working in segments. With your work facing up, start at the waistband on outer edge of one dart; stitch toward and around the dart. Continue up the front flap, and down around the dart point and back up to the waistband on the other side of the dart. Use the outer tape edge as a guide all the way to the opposite side of the pants.
Keep the Front Dart Gusset free of the stitching when topstitching the front flap area. Make sure to catch the Front Dart Gusset on the outsides of the dart. You may need to stop stitching, leaving the needle in the fabric, adjusting to keep the pieces flat. It may be helpful to baste this line of topstitching first to outline exactly where to stitch.

Stitching along the edge of the tape.

Catch the Front Dart Gusset on the outside of the topstitching area.

The first row of topstitching finished on the front of the pants.
Gently remove the tape guide template if you used it. Now, that the first top stitching line is done, use this stitching line as a the guide to create the next top stitching line. This is simple to do, the lines simply run parallel to each other. I simply aligned the edge of the foot with the first row of topstiching I made as a guide for the second row of topstitching. The pattern instructions recommend making the second line of topstitching 1/8" (3mm) from the first line, but I have chosen to make my second line 1/4" (6mm) instead. You can the distance you like best when topstitching your own pants.


Topstitching the Waistband
Make sure the waistband curtain is folded down over the inside of the waistband and the front gusset. The Back Gusset will cover the raw edge of the waistband curtain at the back of the pants.
First, we will stitch the top of the waistband. Stitch from one center front, where the waistband meets the front Dart Gusset, up to the top of the waistband and around to the back gusset. At the back gusset, pivot your stitching to stitch down the side of the back gusset. Backstitch at the bottom of the gusset. Be sure to catch the Back Gusset seam in the stitching - it will cover the raw edge of the curtain. Add a second line of topstitching 1/8" (3mm) (or 1/4"/6mm) from the first, if you like. Repeat exactly as you have done here on the other side of the waistband. Add a bartack to the bottom of the Back Gusset. 

Topstitching the waistband aligning a straight stitch foot edge and the edge of the waistband.
See the illustration below showing the direction to sew the topstitching on the back waistband edge, down the back gusset edge and where to place the bar tack.


Topstitching down the back gusset using a regular straight stitch foot.
Note: If you want to topstitch a row above the waistband seam, do the same technique as below before topstitching below the waistband seam (i.e. follow the instructions to topstitch above the waistband seam, then follow the same instructions to topstitch below the waistband seam).
Mark the area where the welt pocket extends on the waistband.
1. Topstitch below the left waistband in the area the welt pocket extends over the waistband, keeping the pocket and waistband curtain out of the stitching. If you do not want to backstitch to secure, you can bring the threads to the back side of your work with a sewing needle and tie them off. This will give a "cleaner" look.
2. Fold the waistband curtain and pocket bag back down and topstitch under the waistband seam, starting at the center front and stitching to the welt pocket, meeting the topstitching line already there.
3. Then start again at the other end of the welt pocket (and topstitching line) and stitch to the center back gusset. Catch the seam allowance of the back gusset in the stitching with the edge of the curtain under the gusset seam allowance.
Your topstitching lines will meet at each side of the welt pocket, and will not catch the welt pocket in the stitching.
See the illustration below and follow the order of the numbers to help topstitch under the waistband where the welt pocket is positioned.


Using a blind hem foot to topstitch at the welt pocket.
Repeat for the other side of the waistband, stopping at the coin pocket and starting again on the other side of the coin pocket. Again, be sure to catch the seam allowance of the back gusset in the stitching with the waistband curtain under the gusset seam allowance. The illustration below showing stitching just on either side of the coin pocket.


Topstitching using a blind hem foot up to the edge of the coin pocket. Notice the pocket bag is pulled out of the way of the stitching.
And, topstiching is all finished! Yay!
On Day Eleven (final day) of the sew along we will add all the remaining finishing details -- the buttons and buttonholes, and the hand stitched the eyelets. Plus, hemming the legs to the 229 Sailor Pants.

Pant Assembly and Leg Godet
I hope you have enjoyed learning how to make the 229 Sailor Pants so far. The only construction we have left is sewing up the back crotch and adding the inner leg godets!
See Day One, Day Two, Day Three, Day Four, Day Five, Day Six, Day Seven, and Day Eight to see the progress of the 229 Sailor Pants sew along!
Sew Up the Back Crotch Seam
Lets sew up the back crotch. With right sides together, and matching the notches, pin the back crotch seam from the center back gusset to the leg seam.
Stitch from just below the dot at the bottom Center Back Gusset assembly to the end of the back crotch. Stitch the seam again to reinforce. Press the seam open.


The back crotch seam sewn and pressed open.
Add the Godets to the Inner Leg Seams
The inner leg godets are optional, but this is one of the pants best iconic features. Like so many of the features we have learned to make... a godet design can easily translate to other projects with pants legs, as well - if you ever want to transform a pair of pants into bell-bottoms (or even boot-cut).

The Inner Leg Godet pieces ready to be assembled to the pant legs.
Pin and sew the Inner Leg Godet (D) to the inner leg of one leg with right sides together, matching the notches.

The Inner Leg Godet pined to one leg.

A godet sewn to the inner leg.

With the right sides together, match the other side of the same pant leg to the other side of the Inner Leg Godet and pin in place. Match and pin the rest of the inner leg of the pants together, matching the notches and the center crotch seam. Stitch from the bottom edge, up through the top of the godet, and up to the crotch, creating the inner leg seam. Backstitch at the crotch. Press the godet seam toward the leg and press the leg seams open above the godet. Finish these seams as you like.

Use a pin to align the crotch center seam.


A view of the godets sewn in place as seen on the wrong side of the pants.

The godets installed in the leg of the pants.
Repeat for the opposite leg.
We did it! The 229 Sailor Pants construction is done. On Day Ten of the Sew Along we will add the Topstitching Details.

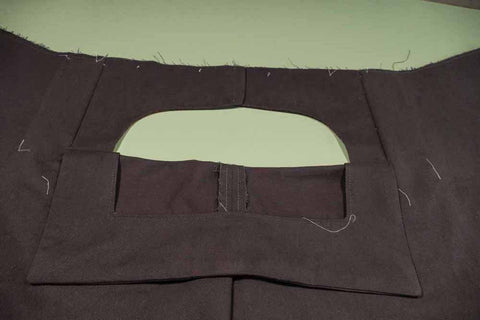
The Center Back Gusset and Back Eyelet Facing
It is time to turn our attention to the back construction of these Sailor Pants. The Center Back Gusset (H) and Back Eyelet Facing (G) are paired together to create the back of the pant feature synonymous with the traditional sailor pant. Originally, this lace-up back eyelet gusset was intended to allow men to just untie the back and slip their pants up or down as needed. However, depending on how the pants fit and your body shape, you just loosen your ties and open one side of the front flap - so that you don't have to unbutton all the buttons to get in and out.
Check out Day One, Day Two, Day Three, Day Four, Day Five, Day Six, and Day Seven of the sew along to see our progress!

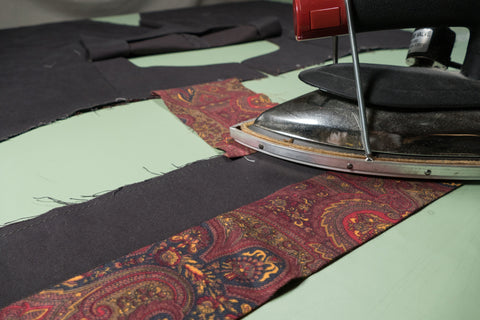
Center Back Gusset H, with paisley fabric lining and the Center Back Eyelet Facings Pieces.
Prepare the Center Back Gusset
The Center Back Gusset is another perfect place to utilize a lining fabric and have a bit of fun. The edges of the Center Back Gusset need to be finished as well. Since, the gusset is not very large, it is a perfect excuse to try a bit of seam binding and show off your fine tailoring skills. I will be doing this at the end of this sew along.
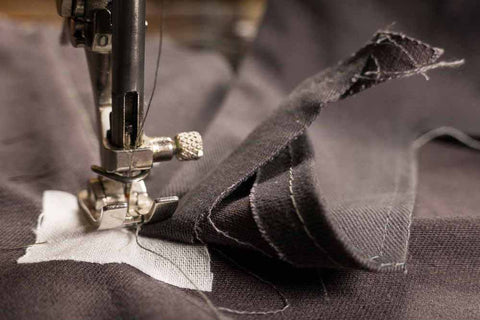
First, with the right sides together, stitch the the main fabric to the lining at the top edge and trim the seam allowance.

Turn and fold, so the wrong sides are together. Press, remembering to roll the edge of the main fabric slightly towards the lining. Leave the remaining edges unsewn for now. Topstitch the top edge of the Center Back Gusset to finish it off and secure the two fabrics.

The top edge of the Center Back Gusset turned and stitched at top edge to finish.
Prepare the Center Back Eyelet Facing G
Now, for the Center Back Eyelet Facing. Turn and press the 1/2" (13mm) seam allowance of the top edges of each Center Back Eyelet Facing to the wrong side. Finish the edge or turn under 1/4" (6.4mm) to meet the top fold if you like. Stitch close to the fold to finish and secure.

The top edges of each Center Back Eyelet Facing turned under.

The top edges of both Center Back Eyelet Facing turned under 1/4" (6.4mm) twice and stitched close to the fold edge to finish.
The two Center Back Eyelet Facing pieces do not need to be faced or lined. Lining would just add to the bulk that should be avoided in this area.
Add the Center Back Eyelet Facing to the Pant Back.
The Center Back Eyelet Facing pieces are now ready to be attached to the back edges of the pants. With right sides together, stitch one Center Back Eyelet Facing to one side of the center pants back, matching the notches. Stitch from the top of the waistband edge to the bottom of the facing. Press the seam towards the pants. Do the same for the other Center Back Eyelet Facing.


Press the Center Back Eyelet Facing towards the pants.
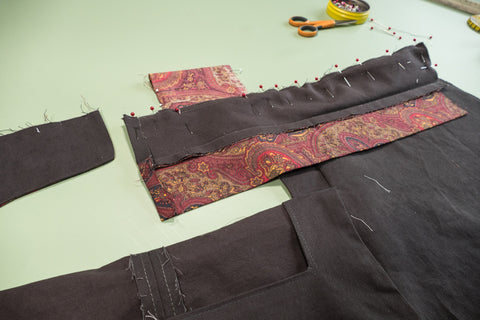
Attach the Center Back Gusset to the Center Back Eyelet Facing Pieces
Working on one side at a time, place the Center Back Gusset assembly on the eyelet facing, with right sides of the main fabrics of each piece together, matching the notches. Pin to secure in place. On one side, stitch a 1/4" (6mm) seam allowance from the top to the bottom of the point. Avoid stitching into the pants. Repeat for the other side of the Center Back Gusset the same way.


Center Back Gusset and Eyelet Facing pined on one edge and ready to be sewn.
 View of Eyelet Facing sew to edge of Center Back Gusset.

One side of the Center Back Gusset and Eyelet Facing sewn and the other side aligned and pined in place.


The back view of the assembled Center Back Gusset and Eyelet Facing.
The raw edges of the Center Back Gusset Facing need to be finished. You can serge or use an overcast stitch to finish, if you like. Trim the bottom corners as needed. I am going to finish the edges of the Center Back Gusset with a piece of seam binding, and simply whip-stitched by hand. Seam binding is light weight, easy to work with, and does not add any extra bulk. I have chosen this method of finishing the edges because the seams are only 1/4" (6.4mm) and turning bias tape on such small edges is hard for me to control. Of course, you can use the usual bias tape technique if you chose.

Raw edges of the Back Gusset Facing to be finished using seam binding.

Seam binding sewn by hand with a simple whip stitch.

Wrap the seam binding over the raw edge and repeat the whip stitch on the opposite side.

Whip stitching the seam binding to cover the raw edge.

The raw edges of the Center Back Gusset finished with seam binding.
The back of the pants are now together and you can really see them take shape now. On Day Nine of the sew along we will finish up the last of the construction work on the 229 Sailor Pants, by adding the godet to the legs and sewing the back of the pant up!

Front Coin Pocket Option and Adding Waistbands to Pants.
We are going to add the waistbands and their pockets to the pants in today. We constructed the welt pocket in the right waistband on Day Three of the sew along. The waistband and waistband curtains were assembled ahead of time on Day Four of the sew along.
With that bit of prep work done we are left with adding a coin pocket to the LEFT side of the front waistband. This little addition is a hidden gem, the construction of this pocket is easy and you will love adding it to other garments as well. I find this pocket perfect for keeping my stick of lip balm readily available or for holding a car or house key. The opening of this little pocket is in the seam allowance at the edges of the waistband, where it connects to the front of the pants. This fun pocket is optional, but I hope you will try it. If you prefer to leave the coin pocket out, just skip ahead to Assemble the RIGHT Waistband to Pants (and do this step for both waistbands).
Check out Day One, Day Two, Day Three, Day Four, Day Five, and Day Six of the sew along to catch up!
The Coin Pocket (K) pattern piece is a single rectangular piece of fabric that folds to create the pocket bag. This coin pocket can be made even more fun with a creative touch. This simple piece is a perfect excuse to use your lining fabric, which is exactly what I am going to do. You can finish the long edges of your fabric piece K now if you like. However, I am going to finish the side edges of my coin pocket with a hand stitched bound seam, after it is assembled to the waistband.

Coin Pocket and waistbands waiting to be sewn to the pants.
Coin Pocket goes on the LEFT front waistband.
Take a minute and orient your Waistband/Waistband Curtain and Coin Pocket like you see in the photo below.
With right sides together, pin one short end of the pocket bag to the bottom edge of the left waistband, matching the dots.


Use pins to align the pocket bag dots.

With right sides together, pin one short end of the pocket bag to the bottom edge of the left waistband.
Keep the waistband curtain out of your way as you work. The idea is to stitch the pocket bag edge and bottom edge of the waistband together, only between the dots. Stitch the pocket bag to the waistband just within the 1/2" (13mm) seam allowance, between the dots. Back stitch at each dot. Making your stitch just inside the seam allowance will keep the pocket bag from being visible when complete.

With right sides together the pocket bag sewn to the bottom of the waist band between the dots.
Coin Pocket Attached to the Front Pant Edge.
Now, we need to sew the pocket bag to the front of the pants, which is actually the left Front Dart Gusset Facing. Orient your work, with the outside of the pant facing up (we are working on the righthand side of the pant as it faces you).

With right sides together pin and sew the other short end of the pocket bag to the left Front Dart Gusset Facing, matching the dots. Be sure to sew through both layers of the Front Dart Gusset Facing, between the dots and just within the 1/2" (13mm) seam allowance just like we did before. Back stitch at each dot.


Another view of the Pocket Bag and Front Dart Gusset sewn together, between the dots.
Press the Coin Pocket Bag
With right sides facing up, press the pocket away from the waistband and away from the pants front as seen in the photos below.

Sewing the Waistband with the Coin Pocket to the Pants.
The waistband containing the coin pocket (left waistband) is sewn to the waist band of the pant in two separate steps.
First, pin the entire waistband to the pant to be secure. Keeping the waistband curtain out of the way, pin only the waistband to the pants and Front Dart Gusset Facing, with right sides together. Match the notches and the pocket edges. Align the Waistband and the Front Dart Gusset center fronts.
Waistband with coin pocket pined to the pant.
Stitch from the back edge of the pant, stopping at the dot on the side of the pocket bag. Back stitch to secure, then pivot your garment to stitch down the side of the pocket to the bottom. Back stitch to secure.
 Start sewing at back of the waistband and stitch towards the dot at the edge of the coin pocket.

Back stitch at the dot, just before pivoting at the edge of the coin pocket.

When sewing the front portion of the waistband to the pant, turn your work over and re-pin the waistband to the pant starting at the center front, as seen in the photo below.
Stitch from the center front toward the front pocket. Back stitch and rotate at the pocket dot and stitch to the bottom of the pocket. Back stitch to secure.

Front of waistband and coin pocket pined and ready for sewing.
Finishing the Coin Pocket
Now that the waistband with the coin pocket is sewn to the pants, the pocket bag should hang down into the inside of the pant. Getting the coin pocket to hang the way it should, depends on how you finish the seam allowance the pocket is sewn onto. You can finish the pocket a couple of different ways. Either press the waistband seam allowance down toward the pants, knowing the waist band curtain will cover the seam.

Seam allowances pressed down towards the pants.
Or, press the waistband seam up toward the waistband and clip the seam on each side of the pocket, so it will lay flat.
Press the pocket toward the pants.

The waistband seam allowance is press upward, clipping at the pocket edges allows the pocket to hang down properly.

View of the front of the pant with the waistband attached and the coin pocket peeking out.

The right waistband with the coin pocket and the waistband curtain laying open.
Assemble the RIGHT waistband to the pant.
Now, it is time to add the the right waistband. In Day 3 of the sew along we constructed a Welt Pocket in the right waistband. Even if you chose to not add the welt pocket, the assemble is the same (just ignore the welt pocket in the photos below). And, if you chose to not add the coin pocket, you will do both waistbands this way.

Welt Pocket with waistband curtain ready to be assembled to the pants.
With the right sides together, pin the waistband to the pants at the waist, matching the center front and notches; stitch together. Keep the waistband curtain out of the way while you work. If your waistband has a welt pocket added to it, be sure to keep the pocket out of the stitching.
Press the seam allowance towards the waistband. Press the front seam allowance to create a clean finished edge.

Waistband with welt pocket pinned to the pants and ready to be sewn.

The left waistband with the welt pocket and the waistband curtain laying open.
Your pants should now have a right and left waistband (with or without pockets), with the seams all neatly pressed. Trim allowances of any bulk.

The inside of the pant with pockets and the waistband curtain folded down hiding the seam allowances.

The outside of the pant with the Front Buttonhole Facing folded down.

The outside of the pant with the Front Buttonhole Facing folded up.
On day Eight of the Sew Along we will work on the back of the pant and add the Center Back Gusset and Eyelet Facings.
Attaching the Front Dart Gusset to the Pant
Just one more construction feature to add to the front of the 229 Sailor Pants, and the assembly of this piece has an interesting turn at the end!
See Day One, Day Two, Day Three, Day Four, and Day Five of the Sew Along to see what we have done so far!
To get started, you should have two Front Dart Gusset Facing B pieces cut from your main Pant fabric, that are mirror images of each other. And two more pieces, either cut from the same main pant fabric or from the lining fabric (also mirror images of each other).
This is a feature that can be faced with a lining fabric or the same fabric as your main pants. To face my Front Dart Gusset Facings, I am using a paisley print lightweight wool challis as my lining fabric. When using a lining fabric that is different from your main pant fabric, remember the idea is to not see the lining fabric on the outside of the pant. When you press the pieces later, be sure to carefully roll the seam edges of your main pant fabric to the inside of the pant. The lining on the Front Dart Gusset Facing is for the inside of the pants only.

Pin and sew the Front Dart Gusset pieces together.
With right sides together, match the notches and align the edges of the two pieces comprising (the outer and inner) Front Dart Gusset Facing piece. Pin, then sew around all the curved edges of one Front Dart Gusset Facing. Leave the top edge (with the notch) open.


Trim the seam allowances and turn the front Dart Gusset Facing.
Clip the curves and trim the seam allowances. Turn the newly sewn up Front Dart Gusset Facing right side out and press. Remember to roll the main pant fabric to the inside.


Sewing Front Dart Gusset Facing to the pant.
With the right side of the pant facing up, place the right side (main fabric) of the Front Dart Gusset Facing to the right side of the pant, matching the dots around the slash.
You may find it helpful to sew a straight line, using a basting stitch, between the two dots on the Front Dart Gusset Facing and on the pants. These lines will serve as a pining and sewing guide, which can be seen on either side of your work. The idea is to match the stitch line on the Front Dart Gusset Facing with the stitch line at the pants slash. Leave long tails on each end of the basting stitch, so they can easily be removed once the Front dart Gusset facings are sewn in place.

Photo of guide line sewn on Front Dart Gusset Facing


Right side of Front Dart Gusset to right side of pant with dots aligned.
Now, turn the pants over, and finish matching the stitch line on the Front Dart Gusset Facing with the stitch line at the pants slash. The line on the pants goes from 1/2" (13mm) seam allowance at the top of the pants and tapers to almost nothing at the dot. Pin to secure, and stitch along the stitching line, backstitching at each end to secure. Take care to keep the Buttonhole facing out of the stitching.
Repeat this process for the remaining Front Dart Gusset Facing piece.


Another view of the Front Dart Gusset Facing aligned and pinned to the pants. The Front Buttonhole facing is folded back.

Starting sewing from the top dot and sewing down, using the stitch line as a guide. Back stitching at both ends.
Up close view of stitching at the bottom dot, with the Front Buttonhole Facing out of the way of the stitching.

Starting sewing from the bottom dot and sewing up, using the stitch line as a guide. Back stitching at both ends (this may work better for left side of pants).
Finishing the Front Dart Gusset Facing.
Now turn the Front Dart Gusset Facing to the inside of the pants, and press the the seam toward the back. I just love how that bit works. The Front Dart Gusset Facing now becomes part of the front of the pants.

View on the right side of the pant with the Front Dart Gusset Facing sewn in place.

View on the right side of the Front Dart Gusset facing about to be turned to the wrong side of the pant.

Turning the Front Dart Gusset to the inside of the pant.

The right side of the pant up, with the Front Dart Gusset facing in place and the seam being pressed.

Another view of pressing the Front Dart Gusset Facing seam.
Views of the Front Dart Gusset Facing and Front Buttonhole Facing.

The right/outside front side of the pant showing the Front Buttonhole Facing folded down, revealing the Front Dart Gusset Facing.
Another view.

The inside/wrong side of the pant showing the Front Dart Gusset Facing.

The right/outside of the pants with the front dart gusset attached and tucked away in side the pants.
Now, you have all of the front pant flap construction done. On Day Seven of the Sew Along we will add a Coin Pocket to the left waistband and sew the right and left waistbands to the pants.

Attaching the Buttonhole Facing to the Pants.
On today's sew along we will focus on attaching the Buttonhole Facing (C) to the Pants Front. We will be creating the iconic Sailor Pant front flap that will eventually house all those fabulous buttons!
Check out Day One, Day Two, Day Three, and Day Four of the sew along if you need to catch up!
Finish the raw edges first.
Before attaching the Buttonhole Facing to the pants, we need to finish the raw edges of the Buttonhole Facing. To do this, fold up the 1/2" (13cm) seam allowance to the wrong side along the BOTTOM edges following the instructions below.
First, I have sewn a 1/2" (13cm) stay-stitch on the bottom edges to use as a guide for turning the edges under. I find that making a quick stay-stitch on the sewing machine to mark this seam allowance is quicker than measuring with a ruler. The stay stitch is also useful as a corner cutting guide too. The stay-stitch can then be quickly removed if you want.

Next, cut a small slit at each corner, to the dot. Be sure to cut just up to the 1/2" (13cm) corner intersection and not beyond. This little cut will release the fabric in the corner and allow the seam allowance to fold up easily. Press to create a clean edges.
Then, stitch close to the folded edge to secure the folded edge and create a nice clean finish.

Typically, I would encourage you to add an interfacing to any area that will be receiving button holes, due to the amount of use on the area. However, this front flap is the stand out feature of this pant design. When button hole are cut, often the interfacing has a habit of showing or peeking out. For this reason I am not using interfacing and I am not going to encourage you to either. The recommended fabric weight used in this Sew Along should be heavy and stable enough for buttonholes. Once the Buttonhole Facing and pant are assembled the fabric will be doubled and will have a fair amount of heft.
Prepare the front of the pants to receive the Buttonhole Facing.
Since we are going to be cutting the fabric at the slash lines, it never hurts to add a small 1" square of fusible interfacing on the wrong side of the pant at the bottom of the slash line. This fusible interfacing will add a bit of stability and reinforce a potentially unstable spot.


Originally, all the pattern markings were transferred from the pattern to the right side of the front of the pant. If you are not going to use the stay-stitch guides, I find it helpful to draw the slash line on the front of the pant fabric to use as a guide when cutting the slash.
Cut the slash line from the top of the pants to the dot at the bottom of the slash line. Do not cut past the dot. The fusible interfacing may help you to see your cutting more precisely.

Be very careful not to cut past the small dot or past the stay stitch line.


Attaching the Buttonhole Facing to the pants.
With the right sides together, pin to secure the top of the Buttonhole Facing to the top front of the pants, matching the dots at the corners, notches, and center front. Sew from one dot to the other with a 1/2" (13mm) seam allowance. Back stitch at the start and finish of each dot.


Now, we will sew the sides of the Buttonhole Facing to the pants along the stitch line. First, turn your work over to the wrong side of your project, focusing on one side of the Buttonhole Facing at a time.
Match the lower dot on the Buttonhole Facing with the dot at the bottom of the slash on the pant. Pin using the stitch line on the pants as a guide.

Sew the side of the Buttonhole Facing to the pants between the top and side dot. You will be stitching along the the stitch line on the pants, tapering from 1/2" (13mm) at the top dot, to the dot at the end of the slash. Be sure to back stitch at the dots to secure.
Note: To make your sewing easier to maneuver, you might want to reverse your stitching on the left side of your work. Start your stitching at the bottom point, following the stitch line, gradually tapering to the 1/2" (13cm) at the top dot of the pant. Once again be sure you back stitch at each dot.

View on the wrong side of the pant of the Front Buttonhole Facing sewn on one side to the pant at the slash line.

 The top and both sides of the Buttonhole Facing (wrong side up) sewn to the pant front (right side up).
Turn the Buttonhole Facing to the inside of the pants.
All that is left is to turn the Buttonhole Facing to the inside of the pants. Clip, trimming the top edge corners and turn the Buttonhole Facing to the inside of the pant.

Trim the corners before turning.

Press to set the Front Buttonhole Facing.
Be sure the corners are well crafted and press the seams rolling toward the inside of the pants. Press well to set the edges and corners.
Turn under 1/2" (13mm) on the Buttonhole Facing below the slash point and press.

Press the edges, rolling the seams inward.

The edge turned under for a clean finish.

We are almost finished with the construction of the front of the pant. On Day 6 of the Sew Along we will assemble the Front Dart Gusset Facing to the front of the Pant.


