- Home
- About
-
Shop
-
Sewing Patterns
-
Fabric
- Sewing Supplies
- Folkwear Clothing
-
- Blog
- Customer Gallery
- Contact

While we plan for 2024, we always reflect on the past year and honor our accomplishments. We did a lot this past year, but mostly we enjoyed connecting with you over sewing and our patterns! We absolutely love seeing what you make with our patterns and hearing about your projects. Thank you for being loyal Folkwear customers! Check out the Customer Gallery here.
NEW PATTERNS
510 Passionflower Lingerie Top
262 Spectator Hats - Turban and Cloche
PATTERNS BROUGHT BACK INTO PRINT
224 Beautiful Dreamer (size up from original)
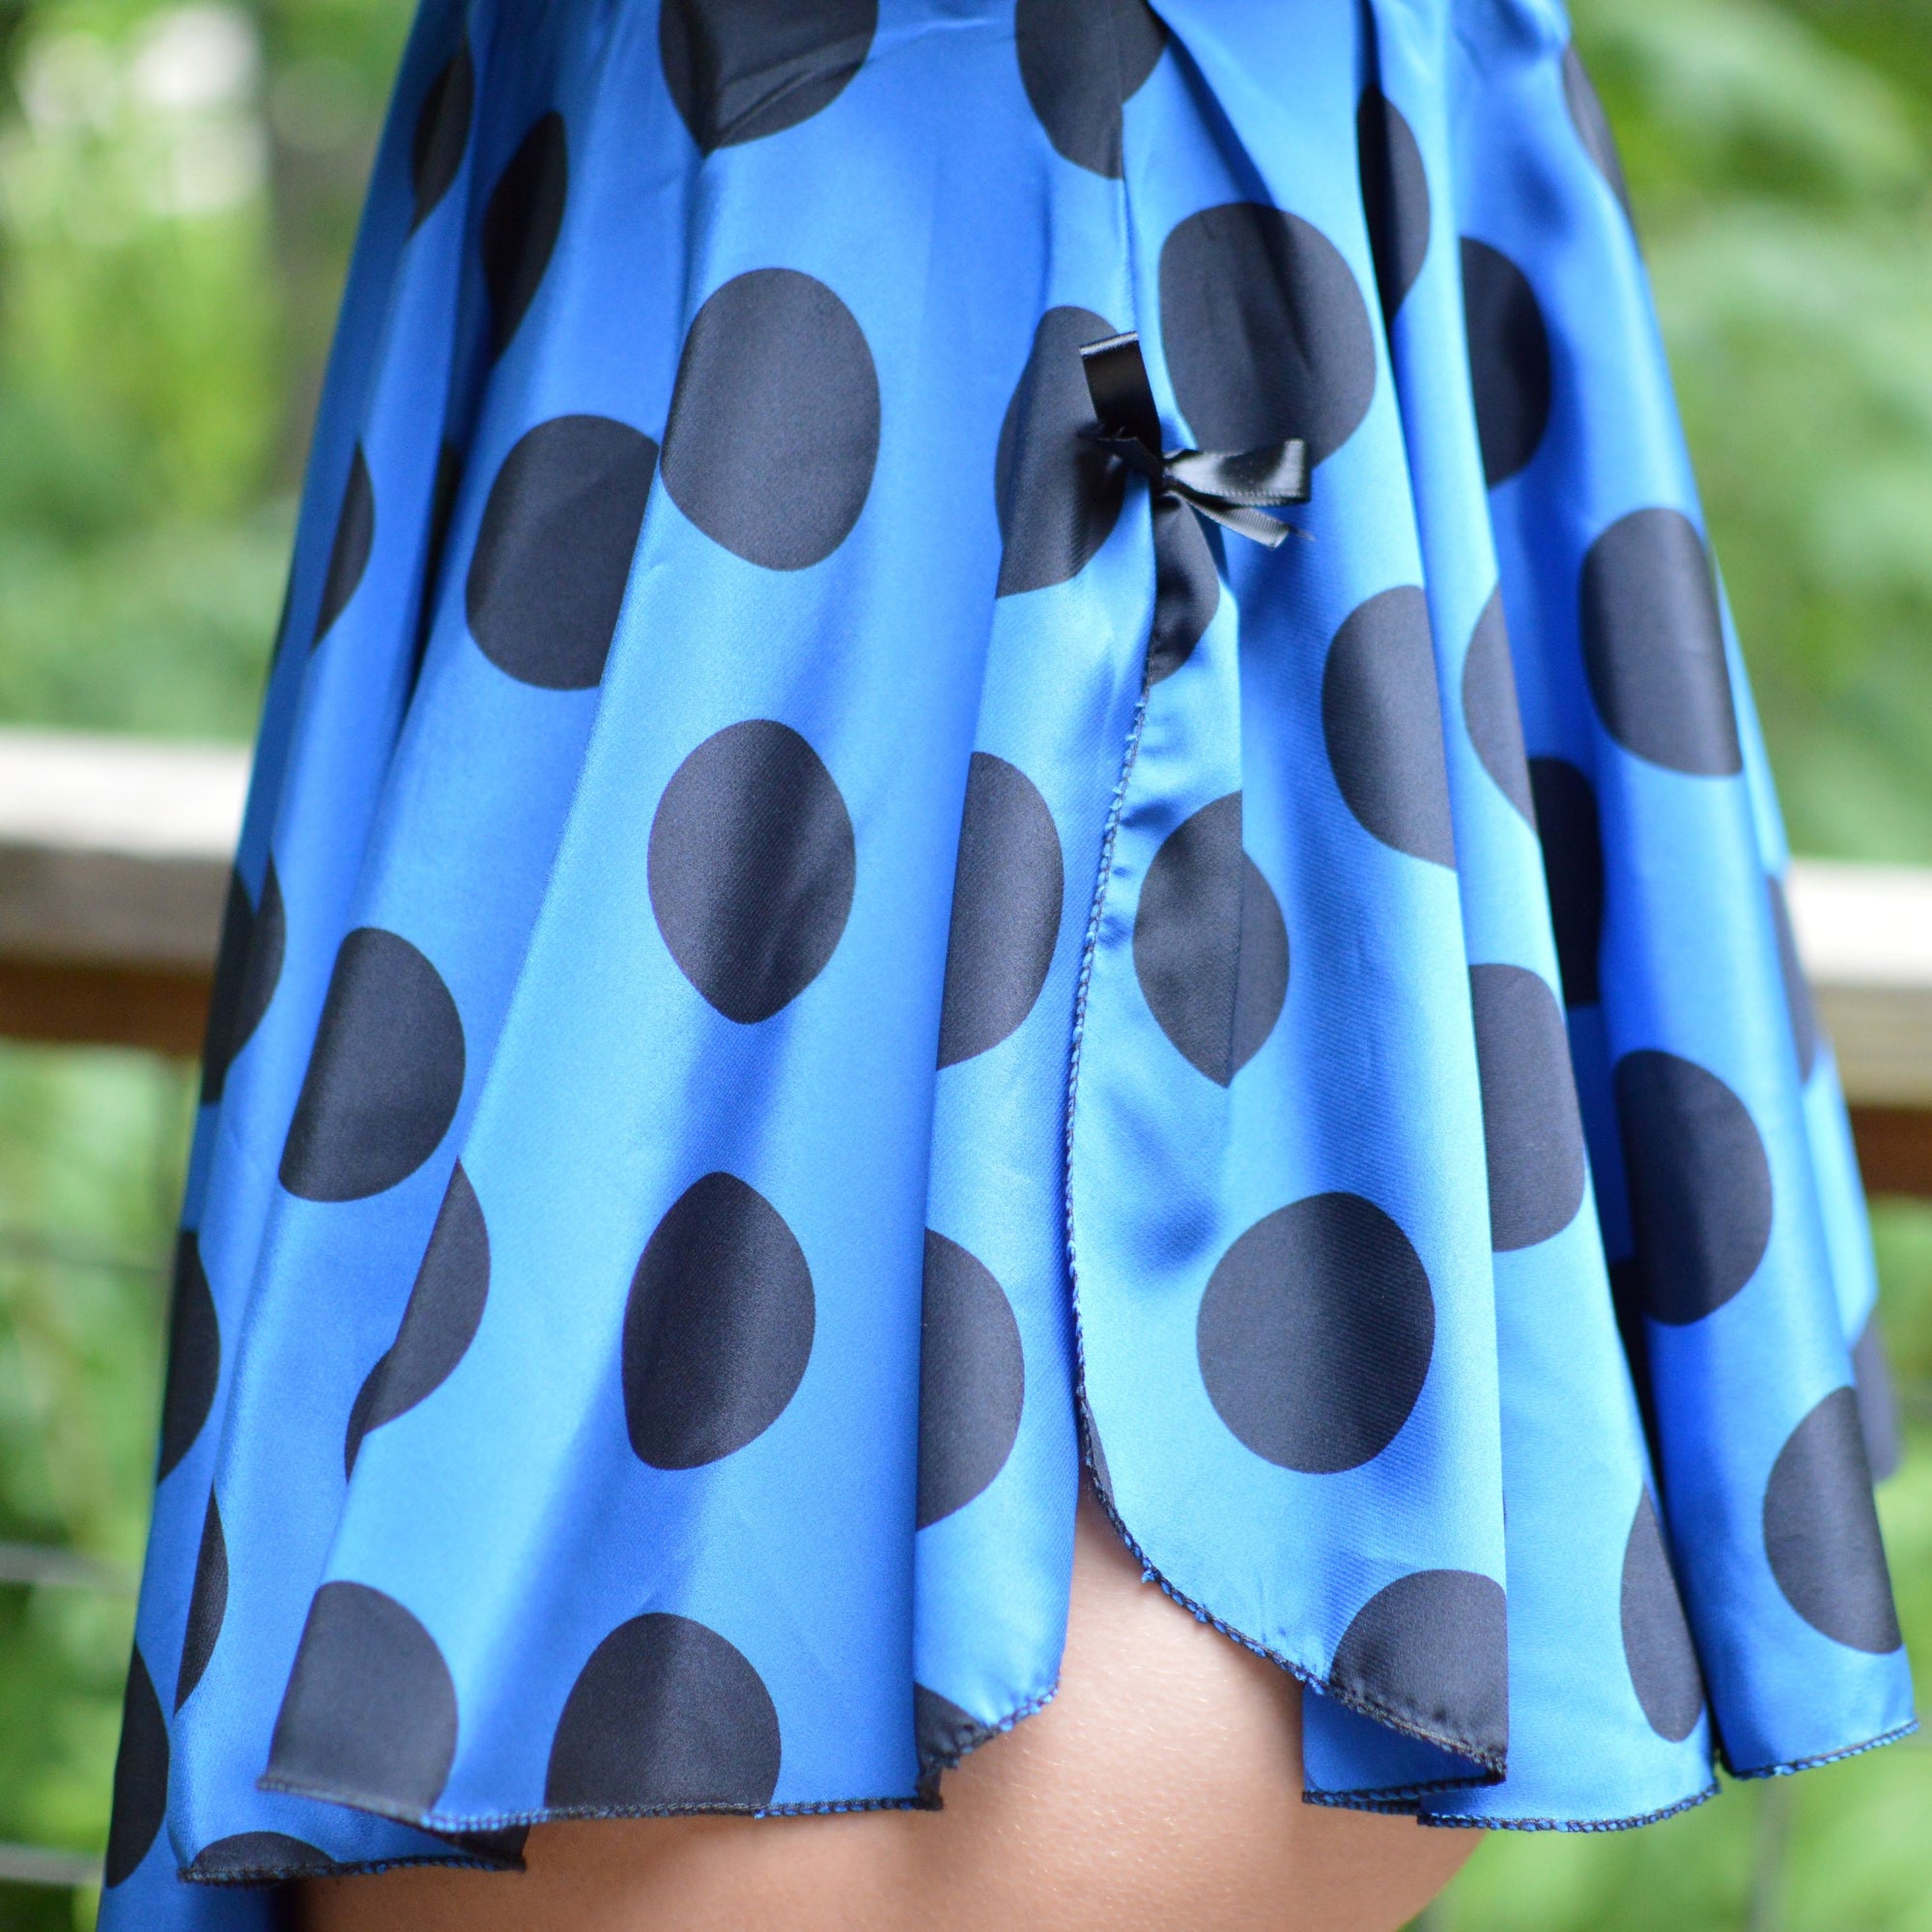
241 Fifties Fit and Flair (sized up from original)
PATTERNS RELEASED AS PDFS
204 Missouri River Boatman’s Shirt
237 Tango Dress (sized up)
253 Vintage Bathing Costume (sized up - also sized up the paper pattern)
241 Fifties Fit and Flair (sized up)
224 Beautiful Dreamer (sized up)
230 Model T Duster (sized up)
We have had a great year at Folkwear. While the sewing market seems to slow down a little bit each year (since Covid), we are grateful that we have a wonderful customer base and fabulous stockists. This year, we also picked up Joann’s as an online retailer of our patterns. And we loved collaborating with Sarah Pedlow of ThreadWritten for embroidery workshops with our patterns! Next workshop is January 20 on Romanian Blouse embroidery. We are looking forward to 2024! We plan to release a few patterns over the year, but our bigger goal for the past few years has been to continue to digitize all Folkwear patterns. We want to have all our patterns available as PDF patterns, and keep in print as many as we can (bringing back out-of-print patterns whenever we can). We plan to continue to work on these goals throughout 2024. We are also planning to release more tutorials for sewing tricky patterns and to cover techniques used in Folkwear patterns. If you have pattern suggestions or tutorial suggestions, leave them in the comments below!
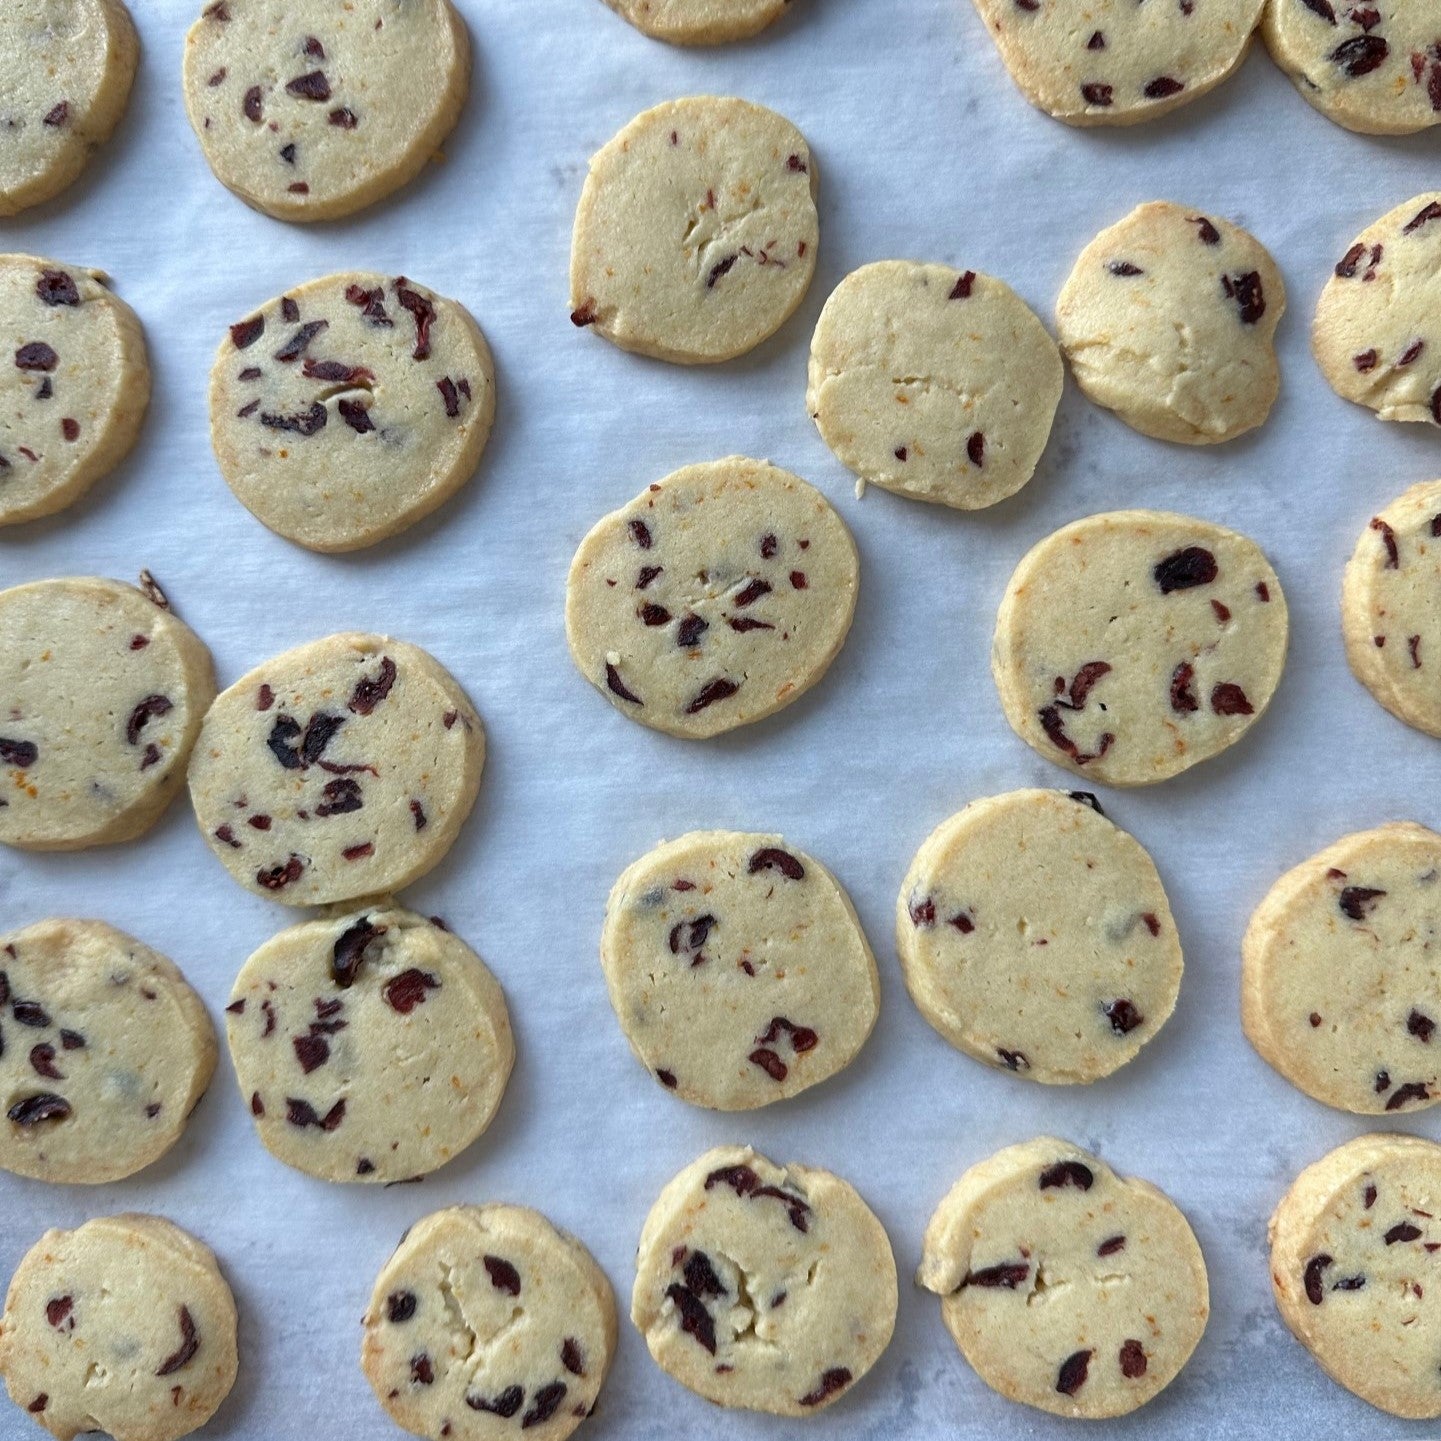
This recipe comes from our 310 Cynthia's Cookie Apron pattern. Cynthia worked at Folkwear for many years and has been a life-long Folkwear fan. She developed the pattern for the apron from a garment that was a staple of her grandmother's who made and wore it all her life - for cooking and doing house and garden chores. An apron to make cookies in should have a delicious cookie to go with it!
This cookie recipe is a variation on Cynthia’s family recipe. Her grandmother loved cordials and liqueurs, so the Grand Marnier was her secret. This cookie is sturdy enough to withstand icing, as well as additional ingredients such as nuts and dried fruit. It is not overly sweet, and so makes a great foundation recipe for changing up the flavors or being made plain.
2 cups all-purpose flour
1/4 teaspoon salt
zest of two oranges
1 cup (2 sticks) unsalted butter (room temperature)
3/4 cup powdered sugar
1/2 cup or more of dried cherries or substitute cranberries
1 teaspoon vanilla extract
1 teaspoon fresh orange juice or 1/2 teaspoon Grand Marnier
For a variation, add 1/2 cup of pecans
Preheat oven to 325 degrees.
In a medium bowl, whisk flour, salt, and orange zest together. In a separate bowl, cream butter, and sugar until smooth. Add vanilla extract, orange juice, and dried cherries, (and pecans if using) combine.
Slowly add the flour mixture to the creamed butter mixture until fully incorporated. Form dough into ball, wrap in wax paper and refrigerate overnight or at least few hours.
On a floured surface roll dough out to 1/4-inch thickness. Cut using cookie cutter and place on lined cookie sheet. Bake 12-15 minutes or until barely golden on the bottom. Transfer cookies to cooling rack to cool completely.
NOTE: You can also shape the dough into rolled logs about 1.5" to 2" (3.75-5cm) thick, chill, and slice into rounds to bake the same way. I used dried cranberries here, rather than dried cherries. I also find that I had to bake the cookies for 16-18 minutes to get them done with golden brown edges.
Happy Holidays from Folkwear!


These cookies make for great holiday gifting!
I won't create a fresh gift guide this year (are you tired, too? I've got a lot of sewing to do!). I'll just direct you to some amazing things we've made from years past, with awesome links to inspire your last-minute sewing gift ideas!
Last year's gift guide can be found here!
Plus here are some great links for extras of the things we recommend in the guide:
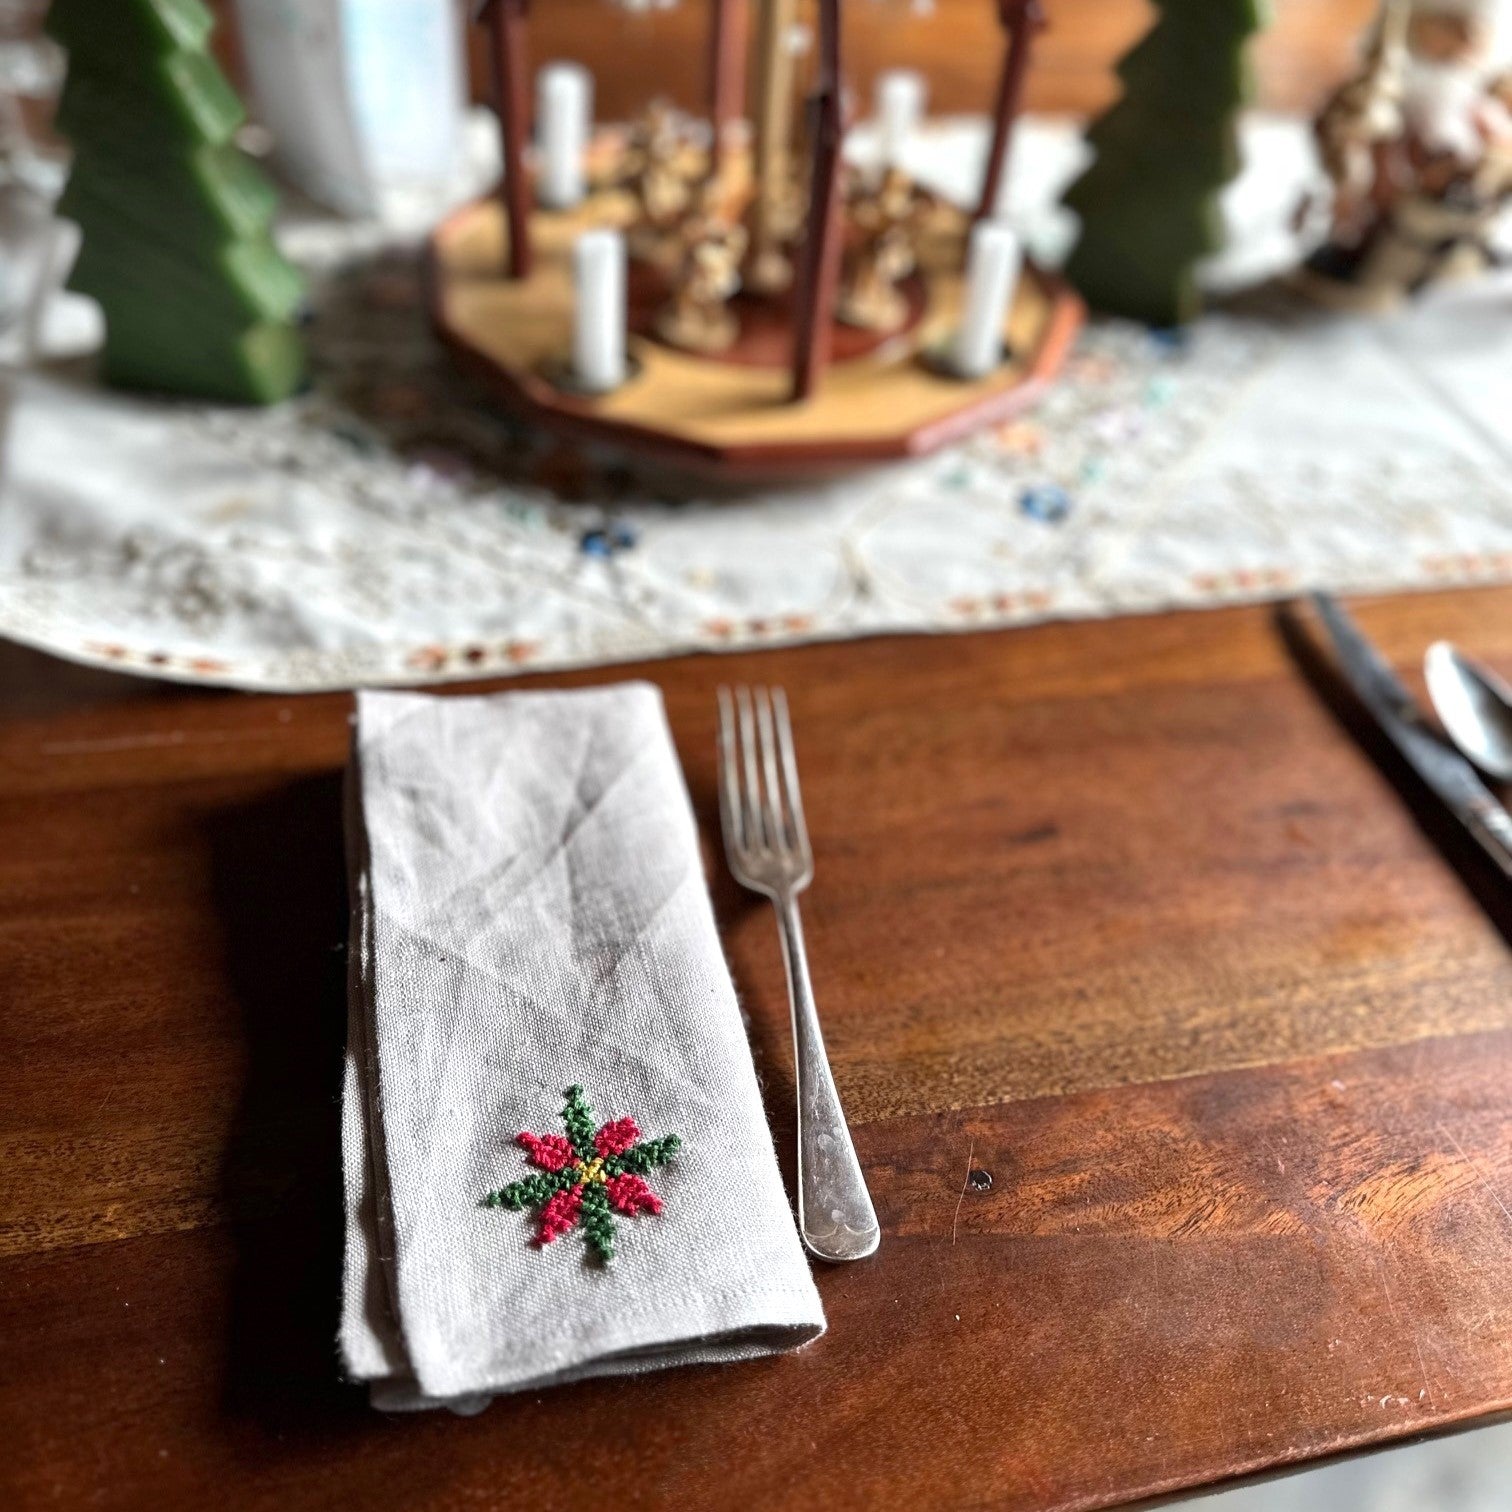
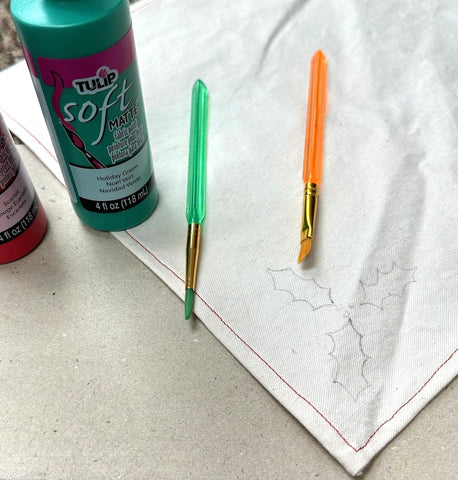
Cloth napkins are a classy and elegant (not to mention, environmentally friendly) way to set a holiday table. These napkins are easy and quick to sew and we have several motifs to add a handmade touch to your napkins - embroider a poinsettia or paint a holly leaf motif. This project will show you how.
Materials Needed:
Suggested fabrics: Medium to lightweight cotton or linen is best; poplin, voile, percale. A solid color is good if you are planning to embroidery or paint, but patterns can be fun also. A holiday-themed fabric would also be fun; quilting cottons come in many holiday patterns.
Notions: Thread. If embroidering, you will need embroidery needles, embroidery floss (DMC or perle cotton #5 or #8) and waste canvas (if doing the cross-stitching). If using fabric paint, fabric paint in your color choice and small paint brushes.
Yardage Requirements
For four luncheon napkins (finish at 15”/38cm wide), you will need 7/8 yard (.8m) of 45” to 60” wide fabric (115-150cm).
For four tea napkins (finish at 10”/25.4cm wide), you will need 3/8 yard (.34m) of 45” to 60” wide fabric (115-150cm).
Cutting
Be sure to wash your fabric before cutting. This will insure that the fabric does not shrink, and you end up with smaller napkins than you expected. Also, if you are embroidering the fabric, you can end up with distorted embroidery if it is not washed first. Press fabric well before cutting.
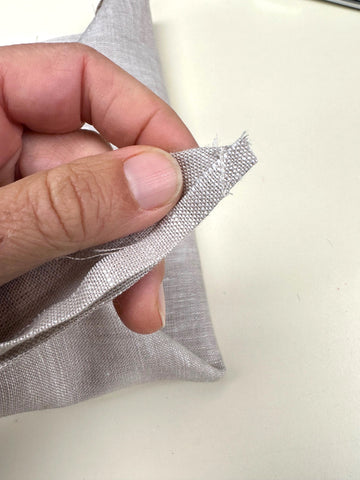
Cut your napkins with your fabric spread flat. This way you will be most likely to cut on the grain and connect straight edges. Note: to find the true grain and to be sure you are cutting on the grain, pull a few threads from the fabric to show the grain and cut along pulled thread lines. Cut four napkins in the sizes below:
For luncheon napkins - Cut 16”x 16“ (40.6 x 40.6cm) square
For tea napkins - Cut 11”x 11“ (28 x 28cm) square
You can choose to make different napkin sizes. For a cocktail napkin, cut 7” (17.8cm) square, for a dinner napkin, cut 19” (48.3cm) square, for a formal dinner napkin, cut 25” (63.5cm) square. Or cut square napkins at the size you desire, adding 1” to the length and width to account for hem allowance. You will need to adjust your yardage required if you change the napkin size. You could also increase the hem allowance by up to 1/2” (13mm) if you want, for a 1” (2.5cm) hem. Be sure adjust yardage if you are making fewer or more napkins, or making them larger or smaller.
Sewing Instructions
These napkins have 1/2” (13mm) hem allowance on every side.
Press under 1/4” (6mm) along all raw edges of napkin. Turn again on 1/2” hem line and stitch along pressed edge by hand or machine. You can do square corners or mitered corners. For square corners, just press up each edge overlap corners with a square edge.

Square corner. Hem is sewn with contrasting red thread.
For mitered corners, only press under 1/4” hem to start, and place right sides of napkin together at the corners, forming a diagonal, matching folded edges. Stitch a line that is perpendicular to the folded edge of inside of the napkin and goes to the hem edge. Back stitch at beginning and end.

Fold down 1/4" (6mm) on all sides.

Fold napkin at corner so hemmed edges are together and stitch at 90 degrees to the folded edge (as shown here in red).

Stitching is shown here (90 degrees to folded edge), backstitched at each end.
Cut off the extra fabric, cutting at a 90 angle to the hemmed edge.
Clipped corner of napkin.
Open the napkin up, adjusting the corner fabric and press the mitered corner. Then press on all sides 1/4" more.


Do this to all corners and stitch close to the folded inner edge to secure the hem.
You can stitch around the hem with a contrasting colored thread for a festive look. Or, stick with a thread that matches the fabric. For sewing the mitered corners, I do recommend using matching thread.
Now you can embroider, paint, or stencil a design on napkin. And/or add lace, tatting, or other edging to napkin edges for a more Victorian vintage look. See our instructions below for cross stitch embroidery, embroidery, and fabric painting.
For Embroidery
Materials:
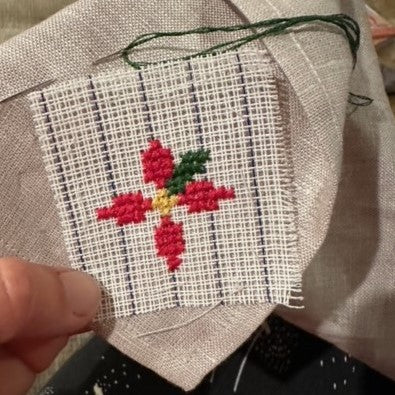
Pattern (from our Christmas embroidery pattern):

Cut scrim larger on all sides than design area. Pin scrim in place, matching the angle you want to stitch your design. It can be on grain or on the bias. Baste to the napkin.
Begin stitching
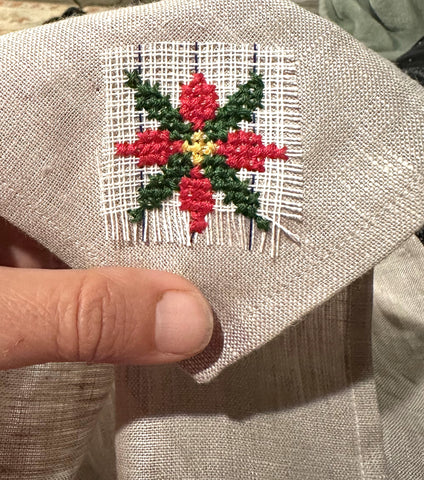
Start at the top, center of the design and work down and outward. Holes in scrim correspond to + on graph, as needle passes through the hole only, and must not catch threads of the scrim. Each graph square represents one Cross Stitch, 10 sts per inch = 10 holes per inch. Use a #10 crewel embroidery needle, and take great care not to catch threads of the canvas, but to pass through the fabric below. Pull stitches up snugly to compensate for removal of scrim. Begin and end threads by running 1”/2.5cm tails under completed stitches on wrong side of fabric.

Stitching
Cross Stitch as indicated on graphs on the design, starting at the center top of the design. It is important to cross the stitches in the same direction, however, you can see in mine that I don't always do that. So it's ok if you miss a direction. Unless someone is going to carefully study your napkin and understand that some stitches are crossed a different way (which they won't do), noone will notice! It is helpful to take each stitch so that on the back of the work so there are only vertical stitch lines (so just go up or down with stitches in the back of the work). This will keep the work neater on the wrong side, which is great for a napkin where the wrong side might be seen. But, again, not a huge deal.
You may work the first half of the stitch in vertical or horizontal rows, crossing on the return course. In small areas it is generally easier to cross each stitch individually (figures on left below).
Remove scrim
When the design is completed, remove basting and fray edges of the scrim so you can grasp the ends one at a time and carefully pull the threads straight out. Pull shorter edges first, holding embroidery near pulling place to avoid distortion. Any scrim threads which have been caught by embroidery must be delicately cut out.


by Molly Hamilton
Adding monograms to garments is quite an old tradition. It seems to have originally started as a way to identify things belonging to high ranking people and therefore was also a status symbol. However, eventually monograms also became more practical (though still often for the privileged). By the 16th century, when people sent their laundry off to be washed, having their initials monogramed on the garment allowed it to be easily identified and returned to the correct person. This was especially helpful for undergarments, like the chemise.
Our 223 A Lady's Chemise pattern includes an alphabet in Victorian script that you can use for adding a monogram to the chemise. Of course, you can add a monogram to nearly any fabric - tablecloths, napkins, handkerchiefs, shirts, quilts etc. Monograms can add a bit of elegance to these things. It also adds some personalization to your garments or items. And monograms can make a sweet addition to gifts (especially baby gifts). We have a free pattern and tutorial for a Victorian potpourri sachet, and it is perfect for adding a monogram to. Small and simple, and you can try out different lettering if you make a few of them. Monograms can also be used to sign a special garment or quilt, using simple stem stitch, to identify the maker of the work (of art!).
There are many options for how you make a monogram. You can make your own design (as monarchs of old did) with your initials, combining them or overlaying them with your own special flourish. You can make very plain, simple letters in a straight stitch or embellish them in fancy fonts. Fonts can be romantic and Victorian with lots of scrolling or it can be block script or Art Deco style fonts. You can cross stitch your letters - using waste canvas or free-handing the letters. You could couch stitches so that the thread looks like handwriting. I learned shadow work at a ThreadWritten monogram workshop which was very interesting and simple. On a side note, I highly recommend Sarah's workshops at ThreadWritten, and her monogram workshop is fun and informative.

Medieval monograms from Byzantine empire - these were made of stone and used to press lead.

Royal monogram on metal from the 1700s in Europe. These combined letters (and a number) into a monogram to identify the royal.

White on white embroidered monogram in block letters with chainstitch and knotted embroidery around it. Pinterest link.

A simple block letter monogram made with satin stitch. Pinterest link.

At deco style lettering that can be used for embroidered monograms. Pinterest link.

A fancy script, cross stitched monogram. Cross stitch can also be used to make very simple letters. Pinterest link.

This is a handkerchief that I have that has been in the family a long time. The H is embroidered in scroll and with a nice satin stitch.

This is on the other side of the same handkerchief. Most likely commemorating a marriage with the year of the marriage. The letters are a bit fancier and much smaller and also done in satin stitch. Note the threadwork hem also. I think the letters are MAS and OGH.
Monogramming Your Garment
Monograms don't have to be perfect. They can be playful; and the imperfections are beautiful also.
Most traditional monograms are made with satin stitch over an outline of backstitch or split stitch, as you can see in many above. You can also do lines of stitching in chain stitch or stem stitch.
If you don't know these stitches, we have several of them shown on our blogs or YouTube channel. Many of these stitches are also taught in our Mexican embroidery pattern.
Starting the Monogram
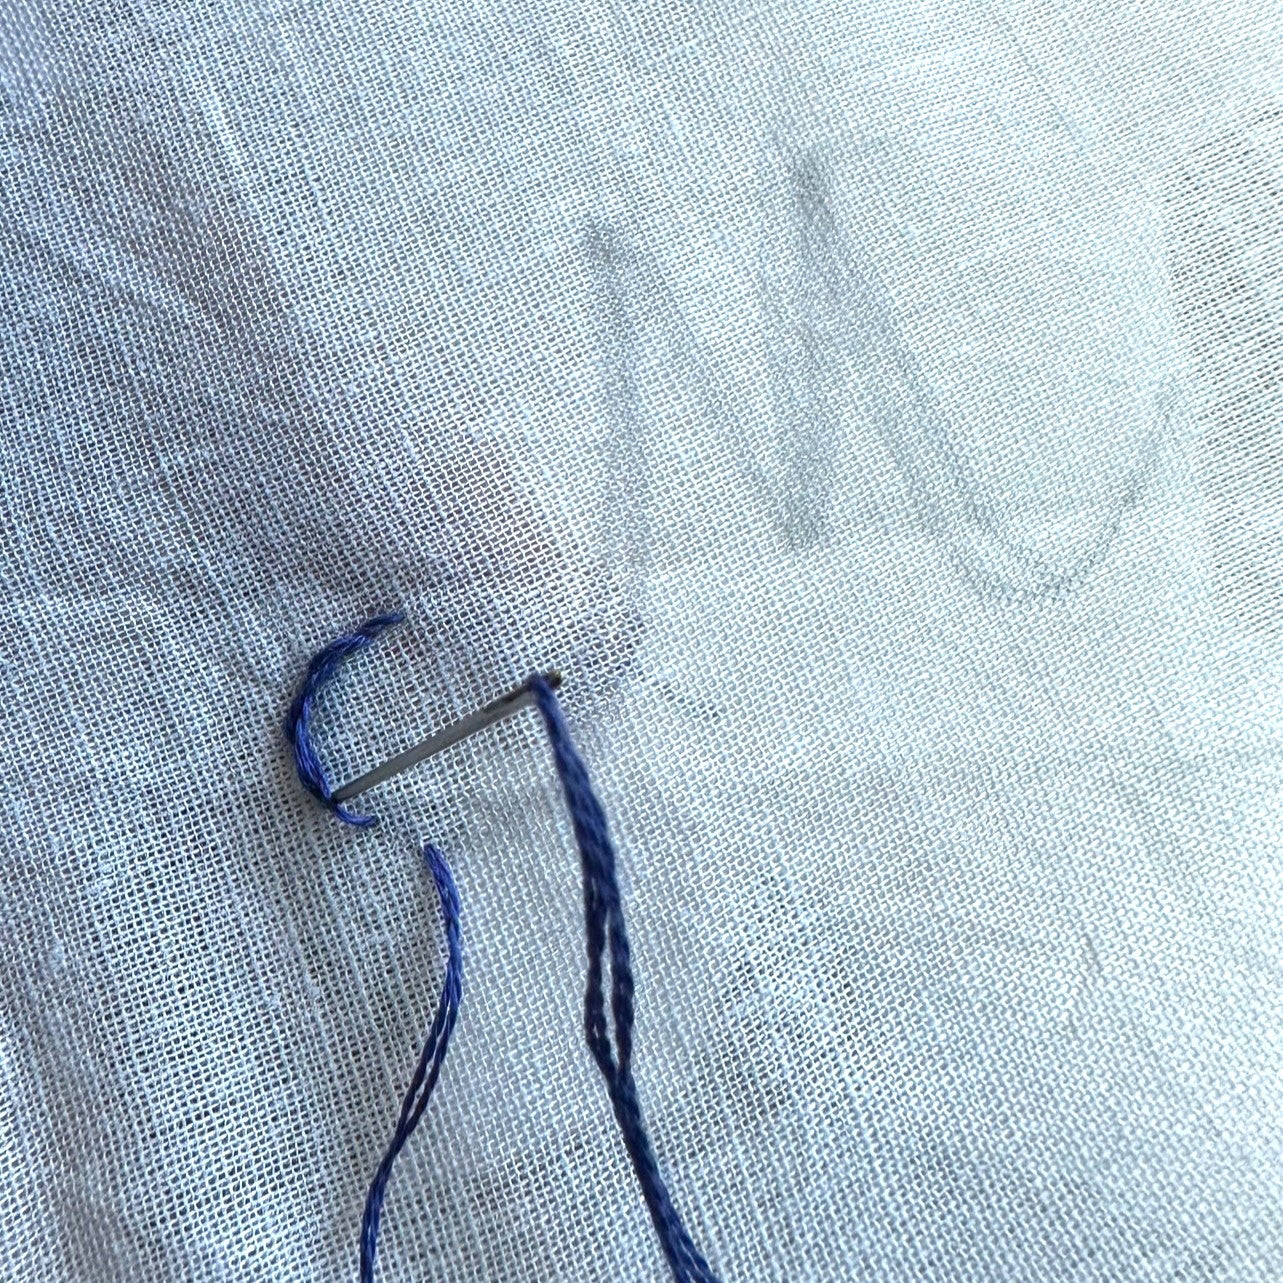
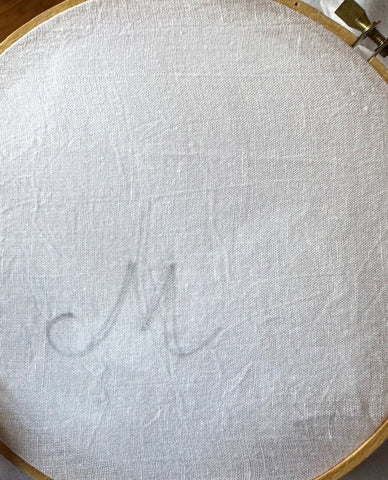
First, you usually add a monogram to a garment after it is made. You can draw the monogram design freehand on your garment or you can trace it. For more information on transferring embroidery designs, find our blog post about it here. I often use a fine, water soluble marker to draw my designs for monograming. Sometimes I'll even use a sharp pencil on a light-colored fabric (as I did below), knowing I will stitch over the markings.
Thread for monograms is usually perle cotton or 2-4 strands of DMC floss. I often use DMC floss, but perle cotton gives a little bit of a different feel and look. Often undergarments (and handkerchiefs, etc.) were monogramed in the same color as the fabric - usually white. But, you can use any color you want. Variegated floss is very pretty and contrasting thread will stand out more. Multicolored monograms are fun. It is up to you to decide the look you want.
I also like to use a hoop for monogramming. I don't always use one when embroidering, but the hoop keeps the fabric taut and makes it easier to see the outline of the letter. It also helps me with tension when I am doing satin stitching (it is not my strongest skill).
The Stitches
I am going to show you how I did monogram similar in design to the ones in our 223 A Lady's Chemise pattern, using a Victorian script and satin stitch over a straight stitch (back stitch) with stem stitch when the design gets narrow and curved. I am using a contrasting thread so you can see the design and stitches easily.
I started by drawing a letter in pencil that shows where the wider part of the letter would be. I could have made this whole letter with stem or back stitch and kept the letter the same width all through, but I wanted to experiment with the satin stitch also.
I started my monogram with a knot at the end of my thread, but there are other ways to secure your thread, including making a few small stitches inside where the satin stitches will go.
Below are the stitches I used for this monogram.
Stem Stitch. I started with a stem stitch. This stitch gives a little more depth to the lines and helps make a pretty curve, in my opinion. Work stem stitch with a simple forwards and backwards motion, always keeping the working thread to the same side of the needle with each stitch (usually below the line, or to the outside of the curve).
Bring thread up through fabric and take one stitch about 1/4 inch (6mm) up.

Bring thread back up for the next stitch about 1/4" (6mm), and go down about half-way back on the first stitch, staying to one side of the thread.


Continue this way, staying on the same side of the thread each time and keeping working thread to the same side).
Backstitch. This simple stitch produces a straight uninterrupted line. I transitioned to the backstitch in the areas that would be covered with stem stitch. This is a good stitch to outline the area to be covered with satin stitch. It also provides a bit more relief to the design when covered in satin stitch.
Bring needle up slightly ahead of starting point (1/4" (6mm) or less) and take it back down into the fabric at the starting point. Bring the thread back up again one stitch length (1/4" (6mm) or less) ahead of the first stich and take it back down, meeting the first stitch, as you can see below.


I continued the backstitch on each side of the wider parts of my monogram.
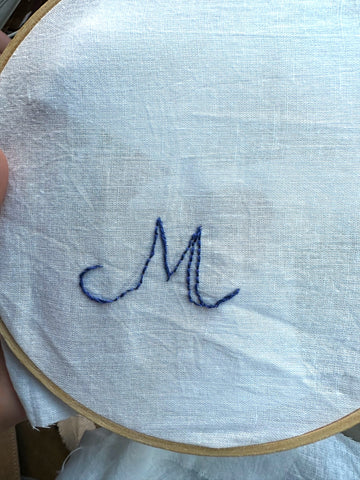
Satin Stitch. These are simple straight stitches worked closely side by side to cover an area. Bring the needle up on one line, then down on the other one. Bring thread up again next to the first stitch and work second stitch beside the first, and repeat, filling the area and adjusting stitch length as needed.


To End the Monogram (or your strand of floss)
You can thread the last bit of your thread through the stitches that you've already made in the back of the monogram. This is an easy way to secure your thread. Then clip any remainder floss.
And that is about all there is to hand embroidering a monogram. These are handmade touches to your garments or linens that are special and commemorative. And they can be fun, fancy, plain and simple, and sometimes wonky - and that is part of their beauty. Have you hand sewn monograms? What have you added monograms to? We love to know!
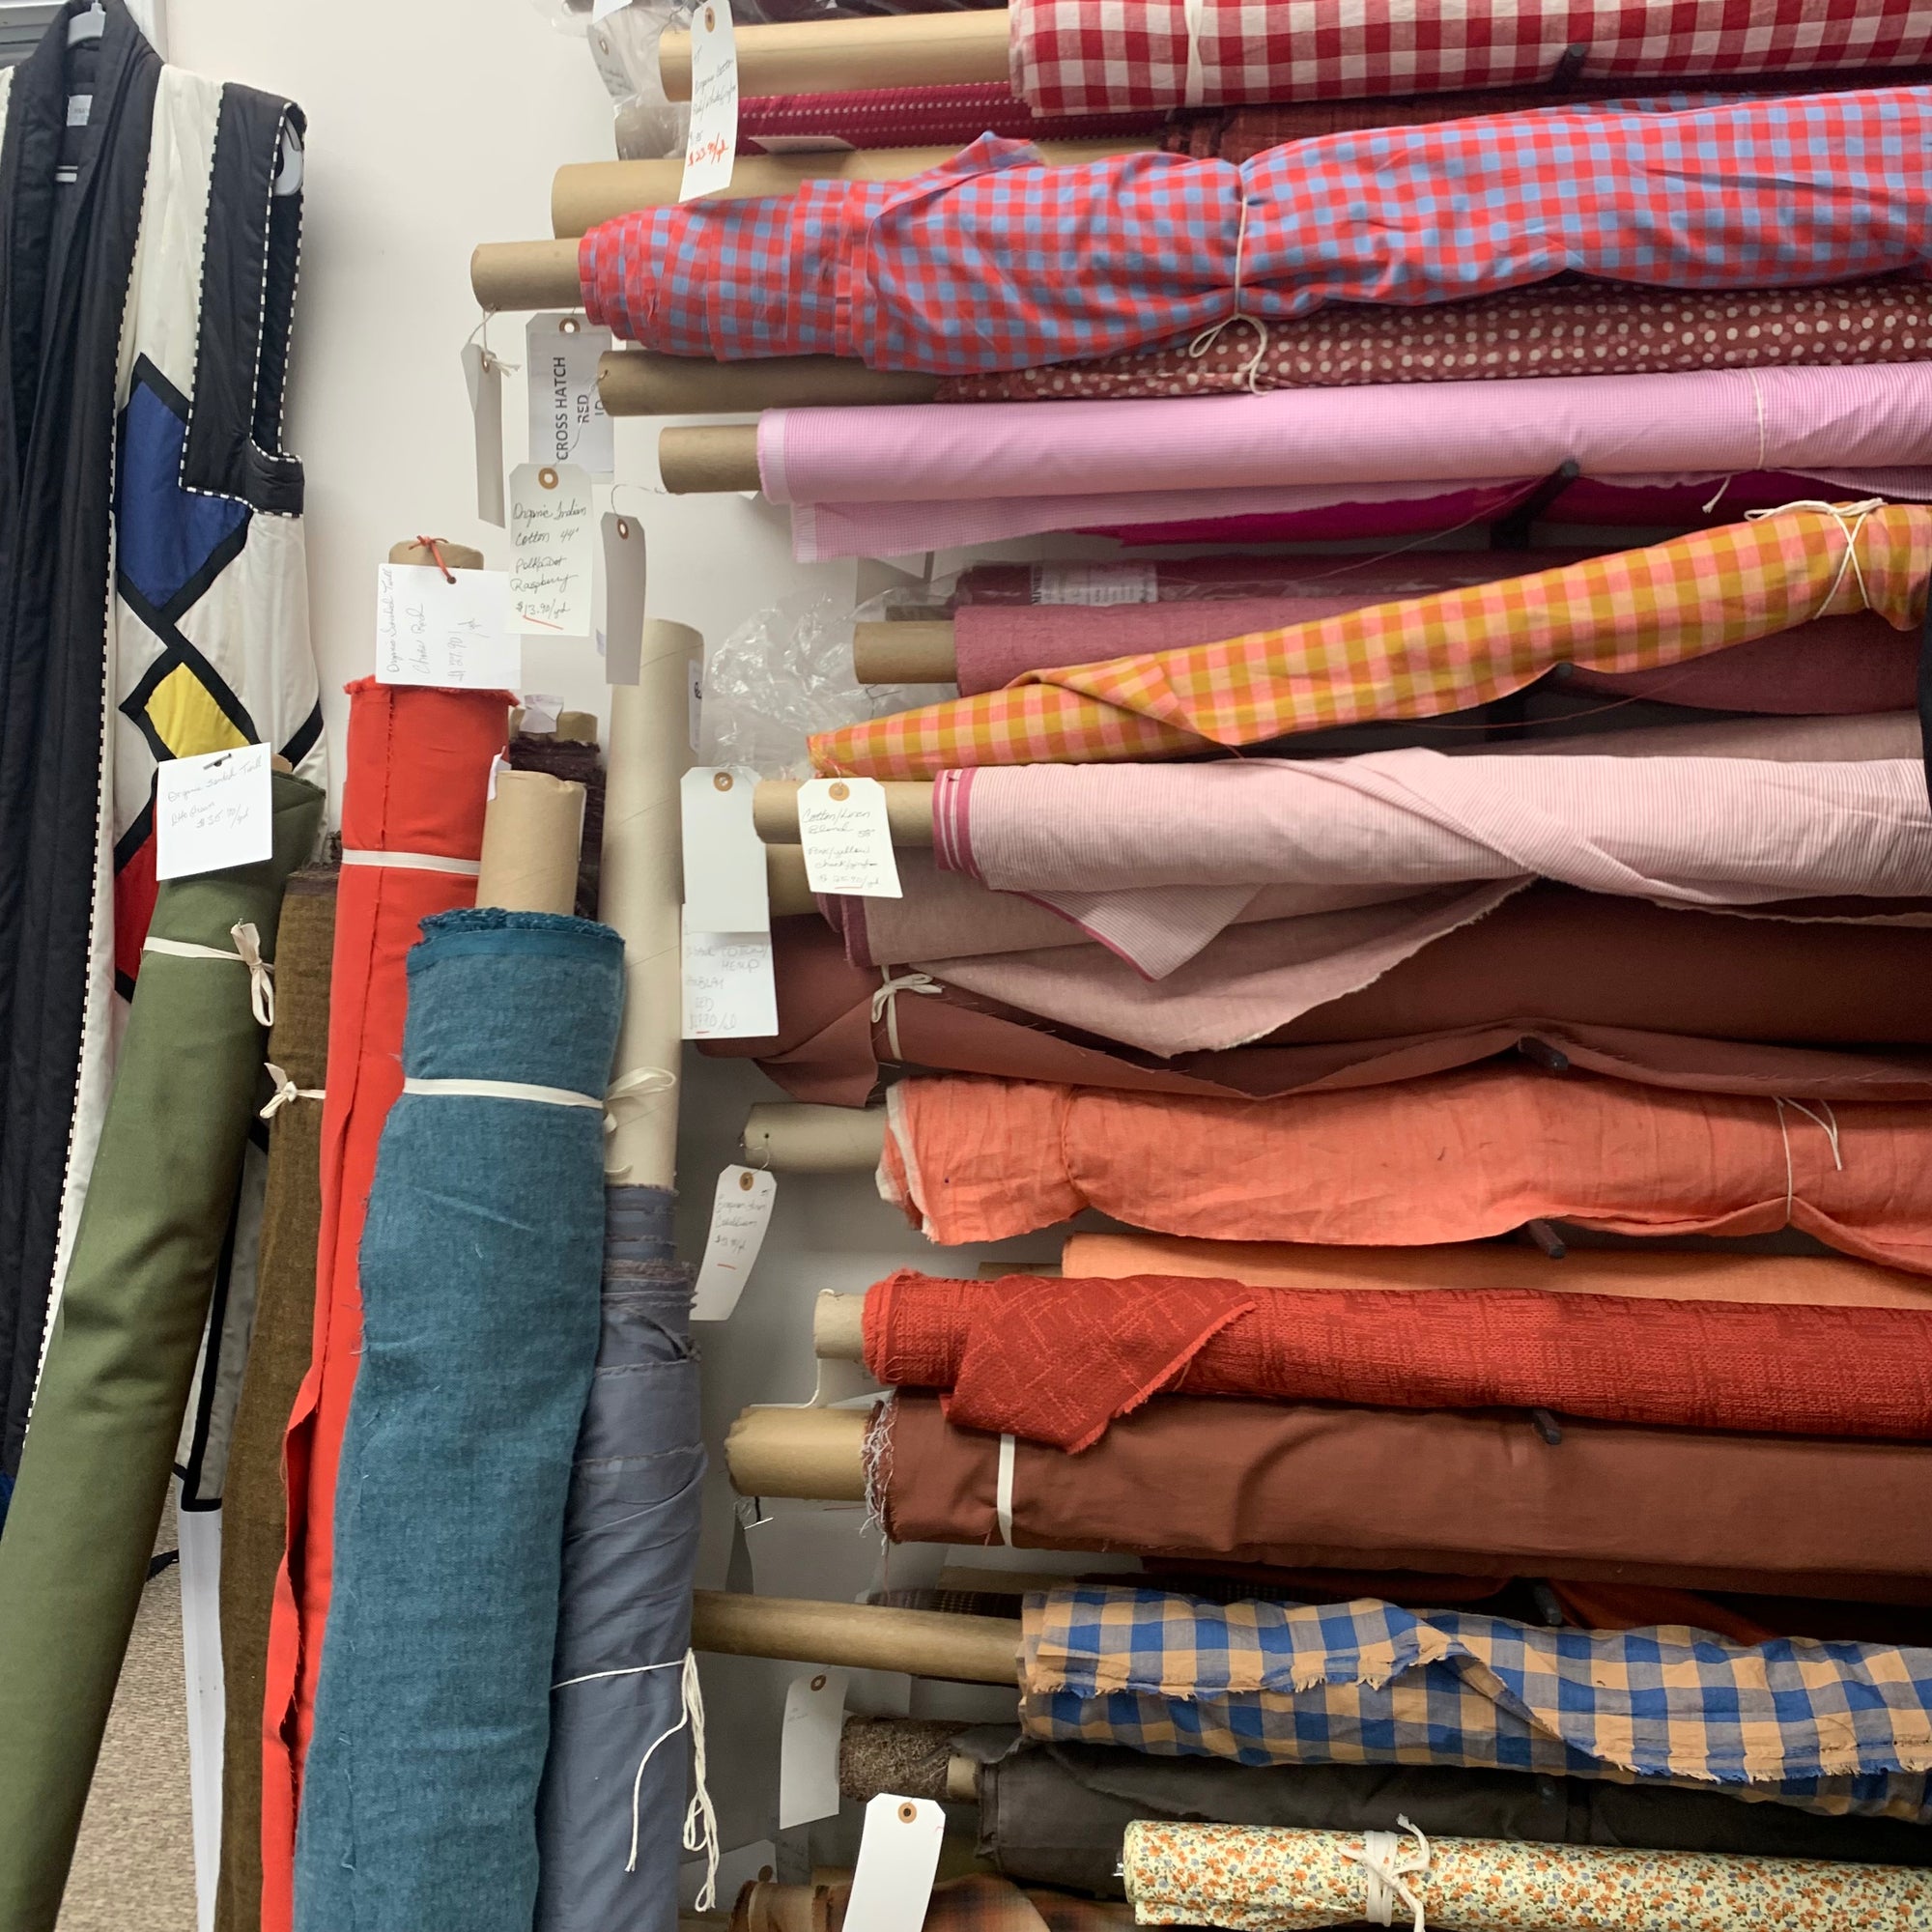
Folkwear's annual Black Friday Sale goes until Sunday the 26th (midnight EDT)! Use code THANKS2023 to save 25% on all sewing patterns, fabric, and sewing supplies. And, just in time for the sale, we got some exciting new fabrics in recently. I will show you the some of these new fabrics and will give suggestions for what Folkwear patterns they will be great for. These fabrics are beautiful and very fitting for winter, and some are well suited for the coming spring season. If you want to get some fabric for sale, today through Sunday would be a great time, especially while we still have these gorgeous fabrics in stock. Don't forget that we sell our fabric by the 1/2 yard, so each unit is 1/2 yard (2 units is 1 yard, etc.).
We ordered several colors of these stunning wool/linen woolsey fabrics from Merchant & Mills. I've been eyeing them for years and now that they will soon be discontinued, we decided to wait no longer to get them in stock. These fabrics would look amazing for long skirts, light weight jackets, shirts, pants, or simple dresses. They are soft with a nice drape, and have different colors on each side of the fabric. I can imagine this used for 216 Schoolmistress Skirt, 148 Black Forest Smock, Basics Overcoat, or a pair of pants or overalls from 240 Rosie the Riveter. Both sides having pretty color would also make it a wonderful fabric for the 271 Sunset Wrap (which also makes a great gift). These woolseys would also be beautiful in 270 Metro Middy Blouse, 209 Walking Skirt, or 233 Glamour Girl Dress. And for pants, these patterns would be great: 119 Sarouelles, Basics Pants, 250 Hollywood Pants, 112 Japanese Field Clothing.
This fabric also comes in a dark burgundy, teal and a dark brown color.

Woolsey Wool Linen blend - Black Coffee

Wool Linen blend Woolsey - Oxblood
We still have some beautiful Italian Wool in stock. This Italian Yarn Dyed Wool is very soft and lightweight (like a suiting weight) with a beautiful glow of muted warm colors. Use it for 256 At The Hop, 209 Walking Skirt, 233 Glamour Girl Dress, 222 Vintage Vests, 132 Moroccan Burnoose. I think it would be really cute for 251 Varsity Jacket and for 123 Austrian Dirndl as a warmer dress.

I really missed having lots of sanded twill options in our collection, so we ordered more! Our new stock is bright, fun, and rich in color. Get ready for this bright orangey-red color called Chore Red!
I think these colors are fantastic, and I think sanded twill is the best! I really want someone to make 231 Big Sky Riding Skirt out of these twills or even something from 240 Rosie the Riveter, 229 Sailor Pants, 126 Vests from Greece and Poland, 270 Metro Middy Blouse, or the Basics Pinafore Dress.
I am definitely buying some of this green sanded twill fabric during our sale. It would be classic for 130 Australian Bush Outfit. I would love it for 230 Model T Duster and 231 Big Sky Riding Skirt. This slightly heavier twill would work nicely for 133 Belgian Military Chef's Jacket, 242 Rodeo Cowgirl Jacket or 243 Rodeo Cowgirl Skirt - PDF.
Also, any of the twills would be great as cushion covers, durable and easy to clean, try it with 305 A Japanese Interior.

Cotton Sanded Twill - Chore Red

Sanded Twill - Otto Green (12oz)
Cotton Sanded Twill - Prussian Blue
We also got in quite a few Jacquard Cottons from Merchant & Mills, including some new ones. These jacquard fabrics are made up of layers of cotton, with a jacquard weave that gives it a quilted look and feel. They are actually quite warm. I've made a pair of sweatpants from a grey Jacquard we have and wear them on really cold days. These fabrics below would fit well with 305 A Japanese Interior, 206 Quilted Prairie Skirt - PDF, 106 Turkish Coat, 138 Child's Australian Drover's Coat. Molly made the 137 Australian Drover's Coat for herself out of our quilt-like Jacquard, check the blog post here. You can also see the 206 Quilted Prairie Skirt she made from one of the jacquards in this post as well. These fabrics are great for bedding as well - Molly has a beautiful blanket she made with a length of this fabric - bound on each end with a pretty binding she made with scraps of Liberty of London lawn.


This layered cotton has a jacquard weave, with fine cotton on top, no batting in the middle of this cloth, the inside is made up of a series of thicker yarns and the reverse is a gauzy cotton.

Marine Blue Jacquard Cotton - Merchant & Mills
We also have these two Viscose Challis vintage floral print fabric. They are very soft and lightweight. They would be perfect for vintage inspired garments like the 252 Beach Pyjamas, 510 Passionflower Lingerie, 241 Fifties' Fit and Flair, 247 Lindy Shirtdress, or 205 Gibson Girl Blouse.

Viscose Challis - Vintage Teal Floral Print

Viscose Challis - Olive Vintage Floral Print
These are only a few of our new fabrics, so go ahead and get shop our fabric while it is on sale! Christmas is coming up so it would be a good time to get some handmade gifts ready! Check out our gift guides from years past: last year's gift guide, gifts to be sewn, and 2021 gift guide.
Enjoy shopping and have a wonderful time with your loved ones!

by Esi Hutchinson
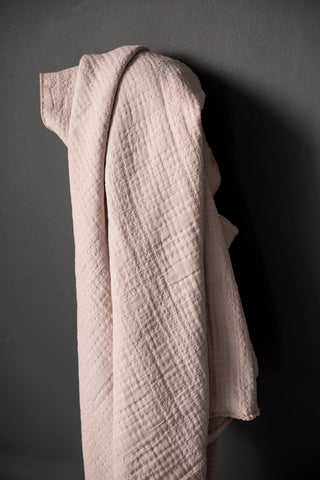
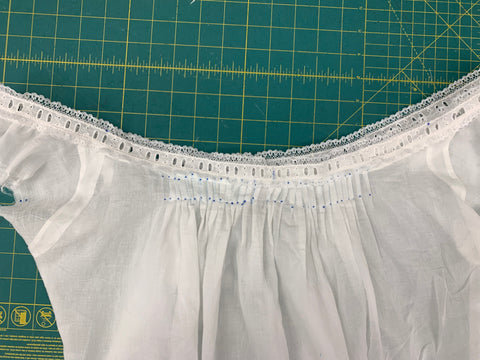
Hello! I hope you saw Folkwear's blog post I wrote about making the 223 A Lady's Chemise into a blouse. If you have not read it you can check it out here. Recently, I made another chemise to add to the Folkwear sample collection. We wanted a sample that was made of an organic white cotton voile -- a more authentic, or traditional/historic, version. We used View A, which is a bit off the shoulders (though can also be worn wide on the shoulders). Traditionally, the chemise was an undergarment made of light to medium weight cotton or linen and was often white. The lace and eyelet/beading was used to finish the neckline and sleeves openings and add a bit of a romantic touch. For this chemise, I used an eyelet lace that we already had in our stash, and the voile from our fabric collection.
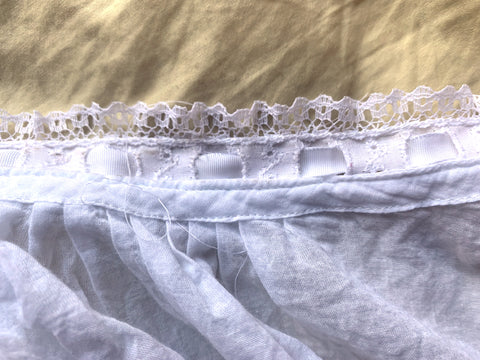
Our eyelet lace already had the ruffle attached (it was eyelet/beading and lace in one!), so I had to modify the instructions to finish this chemise. The instructions have the neckline and sleeves finished with a bias binding, eyelet or beading, and a lace edging - all of which come together to provide a clean and romantic finish. We imagine that often times, you use the notions, like lace or eyelet, that you have in your stash (or have inherited). So when you go to make a garment like this one, you look at what you already have, especially if it is inherited or heirloom pieces. And this means that what you have on hand might not be exactly what the pattern is calling for. As in this case. So, you have to modify how the neckline and sleeves are finished so that you get the look you want with the pieces you have. I will show you how I assembled this eyelet lace to the neckline, and maybe that can help you in a similar situation.

Close up of the eyelet (beading) lace used.
The cotton voile I used is very lightweight so I finished all the seams with French seams. This seam finish is authentic, and it also looks more professional in my opinion. It also really gives the garment an heirloom-quality feel. French seams are also good to use with delicate fabrics like this voile. Here is a blog post on our site you can refer to if you don't know what and how to use a French seam: How to Sew a French Seam.
 French seam on the inside side of this chemise.
Adding the Lace
Instead of first sewing on the eyelet lace (which is also called beading in the instructions), I first sewed on the bias binding like the instructions say. The eyelet I use is finished on each side with lace, so I did not need to "sandwich" it with the binding and lace edging.
I trimmed the seam allowance and pressed the binding away from the bodice, and turned it to the inside. Then I topstitched the pressed edge of the binding through all layers. This finishes the raw edge of the bodice. I did the same to the sleeves.
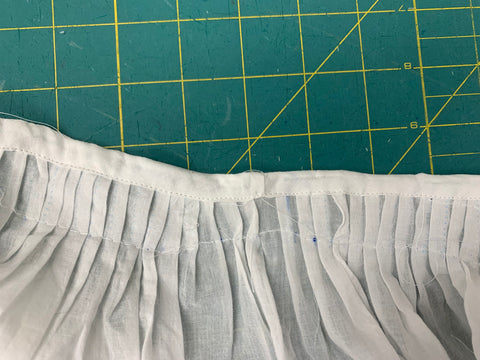
I pinned the eyelet lace so that the inside edge of the lace (where the eyelet changes to lace edging) was about 1/8" (3mm) from the top edge of the bias binding. I stitched the lace down on that line. And I did the same for the sleeves.

Inside the chemise. You can see the stitching line about 1/8" from the top of the bias binding where the eyelet lace is stitched down.
 VOILA! Finished!
You can purchase ribbon to weave through the eyelet or make your own using a binding tape maker and fine fabric. I used a satin store-bought ribbon for this sample. I finished the ends of the ribbon by turning them under twice by 1/4" (6mm) and stitching.
I have a few more pictures of the finished 223 A Lady's Chemise (View A) below. This was a fun project and I enjoyed looking through our lace collection to find something that worked for this chemise.


by Molly Hamilton
I have been wanting to make a pair of wide leg pants for a year now, ever since I bought a pair I loved at a boutique in Asheville last winter. They were so comfortable and easy and fun to wear, that I knew I needed to make another pair for myself. I also knew that we had the perfect pattern in Folkwear's collection. Our 240 Rosie the Riveter has a great pair of wide leg trousers that have plenty of room, nice pleats, and back darts. I really love this 240 Rosie the Riveter pattern. The overalls are very cute, the shirt is wonderful (just make it a size or two smaller than you might think), and I also really love the dress that can be made from the overalls pattern, which is taught in the blog post and not actually part of the pattern. But, I hadn't made the pants yet. So two weeks ago, I made myself a pair of pants!
For fabric, I was first interested in a Tencel twill in a dark color, but the only Tencel twill we had in stock was an aqua. But, I also really like our sanded twills and we had quite a bit of a khaki green color, so I decided to use that. We now have several more colors of sanded twills, and if you are interested you can see them here.
For sizing, I am between the Folkwear sizes Small and Medium for waist and hips. I measured the waistband and felt that the medium size would be most comfortable and fit just right at my waist. There is little to no ease in the waist, but plenty of ease in the hips. I made a muslin to decide if I wanted to make any other adjustments.

There is a lot of room in the crotch of these pants. The crotch is very low and this allows plenty of room in the seat area for moving, squatting, and sitting (as you might be doing if you were working putting together tanks in a factory in the early 1940s). But, I didn't feel I needed or wanted quite so much room. So I raised the crotch in the front and back by 1/2" (13mm). That isn't a lot and I could have done a little bit more, but it was perfectly fine for me and made the fit better. I used our tracing fabric for tracing the pattern and making adjustments, as you an see below.

I also shaved off a little (maybe 1/4"-1/2" (6-13mm)) at the side seams near the hip. I also know that I usually need to increase the length of the legs of our patterns for myself, so I added 1" in length to the leg. These pants have a very straight leg (pattern was folded below, so it looks a little wonky, but it truly is straight!), so lengthening and shortening can be done at the bottom of the leg.

The only thing that was really different from the ready-to-wear pair I bought was that the Rosie pants have a back zip and button rather than a front fly. Since I don't love making a front fly, especially if I have to draft it myself, I decided the back zip was perfectly fine for my own pants. And honestly, I think I like it better! The front is flat and comfortable. Instead of a button in the back as the pattern indicates, I used a hook-and-eye closure, which I also liked better and found it easier to use.


I really like these pants! They will be a wardrobe staple this fall and winter. Note, the shirt I am wearing here is made from our white handkerchief linen and is made with the 212 Five Frontier Shirts (classic view without the decorative yokes). Now I want to make another pair, maybe in a fabric with a little more flow (like a Tencel twill).


by Esi Hutchinson
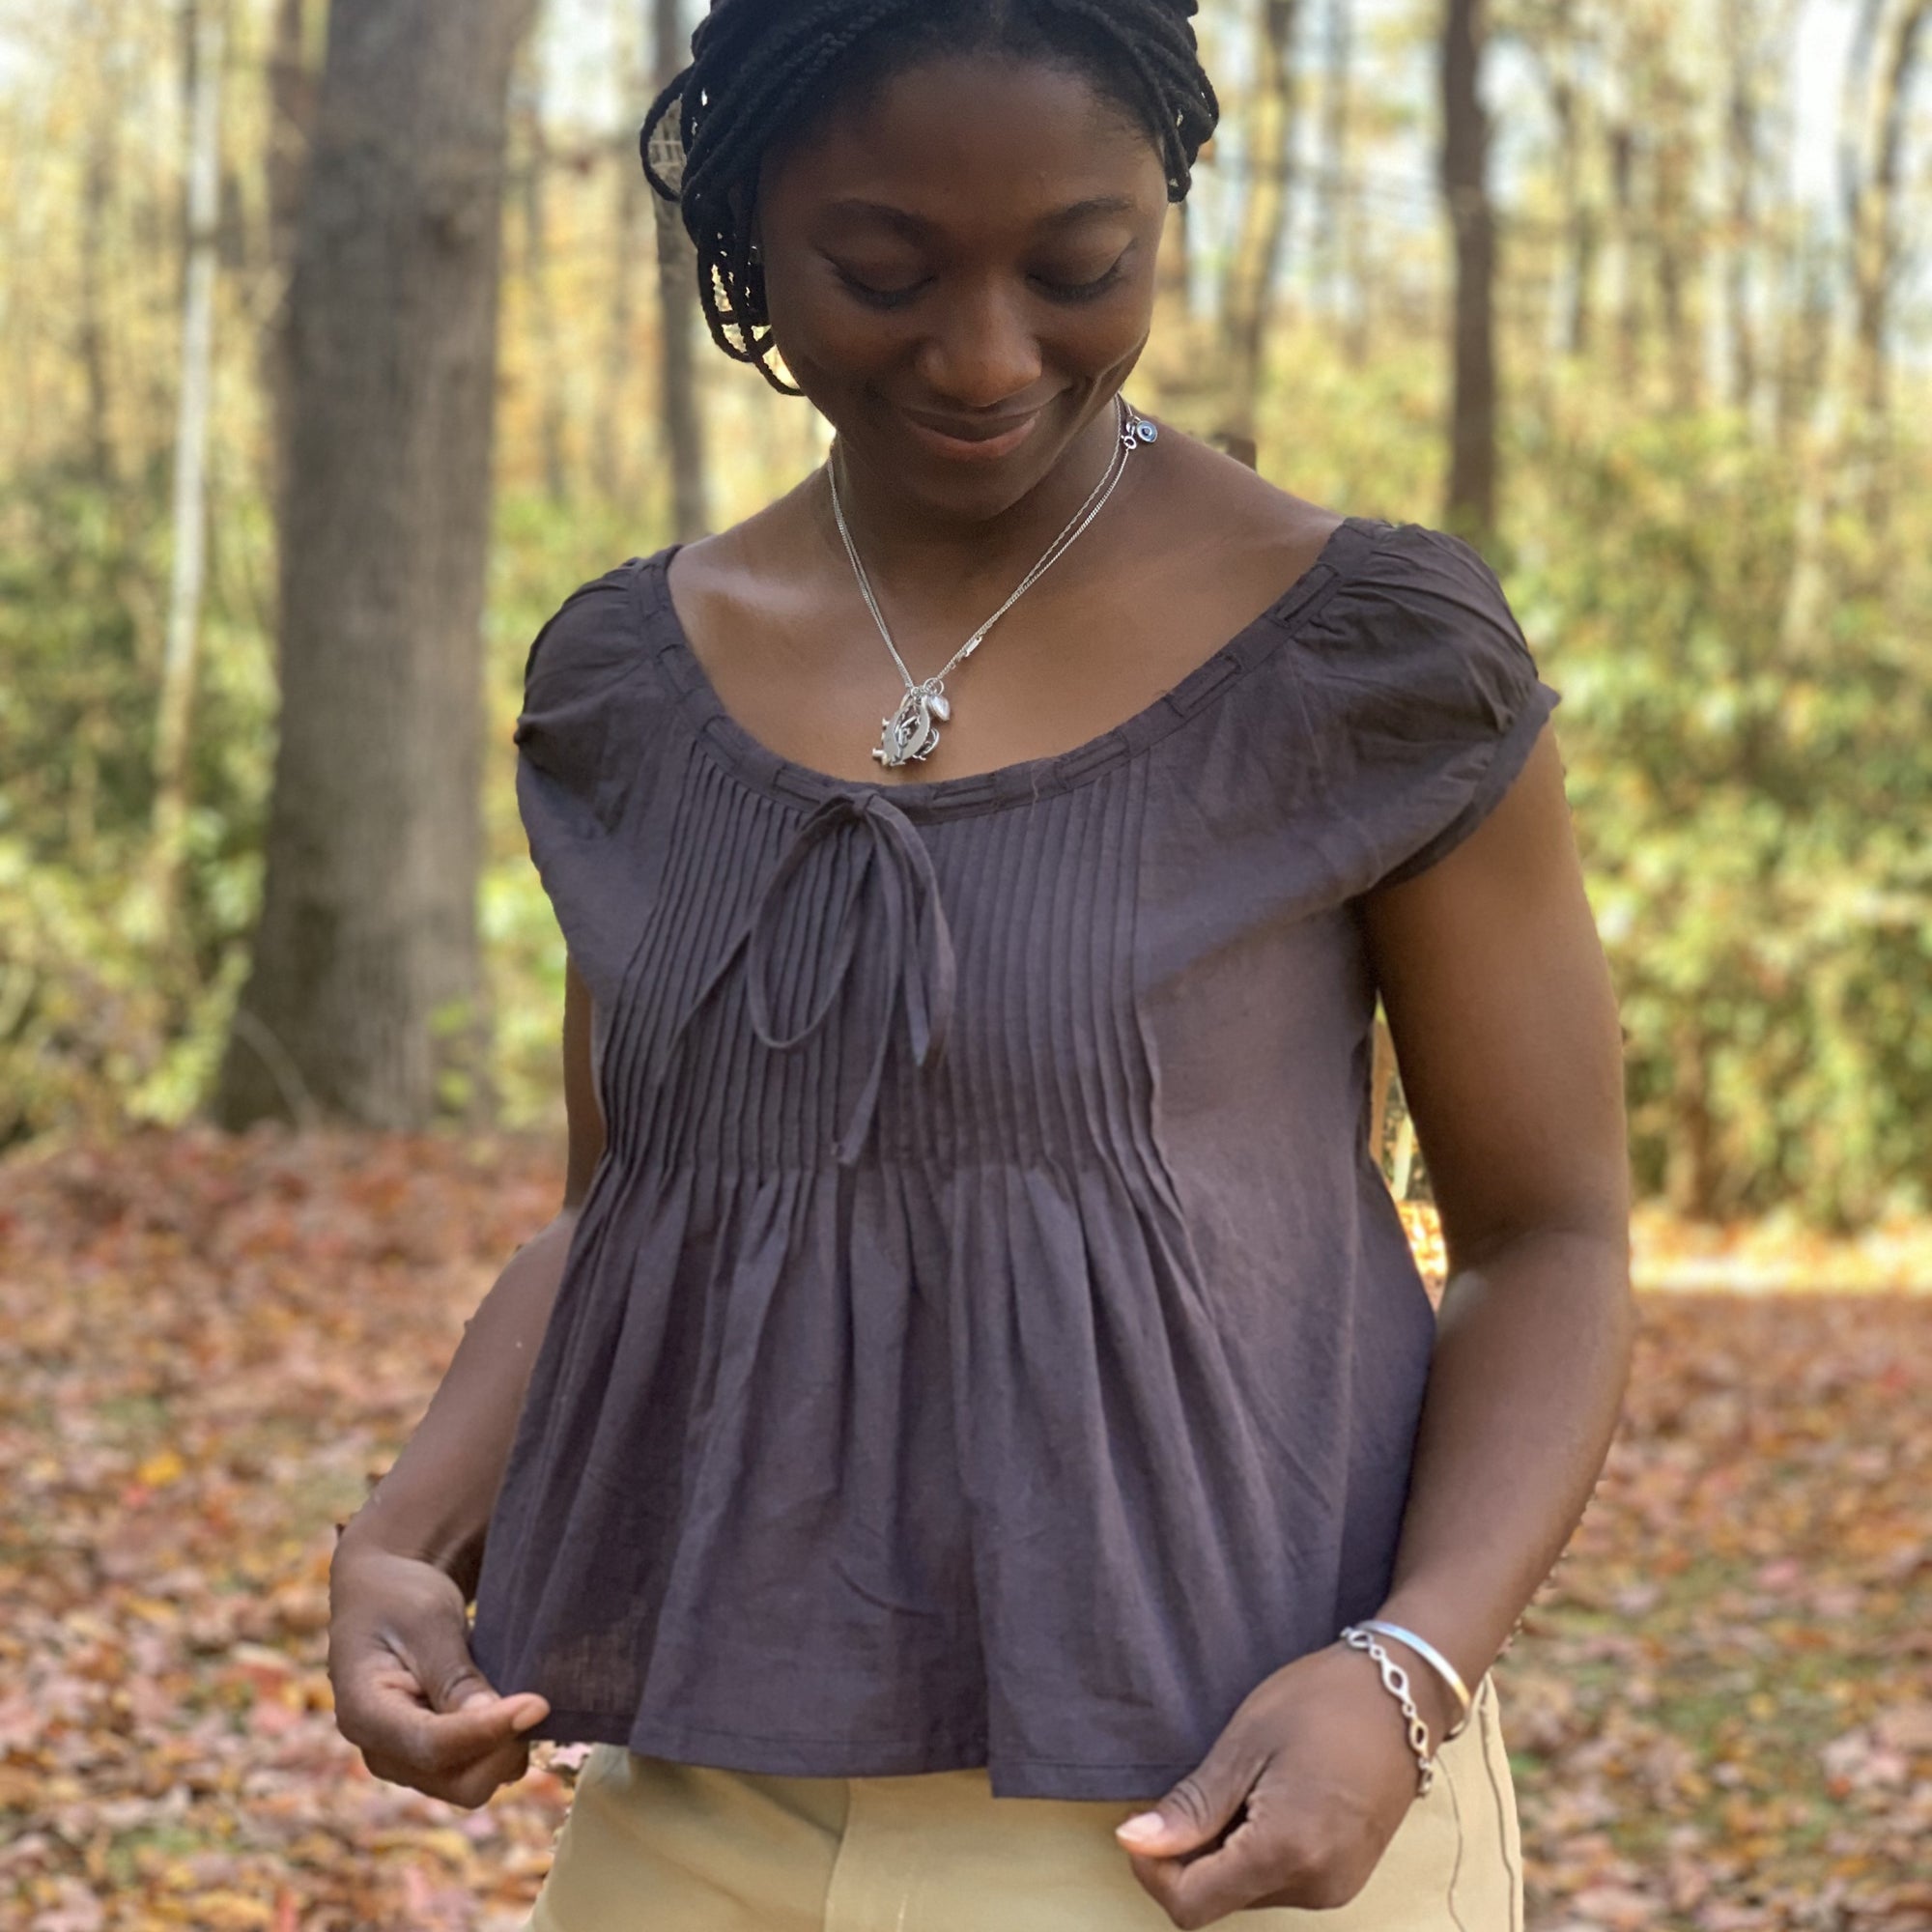
When it comes to lingerie, there are countless options to choose from. And Folkwear has been exploring our own designs of lingerie this year in particular, with our new 1950s-inspired patterns 510 Passion Flower and 511 Juliette's Dream. We also have the Edwardian 226 Princess Slip which makes great nighttime wear but could also be made for a more formal outing in my opinion. I've been thinking about making it recently into an everyday dress, so maybe I'll tackle that project soon. And lots of other vintage lingerie, undergarments, and nighwear patterns can also be great modern day daywear. However, this blog post will show you how I made another one of Folkwear's undergarment patterns into a blouse from the 223 A Lady's Chemise.
Folkwear's 223 A Lady's Chemise pattern is based on chemises that were worn in the mid- to late-1800s. Chemises were originally worn right next to the skin as a simple, practical garment to protect outer clothing (including corsets and stays) from sweat and body oils. However, over time, they evolved into a fashionable and seductive lingerie item. This vintage dress still resonates in style today, with baby doll style dresses, tops and lingerie with beautiful lace and bows.
Our chemise is a loose-fitting undergarment that can be made into a blouse or a dress, falling to whatever length you desire. It makes a great nightdress or a dress for everyday wear. I made a blouse and will show you the changes I made so that you can do it too!
Typically, the chemise was made from lightweight and breathable fabrics such as cotton lawn, voile, silks, lightweight muslin, and linen. For our pattern, you also need eyelet beading, lace or eyelet ruffles to finish and embellish the neckline and sleeves.
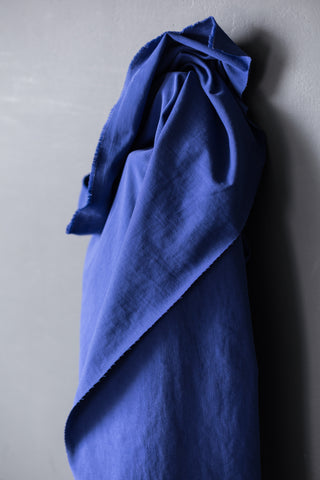
Folkwear suggests using silks, like crepe de chine and charmeuse, which would give it such a beautiful and luxurious look and feel (I don't know who doesn't love silk). Satin, cotton, or rayon challis and other lightweight fabrics such as batiste, lawn, voile, gauze, eyelet, and handkerchief linen would also work well. We recently have been loving our new cotton/linen blends from Merchant and Mills, its a great substitute for linen or cotton that would work really well. Our cotton voiles and Indian cotton are also light and breathable and would suit this garment as well. For this shirt, I used our cotton/linen blend in Blackberry. It is a bit hard to tell on the screen, but this fabric is woven like a chambray and looks different at different angles. It is very pretty! Check out or fabric collection, I am super proud of it right now, we have so many options and I just want to buy everything for myself.
Now to show you how I made this pattern into a shirt for myself. Not only did I shorten the pattern to make a blouse, I made some design changes as I went that were fun and gave me a look I was really pleased with. I love using my creativity when sewing to take a fabulous pattern and make it perfect for me (and you should too!). Lets begin!
Cutting the Pattern and Tracing the Pleats
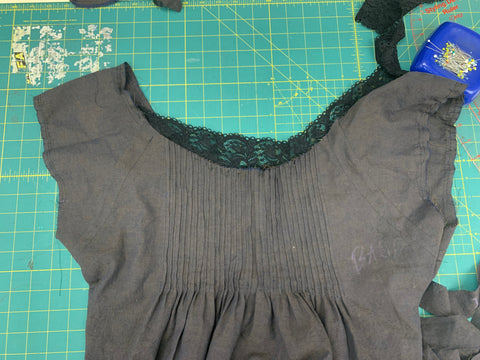
First, I traced the pattern in a size small. I wanted to make a shirt-length top, not a dress-length garment, so I shortened the front and back by cutting the pattern about 18.5" (47cm) from the top of the center front/back on the pattern piece (I did not use the lengthen/shorten lines, but you could!). The other thing to know about this pattern when starting, is that the front and back are cut and pleated, and then they are cut again after pleating to make the neckline (after the pleats are basted). This is to make the tiny pleats easier to manage. But it also gives you some flexibility about where you want your neckline to fall.
 I traced my pattern on tracing fabric (and to get the most out of this fabulous sewing product, we often tape sections together of previously used pieces to get full pattern pieces).
There are a LOT of pleat lines, but don't let that discourage you! The easiest way to transfer these markings to your fabric is to use tracing paper and a tracing wheel. If you don't have these tools, they are indispensable and last a very long time. 
I used a double tracing wheel here because I could set it to trace several lines at the same time.
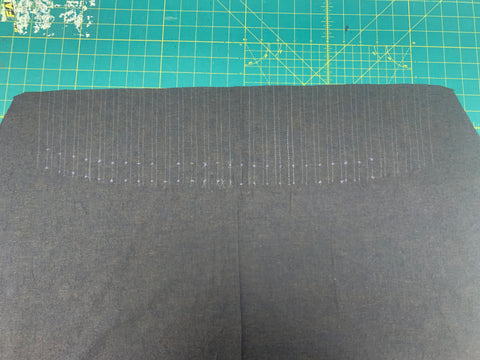
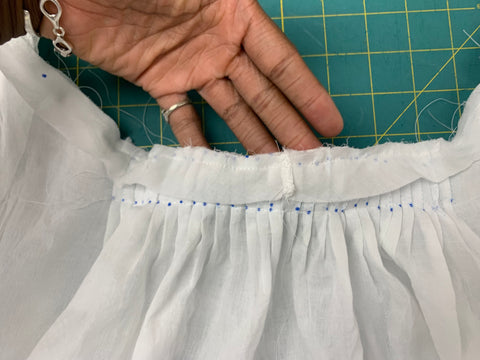
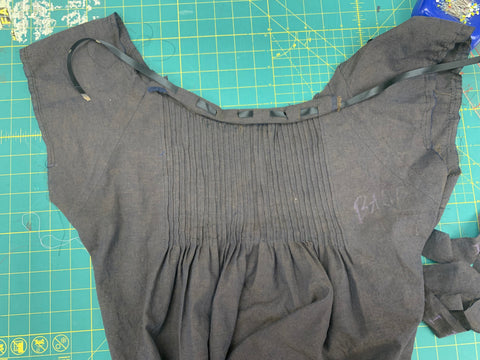
With wrong sides together, I folded along all the pleat lines lines with dots; bringing folds to meet the second line, in the direction of the arrows. I pin-basted the pleats lengthwise from the top edge to bottom dots. This will helped keep everything together. The pleats fall away from Center Back and Center Front.

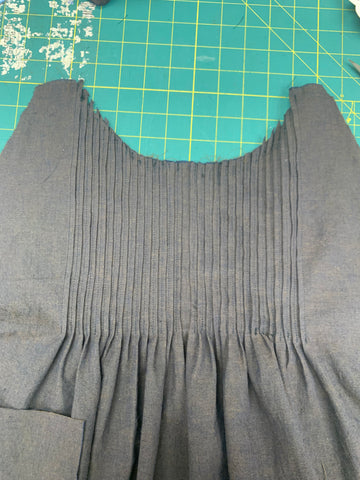
 Original pattern neckline template on my front.
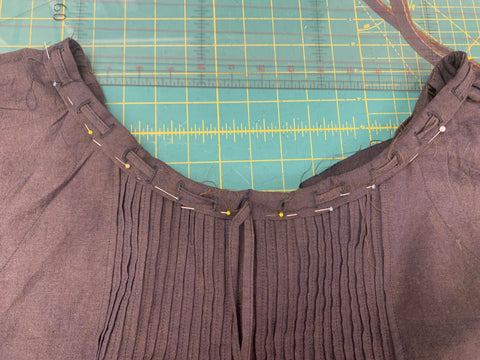
 Here I chalked a new cutting line, 1" above the template neckline. Note that by doing this I added to the shoulder of the pattern too. I could have made the chalk line go toward the original shoulder line, but I liked my pintucks too much, I guess.


This pattern has clever ways of covering the seams around the sleeves and neckline.


 My finished fabric ribbon.


by Esi Hutchinson
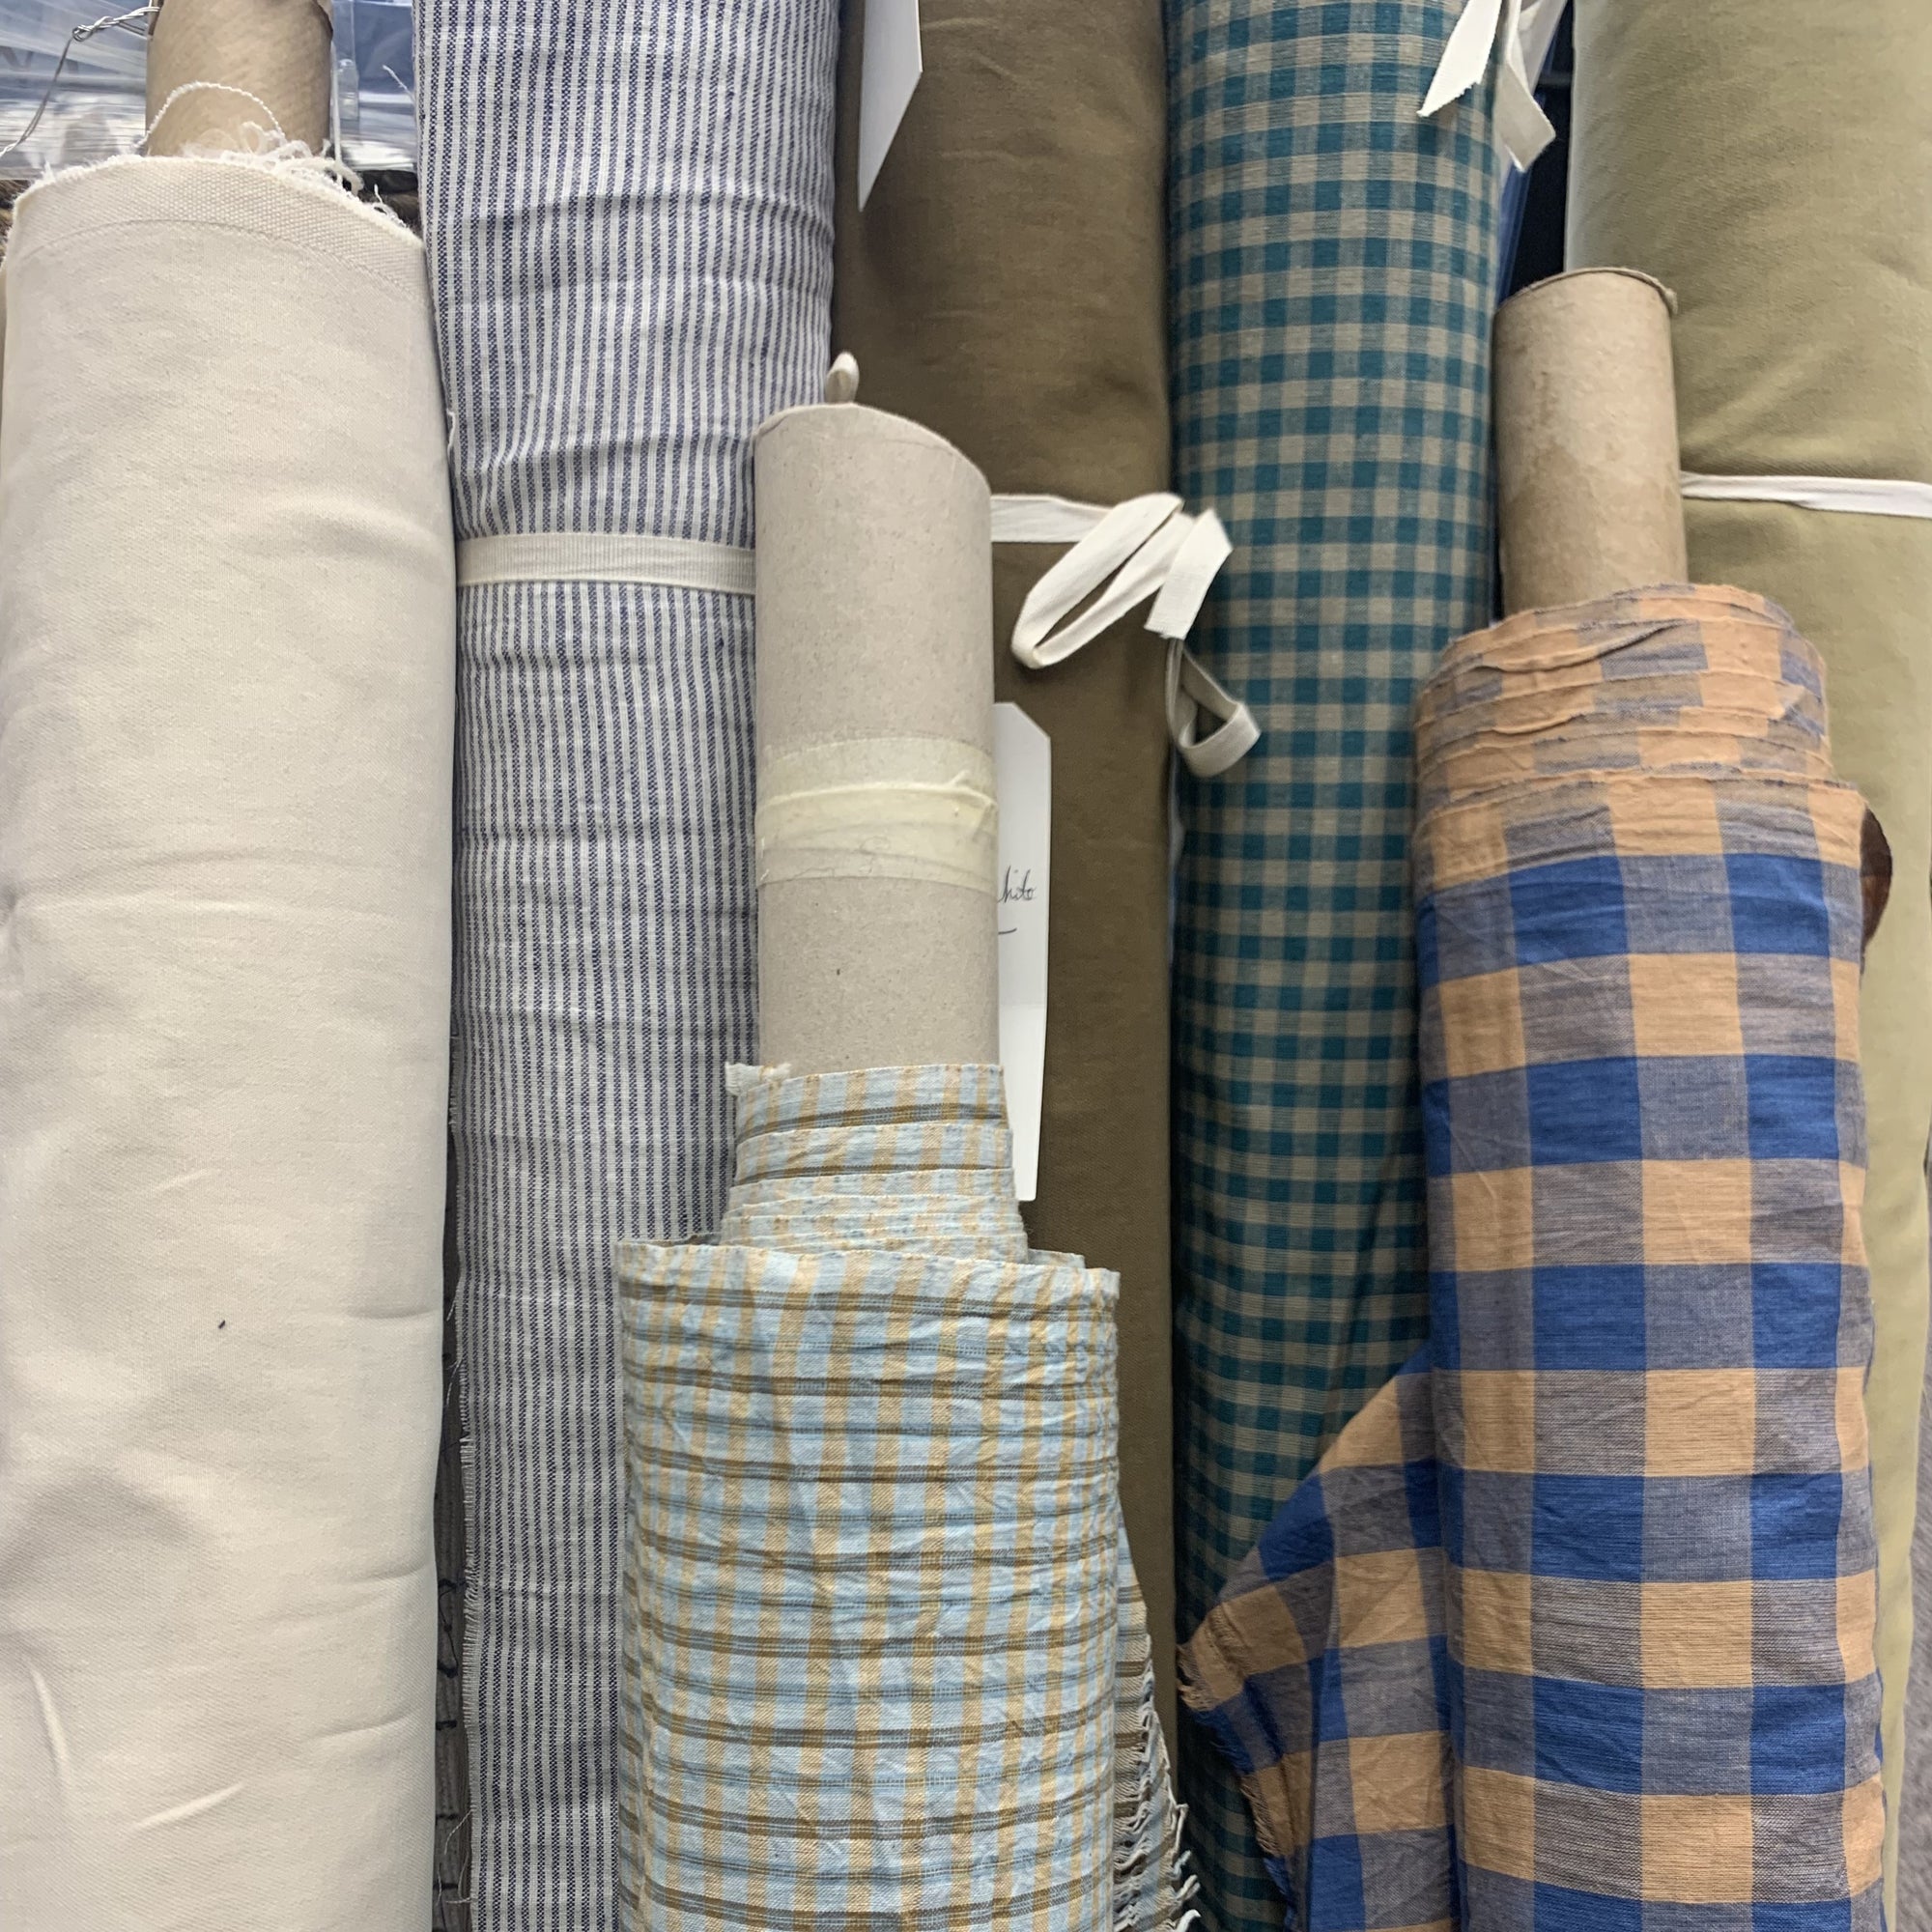
Folkwear has just gotten new fabrics in from Merchant & Mills, and already had a great collection of some fine wools -- all that are perfect for fall sewing. Molly and I are super thrilled about these fabrics that Folkwear just purchased. The colors blend so well together and compliment the beautiful hues of fall. I just had to show off some of Folkwear's fall fabric collection in a blog post!
I hope these inspire you to make something beautiful for yourself or a loved one. It's always exciting getting new fabric!
First is this soft cotton and linen blend in a teal and tan gingham. A versatile cloth that is a great alternative to linen. This fabric would be gorgeous for pattern such as 121 Guatemalan Gabacha, 123 Austrian Dirndl, 142 Old Mexico Dress, 210 Armistice Blouse and others.

Then, we have a lovely sky blue and peachy-orange gingham. This Indian cotton is very soft and lightweight and would work great for tops, shirts, and dresses. 271 Sunset Wrap, 117 Croatian Shirt, 107 Afghan Dress, 212 Five Frontier Shirts, 121 Guatemalan Gabacha and more.

We love this fine organic cotton twill that has a soft sanded finish on one side; in a beautiful classic Ecru color. Perfect for patterns like 229 Sailor Pants, 240 Rosie the Riveter, 231 Big Sky Riding Skirt, 230 Model T Duster as well as other pants, skirts and lighter weight coats and jackets. We also have this fabric in two darker shades (Sand and Tan) as well as Brick.

This is a beautiful plaid Indian Cotton in a sweet orange and pale sour blue. This would suit patterns like 131 Tibetan Chupa, 119 Sarouelles, 107 Afghan Dress, 112 Japanese Field Clothing, and 201 Prairie Dress.

I think this great black and white check cotton fabric fits the fall theme of plaid prints in a deep hue. Use it for patterns like 121 Guatemalan Gabacha, 270 Metro Middy, Basics Pinafore, 117 Croatian Shirt, and 222 Vintage Vests.
I love this cotton/linen blend and I can't wait to make a dress from it. It is a soft fabric in a medium to light weight with navy blue and white skinny stripes. A versatile cloth that is a great alternative to linen. It would look beautiful for 102 French Cheesemaker's Smock, Basics Pinafore, 112 Japanese Field Clothing, 123 Austrian Dirndl, 210 Armistice Blouse, 203 Edwardian underthings, and would be suitable for other dresses, tops, shirts, skirts, and loose fitting pants.

by Molly Hamilton
The cloche hat became popular in the 1920s. It was originally designed in France a decade or so early by milliner Caroline Reboux, and is named with the French word for "bell" because of its typical shape. The cloche generally features a small brim or no brim and was perfect for the new short women's hair styles of the early 1920s. It's popularity surged in the 1920s with new fashions and freedoms. The hat was a huge departure from the wide-brimmed hats that were popular in the previous era, and reflected the changing fashion trends and newfound liberation of women. The cloche hat continues to be a symbol of femininity, style, and the bold spirit of the 1920s.
Folkwear's 262 Spectator Cloche hat comes from the 262 Spectator Coat pattern, and features a wide cuff that is perfect to embellish with embroidery, applique, or other trims. It can also be made from a separate coordinating or contrasting fabric or left off entirely. We recently released this hat as its own PDF pattern!
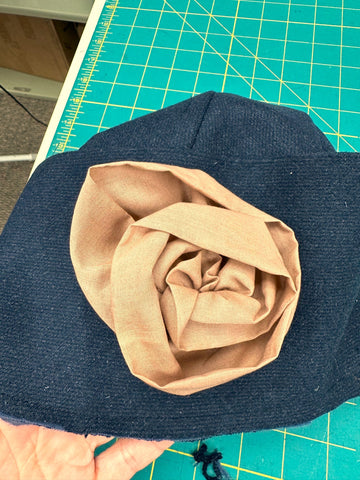
In this blog post, I am going to show you how I made the basic cloche hat. I also made a fabric flower to trim the hat and will share some tips for making one yourself. You can find instructions for making a fabric flower in this blog post.
Choosing Fabric
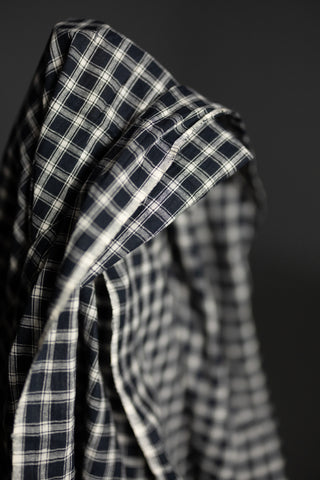
We have made three cloche hats in this office in the last several weeks, and each one was made with a different fabric. In general, you want to use a medium to heavy weight fabric to make a hat that holds its shape. I made the one for this post with a navy heavy weight wool blend from our collection (top photo). This fabric was perfect for a warm hat that is also sturdy. Esi made one with a cotton canvas and several layers of voile, which you can see in this post about making the 262 Spectator Coat.
And I made another that I hope to show off soon out of a lighter weight wool that we also have in stock - this vicuna wool. The photos below show the hat while I was working on it. I made the hat without the cuff and added a band of fabric that I added a ruching style to (from 123 Austrian Dirndl) and had pinned onto the hat to see how it looked. You can see the hat without the cuff, then with just a band of fabric, then with the ruched fabric. Which do you like best??


The possibilities for this hat are almost endless!
For the lining, a soft lightweight fabric is best. Think Bemberg, silk, satin, charmeuse, rayon, cotton voile. I used a navy cotton voile for the lining of this hat. Esi used a rayon/linen blend, and I used a scrap of silk charmeuse for my other hat. All were great!
Sizing
The hat comes in sizes XS to XL, which finish at 22½” (57.2cm) to 24-1/2" (62.2cm), respectively (measurements are in the pattern). However, this hat is cut on the bias which means that there is some movement or stretch that is built into the hat. You can adjust the inside ribbon band to make the hat larger or smaller by about 1/2" in either direction for whatever size you choose. So pick the size that you think works best for your head size (measure around the crown of your head), and adjust at the end of the hat making, if needed. I made my hats in size small and they fit great and did not need any adjustments. Esi made her hat size large to have more room for her hair and she was happy with that size also.
Cutting out the Pattern
For the cloche, you will need to cut one hat cuff, one hat front, and two hat backs from the main fabric and from the lining fabric. Be sure to cut the two back pieces so that they are opposites (i.e. if cutting one layer of fabric, be sure to flip the pattern piece print side down to cut the second one).
Sewing the Cloche
It is important to note that this hat pattern has a 3/8" seam allowance. This is to reduce bulk in the hat seams.
First, it is important to transfer the pattern marks to your fabric. For my wool blend hat, I decided tailor tacks would be the best way to mark the pattern. These are easy to remove and do not leave any marks that I have to wash out. Also my fabric was dark so I would have needed a white or light colored marking tool. I did not want to scrub or brush chalk out. Anyway, tailor tacks were perfect. To make tailor tacks, I used white thread and with a needle pulled the thread through the fabric at the mark on the pattern. I clipped the thread so that it marked on my fabric where the dots were located.

On the front pattern piece, I made the darts indicated on the pattern, sewing from the top dot to the dot at the bottom of the dart, with right sides of the fabric together. At the bottom of the dart, I sewed right off the fabric, cut the threads long and tied them by hand so I did not have backstitching at that point. At the top of the dart (top of hat), I backstitched to secure the thread. I matched the dots (not squares) at the top of the pattern, which I marked in the photo below with red dots so you could see it clearly. The other thread in the photo indicates the square at the top of the crown that we sew in the next step. This is important to note and make sure you sew the correct parts to make the darts. I sewed both darts on the hat front in this same way.


Now I sewed between the dot and the square, which I marked with a tailor tack - so I sewed the remaining seam at the top of the hat from my stitching (also marked by a tailor tack in the photo) to the other tailor tack. You can see how it is marked in the photo below.

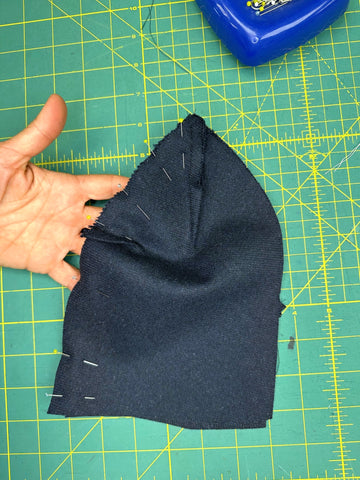
Next, I sewed the same type of dart at the top of the back hat pieces. And, then sewed the small dart on the center back of each back piece. I marked the smaller dart line with red in the photo below so you could easily see where it goes. This one is a little tricky because it is so small, but it just needs to be marked clearly. I marked the start of the dart with a pin and sewed to the tailor tack.

Once the darts are in the hat back pieces, I sewed both back pieces together at the center back seam, with right sides together. I made sure to match the two dart seams that come together at the center back.
Now I was able to sew the front and back of the hat together. At the top of the hat, several seams come together to create some bulk, but you can a seam jumper to help you get over the fabric hump. My seam jumper is just some plastic pieces that you use under the presser foot to keep the foot level even when it is going over bulky seams. You can barely see my seam jumper below just behind my presser food.


Front and back of hat pinned together.
I did all the same steps for sewing my lining pieces as I did for my main fabric pieces. I have a little tip for sewing the lining darts, or really starting any seam on very fine fabric like like fine cotton voile or silk. I use a scrap of tracing fabric under the seam. This gives the fabric stability and keeps the fine fabric from getting pulled into the feed. After the seam in sewn, I just rip the tracing fabric off and I'm left with a nice seam.

Starting my seam with a scrap of tracing fabric under my lining fabric to keep the fine lining from getting pulled into the feed.

Main fabric and lining ready to be put together.
Next I sewed the cuff of the hat by sewing the center back together on the main fabric and lining. Then I put the cuff lining and main fabric together with right sides together and matching notches and center back seam.

I turned the lining to the inside and pressed it so that the outer fabric was about 1/4" to the inside (so the lining would not show on the right side).
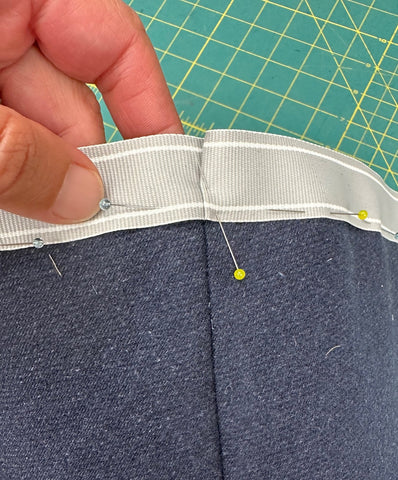
And then placed the lining inside the main part of the hat with wrong sides together. I basted the open edges together so they could be sewn without shifting.


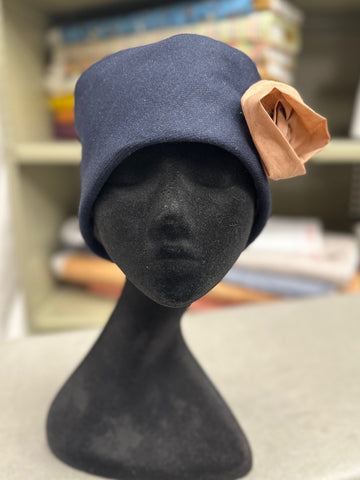


Back of cloche on a hat form.


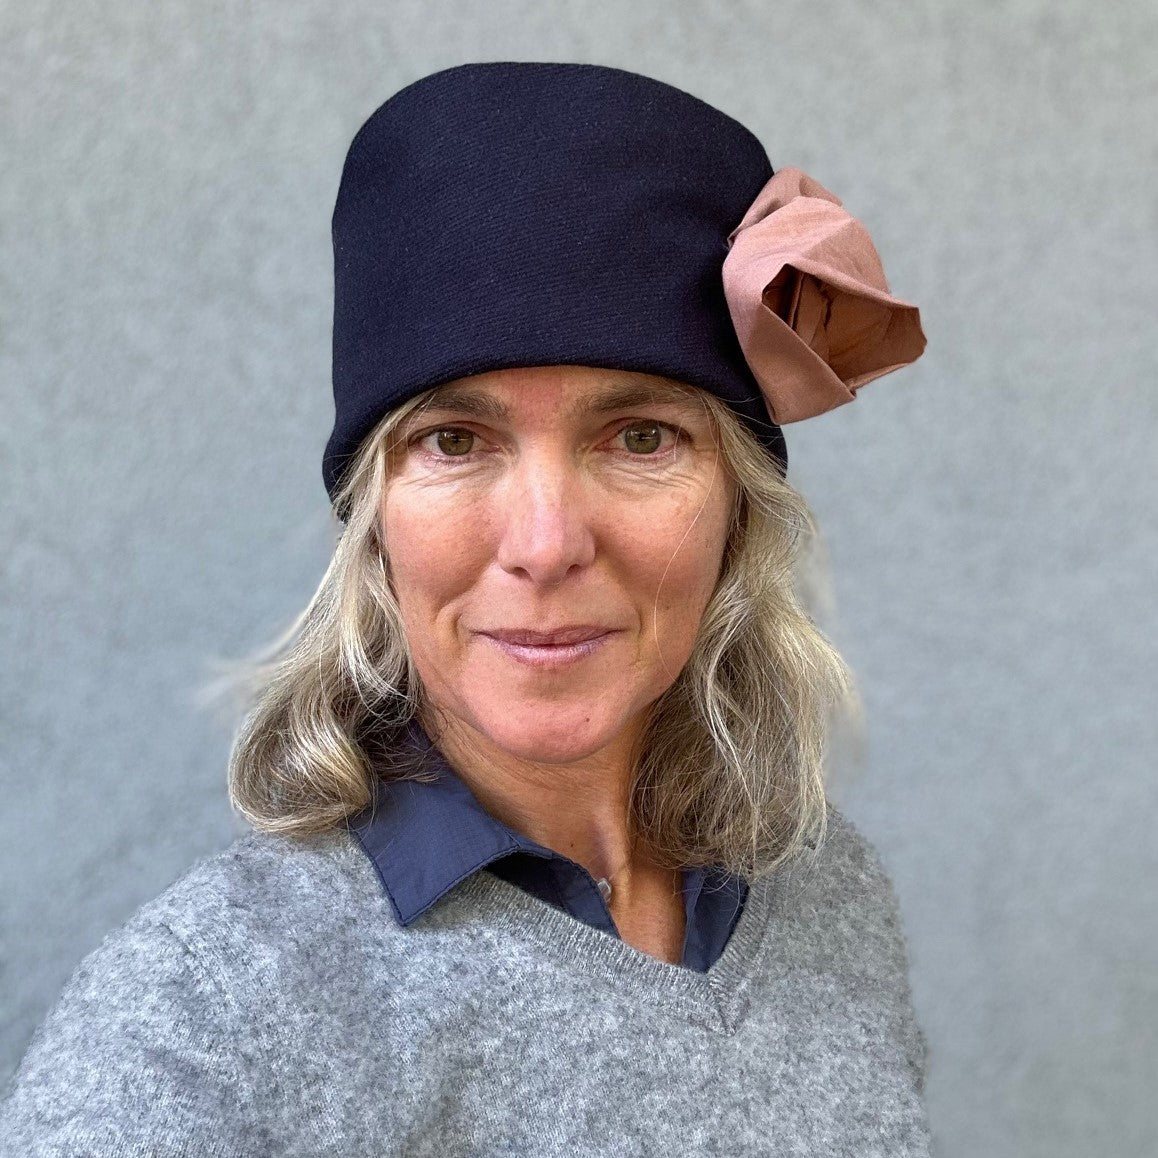
Cloche hat on me. It is quite warm!
Now, what hat are you going to make? What trim would you add to it? What other questions do you have about this hat? There are so many options! We would love to see what you make with this pattern!
by Molly Hamilton
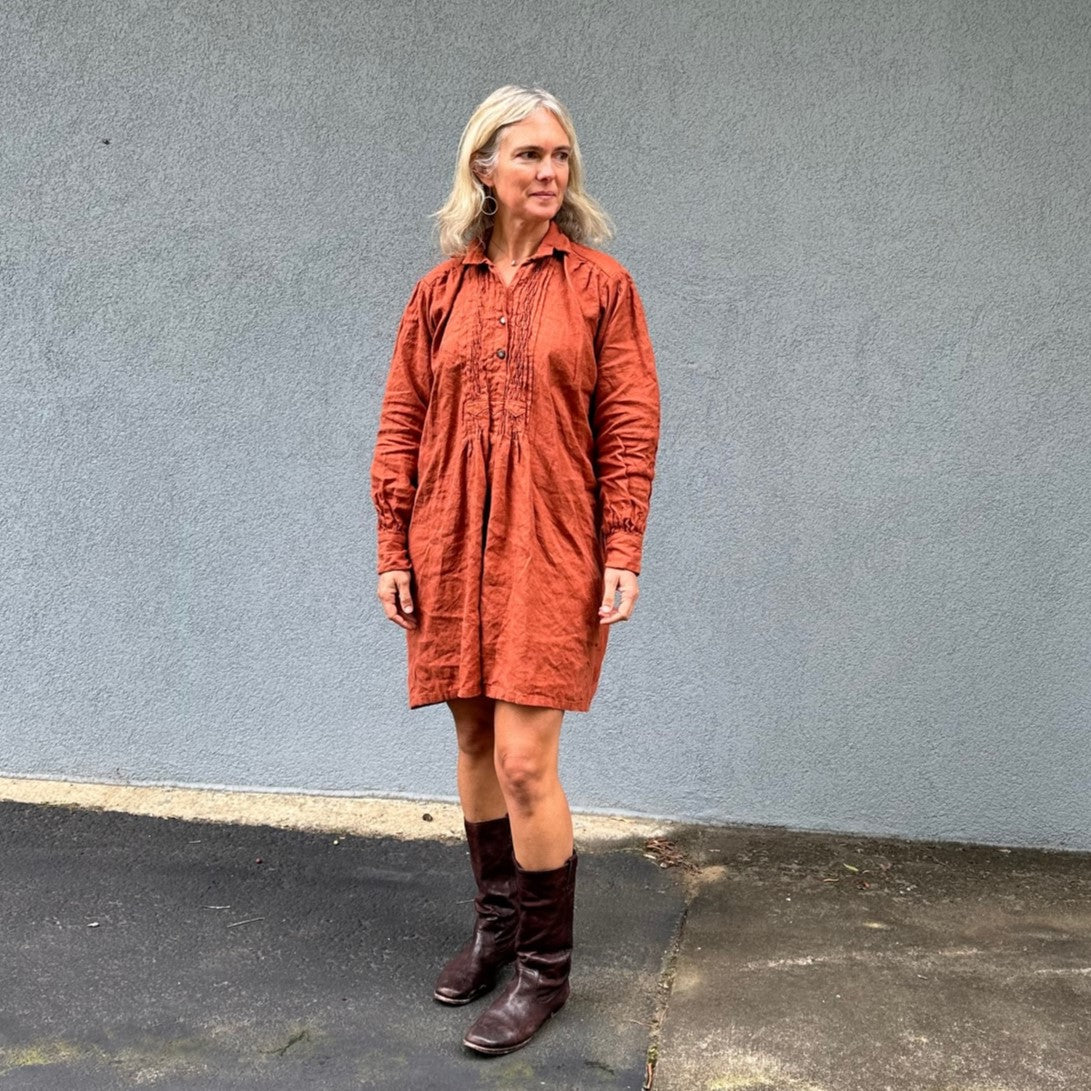
I have had a vision of making the 117 Croatian Shirt pattern into a dress for several years. I even bought the fabric I wanted to make it in and cut out the pattern. I just didn't get around to it until this summer. Sometimes I have to stop what I feel like is important work, like making new patterns, and work on what I want to work on, which might be doing something creative for myself. I also think it is important to focus on the amazing and wonderful old patterns that Folkwear has in its collection. These are truly unique and interesting patterns and I love working with them to make something new.
This summer I was cleaning out fabric and found this beautiful European linen I had bought from Merchant and Mills. It is a linen similar to this one, but mine was an autumn orange-brown. And I remembered I had bought it for making the Croatian Shirt which I wanted to be long enough to wear in the fall as a dress. I stopped what I was doing and started on the dress. The shirt pattern actually has two lengths marked on the pattern - one to make a shirt and one to make a mid-calf length dress. I shortened the dress-length to hit a little above my knee after it was hemmed, and cut out the pattern.

I was a little intimidated by the pintucks in this pattern, but slow and steady, as they say, and they came out fine (but not perfect). There are also a lot of pleats in this pattern - at the shoulders, neck, and cuffs - but giving each a little clip, as the pattern indicates, makes them very easy to manage. I also noticed that the number of pleats at the shoulder was incorrect in my paper pattern and I adjusted them to seven and centered them (this correction has been made in the PDF pattern).

I would not suggest using a linen of the type I used if you are wanting crisp pintucks and pleats. The linen relaxes and does not stay crisp. It also doesn't love to stay perfectly straight for making pintucks. But it was exactly the look I wanted.
 You can see the back and shoulder pleats here (dress is on a hanger for this photo!).
I had finished making the pintucks on the front of my shirt piece when I headed off to drive to Canada with my children. So I decided to use some of my travel time riding in the car (my oldest drove some of the way), making the honeycomb on the pintucks. This technique was easy and interesting and went fairly quickly. I got one side done in an hour or so riding in the car on the way to Canada, and the other side done on the way riding home. I used a slightly contrasting dark brown buttonhole thread to make the stitches. I liked using a thread that could be seen but was not as thick as perle cotton, and liked the contrasting color rather than using a matching color.

I found some buttons in our stash at the office that worked quite well to finish the project. I also like the curved cuff (and collar) on this dress. These little details make it a special piece.

I love how this 117 Croatian Shirt dress turned out! It is exactly what I was hoping for - a perfect fall-colored, cool-weather dress that I can wear with boots for now and add leggings or tights as the weather cools further. It is comfortable and pretty, and I love wearing something that has some history behind it.


