-
Sewing Patterns
-
Fabric
- Sewing Supplies
- About
- Blog
- Gallery
-
by Molly Hamilton
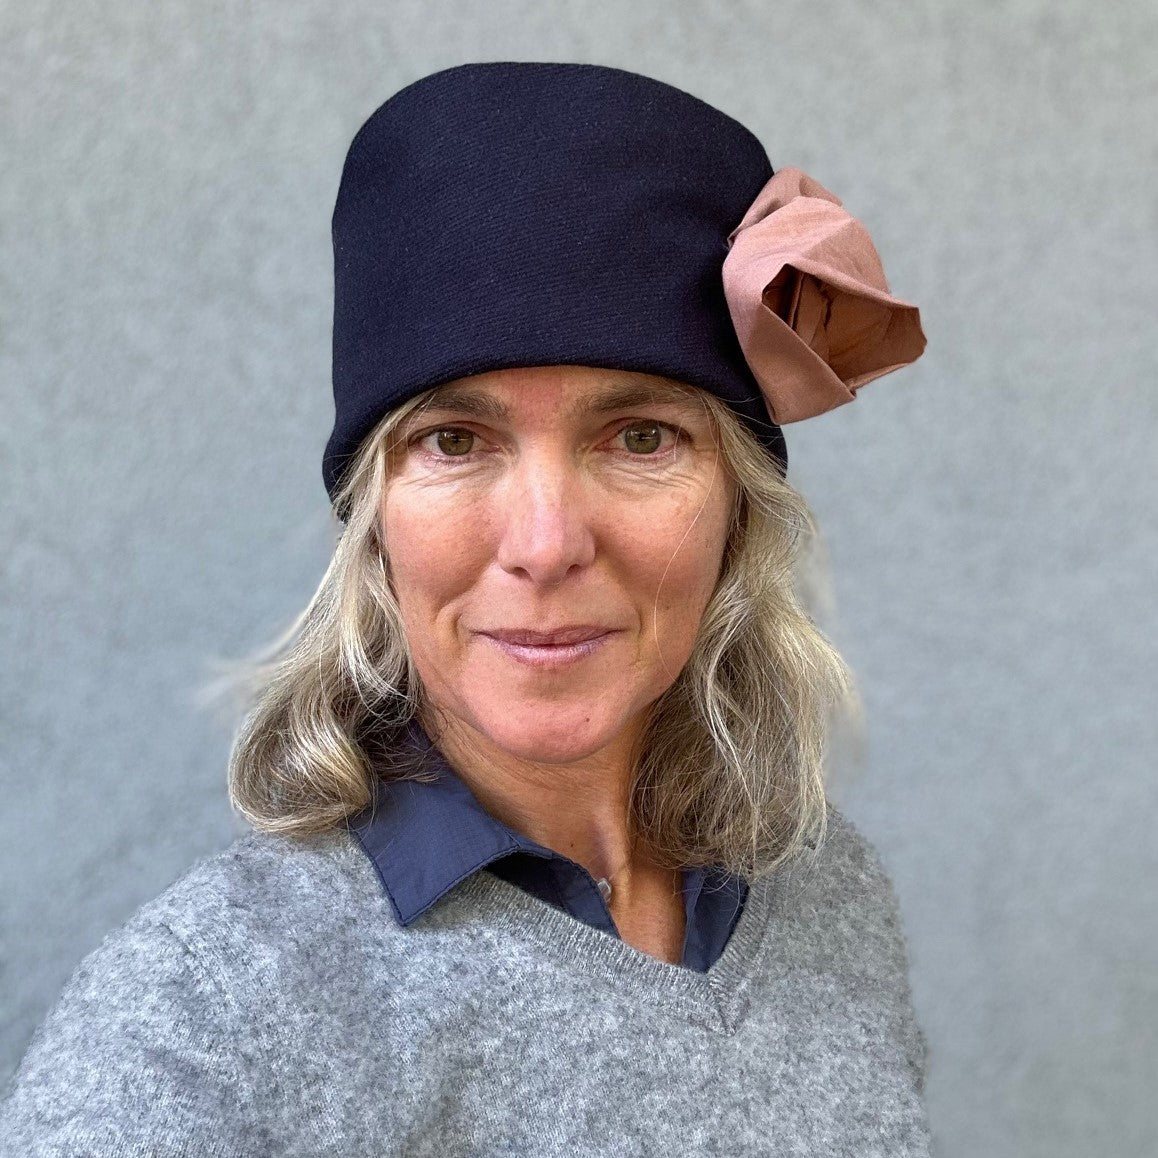
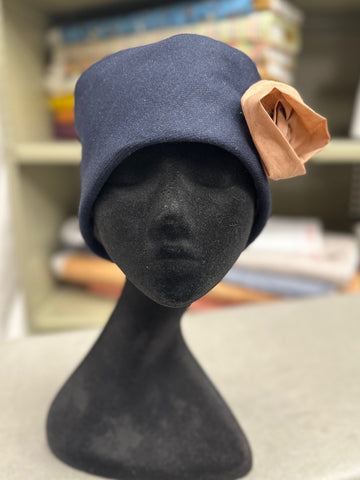
The cloche hat became popular in the 1920s. It was originally designed in France a decade or so early by milliner Caroline Reboux, and is named with the French word for "bell" because of its typical shape. The cloche generally features a small brim or no brim and was perfect for the new short women's hair styles of the early 1920s. It's popularity surged in the 1920s with new fashions and freedoms. The hat was a huge departure from the wide-brimmed hats that were popular in the previous era, and reflected the changing fashion trends and newfound liberation of women. The cloche hat continues to be a symbol of femininity, style, and the bold spirit of the 1920s.
Folkwear's 262 Spectator Cloche hat comes from the 262 Spectator Coat pattern, and features a wide cuff that is perfect to embellish with embroidery, applique, or other trims. It can also be made from a separate coordinating or contrasting fabric or left off entirely. We recently released this hat as its own PDF pattern!
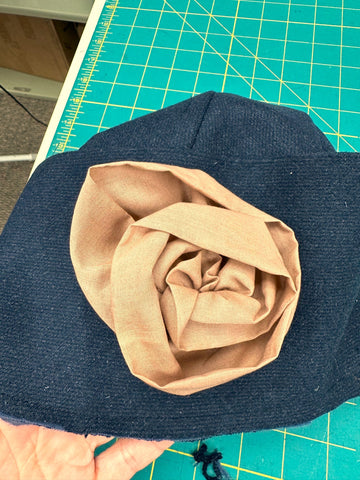
In this blog post, I am going to show you how I made the basic cloche hat. I also made a fabric flower to trim the hat and will share some tips for making one yourself. You can find instructions for making a fabric flower in this blog post.
Choosing Fabric
We have made three cloche hats in this office in the last several weeks, and each one was made with a different fabric. In general, you want to use a medium to heavy weight fabric to make a hat that holds its shape. I made the one for this post with a navy heavy weight wool blend from our collection (top photo). This fabric was perfect for a warm hat that is also sturdy. Esi made one with a cotton canvas and several layers of voile, which you can see in this post about making the 262 Spectator Coat.
And I made another that I hope to show off soon out of a lighter weight wool that we also have in stock - this vicuna wool. The photos below show the hat while I was working on it. I made the hat without the cuff and added a band of fabric that I added a ruching style to (from 123 Austrian Dirndl) and had pinned onto the hat to see how it looked. You can see the hat without the cuff, then with just a band of fabric, then with the ruched fabric. Which do you like best??


The possibilities for this hat are almost endless!
For the lining, a soft lightweight fabric is best. Think Bemberg, silk, satin, charmeuse, rayon, cotton voile. I used a navy cotton voile for the lining of this hat. Esi used a rayon/linen blend, and I used a scrap of silk charmeuse for my other hat. All were great!
Sizing
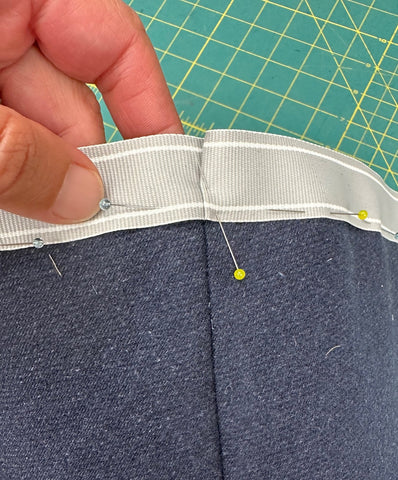
The hat comes in sizes XS to XL, which finish at 22½” (57.2cm) to 24-1/2" (62.2cm), respectively (measurements are in the pattern). However, this hat is cut on the bias which means that there is some movement or stretch that is built into the hat. You can adjust the inside ribbon band to make the hat larger or smaller by about 1/2" in either direction for whatever size you choose. So pick the size that you think works best for your head size (measure around the crown of your head), and adjust at the end of the hat making, if needed. I made my hats in size small and they fit great and did not need any adjustments. Esi made her hat size large to have more room for her hair and she was happy with that size also.
Cutting out the Pattern
For the cloche, you will need to cut one hat cuff, one hat front, and two hat backs from the main fabric and from the lining fabric. Be sure to cut the two back pieces so that they are opposites (i.e. if cutting one layer of fabric, be sure to flip the pattern piece print side down to cut the second one).
Sewing the Cloche
It is important to note that this hat pattern has a 3/8" seam allowance. This is to reduce bulk in the hat seams.
First, it is important to transfer the pattern marks to your fabric. For my wool blend hat, I decided tailor tacks would be the best way to mark the pattern. These are easy to remove and do not leave any marks that I have to wash out. Also my fabric was dark so I would have needed a white or light colored marking tool. I did not want to scrub or brush chalk out. Anyway, tailor tacks were perfect. To make tailor tacks, I used white thread and with a needle pulled the thread through the fabric at the mark on the pattern. I clipped the thread so that it marked on my fabric where the dots were located.

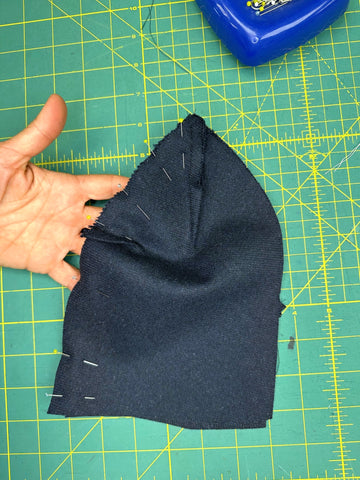
On the front pattern piece, I made the darts indicated on the pattern, sewing from the top dot to the dot at the bottom of the dart, with right sides of the fabric together. At the bottom of the dart, I sewed right off the fabric, cut the threads long and tied them by hand so I did not have backstitching at that point. At the top of the dart (top of hat), I backstitched to secure the thread. I matched the dots (not squares) at the top of the pattern, which I marked in the photo below with red dots so you could see it clearly. The other thread in the photo indicates the square at the top of the crown that we sew in the next step. This is important to note and make sure you sew the correct parts to make the darts. I sewed both darts on the hat front in this same way.


Now I sewed between the dot and the square, which I marked with a tailor tack - so I sewed the remaining seam at the top of the hat from my stitching (also marked by a tailor tack in the photo) to the other tailor tack. You can see how it is marked in the photo below.

Next, I sewed the same type of dart at the top of the back hat pieces. And, then sewed the small dart on the center back of each back piece. I marked the smaller dart line with red in the photo below so you could easily see where it goes. This one is a little tricky because it is so small, but it just needs to be marked clearly. I marked the start of the dart with a pin and sewed to the tailor tack.

Once the darts are in the hat back pieces, I sewed both back pieces together at the center back seam, with right sides together. I made sure to match the two dart seams that come together at the center back.
Now I was able to sew the front and back of the hat together. At the top of the hat, several seams come together to create some bulk, but you can a seam jumper to help you get over the fabric hump. My seam jumper is just some plastic pieces that you use under the presser foot to keep the foot level even when it is going over bulky seams. You can barely see my seam jumper below just behind my presser food.


Front and back of hat pinned together.
I did all the same steps for sewing my lining pieces as I did for my main fabric pieces. I have a little tip for sewing the lining darts, or really starting any seam on very fine fabric like like fine cotton voile or silk. I use a scrap of tracing fabric under the seam. This gives the fabric stability and keeps the fine fabric from getting pulled into the feed. After the seam in sewn, I just rip the tracing fabric off and I'm left with a nice seam.

Starting my seam with a scrap of tracing fabric under my lining fabric to keep the fine lining from getting pulled into the feed.

Main fabric and lining ready to be put together.
Next I sewed the cuff of the hat by sewing the center back together on the main fabric and lining. Then I put the cuff lining and main fabric together with right sides together and matching notches and center back seam.

I turned the lining to the inside and pressed it so that the outer fabric was about 1/4" to the inside (so the lining would not show on the right side).
And then placed the lining inside the main part of the hat with wrong sides together. I basted the open edges together so they could be sewn without shifting.


Back of cloche on a hat form.


Cloche hat on me. It is quite warm!
Now, what hat are you going to make? What trim would you add to it? What other questions do you have about this hat? There are so many options! We would love to see what you make with this pattern!

You can easily add embroidery to the cuff of the 119 Sarouelles Indian pants version. The pattern comes with 4 embroidery patterns that can be used on the cuff (or you can create your own!), and lots of instruction. These embroidery patterns are designed for using your basic sewing machine to do the embroidery, though you can do it by hand if you like. You will be amazed at how quickly and easily these designs and techniques work up.
I am showing a sample here of one of the patterns worked up on a cuff facing. Normally, you would do the embroidery right onto the pants leg, and face it with the facing (in the back).
Also know that your embroidery design does not need to match when the leg seam is sewn. Having unmatched embroidery design at the seam is very authentic.
What You Will Need
Transferring the Design
We provide 4 embroidery designs for the cuffs of these pants, and they can be worked a variety of ways. You can transfer the designs freehand (I like to use a washable fine tip marker for this, but I'm not always great at freehand, especially with precise corners!). Or, you can use dressmaker's carbon and a tracing wheel. Working on a hard surface, secure the fabric and facing design right side up on the cuff. Make sure you have the design 3/4" above the raw edge. I used a couple of pattern weights when I did this sample, but the removable tape we sell would also be great! Slide the tracing paper (carbon side down) under the pattern and trace the design with the wheel, pressing firmly.


Embroidery Hints
Be sure to stabilize your fabric before embroidering. I used a medium weight iron-on interfacing.
It helps to adjust the tension of the top thread to achieve a smoother look. The top thread should be slightly pulled to the underside of the fabric. You can test the tension before you start (though I did it in the first pass I did).
When making sharp curves or corners, always stop stitching with the needle down in the fabric then lift the presser foot and rotate the fabric.
I used a zigzag stitch for this sample - with a stitch length of 0.8 and a width of 2.5.
Press the embroidery with it facing down when finished.
For straight stitching, use machine embroidery thread top-stitching thread or strong quilting thread so it will be clearly seen.
Start working on the bottom row of the design and move up toward the top of the cuff, which will be the last row you do.
You could add trim, rick-rack, or soutache instead of embroidery, especially on the very geometric designs (like this one). Or, try different color and types of thread.

Stitching on top of the copied design - narrow zigzag.


Adding new colors.

Finished cuff (this is a sample made on a cuff facing), but that's the design. I like it! Maybe time to try it on a real pair of Sarouelles.
From the mid 17th century, and to this day, the well-dressed gentleman has never considered his costume complete without some form of neckwear. In 1636 the cravat became fashionable – after the custom of the Croats or Cravates serving in the French army, who wore a length of cloth around their necks to protect the throat.
The first cravats were wound around the neck and usually tied in a bow or with a black ribbon. In 1692, the Battle of Steinkirk (in Belgium) introduced a new fashion. The French cavalry, surprised by the enemy, rushed to the attack with the ends of their cravats flying or carelessly twisted and drawn through a buttonhole. The casual style popularized by their victory was taken up by women as well as men.
For several decades following, the cravat gave way to a neck cloth that was pre-folded and fastened in back – the stock. In the 1770s, a vogue for pastoral English tastes brought back the unconstructed cravat in the form of a large triangle or square of the finest linen or muslin.
After 1830 the collar began to turn down over the cravat, which evolved into the bow tie, the ascot, and the four-in-hand.
Today, the cravat is fashionable for men and women. It can compliment your outfit, provide a splash of color, and keep your neck warm. My British father-in-law wore one nearly everyday of the winter – under his dress shirts or denim work shirts. It gave him an air of gentility, and is a fun and useful accessory. The instructions provided below create a cravat similar to what he wears, or you can download them here. Simple to make and simple to wear, this pattern is a fun and quick make - a great holiday gift for anyone in your life.
Construction
The size and shape of cravats have varied over the centuries. In their earliest manifestation (c. 1680), they consisted of a rectangular strip of very fine lawn, the ends often trimmed with lace. By the end of the 18th century, a folded square or triangle had been adopted, folded into a band, with endless varieties and subtleties of knots. Early in the 19th century, cravats were pre-knotted and mounted on a fixed collar that fastened in the back by a button or a pin, although free-tying cravats were still used. Folkwear also offers the triangular cravat pattern in our 217 Poet's Shirt pattern, which is a versatile and adaptable for modern fabrics and fashions.
Choose fabrics that are fine, soft, and have a good drape. Often, modern cravats are made with paisley print silk or other printed patterned silk, with a soft and plain colored cotton lawn as backing.
This cravat
This cravat pattern is based on cravats my father-in-law wore all winter. They are made of silk paisley print and cotton fabric. They are pleated in the center for ease of wear and are very stylish. You can see the way he ties and wears his cravat at the end of this post.
Seam allowance for this pattern is 1/4".
MATERIALS
CUTTING AND MARKING
Wash and press fabric before beginning.
Cut one rectangle each from the silk and cotton measuring 42" long by 6" wide, each. To see pattern drawings, you can view or download this article as a PDF here.
Note: Most markings can be made just on the cotton piece (which can be a plain color and therefore easier to see markings). Use tailor's chalk, or your favorite marking pen/chalk/pencil/etc.
Mark a line across the center of the fabric (across your fabric at 21"). Line is perpendicular to the long sides.
Make two more lines, one 6 3/4" on each side of this center line. These will be your stitching lines when sewing down the pleats.
Mark a line, perpendicular to the long edge, 3 1/2" from each end of the long rectangle.
Mark the center of each short end of the rectangle and draw a line from the center to 1/4" inside the above line, on each side, to form a triangle. Transfer these diagonal lines to the other side of the fabric also. You will be stitching along these lines in the next step.


SEWING THE CRAVAT
Use 1/4" seam allowance.
Place right sides of fabrics together (I would consider the chalk marked side of the cotton to be the "right side"). Pin and sew 1/4" seam allowance on the long sides of the cravat. At the short ends, sew along 3 of the 4 diagonal lines formed in the previous step.
Turn right sides out. Press so that the ends form a nice flat triangle. You will be hand stitching one side end closed later.

Now it is time to form the pleats.
Draw, with chalk, horizontal lines every 1/2" from the top edge, going perpendicular to the 3 center lines. These marking lines should only go from the left-hand vertical line, crossing the center, to the right-hand vertical line. They do not need to go further.
Start folding from the top, place each horizontal line on the second one below it, so that you have 3 horizontal pleats. Press pleats.

Stitch across pleats along the 3 vertical stitching lines, backstitching at beginning and end to secure thread.

Whipstitch diagonal end closed.

How to wear:
This is how my father-in-law ties and wears his cravats.
First, hang this cravat around the back of your neck with one end shorter than the other.

Then, wrap the longer end around the shorter end two times.

Then, tuck the long end behind the wrap and bring it to the front and tuck it into the font of your shirt.


Here in Western North Carolina we are feeling the season change. The days are are shortening, the evenings are cool, and the leaves have turned and are dropping. So, naturally we start looking ahead to the cozy months, months of sewing and creativity . . . and of course the Holidays! Below, we have a list of wonderful gift ideas that you can make from Folkwear patterns so you can get a jump start on your handmade holiday gifts.
Quick for Children:
109 Little Folks PDF Pattern
An international collection, featuring eight(!) patterns and a variety of optional handwork techniques. This pattern is no longer available as a paper pattern, but we have an easy to use PDF available! Dress your sweeties up in a Japanese Kintaro, Mexican Dress or Baby Shirt, Korean Booties, Nepali Chupa, Moroccan Djellaba, or Turkish Tunic and Bloomers. These are easy and quick patterns, and you can make them more personalized with embroidery, homemade tassels, or other handwork which are included in the instructions (or adorable monograms).

225 Childhood Dreams (image above)
Although, this pattern cam be made for day dresses of even special occasions, it also has all the makings for a really nice nightgown. The choice of fabric and trim can change the look and use of this garment. It was always a Christmas Eve tradition in my family to open a gift of new sleepwear. This has carried on from my parents to my children. This would be a perfect pattern for that tradition.
What traditions do you have for family's Holiday?
Wearable and Quick with Little-to-No Sizing or Fitting Required

I'm a sucker for a great hat! It's always fun to find one that is both interesting and practical. This patterns shows options for decorative fabric rosettes that can be fashioned out of the hat fabric, contrasting materials such as lace, tulle, or glittering silk, or entirely replaced by a vintage brooch or dramatic button. This pattern can be made in 3 sizes, and there are just three pattern pieces: Brim, Band, and Crown. Constructing this in a wool or felt will certainly help keep your loved one warm!
For the person who has everything! This unique gift provides warmth and protection for the toes with flip flops or by themselves as comfortable at-home slippers to protect your floors. Traditional to Japan . . . . A quick, easy, and inexpensive gift!
You can make three garments from this pattern - all of them easy to fit (with lots of ease built into the patterns). The Hapi is a shorter, unlined cardigan-type jacket that is easy to sew. The Haori is slightly longer, lined, and similar to a kimono. This pattern also comes with the Japanese Tabi sock pattern. These are great garments to make for women or men (sized for both), and are perfect lounge-wear, though I made a Hapi for myself that I use as a light jacket to wear out and about.

This classic pattern is for an unlined kimono (yukata) and is a great gift for anyone (sized for women and men). Our pattern includes instructions for shibori dyeing, sashiko embroidery (image above), and for making an obi or sash. So, you can make this a unique gift.
A unique gift, this cape is dramatic when worn un-traditionally over modern clothing. On trend right now too! Our pattern details different ways of wearing and draping the finished garment. No fitting required - just a vision and some great fabric.
For the Home:
This pattern has 7 parts to choose from. The piece that really stands out for me (sweet and simple) is the Potpourri Sachet! This would be a fun thing to make and have for quick gifts for friends and family - and you can use up your awesome fabric scraps. There is a recipe for the potpourri blend or you can get creative with your own blend.
This pattern has 5 parts to choose from. The Teddy Bear would be so sweet with many fabric choices. The Pillow Sham has great potential for customization with fabric choice, added embroidery, or applique. Kids love gifts with their name or favorite things featured on them. The size of the Quilt would make a nice throw for anywhere in the home (not limited to cribs)!

This popular pattern has 8 parts to choose from. The pattern includes tips for handwork and dyeing techniques. The Decorative Curtains (Noren) would be a great way to show off some of your handwork skills! There are 3 different shapes of pillows to choose from as well. An adaptation for these could be to make them heat friendly (filling with buckwheat or rice and dried herbs), and use them to warm up on a chilly day! Or, do your own indigo dying and make the pillow covers or quilt. Oh, did I mention Quilted Sleeping Kimono adaptation instructions using 113 Japanese Kimono?
------------
We hope this helps you with some great ideas for gifts to make your friends and family this holiday season. To make it easier for you, all of these patterns will be on sale through November! And, keep a look out for our Black Friday/Cyber Monday sales at the end of the month.
And, we would love to see what you make! Tag us on social media (#folkwearpatterns) or send an email!
Happy sewing!!

The Greek Island Dress is a great garment to use with sheer flowing fabrics, but these fabrics can be a bit tricky to work with. Here are some tips to help you before you begin to cut into and sew with those wonderful and fun (but maybe intimidating) fabrics.
These tips, plus quite a few more (including tips on sewing with lace) are included in the #266 Greek Island Dress pattern. Happy sewing . . . with sheers!
I love the great small businesses that stock Folkwear patterns! They are fabric stores, sewing supply shops, online retailers, specialists in historic costuming, and on and on. Folkwear can be found in their shops all through the US, and also in Canada, the U.K., the Netherlands, and Germany. These stores and shops are committed to providing high quality sewing supplies and fabulous customer service. You can see a list of all the companies who stock Folkwear patterns on our Stockist page.
I am going to occasionally post short interviews with Folkwear stockists here on the blog, so you can learn about these great small businesses and check out what else they do.
Bonnie's Pattern Shop has been selling Folkwear patterns for over 8 years.
Tell us a little about your business.
I began selling patterns online around 2001, and it quickly grew. I offer a wide range of patterns (over 350 different patterns!) for the family, home, pets, and crafts. I specialize in designs from independent pattern companies not found in most stores. I offer many patterns for historic costumes ranging from medieval through the mid-1900s. I have a large selection of patterns for Colonial, Pioneer, Victorian, Western, and Civil War ear clothing.
I also carry many patterns for Native American moccasins and costumes for Pow Wows. I offer many patterns for gymnastics and skating costumes as well. My customers have included movie, TV, and theater production companies. I love being in the pattern business.
How can people find you?
I am on several sites: www.bonniespatternshop.com
eBay: http://stores.ebay.com/Bonnies-Pattern-Shop
Etsy: https://www.etsy.com/shop/BonniesPatternShop?ref=si_shop
Facebook: https://www.facebook.com/bonniespatternshop/
Anything else you want to let us know about?
Customer service is extremely important! I take care in preparing packages to arrive safely to the buyers. Packages are mailed promptly and buyers are sent confirmation with tracking numbers.
So many patterns! Thanks, Bonnie!
I just finished watching my first episode of Miss Fisher's Murder Mysteries on PBS, and though I've heard a lot about the great clothing on the show (and it is great), Miss Fisher's hats were my favorite. I love the colors, embellishments, and the style. They are fabulous and she wears them well!
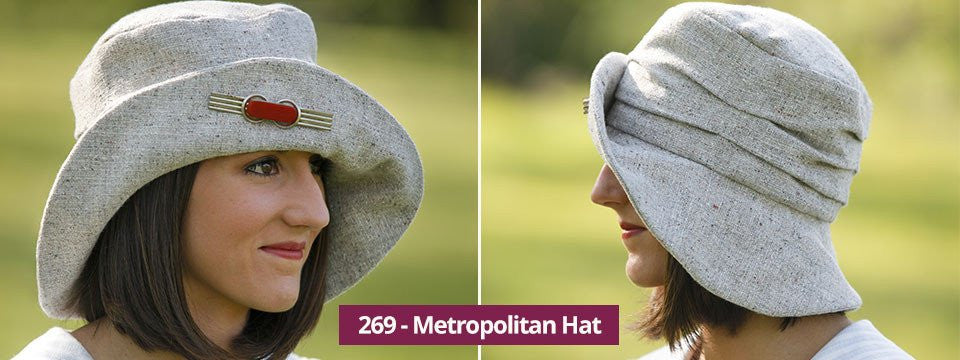
We are featuring the #269 Metropolitan Hat this month (May) in our store. It is a great hat to start building your own hat collection, and similar in style to Miss Fisher. There are so many ways to interpret this hat - from floppy linens to structured wools, fabric prints, and pins, bands, flowers, or your own creation to add to the brim. This hat can be a statement piece or a casual sun hat (and it makes a great sun hat!). I created a new Pinterest board that is starting off with hat inspiration for the Metropolitan Hat (Board is called Hats and Bags, so I'll be filling it up with Folkwear hat and bag photos and inspirations). The Metropolitan Hat is on sale this month!
All the hat inspiration also came from the excitement leading up to the Kentucky Derby - and all the amazing creations coming from that event (or series of events). One of my best friends is from Louisville and she always shares photos of her friends attending Oaks and Derby in their incredible hats. I love seeing the creativity and color of those hats. My friend also pointed to Dee's Hats as great place to get hats made in Louisville, and their website was fun to look at, so if you love hats, you should check it out.
Happy Hat Making!
And, as always, we love to see what people are making, so tag us if you post pictures on Instagram or Facebook or Pinterest. Or, join the Facebook Folkwear Patterns Sewing Group and let us all see what you've made!
Sometimes it is hard to find just the right fabric for your sewing project. Especially since local fabric stores carrying a wide selection of garment fabrics are not a reality for many of us. Often, we are left with the option of online fabric shopping.
Shopping for fabric online can be daunting. Is the color going to be right? the weight? the texture? fabric content?
A couple of things I do to make sure (or at least as close to sure as I can be) that I get good fabric that works for the garment I am making are:
So, after all those tips, I am going to leave you with a few fabrics I would love to use to make our Japanese Kimono. We picked these out from some of the fabric stores we trust as online sources., but there are many more out there, so you can see this as just a starting point.
 Rifle Paper Co Wonderland Black from Harts Fabric. This is a beautiful and popular fabric. 100% rayon. $14.79/yard.
 Japanese Dragons - Blue from Stone Mountain & Daughter Fabrics. 100% cotton. $11.90/yard
 Rayon Challis Crane Print - Red from Stone Mountatin & Daughter Fabrics. Rayon challis with a fluid drape and hand. This light fabric and a pretty print would make a beautiful and drape-y kimono. $11/yard.
 Bruce Botanical Satin Faced Silk Print from Vogue Fabrics. This is a beautiful print that I think would make a lovely kimono. 100% silk. $12.99/yard.
 Sunstone Abstract Cotton Print from Vogue Fabrfics. 100% cotton, medium weight batic. $8.99/yard.
 Geishas and Ginkos - Purple from Michael Levin. 100% chambray. $13.75/yard.
 Genuine Handwoven Ikat - Raspberry/Gray from Michael Levin. 100% cotton. A traditional eastern look - very beautiful. $18.50/yard.
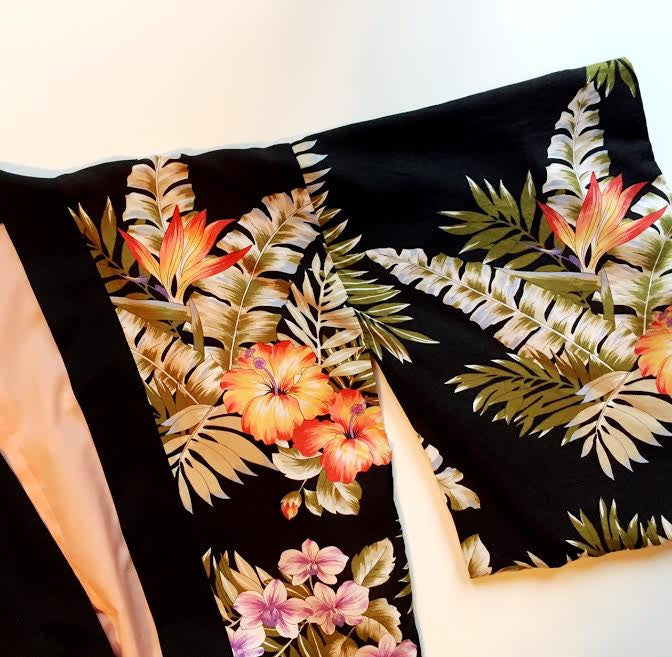
Kimonos are a beautiful and classic garment of Japanese origin and influence. The Folkwear Kimono pattern is for the yukata, or unlined informal kimono, worn by all classes of Japanese in summer. The word "kimono" literally means "clothing" but has come to distinguish the Japanese national costume from other clothes.
Kimonos are great garments to be used as robes, house coats, jackets, or outwear. They can be statement pieces or simple and elegant garments. Kimonos can be made with beautiful silks, medium to lightweight cottons (cotton gauze is a favorite of mine right now)., or even heavier fabrics like denim or brocade.
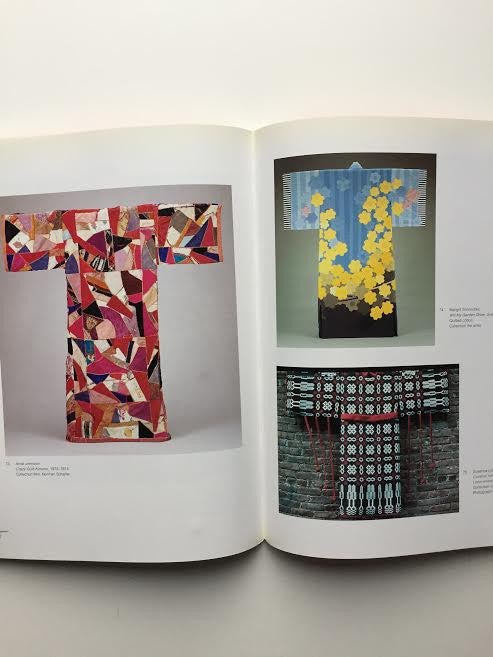
I found a great book in our collection entitled Kimono Inspiration: Art and Art-to-Wear in America, from the Textile Museum at George Washington University. I've put some pictures from the book on our Facebook and Instagram accounts. If you want to know more about the history and tradition of kimonos, as well as see some amazing artistic interpretations of them, you should check out this book. Kimonos can be a canvas for your art - quilting, painting, dying, embroidery, weaving, etc.
Traditional kimonos are a work of art themselves, so however you want to make one (traditional interpretation or modern art interpretation), it is a rewarding garment to make.
In our kimono pattern, we give information on the history and use of the kimono, styling and dress information, and instructions for traditional handwork (sashiko) and dyeing (shibori).
Have you ever made a kimono? What would you be inspired to make now?
** FYI, #113 Japanese Kimono is on sale for all of April (it is a great deal). Enjoy! **

The History of Folkwear
In the mid-1970s, three
The three founders were a perfect team to create a line of innovative patterns that was revolutionary for its time—this was the mid 1970s when women's wear in
During the recession of the mid-1980s, Folkwear's business health suffered along with so many other small businesses. The company was sold to The Taunton Press, publisher of Threads magazine, and by the early 1990s most of the original patterns were back in print and new patterns were under development.
In 1998,

So many different types of people use Folkwear patterns. There are historic re-enactors, Renaissance Faire participants, theater costume designers, and lovers of creative art-to-wear. Residents of historic neighborhoods and members of antique auto clubs use the patterns to dress to the appropriate historic period for their annual events. Folks who adopt children from other countries use the patterns to teach the little ones about their native cultures. Swing, tango, and ballroom dancers love to use the patterns for their passion. Living history museums and Universal Studios dress their staff in Folkwear patterns. The The male actors in the first television episode of The Lonesome Dove all wore a Folkwear pattern (#204
In 2002, Mathews purchased the Folkwear pattern division. Folkwear became, yet again, an independent, woman-owned firm, just like it was in its earliest days. Mathews ran Folkwear for 14 years, adding many new patterns to the collection. Folkwear was sold in late 2016 to Molly Hamilton, a young woman and fellow sewer, in Asheville who currently owns and runs the company. Through it all, the company has retained a loyal group of fans who keep the passion for vintage and ethnic garments alive! And, Gretchen Schields has continued to illustrate nearly all of the patterns since the inception of the company until 2017, contributing to the iconic images associated with Folkwear patterns.
-- written by Kate Mathews - fiber artist, sewer, weaver, and former owner of Folkwear

Welcome to Folkwear’s new website! We are so excited to have this new website, shop, and blog in order to share with you Folkwear patterns, and information on sewing, costuming, embellishing, and the history and culture of all our sewing patterns. The new on-line shop is fabulous! It will be easier to navigate, easy to place your order, and (maybe most exciting for you!) most shipping prices will be lower than ever before!
The shop is organized by categories, and each pattern has illustrations, pictures, and line drawings. We plan for the blog to showcase our patterns, provide sew-alongs and tutorials, and feature relevant news and events in fashion and sewing. There should be fun things to check out here on a regular basis! And, you can subscribe to our newsletter by entering your email address at the bottom of our page. Thanks for joining us!


