-
Sewing Patterns
-
Fabric
- Sewing Supplies
- About
- Blog
- Gallery


There are few garments that conjure up American nostalgia quite like a poodle skirt. This skirt became synonymous with the 1950’s carefree lifestyle of the post war years and a dance floor icon that exemplified the energy of new cultural phenomenon called Rock n’ Roll.
Our 256 At the Hop pattern is a time-capsule of 1950’s women’s fashion that embodied the spirit of a new generation. This nicely curated collection of classic garments comes with all the extra details needed to add as much 1950's nostalgia as you like. The pattern includes not only the iconic Poodle Skirt, but a classic short sleeve blouse pattern, and knitting instructions for a cropped cardigan. To complete the look, coordinating winter holiday and poodle dog appliqués and knitting designs are provided to embellish the skirt and sweater. The seasonal holiday and poodle motifs are in keeping with the original history of the first poodle skirts designs as you will learn.

Women’s Fashion was put on the back burner due to the war years starting in 1939 and lasting thru 1945. Once the WWII was over and the country began to prosper, a new cultural energy and ethos began to stir. The whole country was ready for better times, as well as something exciting and new. In 1947 such an exciting change came to women's fashion. The New Look by Christian Dior was unveiled, introducing a skirt with a full and flowing shape and a nipped waist. This new look was in sharp contrast to the practical clothing of the war years and women embraced this new symbol of high-style with enthusiasm. The fact that it was easy to make only added to the craze among women across all spectrum of society.
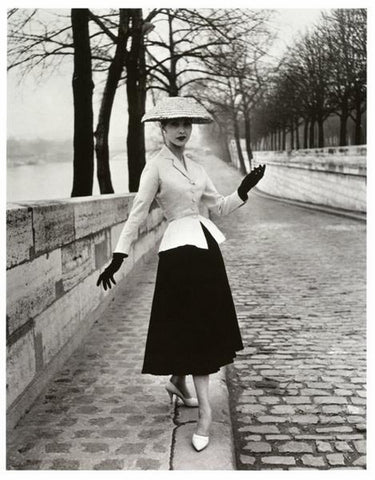
Christian Dior's iconic New Look.
During the winter holiday season of the same year, a young budding actress named Julie Lynn Charlot had an invitation to a Christmas party and nothing to wear. Julie was newly married and broke, but her mother owned a factory that used felt. Needing a holiday outfit Julie decided to draft her own skirt pattern (like Mr. Dior’s) and used the easy-to-work-with felt she had on hand. Sewing was not a skill Julie was good at, so she cut a big circle with a hole in the middle for her waist, which eliminated the need for seams. On this first party skirt, Julie included seasonal holiday appliqués just for the fun of it. The new couple not only enjoyed the Christmas party on a budget that year, but Julie’s skirt drew quite a lot of attention.

A Christmas Holiday Skirt designed by Julie Lynn Charlot.
Before long, Julie was selling her felt holiday skirts in Beverly Hills boutiques, where they flew off the racks. It did not take long before non-holiday themed embellishments were requested and the trend took off like skirts on fire! You never know when making something for yourself could turn you into a fashion designer?

Julie also established the skirts iconic fabric of choice. Felt may have been what Julie had on hand, but it was a perfect choice, once again making the skirt easy for anyone to sew. To add to this charming story, Julie was not stingy with her designs and worked with a pattern company to make her designs accessible to women world wide. She helped to create a whole generation of women who delighted in creating skirts with fun scenes and stories using easy to apply appliqué techniques.
As it so happened, the first Westminster Dog Show that year, had created a rage for all things dogs. As a result, Julie was commissioned to make a skirt depicting a story of three appliquéd dachshunds.
Julie in her own Dachshund Dog design skirt.
Due to the high profile dog show and their fancy haircuts, poodles became a symbol of refinement and high class. As fate would have it, the appliquéing of poodles on skirts was beyond huge. Before long, just about anything became a possible embellishments for these wide circle skirts. Grown women adorned their skirts with the Eiffel Tower, Martini glasses, flower pots, and seasonal themes. Teenage girls embellished their skirts with trendy images like records, catchy phrases, hot rod cars and anything that inspired.

Ladies of the 1950's modeling different themed circle skirts.

Horse Race skirt design by Julie Lynn Charlot.

Dance Floor skirt design by Julie Lynn Charlot.
Designer Bettie Morrie even appliquéd a backgammon board on her skirt, which she used for an impromptu game when it arose.

After the difficult years of the war, women were in need of not only glamour but the country was overdue for some much needed fun. Mr. Dior's flowing skirt design was not only fun to move and dance in, but it was the perfect canvas for displaying one's individual expression. It would be Julie's idea of adding appliquéd embellishments that would transform the skirt into a popular conversation piece. Even walking down the street became more interesting and fun for everyone!
Of course, each garment in the pattern in the Folkwear's 256 At The Hop pattern is a classic, easily made for everyday wearing no matter the season. Use this pattern to make a costume, historical reenactment, a theater production, a sports or hobby themed skirt, or as a canvas when inspiration strikes.

Halloween made more fun!
This is truly an American story of how a fashion icon was created out of one mans awareness of how to fulfill a desire for glamour and the necessity of one young woman to dress herself for a party. So, it just goes to show how once a momentum gets started, anything can happen! It is amazing how a simple skirt bound a generation of women and created wonderful memories in the process.
Find your own inspiration using the this pattern and please share what you make, whether a masterpiece or a lovely everyday look.
Be sure to stay tuned to what we were inspired to make using the 256 At the Hop skirt pattern in the next blog (coming this week!).

Well hey there, howdy, hi. I’m Sarahbeth. A (mostly) retired, previously-award-winning indie apparel designer coming to you from Mars Hill, NC with a hopefully inspired, and also tragically comedic, adaptation of the 267 M’Lady’s Corset.
A bit about my history in apparel design: Many many moons ago I had an indie apparel line called Unabashed Apparel. I did it all: designed, drafted, sewed, produced product line, photo shoots, etc. Now I create for myself and my loved ones and take a few commissions when the mood strikes me. I’m most interested in how we inspire and encourage one another as creatives. I drafted patterns for every piece I made for my apparel line. I drafted a prototype, then several sizes for each piece in a collection. I personally handmade each piece. In custom bridal, I created a custom body block for each client and then a pattern for the gown from there. I sewed muslins before cutting into silk, but my original patterns were spot on and so after a few years I scratched the muslin part of the process. It was nerve wracking at first. For the last decade I’ve mostly draped any piece that I want to create. There have been times I’ve been frustrated that I didn’t create a pattern to return to, but it’s rare. For personal use, Folkwear has been the only pattern company whose patterns (other than my own) I have reused time and again. I’m a big fan not just of the quality but of the fantastic women who have been stewards of this pattern company.

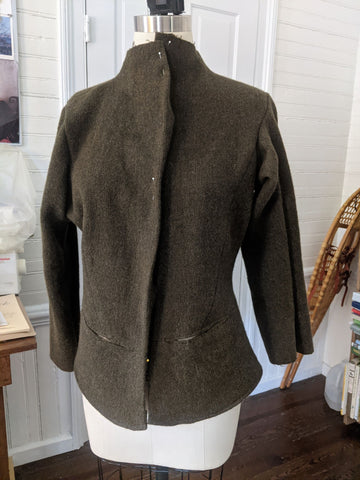
The tale of this jacket is one of beautiful woe.
Mostly it goes like this: pride cometh before the 2 dozen things you have to do to make a grand idea live-able. You know the old phrase, when someone tells you they like something you made, say thank you and then clamp your mouth shut? This is not that. I want you to be inspired, I want you to grab the bull by the horns, (I want you to use a different lining for your project…)
In short: A while back I designed a jacket for a particularly beautiful Merchant & Mills wool. Then inspiration struck! It was similar enough to the 267 M’Lady’s Corset my buddy Cynthia asked me to model for her recent Folkwear blog post. Why reinvent the wheel? I fetched the pattern and planned to adapt it to my design.
Now, I feel I should tell you I’m more a Jack Pollock than a Jo Vermeer type. Of course, I wish I was refined and dedicated to the exact right brush stroke, but in truth, I really don’t have patience and just throw spaghetti on the wall. I’d rather yelp and fix than wait and plan it perfectly. It’s good to know thyself, because it turns out I was a bit rusty and a bit over-confident with my adaptation and ideas. I had a lot I had to fix with this project. I learned/remembered a lot too and that’s always a great boon to an old grizzled pro.
The idea: Seamed peplum wool jacket, lined with soft jersey for comfort and a casual effect.
Add to the pattern: Sleeves, High neck, Pockets, an Elizabethan flare, be comfy & warm.
Reality: Lined with soft, lightweight jersey? Please. Send help.
1. Prewash. I pre-wash almost everything, including wool. I hand wash my woolens, and to be able to do this, I throw my fabric in the washing machine before I cut out a pattern. It might change the look (and it did change this wool) but I find I want to be able to personally wash things 99% of the time. I buy 1/3 more of my wool than a pattern calls for for this fact. You can see here that the fabric was looser before washing. I prefer the tighter and fluffier outcome post washing and drying. I can’t tell you the number of times a bride I’ve designed for will call me about stains/dirt, and when I say, throw your gown in the bathtub, wash it with some gentle soap – wring it out, hang it to dry – they cry. I prewash errythang.

2. Lay it out, think it through. Add about an inch to the pattern body to turn a fitting corset into a jacket. Cut.
Consider the neck. Of course the original pattern had a scoop neck, and I wanted a warm jacket. I like things to cover the base of my neck and ride a bit high in the back. I used my French curve ruler to sort it out. Always allow for more fabric (shallower curve), you can trim away for the correct shape.

3. I love a selvedge. I use them all the time for the center front of jackets. The stability is priceless.

4. Peplum Front: I straightened the pattern piece to match a jacket front, knowing I would want to continue my closure.


7. Sleeves. Ok here’s the catch and how I (successfully) planned for it:
A) The M’Lady’s corset pattern has a rather squared off underarm. I rounded it and added a bit of fabric to my cut with a “that looks right” eye on the pattern pieces, there are 2 pieces here to consider. Always cut it higher, again, you can trim away, you can’t add back. The multiple seams at the side also give you plenty of room to adjust your fit. You’ll learn the true non-symmetrical reality of your body in this add-edit-and-cut process. Lack of the body’s symmetry is one of the secrets to understanding personal fit success.
B) What sleeve pattern piece to choose: You can see this is one of my old drafted pattern pieces. How to pick a sleeve: Pick a sleeve from a pattern you already have that is loose enough to be a jacket sleeve. I chose a single piece rather than a double piece because it was for a loose rather than rigid jacket idea. This is most important: You can always make an ample sleeve fit a jacket by pinning it and editing it to what you’re creating. It follows more fabric = more editing options principle. The only thing to be aware of is not to cut too deep a curve away from the top of the sleeve to the underarm edge, while this allows for more underarm room in principle, it only does so if you have matching and loose shirt/jacket designs and pattern pieces. Again, cutting away is easy, adding back is not impossible, but more gnashing of teeth than it’s worth. Make sure you pick a woven sleeve pattern. Creating a good sleeve hang is easily achieved through pinning it to the armseye and adjusting the ease from there.

8. Pockets. Now the pocket part was brilliant, forgetting to recut them in a matching fabric was my 2nd whoopsie of this project. I wanted you to see that little French-seamed, wonky silk habotai pockets are easy and awesome to add, particularly where you have a natural waist seam, so I cut a couple out of this pale beige silk and then forgot to remake them in the correct and matching green color for the jacket. That’s right. I added them in, after I remembered to rip out the seam where they needed to be inserted. See next photo.


13. Finishing: Mmmhmm. Well, I’d planned to attach the jersey lining to the hem. Ridiculous in reality due to the pulling of the jersey to wool situation but I hadn’t cut the jacket long enough for a double hem. Solution: I tea-stain dyed some cotton lace and used it to hand finish the wool hem. I hand stitched the jersey to the wool at the front placket and neck. I wanted a subtle edge to both.


I’d do it all again with a silk stretch charmeuse lining. I’d cut the lining the same size as the rest of my pieces and I’d be happy as a peach.
I hoped you enjoyed reading about my adventures of my extreme pattern hack of this fab pattern, 267 M'Lady's Corset (and maybe you learned something too). And are inspired to tackle your own pattern hacking. Folkwear patterns are a great place to start.

by Cynthia Anderson
Creating our own trim is something we generally do not consider taking the time to do as modern sewists. With all the lovely ribbon, laces, and trims available on the market, it hardly seems necessary. There are times however, when finding the right embellishing trim may not be feasible or the perfect trim simply does not exist. Plus learning to make your own trim embellishments is a tradition that is fun and connects us to generations of past makers whose creativity and techniques are good to learn from.
Until recent history, making your own trim was done by hand. The techniques found in the our 123 Austrian Dirndl Pattern have long been a part of European trim, or ruching, making traditions and culture that continue today. These trim techniques are synonymous but not limited to the dirndl. The dirndl may be the traditional dress of Austria and Southern Germany, but this popular silhouette makes a beautiful everyday summer dress as well. Whether you embellish it or not, is up to you. Though resisting these trims may prove difficult.
The 123 Austrian Dirndl comes with a plethora of extra information and history to help inspire anyone interested in not only making the dirndl, but the authentic trims. You will find seven different ruching trimmings to try. All the trims are stunning on their own and can be combined in numerous ways, or masterfully paired to make one fabulous trim (as in the photo above). Upon closer inspection, it is not hard to imagine all the different types of projects that these ruching trims could be used for. These techniques are fun and easy to master and so beautiful! You can also find all the information you need in the PDF version of the 123 Austrian Dirndl.
Materials
All the ruching techniques offered in this pattern start with a tube of cloth or ribbon, that is then hand-stitched in various ways and pulled up to form a repeated motif. Tubes cut on the bias are generally preferred, because fabric cut on the bias naturally allows for bending into curves that lay smoothly. This is especially true when applying trim to necklines, armholes, or any curved shape or edge. Detailed instructions on how to make a continuous bias strip or tape are included in the pattern. You can also view this extremely helpful video we made on how to make lots of continuous bias tape.
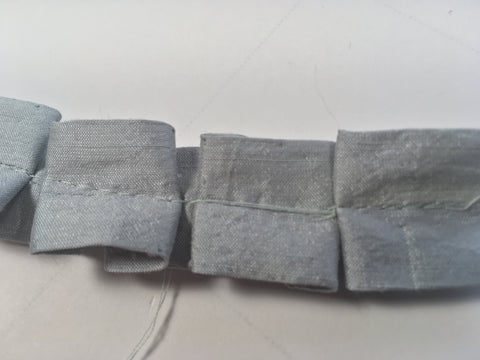
In this blog I will be demonstrating the Holflaten, also called a Whole Folds or Box Pleat Ruching, and the Rosenrushe or Rose Ruching. These rushing techniques start with making a tube cut on the bias or straight grain. The fabric I am using here is cut on the straight grain to economize fabric and for the ease of time.
Ribbon can be used for making many straight grain techniques as well. Silk ribbon cut on the bias is especially nice when bias is required. You can find beautiful bias hand dyed silk ribbon by Hannah Silks on Etsy.
That's not all, the Herzrusche or Heart Ruching will be demonstrated using a sateen finished ribbon, because everyone should be inspired to make this beauty!
Getting Started
First you need to determine the width and length of your tube, or ribbon, if you have a specific purpose in mind. When deciding on the width, simply experiment to see what proportions you like depending on application. Your final widths for the tube, or ribbon width, can be between 1/2" to 1-3/4", depending on the look you want and the weight of fabric, or ribbon, you are using.
To make a fabric tube for the trim, cut your fabric two times as wide as the final tube plus 1/4 inch (6mm) for seam allowances. For example, for a 1-inch (2.5cm) tube, cut bias strips 2 inches (5cm) wide plus 1/4 inch (6mm), or 2-1/2 inches (6.3cm) in total width.
Keep in mind that the fabric weight. Heavier weight fabrics generally work best for wider trims that do not require fitting along tight curves or shapes. Lighter and finer weight fabrics work best for more narrow trim widths and will allow for fitting along tighter curves or shapes.
The length of bias you will need to make your ruching also depends on how heavy your fabric. It is best to experiment with scraps before cutting your bias strips to help determine width and length. Below are the approximate length calculations for the ruching designs used in this blog.
For demonstrating these rushing techniques, I have cut a strip of laundered silk dupioni on the straight grain approximately one yard (.9m) long. Laundering silk dupioni reduces the shine and softens the fabric. This length is plenty for experimenting. Since we are merely experimenting, a one-yard length can be used for more that one technique and then cut apart if desired. Cotton muslin is perfect for experimenting in making ruching either on the straight grain and/or bias as well.
Make a Ruching Tube

Fold the strip of fabric in half with right sides together, matching and pin the edges every two to three inches (5.75cm), then sew a 1/4 inch (6mm) seam allowance. If working with a bias cut tube, try not to pull or stretch while pinning and sewing or the tube will not lay flat when turned, which will cause pleating difficulties.

Press the seam open. If experimenting go ahead and press the edges creating a crease. However, on some ruching, you may not want a crease in your fabric and want rounded edges. You can finger press in those instances.

Next turn the tube. To help turn the tube right side out, thread a cord or yarn through the tube with a safety pin. Pin the cord/yarn to the end of the tube and use the cord pull back through.

Or stitch across the cord/yarn to hold it securely in place and use the cord/yarn to pull back through.

Try to keep the seam allowances open inside the tube. As you pull the tube right side out, it will help to pin the seam allowances in place as you go.


Clip off the end with the cord/yarn or remove the stitches to release the cord/ yarn.

To make experimenting easier, you can press the tube creating creased edges. Be sure the seam is in the center back (underneath side) of the tube and not at an edge. Placing the seam at an edge hampers folding.
Note, that when making a final strip of ruching you may prefer the look of gently rounder edges instead of pressed edges. Once you get the hang of making ruching using a tube, try avoiding pressing the edges, so you can compare the effects.

Now that the tube is complete, lets make some ruching.
Holfalten, or Box Pleat, Ruching
To make the Holfalten (Whole Folds) Ruching the tube is pinned into box pleats, then stitched down the middle of the tube to secure the pleats in place. Box pleating ruching is lovely on its own. However, we will use this technique for the foundation in making the Rosenrusche Ruching below.
Begin by working on the underneath side, or the side with the center seam. Notice the center seam in the photo below.
To make using a 1-inch (2.5cm) wide tube, place spacing pins 2 inches (5cm) apart with 1 inch (2.5cm) between the spaces.

The red tip pin indicates the center point between the two white tip pins spaced 2 inches (5cm) apart. The far left pin indicates the 1 inch (2.5cm) space. Don't worry about the 1 inch (2.5cm) pin for now.

Starting at the right hand edge, fold so that the 2 inch (5cm) spacing (white tip) pins meet in the center (indicated by red tip pin) of the 2 inch (5cm) space. This automatically creates two 1-inch (2.5cm) underfolds which will extend under the 1-inch (2.5cm) spaces, which will become the top folds or box-pleats.

Notice the underneath side fold and seam below.

View of top fold below (notice there is no center back seam, and the box pleat is seen on the front side).

Repeat making as many box pleats as you want. The idea is to make the box pleats the same width consistently. If you find folding and measuring with the fabric fiddly at first, practice using a strip of paper instead.
Below is a view of the box-pleats seen from the back or underneath side. Notice the seam.

Below is a view of the box-pleats flipped over to the front side.

Stitch by machine, using a long stitch length through the center of the tube to hold the folds in place. Now, the box pleating is finished to be used alone or transformed into the Rosenrusche or Rose Rushing as instructed below.

Rosenrusche, or Rose Ruching
This trim may look more like bows than roses, but is simple to make and quite decorative. To make the Rose Ruching you will need to start with the box-pleat ruching as the foundation. The roses are created by matching the center edge of each box-pleat and stitching them into place.
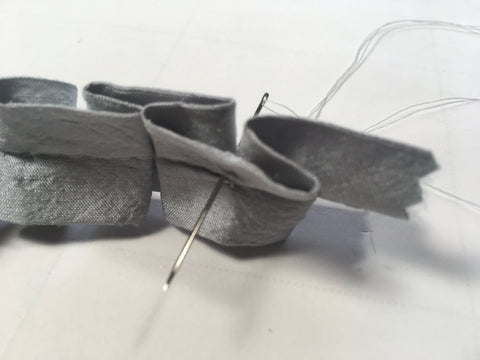
Start with a knotted double threaded hand-sewing needle, long enough to use continuously as you work.
On the underneath side, bring double threaded needle up through the center of the square at the center stitching on the front side of the box-pleat.

Then make two small stitches, one on each side of the center point.

Draw these points together and stitch down through center to the underneath side, to anchor these stitches.

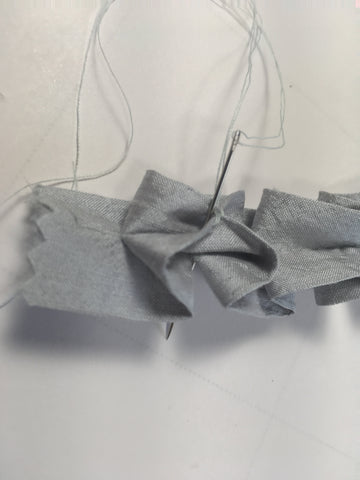
Come up again from the underneath side, to the front side through center of stitching.
This time, catch both edges at the center of the box-pleat with the needle and thread, pulling them together. Secure the edges with a couple of small stitches, knotting at the second stitch to secure. Follow the sequence of photos below.


To continue using one continuous thread, part the gathered section at the base of the rose and send the needle back through the center front to the back or underneath side.
While still on the underneath side, start the next rose by drawing the thread over the box-pleat as seen below. Then pass the needle and thread through the center fold on the underneath side, coming up through the center of the box-pleat on the front side. Below is a view of the continuous thread stretched across the underneath side and inserted into the center of next box pleat.
Repeat until you have finished turning the box-pleats into rose ruching.

Herzrusche, or Heart Ruching
This trim looks a bit like the flower known as bleeding heart, but not so much like a traditional Valentine heart. It is amazing how by simply drawing fabric up on itself, such a lovely soft three-dimensional effect can be created. This technique is worked on the underneath side, so be sure turn your work over from time to time, and inspect the beauty happening on the front side!
The Heart Ruching can be made using a fabric tube or ribbon, on the straight grain or bias. A satin finish ribbon is being used for this demonstration. The sheen of the ribbon reflects the light, creating an enchanting effect.
Start by making the stitching guides. Lightly mark these guides with pencil on the underneath side of the ribbon. Measure the points one-inch apart along the top and bottom edge of the ribbon, keeping the points perpendicular. Then mark the center between the one-inch points with a lightly drawn "x" as seen below.
Use a long thread so the stitching can be as continuous as possible.

With the underneath side up, pinch the two edges of the ribbon together, matching the drawn points and tack the edges together with a couple of stitches. Knot the last stitch to ensure the edges stay securely together.


Pass the eye of the needle through or under the stitched edges from right to left. Passing the needle through backwards helps prevent nicking or catching the ribbon with the needle.

Turn the needle around and create a horizontal stitch at the center "x", inserting the needle from the right to the left as seen below.

Pull the needle and thread left all the way through the stitch.

Now, pull the thread in the opposite direction (to the right), drawing it up, until the center stitch meets the first stitch, forming a small pinched triangle on the front side. The idea is to pull, drawing the center stitch to the already stitched edges.

Hold the two combined stitches firmly, with the edges folded downward with your fingers, then make a couple of stitches to secure the edges together. Knot the final stitch to hold.

Remember, all of the work thus far has happened on the underneath side. In order to see the how the final ruching is looking, turn your work to inspect your progress. The photo below depicts how the small pinched triangle on the front side should look.
Note: Keeping the spacing equal and tension even on the overlaying thread is the key to mastering this technique.

Again, turn so the underneath side is facing up. Pinch, matching the next set of edge dots; notice when starting to make this second edge stitch, the thread is continuous and carried from the right to the left, with the thread stretched between the first set of combined stitches and the start of the second edge stitch. See second photo below.

Look closely at the free floating horizontal thread connecting one finished set of stitches with the beginning of the next set of edge stitches.

Be sure to gently pull the thread just enough to allow the trim to remain horizontal before stitching the edges together. If you pull the thread too much the ribbon will gather up on itself. The idea is to keep the ribbon ruching laying relatively flat.
Repeat tacking the two edges together as before, continue drawing up the center "x" stitch and drawing it to the edge stitch, and securing it in place. Continue, repeating the steps until you have as much ruching as your heart desires!


Many Folkwear patterns include embroidery designs - to add traditional embroidery to folk garments and to add period embellishments to historic garments. Some of our patterns have extensive embroidery designs (such as 101 Gaza Dress, 103 Romanian Blouse, 126 Vests of Greece and Poland, 114 Chinese Jacket). And some have smaller designs that can be added as desired (113 Japanese Kimono, 209 Walking Skirt, 264 Monte Carlo Dress). In our paper patterns, embroidery designs sometimes come on transfer paper so they can easily be moved to the garment to set up the embroidery. But some patterns, and all of our PDF patterns, have designs on paper that you need to transfer yourself to the garment you wish to add them to.
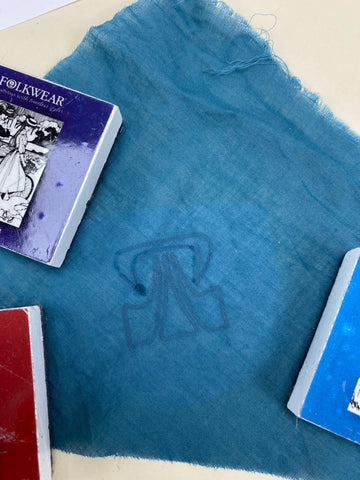
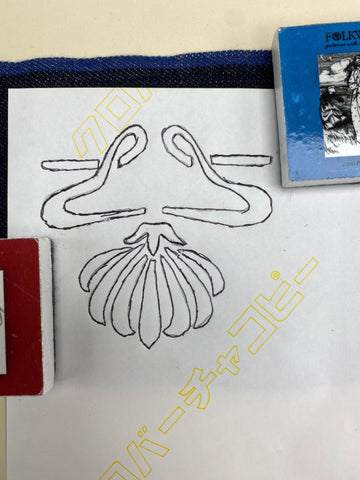
We are featuring our 264 Monte Carlo Dress pattern this month, and includes a number of Art Deco designs printed on transfer paper. These are gorgeous added to the front of the dress - or to the tunic. This blog post will show you how to transfer the designs (or any design) from paper to your fabric if you don't have designs printed on transfer paper. We will show several techniques below that can be used for any of our patterns.
Using Iron on Transfer Pencil
To use an iron-on transfer pencil (or transfer pens), print the embroidery pattern on regular paper, then trace the design with an iron-on transfer pencil.

![]()
Then place the design down on your fabric with the pencil markings facing the fabric and press with a hot iron.

![]()

A couple of tips:
1. These markings are permanent, so make sure you place your design right where you want it. It cannot be moved after pressing. Also make sure your pencil lines are not too wide that they will be seen after embroidery is complete. And, make sure the markings you make are where you want them on the paper. Mistakes will also transfer and cannot wash out. So, if you make a mistake, just print another design and start again.
2. You can use any color pencil, but make sure the markings will show up on your fabric. For dark fabrics, use a lighter colored pencil (light blue or even white if you can find it).
3. If you trace on top of the embroidery design, when you flip it over, you will be pressing the mirror image onto your fabric. This is not a problem if your image is symmetrical. But, if your image is asymmetrical and you want to transfer the exact image that is printed, you should trace the image from the back of the paper and press the back side to your fabric (again, side with pencil markings to fabric). You can see how to do this in the photos below.


Using Water Soluble Pens
Water-soluble pens create marks that wash off easily in water - also called water erasable pens. I often use washable Crayola markers when sewing, but usually the water soluble pens have a much more fine tip and are great for making more precise markings or fine lines so are perfect for embroidery transfer.
They are best used for lighter-colored fabrics. You can often set the printed design under the fabric and trace it right onto your fabric with the pen. If it is too hard to see through the fabric to trace on a table, you can use a light table or a window, or even an iPad (or device) if your embroidery pattern is digital. Tape your embroidery design on a light filled window and secure (tape) your fabric to the window over the design. Then trace the design on to the fabric. I show how to do this in the photos below. Make sure to secure your fabric well on the table or window so it does not shift easily when tracing - pattern weights or tape can work well. You could even tape the design to the back of the fabric to keep it secure.
Tracing the design through semi-sheer voile fabric, directly onto the fabric:
Using a window to trace the design onto fabric:


The nice thing about these pens is the markings wash away. So, if you make a mistake, you can wash it off, or if you decide to change your design, it is easy to do. And the lines wash away when you are done embroidering (in case you went "out of the lines" when sewing). However, the lines can be very light and can disappear over a few days. It's not a bad idea to re-trace them, and if your embroidery takes a few days to complete, re-trace the lines often.
Using Carbon Paper (helpful for dark fabrics)
Dressmakers carbon paper is a great way to transfer embroidery designs, especially on dark or heavy fabrics. It is easiest to use white or light colored carbon paper so you can see the embroidery design through it. Carbon paper is also great because it does not leave permanent marks.
First lightly trace the design onto the paper side (back side) of your carbon paper.

Then, place the carbon paper over your fabric and using a pen (the cheap, round tip pens work well) trace over the design you just traced with the pencil, pressing harder through the paper. You don't want to puncture the paper, just press into it. The design transfers to your fabric!


Depending on how well the design transfers (and your fabric), it might be a good idea to re-trace the design after removing the carbon paper to make the lines more distinct. If you use a non-washable pen (like a white gel pen) to re-trace lines, just be aware that those lines will will be permanent, but likely covered by embroidery. For a washable marking, you can use a quilters chalk pencil with a fine tip. The carbon paper lines can smudge if you are doing a lot of work or working on the project over several days, so re-tracing can be helpful.
Other Transfer Options
There are several other ways to transfer designs. If your design is digital, or can be printed, you can print it on a regular home printer on transfer paper that can the be ironed onto your fabric, transferring the design. Usually these transfers are permanent, but there are some options that claim to be wash-away. There are also papers you can print on then pin or baste over your fabric, stitching through paper and fabric, which then wash away (dissolve) in water when you are finished stitching.
Prick and Pounce. This technique involves pricking small holes along the paper in the shape of the embroidery design (i.e. over your printed design), dusting chalk powder over the holes so they come through on your fabric. This technique is easiest if the design is very simple with longer lines. A needle point tracer wheel is good to use for this technique. And, I usually trace the design with a water soluble pen or other tool afterward because the lines can rub away fairly easily.
I hope these give you some good ideas on how to easily transfer embroidery designs to fabric. Do you embroider? What are your favorite methods of transferring patterns to fabric?


 <
<


When we decided last month to feature our 203 Edwardian Underthings pattern, we agreed to make an outfit that shows how the three garments in the pattern can be used to make an outfit that is not just historic underwear. You can read more about how to style these wonderful pieces here.
Three of us in the office (Esi, Cynthia, and Molly) made these three garments from 203 Edwardian Underthings pattern. We chose a beautiful white embroidered eyelet type fabric for the drawers. I think I bought the fabric in NYC Garment District, and was saving it for a project like this (we have several romantic patterns in the Folkwear collection perfect for eyelet). For the petticoat and the camisole, we wanted something a little lighter-weight and the new organic cotton voiles that we carry now were perfect. We chose the lilac and blush colors - so sweet for springtime. They were the perfect weight and sheer-ness for this project!
Esi made the camisole with the simple pintucks at the front and small gathers at the waist as the pattern instructs. Instead of eyelet lace or beading at the neckline for the ribbon, she just turned under the allowance to make a casing and threaded a ribbon through. Pretty little rounded purple-pink buttons finished it off.

The next garment to be made was the white drawers made of eyelet fabric. In the pattern, the drawers come to just below the knees, but we wanted them longer. We have seen the trend of these old-fashioned long drawers that look so stylish with every-day tops (and very romantic and chic). Cynthia lengthened the drawers at the hem line of the main pieces, and kept the ruffle the same length as indicated in the pattern. Because she used the edge of the eyelet that was already finished, she did not need to hem the drawers. She made the plackets from a lighter weight white cotton voile. And you can read about how to make the plackets here if you need a little tutorial to help get them done. There is a placket on each side of the waistband. This is a perfect place to put a pocket (if you can add a pocket to a placket), but also a perfect place for a Victorian type pocket.


Hands in plackets (not pockets)

This is a close up of the fabric ruffle. You can see the eyelet fabric edge and how this edges does not need to be hemmed.
Finally, the petticoat was made from the lilac cotton voile. I shorted in the skirt part of the pattern by about 4 inches. And I made the petticoat with the dust ruffle, which is optional. I wanted to add the dust ruffle just to give a little extra body to the bottom of the petticoat. It also makes a fun detail. Because the dust ruffle seam allowance is exposed on the right side of the fabric, you need to sew a ribbon or bias binding over the allowance to enclose it. I used scraps from the camisole to make bias binding to add a touch of color to the inside of the petticoat. I used the method we show in this video to make lots of bias binding fairly quickly and very easily.

The ruffle is sewn to the skirt about 6.5" above the bottom of the skirt and dust ruffle and covers the bottom. There are options to add insertion lace here and/or pintucks. I decided to add the pintucks, which were quite easy. The method taught in the pattern has the raw edge of the hem hidden inside the lowest pintuck. Quite ingenious and easy. As with the dust ruffle, the outer ruffle seam allowance is exposed on the outside of the petticoat. It can be covered with a ribbon for a more decorative finish, but I just made more bias binding from the scraps of fabric from cutting out the pattern.
The waist of the petticoat is just a casing on the inside with a ribbon to cinch. Again, I used bias binding made from the camisole scraps and for ribbon, I used a seam binding in my collection (which worked really well and was a pale pink), but ribbon, twill tape, or handmade bias binding would work well.

Here you can see the pintucks on the ruffle, the dust ruffle underneath, and the bias binding that finishes each ruffle.


These pieces are all adorable on their own, but quite stunning together. I hope you will give this pattern a try! It is sweet.

What is a placket, you might ask? You have seen them and used them before! A placket is an opening or slit in a garment at the waist, neck, or sleeves to help the user put the garment on and off easily. It usually contains some kind of closure for the garment (like buttons, snaps, zip, etc.). The slip of fabric must be contained, or faced, so it looks good and the fabric does not unravel or fall apart. Plackets can vary depending on application - there are plackets used for shirt neck openings, vents, sleeve openings, pant and skirt openings. Plackets are commonly found in tailored shirt sleeves.
Here I am going to show you how to make the placket that is in our 203 Edwardian Underthings Pattern. This pattern has a petticoat and drawers that result in a beautifully finished opening. The plackets make the petticoat and drawers easy to get in and out of, and are authentic to the time period when zippers were not used or common. The petticoat has a placket in the center back seam. The drawers have plackets at each side seam of the waist for added easy accessibility.
This type of placket creates a continuous binding to the raw edges of the seam opening, resulting in a clean tailored finish that can be used on shirt sleeves also. This design results in a neat-crisp tailored-looking finish that is well worth the effort. This placket design is a handy skill to learn, and the more skills you know, the more options your sewing will have.
It can help to make a practice placket or two before you attempt the placket on your final project. When practicing, and to help with eliminating any confusion, use a fabric with an obvious right and wrong side. This will help prevent getting tangled up.
Take time to prepare the placket so construction will go more smoothly. The placket should be cut precisely on the grain to ensure the fabric folds as crisply and accurately as possible. Carefully mark the fold lines, stitch lines, and the dots for the clipping lines as indicated on the pattern. Use a fine pencil, or other marking tool, to create all the necessary marking on the practice piece to help guide the construction and accuracy. See photo below.

It also helps to use a fabric for the placket that will not fray easily. Try using a finely woven cotton batiste or muslin for your practice fabric.
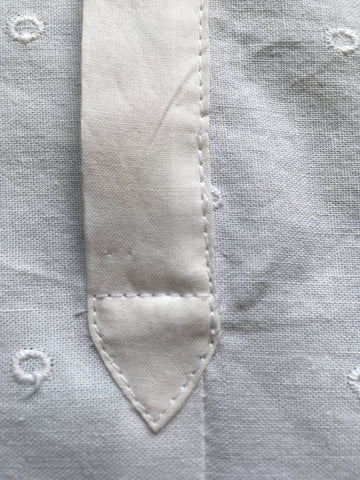
For these plackets, I prepared the center back of the petticoat and the side seams of the drawers according to the pattern instructions. In getting started it is helpful to know that when the placket is finished, the wider back section with the point will lay and fasten over the front or narrow section of the placket. Have a look at a tailored shirt sleeve as an example.
To add the placket to the petticoat get oriented first: Pin the wider section of the placket to the left-hand side of petticoat or skirt back.
To add the placket to the drawers get oriented first: Make the placket on the right-hand side first, which is identical to the petticoat instructions. Pin wider section of placket to Back of drawers.
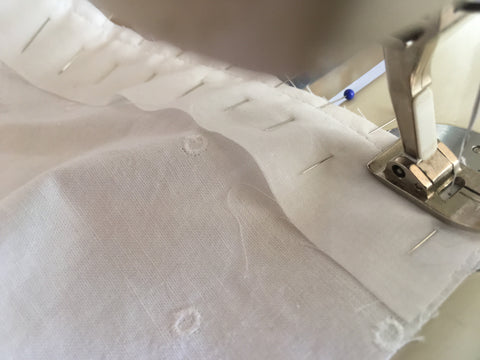
Pin the wider section of the placket to the back piece of the garment opening only (as seen below). Place the right side of the placket to the wrong side of the back garment piece, match the box, notches and waist edge. Notice the straight edge aligns with the waist edge. Stitch from the waist edge to the center of the square, using a 1/4" (6mm) seam allowance. Be sure to back-stitch at the waist edge and carefully at the square.
Clip the seam allowance of the garment to the square. Do not clip into the placket. Clipping the seam allowance of the garment fabric, releases the fabric so it will open up and lay flat for easier construction. See the photo below.
Press the seam open or to the back of the garment depending on how you choose to finish the garment seams.

With the garment seem allowance clipped the fabric should relatively flat. Pin and stitch the narrower section of the placket to the other or front side of the garment opening. Be sure to pin the right side of the placket to the wrong side of the main fabric as seen in the photo below. Stitch using a 1/4" (6mm) seam allowance from the square center to the waist edge. Be sure to back-stitch at the waist edge and carefully at the square.

Press the seam towards the placket. Notice that the right side of the placket is facing up and the wrong side of the garment is facing up in the photo below.

On the wider section of the placket, clip the inside of the point to the small dots indicated on the pattern. See the drawn guide line in the photo below.
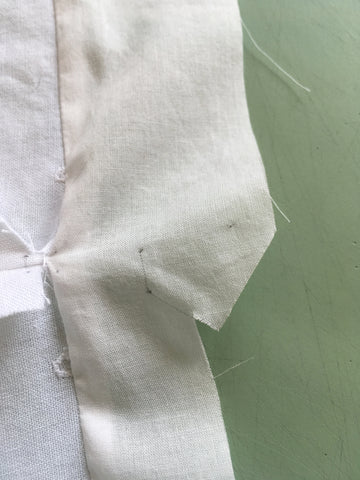
Carefully clipping the guide line, Avoid cutting beyond the dot and into the fabric.

Press the point edges under 1/4" (6mm) creating a crisp and clean finish.

One point edge pressed tuner 1/4" (6mm).

The other point edge pressed under 1/4" (6mm) creating a clean point.

Now, press under the long edges of both sections of the placket using a 1/4" (6mm) seam allowance.
Helpful Hint: To make turning the edges under easier, make a folding guide by sewing a long stay-stitch. Leave thread tails on each end. Once the edge is turned and pressed, the stay-stitch can be easily removed by gently pulling the thread tails. See photo below.

Pressing the edges under 1/4" (6mm).


Turn the narrow section of the placket to the right side to the garment fabric at the seam line and press.

To secure the narrow placket to the garment fabric, pin and top-stitch in place from the waist to small dot on the turned under edge, as indicated on the pattern. Note, the folded outer edge does not require top-stitching.
The two sides of the placket should naturally fold and lay into place as seen below. Note, that the narrow section of the placket falls to the inside of the opening. The wider section with the point falls to the outside of the garment, covering and laying on top of the narrow section. Be sure the edges are aligned as they should be. Adjust the turned edges if needed.


Fold the remaining wider section of the placket, wrong sides together, on the lengthwise center fold line as indicated on the pattern and press creating a clean crisp edge. Pin the turned-under edge over the seam line, using the seam line as a guide. Top-stitch from waist edge to star (as indicated on the pattern), taking care not to catch the stitching in other side of narrow placket underneath.


Pin the pointed end of the placket, over the narrow side of the placket (point will extend below). The idea is to securely stitch the two sections of the placket together at the pointed end.

That's it! Placket beautifully made. While learning to make plackets may take a bit of practice, the results are well worth the effort. Plackets are useful and beautiful elements that will elevate any sewing project. Plus, Folkwear has many patterns that are made even more special due to their beautiful plackets. If you need more placket sewing inspiration Folkwear has it covered... check out the 102 French Cheesemaker's Smock, 116 Shirts of Russia & Ukraine, 117 Croatian Shirt, 120 Navajo Blouse & Skirt, 124 Bolivian Milkmaid's Jacket, 128 Russian Settler's Dress, 130 Austrian Bush Outfit,
I hope you found this blog tutorial helpful and please keep as a reference for the next time you need to make a placket.

The Edwardian Era is synonymous with a feminine and charming aesthetic that still stirs the senses, leaving romantic notions in it’s wake. Few eras in history have ever inspired such titles as The Belle Epoche (Beautiful Era) and The Gilded Age. There seemed nothing that was left untouched by the lingering swirl of the romantically bohemian art movement known as Art Nouveau. An appreciation for all things feminine and natural created a blending of influences that would leave a lasting mark on the definition of beauty. This all consuming notion would makes it's mark on nearly everything, including underclothes.
Learn a bit more about the History of the Edwardian Era and the revolution that would change underthings forever in this blog.

There is something irresistible about the diaphanous white underthings of the Edwardian period, whether simple or embellished in delicate lace, that pulls at one’s romantic strings. The 203 Edwardian Underthings Pattern conjures up beguiling ideals of this bygone era that still manages to possess. It would be the addition of lace embellishments that would transform previously everyday undergarments into a new fixating trend called lingerie. Advancements in industrial manufactured lace created a lingerie explosion that resulted in an industry born of a desire for beautiful things, even if they were hidden from sight.

Our 203 Edwardian Underthings pattern consists of three mainstay lingerie pieces of an Edwardian woman’s wardrobe; a camisole (corset cover), petticoat, and drawers. Each piece is offered is in sizes XS-3XL. You can use the pattern to make your own beautiful Edwardian-inspired lingerie, or re-imagine each piece for everyday wear!

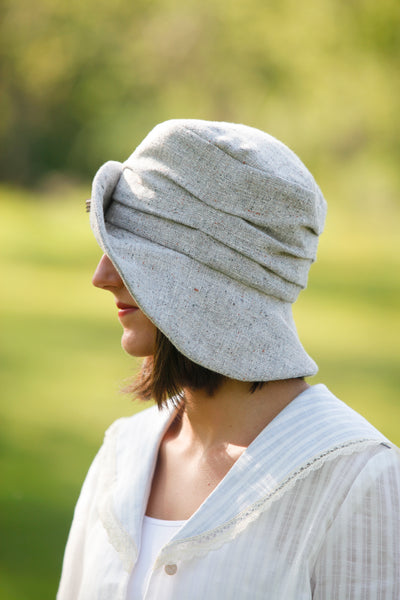
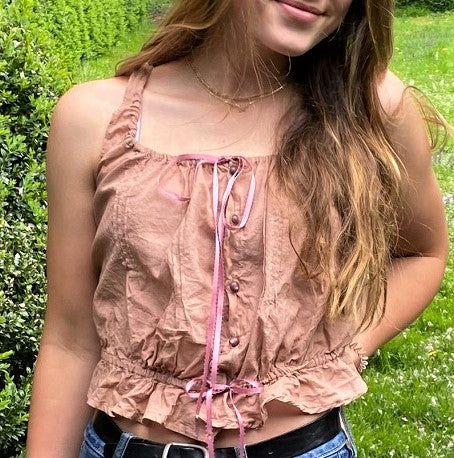
The camisole design in this pattern is slightly high-waisted and is fitted in the back, it is bloused in the front, with a soft fullness falling from a gathered neckline. The front of this camisole closes with drawstrings or either ribbons ties at the neckline and waist, and a buttoned front opening. This is a perfectly romantic top, no matter how you wear it, so why not everyday!
For Example:

For a truly Edwardian look, accentuate the bodice of the camisole with clusters of tucks (as indicated on the pattern) and/or add lace insertions. The neckline and armholes can also be trimmed with lace or eyelet edging or just turned under. The pattern also has three crochet patterns to create your own insertion lace and lace edgings.
The gored petticoat in the pattern falls to a wide flounce with a dust ruffle at the hemline. It has a drawstring tie at a back placket opening. The simple design of this piece allows for plenty of embellishment options. Add as many tucks, lace insertions and trims, as well as embroidery touches, as your heart desires (instructions for these embellishments are in the pattern).


However, if you think of this petticoat as a skirt, the options are endless! There is no reason why this pattern would not also make a perfect everyday skirt, underskirt, or half slip… with or without the ruffle.
For example:
Don’t forget the knee-length drawers or “knickers!" These drawers gather at a curved waistband, are constructed with a front gusset and two buttoned side plackets, then finished with a ruffle at the knees. The drawers can also be decorated with tucking and/or lace or eyelet trim or embroidery.

To make the drawers pattern more for everyday wearing:

To make a longer set of drawers, as in the sample above, you can add as much length as you like to the bottom edge of the legs. Even though there is no “lengthen or shorten” line, it is little trouble to add extra length to the drawers pattern. Just be sure to add the exact amount to the edges of both the Front and Back pattern pieces, keeping seam allowances in mind. Lengthen or shorten the ruffle in the same way if you like. Remember, if you use a fabric with a decorative finished edge, like an eyelet or lace edge, lace insertion, or crochet lace for the ruffle, there is no hemming required! The edge is already finished. You can even make the legs full-length with or without a ruffle. A really simple version would be to use a beautiful eyelet fabric that has a decorative bottom edge (like we did with this sample) - and no ruffle is needed!
See the photo below for original lacy Edwardian Era inspiration.

Though the garments in this pattern were originally made of semi-sheer light weight white cotton fabrics, that does not mean they would not be perfectly lovely in other fabrics. Light to mid-weight cotton, linen, silk, eyelet, or cotton flannel would be lovely. The versatility of each of these patterns means they can be made with sheer fabrics for warmer weather, as well as heavier fabrics for added warmth in winter.
Personally, I think layering is under appreciated, and this pattern is perfect for layering. Pair lightweight layers like cotton batiste, muslin, handkerchief linen, and silk haboti underneath heavier weight skirts made of cotton, linen, silks, or wool. This not only extends Edwardian practicality to create comfy warmth without the bulky layers, but makes interchangeable layering fun!
Pairing the camisole and drawers make a fun twist on pajamas! The camisole is perfect for warm weather sleeping, but don't forget how lovely it would be made of cotton flannel for winter slumbering. Make a short pair of drawers for warm weather out of cotton or linen. Make a long pair of drawers for chilly temps out of mid-weight linen, cotton shirting, cotton flannel, or silk.
If you love the clothing of the Edwardian Era as much as we do, you are in luck. Folkwear offers a wide range of garments of to help you find the perfect Edwardian piece for any occasion or just because they are so lovely. Additional romantic Folkwear patterns include the 205 Gibson Girl Blouse, 206 Quilted Prairie Skirt, 209 Walking Skirt, 210 Armistice Blouse, 216 schoolmistress’ Shirtwaist & Skirt, 223 Lady’s Chemise, 227 Edwardian Bridal Gown... plus more!
Shop our lovely spring fabric selection here.
Be sure to see Molly's blog on lace insertion if you want to add lace to this pattern (also instructions are in the pattern). Of course, this tutorial is perfect for making the 205 Gibson Girl Blouse or any other garment that needs an authentic touch of lace insertion.
Whether for your trousseau, cosplay costume, historical reenacting, or everyday wearing our 203 Edwardian Underthings pattern will prove to be an enjoyable and easy to make addition to any romantically inspired wardrobe. Let this pattern stir the romantic in you!
As always, we look forward to seeing what you are inspired to make.


We are excited to introduce you to the pleasures of making and wearing the garments offered in the 108 Turkish Dancer pattern (a pattern we are featuring this month). In this blog we will share a bit of Turkish history, offer fabric suggestions, and tips that can be used for making any or all of the garments featured.
108 Turkish Dancer includes three basic garments that Turkish women often wore combined and layered, creating sumptuous looks that feel totally modern. Included in this pattern, is an Entari or robe, a bodice-shaped vest, and a short jacket. In addition to the collection of garments featured in this pattern, you can create your own extraordinary wardrobe by combining these basics with other traditional Folkwear patterns. The 106 Turkish Coat and the Turkish pants from the 119 Sarouelles will perfectly round out a great outfit.

While the garments in the Turkish Dancer pattern are considered to be the basics of a Turkish woman’s wardrobe, they are not your average basics (read more about the history of the pattern here). Each piece can be made as simple or as lavish as you chose. While each garment is basic and relatively quick to make, it is the beautifully drafted pattern foundation, resulting is a flattering lines and fit that gives you so much to work with. Simple, yet well designed, patterns such as these are a pleasure to sew and wear, providing a perfect canvas in which to let your creativity shine. The pattern fits a broad range of sizes - from XS to 2XL. Each piece can easily stand alone as a statement piece or mix any combination of the trio with a simple skirt, pants, or leggings. Even your favorite pair of jeans will be transformed when paired with any or all of the Turkish Dancer offerings! The pattern also includes extra information, including much more history, lots of traditional embellishment ideas, how-to instructions for different embroidery stitches, and authentic embroidery designs transfers.
The Entari or robe, features optional waist-shaping darts, plunging V-front neckline, button-loop front closures, flowing bell shaped sleeves, and free-floating ankle length panels. Make as a gown to layer under the vest and jacket and/or as a coat to wear on top. While the the length of this design is most dramatic when long and flowy, its versatility allows it to be made any length you chose. Adjust the length of the sleeves or remove them all together to create a sleeveless tunic. Leave out the waist shaping darts and enjoy a more leisurely look and fit - perfect for lounging about!
The unlined, semi-fitted vest has a low-cut curved neckline, curved Princess seams (which makes fit adjustments easy), and button-loop front closures. This easy-to-sew garment can be quickly bound along the edges and lavishly embellished with braid, sequins, machine or hand embroidery, and it right in style with the currently popular mid-riff look.
The short jacket (also called a Yelek or Mintan) has a gently curving front hemline and bell sleeves that fit over the Entari, allowing the Entari sleeves to drape sensuously. This quick-sew garment with bound edges is perfect for elaborate fabrics and embellishments.
Fabric Suggestions
The hardest part in choosing a fabric for any one of these pieces will be narrowing down the options. Each garment offered in this pattern could be made of just about anything, with just a few considerations to think about. Keep in mind how the fabric you chose drapes and the ease of working with certain fabrics when it comes to making binding and button-loops.
Silk would make any of these pieces totally swoon worthy. Just imagine an entire layered ensemble made of beautifully combined silks! Mid-weight linen and handkerchief linen are also ideal and would be perfect for transitioning from early spring to summer wearing. Personally, I think spring is best enjoyed while draped in layers of linen! And, cottons of all weights are always perfect. A combination of cotton batiste, lawn, and voile would be perfect for easy-breezy-summer layering. Of course, these a just a few possibilities. Below you will find more options for each specific garment.
The Entari already has built-in drape due to it’s flowing panels. So just about any fabric will work, but something drapey or with a bit of structure is perfect. Cottons and linens of all weights are ideal. So are cotton velvet or rayon velvet. You could also use rayon, flannel, or even knits with a bit of body, all of which would be nice for a gown or robe. Light-weight to medium-weight wools would be a good choice for a coat or long-tunic-vest if you eliminate the sleeves.
Since the vest is more structured, consider the fabrics weight. Also think about fiber content next to the skin, if you plan to wear it on its own. Of course, it can be worn with a top or blouse underneath. All weights of silk, cotton, linen, velvet, wool, felt, flannel, denim, brocade, satin, suede, or upholstery fabric would work nicely.
The Entari and vest are each finished with bound edges and a front button-loop closure, so see the tips below and in our blog post about making and using bias binding and button-loops.
The short jacket is a piece of cake. Quick and easy to make out of anything - just be sure to make the most of the beautiful drape of it’s sleeves. Because this piece can be worn over and/or layered with just about anything, it can withstand a bit more structure. Using a bit heavier or more tightly woven fabric you automatically give this jacket more structure. Wool, linen, cotton, all come in heavier weights and will work well. Velvet, felt, flannel, denim, brocade, satin, suede, or upholstery fabric are good choices too. For a softer look, a loosely woven or light-weight cotton or linen, silks of all sorts, rayon, knits with bit of body, and lightweight wool challis are examples of fabrics with more drape that would give this jacket an entirely different look and feel. This jacket’s edges are also finished with binding so see the tips below to help make your sewing easy.
No matter the fabrics you choose, keep the layering harmonious. Relegate heavier fabrics for the outer most garment layers. If using light-weight fabrics, consider interfacing the pieces with compatible interfacing before construction.
Fabric Tips for Binding and Button-Loop
When making binding and loops the only rule is to avoid a fabric that wants to unravel. Depending on your experience level and bravery, you may want to avoid fabrics that are slippery or heavy. Lighter weight stable fabrics are much preferred when first attempting to make binding and button-loops. Learn more tips and How to Make Binding and Front Button-Loop Closures.
Because these three pieces go so beautifully together they are perfect of mixing fabric weights, patterns, and textures to create an interesting dynamic aesthetic or keeping things elegantly simple with fabrics that blend subtly. Just keep in mind how different fabrics behave when put together. When layering you want the fabrics to slide against each other enough, to allow for easy getting in and out of and comfortable wearing.
Below are some fabric suggestions from some of our favorite fabric stores. Please note, these suggested fabrics are based on fabrics that are in stock at the time the blog post is written, and may go out of stock from store at some point. If link is invalid for specific product, look for a similar fabric you can substitute.
The textures woven into this golden linen from Stonemountain & Daughter Fabrics are subtle enough to pair with a bolder fabric for the outer layers, yet unique enough to still draw interest. The light weight would suit itself well to the inner-most Entari layer.

Oak Fabrics has a fun and lively cotton lawn option that would make for a more exciting look for the Entari or the vest.

Also from Oak Fabrics is this lovely Russet Stripe cotton flannel. The weight has enough body to be used for any part of the ensemble, and would be beautiful in the jacket.

This cotton canvas from Harts Fabrics is sturdy enough to make for a striking vest or jacket.

For a fabric that would pair nicely with any of our suggested options above, this earthy cotton-linen blend would make a lovely jacket.


by: Cynthia Anderson
There is an allure just in the name of this pattern . . . Turkish Dancer. The sensual lines and aesthetic of the garments seem to tell a hidden story that insinuates a mystique. To fully appreciate this beautiful pattern and to understand it’s origins, you must take a closer look into it’s past.
The making of history is a constant force, but there are times and places when the those forces are so profound, that a cosmic shift seems to occur. This is exactly what happened centuries ago, in a region of the world we now know as Turkey. A perfect brewing of timing, along with the an ideal location, and a plethora of overlapping and unanticipated factors, would create such a powerful and exciting explosive cultural storm, that its sheer impact would maintain its own momentum for centuries. With such a force, it is inevitable that people and the evolution of their clothing would be propelled in tandem as history would be woven. The Folkwear 108 Turkish Dancer pattern represents a selection of garments that come from a blending of multiple cultures over many centuries that is associated with this nexus of history. Turkey’s cultural history became one of the most rich and diverse as any in the world. Due in great part to it’s physical ability to literally connected the east and west, creating a ripe and seemingly ever changing epicenter that would influence a significant part of the world, with an equally exciting and rich array of clothing and textiles to match.
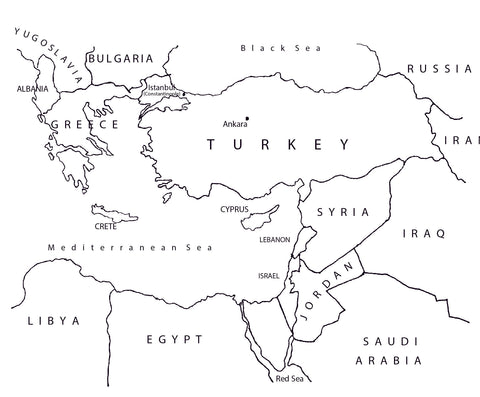
Originally, Turkey was know as Anatolia, which resides on what we know as the Anatolian Peninsula. This outcropping of land is bounded on three sides - the Black Sea to the north, the Aegean Sea to the west, and the Mediterranean Sea to the south. This peninsula served as a natural bridge between Asia and Europe. The orientation of the peninsula resulted in it becoming a central point of trade and therefore saturated with overlapping influences that would culminate over the centuries. One could say that this exchange of cultures, ideas, and goods was one of the first examples of globalization. This long great migration of people would create a fascinatingly diverse place that would influence the world and what it chose to make and wear.
The Turks were originally related to nomadic people of Eastern Upper Asia, and not the Arabs as commonly believed. As the nomads migrated west and south along the trade routes in the Middle Ages, they settled in the rural areas of Central Asia, the northern Arabian peninsula, and eventually the Anatolian Peninsula.
As the Turks gained power in Asia, they infiltrated the Byzantine empire, where they took over more and more territory. After the 6th century the Turks had a dominate presence in Persia (now Iran), Iraq, Eastern Europe, and cemented Anatolia once and for all.
The Turks settled in isolated villages, which ensured many aspects of their inherited Asian cultures were preserved. While at the same time, the proximity of Eastern European and Mediterranean countries influenced and intermingled with their traditions, resulting in an interesting multi-cultural mix. Greek, Roma, Persian, and Arabic cultures had all existed in what is present-day Turkey. This cross pollination of style and design was inevitable. For example, the impact of the geographical closeness of Greece was apparent in the Turk’s Flowing robes, while proximity to the East showed up in the sumptuous embroidery on Turkish textiles.
The Ottoman Empire was formed in 1297 and became the epicenter of Turkish life. By the end of the 14th century, the Ottomans held more territory in Europe than in Asia. Reaching its height in the middle 1500s was marked by advances in government administration, the arts and architecture, and trade agreements with France. At this time, the Ottoman Empire was the largest, strongest, and richest power in the Old World. One can only imagine how interesting and beautiful their clothing must have been! However, as in much of the world’s history, it’s freedoms and resources was relegated to the privilege of men.
What is hard for our modern sense of freedom to fathom, is that half of this plethora of beautiful clothing and culture was hidden out of public sight during the reign of the Ottoman Empire. Because Ottoman women played no open role in public life they were not free to be seen out in the world. If they lived in cities they were confined in to the walls of their homes. If they lived in rural areas they worked in the fields. Women could earn their own money, as long as it did not require any association with men. Typically, women worked as weavers and embroiderers, either in the home or at professional workshops. (Some of these beautiful traditional embroidery patterns and techniques are included in this pattern).
The lives of men and women were segregated in all aspects of life. Even at home, men had their quarters and women and children had theirs. Depending on their families means, women spent their days supervising the work of servants, caring for children, observing religious customs, playing music, sewing and embroidering family linens, dowries, or goods for sale. Because of the limitations on women’s activities and the boredom (and depression) that inevitably resulted, indulgence in opium smoking could occur.
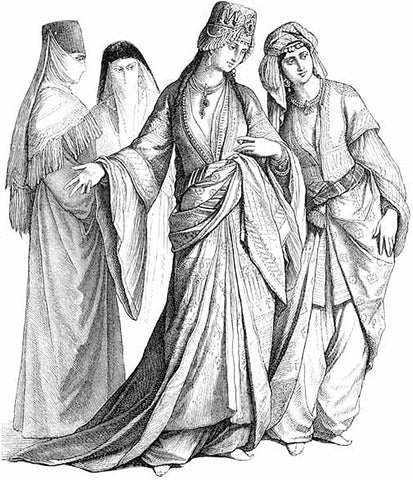
When women left the house, they were required by Islamic law to conceal themselves according to strict rules, usually in enveloping cloaks and veils. Although the Turks descended from Central Asian Buddhists and were exposed to the more inclusive and the freer thinking religions of China, Tibet, India, and Persia, they adopted Islam by the end of the 11th century. Needless to say, the women were not consulted.
The one freeing indulgence that was acceptable for women to engage in was visiting the public baths. Hamman, as the public baths were called, were important social events for women. At the baths, they visit with each other, exchange news and stories (gossip). They worked together on their needlework, ate, and bathed. Women wore their finest clothes to the hamman, where they showed off their dancing abilities and embroidery skills. These women had no idea that their connection to each other, would still hold true through today - through a Folkwear pattern. It is not hard to picture our pattern and all is variations being worn as these women visited, relishing in time to themselves.
History has lead us to believe that women or “sultanas” danced only for men, the truth is that women danced primarily for each other at home in their private quarters or at the baths. If a woman danced for a man, it was strictly in private for their husband only.
Despite half of the Empire’s population being relegated basically to societal non-participation, it continued on. Because of the Empire’s complex historical and cultural diversity, and great climatic and geographical differences, it is an understatement to say there was a great variation in clothing. The reach of the Empire into the Balkans and North Africa influenced the look of indigenous dress, and customary Ottoman dress was, in turn, influenced by the indigenous costumes of those areas. One can identify many common features of costumes across the Empire, yet the integration of regional characteristics made for a beautiful mosaic of Turkish dress.
As history would have it, even great empires are not immune to decline no matter how long and illustrative their histories might be. The Ottoman Empire would prove unsustainable, due to internal strife and corruption. Outside powers would gain an upper hand, which would exacerbate the loosening grip of the empire. Despite this slipping of power, the decline would last several centuries more before the Empire ended. The Empire finally dissolved upon the close of World War I in 1918. In 1922, the last Turkish sultan was overthrown and modern Turkey was born.
Once again a new storm brewed - changing world factors would create another tectonic shift and send history off into new trajectory, dragging behind it old relics that still remain. The grip of history has changed little for women who still live within these ancient cultural norms. This may also explain why creating beautiful clothing and textiles was such an essential outlet for so many women throughout history. The one constant about history is that it never stops playing itself out and some constructs do change, for better or worse. The important part is to have a better understanding of the past, so we can better reshape the present and future. This is a lot to contemplate, but much of history evolves in the quiet recesses of daily life.
Folkwear patterns are more than just clothing patterns. We hope to inspire and provoke interest in the deeper value of how clothing has helped shape the world. We believe that sewing is made richer and therefore more enjoyable when you understand more about the garments you have been inspired to make - including their histories and cultures. Each Folkwear pattern comes with a past life and an incomplete history lesson, as well as “how to’s” using authentic techniques to not only inspire your sewing, but to also create a meaningful link to the past. Folkwear hopes to celebrate each pattern we promote, with a mindful appreciation of the origins and culture that each pattern represents. Clothing is a beautiful way to link ourselves to others. But, to gain a true understanding and respect of all people, it is equally important to look a little deeper into the truths and realities of history and to see how deeply our own reflection looks back at us in the mirror. The evolution of what we wear rarely happens in a clear linear fashion, but manifests in a twisting sequence of often challenging occurrences, as does life.
The next time you use a Folkwear pattern to make a garment that is all your own, we hope you feel a connection, learn something new, and realize you are helping to keep history alive.
We hope you will enjoy making the garments in the 108 Turkish Dancer Pattern and integrate these basic pieces into your person wardrobe, in your own unique way. As always, we love seeing what you are inspired to make!
P.S. Don't forget to check out the blog where you will learn how to make binding and a front button-loop closure for the Folkwear 108 Turkish Dancer Entari and vest.


