-
Sewing Patterns
-
Fabric
- Sewing Supplies
- About
- Blog
- Gallery
-

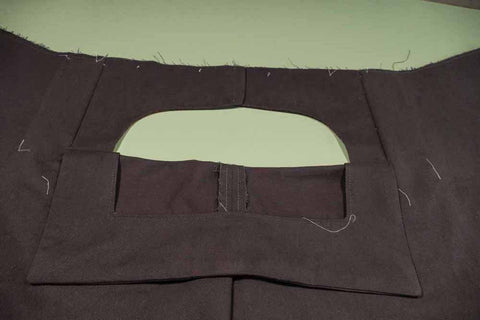
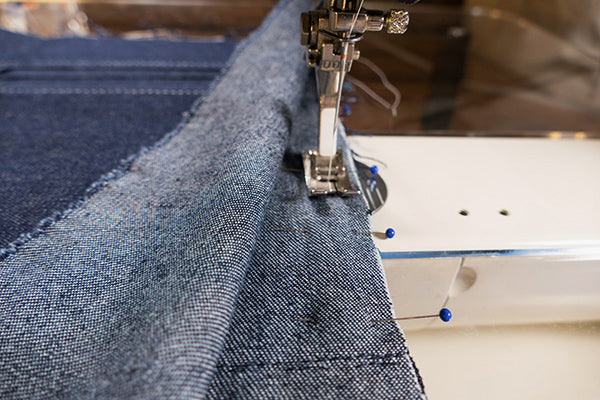
The Center Back Gusset and Back Eyelet Facing
It is time to turn our attention to the back construction of these Sailor Pants. The Center Back Gusset (H) and Back Eyelet Facing (G) are paired together to create the back of the pant feature synonymous with the traditional sailor pant. Originally, this lace-up back eyelet gusset was intended to allow men to just untie the back and slip their pants up or down as needed. However, depending on how the pants fit and your body shape, you just loosen your ties and open one side of the front flap - so that you don't have to unbutton all the buttons to get in and out.
Check out Day One, Day Two, Day Three, Day Four, Day Five, Day Six, and Day Seven of the sew along to see our progress!

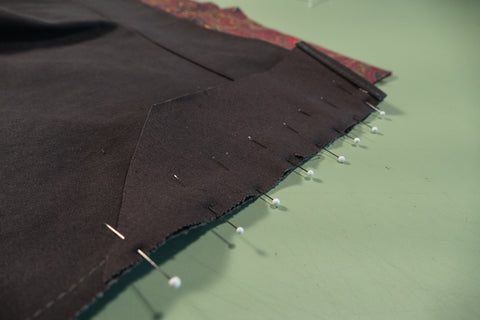
Center Back Gusset H, with paisley fabric lining and the Center Back Eyelet Facings Pieces.
Prepare the Center Back Gusset
The Center Back Gusset is another perfect place to utilize a lining fabric and have a bit of fun. The edges of the Center Back Gusset need to be finished as well. Since, the gusset is not very large, it is a perfect excuse to try a bit of seam binding and show off your fine tailoring skills. I will be doing this at the end of this sew along.
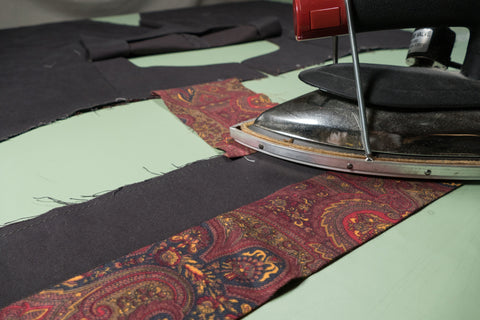
First, with the right sides together, stitch the the main fabric to the lining at the top edge and trim the seam allowance.

Turn and fold, so the wrong sides are together. Press, remembering to roll the edge of the main fabric slightly towards the lining. Leave the remaining edges unsewn for now. Topstitch the top edge of the Center Back Gusset to finish it off and secure the two fabrics.

The top edge of the Center Back Gusset turned and stitched at top edge to finish.
Prepare the Center Back Eyelet Facing G
Now, for the Center Back Eyelet Facing. Turn and press the 1/2" (13mm) seam allowance of the top edges of each Center Back Eyelet Facing to the wrong side. Finish the edge or turn under 1/4" (6.4mm) to meet the top fold if you like. Stitch close to the fold to finish and secure.

The top edges of each Center Back Eyelet Facing turned under.

The top edges of both Center Back Eyelet Facing turned under 1/4" (6.4mm) twice and stitched close to the fold edge to finish.
The two Center Back Eyelet Facing pieces do not need to be faced or lined. Lining would just add to the bulk that should be avoided in this area.
Add the Center Back Eyelet Facing to the Pant Back.
The Center Back Eyelet Facing pieces are now ready to be attached to the back edges of the pants. With right sides together, stitch one Center Back Eyelet Facing to one side of the center pants back, matching the notches. Stitch from the top of the waistband edge to the bottom of the facing. Press the seam towards the pants. Do the same for the other Center Back Eyelet Facing.


Press the Center Back Eyelet Facing towards the pants.
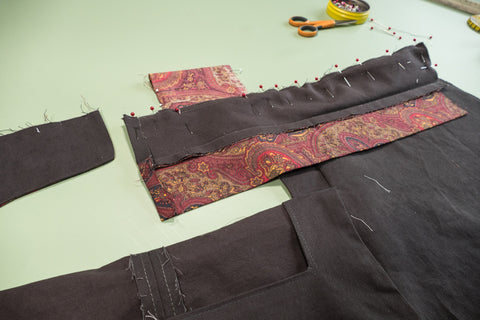
Attach the Center Back Gusset to the Center Back Eyelet Facing Pieces
Working on one side at a time, place the Center Back Gusset assembly on the eyelet facing, with right sides of the main fabrics of each piece together, matching the notches. Pin to secure in place. On one side, stitch a 1/4" (6mm) seam allowance from the top to the bottom of the point. Avoid stitching into the pants. Repeat for the other side of the Center Back Gusset the same way.


Center Back Gusset and Eyelet Facing pined on one edge and ready to be sewn.
 View of Eyelet Facing sew to edge of Center Back Gusset.

One side of the Center Back Gusset and Eyelet Facing sewn and the other side aligned and pined in place.


The back view of the assembled Center Back Gusset and Eyelet Facing.
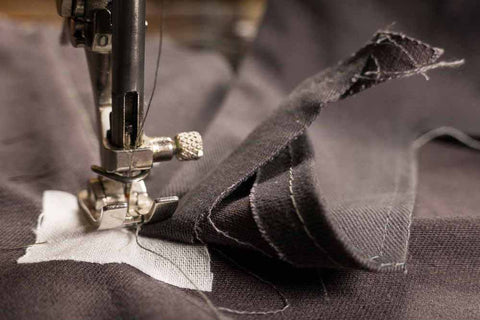
The raw edges of the Center Back Gusset Facing need to be finished. You can serge or use an overcast stitch to finish, if you like. Trim the bottom corners as needed. I am going to finish the edges of the Center Back Gusset with a piece of seam binding, and simply whip-stitched by hand. Seam binding is light weight, easy to work with, and does not add any extra bulk. I have chosen this method of finishing the edges because the seams are only 1/4" (6.4mm) and turning bias tape on such small edges is hard for me to control. Of course, you can use the usual bias tape technique if you chose.

Raw edges of the Back Gusset Facing to be finished using seam binding.

Seam binding sewn by hand with a simple whip stitch.

Wrap the seam binding over the raw edge and repeat the whip stitch on the opposite side.

Whip stitching the seam binding to cover the raw edge.

The raw edges of the Center Back Gusset finished with seam binding.
The back of the pants are now together and you can really see them take shape now. On Day Nine of the sew along we will finish up the last of the construction work on the 229 Sailor Pants, by adding the godet to the legs and sewing the back of the pant up!

Front Coin Pocket Option and Adding Waistbands to Pants.
We are going to add the waistbands and their pockets to the pants in today. We constructed the welt pocket in the right waistband on Day Three of the sew along. The waistband and waistband curtains were assembled ahead of time on Day Four of the sew along.
With that bit of prep work done we are left with adding a coin pocket to the LEFT side of the front waistband. This little addition is a hidden gem, the construction of this pocket is easy and you will love adding it to other garments as well. I find this pocket perfect for keeping my stick of lip balm readily available or for holding a car or house key. The opening of this little pocket is in the seam allowance at the edges of the waistband, where it connects to the front of the pants. This fun pocket is optional, but I hope you will try it. If you prefer to leave the coin pocket out, just skip ahead to Assemble the RIGHT Waistband to Pants (and do this step for both waistbands).
Check out Day One, Day Two, Day Three, Day Four, Day Five, and Day Six of the sew along to catch up!
The Coin Pocket (K) pattern piece is a single rectangular piece of fabric that folds to create the pocket bag. This coin pocket can be made even more fun with a creative touch. This simple piece is a perfect excuse to use your lining fabric, which is exactly what I am going to do. You can finish the long edges of your fabric piece K now if you like. However, I am going to finish the side edges of my coin pocket with a hand stitched bound seam, after it is assembled to the waistband.

Coin Pocket and waistbands waiting to be sewn to the pants.
Coin Pocket goes on the LEFT front waistband.
Take a minute and orient your Waistband/Waistband Curtain and Coin Pocket like you see in the photo below.
With right sides together, pin one short end of the pocket bag to the bottom edge of the left waistband, matching the dots.


Use pins to align the pocket bag dots.

With right sides together, pin one short end of the pocket bag to the bottom edge of the left waistband.
Keep the waistband curtain out of your way as you work. The idea is to stitch the pocket bag edge and bottom edge of the waistband together, only between the dots. Stitch the pocket bag to the waistband just within the 1/2" (13mm) seam allowance, between the dots. Back stitch at each dot. Making your stitch just inside the seam allowance will keep the pocket bag from being visible when complete.

With right sides together the pocket bag sewn to the bottom of the waist band between the dots.
Coin Pocket Attached to the Front Pant Edge.
Now, we need to sew the pocket bag to the front of the pants, which is actually the left Front Dart Gusset Facing. Orient your work, with the outside of the pant facing up (we are working on the righthand side of the pant as it faces you).

With right sides together pin and sew the other short end of the pocket bag to the left Front Dart Gusset Facing, matching the dots. Be sure to sew through both layers of the Front Dart Gusset Facing, between the dots and just within the 1/2" (13mm) seam allowance just like we did before. Back stitch at each dot.


Another view of the Pocket Bag and Front Dart Gusset sewn together, between the dots.
Press the Coin Pocket Bag
With right sides facing up, press the pocket away from the waistband and away from the pants front as seen in the photos below.

Sewing the Waistband with the Coin Pocket to the Pants.
The waistband containing the coin pocket (left waistband) is sewn to the waist band of the pant in two separate steps.
First, pin the entire waistband to the pant to be secure. Keeping the waistband curtain out of the way, pin only the waistband to the pants and Front Dart Gusset Facing, with right sides together. Match the notches and the pocket edges. Align the Waistband and the Front Dart Gusset center fronts.
Waistband with coin pocket pined to the pant.
Stitch from the back edge of the pant, stopping at the dot on the side of the pocket bag. Back stitch to secure, then pivot your garment to stitch down the side of the pocket to the bottom. Back stitch to secure.
 Start sewing at back of the waistband and stitch towards the dot at the edge of the coin pocket.

Back stitch at the dot, just before pivoting at the edge of the coin pocket.

When sewing the front portion of the waistband to the pant, turn your work over and re-pin the waistband to the pant starting at the center front, as seen in the photo below.
Stitch from the center front toward the front pocket. Back stitch and rotate at the pocket dot and stitch to the bottom of the pocket. Back stitch to secure.

Front of waistband and coin pocket pined and ready for sewing.
Finishing the Coin Pocket
Now that the waistband with the coin pocket is sewn to the pants, the pocket bag should hang down into the inside of the pant. Getting the coin pocket to hang the way it should, depends on how you finish the seam allowance the pocket is sewn onto. You can finish the pocket a couple of different ways. Either press the waistband seam allowance down toward the pants, knowing the waist band curtain will cover the seam.

Seam allowances pressed down towards the pants.
Or, press the waistband seam up toward the waistband and clip the seam on each side of the pocket, so it will lay flat.
Press the pocket toward the pants.

The waistband seam allowance is press upward, clipping at the pocket edges allows the pocket to hang down properly.

View of the front of the pant with the waistband attached and the coin pocket peeking out.

The right waistband with the coin pocket and the waistband curtain laying open.
Assemble the RIGHT waistband to the pant.
Now, it is time to add the the right waistband. In Day 3 of the sew along we constructed a Welt Pocket in the right waistband. Even if you chose to not add the welt pocket, the assemble is the same (just ignore the welt pocket in the photos below). And, if you chose to not add the coin pocket, you will do both waistbands this way.

Welt Pocket with waistband curtain ready to be assembled to the pants.
With the right sides together, pin the waistband to the pants at the waist, matching the center front and notches; stitch together. Keep the waistband curtain out of the way while you work. If your waistband has a welt pocket added to it, be sure to keep the pocket out of the stitching.
Press the seam allowance towards the waistband. Press the front seam allowance to create a clean finished edge.

Waistband with welt pocket pinned to the pants and ready to be sewn.

The left waistband with the welt pocket and the waistband curtain laying open.
Your pants should now have a right and left waistband (with or without pockets), with the seams all neatly pressed. Trim allowances of any bulk.

The inside of the pant with pockets and the waistband curtain folded down hiding the seam allowances.

The outside of the pant with the Front Buttonhole Facing folded down.

The outside of the pant with the Front Buttonhole Facing folded up.
On day Eight of the Sew Along we will work on the back of the pant and add the Center Back Gusset and Eyelet Facings.
Attaching the Front Dart Gusset to the Pant
Just one more construction feature to add to the front of the 229 Sailor Pants, and the assembly of this piece has an interesting turn at the end!
See Day One, Day Two, Day Three, Day Four, and Day Five of the Sew Along to see what we have done so far!
To get started, you should have two Front Dart Gusset Facing B pieces cut from your main Pant fabric, that are mirror images of each other. And two more pieces, either cut from the same main pant fabric or from the lining fabric (also mirror images of each other).
This is a feature that can be faced with a lining fabric or the same fabric as your main pants. To face my Front Dart Gusset Facings, I am using a paisley print lightweight wool challis as my lining fabric. When using a lining fabric that is different from your main pant fabric, remember the idea is to not see the lining fabric on the outside of the pant. When you press the pieces later, be sure to carefully roll the seam edges of your main pant fabric to the inside of the pant. The lining on the Front Dart Gusset Facing is for the inside of the pants only.

Pin and sew the Front Dart Gusset pieces together.
With right sides together, match the notches and align the edges of the two pieces comprising (the outer and inner) Front Dart Gusset Facing piece. Pin, then sew around all the curved edges of one Front Dart Gusset Facing. Leave the top edge (with the notch) open.


Trim the seam allowances and turn the front Dart Gusset Facing.
Clip the curves and trim the seam allowances. Turn the newly sewn up Front Dart Gusset Facing right side out and press. Remember to roll the main pant fabric to the inside.


Sewing Front Dart Gusset Facing to the pant.
With the right side of the pant facing up, place the right side (main fabric) of the Front Dart Gusset Facing to the right side of the pant, matching the dots around the slash.
You may find it helpful to sew a straight line, using a basting stitch, between the two dots on the Front Dart Gusset Facing and on the pants. These lines will serve as a pining and sewing guide, which can be seen on either side of your work. The idea is to match the stitch line on the Front Dart Gusset Facing with the stitch line at the pants slash. Leave long tails on each end of the basting stitch, so they can easily be removed once the Front dart Gusset facings are sewn in place.

Photo of guide line sewn on Front Dart Gusset Facing


Right side of Front Dart Gusset to right side of pant with dots aligned.
Now, turn the pants over, and finish matching the stitch line on the Front Dart Gusset Facing with the stitch line at the pants slash. The line on the pants goes from 1/2" (13mm) seam allowance at the top of the pants and tapers to almost nothing at the dot. Pin to secure, and stitch along the stitching line, backstitching at each end to secure. Take care to keep the Buttonhole facing out of the stitching.
Repeat this process for the remaining Front Dart Gusset Facing piece.


Another view of the Front Dart Gusset Facing aligned and pinned to the pants. The Front Buttonhole facing is folded back.

Starting sewing from the top dot and sewing down, using the stitch line as a guide. Back stitching at both ends.
Up close view of stitching at the bottom dot, with the Front Buttonhole Facing out of the way of the stitching.

Starting sewing from the bottom dot and sewing up, using the stitch line as a guide. Back stitching at both ends (this may work better for left side of pants).
Finishing the Front Dart Gusset Facing.
Now turn the Front Dart Gusset Facing to the inside of the pants, and press the the seam toward the back. I just love how that bit works. The Front Dart Gusset Facing now becomes part of the front of the pants.

View on the right side of the pant with the Front Dart Gusset Facing sewn in place.

View on the right side of the Front Dart Gusset facing about to be turned to the wrong side of the pant.

Turning the Front Dart Gusset to the inside of the pant.

The right side of the pant up, with the Front Dart Gusset facing in place and the seam being pressed.

Another view of pressing the Front Dart Gusset Facing seam.
Views of the Front Dart Gusset Facing and Front Buttonhole Facing.

The right/outside front side of the pant showing the Front Buttonhole Facing folded down, revealing the Front Dart Gusset Facing.
Another view.

The inside/wrong side of the pant showing the Front Dart Gusset Facing.

The right/outside of the pants with the front dart gusset attached and tucked away in side the pants.
Now, you have all of the front pant flap construction done. On Day Seven of the Sew Along we will add a Coin Pocket to the left waistband and sew the right and left waistbands to the pants.

Attaching the Buttonhole Facing to the Pants.
On today's sew along we will focus on attaching the Buttonhole Facing (C) to the Pants Front. We will be creating the iconic Sailor Pant front flap that will eventually house all those fabulous buttons!
Check out Day One, Day Two, Day Three, and Day Four of the sew along if you need to catch up!
Finish the raw edges first.
Before attaching the Buttonhole Facing to the pants, we need to finish the raw edges of the Buttonhole Facing. To do this, fold up the 1/2" (13cm) seam allowance to the wrong side along the BOTTOM edges following the instructions below.
First, I have sewn a 1/2" (13cm) stay-stitch on the bottom edges to use as a guide for turning the edges under. I find that making a quick stay-stitch on the sewing machine to mark this seam allowance is quicker than measuring with a ruler. The stay stitch is also useful as a corner cutting guide too. The stay-stitch can then be quickly removed if you want.

Next, cut a small slit at each corner, to the dot. Be sure to cut just up to the 1/2" (13cm) corner intersection and not beyond. This little cut will release the fabric in the corner and allow the seam allowance to fold up easily. Press to create a clean edges.
Then, stitch close to the folded edge to secure the folded edge and create a nice clean finish.

Typically, I would encourage you to add an interfacing to any area that will be receiving button holes, due to the amount of use on the area. However, this front flap is the stand out feature of this pant design. When button hole are cut, often the interfacing has a habit of showing or peeking out. For this reason I am not using interfacing and I am not going to encourage you to either. The recommended fabric weight used in this Sew Along should be heavy and stable enough for buttonholes. Once the Buttonhole Facing and pant are assembled the fabric will be doubled and will have a fair amount of heft.
Prepare the front of the pants to receive the Buttonhole Facing.
Since we are going to be cutting the fabric at the slash lines, it never hurts to add a small 1" square of fusible interfacing on the wrong side of the pant at the bottom of the slash line. This fusible interfacing will add a bit of stability and reinforce a potentially unstable spot.


Originally, all the pattern markings were transferred from the pattern to the right side of the front of the pant. If you are not going to use the stay-stitch guides, I find it helpful to draw the slash line on the front of the pant fabric to use as a guide when cutting the slash.
Cut the slash line from the top of the pants to the dot at the bottom of the slash line. Do not cut past the dot. The fusible interfacing may help you to see your cutting more precisely.

Be very careful not to cut past the small dot or past the stay stitch line.


Attaching the Buttonhole Facing to the pants.
With the right sides together, pin to secure the top of the Buttonhole Facing to the top front of the pants, matching the dots at the corners, notches, and center front. Sew from one dot to the other with a 1/2" (13mm) seam allowance. Back stitch at the start and finish of each dot.


Now, we will sew the sides of the Buttonhole Facing to the pants along the stitch line. First, turn your work over to the wrong side of your project, focusing on one side of the Buttonhole Facing at a time.
Match the lower dot on the Buttonhole Facing with the dot at the bottom of the slash on the pant. Pin using the stitch line on the pants as a guide.

Sew the side of the Buttonhole Facing to the pants between the top and side dot. You will be stitching along the the stitch line on the pants, tapering from 1/2" (13mm) at the top dot, to the dot at the end of the slash. Be sure to back stitch at the dots to secure.
Note: To make your sewing easier to maneuver, you might want to reverse your stitching on the left side of your work. Start your stitching at the bottom point, following the stitch line, gradually tapering to the 1/2" (13cm) at the top dot of the pant. Once again be sure you back stitch at each dot.

View on the wrong side of the pant of the Front Buttonhole Facing sewn on one side to the pant at the slash line.

 The top and both sides of the Buttonhole Facing (wrong side up) sewn to the pant front (right side up).
Turn the Buttonhole Facing to the inside of the pants.
All that is left is to turn the Buttonhole Facing to the inside of the pants. Clip, trimming the top edge corners and turn the Buttonhole Facing to the inside of the pant.

Trim the corners before turning.

Press to set the Front Buttonhole Facing.
Be sure the corners are well crafted and press the seams rolling toward the inside of the pants. Press well to set the edges and corners.
Turn under 1/2" (13mm) on the Buttonhole Facing below the slash point and press.

Press the edges, rolling the seams inward.

The edge turned under for a clean finish.

We are almost finished with the construction of the front of the pant. On Day 6 of the Sew Along we will assemble the Front Dart Gusset Facing to the front of the Pant.

Waistband and Waistband Curtain Assembly.
This waistband actually has a curtain on the inside of the pant. This simple curtain hangs 1/2" (12mm) below the inside of the waistband and hides the seam allowance construction, for a nice finished look. This is such a nice feature that can easily be added to other projects with waistbands. Have a look at what we have done so far on, Day One, Day Two, and Day Three of the Sew Along.
Today, we will just be assembling Waistband E and the Waistband Curtain F. This pairing will be added to the pants later in our sew along series.
First, fold each waistband curtain wrong sides together, matching the long edges, and press.
 Waistband and Waistband curtain cut out and ready for assembly.
With right sides together, place one Waistband to one Waistband Curtain with the top raw edges of both pieces aligning and match the notches. Then pin the top raw edge to secure. The center front edges should matching together. The back edge of the Waistband will be longer then the Waistband Curtain. Stitch together at the top raw edge seam allowance, being sure to back stitch at the start and finish.

Waistband and waistband curtain pinned ready for sewing seam allowance.

Waistband and waistband curtain sewn at top raw edge.

Waistband and waistband curtain sewn together.
Open up the waistband and waistband curtain and press the seam open.

At the center front, fold the 1/2" (13mm) seam allowance of both pieces to the wrong side and press creating a clean edge.

Then, fold the waistband and waistband curtain together with wrong side of the waistband facing the waistband curtain, and press. Be sure to roll the waist band edge toward the waist band curtain, so the waist band curtain will not be seen on the outside of the garment. You can understitch the waistband curtain here if you like, but you may be topstitching later, so it may not be necessary. Be sure the center front edge is straight and pressed to the inside.
 Center front edge pressed under.
 Waistband and waistband curtain complete for now.
Go ahead and repeat this construction on the other waistband piece with the welt pocket construction. Even if you are not including the welt pocket, it will be nice to get the prep work done for both waistbands, which we will assemble to the pants later in our sew along.
With the waistband and waistband curtains assembled, set them aside.
Join me on Day 5 of the Sew Along and we will assemble the Front Buttonhole Facing to the front of the pants.

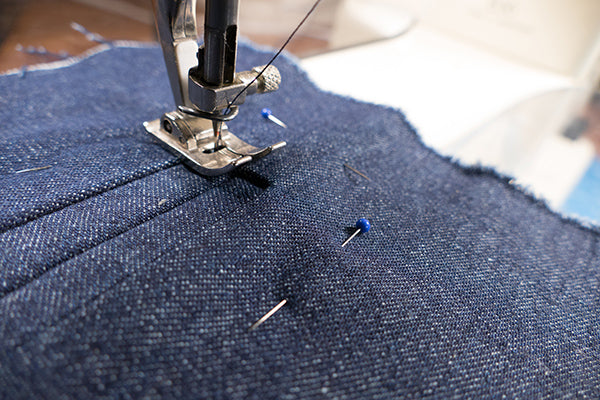
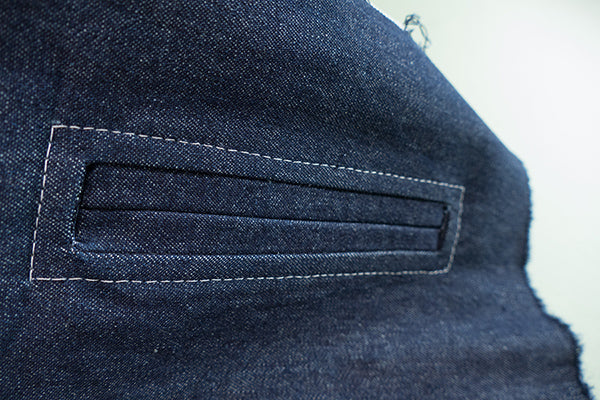
Adding a welt pocket to the back waistband
The 229 Sailor Pant is loaded with design features and in this Sew Along we are going to learn how to make a fine pocket tailoring technique known as the double welt pocket. This pocket opening is actually built into the back waistband of the pant. Most welt pockets are made using with one or two welts. "Welt" refers to the narrow fabric strips that bind and cover the edges of pocket openings, which in this case will be double. The actual pocket bag is hidden away inside the back of the pant.
If you haven't already, check out Day one and Day two of the sew along.
There are many methods in making a welt pocket, whether incorporating one or two welts. Here, we are going to learn how to make a double welt pocket, with a simple, yet beautifully engineered technique, without the usual separate welt pieces. Instead, this simple technique creates welts by simply folding the fabric is place!
The pattern has designated the welt pocket to be located in the back RIGHT waistband (as you are wearing the pant). As noted on the Waistband pattern piece, move the the rectangular welt pocket opening over 1" (2.5cm) toward the center back, for each size larger than the size 30.
Today, we will be working with three fabric pieces: RIGHT Waistband E, Pocket Welt I, and Pocket Bag J.
Step 1: Adding Fusible Interfacing
Learning to make a welt pocket is not difficult, but measuring precisely and ensuring accurate placement and stitching is important. With that said, the first task is to create a well crafted pocket opening. The pocket opening is indicated on the Waistband and Welt Pocket. Transfer the pocket opening markings on the pattern to the wrong side of Right Waistband and Welt Pocket. Be sure the rectangles are straight on your fabric pieces.
The pocket opening can potentially get a lot of use and could benefit from some added strength and stability. Adding a bit of fusible interfacing will help ensure this needed reinforcement. Cut two pieces of light weight fusible interfacing measuring, 1-1/4" x 5 3/4" (3.2cm x 14.6cm) each. Center and draw the pocket opening rectangle (3/4"x 5" (1.9x13cm)) on the fusible interfacing.
Use a pin to help align the corner markings of the rectangles on the interfacing and the Waistband. Iron one piece of lightweight fusible interfacing to the wrong side of Waistband, over the pocket opening markings. Use a pin to help align the corner markings and iron the other piece of fusible interfacing to the wrong side of the pocket opening of Welt Pocket.

Using pins to align the corners of the pocket opening with interfacing.

Iron fusible interfacing to wrong side of Welt Pocket I
The fusible interfacing also gives you an easy place to draw your guide lines and using it will help stabilize the fabric once you cut the corners to prevent fraying out at the corners.

The rectangular opening drawn out with care.
The photo below shows the fusible interfacing aligned and ironed to the wrong side of Waistband and Welt pocket. Notice I am using a lining fabric for Pocket Bag... for a creative touch.

Step 2: Sew the Pocket Welt and the Pocket Bag
With right sides together, stitch the Pocket Welt (I) and the Pocket Bag (J) at the bottom edges. These two pieces now become the pocket bag. Finish the bottom seam.

Welt Pocket I and Pocket Bag J right sides together and sewn at bottom edge.
Step 3: Align The Pocket Openings
Pin the right side of the Welt Pocket to the right side of the Waistband, using pins to carefully match and align the corners of the pocket opening.

Use pins to align the corners of Waistband and Welt Pocket.

Waistband and Pocket Welt pined and aligned and corners.
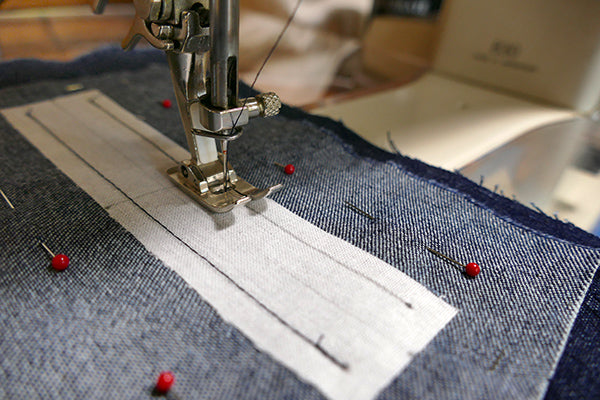
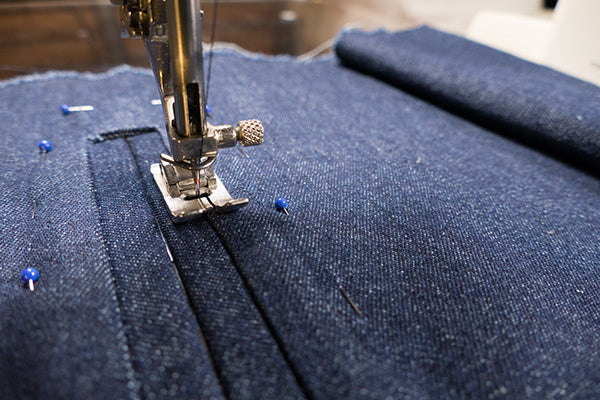
Step 4: Stitch Parallel Lines
To secure the Pocket Welt to the Waistband, stitch along the horizontal (longer) parallel lines of the welt pocket opening. It is important to make sure you start and finish in the same place for each line. This is important to ensure a rectangular pocket opening (rather than a parallelogram or a skewed pocket opening). You may need to adjust the stitch length when you reach the end of the line, in order to end exactly where you want. Or, turn the last stitch or two with the hand wheel to ensure you are exact. Back stitch at each end.

Needle inserted precisely on the corner to start stitching

Sewing the parallel lines each precisely the same length to create a perfect rectangle.

The parallel lines of the rectangle precisely sewn.
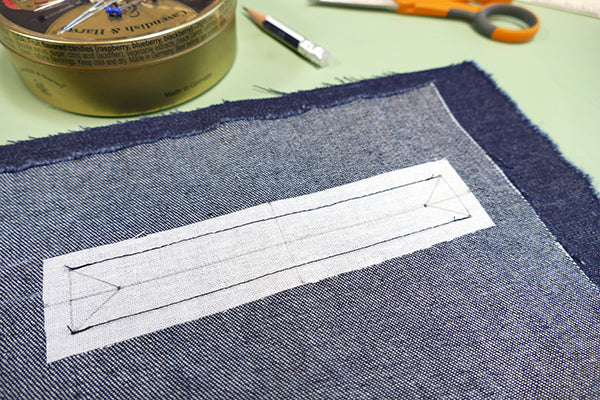
Step 5: Prepare & Cut Slit Pocket Opening
If you have not already, draw a horizontal center line between the two parallel lines you just stitched. Measure in 1/2” (13mm) from the vertical, or short ends, of the rectangle and mark with a dot. Draw an angled line from the dot to each corner to create cutting guide lines. Repeat on the other vertical end of the rectangular opening. These markings are on the pattern pieces, so you can use them as a guide.

Drawn center parallel line and corner cutting guides.
Fold the pocket in half (use a pin to be sure the center line is aligned) and cut a small slit through all the layers of the fabric. This initial snip will help you get started in cutting the center horizontal slit line.

Use a pin to align the center parallel line.

Make initial small cut on the center guide line.
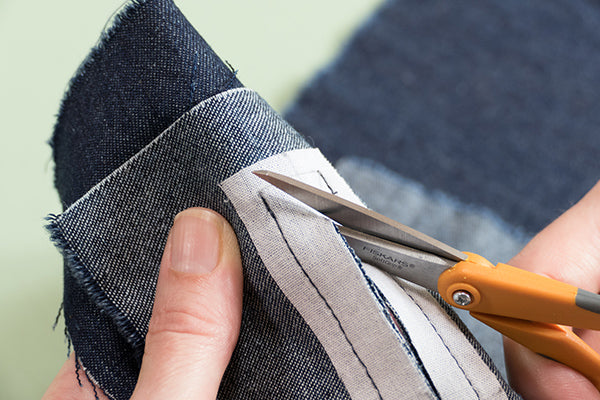
Continue to cut along the center line and stop at the dot you marked. Then cut diagonally, to the corner edges using the guide lines you drew in. Cut as close a possible, without cutting into the stitching and cut just up to the corner and not beyond.

Cutting center line of welt pocket opening.

Carefully cutting to corner of welt pocket opening.
Step 6: Pull the Pocket Bag Through the Slit
Now we need to pull the whole pocket bag through the slit to the other side (to the wrong side of the garment fabric).

Pull the pocket bag through the slit pocket opening.
 View of the fabric pulled to the opposite side before shaping the edges and corners
Step 7: Shape the Pocket Opening
Take a minute and get re-oriented. The right side of the garment should be facing up and the right side of the Pocket Welt/Pocket Bag should be seen facing up through the opening. The interfacing pieces will not be visible.

Right side of waistband facing up to start shaping pocket opening
Now, use your fingers to manipulate the stitched edges of the rectangle opening into straight crisp edges. Gently pull and twist the fabric to set the shape of the corners and pinch with your fingers to create right angle corners.

Use your fingers to shape the edges and corners of the pocket opening.
The idea is to create a well crafted rectangular pocket opening. Once you are satisfied with the rectangle pocket opening, press to set.

Press the edges to set the pocket opening.

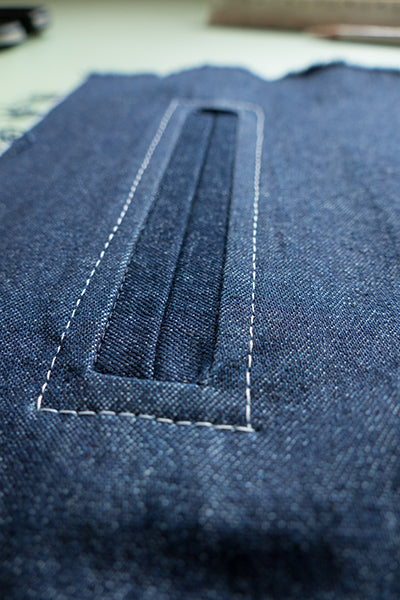
The rectangular welt pocket opening.
Step 8: Creating the Welts
Turn your work over, with the wrong side of the Waistband and the right side of the pocket fabric should be facing up.
Now, we are going to make the welts. To do this, simply fold the top of the Pocket Welt into a pleat so that the top half of the pocket opening is covered. To help ensure the pleat aligns exactly with half of the opening, mark the center of the short edges as a guide. Press the top welt into place creating a nice clean edge to the pleat and pin to secure.

Folding top welt pleat to cover half of pocket opening
Now, fold up the bottom of the Pocket Welt into a pleat so that the bottom half of the pocket opening is covered and meets in the center. Be sure that each welt pleat is the same width and align touching in the center. Press the bottom welt into place.

Folding up the bottom welt pleat to cover the other half of the pocket opening.

View of the welt pocket pleats folded on the backside of the waistband.
Turn your work over, so the right side of the Waistband is facing up, and inspect your welts. Realign and press again if you need to. Make everything as neat as you possibly can.

Making sure the welts are even.

Step 9: Sew Welts in Place
Now, the welt needs to be secured in place. There are three suggested techniques to tack the welts in place and secure the integrity of the pocket construction. I will demonstrate all three versions to create a detailed finish and completely ensure a secure pocket opening. Be sure the pocket bag is out of the way before you start.
Version 1: Stitch and back tack the shorter vertical edges of the pocket opening on the inside of the pocket opening. This secures the welts to the underneath of the pocket. Use thread that blends into the fabric when using this version. But, to really secure the welts, use version 2 or 3 as well.

Stitch and back tack the shorter edge to secure the welts underneath the pocket.
Version 2: Edge stitch or stitch-in-the-ditch all the way around the inside of the welt. Use thread that blends into the fabric when using this version.
 Edge stitch or stitch-in-the-ditch all the way around the inside of the welt.
Version 3: Top stitch all the way around the pocket opening outer edge. This not only secures the pocket, but adds a detail that can be played up or down. Use a thread that blends with your garment fabric, or use a contrasting thread to stand out. If using a contrasting thread, avoid back stitching. Top stitching adds a casual or sporty aesthetic, so if you are going or a more elegant look you may want to skip top stitching.

Top stitching around the pocket opening creates a nice detail and secures the welts in place.
To create a sharp corner when top stitching, instead of pivoting your sewing at the corners. Leave a long tail thread (top thread) on the right side of your work and an equally long (bobbin thread) tail on the underneath side of your work. Thread the top thread to a needle and pull through to the underneath side. Using the ending stitch length to determine where to pull the thread to the underneath side. To secure the stitch, tie the two threads together a few times and cut to tidy the long threads.

Thread the top thread tail through a needle and pull to the backside.

The corner threads of the top stitching tied off on the backside of the pocket opening.

Close up of the top stitching corners. Notice the stitch-in-the-ditch stitching too.
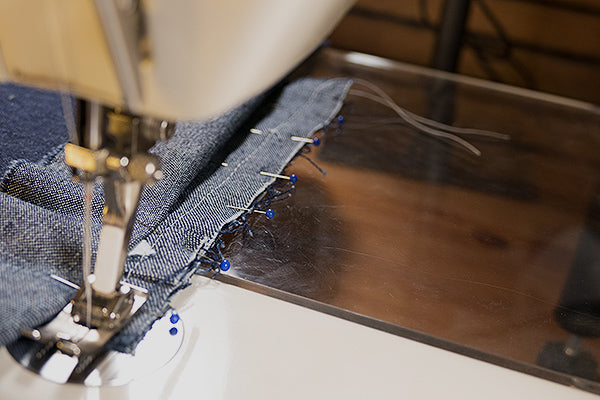
Step 10: Stitch Up The Pocket Bag
Fold the Pocket Bag up to face the Pocket Welt. Align the sides and pin into place. Then, sew both sides of the pocket using a 1/2" (13mm) seam allowance. Being sure to back stitch at the start and finish. Finish the pocket edges in any technique you prefer when making a finished garment.

Sewing the side seam edges of the pocket. Notice the waistband is folded back and out of the way.
Now, the top of the pocket needs to be sewn up. With the right side of the Waistband facing up, fold the top of the Waistband down over the welt. The idea is to move the fabric out of the way so you can sew the top of the pocket together and get as close as possible to the welts.

Sewing the top of the pocket closed. Folding the top of the waist band out of the way.
The welt pocket is complete!
Set this portion of the project aside for the time being. We will attach the waist band to the pant after we do a few other things first.

The waist band welt pocket is complete.

A peek at the pocket lining.
Hope your Welt Pocket was a success! Next, join me for Day Four of the Sew Along and we will assemble the Waistband and the Waistband Curtain.

Cutting and Assembly of the Front and Back of the Pant.
Now that you have made all the necessary sizing and lengthening adjustments to customize your Sailor Pants pattern, we will start cutting and sewing! Check out the prep work in Day 1 of the Sew Along.
Most pants patterns have a front leg pattern piece and a back leg pattern piece, This pattern is a bit different, with only one leg pattern piece. The front and back leg are built into the same piece. This design eliminates an outer side seam. The leg piece actually wraps around the leg and connects at the inner leg seam.
We have two leg pieces to cut out and each leg pattern piece should be cut out separately, one at a time. Cutting the pieces one at a time will help to ensure accuracy which is especially important to this design, as well as insuring each leg is cut on the grain (otherwise the legs can start to twist when you wear your pants). Spread your fabric out in one flat layer. Because, this leg pattern piece are rather large, take the time to access how to lay your pattern out so everything will fit and stays on grain. Spread out on the floor if you need to. Below, is an example of the layout of pattern pieces on the fabric and lining, I am using.
Note: It is always a good idea to make a muslin the first time you try a new pattern. Making a muslin frees you to try new techniques, make adjustments and simply familiarize yourself with your project without the added pressure of possibly messing up. It is like a practice round. You can use cheap fabric, leave off details that are not important to fit, and not finish seams.

Cutting your fabric
Place the leg pieces on the fabric first since they are the largest. Remember one of the legs will need to be flipped over with print side down to cut out of the fabric. You want to cut out two leg pieces that are a mirror image of each other, and you want them cut on the grain (so you need to cut them separately and flat, flipping over the pattern to cut out one of the legs).
Depending on your fabric, pay close attention to any directional elements, like the nap or design/pattern/plaid considerations. You do not want the directional elements of one one leg going in the opposite direction from the other! If using a fabric with a directional element be sure both pant pieces are a mirror image of each other as well.
You will need to cut two legs, two waistbands, two godets (if using), two front dart gusset facings, two center back eyelet facings, one center back gusset, one buttonhole facing (on the fold), and one welt pocket (if using) from the main fabric. If you are using a lining fabric (like we are in this tutorial), you will cut two front dart gusset facings, two waistband curtains (on the fold), one center back gusset, one pocket bag (if using), and one coin pocket bag (if using) from the lining. Of course, you can cut these pieces from your main fabric instead of a lining fabric, if you want. Or, you can cut the welt pocket from the lining fabric (for a little fun visual since this piece will be seen from the outside of the pants). Options are up to you!
Pin or weigh all your pattern pieces to your fabric and carefully cut them out of the fabric. Once you have cut out the legs, you can fold your remaining fabric in half being sure the grain is aligned, and cut the remaining pieces. Be sure to pay attention to the grain lines for each pattern piece.
Before you remove your pattern pieces from your fabric, be sure to transfer all necessary instructional marking to the RIGHT side of the fabric. And, make sure your notches are in place. You can use chalk, a tracing wheel, tailor's tacks, or water soluble marker to transfer the markings to your fabric. I have added simple tailor's tacks to indicate the placement of the corners of the top-stitching to be added latter on. I have drawn in the stitch line and slash line as well. Be sure to add these guides to both sides of the center front of the pants with removable marking tool.

Stitch line and slash line drawn on front to each side of pant.

Because we will be handling and manipulating this project at lot during the process of making it, I recommend that you add a stay stitch (sew a line with shorter stitch length) just inside the seam allowances of the leg inseams. This stay stitch will add stability that the curves most definitely need.
Step One: Assemble the Pant Front/Back
Sewing up the Center Front of the pants is the first step in constructing the 229 Sailor Pants. With the right sides of Pants A together, match the notches at the center front and stitch from the top edge to the crotch. You can finish the seam now or wait until later in the process. Press the seams open.

Front pined and crotch sewn. Notice the stabilizing stay-stitching inside the seam allowance

Seam allowance pressed open on wrong side.

Front of the pants sewn up.
That's it for now!
The assembly of the 229 Sailor Pants, is not difficult. However, it is important to follow in the correct order. You will learn some helpful tricks that will ensure your project will go together smoothly. I hope you will try all the techniques offered in this sew along.
Each lesson will be broken down into easy to follow segments, with ample time given for you to sew along. When we are finished you will be amazed with what you were able to accomplish! Hopefully, you will not only be thrilled with your new 229 Sailor Pants, but you will have grown in confidence with all that you have learned.
On Day 3 of our Sew Along we will learn how to make a Welt Pocket in the back waistband of the 229 sailor pants.

Folkwear's newest pattern! Cover illustration by the talented, Candii Kismet.
Folkwear is excited to start the sew along for our new pattern, 229 Sailor Pants - just in time for fall sewing. Read about the pattern and history of the sailor pants to get a feel for the pattern and learn about its history. In the 229 Sailor Pants sew along, all the unique details, elements, and construction will be broken down into eleven detailed and manageable sessions. We will learn and have fun making these uniquely constructed and flattering pant. I hope you will join me for this sew along and create a bit of nautical sewing history of your own!

Below is an outline schedule to help you prepare for what you will be making each day of the sew along.
Sew Along Schedule
Day 1: (today) Preparation- select size, selecting and preparing fabric, getting to know the pattern, prepare the pattern
Day 2: Cutting and assembly of the front and back of the pant
Day 3: Adding a welt pocket to the back waistband
Day 4: Waistband and waistband curtain.
Day 5: The front buttonhole facing and attaching it to the pant
Day 6: The front dart gusset and attaching it to the pant
Day 7: Front coin pocket option and adding waistbands to pants
Day 8: The center back gusset and back eyelet facing
Day 9: Pant assembly and leg godet
Day 11: Finishing the details (button placement, making eyelets, and hemming)
Materials you will need.

... and all the usual tools and notions: pins, scissors, pattern weights, pencil for tracing, measuring tape or ruler, iron and ironing board. And a sewing machine in good working order. A serger is always nice for finishing seams and edges, but not essential to this project - you can zigzag any seam edges to finish on a regular machine.
First, get your Folkwear 229 Sailor Pants Pattern, and think about any sizing and lengthening considerations you may want to implement. The coin and welt pockets are optional. The leg godets are optional, too. Read the pattern instructions to familiarize yourself with the pattern, and have a close look at all the possible considerations before we start.
Fabric & Design Details
Our pattern comes from an original WWII Navy sailor pant, made of Melton wool. Originally, sailor pants were made as work-wear from fabrics such as denim and cotton canvas. These fabrics were common and are still good choices. For the purpose of this sew along, woven fabric is recommended. Due to the slashes we will be making, a fairly tightly woven fabric would be best. A fabric that wants to spread once cut will not be the best choice for the first time you try this project. There are also areas in this project where the layers of fabric can get thick, making a mid-weight fabric easier to work with. Check out our fabric suggestions for this pattern for some good ideas.
Note: Whenever I am on the fence about a fabric weight choice, I consider the areas where the garment will gain thickness due to layering or turning. Fold the fabric the number of layers that will occur, hold the layers between your finger to help you gauge the thickness. Decide if this thickness is too bulky or ok? You can always use a hammer to help with the matter (reduce bulk), which is actually a legitimate tailoring technique.
To ensure a fabric will be easy to work with, look for mid-weight cotton twill, cotton canvas, denim, broadcloth, flannel, etc. Linen and wool are good choices too. For this sew along, I am using a Cotton Sanded Twill in Gray, which has a 60" (154cm) width. We have stocked this fabric because it is ideal for making this pant. This Sanded Twill also comes in Navy. Have a look at the Fabric Suggestions for the 229 Sailor pant on our blog.
When picking out your fabric remember that this pattern is loaded with details and elements just waiting for your creative inspiration. Have fun with the lining and welt pocket pieces … add a bit of unexpected whimsy to be discovered in your design. The buttons, buttonhole stitching, eyelets, and top stitching can be subtle or a feature that stands out. Try your hand at some fine finishing techniques too. I will be adding a bound seam to the back gusset, to finish it off. There are so many details in this pants design just waiting for an special added touch.
Once you have decided on a fabric, consult the size and yardage requirement chart on the back of the pattern.
Sizing, Yardage, and Adjustment Considerations
The 229 Sailor Pant pattern is intended for both women and men. Sizing is is based on waist measurements (sizes 30-42), and the sizing chart provided includes the finished measurements for waist, hip, and upper thigh measurements. Start with the waist measurement you require, and then consider the hip and upper thigh measurements next. This pattern can also be graded between sizes. For example, if your waist measurement is 34" (86cm) at the waist, but you measure 38" (97cm) at the hip, you can pencil in a line from the waist to smoothly go to the 38" (97cm) measurement at the hip. This will allow you to keep the waistband pieces the same as for the waist size. See the sizing and yardage chart (also below) and on the back of the pattern, to help you decide your size and the amount of yardage needed.

The leg of the 229 Sailor Pant is a bit different in construction from most pants designs. This design has no side seam. The inner lower leg seam also incorporates a godet to achieve the classic bell-bottom look. Because of the godet feature, most leg length adjustments should happen at the designated "Shorten or Lengthen Here" line printed on the leg portion of the pattern.
If you need to shorten the leg length, fold the pattern up into a pleat along the adjustment line equal to 1/2 the measurement you wish to shorten. Pin or tape your pattern into place. You do not need to cut your pattern, just take up the extra length by folding up a pleat.
To lengthen, slash along the adjustment line; place extra paper underneath and spread the split pattern pieces to equal the measurement required; pin or tape the extra paper to the pattern pieces to secure.
Note: You can eliminate the godet for a smaller leg flare and a more typical leg silhouette. This also allows for more adjustment in length at the hem.
The crotch length can easily be adjusted in the same manner, using the adjustment lines labeled "Lengthen or Shorten Here" printed on the pattern. Follow the same instructions outlined above to adjust (lengthen or shorten) your pattern piece at the crotch. These pants are high-waisted, and a quick muslin can help you decided if you need adjustments.
Note: If making any sizing adjustments to the pattern pieces, yardage requirements may change.
Have a look at the instructions as to how the pattern pieces layout, as well as the width of the fabric. Purchase enough fabric, depending on the yardage width, for the size you require.
Note: Making a muslin is recommended when trying a new pattern for the first time, especially when making adjustments. Feel free to Sew Along using an inexpensive fabric first.
Prepare Your Fabric
Once you have your fabric, it is a good idea to test for washability and shrinkage. Cut a small swatch 3"x4" (8cm x 10cm) of fabric from the corner of your yardage. Place the swatch on a piece of paper and trace around it. Keep the tracing for a reference. Wash and dry your swatch the way you intend on laundering your finished garment. Now, lay the swatch back down on the tracing and compare. Did the swatch shrink? Did the fabric change in an unacceptable way? If your yardage shrank in a substantial way, you may need more yardage or a different fabric. This little test helps to eliminate any unfortunate surprises resulting in disappointment.
If you are fine with your swatch test, go ahead and prepare to wash and dry your yardage according to how you intend to launder the final garment, or according to any care instructions that the fabric requires.
Before you wash, you can serge the raw edges, or sew a straight stitch or long basting stitch, to the raw edges of your fabric yardage. This will prevent your fabric from unraveling and getting tangled, when being put through the rigors of washing and drying.
After you launder your fabric, determine the right side of the fabric. If it is not apparent, you can choose which will be the right side. Thread a needle with a bit of contrasting thread and catch a few threads of the right side of the fabric, in the selvage. Tie the marking thread off with a few tiny knots to secure. This step can save a lot of time second guessing yourself on which is the right side.
Give your fabric a good pressing, not only to smooth it out so the pattern will lay down well, but to force yourself to give the fabric one last inspection before you lay out your pattern.
Trace off your pattern
In order to preserve your pattern and keep it intact, consider tracing off the pattern size you require and make any adjustments needed on the traced pattern and not on the original. News print or a roll of paper will work. However, Swedish tracing paper is really fabulous for this. Swedish tracing paper behaves like a cross between paper and fabric. It is durable (will take endless pinning and folding) and, is transparent enough to make tracing your pattern easy. It takes both pencil and ink well. It irons well too.
Trace and cut your pattern out accurately. Be sure to add all notches, dots, and instructional markings too.
Join me for Day 2 of the Folkwear 229 Sailor Pant Sew Along!

Our 229 Sailor Pants originate from those worn by WWII Navy seamen. The back-story behind this pattern is that a veteran of WWII came to Isabelle Lott (long-time pattern grader for Folkwear) because he wanted to wear his Sailor Pants to his squadron reunion. However, he no longer fit in the pants. Isabelle drafted a pattern from his original pants and graded them to fit. Then, Folkwear was able to use her pattern to make these 229 Sailor Pants!

Cover illustration by Candii Kismet
This style and design have been worn as part of the Navy uniform, or "Crackerjack" uniform, for many decades; and the nautical style influenced fashion for more than half a century. These iconic high-waisted, bell bottom pants are loaded with all the elements and details of the original, such as the distinctive buttoned front flap closure, lace-up back eyelet gusset, back welt pocket, and inner leg godet. A small hidden coin pocket is tucked neatly in the front waistband seam. All the details of this pants design reflect the practical sensibilities of a uniform combined with a casual sophistication that remains timeless.
Our pattern is intended to be worn by men or women. Sizing is based on waist measurements, and we provide finished waist, hip, and upper thigh measurements. Don't forget that the back gusset provides an extra couple of inches at the waist if needed. And, the pattern can be graded between sizes. For example, if you are a size 34 at the waist, but 38 at the hip, you can pencil a line from the waist to smoothly go to 38 at the hip. You can keep the waistband pieces the same as for the waist size. See the sizing and yardage chart here.
Some of the distinct features:


In the 1910s, women's fashion trends moved towards loose, flowing gowns reminiscent of Classical Greek costumes. These style liberated women's bodies from corsets and other (multitudinous) undergarments. Simple gowns with voluminous fabric, like this Paris Promenade Dress, were shaped with decorative cords or sashes and accessorised with long strands of beads, cords, tassels, and/or pendants.
This simple, but elegant, dress is made from just three main pattern pieces. The dress shape is defined at the waist with a fabric sash that can pass underneath the bib-shaped underdress to tie in the back. The three sections of the dress are also great for putting together interesting fabrics and fabric combinations (prints, colors, stripes, textures, etc.), as well as for adding creative embellishments (around the lower skirt, outline the overdress, or around the bateau neckline.
We do, however, often get questions about this dress and its construction. It is fairly simple once you get the hang of it, but at first glance (and without the whole pattern in front of you), it can be a bit confusing. The construction is different than a typical dress construction - i.e. skirt, bodice, sleeves, collar/facing. In this pattern there is a dress, overdress (and lining), and skirt. A lot of fabric is needed for the dress, in several different sections or main pieces, so understanding how it goes together can help when picking out fabrics, especially if you want to do combinations of fabric. We have a blog post on fabric suggestions which may help you decide what type of fabric to use and give ideas on combinations (many of the suggestions may not longer be available, but the ideas may help).
I'm going to demonstrate below how this pattern goes together using paper cut into the shapes of the main pattern pieces. This is a good technique to use if you want to see what colors or prints might go together well, or to experiment with the look you want before cutting into fabric.
First, here are the main pattern pieces: Overdress and Lining (left), Dress (center), Skirt (right)

When they are cut on the fold, they will look like this:

The Dress (top) has the neckline/opening cut into the top (or middle) of the piece. The Lining (right) is cut from the same piece as the Overdress (left). And the Skirt is cut to have a "V" at the top. There will be one Dress, but two of everything else. I am only showing one Lining, one Overdress, and one Skirt to show how this goes together on one side (front).
First, the Overdress and Lining and sewn together along to top. The Lining will be behind the Overdress, but will be seen from the outside, similar to how a large pocket lining is seen on the outside occasionally, depending on how the wearer moves.

Then, the Skirt is sewn to the Overdress at the bottom of the Overdress.

The Lining is sewn to the bottom of the Dress (the dress is folded so that there is no shoulder seam and the neck opening is at the top). And, the Overdress is folded up over the front of the dress. Now this would make an extremely long dress, much too long for anyone to wear. So, there is one more step.

The skirt is folded up underneath the dress to be sewn to the Lining on the inside. This encloses all the seams inside the dress as well (except for the side seam), and makes the dress a "normal" length.

You can color or draw on the pieces to decide how you might want to have your dress designs - how to put colors, prints, or stripes together.

You can see this is a fairly easy dress to put together, but unusual at the same time. The Overdress is sewn, at the top, to the Dress, and sashes and facings are added. It makes an elegant gown.
One other tip when making this dress, is that there is a LOT of ease in the dress, and many people (including me) often size down one or two sizes to reduce the amount of fabric in the dress. A muslin might be a good idea - and you can just make it with the Dress piece only - to see if the sizing feels good to you.

Have you admired the welt pocket, but deemed it too complicated or beyond your skill level? Follow along this blog post and hopefully you will discover how simple this welt pocket design is to make. There are many methods in making a welt pocket, incorporating one or two welts. Here, we are going to learn how to make a double welt pocket, with a simple, yet beautifully engineered technique, without the usual separate welt pieces. This simple technique creates welts by fold the fabric is place!
Welt pockets are a great addition to any number of garments that require an extra touch of tailored flair. Folkwear offers many patterns that either have welt pockets in them or would be made even more perfect with addition of a welt pocket. Folkwear's 124 Bolivian Milkmaid's Jacket, 209 Walking Skirt, 222 Vintage Vest, 230 Model T Duster, 251 Varsity Jacket, and 263 Countryside Frock Coat, just to name a few favorites. And, the welt pocket design demonstrated here will be featured in our brand new Folkwear pattern (released very soon)!
The welt pocket goes by many names… jet, bound, slit, and besom. This pocket design has a long history of adding to the functionality of men’s waist coats, jackets and pants. "Welt" refers to the narrow fabric strips that bind and cover the edges of pocket openings, which can be single or double. The actual pocket bag is hidden away inside the garment… sometimes between the lining and the outer garment fabric, which keeps it perfectly contained.
As history would have it, women’s clothing has been mostly absent of pockets. It would seem that only women's clothing deemed truly functional, was suitable enough for the addition of pockets. One can only guess that this is the reason welt pockets were sometimes found in tailored women’s clothing like riding habits, which were close cousins to men's riding jackets. Learn more about the pocket history here.
Learning to make a welt pocket is not difficult, but measuring precisely and ensuring accurate placement and stitching. Pocket placement is an important consideration,for ease of accessibility and comfort. Most welt pockets are located at breast level and just above the waist on jackets, vests, etc. Placing pockets within seams and darts can cause extra issues, but not once you have a bit more experience. Thinking about how the inside pocket bag will hang is also a factor. You do not want to see the bulge of items within your pockets. Welt pockets are usually placed horizontally on garments, but they can be vertical or at an angel as well. Once you get the hang of the construction you will see all kinds of new possibilities in incorporating the welt pocket into your wardrobe. It is always worth having new skills in your back pocket (pun intended)!
In this demonstration I am not actually making a finished garment, but showing you how to make a welt pocket as if it were going into a garment. This is a great way to try your hand at not only the craftsmanship that is required for a well constructed welt pocket, but you can easily experiment with different fabric weights and fabric combinations. The welt is a great detail that can be played up or down. The detail may be small but it can add an unexpected touch of whimsy or elegance… all it takes is creative consideration.
Getting Started
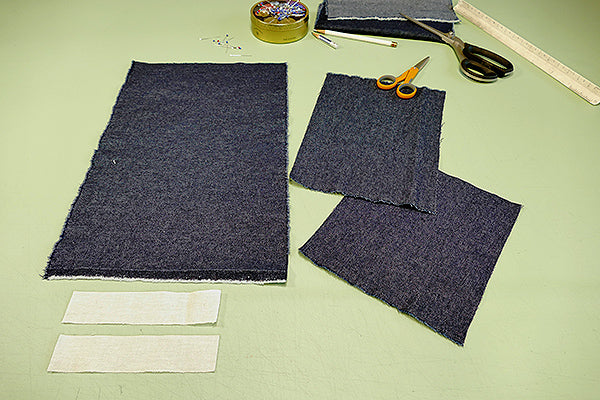
You will need:
The fabric I am using for the demonstration is a lovely Merchant & Mills 8 oz. denim. This is a nice weight of fabric with two distinct sides. Having distinct sides will help with seeing the right and wrong sides of the fabric as we work.
The weight of your fabric will somewhat determine the size of your welts. Remember that heavy weight fabric, when folded over is thick. When using a thick fabric you may want to make your welts larger, which requires a larger rectangle pocket opening. For this exercise, pick a light weight to medium weight fabric to help ensure good results and to make things easier to manage. Light weight fabric will help in making precise and clean folds, seams, and corners.
Only two pattern pieces are used to make this pocket. These two pieces will be referred to as the “Pocket Welt" (which is slightly larger at 7”x 9” (18x23cm)) and “Pocket Bag” (slightly shorter at 7”x 7-3/4” (18x20cm)). The rectangular opening on the “Pocket Welt” measures 3/4”x 5” (1.9x13cm).
The fabric you use that represents the “Garment” will need to be larger than the pocket dimensions. I am using a piece of fabric measuring 9”x 15” (23x38cm).
Determine where on your garment fabric you would like your pocket to be placed. For demonstration purposes, I am centering the pocket opening between the width of my fabric and 2” (5cm) down from the top edge of my Garment fabric. Mark the four corners of the pocket opening (3/4"x 5"/1.9x13cm) on the garment fabric using sewing pins or mark with a pencil. These markings now determine the placement and opening of the welt pocket.
Step 1: Adding Fusible Interfacing
Iron a lightweight fusible piece of interfacing measuring 1-1/4”x 5-1/2” (3.17x13.9cm) to the wrong side of the garment fabric, over the pocket opening markings. The fusible interfacing gives you an easy place to draw your guide lines and using it will help stabilize the fabric once you cut the corners to prevent fraying out at the corners.
Iron another piece of fusible interfacing the same dimensions to the wrong side of Pocket Welt, also aligning over the pocket opening markings. Accurately draw the rectangle pocket opening onto the fusible interfacing on the Welt Pocket with a pencil or water soluble marker. The corners should be at right angles.
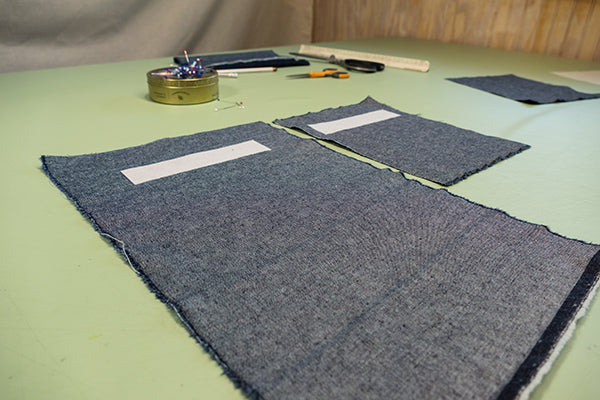 Fusible Interfacing ironed to the wrong side of the Garment fabric and the wrong side of the Pocket Welt .
Step 2: Sew the Pocket Welt and the Pocket Bag
Stitch the Pocket Welt and the Pocket Bag at the bottom, with right sides together. These two pieces now become the pocket.

Step 3: Align The Openings
Pin the right side of the Welt Pocket to the right side of the garment at the welt pocket corner markings, making sure to match and align the corners of the pocket opening.
 Using pins to align the corner dots on the Garment fabric and the pocket welt.
The right side of your Garment fabric should be facing up and the wrong side of the Welt pocket should be facing up.
Step 4: Stitch Welt Pocket Parallel Lines
To secure the Pocket Welt/Pocket Bag to the Garment fabric, stitch along the horizontal (longer) parallel lines of the welt pocket opening. It is important to make sure you start and finish in the same place for each line. This is important to ensure a rectangular pocket opening (rather than a parallelogram or a skewed pocket opening). Back stitch at each end.
Sewing parallel horizontal lines of welt pocket.
Now that the welt opening is attached to the Garment, the engineering gets fun!
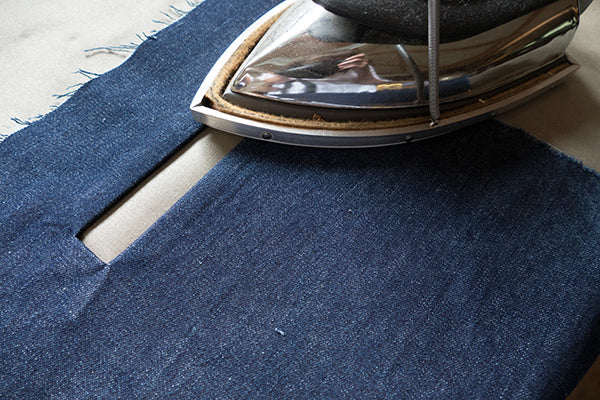
Step 5: Prepare & Cut Slit Pocket Opening
Draw a horizontal center line between the two parallel lines you just stitched. Measure in 1/2” (13mm) from the vertical, or short ends, of the rectangle and mark with a dot. Drawn in lines from the dot to the corners to create cutting guide lines.
The horizontal stitching lines and drawn guide lines.
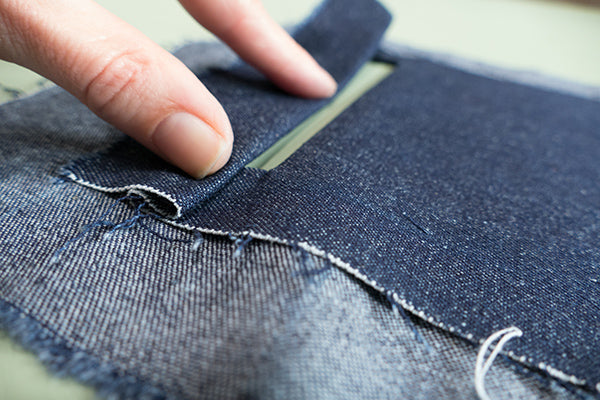
Fold the pocket in half (use a pin to be sure the center line is aligned) and cut a small slit through all the layers of the fabric. This initial snip will help you get started in cutting the center horizontal slit line.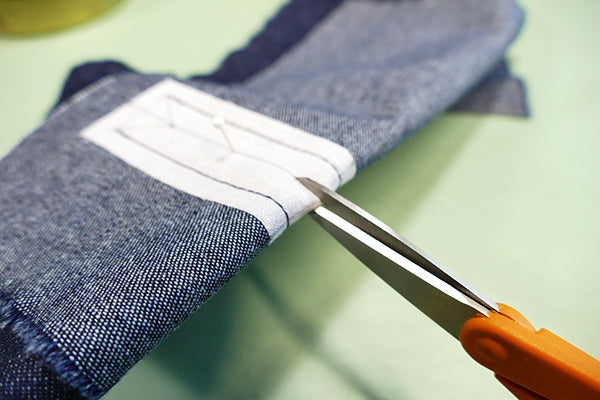 Initial snip to help with cutting the pocket slit opening.
Continue to cut along the center line and stop at the dot you marked. Then cut diagonally, to the corner edges using the guide lines you drew in. Cut as close a possible, without cutting into the stitching and cut just up to the corner and not beyond.
 Carefully cutting the pocket slit opening and cutting to the corners.
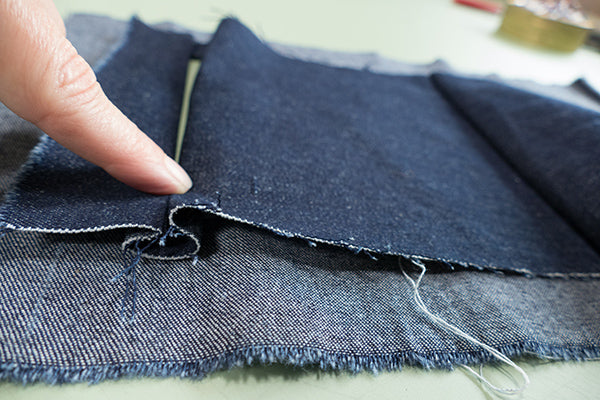
Step 6: Pull the Pocket Bag Through the Slit
Now we need to pull the whole pocket bag through the slit to the other side (which is the wrong side of the garment fabric).
 Pocket bag being pulled through to wrong side of Garment fabric.
 View of fabric pulled to other side, before shaping the rectangular opening.
Step 7: Shape the Pocket Opening
Take a minute and get re-oriented. The right side of the garment should be facing up and the right side of the Pocket Welt/Pocket Bag should be seen facing up through the opening. The interfacing pieces will not be visible.
Now, use your fingers to manipulate the stitched edges of the rectangle opening into a straight crisp edges. Gently pull and twist the fabric to set the shape of the corners and pinch with your fingers to create right angle corners.
 Shaping the rectangle with your fingers.
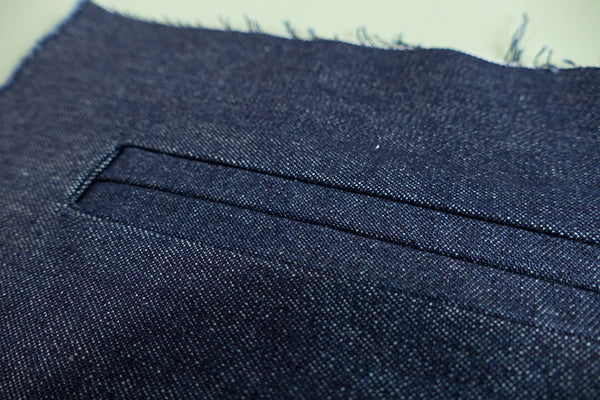
The idea is to create a well crafted rectangular opening that will soon get its welts. Once you are satisfied with the rectangle pocket opening, press to set.
Press rectangle pocket opening to set the edges and corners.
Step 8: Creating the Welts
Now turn your work over, with the wrong side of the Garment fabric and the INSIDE of the pocket should be facing up.
Now, we are going to make the welts. To do this, simply fold the top of the Pocket Welt into a pleat so that the top half of the pocket opening is covered. To help ensure the pleat aligns exactly with half of the opening, mark the center of the short edges as a guide. Press the top welt into place creating a nice clean edge to the pleat and pin to secure.
Fold top of the pocket welt into a pleat covering half of the opening.
Now, fold up the bottom of the Pocket Welt into a pleat so that the bottom half of the pocket opening is covered and meets in the center. Be sure that each welt pleat is the same width and align touching in the center. Press the bottom welt into place to secure and create a nice clean edge to the pleat.
 Fold up the bottom of the welt pocket, making a pleat, covering the bottom half of the pocket opening.
Turn your work over, so the right side of the garment is facing up, and inspect your welts. Realign and press again if you need to. Make everything as neat as you possibly can.
 Welts folded and aligned in place and pressed to set.
Step 9: Sew Welts in Place
Now, the welt needs to be secured in place. There are three suggested techniques to tack the welts in place and secure the integrity of the pocket construction. I will demonstrate all three versions to create a detailed finish and completely ensure a secure pocket opening. Be sure the pocket bag is out of the way before you start.
Version 1: Stitch and back tack the shorter vertical edges of the pocket opening on the inside of the pocket opening. This secures the welts to the underneath of the pocket. Use thread that blends into the fabric when using this version.
 Stitch and back tack the shorter edge to secure the welts underneath the pocket.
Version 2: Edge stitch or stitch-in-the-ditch all the way around the inside of the welt. Use thread that blends into the fabric when using this version.
Edge stitch or stitch-in-the-ditch all the way around the inside of the welt.
Version 3: Top stitch all the way around the pocket opening outer edge. This not only secures the pocket, but adds a detail that can be played up or down. Use a thread that blends with your Garment fabric or use a contrasting thread to stand out. If using a contrasting thread, avoid back stitching. Top stitching adds a casual or sporty aesthetic, so if you are going or a more elegant look you may want to skip top stitching.

Top stitching around the pocket opening creates a nice detail and secures the welts in place.
Note: Instead of pivoting your sewing at the corners. Leave a long tail thread (top thread) on the right side of your work and an equally long (bobbin thread) tail on the underneath side of your work. Thread the top thread to a needle and pull through to the underneath side. Using the ending stitch length to determine where to pull the thread to the underneath side. To secure the stitch, tie the two threads together a few times and cut to tidy the long threads.
The only part that remains is to sew up the pocket.
Welt Pocket top stitched and almost done. Notice the crisp corners.
Step 10: Stitch Up The Pocket Bag
Fold the Pocket Bag up to face the Pocket Welt. Align the sides and pin into place. Then, sew both sides of the pocket using a 1/2" (13mm) seam allowance. Being sure to back stitch at the start and finish. Finish the pocket edges in any technique you prefer when making a finished garment.
Sewing the side seam of the pocket.
Now, the top of the pocket needs to be sewn up. With the right side of the Garment facing up, fold the top of the fabric down over the welt. The idea is to move the garment fabric out of the way so you can sew the top of the pocket together and get as close as possible to the welts.
Sewing to close the top of the pocket bag.
The Welt pocket exercise is complete... simple and quick.
Pockets are welcome any time of the year in my wardrobe, for they provide a practical and hidden receptacle for any number of items. For me, the promise of cooler temps means pockets needed for tissues, gloves, and gathered acorns - along with keys and a cell phone. Consider adding a handy and elegant welt pocket to your next fall sewing project. Check out the accompanying video in Folkwear's Pocket Series: Make a Welt Pocket, for additional help.
I hope this tutorial will sooth any anxieties you may have had about trying a welt pocket or taught you a new welt pocket technique! The next time you make a pair of pants, pajamas, a blouse, a coat, a jacket, a vest, a cap - or anything with a lining - consider adding a welt pocket. Pockets add practicality as well as pleasure-in-wearing to clothing.
Be sure to look for the release of Folkwear's exciting new pattern! Besides being a perfect fall wardrobe staple, it features a Welt Pocket and many other interesting details to learn and master!
Sew Well,
Cynthia

Parasols are not only a convenient and stylish way shield yourself from the suns rays, but a perfect accessory companion to one of Folkwear's most favorite and popular patterns. The Folkwear 261 Paris Promenade Dress is made even more perfect when paired with its very own parasol.
The 1920's styling of this easy-to-sew and easy-to-wear, pullover dress has a carefree, yet sophisticated aesthetic. The unique construction of this dress makes it easy to imagine all sorts of creative fabric combinations. Complete your 261 Paris Promenade Dress ensemble by coordinating the vintage-style drawstring hand bag that comes with the pattern and now a parasol, for the next time you want to make a truly vintage-inspired statement.
And, today we are going to show you how to make your own parasol!


For a bit of inspiration in making your own parasol read the History of the Parasol blog for an interesting stroll through the history of sun protection and much more. Learning to make your own parasol is not as difficult as you might imagine.
Knowing what to look for in a parasol or umbrella frame is important because the frame is the foundation of your project. Due to the superb quality and craftsmanship of antique umbrellas and parasols, their frames and handles can be found in good condition and are not hard to find if you know where to look. Flea markets, thrift shops, ebay, Etsy, and historical reenactment website shops are all excellent resources. Consider using an umbrella you already have... if the quality of the frame is good, don’t toss it out… recover, re-purpose, reuse. Enjoy anew!
Frame Structure
When looking for a frame to use, remember that the more sections or pie-shapes a frame has, the easier it will be to make the canopy fit. This is in part because the more reinforcing seams you have, the more stable the fabric will be. The narrower the width and the more seams there are, the more stable the fabric and therefore it will be easier to fit the canopy to the frame. The number of pie shapes corresponds to the number of ribs. The number of ribs corresponds to the seams. Parasols tend to be more elegant and daintier then umbrellas. So, parasols usually have more ribs, pie-shapes sections, and seams.

The frame and pieces needed to make a parasol.
The parasol frame and parts I am using in this tutorial were sourced at Vena Cava Designs (they also carry Folkwear patterns!). I ordered the Parasol Frame (Skeleton) kit (adult, straight handle).
This is an inexpensive and good quality frame. This frame is suitable for either a parasol or umbrella and a great option for trying out your making skills. The pattern we are providing here fits this particular frame. However, you can use this pattern, with some modifications, to fit most other frames that you might find.
Please note that I am referencing the parasol frame that is sourced in this tutorial. The pattern included has been made to fit this frame.
The Proper Fabric
The fabric you use to make an umbrella is different than fabric used for a parasol. Parasols were generally made of natural materials like silk, cotton, and linen and these fabrics are available at most fabric stores. Most natural fibers such as the ones mentioned have enough stretch and sometimes too much stretch when cut on an angel. For this reason the pie shaped pattern piece should be cut with the grain line indicated on the pattern (aligned with selvedge of the fabric).
When choosing a fabric, it is best to choose a fabric that is the same on both sides since you will see the wrong side of the fabric when he parasol is open.
Modern oil cloth and waxed cotton are fabrics that come the closest to original umbrella fabrics. Suitable waterproof fabrics will be made of synthetic nylon and woven from fine threads. These types of fabrics will not have much stretch, so pattern pieces will need to be cut on the cross-grain or with a curved edge on the bottom edge. Nylon frays easily (can cut with a hot knife or serge immediately). To avoid disappointment, do a bit of research if considering the use of waterproof fabrics.
If you are going to make the parasol canopy for the kit, or modify it for your own use, instructions are below.
You will need:
Fabric Layouts and Cutting Guide
Layout your pattern piece on your fabric and cut out 10 pieces to make your parasol. The diagram below shows how to create the parasol pattern piece used in this demonstration, if you do not print the PDF piece provided in the link above. Notice the grain line and lay your pattern out with the grain line parallel to the selvage.

Ten pattern pieces laid out on a 45" (114.3 cm) or 60" (152.4 cm) wide fabric, requires just over a yard (1m) of fabric. Note that these illustrations shows the fabric laying open and flat.


Note: The pattern pieces in the illustrations above are placed close to the edges of the fabric. If you think you may need more hem at the bottom edges, then allow for a bit more yardage. To be safe add an additional 1/4 yard (0.2286 m) of fabric.
If your pattern pieces are a different size than ours, you can lay the pattern pieces out on a piece of fabric the width you intended to use, and have a look at how the pattern pieces lay out and how you can make them fit. The illustrations above should help.
Sewing Guide
The 1/2" (13 mm) seam allowance for the long edges are included in the pattern. The 1/2" (13 mm) bottom edge seam allowance is included to produce a 1/4" (6.35 mm) hem. The narrow top edge of the pattern piece does not get a hem. This pattern is intended for a natural fabric to be cut on the selvage grain. I used a light weight linen for the purpose of this demonstration.
MAKE A MUSLIN FIRST!! This is my best piece of advice in attempting the making of a parasol or umbrella. Frames are not always perfect. Especially if your frame is an antique. Plus experimenting without feeling the pressure of messing up good fabric is always wise. And, you get to practice getting it right.
Step One: Sewing the Canopy
Once the fabric pieces are cut out, I recommend working with wedges in pairs. With the right sides of the fabric together, pin one long edge and stitched a 1/2" (13 mm) seam allowance. Then, move the needle over one or two notches and stitch again just OUTSIDE of the seam allowance. Back stitch at each end. This extra stitch line will help to create a bit more seam strength and stability.
If you want add a strap to fasten your parasol neatly closed, now is the time. Just pick a seam and insert the strap into the seam allowance, sewing all at once. Use a snap or a button to fasten the strap.

View showing a second reinforcing stitch just to the outside of the seam allowance.
Continued this method, working in pairs until all ten of the pie piece shapes are sewn together creating the circular canopy. There should be a hole in the center of the canopy. This is where the tip will come through.

Canopy all sewn up.
Press all seams in the same direction on the wrong or under side of the canopy. Press to set the seams and create a clean finish on the right or top side of the canopy as well.
Finish all the underneath seam allowances. Either, serge, pink, or trim. You could also do a faux flat felled seam. French seams and bound seams will be too bulky and are not recommended.
Seam finished with a serge. Notice the seam allowance stitch and the second row of reinforcing stitches.
Step Two: Top Strengthening Detail
The entry point where the tip-ferrule-post or top point, inserts into the fabric of the canopy is a major stress point and needs reinforcing to provide strength. The hole at the opening needs to be made smaller without adding fabric bulk. A couple of simple tricks will take care of both of these issues.
Make a short stay stitch approximately 5/8" (16 mm) around the hole opening in the top of the canopy. This will ensure all the panels stay in place and not over stretch when the parasol is opened and closed repeatedly.
A simple circle of fabric sewn to the underneath at the hole opening, will provide another layer of support and to be sure the canopy hole fits tightly to the tip-ferrule-post base.
From a scrap of the same fabric you are using to create your parasol, cut a 2-1/2" (6.35 cm) to 3" (7.62 cm) circle, using pinking shears. The idea is to not add any bulk to this area so finishing the edges with pinking shears serves the purpose well.
Fold the fabric circle in half and then in half again. Snip the tip of the point off with your scissors. Smooth out the circle and press to remove the ceases.

Fold the Circle of fabric in half and then in half again.
Depending on the nature of your fabric, it might be wise to Fray Check the edges to seal the edges. The linen I have used needed a bit of Fray Check for this very reason. Allow the Fray Check to dry.

Reinforcing linen fabric circle getting a touch of Fray Check.
On the underneath side, make sure all seam allowances are pressed in the same direction, align the hole of the small reinforcing circle with the opening of the canopy and sew the circle to the canopy approximately 1/2" (13 mm) from the center hole.
Push the tip of the frame through the hole of the circle to see how it fits. Clip the hole of the circle a tiny bit more if needed. The idea is to have the hole of the circle to fit snugly to the base of the tip-ferrule-post.
 View of pinked linen circle sewn to the canopy.
Below are a series of images showing you how the simple circular piece of reinforcing fabric is attached to the canopy and what an important role this little bit of fabric performs in maintaining the strength and integrity of a highly used stress point.


View of the pinked linen circle peaking through on the outside of the canopy before the being stretched and fitted to the frame.
With the canopy stretched over the frame and closed-up you can appreciate how much this simple bit fabric reinforcement provides to the integrity of the parasols construction.

View of the pinked linen circle peaking through on the outside of the closed canopy after being stretched and fitted to the frame.
Step Three: Hemming the Edge
Turn the widest edge or the bottom edge of the pie pieces under 1/4" (6.35 mm) and press. Turn under another 1/4" (6.35 mm) and press creating a straight edge. Press and pin the hem in place. Manipulate the connecting seam edges to lay as smoothly as possible. Top-stitch close to the turned edge, taking care to create a clean finish.

Pinning the hem.
Step Four: Adding the Rib Posts
Using button twist thread for extra strength, hand sew all the wooden tips to the wrong side of the canopy, at the seam allowance. Use the turned under hem as an anchor spot for sewing the tip to. You do not want to see any stitch work on the right side or top side of the canopy.

Gutermann button hole twist is ideal for attaching and strengthening the tips to the canopy.
The extra thickness of the turned under hem makes an excellent spot to sew on the tips and prevent the stitches from being seen on the top side.

Wooden tip securely sewn to the hem of the canopy.
Step Five: Test for a Proper Fit
Once you get a few tips sewn in place, give the fit a try. It will work best to sew your first few tips on opposite sides of the canopy from each other, to help with the tension. Place the top hole of the canopy over the tip-ferrule-post base. Then gently pull the fabric over the rib and insert the metal rib tip into the wooden tip sewn at the canopy edge. You want the fabric of the canopy to fit tightly over the ribs (each seam should correspond to a rib), once the rib end is inserted in the wooden tip. There should be some tension, but not so much that the rib begins to distort or twist from its intended position along the seam. If this does happen, there is too much tension, the panel is too short. To remedy, let out the hem a bit to lengthen the panel.
With the rib inserted in the tip you can see how the tip needs to be secure and strong due to the tension required for a proper fit.
Tension created when metal rib is inserted in wooden tip.
Note: It is important the fit is good before proceeding any further.

A perfect fit on the outside!

Perfect fit on the inside!
Step Six: Secure Ribs to the Seam Allowance
Your canopy should now be installed to the frame and fit perfectly. Even if the canopy fits beautifully to the frame, a bit more stabilization never hurts. Adding a thread tack will easily accomplish this task.
I have placed and sewn each tack 5" (13 cm) from the hem edge inwards along the rib. Using regular thread, double the thread up, and sew a few hand tacks as shown below.

Measure to determine tack location to help added extra stability for each rib.
Start on one side of the seam allowance, inserting the needle between the seam stitch line and the extra stitch line previously made in the assemble instructions. Make the stitch through the seam allowance and under the rib. Pull the needle through to the opposite side.

First pass through the seam allowance and under the rib.
Insert the needle over the rib, through the seam allowance at the extra stitch line, to the opposite side. Continue in this manner until you have made 5 to 8 passes, creating a neat and secure hold. The idea is to prevent any stitch work from showing on the top side of the canopy. Tie the thread off with a couple of knots on each side of the tack. Trim the thread close to the knot. Repeat for each rib.

Passing thread over the rib and continuing to make the tack.

Making tacks all the way around for each rib.
The Top Finishing Detail
One last finishing touch is required to tidy up the top of the parasol, where the canopy and tip-ferrule-post meet. This will conceal the reinforcing stitching lines and create a clean yet simple finishing flourish of interest. This not the only creative way to finish the top of your parasol, but it is quick and easy and adds just enough detail without being fussy.

Start with a strip of fabric measuring 1-3/4" wide by 8-1/2" long (4.445 cm x 21.59 cm). I like to utilize the selvage edge when ever possible to give an extra bit of strength and stability. So, I have cut my strip of fabric including the selvage. I turned and press the opposite long edge under 1/4" (6.35 mm). Then top stitched to create a finished edge. This edge will eventually show.

Finishing detail begins with a linen strip. Notice the top stitched turned under edge.
Next, sew a long gathering stitch 1/2" (13 mm) from the top stitched edge. Leave long thread tails on either end to make gathering easier. Make another long gathering stitch 1-1/8" (3 cm) from the top stitched edge. Leave long thread tails again.


You will need:


The carrier/holder strap in place and seam allowance sewn before turning right side out.
Note: Predetermine the length you would like the strap to be before sewing up the seam allowance.
With right sides together and the strap length out of the way of catching in the seam allowance, sew 1/2" (13 mm) seam allowance on the longest side and at the smallest end if you are sewing the end up. Trim the excess strap. Press the seam open. Finish seam or trim.
Turn right side out and hem the remaining ends using a 1/4" (6.35 mm) turn under and then turn under another 1/4" (6.35 mm). Top stitch close to the edge to finish. I chose to leave the bottom edge open so I hemmed it too.


